Project 1: Build a Modal Text Editor in C
Build a terminal-based modal editor that owns the screen, edits text efficiently, and redraws a stable grid without flicker.
Quick Reference
| Attribute | Value |
|---|---|
| Difficulty | Advanced |
| Time Estimate | 1-2 weeks |
| Main Programming Language | C (Alternatives: Rust, Zig, Go) |
| Alternative Programming Languages | Rust, Zig, Go |
| Coolness Level | Level 9 - You wrote a real editor core |
| Business Potential | Medium (education, internal tooling) |
| Prerequisites | C pointers/structs, terminal basics, basic data structures |
| Key Topics | termios, ANSI escape sequences, modal FSM, gap buffer, redraw batching |
1. Learning Objectives
By completing this project, you will:
- Put a TTY into raw mode and safely restore it on exit.
- Parse multi-byte key sequences and map them to editor commands.
- Implement a modal state machine with Normal, Insert, and Command modes.
- Store and edit text efficiently with a gap buffer or piece table.
- Render a stable, full-screen grid with minimal flicker.
- Implement scrolling, cursor clamping, and viewport math correctly.
- Save files atomically and handle IO failures gracefully.
- Build a small, testable editor core with a clean module layout.
2. All Theory Needed (Per-Concept Breakdown)
2.1 Terminal Line Discipline and Raw Mode (termios)
Description
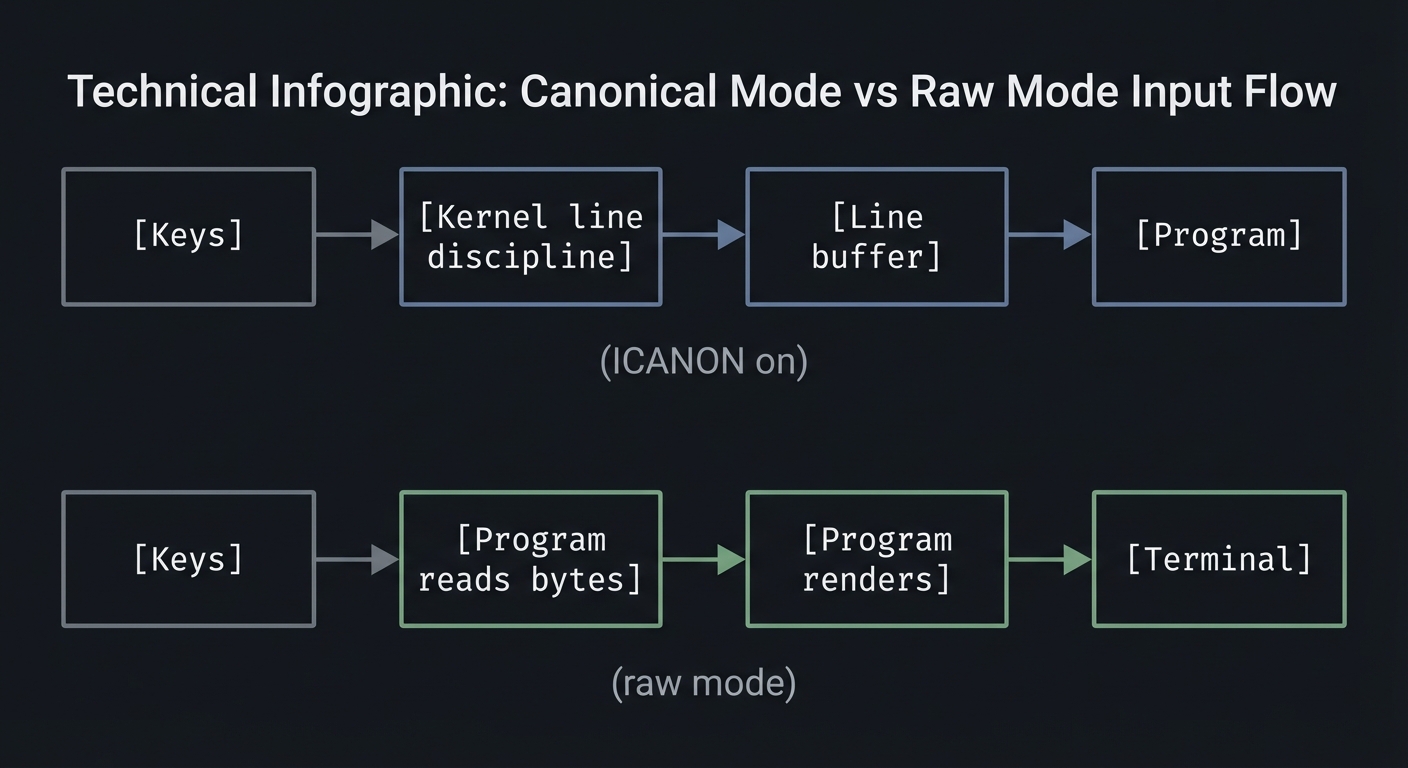
Raw mode disables line buffering and echo so your program receives each byte immediately and is responsible for all rendering.
Definitions & Key Terms
- TTY / PTY: A terminal device providing input and output streams.
- Canonical mode (ICANON): Kernel buffers input until newline.
- ECHO: Kernel echoes typed characters back to the terminal.
- ISIG: Enables Ctrl-C, Ctrl-Z signal handling.
- VMIN/VTIME: Read behavior for non-canonical mode.
Mental Model Diagram (ASCII)
[Keys] -> [Kernel line discipline] -> [Line buffer] -> [Program]
                  (ICANON on)

[Keys] -> [Program reads bytes] -> [Program renders] -> [Terminal]
                  (raw mode)
How It Works (Step-by-Step)
- Read current terminal settings with
tcgetattr. - Disable ICANON and ECHO; optionally disable ISIG.
- Configure VMIN/VTIME to control read blocking.
- Apply settings with
tcsetattr. - On exit, restore the original settings (even on error).
Minimal Concrete Example
struct termios raw, orig;
if (tcgetattr(STDIN_FILENO, &orig) == -1) die("tcgetattr");
raw = orig;
raw.c_lflag &= ~(ICANON | ECHO);
raw.c_cc[VMIN] = 0;   // non-blocking reads
raw.c_cc[VTIME] = 1;  // 100ms timeout
if (tcsetattr(STDIN_FILENO, TCSAFLUSH, &raw) == -1) die("tcsetattr");
Common Misconceptions
- “Raw mode disables Ctrl-C” -> Only if you clear ISIG.
- “Raw mode is portable everywhere” -> Behavior varies across terminals.
Check-Your-Understanding Questions
- Why must raw mode be restored even on crash?
- Explain why VMIN=0 and VTIME=1 make reads behave like polling.
- Predict what happens if ECHO is left on in raw mode.
- Explain why disabling ISIG changes how Ctrl-C is handled.
- Predict the output if a program exits without restoring termios.
Where You’ll Apply It
- See §3.7.3 for the CLI transcript and §5.10 Phase 1.
- Also used in P06-neovim-lite-capstone.
2.2 ANSI Escape Sequences and the Screen Grid Model
Description
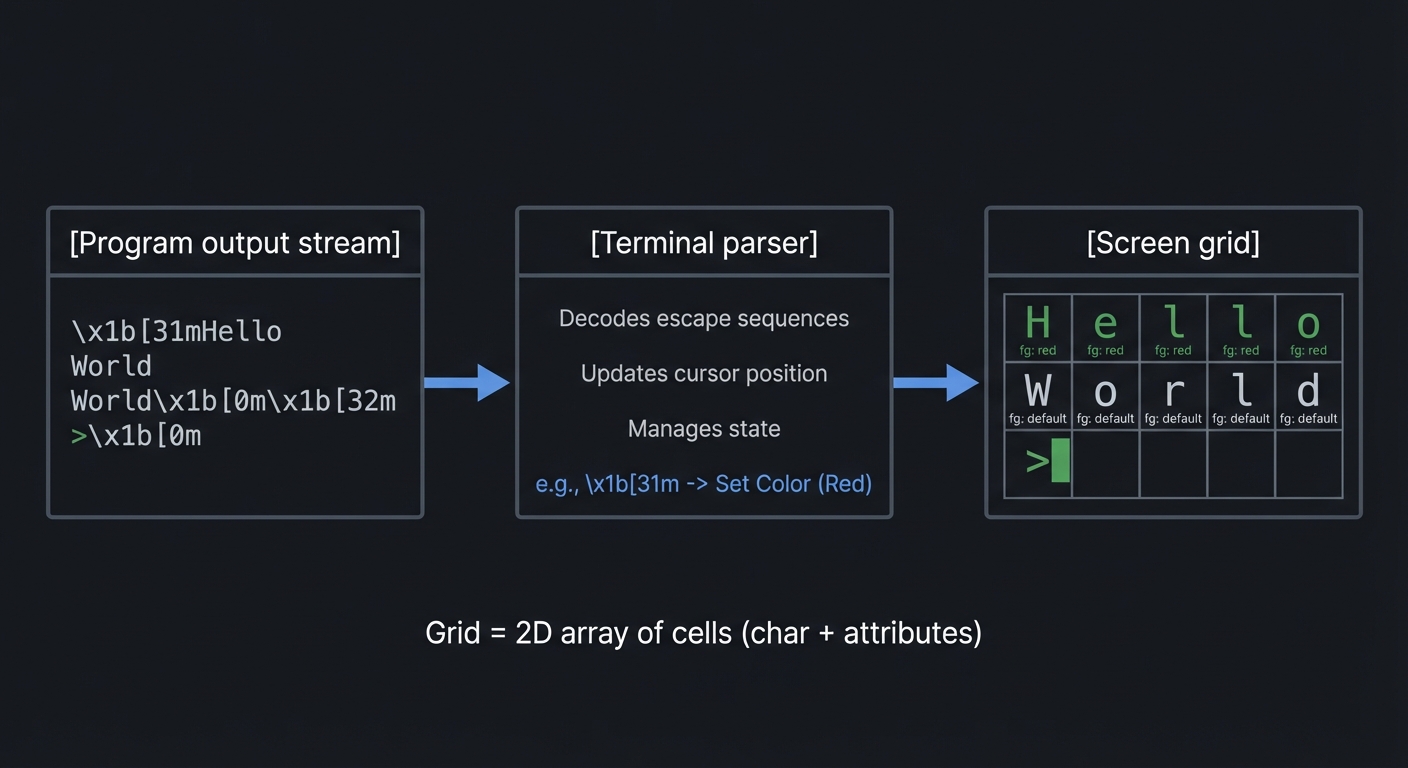
Terminal UIs are just streams of bytes. ANSI escape sequences let you move the cursor, clear regions, and draw a grid.
Definitions & Key Terms
- ESC: ASCII 27, start of an escape sequence.
- CSI: Control Sequence Introducer, usually ESC
[. - Cursor addressing:
ESC[row;colHmoves the cursor. - Clear screen:
ESC[2Jclears the screen.
Mental Model Diagram (ASCII)
[Program output stream] -> [Terminal parser] -> [Screen grid]

Grid = 2D array of cells (char + attributes)
How It Works (Step-by-Step)
- Clear the screen and hide the cursor during redraw.
- Render each row from top to bottom at known positions.
- Move the cursor to the logical position after drawing.
- Show the cursor again.
Minimal Concrete Example
write(STDOUT_FILENO, "\x1b[2J", 4);    // clear
write(STDOUT_FILENO, "\x1b[H", 3);     // cursor home
write(STDOUT_FILENO, "Hello", 5);
Common Misconceptions
- “The terminal remembers rows” -> It only remembers what you drew last.
- “Cursor position is the same as editor cursor” -> You must map it.
Check-Your-Understanding Questions
- Explain why batching output reduces flicker.
- Predict what happens if you forget to move the cursor to home before drawing.
- Explain why a redraw loop should hide the cursor.
Where You’ll Apply It
- See §4.1 High-Level Design and §5.10 Phase 1.
- Also used in P06-neovim-lite-capstone.
2.3 Input Decoding and Escape Sequence Parsing
Description
Arrow keys and function keys are multi-byte sequences. You must decode them without confusing them with a literal ESC.
Definitions & Key Terms
- Escape sequence: A multi-byte key encoding starting with ESC.
- Timeout window: Small delay to decide if ESC is a standalone key.
- Keymap: Mapping from decoded key events to commands.
Mental Model Diagram (ASCII)
Bytes: 0x1b 0x5b 0x41
  ESC   '['  'A'
=> KEY_UP
How It Works (Step-by-Step)
- Read a byte from stdin.
- If it is not ESC, return it as a normal key.
- If it is ESC, read the next byte(s) with a short timeout.
- Match known sequences (e.g., ESC [ A for Up).
- If no sequence matches, treat ESC as a standalone key.
Minimal Concrete Example
int read_key() {
  int c = read_byte();
  if (c != '\x1b') return c;
  char seq[3];
  if (read_timeout(seq, 2) == 0) return '\x1b';
  if (seq[0] == '[') {
    if (seq[1] == 'A') return KEY_UP;
    if (seq[1] == 'B') return KEY_DOWN;
  }
  return '\x1b';
}
Common Misconceptions
- “ESC always means escape sequence” -> It can be a real key press.
- “All terminals use the same sequences” -> Some do not.
Check-Your-Understanding Questions
- Explain why you need a timeout when decoding ESC.
- Predict what happens if you block forever after ESC.
- Explain how you would extend the parser for Home/End.
Where You’ll Apply It
- See §5.10 Phase 2 and §5.11 Key Implementation Decisions.
- Also used in P03-neovim-gui-client.
2.4 Modal State Machines and Operator-Pending Grammar
Description
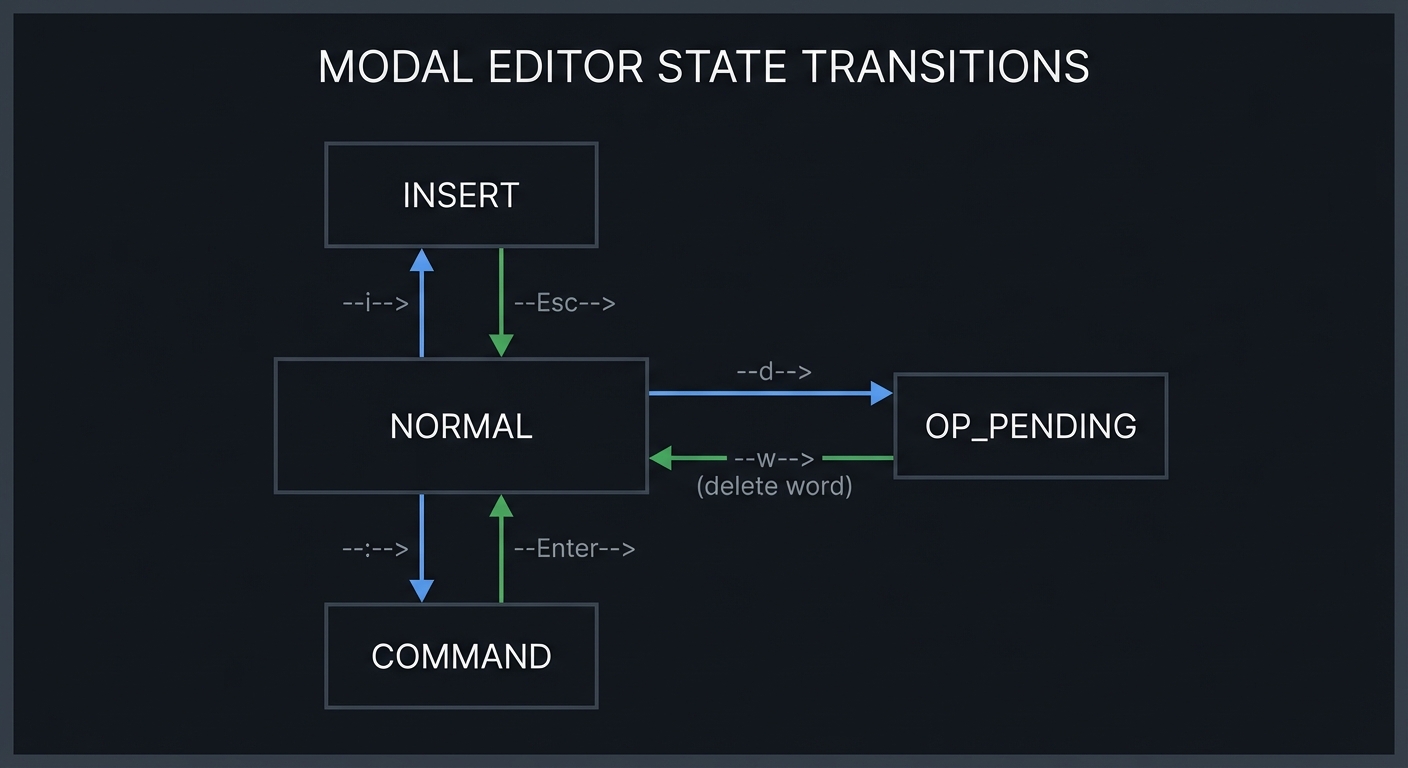
Modal editing is a finite state machine: keys have different meanings depending on the current state.
Definitions & Key Terms
- Mode: A state that changes key interpretation (Normal, Insert, Command).
- Operator-pending: A temporary state where an operator awaits a motion.
- Text object: A semantic range like “word” or “paragraph”.
Mental Model Diagram (ASCII)
NORMAL --i--> INSERT --Esc--> NORMAL
NORMAL --:--> COMMAND --Enter--> NORMAL
NORMAL --d--> OP_PENDING --w--> NORMAL (delete word)
How It Works (Step-by-Step)
- Start in NORMAL mode.
- On a mode-switch key (i, :), update state.
- On operator (d, c, y), enter OP_PENDING.
- Next motion resolves the operator and returns to NORMAL.
Minimal Concrete Example
switch (state.mode) {
  case MODE_NORMAL:
    if (key == 'i') state.mode = MODE_INSERT;
    else if (key == 'd') state.mode = MODE_OP_PENDING;
    break;
  case MODE_OP_PENDING:
    if (key == 'w') delete_word();
    state.mode = MODE_NORMAL;
    break;
}
Common Misconceptions
- “Modes are just booleans” -> Operator-pending adds more states.
- “Commands execute immediately” -> Some commands depend on a motion.
Check-Your-Understanding Questions
- Explain why operator-pending exists in Vim-style editors.
- Predict the state after: NORMAL -> d -> ESC.
- Explain how you would add Visual mode without breaking existing logic.
Where You’ll Apply It
- See §3.1 features, §5.5 design questions, and §5.10 Phase 2.
- Also used in P06-neovim-lite-capstone.
2.5 Text Buffer Data Structures (Gap Buffer and Piece Table)
Description
Efficient editing requires data structures that avoid O(n) shifts on every insert.
Definitions & Key Terms
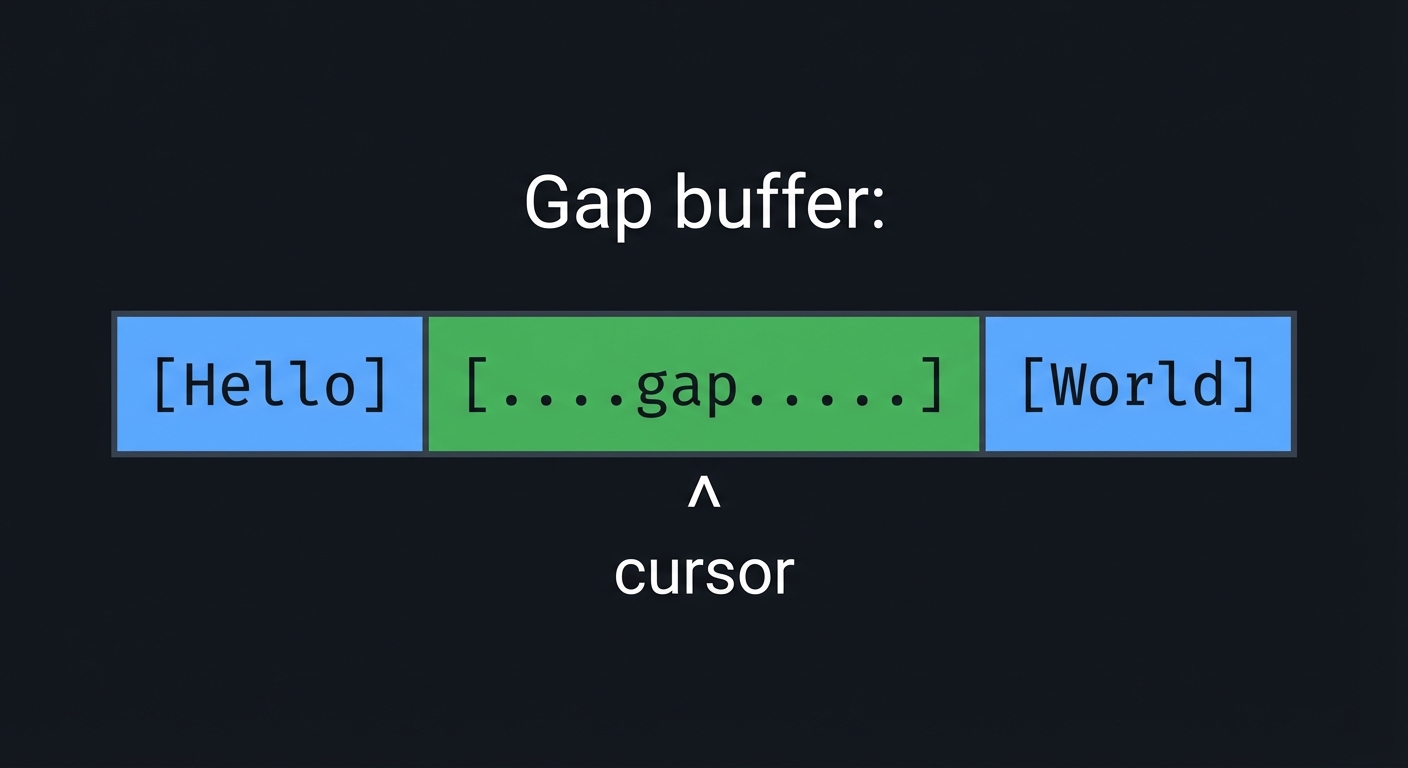
- Gap buffer: Array with a movable empty gap at the cursor.
- Piece table: Original buffer plus add buffer, edits tracked as spans.
- Rope: Balanced tree of string chunks for large files.
Mental Model Diagram (ASCII)
Gap buffer:
[Hello][.....gap.....][World]
          ^ cursor
How It Works (Step-by-Step)
- Keep text in a contiguous array with a “gap” region.
- Insert at the cursor by writing into the gap and moving the gap end.
- Move the cursor by sliding the gap (copying bytes) when needed.
- For deletes, expand the gap by shrinking text on one side.
Minimal Concrete Example
struct GapBuffer {
  char *data;
  size_t gap_start;
  size_t gap_end;
  size_t cap;
};
Common Misconceptions
- “Linked lists are simpler” -> They make random access and rendering slow.
- “Gap buffers are slow” -> They are fast for local edits.
Check-Your-Understanding Questions
- Explain why gap buffers are O(1) for local inserts.
- Predict what happens when the cursor jumps far away.
- Explain why piece tables are good for undo.
Where You’ll Apply It
- See §4.3 Data Structures and §5.10 Phase 2.
- Also used in P06-neovim-lite-capstone.
2.6 Cursor, Lines, and Viewport Mapping
Description
You must map between buffer offsets and screen rows/columns, including tabs and scrolling.
Definitions & Key Terms
- Logical cursor: Position in the buffer (row, col).
- Rendered cursor: Position after expanding tabs.
- Viewport: The slice of the document currently visible.
Mental Model Diagram (ASCII)
Buffer rows: 0..N
Viewport: rows [top..top+screen_rows)
Cursor: (cx, cy) within buffer
Rendered x = rx (tabs expand)
How It Works (Step-by-Step)
- Track cursor in buffer coordinates (cx, cy).
- Compute rendered x (rx) by expanding tabs.
- If cy < top, scroll up; if cy >= top+rows, scroll down.
- Render only visible rows with left/right offsets.
Minimal Concrete Example
int editor_row_cx_to_rx(Row *row, int cx) {
  int rx = 0;
  for (int i = 0; i < cx; i++) {
    if (row->chars[i] == '\t') rx += (TAB_STOP - 1) - (rx % TAB_STOP);
    rx++;
  }
  return rx;
}
Common Misconceptions
- “Cursor col == rendered col” -> Tabs and wide chars break that.
- “Scrolling is just moving the cursor” -> You must adjust viewport.
Check-Your-Understanding Questions
- Predict the rendered column of a tab at column 3 with TAB_STOP=8.
- Explain why scrolling must happen before rendering.
- Explain how horizontal scrolling differs from vertical scrolling.
Where You’ll Apply It
- See §3.2 requirements, §4.4 algorithms, and §5.10 Phase 2.
- Also used in P03-neovim-gui-client.
2.7 Redraw Loop, Dirty Rows, and Output Batching
Description
A stable editor redraws the screen in batches, optionally tracking dirty rows to avoid unnecessary work.
Definitions & Key Terms
- Frame: One full screen update.
- Dirty row: A row that changed since last frame.
- Double buffering: Render to memory then write once.
Mental Model Diagram (ASCII)
[Model state] -> [Build render buffer] -> [Single write()] -> [Terminal]
How It Works (Step-by-Step)
- On each loop iteration, compute visible rows.
- Build a string buffer containing the entire frame.
- Write once to stdout to avoid flicker.
- Optionally only re-render rows marked dirty.
Minimal Concrete Example
struct abuf { char *b; int len; };
void ab_append(struct abuf *ab, const char *s, int len);
void editor_refresh_screen() {
  struct abuf ab = ABUF_INIT;
  ab_append(&ab, "\x1b[?25l", 6); // hide cursor
  // draw rows...
  ab_append(&ab, "\x1b[?25h", 6); // show cursor
  write(STDOUT_FILENO, ab.b, ab.len);
  ab_free(&ab);
}
Common Misconceptions
- “Redrawing is expensive” -> Batching makes it fast enough.
- “Dirty rows always help” -> Complexity can outweigh benefits on small files.
Check-Your-Understanding Questions
- Explain why writing once per frame reduces flicker.
- Predict what happens if you forget to show the cursor.
- Explain when dirty-row tracking is worth it.
Where You’ll Apply It
- See §4.1 architecture and §5.10 Phase 1.
- Also used in P06-neovim-lite-capstone.
2.8 File IO, Atomic Save, and Crash Safety
Description
Editors must read files reliably and save without corrupting data.
Definitions & Key Terms
- Atomic save: Write to temp file then rename.
- fsync: Force data to disk.
- EACCES: Permission denied error.
Mental Model Diagram (ASCII)
open(file) -> read -> buffer
buffer -> write(temp) -> fsync -> rename(temp, file)
How It Works (Step-by-Step)
- Read file into buffer line by line.
- On save, create a temp file in same directory.
- Write full buffer to temp file and fsync.
- Rename temp over original (atomic on POSIX).
Minimal Concrete Example
int fd = open(tmp_path, O_WRONLY|O_CREAT|O_TRUNC, 0644);
write(fd, data, len);
fsync(fd);
close(fd);
rename(tmp_path, real_path);
Common Misconceptions
- “rename is always safe” -> Only atomic on same filesystem.
- “fsync is optional” -> It prevents silent data loss on crash.
Check-Your-Understanding Questions
- Explain why writing directly to the file is risky.
- Predict what happens if the program crashes after writing temp but before rename.
- Explain how you would preserve file permissions.
Where You’ll Apply It
- See §3.2 requirements and §5.10 Phase 2.
- Also used in P06-neovim-lite-capstone.
2.9 Undo/Redo via Command Log
Description
Undo and redo work best as inverse operations recorded as commands.
Definitions & Key Terms
- Command pattern: Encapsulate changes as objects with undo.
- Undo stack: LIFO stack of applied commands.
- Redo stack: Commands undone and available to reapply.
Mental Model Diagram (ASCII)
[Command] -> apply -> push to undo
undo -> pop undo -> inverse -> push to redo
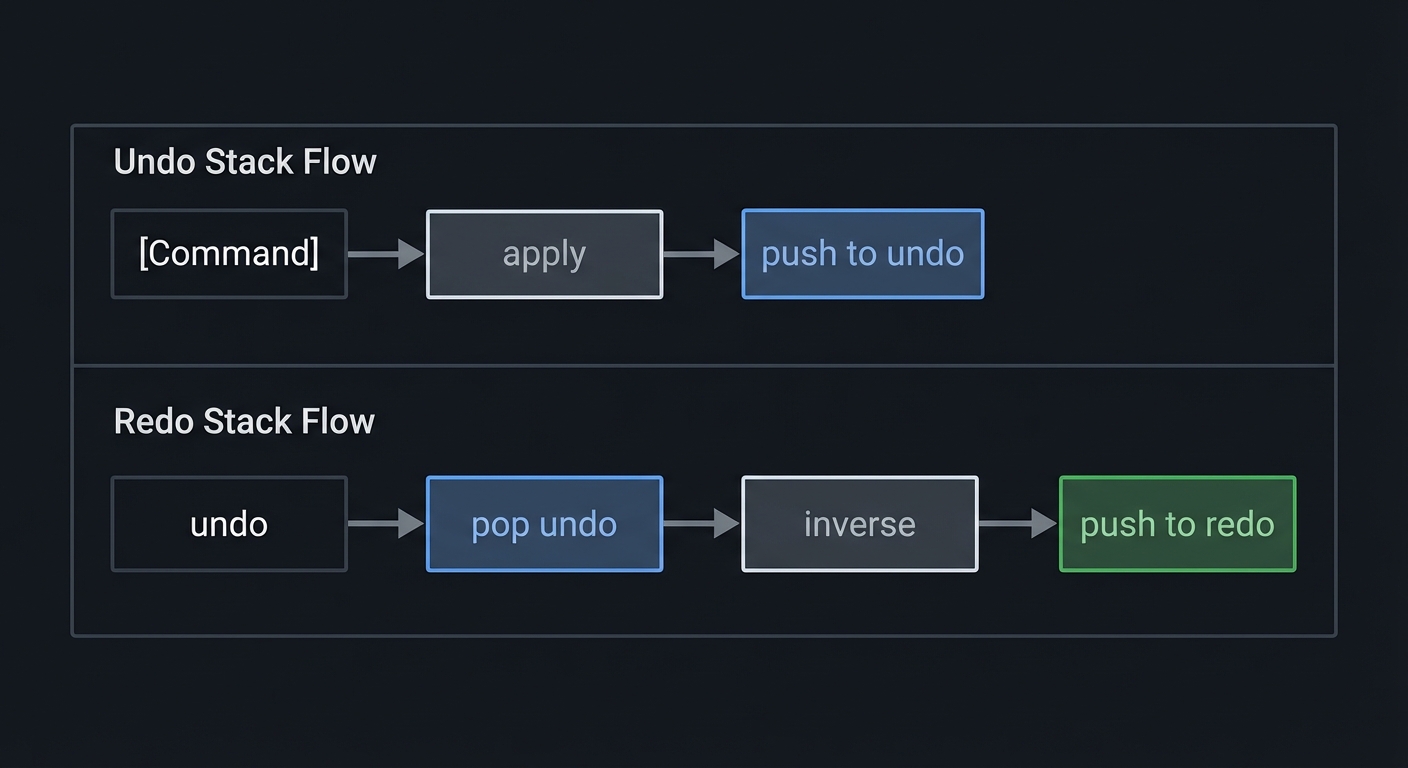
How It Works (Step-by-Step)
- Represent edits as commands: insert, delete, replace.
- Apply command and push onto undo stack.
- Undo by applying inverse and pushing onto redo stack.
- Clear redo stack when a new command is applied.
Minimal Concrete Example
typedef struct { int type; int pos; char *text; } EditCmd;
void apply(EditCmd *c);
void inverse(EditCmd *c, EditCmd *out);
Common Misconceptions
- “Undo is just storing snapshots” -> That is memory-heavy and slow.
- “Redo is automatic” -> You must track inverse operations.
Check-Your-Understanding Questions
- Explain why redo must be cleared after a new edit.
- Predict what happens if you undo past the first command.
- Explain how to group multiple inserts into one undo step.
Where You’ll Apply It
- See §5.10 Phase 3 and §7.1 pitfalls.
- Also used in P06-neovim-lite-capstone.
3. Project Specification
3.1 What You Will Build
A terminal editor with:
- Full-screen rendering of a text file
- Normal, Insert, and Command-line modes
- Cursor movement, scrolling, and status line
- File load/save with atomic writes
- Basic commands:
:w,:q,:wq,:e <file>
Included: raw terminal control, modal FSM, buffer structure, redraw loop, file IO. Excluded: plugins, Tree-sitter, LSP, multiple windows.
3.2 Functional Requirements
- Open file: Launch with a file path and render its contents.
- Normal mode navigation: Support
h/j/k/l,0,$,gg,G. - Insert mode editing: Insert text, backspace, newline.
- Command line: Accept
:w,:q,:wq,:e <path>. - Status line: Show file name, line count, current mode.
- Scrolling: Keep cursor visible in viewport.
- Save: Write file atomically and show a confirmation.
3.3 Non-Functional Requirements
- Performance: 10k-line files should remain responsive.
- Reliability: Terminal settings must always be restored.
- Usability: Clear mode indicator and helpful error messages.
3.4 Example Usage / Output
$ ./kilo-vim README.txt
# full screen editor appears
# press i to insert, Esc to return to normal
# :w to save,:q to quit
3.5 Data Formats / Schemas / Protocols
- File format: UTF-8 text, newline separated.
- Command line grammar:
:wsave:qquit (fails if dirty unless:q!):wqsave then quit:e <path>open file
- Keymap: Normal mode is command-driven, Insert mode is literal text.
3.6 Edge Cases
- Empty file or missing file (create new buffer).
- Very long line that exceeds screen width.
- Window resize while editing.
- Permission denied on save.
- Binary file with non-printable bytes.
3.7 Real World Outcome
You will have a binary called kilo-vim that behaves like a small editor.
3.7.1 How to Run (Copy/Paste)
cc -O2 -Wall -Wextra -pedantic -o kilo-vim src/main.c src/editor.c src/gap_buffer.c
./kilo-vim demo.txt
3.7.2 Golden Path Demo (Deterministic)
- Use a fixed demo file
fixtures/demo.txt. - Run with
KILO_TEST_MODE=1so the status bar clock is frozen at00:00.
Steps:
KILO_TEST_MODE=1 ./kilo-vim fixtures/demo.txt- Press
i, typeHello, pressEsc. - Type
:wthen Enter.
Expected results:
- Status line shows
Wrote 5 bytes. - File
fixtures/demo.txtnow includesHelloat the cursor position.
3.7.3 If CLI: exact terminal transcript
$ KILO_TEST_MODE=1 ./kilo-vim fixtures/demo.txt
# Screen opens in NORMAL mode
# Press: iHello<Esc>
# Press::w<Enter>
[status] Wrote 5 bytes
# Press::q<Enter>
Failure demo:
$ ./kilo-vim /root/secret.txt
Error: cannot open file (EACCES)
Exit code: 1
Exit codes:
0success1file open failure2save failure3terminal init failure
3.7.8 If TUI: layout and key interactions
+----------------------------------------------------+
|demo.txt                                12 lines    |
|Line 1                                              |
|Line 2                                              |
|~                                                   |
|~                                                   |
|                                                    |
|-- NORMAL --                                        |
+----------------------------------------------------+
Keys:
  h/j/k/l move, i insert, Esc normal, : command

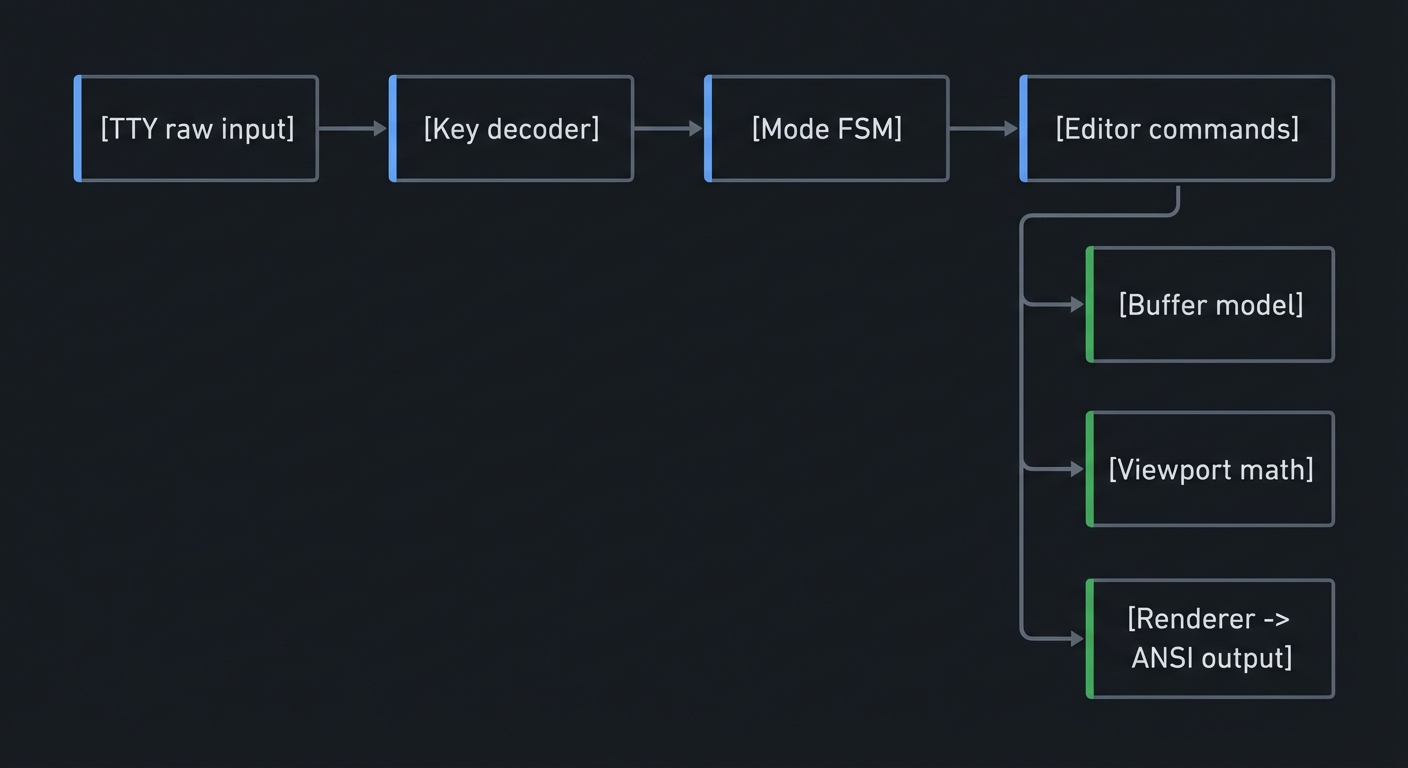
4. Solution Architecture
4.1 High-Level Design
[TTY raw input] -> [Key decoder] -> [Mode FSM] -> [Editor commands]
                                              -> [Buffer model]
                                              -> [Viewport math]
                                              -> [Renderer -> ANSI output]
4.2 Key Components
| Component | Responsibility | Key Decisions |
|---|---|---|
| Input Reader | Read bytes, handle timeouts | VMIN/VTIME strategy |
| Key Decoder | Parse escape sequences | Minimal vs full map |
| Mode FSM | Normal/Insert/Command state | Operator-pending design |
| Buffer | Store and edit text | Gap buffer vs piece table |
| Viewport | Calculate visible rows | Track top row + rx |
| Renderer | Build frame buffer | Batch writes, hide cursor |
| File IO | Load/save files | Atomic save + fsync |
| Command Line | Parse : commands |
Simple grammar |
4.3 Data Structures (No Full Code)
typedef struct {
  int cx, cy;         // cursor position in buffer coords
  int rx;             // rendered x
  int rowoff, coloff; // viewport offsets
  int screenrows, screencols;
  int mode;           // NORMAL/INSERT/COMMAND
  int dirty;          // unsaved changes
  GapBuffer buf;
} EditorState;
4.4 Algorithm Overview
Key Algorithm: Rendering a Frame
- Compute visible rows based on
rowoffandscreenrows. - For each visible row, build a render string with tabs expanded.
- Append status line and message line.
- Write the full buffer once to stdout.
Complexity Analysis:
- Time: O(V) where V is visible chars per frame
- Space: O(V) for the render buffer
5. Implementation Guide
5.1 Development Environment Setup
cc --version
make --version
5.2 Project Structure
project-root/
├── src/
│   ├── main.c
│   ├── editor.c
│   ├── editor.h
│   ├── gap_buffer.c
│   ├── gap_buffer.h
│   ├── input.c
│   ├── render.c
│   └── command.c
├── fixtures/
│   └── demo.txt
└── Makefile
5.3 The Core Question You’re Answering
“How does a program own a terminal, interpret raw keystrokes, and maintain a live document while constantly redrawing a grid?”
5.4 Concepts You Must Understand First
Stop and research these before coding:
- Raw terminal mode (termios)
- Why VMIN/VTIME matter for key decoding
- Book: TLPI Ch. 62
- Gap buffer vs piece table
- When each is faster
- Book: Data Structures the Fun Way Ch. 8
- Finite state machines
- Modeling modes and operator-pending
- Book: Design Patterns (State)
- Atomic file save
- Rename semantics, fsync
- Book: APUE Ch. 5
5.5 Questions to Guide Your Design
- How will you represent cursor position when tabs exist?
- When do you redraw the screen (every key vs on timer)?
- How will you parse commands like
:wvs:wq? - How will you report errors without corrupting the screen?
5.6 Thinking Exercise
Manually trace these edits on paper using a gap buffer:
Initial: "hello world"
Cursor at index 5 (between 'o' and ' ')
Insert: "X"
Move cursor to end
Backspace 3 times
Questions:
- Where does the gap move?
- What bytes get copied?
- What is the final string?
5.7 The Interview Questions They’ll Ask
- Why is a gap buffer good for local edits?
- How do you avoid flicker when redrawing a terminal?
- What are the tradeoffs of always re-rendering the whole screen?
- How would you implement undo and redo?
5.8 Hints in Layers
Hint 1: Raw mode first Make the terminal safe before you do any rendering.
Hint 2: Centralize editor state
Keep a single EditorState that owns cursor, viewport, and buffer.
Hint 3: Render into a buffer
Build one string and write() once per frame.
Hint 4: Clamp cursor After every command, clamp cursor to line length.
5.9 Books That Will Help
| Topic | Book | Chapter |
|---|---|---|
| Terminal IO | The Linux Programming Interface | Ch. 62 |
| Processes and IO | Advanced Programming in the UNIX Environment | Ch. 5 |
| Data structures | Data Structures the Fun Way | Ch. 8 |
| Text editors | The Craft of Text Editing | Ch. 1-3 |
5.10 Implementation Phases
Phase 1: Foundation (2-3 days)
Goals:
- Raw mode + screen clear
- Render static file
Tasks:
- Enable raw mode and restore on exit.
- Read file into a simple line array.
- Render lines to a full-screen grid.
Checkpoint: You can open a file and see it rendered correctly.
Phase 2: Core Editing (3-5 days)
Goals:
- Modal input and editing
- Gap buffer or piece table
Tasks:
- Implement Normal and Insert modes.
- Add key decoding and movement commands.
- Insert and delete text in the buffer.
- Implement file save.
Checkpoint: You can edit and save a file without glitches.
Phase 3: Polish and Safety (2-4 days)
Goals:
- Command line mode
- Status line and errors
- Undo/redo (basic)
Tasks:
- Implement
:command line and:w,:q. - Add status and message lines.
- Add undo/redo stack.
Checkpoint: You can edit, save, quit, and undo safely.
5.11 Key Implementation Decisions
| Decision | Options | Recommendation | Rationale |
|---|---|---|---|
| Buffer structure | Gap buffer, piece table | Gap buffer | Simple and fast for local edits |
| Rendering | Full redraw, dirty rows | Full redraw first | Easier, good enough for small files |
| Key decoding | Blocking read, timeout read | Timeout read | Avoid hanging on ESC |
| Save strategy | Direct write, temp + rename | Temp + rename | Prevent data loss |
6. Testing Strategy
6.1 Test Categories
| Category | Purpose | Examples |
|---|---|---|
| Unit Tests | Verify buffer operations | insert/delete, gap moves |
| Integration Tests | Full edit flow | open -> edit -> save |
| Edge Case Tests | Stress conditions | long lines, empty file |
6.2 Critical Test Cases
- Insert at beginning: Insert “ABC” at start of file.
- Delete across lines: Backspace at line start joins lines.
- Resize window: Editor redraws to new size.
- Save failure: Attempt to save to read-only directory.
6.3 Test Data
fixtures/
  empty.txt
  long-line.txt (10k chars)
  tabs.txt (mix of tabs and spaces)
7. Common Pitfalls & Debugging
7.1 Frequent Mistakes
| Pitfall | Symptom | Solution |
|---|---|---|
| Not restoring termios | Terminal broken after exit | Use atexit and signal handlers |
| ESC parsing wrong | Arrow keys insert junk | Implement timeout parser |
| Cursor desync | Cursor jumps unexpectedly | Separate logical vs rendered x |
| Save corrupts file | File becomes empty | Use temp + rename |
7.2 Debugging Strategies
- Print diagnostics to a log file so you do not corrupt the screen.
- Add a debug mode that renders internal cursor and viewport values.
- Use
stty -ato verify terminal flags after exit.
7.3 Performance Traps
- Redrawing on every byte is fine early, but avoid per-row writes.
- Recomputing rendered rows for every key can be optimized later.
8. Extensions & Challenges
8.1 Beginner Extensions
- Add line numbers on the left margin.
- Add
/search for a literal string.
8.2 Intermediate Extensions
- Add undo/redo grouping for insert sessions.
- Add syntax highlighting for a small language.
8.3 Advanced Extensions
- Implement a piece table with incremental rendering.
- Add a minimal plugin system using dynamic libraries.
9. Real-World Connections
9.1 Industry Applications
- Terminal editors: Vim, Neovim, Helix use similar raw-mode loops.
- Embedded tools: Git commit message editors rely on the same terminal control.
9.2 Related Open Source Projects
- kilo: Minimal C text editor that inspired this project.
- neovim: Modern modal editor with RPC and Lua.
9.3 Interview Relevance
- Systems IO: raw mode, IO multiplexing, terminal control.
- Data structures: gap buffers, piece tables, ropes.
10. Resources
10.1 Essential Reading
- The Linux Programming Interface (Kerrisk) - Ch. 62
- The Craft of Text Editing (Finseth) - Ch. 1-3
10.2 Video Resources
- Terminal control and ANSI basics (search: “ANSI escape sequences tutorial”)
- Editor internals overview (search: “text editor data structures”)
10.3 Tools & Documentation
termios(3)man page- POSIX
open(2),read(2),write(2),rename(2)
10.4 Related Projects in This Series
- P02 - Neovim Focus Mode Plugin: event-driven UI
- P03 - Neovim GUI Client: external UI rendering
- P06 - Neovim Lite Capstone: integration project
11. Self-Assessment Checklist
11.1 Understanding
- I can explain canonical vs raw mode without notes.
- I can explain how a gap buffer works and its tradeoffs.
- I can describe how cursor mapping works with tabs.
11.2 Implementation
- All functional requirements are met.
- Save uses temp + rename and reports errors.
- Terminal settings always restore on exit.
11.3 Growth
- I can describe one improvement to rendering performance.
- I can explain this project in an interview.
12. Submission / Completion Criteria
Minimum Viable Completion:
- Raw mode works and restores cleanly.
- Normal and Insert modes function correctly.
- File load/save works with error handling.
Full Completion:
- All minimum criteria plus:
- Command-line mode with
:w,:q,:wq. - Status line with file info and mode.
Excellence (Going Above & Beyond):
- Undo/redo with command grouping.
- Basic syntax highlighting or search.
13. Determinism and Reproducibility Notes
- Use
KILO_TEST_MODE=1to freeze any timestamps in the status bar. - Keep a fixed
fixtures/demo.txtso the golden demo always matches. - The failure demo uses a consistent path (
/root/secret.txt) to trigger EACCES.