Deeply Understanding Neovim from Scratch
Goal: Deeply understand how Neovim works as a modern modal editor: how it takes control of the terminal, stores and edits text efficiently, parses and highlights code incrementally, and exposes its core over RPC to plugins and GUIs. You will trace the exact data flow from a single keypress to a redraw on screen, and understand the architectural separation between core, UI, plugins, and external tooling. You will be able to build a minimal modal editor, a real Neovim plugin, a GUI frontend, a Tree-sitter grammar, and an LSP server. By the end, you can reason about performance, correctness, and UX trade-offs in editor design and implement them yourself.
Introduction: What This Guide Covers
Neovim is a modern, modal text editor core that can run headless, be embedded by other programs, and be extended through a rich Lua and RPC API. It is both a power-user editor and a programmable text-processing engine that can be controlled by GUIs, scripts, and language tools.
What you will build (by the end of this guide):
- A minimal modal text editor in C that runs in a terminal
- A production-grade Neovim plugin in Lua with autocommands, extmarks, and floating UI
- A GUI client that renders Neovim through the official UI protocol
- A Tree-sitter grammar and queries for a custom language
- A Language Server Protocol (LSP) server that Neovim can drive
- A capstone “Neovim Lite” editor that combines all core subsystems
Scope (what is included):
- Terminal control and ANSI escape sequences
- Text buffer data structures (gap buffer, piece table, rope)
- Modal editing design (state machines, operator-motion grammar)
- Event loops and asynchronous IO
- MessagePack-RPC and Neovim’s UI protocol
- Lua plugin architecture and Neovim API
- Tree-sitter incremental parsing and queries
- LSP lifecycle and JSON-RPC messaging
Out of scope (for this guide):
- Full Vimscript compatibility
- Full-featured plugin ecosystem replication
- Advanced diff/merge tooling or VCS UI
- Cross-platform packaging and distribution of a production editor
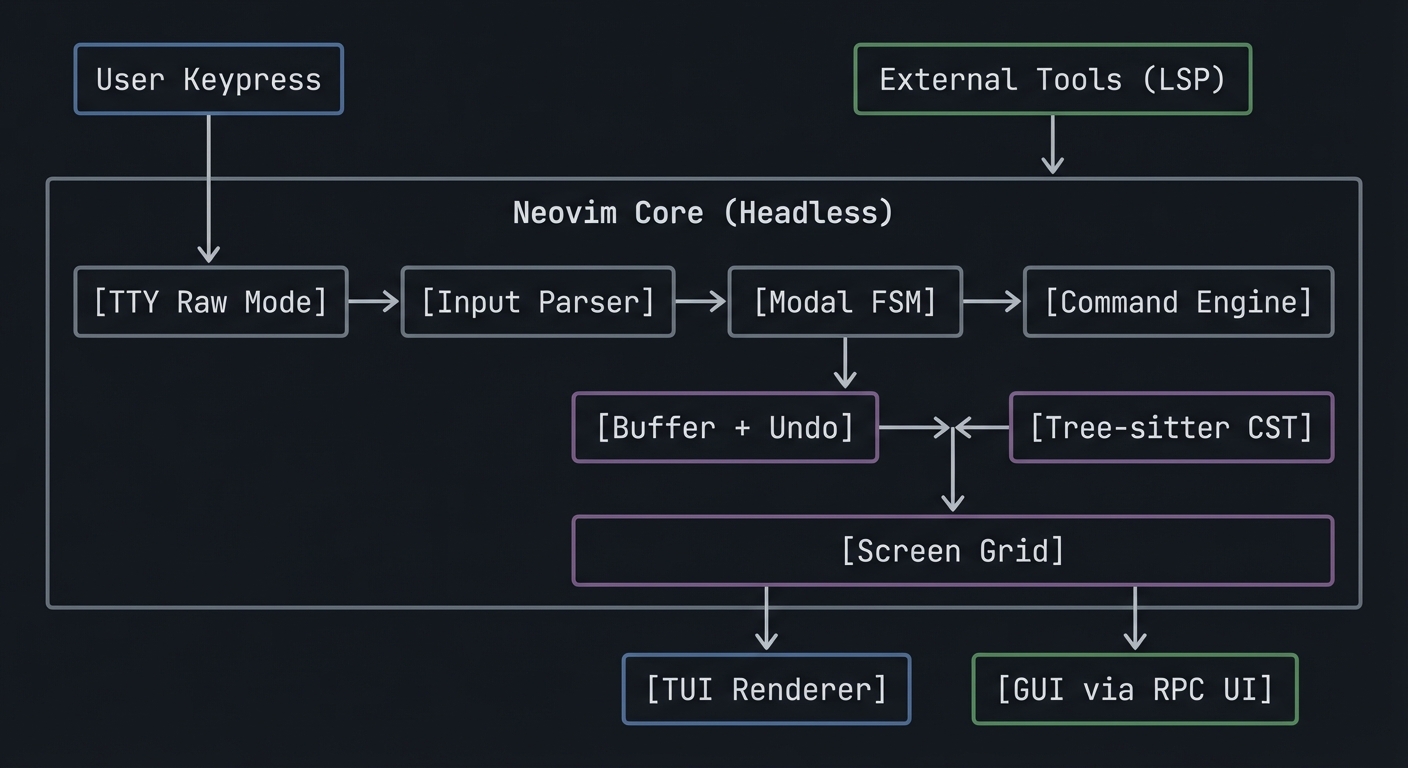
The Big Picture (Mental Model)
            +------------------+       +------------------------+
            |  User Keypress   |       | External Tools (LSP)    |
            +---------+--------+       +-----------+------------+
                      |                            |
                      v                            v
+---------------------+----------------------------+---------------------+
|                       Neovim Core (Headless)                          |
|                                                                        |
|  [TTY Raw Mode] -> [Input Parser] -> [Modal FSM] -> [Command Engine]   |
|                                        |               |               |
|                                        v               v               |
|                              [Buffer + Undo]     [Tree-sitter CST]     |
|                                        |               |               |
|                                        +-------+-------+               |
|                                                v                       |
|                                         [Screen Grid]                  |
+------------------------+-------------------------------+----------------+
                         |                               |
                         v                               v
                 [TUI Renderer]                 [GUI via RPC UI]
Key Terms You’ll See Everywhere
- Buffer: A file-like container of text in memory.
- Window: A viewport into a buffer (a buffer can be shown in many windows).
- Grid: The editor’s rendered screen as a 2D array of cells.
- Extmark: A persistent, invisible marker attached to a buffer position.
- Namespace: An ID used to group extmarks and highlights.
- Autocommand: An event-triggered callback (like a hook).
- RPC: Remote Procedure Call, how external clients control Neovim.
- Tree-sitter: Incremental parsing library that builds concrete syntax trees.
- LSP: Language Server Protocol, the editor-language tooling bridge.
How to Use This Guide
- Read the Theory Primer first. It is the textbook for the projects.
- Pick a learning path that matches your background (see below).
- Build each project with a notebook for logs, questions, and diagrams.
- Use the “Core Question” in each project as your design compass.
- Treat debugging as part of learning. The pitfalls are deliberate.
Prerequisites & Background Knowledge
Essential Prerequisites (Must Have)
Programming Skills:
- Solid C basics (pointers, structs, memory allocation, file IO)
- Comfort with the terminal and shell tools
- Basic JSON and serialization concepts
- Ability to read and write Lua (for Neovim plugins)
Systems Fundamentals:
- File descriptors and standard IO
- Basic process model (fork/exec, signals)
- Basic data structures (arrays, linked lists, trees)
- Recommended Reading: “The Linux Programming Interface” by Michael Kerrisk - Ch. 3, 5, 6, 62
Parsing & Protocol Basics:
- What a grammar is and how parsers work (high level)
- Client/server messaging (requests, responses, notifications)
- Recommended Reading: “Engineering a Compiler” by Cooper & Torczon - Ch. 2-4
Helpful But Not Required
Async IO and Event Loops:
- You can learn this in Project 3 and the Event Loop chapter.
Language Tooling Concepts:
- Symbol tables and diagnostics can be learned during Project 5.
Self-Assessment Questions
- Can you explain what
tcgetattrandtcsetattrdo? - Can you implement a dynamic array in C without leaks?
- Can you explain the difference between a request and a notification in RPC?
- Have you written a small Lua module before?
- Do you know what an AST is and why it is useful?
If you answered “no” to questions 1-3: Spend 1-2 weeks reading TLPI Ch. 3, 6, 62 and doing small C IO exercises.
Development Environment Setup
Required Tools:
- A Unix-like system (Linux or macOS)
- A C compiler (clang or gcc)
- A recent Neovim release
- Lua language support (bundled with Neovim)
- A terminal that supports ANSI escape sequences
Recommended Tools:
gdborlldbfor debuggingstraceordtrussfor syscall tracingtree-sitterCLI (for grammar testing)
Testing Your Setup:
$ cc --version
$ nvim --version
$ python3 --version
Time Investment
- Project 1 (Modal Editor in C): 1-2 weeks
- Project 2 (Lua Plugin): 3-5 days
- Project 3 (GUI Client): 1-2 weeks
- Project 4 (Tree-sitter Grammar): 4-7 days
- Project 5 (LSP Server): 1-2 weeks
- Capstone: 2-4 weeks
Important Reality Check
Editor internals are complex because they touch terminals, rendering, parsing, and async IO. Expect to loop through multiple passes:
- Make it work (even if naive)
- Make it correct (edge cases)
- Make it fast (diff rendering, incremental parsing)
- Make it composable (plugins, RPC, UIs)
Big Picture / Mental Model
Keypress -> Raw Input -> Keymap Resolver -> Modal FSM
                     -> Command Engine -> Buffer Model -> Undo Stack
                     -> Syntax Parser (Tree-sitter)
                     -> Render Model -> Screen Grid
                     -> Output (TUI) or RPC UI Events (GUI)
                     -> Optional LSP Requests
Theory Primer (Read This Before Coding)
Chapter 1: Terminal Control and Screen Model
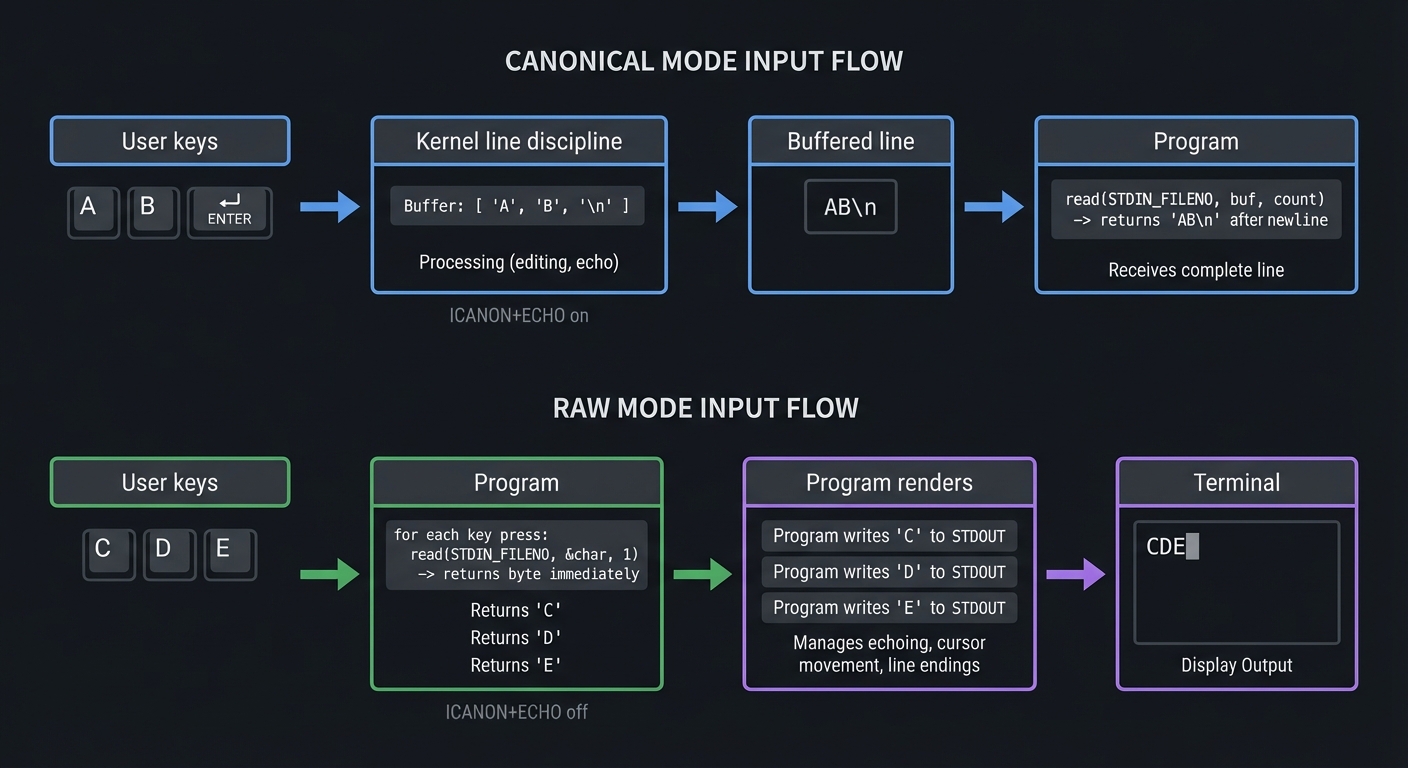
Concept: Canonical vs Raw Mode (termios)
Definitions & Key Terms
- Canonical mode: The terminal line discipline buffers input until newline; special keys are handled by the kernel.
- Raw mode: Input is delivered byte-by-byte with minimal processing.
- ICANON: termios flag that enables canonical mode.
- ECHO: termios flag that causes typed characters to be echoed automatically.
Mental Model Diagram
User keys -> Kernel line discipline -> (buffered line) -> Program
                 | ICANON+ECHO on

User keys -> Program (byte-by-byte) -> Program renders -> Terminal
                 | ICANON+ECHO off
How It Works (Step-by-Step)
- Your editor calls
tcgetattr()to read current terminal settings. - It disables
ICANONandECHO, and setsVMIN/VTIMEfor read behavior. - It calls
tcsetattr()to apply the changes. - Input is read directly from stdin, one byte at a time.
- On exit, the editor restores the original settings.
Minimal Concrete Example (C)
struct termios raw, orig;
tcgetattr(STDIN_FILENO, &orig);
raw = orig;
raw.c_lflag &= ~(ICANON | ECHO);
raw.c_cc[VMIN] = 0;
raw.c_cc[VTIME] = 1;
tcsetattr(STDIN_FILENO, TCSAFLUSH, &raw);
Common Misconceptions
- “Raw mode means no signals” -> Signals like SIGINT can still be delivered unless you disable ISIG.
- “Raw mode is a terminal feature” -> It is a kernel line discipline setting per tty.
Check-Your-Understanding
- What happens if you disable ICANON but leave ECHO on?
- What is the difference between VMIN=0/VTIME=1 and VMIN=1/VTIME=0?
- Why must you restore termios settings on exit?
Where You’ll Use It
- Project 1 (Modal Editor in C)
- Project 3 (GUI client when embedding TUI fallback)
- Capstone
Reference: termios(3) man page (ICANON, ECHO): https://man7.org/linux/man-pages/man3/termios.3.html
Concept: ANSI Escape Sequences and Cursor Addressing
Definitions & Key Terms
- ANSI escape sequence: Control sequence starting with ESC
\x1b. - CSI: Control Sequence Introducer (ESC
[), used for cursor movement, colors, and screen control.
Mental Model Diagram
Program output -> ESC sequences -> Terminal parser -> Screen state
How It Works (Step-by-Step)
- Your program prints
\x1b[2Jto clear the screen. - It prints
\x1b[Hto move the cursor to top-left. - It prints text lines to redraw the screen.
- It uses
\x1b[?25land\x1b[?25hto hide/show cursor.
Minimal Concrete Example
write(STDOUT_FILENO, "\x1b[2J", 4);
write(STDOUT_FILENO, "\x1b[H", 3);
Common Misconceptions
- “Escape sequences are portable” -> Different terminals support different subsets.
- “The terminal redraws for you” -> The program must explicitly repaint.
Check-Your-Understanding
- What does
\x1b[12;40Hdo? - Why do editors use a single large write() call for redraw?
- What happens if you forget to restore cursor visibility?
Where You’ll Use It
- Project 1
- Capstone
Concept: Screen Grid and Redraw Batching
Definitions & Key Terms
- Grid: 2D matrix of cells (character + highlight).
- Redraw batch: A set of updates processed together.
- Flush: A signal that a full redraw is complete.
Mental Model Diagram
Buffer -> Render pass -> Grid diff -> Output/Events -> Display
How It Works (Step-by-Step)
- Editor computes a virtual grid from buffer and window state.
- It computes a diff against the previous grid.
- It emits only the changed cells/lines.
- UI applies updates and only shows final state after a flush.
Minimal Concrete Example (Pseudo)
new_grid = render(buffer, viewport)
diff = compare(old_grid, new_grid)
for each change in diff:
    emit(update)
emit(flush)
old_grid = new_grid
Common Misconceptions
- “Redraw means clearing the screen” -> Efficient editors use diffs.
- “Flush is optional” -> UIs rely on flush to display consistent state.
Check-Your-Understanding
- Why is a diff-based redraw faster than full repaint?
- Why can intermediate redraw batches not be shown?
Where You’ll Use It
- Project 1
- Project 3
- Capstone
Reference: Neovim UI protocol docs (grid_line, flush): https://neovim.io/doc/user/api-ui-events.html
Chapter 2: Text Buffer Data Structures
Concept: Gap Buffer
Definitions & Key Terms
- Gap: A contiguous empty region in the buffer at the cursor.
- Move gap: Copy characters so the gap aligns with cursor.
Mental Model Diagram
[Hello|_____gap_____|World]
       ^cursor

How It Works (Step-by-Step)
- Buffer is a single array with a gap.
- Insertions write into the gap (O(1)).
- Deletions expand the gap (O(1)).
- Moving the cursor moves the gap (O(n)).
Minimal Concrete Example (Pseudo)
insert(c): buffer[gap_start++] = c
backspace(): gap_start--
move_cursor(pos): move_gap(pos)
Common Misconceptions
- “Gap buffer is always slow” -> It is fast for localized edits.
Check-Your-Understanding
- Why is cursor movement the expensive operation?
- Where does a gap buffer perform worst?
Where You’ll Use It
- Project 1 (initial implementation)
- Capstone
Concept: Piece Table
Definitions & Key Terms
- Original buffer: The immutable original file content.
- Add buffer: Append-only buffer for inserted text.
- Piece: A tuple pointing to a span in original/add buffers.
Mental Model Diagram
Original: [Hello World]
Add:      [Beautiful ]
Pieces:   [Orig(0,5)] [Add(0,10)] [Orig(6,5)]
How It Works (Step-by-Step)
- Load file into original buffer; add buffer starts empty.
- Insert text -> append to add buffer -> insert piece.
- Delete text -> remove or split pieces.
- Rendering walks the piece list.
Minimal Concrete Example (Pseudo)
Piece { buf: ORIGINAL|ADD, start, len }
Common Misconceptions
- “Piece tables are complex” -> The core data model is simple; complexity comes from operations.
Check-Your-Understanding
- Why does a piece table make undo easier?
- What data structure stores pieces efficiently (list vs tree)?
Where You’ll Use It
- Project 1 (upgrade)
- Capstone
Concept: Rope (Balanced Tree of Strings)
Definitions & Key Terms
- Rope: A balanced tree where leaves are string fragments.
- Weight: The length of the left subtree, used for indexing.
Mental Model Diagram
           [len=11]
          /        \
     ["Hello "]   ["World"]
How It Works (Step-by-Step)
- Leaves store small strings.
- Internal nodes store length metadata.
- Insertions split leaves and rebalance.
- Indexing walks the tree using weights.
Minimal Concrete Example (Pseudo)
Node { left, right, weight, text? }
Common Misconceptions
- “Ropes are always faster” -> Overhead can be high for small files.
Check-Your-Understanding
- Why is indexing O(log n) in a rope?
- When would a rope be worse than a gap buffer?
Where You’ll Use It
- Project 1 (optional upgrade)
- Capstone
Concept: Undo/Redo as an Edit Log
Definitions & Key Terms
- Undo stack: A stack of reversible operations.
- Redo stack: Operations undone but not overwritten by new edits.
Mental Model Diagram
[Edit1] -> [Edit2] -> [Edit3]
undo => [Edit1] -> [Edit2]
redo => [Edit1] -> [Edit2] -> [Edit3]
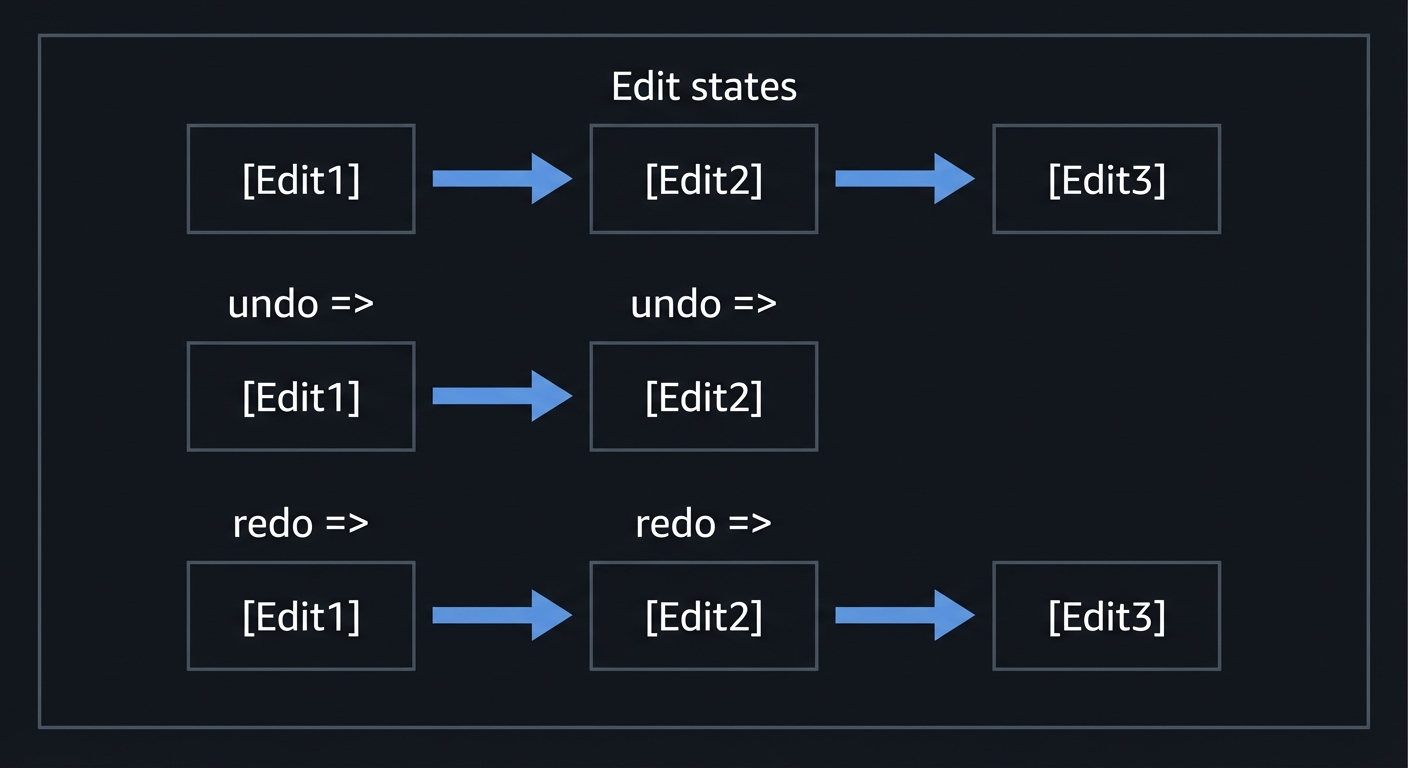
How It Works (Step-by-Step)
- Each edit is recorded as an operation (insert/delete).
- Undo applies the inverse operation.
- Redo re-applies the operation.
- New edit clears redo stack.
Minimal Concrete Example (Pseudo)
Edit { type, pos, text }
undo: apply(inverse(Edit))
Common Misconceptions
- “Undo is just a snapshot” -> Snapshotting is expensive; logs scale better.
Check-Your-Understanding
- What is the inverse of an insertion?
- Why is redo invalid after a new edit?
Where You’ll Use It
- Project 1 (bonus)
- Capstone
Chapter 3: Modal Input and Keymaps
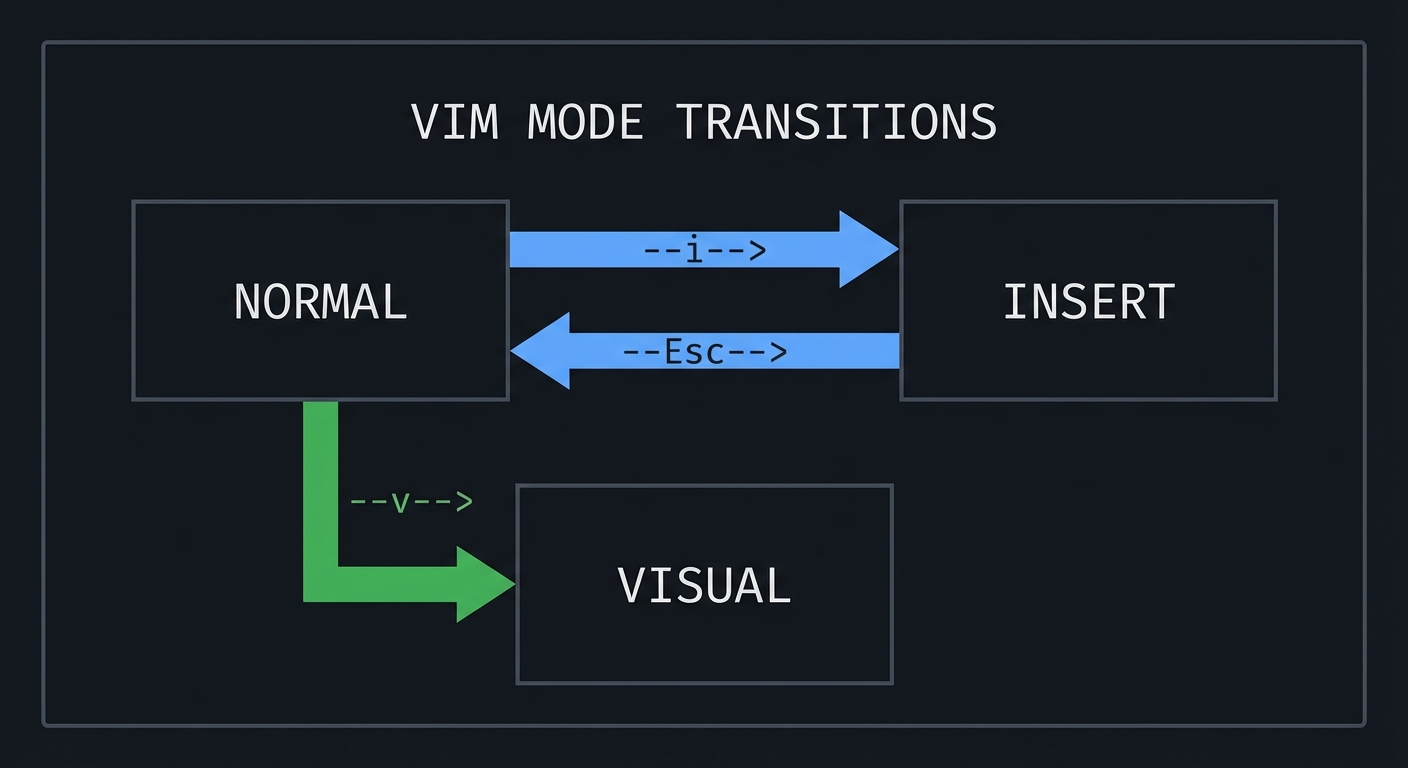
Concept: Finite State Machines (FSM)
Definitions & Key Terms
- State: A mode that changes meaning of keys (NORMAL, INSERT, VISUAL).
- Transition: A change between states based on input.
Mental Model Diagram
NORMAL --i--> INSERT
INSERT --Esc--> NORMAL
NORMAL --v--> VISUAL
How It Works (Step-by-Step)
- Keypress arrives.
- Current state determines interpretation.
- Action runs and may trigger state change.
Minimal Concrete Example (Pseudo)
if state == NORMAL and key == 'i': state = INSERT
Common Misconceptions
- “Modes are just flags” -> They define a grammar for input sequences.
Check-Your-Understanding
- Why does Vim need an “operator-pending” state?
- How does state simplify composability?
Where You’ll Use It
- Project 1
- Capstone
Concept: Operator + Motion Grammar
Definitions & Key Terms
- Operator: Action like delete (
d), change (c), yank (y). - Motion: Cursor movement like word (
w) or line (j).
Mental Model Diagram
Operator 'd' + Motion 'w' = delete word
Operator 'c' + Motion '$' = change to end of line
How It Works (Step-by-Step)
- User types operator.
- Editor enters operator-pending state.
- Motion is parsed.
- Operator is applied to range produced by motion.
Minimal Concrete Example (Pseudo)
range = parse_motion()
apply_operator(op, range)
Common Misconceptions
- “Delete word is a single command” -> It is a composition of two commands.
Check-Your-Understanding
- What happens if the motion is invalid?
- Why do operators make macros more powerful?
Where You’ll Use It
- Project 1
- Capstone
Concept: Text Objects and Motions
Definitions & Key Terms
- Text object: A semantic chunk like “inside parentheses” (
i() or “a word” (aw). - Motion: A cursor movement command (used both alone and with operators).
Mental Model Diagram
ci(  => change inside parentheses
yaw  => yank a word
How It Works (Step-by-Step)
- Parse operator (optional).
- Parse text object kind (inner/around) and delimiter.
- Compute selection range.
Minimal Concrete Example (Pseudo)
if obj == "i(" then range = find_matching_parens(inner=true)
Common Misconceptions
- “Text objects are motions” -> They are semantic selections that can be used with operators.
Check-Your-Understanding
- Why are text objects editor-agnostic once you have a parser?
- How would you implement
iwwithout regex?
Where You’ll Use It
- Project 1 (bonus)
- Capstone
Chapter 4: Event Loop and Async IO
Concept: Event Loop (libuv)
Definitions & Key Terms
- Event loop: A loop that waits for IO/events and dispatches callbacks.
- Watcher: An object registered with the loop (timers, IO, fs).
Mental Model Diagram
[Poll OS events] -> [Run callbacks] -> [Render] -> [Repeat]
How It Works (Step-by-Step)
- Loop blocks waiting for IO readiness.
- OS wakes it when events occur.
- Callbacks run to handle events.
- Loop repeats.
Minimal Concrete Example (Pseudo)
while (running) {
  poll();
  run_ready_callbacks();
}
Common Misconceptions
- “Event loops are single-task” -> They multiplex many tasks without threads.
Check-Your-Understanding
- Why is a single-threaded event loop still responsive?
- What happens if a callback blocks?
Where You’ll Use It
- Project 2 (autocommands)
- Project 3 (GUI loop)
- Capstone
Reference: Neovim exposes libuv via vim.uv: https://neovim.io/doc/user/lua.html
Concept: Async Jobs and Timers
Definitions & Key Terms
- Job: External process managed asynchronously by the editor.
- Timer: Scheduled callback for periodic work.
Mental Model Diagram
User action -> Spawn job -> Output stream -> Callback -> Update UI
How It Works (Step-by-Step)
- Editor spawns a process (LSP, formatter).
- Event loop monitors its stdout/stderr.
- Output triggers callbacks to update UI.
Minimal Concrete Example (Pseudo)
start_job(cmd, on_stdout, on_exit)
Common Misconceptions
- “Async means multithreaded” -> It often means event-driven single thread.
Check-Your-Understanding
- Why do you need debouncing for frequent events?
- How do timers avoid blocking input?
Where You’ll Use It
- Project 2
- Project 5
- Capstone
Chapter 5: RPC and Client-Server Architecture
Concept: MessagePack-RPC in Neovim
Definitions & Key Terms
- MessagePack: A binary serialization format.
- RPC request: A message that expects a response.
- Notification: A message that does not expect a response.
Mental Model Diagram
Client -> [msgpack request] -> Neovim -> [msgpack response] -> Client
How It Works (Step-by-Step)
- Client serializes a request with MessagePack.
- Neovim processes messages in the order received.
- Neovim sends responses in reverse order of requests (Nvim-specific constraint).
Minimal Concrete Example (Pseudo)
[0, msgid, "nvim_input", ["i"]]
Common Misconceptions
- “RPC is just JSON over HTTP” -> Neovim uses binary MessagePack-RPC.
Check-Your-Understanding
- What is the difference between a request and a notification?
- Why is binary encoding useful for high-frequency events?
Where You’ll Use It
- Project 3
- Capstone
Reference: Neovim API docs (MessagePack-RPC constraints): https://neovim.io/doc/user/api.html
Reference: MessagePack format: https://github.com/msgpack/msgpack/blob/master/spec.md
Concept: Neovim UI Protocol (Linegrid)
Definitions & Key Terms
- nvim_ui_attach: RPC call to subscribe as a UI.
- grid_line: Event that updates a row in the screen grid.
- flush: Signals the end of a redraw batch.
Mental Model Diagram
Neovim -> redraw batch -> grid_line events -> flush -> UI paints
How It Works (Step-by-Step)
- Client calls
nvim_ui_attach(width, height, {ext_linegrid=true}). - Neovim emits redraw batches of
grid_lineevents. - UI updates its grid and only presents after
flush.
Minimal Concrete Example (Pseudo)
call nvim_ui_attach(80, 24, {ext_linegrid=true})
receive ["grid_line", grid, row, col, cells, wrap]
receive ["flush"]
Common Misconceptions
- “UI gets full screen every time” -> It receives incremental line updates.
Check-Your-Understanding
- Why is
flushneeded for consistent rendering? - What happens if you ignore
grid_resize?
Where You’ll Use It
- Project 3
- Capstone
Reference: Neovim UI protocol docs: https://neovim.io/doc/user/api-ui-events.html
Chapter 6: Lua Plugin Architecture
Concept: Lua as the Configuration and Plugin Language
Definitions & Key Terms
- vim module: Neovim’s Lua standard library namespace.
- vim.api: Lua bindings to the core API.
Mental Model Diagram
Lua code -> vim.api -> Neovim core -> effect
How It Works (Step-by-Step)
- Neovim embeds Lua 5.1.
- The global
vimmodule exposes API and helpers. - Plugins are loaded from runtimepath.
Minimal Concrete Example (Lua)
vim.api.nvim_set_option_value("number", true, {})
Common Misconceptions
- “Lua is just config” -> It can create full plugin systems.
Check-Your-Understanding
- What is the difference between
vim.apiandvim.fn? - Why is
vimalways available withoutrequire?
Where You’ll Use It
- Project 2
- Capstone
Reference: Neovim Lua docs: https://neovim.io/doc/user/lua.html
Concept: Autocommands
Definitions & Key Terms
- Autocommand: A callback triggered by editor events.
- Event: A named signal like
BufWritePostorCursorMoved.
Mental Model Diagram
Event -> Autocommand -> Lua callback -> Update state/UI
How It Works (Step-by-Step)
- You register an autocommand with
nvim_create_autocmd. - When the event fires, Neovim invokes your callback.
- Your callback updates highlights, windows, state.
Minimal Concrete Example (Lua)
vim.api.nvim_create_autocmd("CursorMoved", {
  callback = function() print("moved") end
})
Common Misconceptions
- “Autocommands are always safe” -> They can cause performance issues if they run too often.
Check-Your-Understanding
- Why should heavy work be debounced inside autocommands?
- What happens if an autocommand throws an error?
Where You’ll Use It
- Project 2
- Capstone
Reference: Neovim Lua guide and autocmd docs: https://neovim.io/doc/user/lua.html
Concept: Extmarks and Namespaces
Definitions & Key Terms
- Extmark: Persistent mark tied to a buffer position.
- Namespace: Logical group for extmarks/highlights.
Mental Model Diagram
Buffer text -> [extmark] -> UI decorations
How It Works (Step-by-Step)
- Create namespace with
nvim_create_namespace. - Place extmarks with
nvim_buf_set_extmark. - Extmarks move as text edits occur.
Minimal Concrete Example (Lua)
local ns = vim.api.nvim_create_namespace("focus")
vim.api.nvim_buf_set_extmark(0, ns, 10, 0, { hl_group = "Visual" })
Common Misconceptions
- “Extmarks are just highlights” -> They can store virtual text, ranges, and metadata.
Check-Your-Understanding
- Why do extmarks survive text edits?
- How do namespaces prevent plugin conflicts?
Where You’ll Use It
- Project 2
- Capstone
Reference: Neovim API (extmark functions): https://neovim.io/doc/user/api.html
Concept: Floating Windows
Definitions & Key Terms
- Floating window: A window positioned relative to cursor, editor, or buffer.
- Config: Window options like size, border, zindex.
Mental Model Diagram
Editor grid + floating overlay
How It Works (Step-by-Step)
- Create a buffer for the float.
- Call
nvim_open_winwithrelativeandrow/col. - Update buffer contents to redraw the float.
Minimal Concrete Example (Lua)
vim.api.nvim_open_win(0, false, { relative="editor", width=20, height=3, row=1, col=1 })
Common Misconceptions
- “Floats are always external” -> They can be drawn by the built-in TUI.
Check-Your-Understanding
- What does
relative="editor"mean? - Why does a float need a width and height?
Where You’ll Use It
- Project 2
- Capstone
Reference: Neovim API (nvim_open_win): https://neovim.io/doc/user/api.html
Chapter 7: Incremental Parsing and Tree-sitter
Concept: Tree-sitter Incremental Parsing
Definitions & Key Terms
- Concrete Syntax Tree (CST): A parse tree that includes all syntax tokens.
- Incremental parsing: Updating a parse tree after edits without reparsing everything.
Mental Model Diagram
Edit -> Changed region -> Reparse subtree -> Updated CST
How It Works (Step-by-Step)
- Initial parse builds a CST for the whole buffer.
- When text changes, Tree-sitter identifies affected ranges.
- Only the impacted subtrees are reparsed.
- The CST stays usable even with syntax errors.
Minimal Concrete Example (Pseudo)
tree = parse(text)
edit(tree, change)
new_tree = parse(text, old_tree=tree)
Common Misconceptions
- “Incremental parsing is approximate” -> Tree-sitter provides concrete, usable trees.
Check-Your-Understanding
- Why is incremental parsing essential for editors?
- How does error recovery help highlighting?
Where You’ll Use It
- Project 4
- Capstone
Reference: Tree-sitter docs (incremental parsing overview): https://tree-sitter.github.io/tree-sitter/
Concept: Tree-sitter Queries and Highlights
Definitions & Key Terms
- Query: A pattern that matches nodes in a CST.
- Capture: A named match used to assign highlights or metadata.
Mental Model Diagram
CST -> Query patterns -> Captures -> Highlight groups
How It Works (Step-by-Step)
- Write
highlights.scmwith query patterns. - Neovim runs queries against the CST.
- Captures map to highlight groups.
Minimal Concrete Example (Query)
(function_declaration name: (identifier) @function)
Common Misconceptions
- “Queries are regex” -> They are structural tree matches.
Check-Your-Understanding
- Why do queries enable semantic highlighting?
- What happens if a query is missing?
Where You’ll Use It
- Project 4
- Capstone
Reference: Neovim Treesitter docs: https://neovim.io/doc/user/treesitter
Chapter 8: Language Server Protocol (LSP)
Concept: JSON-RPC as the Transport
Definitions & Key Terms
- JSON-RPC: A lightweight RPC protocol using JSON.
- Request: JSON object with
idexpecting a response. - Notification: JSON object without
id.
Mental Model Diagram
Client -> JSON-RPC -> Server -> Response
How It Works (Step-by-Step)
- Client sends
Content-Lengthframed JSON-RPC message. - Server responds with
resultorerror.
Minimal Concrete Example
{"jsonrpc":"2.0","id":1,"method":"initialize","params":{}}
Common Misconceptions
- “JSON-RPC is HTTP” -> It is transport-agnostic and often uses stdio.
Check-Your-Understanding
- Why are notifications not acknowledged?
- What happens if
idis null?
Where You’ll Use It
- Project 5
- Capstone
Reference: JSON-RPC 2.0 spec: https://www.jsonrpc.org/specification
Concept: LSP Lifecycle and Text Synchronization
Definitions & Key Terms
- Initialize: First handshake between client and server.
- Text sync: How document changes are sent (full or incremental).
- Capabilities: Features supported by client and server.
Mental Model Diagram
initialize -> initialized -> didOpen -> didChange -> shutdown
How It Works (Step-by-Step)
- Client sends
initializewith capabilities. - Server replies with its capabilities.
- Client sends
initializedand opens documents. - Changes are streamed via
textDocument/didChange.
Minimal Concrete Example (Pseudo)
initialize -> initialized -> didOpen -> didChange -> diagnostics
Common Misconceptions
- “LSP is just autocomplete” -> It includes definitions, symbols, formatting, diagnostics.
Check-Your-Understanding
- Why does the server need document versions?
- What is the difference between full and incremental sync?
Where You’ll Use It
- Project 5
- Capstone
Reference: LSP official specification (v3.17): https://microsoft.github.io/language-server-protocol/
Glossary (High-Signal)
- Buffer: In-memory text content.
- Window: A viewport into a buffer.
- Tabpage: A layout containing multiple windows.
- Grid: Rendered text cells displayed by UI.
- Extmark: Persistent position marker in a buffer.
- Namespace: ID for grouping extmarks/highlights.
- Autocommand: Event-triggered callback.
- RPC: Remote procedure call.
- CST: Concrete syntax tree.
- LSP: Language Server Protocol.
Why Neovim Matters
The Modern Problem It Solves
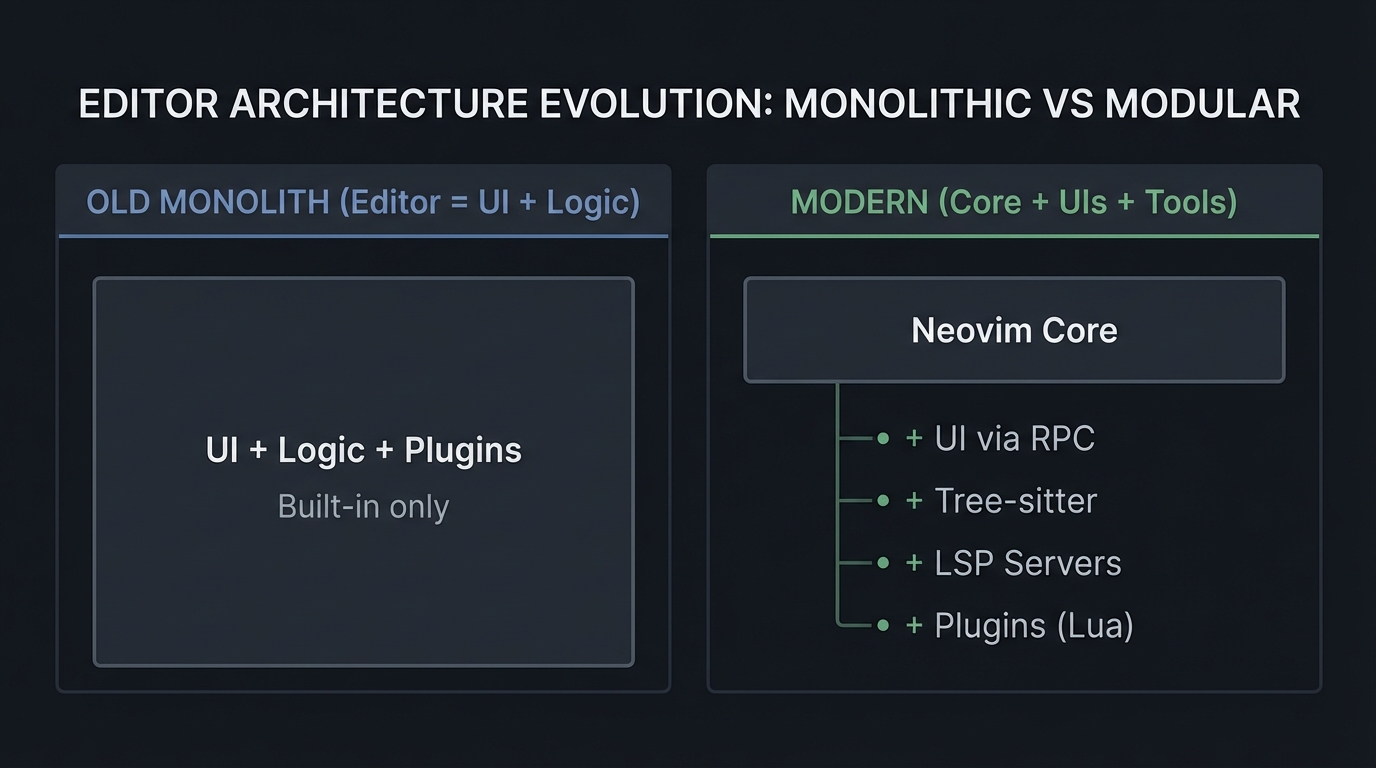
Modern development workflows demand editors that can scale across large codebases, handle multiple languages, and integrate with external tooling (formatters, linters, LSPs). Neovim separates the editor core from its UI and plugins, enabling headless automation, custom GUIs, and high-performance parsing.
Real-world impact (statistics):
- Vim usage (2023): 22.29% of respondents reported using Vim as a development environment. (Stack Overflow Developer Survey 2023: https://survey.stackoverflow.co/2023)
- Neovim usage (2023): 11.88% reported using Neovim as a development environment. (Stack Overflow Developer Survey 2023: https://survey.stackoverflow.co/2023)
- Lua usage (2023): 5.2% reported extensive development work in Lua. (Stack Overflow Developer Survey 2023: https://survey.stackoverflow.co/2023)
Why this matters: The editor ecosystem is not just about UI. It is about modular tooling. Neovim’s RPC and plugin architecture allows new UI frontends, advanced automation, and integration with language tooling without changing the core.
OLD MONOLITH (Editor = UI + Logic)     MODERN (Core + UIs + Tools)
+-------------------------------+      +------------------------+
| UI + Logic + Plugins          |      | Neovim Core             |
| Built-in only                 |      | + UI via RPC            |
+-------------------------------+      | + Tree-sitter           |
                                       | + LSP Servers           |
                                       | + Plugins (Lua)         |
                                       +------------------------+
Context & Evolution (Optional)
Vim pioneered modal editing for efficient text manipulation. Neovim modernized the architecture by embedding Lua, adding RPC, and supporting modern parsing and tooling integration while preserving modal editing principles.
Concept Summary Table
| Concept Cluster | What You Need to Internalize |
|---|---|
| Terminal Control & Screen Model | Raw mode, escape sequences, redraw batching, and grid rendering. |
| Text Buffer Structures | Gap buffers, piece tables, ropes, and undo logs. |
| Modal Input Grammar | State machines, operators, motions, and text objects. |
| Event Loop & Async IO | How editors stay responsive while running external tools. |
| RPC & UI Protocol | MessagePack-RPC, UI events, and redraw batching. |
| Lua Plugin Architecture | vim.api, autocommands, extmarks, and floating windows. |
| Tree-sitter Parsing | Incremental parsing, CSTs, and queries. |
| LSP Lifecycle | JSON-RPC, initialization, and text synchronization. |
Project-to-Concept Map
| Project | What It Builds | Primer Chapters It Uses |
|---|---|---|
| Project 1: Modal Editor in C | Raw-mode terminal editor | Ch. 1, 2, 3 |
| Project 2: Lua Plugin | Event-driven UI + extmarks | Ch. 4, 6 |
| Project 3: GUI Client | RPC-driven Neovim frontend | Ch. 4, 5 |
| Project 4: Tree-sitter Grammar | Language parser + highlighting | Ch. 7 |
| Project 5: LSP Server | Language tooling backend | Ch. 8 |
| Capstone: Neovim Lite | Integrated editor | All chapters |
Deep Dive Reading by Concept
Fundamentals & Systems
| Concept | Book & Chapter | Why This Matters |
|---|---|---|
| Terminal IO | The Linux Programming Interface - Ch. 62 | Raw mode and terminal control. |
| Event loops | The Linux Programming Interface - Ch. 63 | IO multiplexing strategies. |
| Processes | Advanced Programming in the UNIX Environment - Ch. 8-10 | Processes and file descriptors. |
Data Structures & Editing
| Concept | Book & Chapter | Why This Matters |
|---|---|---|
| Gap buffers | Data Structures the Fun Way - Ch. 8 | Efficient cursor-local edits. |
| Trees/Ropes | Algorithms, 4th Ed. - Ch. 3 | Balanced trees for text storage. |
| Undo logs | Clean Code - Ch. 3 | Designing clean command structures. |
Parsing and Language Tools
| Concept | Book & Chapter | Why This Matters |
|---|---|---|
| Parsing | Engineering a Compiler - Ch. 2-4 | Grammars and parsing foundations. |
| Compiler architecture | Compilers: Principles and Practice - Ch. 4 | Syntax analysis and trees. |
Software Architecture & Design
| Concept | Book & Chapter | Why This Matters |
|---|---|---|
| State machines | Design Patterns (State pattern) | Modeling modal editor behavior. |
| Plugin boundaries | Clean Architecture - Ch. 18 | Separating core and extensions. |
Quick Start: Your First 48 Hours
Day 1 (4 hours):
- Read Chapter 1 and Chapter 3 of the primer.
- Write a tiny C program that enters raw mode and reads bytes.
- Start Project 1: display a static file in the terminal.
- Ignore editing for now. Just render.
Day 2 (4 hours):
- Add cursor movement (hjkl) and redraw.
- Implement Insert mode and save to disk.
- Read Project 1 “Core Question” and “Hints”.
End of weekend: You understand raw mode, screen redraw, and modal state transitions. That is the core of every modal editor.
Recommended Learning Paths
Path 1: The Systems Programmer (Recommended)
Best for: People who want to understand editor internals end-to-end.
- Project 1 (Modal Editor in C)
- Project 3 (GUI Client)
- Project 4 (Tree-sitter Grammar)
- Project 5 (LSP Server)
- Project 2 (Lua Plugin)
- Capstone
Path 2: The Plugin Developer
Best for: People who want to build Neovim extensions quickly.
- Project 2 (Lua Plugin)
- Project 4 (Tree-sitter Grammar)
- Project 5 (LSP Server)
- Project 1 (Optional)
- Capstone
Path 3: The GUI Builder
Best for: People who want to build custom Neovim frontends.
- Project 3 (GUI Client)
- Project 1 (Modal Editor in C)
- Project 2 (Lua Plugin)
- Capstone
Path 4: The Completionist
Phase 1 (Weeks 1-2): Project 1 Phase 2 (Weeks 3-4): Project 2 + 3 Phase 3 (Weeks 5-6): Project 4 + 5 Phase 4 (Weeks 7-8): Capstone
Success Metrics
- You can explain Neovim’s UI protocol and implement a minimal client.
- You can implement modal editing in C with raw terminal input.
- You can write a Lua plugin that uses extmarks and floating windows.
- You can write and debug a Tree-sitter grammar and queries.
- You can build a minimal LSP server with diagnostics.
Appendix: Neovim Debugging and Introspection Cheatsheet
:checkhealth- sanity check for runtime and plugins:messages- recent error messages:lua print(vim.inspect(...))- inspect Lua data:Inspect- inspect highlight groups:InspectTree- inspect Tree-sitter CST:help api- API reference:help lua-guide- Lua plugin guide
Project 1: Build a Modal Text Editor in C
- Main Programming Language: C
- Alternative Programming Languages: Rust, Zig, Go
- Coolness Level: Level 9 - You built a real editor core
- Business Potential: 4/10 - Educational tooling, niche product
- Difficulty: Level 4 - Advanced
- Knowledge Area: Systems programming, terminal control
- Software or Tool: Raw terminal + ANSI escape sequences
- Main Book: “The Linux Programming Interface” by Michael Kerrisk
What you’ll build: A terminal-based modal text editor with Normal and Insert modes, a status bar, file loading/saving, and a minimal command line.
Why it teaches Neovim internals: It forces you to implement raw input, state machines, buffer data structures, and screen rendering - the exact foundation Neovim is built on.
Core challenges you’ll face:
- Handling raw input and escape sequences reliably
- Representing a mutable document efficiently
- Rendering a scrolling viewport without flicker
Real World Outcome
You will have a binary called kilo-vim that behaves like a small, usable editor.
What you will see:
- A full-screen editor that renders a file and a status line.
- Modal behavior: Normal mode for navigation, Insert mode for typing.
- Commands:
:wsaves the file,:qquits.
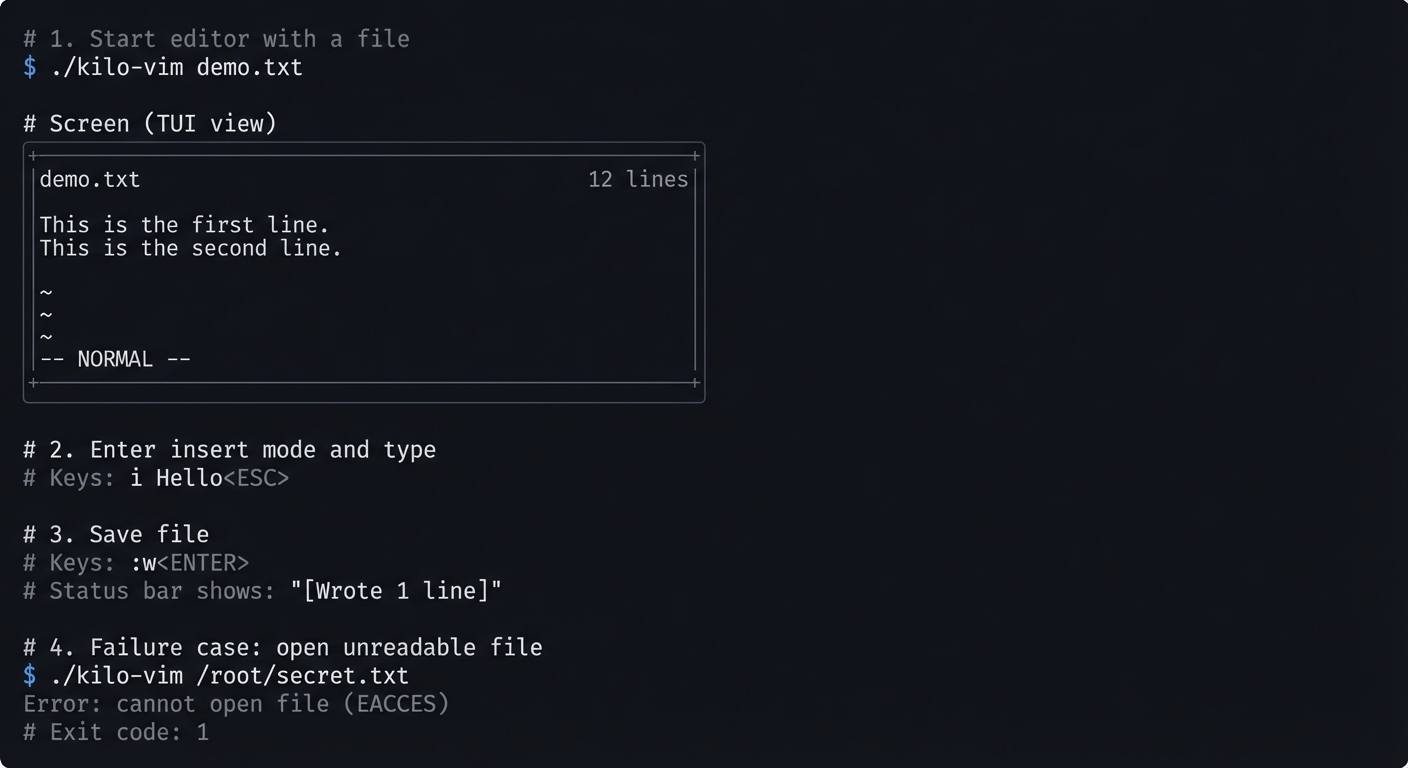
Command Line Outcome Example:
# 1. Start editor with a file
$ ./kilo-vim demo.txt

# Screen (TUI view)
+----------------------------------------------------+
|demo.txt                                    12 lines|
|                                                     |
|This is the first line.                              |
|This is the second line.                             |
|                                                     |
|~                                                    |
|~                                                    |
|~                                                    |
|                                                     |
|-- NORMAL --                                         |
+----------------------------------------------------+

# 2. Enter insert mode and type
# Keys: i Hello<ESC>

# 3. Save file
# Keys::w<ENTER>
# Status bar shows: "[Wrote 1 line]"

# 4. Failure case: open unreadable file
$ ./kilo-vim /root/secret.txt
Error: cannot open file (EACCES)
Exit code: 1
The Core Question You’re Answering
“How does a program take full control of the terminal, interpret keystrokes as commands, and maintain a dynamic document in memory while constantly redrawing a screen grid?”
Concepts You Must Understand First
Stop and research these before coding:
- Raw terminal mode (termios)
- What does
ICANONdo? - Why does disabling
ECHOmatter? - Book Reference: “The Linux Programming Interface” Ch. 62
- What does
- ANSI escape sequences
- How do you move the cursor?
- How do you clear the screen?
- Book Reference: “The Linux Command Line” (terminal basics)
- Gap buffer or piece table
- Why is O(n) insertion slow?
- How does a gap buffer avoid shifts?
- Book Reference: “Data Structures the Fun Way” Ch. 8
- Finite state machines
- How do modes map to states?
- Book Reference: “Design Patterns” (State pattern)
Questions to Guide Your Design
Before implementing, think through these:
- Input handling
- How do you distinguish a raw ESC from an escape sequence?
- What is your timeout strategy for multi-byte sequences?
- Rendering
- Will you redraw the whole screen every frame or use diffs?
- How do you represent the visible viewport?
- Buffer model
- Are you storing text by lines or by bytes?
- What does your cursor represent (byte index vs row/col)?
Thinking Exercise
Manual State Machine Trace
Draw this on paper and trace these keystrokes:
NORMAL --i--> INSERT --Esc--> NORMAL
NORMAL --d--> OP_PENDING --w--> NORMAL (delete word)
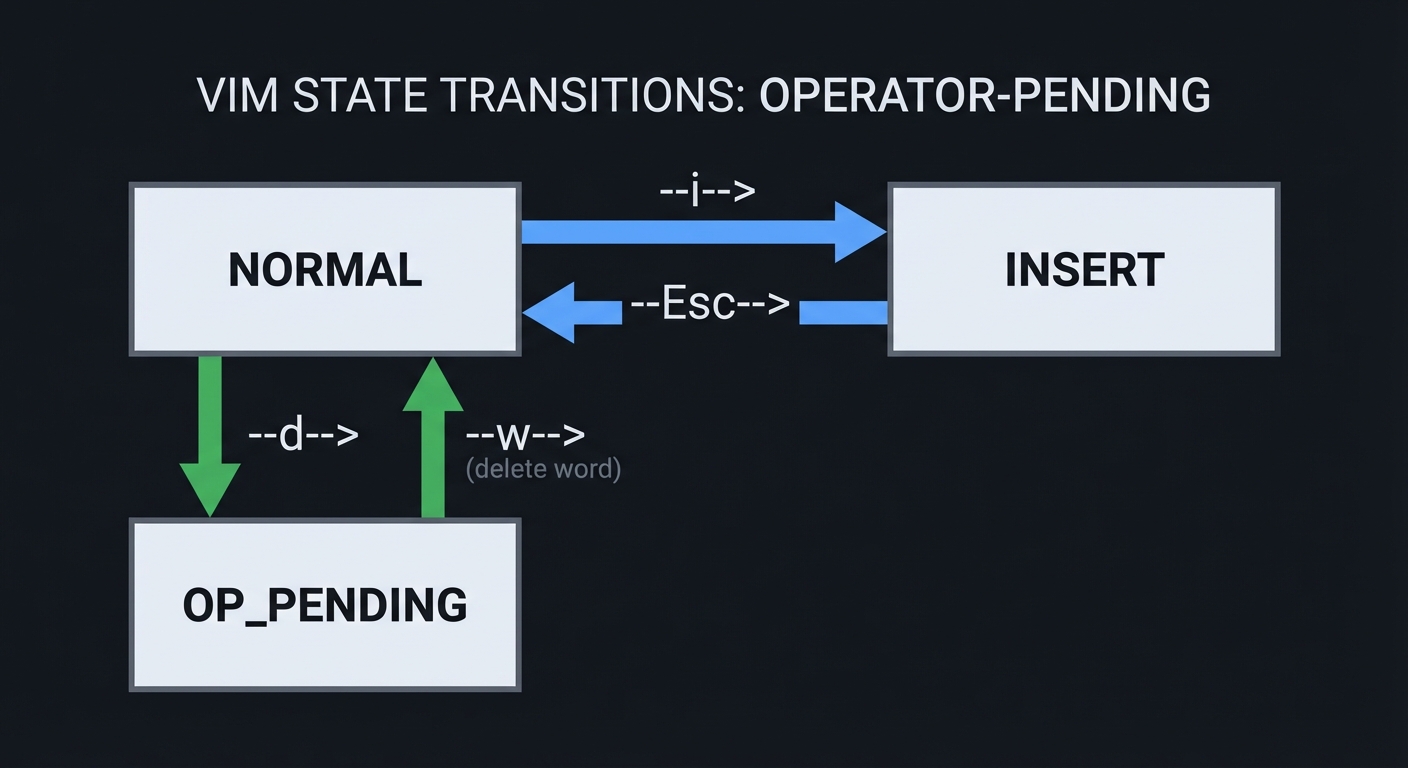
Questions:
- What happens if you press
dtwice? - Where do you store the pending operator?
The Interview Questions They’ll Ask
- Why use a gap buffer instead of a linked list of lines?
- What is the difference between canonical and raw terminal modes?
- How would you implement undo/redo efficiently?
- How would you handle files larger than RAM?
Hints in Layers
Hint 1: Raw mode first
raw.c_lflag &= ~(ICANON | ECHO);
Hint 2: Centralize state
Use a global EditorConfig struct for cursor, screen size, and rows.
Hint 3: Render into a buffer
Build one large string and write() once per frame.
Hint 4: Debug rendering Print the viewport row/col in the status bar to verify scrolling.
Books That Will Help
| Topic | Book | Chapter |
|---|---|---|
| Terminal IO | “The Linux Programming Interface” | Ch. 62 |
| Data structures | “Data Structures the Fun Way” | Ch. 8 |
| C programming | “C Programming: A Modern Approach” | Ch. 17 |
Common Pitfalls & Debugging
Problem 1: “Terminal is broken after exit”
- Why: You forgot to restore termios.
- Fix: Always restore in
atexit(). - Quick test: Run
stty -aafter exit and verify flags.
Problem 2: “Escape sequences appear as characters”
- Why: You are not parsing multi-byte sequences.
- Fix: Implement a small parser for ESC
[A/B/C/D.
Problem 3: “Cursor jumps incorrectly”
- Why: Cursor is stored as row/col but buffer indexing mismatches.
- Fix: Keep a consistent representation and convert carefully.
Definition of Done
- Raw mode works and is restored on exit
- Normal/Insert modes work correctly
- File load/save works
- Cursor movement and scrolling are correct
- Basic status line shows mode and file info
Project 2: Build a Neovim Plugin from Scratch (Lua)
- Main Programming Language: Lua
- Alternative Programming Languages: None (Lua is native)
- Coolness Level: Level 7 - Real plugin with UI polish
- Business Potential: 6/10 - Plugin ecosystem is huge
- Difficulty: Level 3 - Intermediate
- Knowledge Area: Neovim Lua API
- Software or Tool: Neovim plugin system
- Main Book: “Practical Vim” by Drew Neil
What you’ll build: A “Focus Mode” plugin that dims inactive windows, highlights the current paragraph, and shows a floating status widget.
Why it teaches Neovim internals: It forces you to use autocommands, namespaces, extmarks, and window configuration - the core UI primitives.
Core challenges you’ll face:
- Managing state across events
- Using extmarks without slowing the editor
- Creating floating windows that stay positioned
Real World Outcome
You install your plugin in ~/.config/nvim/lua/focus/ and run :FocusMode.
What you will see:
- Active window remains bright; others dim.
- Current paragraph is highlighted.
- A floating box in the corner shows session time and WPM.
Command Line Outcome Example:
# Start Neovim with plugin
$ nvim notes.md

# In Neovim:
:FocusMode

# Screen effect:
# - NormalNC highlight dims inactive windows
# - Floating stats box shows:
#   "Focus: 12:30" and "WPM: 47"

# Failure case: Missing namespace
# Error: "FocusMode: namespace not created"
The Core Question You’re Answering
“How do I hook into Neovim’s event loop to update UI in response to cursor movement and window changes without rewriting the editor core?”
Concepts You Must Understand First
- Lua API (
vim.api)- How to call Neovim functions from Lua?
- Book Reference: “Programming in Lua” Ch. 1-4
- Autocommands
- Which events should trigger redraw?
- Book Reference: “Practical Vim” Ch. 12
- Extmarks and namespaces
- How do extmarks survive edits?
- Book Reference: Neovim
:help extmarks
- Floating windows
- How do you place a float relative to the editor grid?
- Book Reference: Neovim API docs (
nvim_open_win)
Questions to Guide Your Design
- What events should toggle highlights? (
CursorMoved,WinEnter?) - Where will you store plugin state (module-local table)?
- How will you avoid running heavy logic on every cursor move?
Thinking Exercise
Draw a timeline of events when the cursor moves rapidly. When should you recalculate WPM? When should you redraw the float?
The Interview Questions They’ll Ask
- What is the difference between
vim.apiandvim.fn? - How do namespaces prevent highlight conflicts?
- Why can autocommands cause lag?
Hints in Layers
Hint 1: Start with a toggle
local M = { enabled = false }
function M.toggle() M.enabled = not M.enabled end
Hint 2: Use NormalNC
Change NormalNC highlight group for inactive windows.
Hint 3: Use extmarks for paragraph highlight
Set extmarks on line range with hl_group.
Hint 4: Float positioning
Use relative='editor' with fixed row/col.
Books That Will Help
| Topic | Book | Chapter |
|---|---|---|
| Lua language | “Programming in Lua” | Ch. 1-4 |
| Vim workflow | “Practical Vim” | Ch. 12 |
Common Pitfalls & Debugging
Problem 1: “Highlights flicker”
- Why: You clear and re-add extmarks too frequently.
- Fix: Only update on meaningful events, debounce.
Problem 2: “Floating window disappears”
- Why: Buffer was wiped by GC.
- Fix: Set
bufhidden=wipeand keep handle.
Definition of Done
- Plugin loads with
require('focus').setup() :FocusModetoggles correctly- Extmarks update on cursor movement
- Float stays positioned on resize
Project 3: Build a Neovim GUI Client
- Main Programming Language: Rust (recommended)
- Alternative Programming Languages: Python, C++, Go
- Coolness Level: Level 10 - You built your own Neovim UI
- Business Potential: 7/10 - Custom editor frontends
- Difficulty: Level 5 - Expert
- Knowledge Area: RPC, UI rendering
- Software or Tool: Neovim UI protocol
- Main Book: “The Linux Programming Interface” (IO multiplexing)
What you’ll build: A GUI application that embeds Neovim and renders its grid protocol into a custom window.
Why it teaches Neovim internals: It forces you to implement the UI protocol, grid model, and async IO handling.
Core challenges you’ll face:
- Parsing MessagePack-RPC streams
- Rendering a grid of styled cells
- Handling
flushand resize events correctly
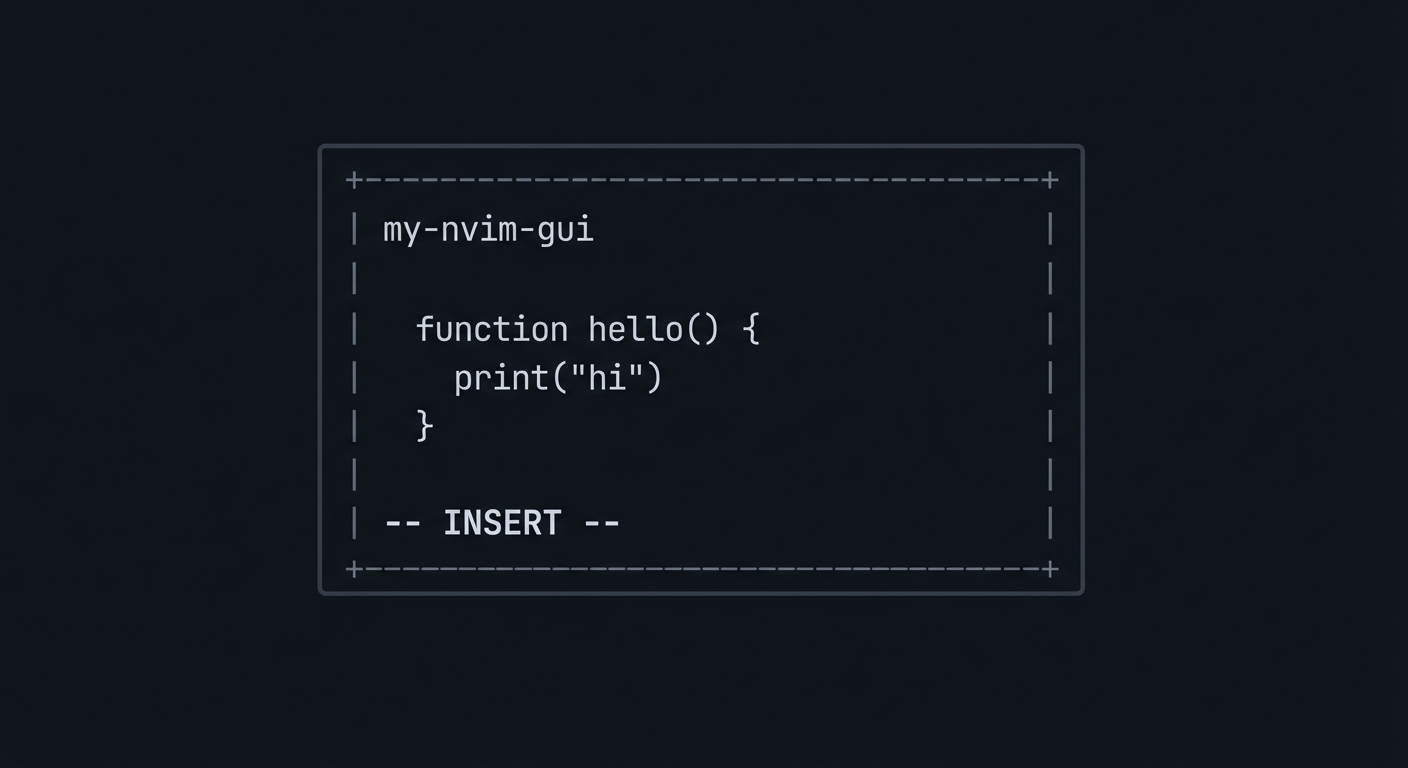
Real World Outcome
You run ./my-nvim-gui, and a window appears that behaves like Neovim.
What you will see:
- A monospace grid with editable text.
- Cursor movement and insert mode.
- UI updates triggered by Neovim RPC events.
Command Line Outcome Example:
# 1. Start Neovim embedded
$ ./my-nvim-gui
[info] spawn: nvim --embed
[info] rpc: nvim_ui_attach(120, 40, {ext_linegrid=true})

# 2. Log of redraw events
[redraw] grid_line grid=1 row=0 col=0 "Hello" hl=0
[redraw] flush

# Failure case: missing flush handling
[warn] skipped flush -> screen shows partial state
ASCII wireframe:
+--------------------------------------------------+
| my-nvim-gui                                      |
|                                                  |
|  function hello() {                              |
|    print("hi")                                   |
|  }                                               |
|                                                  |
| -- INSERT --                                     |
+--------------------------------------------------+
The Core Question You’re Answering
“How can a separate UI process render Neovim’s internal state using only RPC events, while staying responsive and consistent?”
Concepts You Must Understand First
- MessagePack-RPC
- How are requests/responses encoded?
- Book Reference: Neovim API docs
- UI linegrid events
- What is
grid_lineandflush? - Book Reference: Neovim UI protocol docs
- What is
- Event loops
- How do you multiplex IO and UI events?
- Book Reference: TLPI Ch. 63
Questions to Guide Your Design
- How will you store the grid (2D array of cells)?
- How will you map highlight IDs to colors?
- How will you handle resize events and redraws?
Thinking Exercise
Write a mock RPC client that prints grid_line events to stdout. Then draw the screen on paper from those events.
The Interview Questions They’ll Ask
- Why does the UI protocol send redraw batches with
flush? - How would you handle multi-grid windows?
- What makes MessagePack more efficient than JSON here?
Hints in Layers
Hint 1: Start with logging Log every incoming MessagePack event before rendering.
Hint 2: Build a grid model
Use a Vec<Vec<Cell>> with text + highlight id.
Hint 3: Render in batches
Only present after flush.
Hint 4: Ignore advanced UI Skip multigrid, popupmenu, and external widgets at first.
Books That Will Help
| Topic | Book | Chapter |
|---|---|---|
| IO multiplexing | “The Linux Programming Interface” | Ch. 63 |
| RPC concepts | “Computer Networks” | Ch. 2 |
Common Pitfalls & Debugging
Problem 1: “UI flickers”
- Why: You redraw on every event, not on
flush. - Fix: Buffer changes until flush.
Problem 2: “Grid desync”
- Why: Ignored
grid_resizeevents. - Fix: Resize grid on
grid_resize.
Definition of Done
nvim_ui_attachworks- grid_line and flush events render correctly
- Cursor position updates
- Resize works without crash
Project 4: Build a Tree-sitter Grammar
- Main Programming Language: JavaScript (Tree-sitter DSL)
- Alternative Programming Languages: None
- Coolness Level: Level 8 - You built a parser used by the editor
- Business Potential: 5/10 - Language tooling foundation
- Difficulty: Level 4 - Advanced
- Knowledge Area: Parsing and grammars
- Software or Tool: Tree-sitter
- Main Book: “Engineering a Compiler”
What you’ll build: A Tree-sitter grammar and query files for a custom language.
Why it teaches Neovim internals: It exposes how Neovim gets structural syntax highlighting and folding.
Core challenges you’ll face:
- Defining a grammar with minimal ambiguity
- Handling error recovery
- Writing highlight queries
Real World Outcome
You will create a grammar tree-sitter-xyl and install it in Neovim.
What you will see:
- Syntax highlighting for your language.
- Correct folding of nested structures.
- Error highlighting without breaking the whole file.
Command Line Outcome Example:
$ tree-sitter parse examples/sample.xyl
(program
  (function_declaration
    name: (identifier)
    parameters: (parameters ...)
    body: (block ...)))

# Failure case: ambiguous grammar
Error: Unresolved conflict for symbol "expression"
Exit code: 1
The Core Question You’re Answering
“How do we define a language formally so the editor can understand it in real time?”
Concepts You Must Understand First
- Context-free grammars
- What is a production rule?
- Book Reference: “Engineering a Compiler” Ch. 2
- Tree-sitter DSL
- How do you define tokens and precedence?
- Book Reference: Tree-sitter docs
- Queries and captures
- How do queries map nodes to highlights?
- Book Reference: Neovim Treesitter docs
Questions to Guide Your Design
- What are the core syntactic forms in your language?
- Where is ambiguity likely (expressions, operators)?
- What error recovery rules will keep the tree usable?
Thinking Exercise
Design a grammar for a TODO list format and list the AST nodes you would want to highlight.
The Interview Questions They’ll Ask
- Why is incremental parsing critical for editors?
- How does Tree-sitter recover from errors?
- What is the difference between AST and CST?
Hints in Layers
Hint 1: Start with a minimal grammar
Define just program and statement.
Hint 2: Add precedence rules
Use prec.left and prec.right to resolve ambiguity.
Hint 3: Use tree-sitter parse
Validate with tree-sitter parse before Neovim integration.
Hint 4: Add queries last
Write highlights.scm after the grammar is stable.
Books That Will Help
| Topic | Book | Chapter |
|---|---|---|
| Parsing | “Engineering a Compiler” | Ch. 2-4 |
| Syntax trees | “Compilers: Principles and Practice” | Ch. 4 |
Common Pitfalls & Debugging
Problem 1: “Conflicts during generation”
- Why: Ambiguous grammar.
- Fix: Add precedence or explicit associativity.
Problem 2: “No highlighting”
- Why: Missing query file in
queries/<lang>/highlights.scm. - Fix: Ensure file is in runtimepath.
Definition of Done
- Grammar parses sample files
- Queries highlight keywords and identifiers
- Folding works
- Errors do not break highlighting
Project 5: Build an LSP Server
- Main Programming Language: Python or Rust
- Alternative Programming Languages: Go, C#, TypeScript
- Coolness Level: Level 9 - Your own language tooling backend
- Business Potential: 7/10 - Language tools are in demand
- Difficulty: Level 5 - Expert
- Knowledge Area: Protocol design, parsing
- Software or Tool: Language Server Protocol
- Main Book: “Computer Networks”
What you’ll build: A minimal LSP server for a small language that provides diagnostics and go-to-definition.
Why it teaches Neovim internals: It shows how Neovim communicates with external tooling through JSON-RPC.
Core challenges you’ll face:
- Implementing JSON-RPC framing
- Keeping document state synchronized
- Computing diagnostics efficiently
Real World Outcome
You run my-lsp-server and connect it to Neovim.
What you will see:
- Diagnostics appear as you type.
- Go-to-definition jumps to symbols.
Command Line Outcome Example:
# 1. Start server
$ ./my-lsp-server --stdio

# 2. LSP handshake (simplified)
Content-Length: 86

{"jsonrpc":"2.0","id":1,"method":"initialize","params":{}}

# 3. Failure case: malformed JSON
Content-Length: 10

{bad json}
Error: Parse error
Exit code: 2
The Core Question You’re Answering
“How do editors and language tools stay in sync so you can navigate and refactor code instantly?”
Concepts You Must Understand First
- JSON-RPC framing
- Why do we use
Content-Lengthheaders? - Book Reference: JSON-RPC spec
- Why do we use
- LSP lifecycle
- What happens between
initializeandshutdown? - Book Reference: LSP spec
- What happens between
- Symbol tables
- How do you resolve identifiers?
- Book Reference: “Engineering a Compiler” Ch. 5
Questions to Guide Your Design
- How will you store open documents and versions?
- How do you compute diagnostics incrementally?
- How do you handle multiple files?
Thinking Exercise
Write a fake JSON-RPC client that sends initialize and didOpen, then parse it manually.
The Interview Questions They’ll Ask
- What problem does LSP solve compared to editor-specific plugins?
- What is incremental text synchronization?
- How do you avoid re-parsing the entire file on each keystroke?
Hints in Layers
Hint 1: Start with diagnostics only Hardcode a simple rule and return one diagnostic.
Hint 2: Use a JSON parser Do not parse JSON manually.
Hint 3: Track document versions Reject out-of-order changes.
Hint 4: Log everything Write all incoming messages to a log file.
Books That Will Help
| Topic | Book | Chapter |
|---|---|---|
| Networking basics | “Computer Networks” | Ch. 2 |
| Parsing | “Engineering a Compiler” | Ch. 2-5 |
Common Pitfalls & Debugging
Problem 1: “Server hangs”
- Why: You are blocking on stdin reads.
- Fix: Use non-blocking IO or a buffered reader.
Problem 2: “Diagnostics out of sync”
- Why: You ignore document versioning.
- Fix: Track
textDocument.version.
Definition of Done
- LSP initialize/initialized handshake works
- Diagnostics appear in Neovim
- Go-to-definition works for simple symbols
- Server handles malformed input gracefully
Final Comprehensive Project: Build “NeoVim Lite”
- Main Programming Language: C + Lua
- Alternative Programming Languages: Rust + Lua
- Coolness Level: Level 10 - Full editor build
- Business Potential: 7/10 - Custom editor and tooling
- Difficulty: Level 5 - Expert
- Knowledge Area: Systems, UI, parsing, extensibility
- Software or Tool: Terminal UI + RPC + Tree-sitter
- Main Book: “The Craft of Text Editing” by Craig Finseth
What you’ll build: A complete modal editor with multiple buffers, split windows, command-line mode, Lua scripting, Tree-sitter-based highlighting, and an RPC API.
Why it teaches Neovim internals: This project forces you to integrate all subsystems - input, buffer, rendering, parsing, plugins, and RPC - into one coherent architecture.
Core challenges you’ll face:
- Preserving performance while layering features
- Isolating plugin crashes from the core
- Keeping rendering and parsing in sync
Real World Outcome
You run ./neovim-lite and get a fully interactive modal editor.
What you will see:
- Multiple buffers and split windows.
- Syntax highlighting from Tree-sitter.
- Lua commands executing at runtime.
- RPC requests controlling the editor.
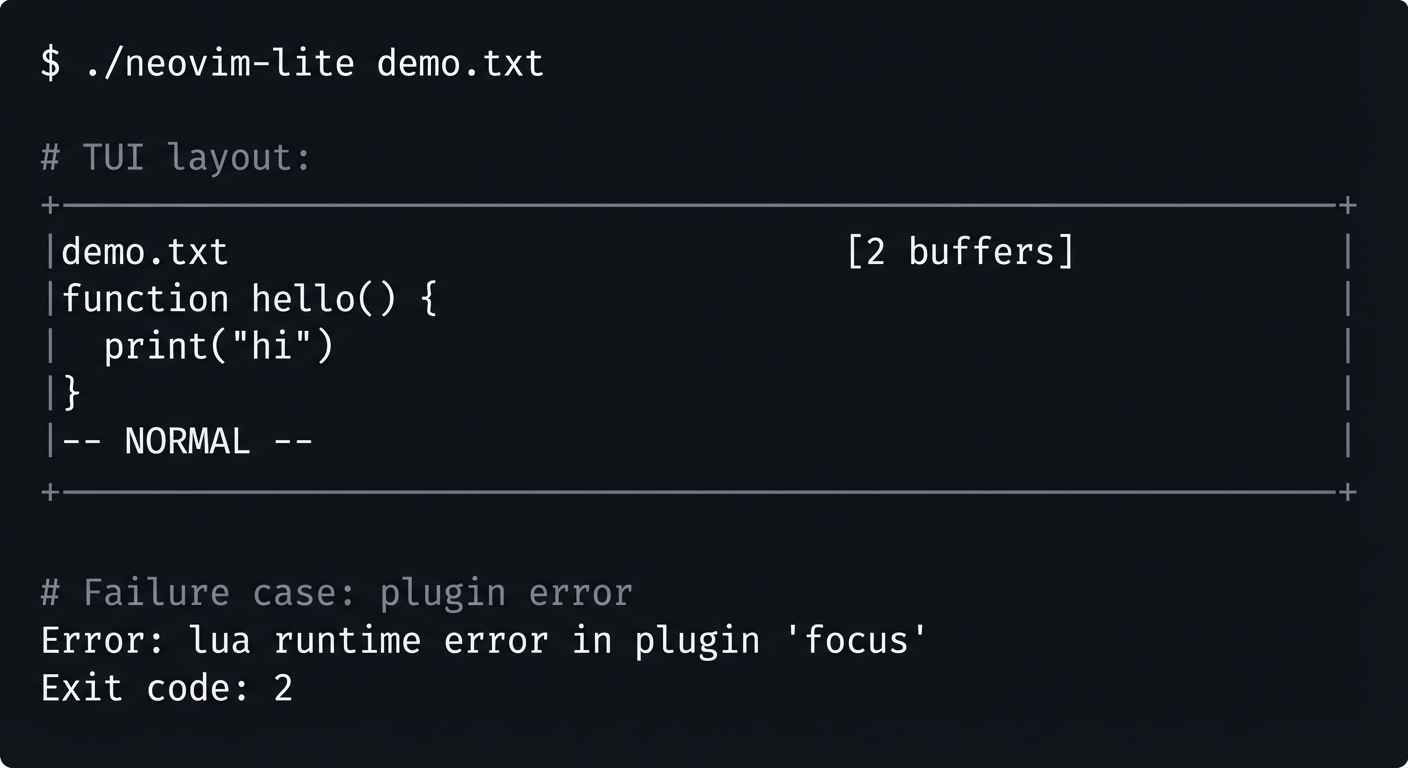
Command Line Outcome Example:
$ ./neovim-lite demo.txt

# TUI layout:
+----------------------------------------------------+
|demo.txt                                [2 buffers] |
|function hello() {                                 |
|  print(\"hi\")                                     |
|}                                                  |
|-- NORMAL --                                       |
+----------------------------------------------------+

# Failure case: plugin error
Error: lua runtime error in plugin 'focus'
Exit code: 2
The Core Question You’re Answering
“Can you synthesize all the isolated concepts into a single cohesive system that feels like a real editor?”
Concepts You Must Understand First
- Modal editing state machine
- How do operators and motions compose?
- Book Reference: “Design Patterns” (State pattern)
- Text buffer data structures
- Why is a gap buffer or piece table needed?
- Book Reference: “Data Structures the Fun Way” Ch. 8
- Tree-sitter integration
- How does incremental parsing work?
- Book Reference: “Engineering a Compiler” Ch. 2-4
- RPC protocol design
- How do you expose a safe API?
- Book Reference: “Computer Networks” Ch. 2
- Lua embedding
- How do you embed and expose functions safely?
- Book Reference: “Programming in Lua” Part IV
Questions to Guide Your Design
- Architecture: how will you split core, UI, and plugins?
- Plugin API: how much power do plugins get?
- Parsing: how do you keep Tree-sitter synchronized with edits?
- Rendering: how do you avoid flicker under heavy updates?
Thinking Exercise
Draw an architecture diagram and mark where Tree-sitter and RPC plug in. Label which layer owns which data structures.
The Interview Questions They’ll Ask
- What was the hardest integration bug and how did you solve it?
- How did you ensure performance while keeping extensibility?
- What would you change if you rewrote the editor for concurrency?
- How did you prevent plugins from corrupting core state?
Hints in Layers
Hint 1: Build buffer + window first. Hint 2: Add TUI rendering next. Hint 3: Add Lua plugin runtime early. Hint 4: Add RPC UI last.
Books That Will Help
| Topic | Book | Chapter |
|---|---|---|
| Text editors | “The Craft of Text Editing” | All |
| Architecture | “Clean Architecture” | Ch. 18 |
| Lua C API | “Programming in Lua” | Part IV |
Common Pitfalls & Debugging
Problem 1: “Rendering and parser desync”
- Why: Edits are applied without updating CST.
- Fix: Update Tree-sitter on each edit.
- Quick test: Edit a line and confirm highlights change.
Problem 2: “Plugins crash the editor”
- Why: Unprotected Lua calls.
- Fix: Wrap plugin calls with error handling.
Definition of Done
- Multiple buffers and windows work
- Modes and commands function correctly
- Tree-sitter highlighting is stable
- Lua scripts run without crashing core
- RPC API can control the editor