Project 14: Interactive Menu System and Wizard
Build a full-screen interactive wizard for configuring tools and workflows.
Quick Reference
| Attribute | Value |
|---|---|
| Difficulty | Level 2: Intermediate |
| Time Estimate | 1-2 weeks |
| Language | Bash (Alternatives: Python, Go) |
| Prerequisites | Project 6, familiarity with ANSI codes and raw input |
| Key Topics | TUI input handling, state machines, menus, UX design |
1. Learning Objectives
By completing this project, you will:
- Build an interactive terminal UI with menus and prompts.
- Handle raw keyboard input and navigation.
- Implement a state machine for wizard flow.
- Validate user inputs and show errors.
- Persist configuration results to file.
2. Theoretical Foundation
2.1 Core Concepts
- Terminal raw mode: Capture keystrokes without Enter.
- ANSI cursor control: Layout control and screen redraws.
- State machines: Multi-step wizard flows.
- Input validation: Prevent invalid configurations.
- User experience: Clear prompts and confirmations.
2.2 Why This Matters
Many CLI tools rely on interactive setup (SSH, AWS, kubectl). A robust wizard improves usability and reduces configuration errors.
2.3 Historical Context / Background
Before GUIs were common, TUIs were the primary configuration interface. Tools like whiptail and dialog still provide this today.
2.4 Common Misconceptions
- “TUIs are easy.” Input and redraw logic is non-trivial.
- “Menus are just printing.” Navigation and state handling are essential.
3. Project Specification
3.1 What You Will Build
A wizard CLI that guides users through configuration (selecting environment, output format, and optional modules) and writes a config file.
3.2 Functional Requirements
- Main menu: select options with arrow keys.
- Wizard flow: multi-step prompts with back/next.
- Validation: ensure valid inputs before continuing.
- Preview: show summary before saving.
- Persistence: write config file with chosen values.
3.3 Non-Functional Requirements
- Usability: clear instructions and feedback.
- Reliability: restore terminal state on exit.
- Portability: work on common terminals.
3.4 Example Usage / Output
$ wizard
[Wizard] Select environment:  [dev] [staging] [prod]
3.5 Real World Outcome
You provide a polished interactive setup experience, similar to git config --global or cloud CLI setup flows.
4. Solution Architecture
4.1 High-Level Design
input loop -> state machine -> renderer -> config output
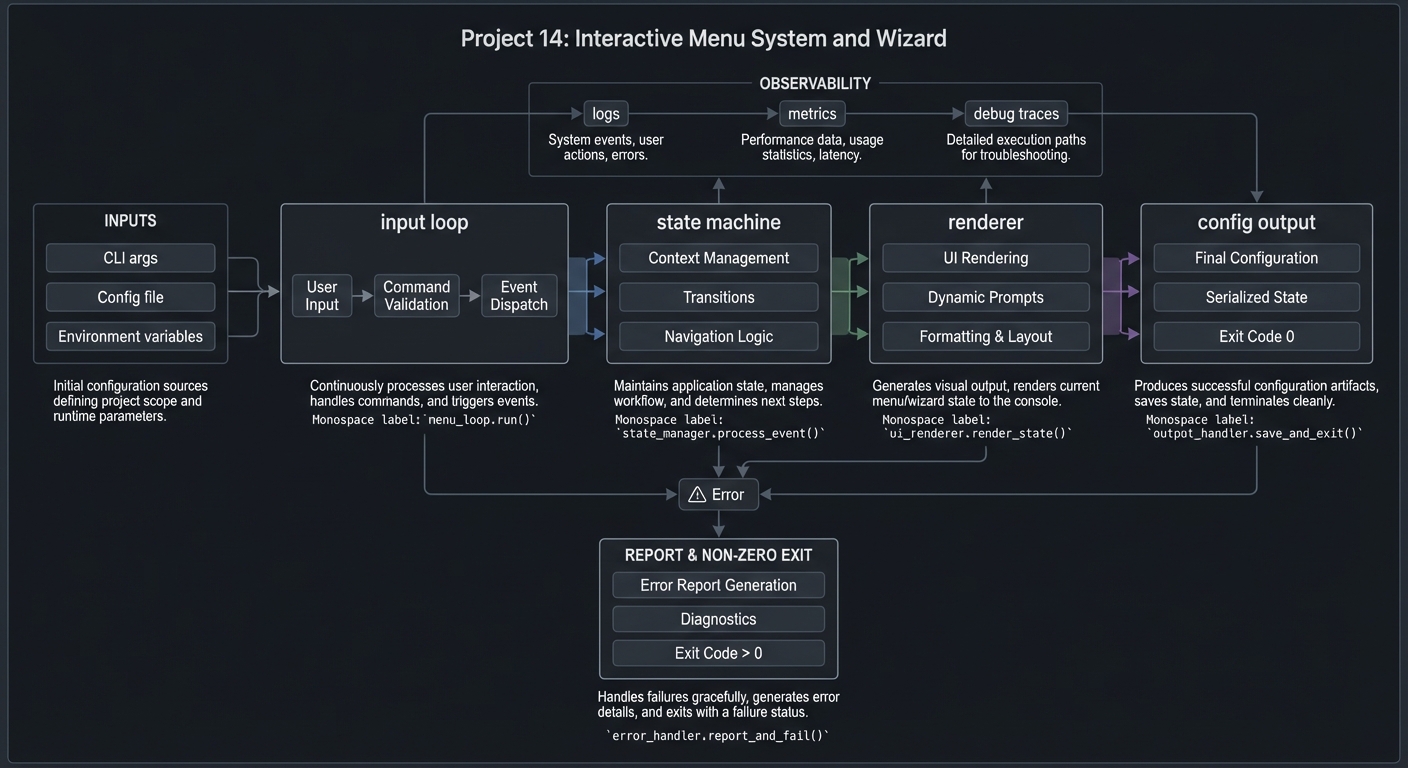
4.2 Key Components
| Component | Responsibility | Key Decisions |
|---|---|---|
| Input handler | Capture keystrokes | raw mode |
| Renderer | Draw menus and prompts | full redraw |
| State machine | Track wizard steps | enum states |
| Config writer | Persist result | JSON/INI |
4.3 Data Structures
STATE=select_env
CONFIG[env]=prod
CONFIG[format]=json
4.4 Algorithm Overview
Key Algorithm: Wizard Loop
- Render current screen.
- Read key input.
- Update state based on input.
- Repeat until completion.
Complexity Analysis:
- Time: O(steps) per interaction
- Space: O(options)
5. Implementation Guide
5.1 Development Environment Setup
brew install bash
5.2 Project Structure
wizard/
|-- wizard
|-- lib/
|   |-- input.sh
|   |-- render.sh
|   `-- state.sh
`-- config/

5.3 The Core Question You Are Answering
“How can I build a delightful terminal wizard that feels like a GUI?”
5.4 Concepts You Must Understand First
- Raw input handling
- Cursor positioning
- State machine design
5.5 Questions to Guide Your Design
- How do you handle resize events?
- How do you persist state when a user goes back?
- How do you validate inputs in a TUI?
5.6 Thinking Exercise
Sketch the wizard screens and transitions before coding.
5.7 The Interview Questions They Will Ask
- Why is raw mode required for arrow keys?
- How do you ensure terminal state is restored?
- How do you model wizard steps?
5.8 Hints in Layers
Hint 1: Start with a static menu rendered once.
Hint 2: Add input handling for up/down keys.
Hint 3: Add a state machine for multi-step flow.
Hint 4: Add preview and confirmation screen.
5.9 Books That Will Help
| Topic | Book | Chapter |
|---|---|---|
| Terminal UI | “The Linux Command Line” | Ch. 32 |
| State machines | “Designing Data-Intensive Applications” (concepts) | Models |
5.10 Implementation Phases
Phase 1: Basic Menu (3-4 days)
Goals:
- Render menu and capture input.
Tasks:
- Draw menu in terminal.
- Handle arrow navigation.
Checkpoint: Menu selection works.
Phase 2: Wizard Flow (3-4 days)
Goals:
- Multiple steps with back/next.
Tasks:
- Add state machine.
- Add validation.
Checkpoint: Wizard completes successfully.
Phase 3: Persistence (2-3 days)
Goals:
- Write config file.
Tasks:
- Add preview screen.
- Write config file.
Checkpoint: Config file matches selections.
5.11 Key Implementation Decisions
| Decision | Options | Recommendation | Rationale |
|---|---|---|---|
| UI rendering | full redraw vs diff | full redraw | simpler |
| Config format | JSON vs INI | INI | easy to read |
| Input method | read -rsn1 vs stty | stty | more control |
6. Testing Strategy
6.1 Test Categories
| Category | Purpose | Examples |
|---|---|---|
| Unit | state transitions | step logic |
| Integration | input sequences | simulate keys |
| Edge Cases | resize handling | terminal resize |
6.2 Critical Test Cases
- Arrow navigation works across menu edges.
- Cancel restores terminal state.
- Config file created correctly.
6.3 Test Data
fixtures/config_expected.ini
7. Common Pitfalls and Debugging
7.1 Frequent Mistakes
| Pitfall | Symptom | Solution |
|---|---|---|
| Not restoring terminal | shell broken | trap cleanup |
| Input reads block | UI freezes | non-blocking read |
| Flicker | messy UI | buffer render |
7.2 Debugging Strategies
- Add debug mode to print key codes.
- Use
stty -ato confirm raw mode.
7.3 Performance Traps
Redrawing too frequently causes flicker; throttle updates.
8. Extensions and Challenges
8.1 Beginner Extensions
- Add color themes.
- Add help tooltips.
8.2 Intermediate Extensions
- Add mouse support (if terminal allows).
- Add progress indicators.
8.3 Advanced Extensions
- Build a form engine with multiple inputs.
- Add real-time validation.
9. Real-World Connections
9.1 Industry Applications
- Installer wizards for CLIs.
- Interactive onboarding for DevOps tools.
9.2 Related Open Source Projects
- dialog: classic TUI tool.
- whiptail: lightweight wizard UI.
9.3 Interview Relevance
- Shows knowledge of terminal input and UX.
- Demonstrates state machine design.
10. Resources
10.1 Essential Reading
man stty,man tput
10.2 Video Resources
- “Terminal UI Basics” (YouTube)
10.3 Tools and Documentation
dialog,whiptail
10.4 Related Projects in This Series
- Project 6: System Monitor
- Project 15: Mini Shell
11. Self-Assessment Checklist
11.1 Understanding
- I can explain raw vs canonical input.
- I can model wizard flow states.
11.2 Implementation
- Menu navigation works with arrow keys.
- Config file matches selections.
11.3 Growth
- I can extend the wizard with new screens.
12. Submission / Completion Criteria
Minimum Viable Completion:
- Interactive menu with selection
Full Completion:
- Multi-step wizard + config save
Excellence (Going Above & Beyond):
- Form engine + real-time validation