Project 8: Science Explorer Mini-Lab
Build a mini-lab with simple simulations that encourage safe exploration.
Quick Reference
| Attribute | Value |
|---|---|
| Difficulty | Level 3 (Advanced) |
| Time Estimate | 2-4 weeks |
| Main Programming Language | Swift (Alternatives: Objective-C, C# Unity, JavaScript React Native) |
| Alternative Programming Languages | Objective-C, C# Unity, JavaScript React Native |
| Coolness Level | Level 4 (Hardcore Tech Flex) |
| Business Potential | Level 2 (Micro-SaaS / Pro Tool) |
| Prerequisites | Projects 2-5 concepts |
| Key Topics | Simulation design, sandbox UX, performance |
1. Learning Objectives
By completing this project, you will:
- Design safe, bounded simulations for kids.
- Balance realism with simplicity for learning.
- Build a sandbox UX that invites exploration.
- Maintain smooth performance with multiple interactive elements.
2. All Theory Needed (Per-Concept Breakdown)
Safe Sandbox Simulation Design
Fundamentals
A sandbox is an environment where the child can explore without fear of failure. In a science mini-lab, the goal is to make scientific concepts tangible while keeping the system safe and predictable. The simulations must be simplified so they are understandable, but not so simplified that they mislead. This balance is the core design challenge.
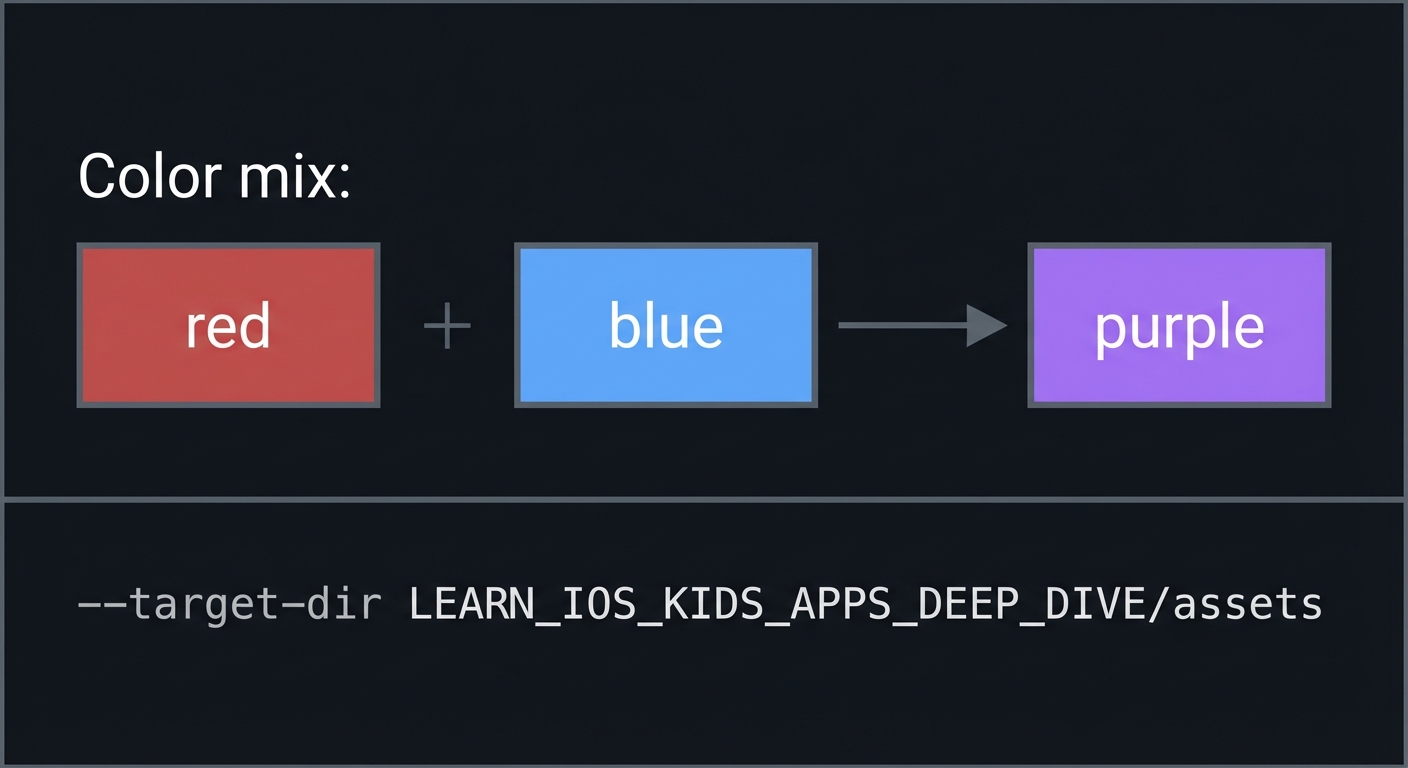
In a kids app, the simulation is not a physics engine; it is a learning tool. You choose which behaviors to model and which to approximate. For example, in a color-mixing experiment, you can use simple additive blending rather than complex light physics. The important part is that the result matches the expected concept: red plus blue makes purple.
The sandbox must have boundaries. Without boundaries, children can create chaotic states that are confusing or frustrating. Boundaries include limits on the number of objects, reset buttons, and clear visual cues about what is interactive. These boundaries allow exploration without overwhelm.
Exploration is a core learning behavior for children. The interface should invite curiosity by making interactive elements obvious and safe. Large objects, clear boundaries, and gentle prompts signal that it is okay to experiment.
The experiments should be short and self-contained. A child should be able to understand what happened within a few interactions. Long, complex chains of actions are more appropriate for older learners, not for a kids mini-lab.
Another fundamental is visual explanation. If a concept is not visible, it will not be learned. For example, if you want to show magnet attraction, the magnets should visibly move toward each other. If you want to show gravity, the falling object should be clearly visible and not hidden behind effects.
Each experiment should have a single take-away concept. If an experiment tries to teach multiple ideas at once, the child may not retain any. Keep each module focused: colors for mixing, gravity for falling, magnets for attraction and repulsion.
Guided exploration can be achieved with micro-prompts. A short prompt at the start, like “Try dropping a ball,” gives the child an entry point. You can then fade the prompt out to encourage exploration. This is a subtle scaffolding technique that respects autonomy.
The lab should communicate what is interactive. Use simple affordances like a subtle glow or bounce to indicate draggable objects. Without these cues, children may not know where to start, which reduces engagement.
Keep the number of controls low. A reset button and a short prompt are usually enough. Too many buttons turn exploration into menu navigation.
Use consistent iconography for actions like reset or back. When children learn a symbol in one experiment, they should recognize it in another. This reduces cognitive load and makes the lab feel cohesive.
Use short, friendly labels for experiments, such as “Colors” or “Gravity.” Short labels reduce reading demands and make navigation easier.
Clear labels and icons make it easy for children to understand which experiment they are using.
Short labels and icons should be consistent across all experiments.
Deep Dive into the Concept
Simulation design for kids has three core constraints: clarity, safety, and responsiveness. Clarity means the child can see the cause and effect of their actions. Safety means they cannot break the simulation or reach unintended states. Responsiveness means the system reacts instantly and smoothly to input.
Start by defining the learning objective for each experiment. For example: “Mixing primary colors produces secondary colors.” Then define the smallest interactive elements that express this objective. For color mixing, that might be three draggable color droplets and a mixing area. For gravity, it might be a ball and a floor. For magnets, it might be two magnets with attraction and repulsion zones. Each experiment should have only a few moving parts.
Next, decide what to simulate and what to fake. For gravity, you might simulate a simple bounce with a fixed damping factor. You do not need full physics equations. For magnets, you can use a simple distance-based attraction or repulsion effect. The goal is to convey the concept, not to be scientifically exact. The key is to keep the behavior consistent. If the child sees a magnet sometimes attract and sometimes repel in unpredictable ways, they will be confused.
Boundaries are essential. Set a maximum number of objects. If the child can spawn unlimited objects, performance will drop and the screen will become chaotic. A safe limit might be 5-10 objects. Provide a reset button that clears the experiment. The reset should be easy to find and should work instantly.
Feedback should be immediate and multi-sensory. For example, in a magnet experiment, when two magnets attract, you can add a subtle sound and a gentle vibration. But keep feedback minimal; too much noise distracts. The emphasis should remain on the visual cause-and-effect.
The sandbox UX should invite exploration. Provide a short, simple voice prompt at the start of each experiment: “Drag the colors into the circle to mix them.” This gives the child a starting point without over-explaining. You can also include a simple “Did you notice?” summary after a few interactions to reinforce the concept.
Performance is a major technical constraint. Simulations can be expensive, especially if you add animations or physics. You should keep the object count low and reuse assets. Avoid heavy gradients or large textures. If you use a 2D engine, keep the scene graph shallow. For SwiftUI, you can still create simple animations, but avoid complex layered effects.
Testing is also important. The child can create unusual states, such as dragging objects to the edge or stacking them. You must ensure the simulation still behaves sensibly. This is a form of edge case testing: what happens if two magnets are placed on top of each other? What happens if a ball is dropped from the same spot repeatedly? These cases should not crash or behave erratically.
Finally, the sandbox should end with a sense of closure. A simple “Try another experiment” button or a summary card helps the child transition. This is part of the learning loop: explore, discover, summarize, move on. Without a summary, the concept might not stick.
Simulation rules should be deterministic. If the same action produces different results, the child cannot build a mental model. Determinism is also critical for debugging. This is why you should avoid random noise or unpredictable physics unless it is part of the learning goal.
Performance budgets are practical constraints. Decide how many objects and how many animations can run without dropping frames. Use simple shapes and textures. Avoid heavy particle effects. If you use audio feedback, keep it short and consistent to avoid overlapping sounds.
You should also include a short summary cue after the child has interacted a few times. For example, after mixing colors, show a small card that says “Red + Blue makes Purple.” This reinforces the concept without turning the experience into a lesson.
Testing with edge cases matters. What happens if the child drags an object rapidly across the screen? What happens if they try to stack objects? These tests ensure the sandbox remains stable and safe.
Approximations should be transparent in behavior. If a magnet always attracts at a fixed distance, make that distance consistent. If you change it based on speed or position, the child may not understand the rule. Consistent rules help the child form a mental model.
Consider adding a small “explain” button that shows a one-line summary after a few interactions. This keeps exploration primary but reinforces learning. The summary should be optional and non-intrusive.
Each experiment should have a known “golden behavior” you can test. For example, in the gravity experiment, dropping a ball from the top should always result in three visible bounces before settling. This gives you a deterministic test case and ensures the simulation remains consistent as you iterate.
If you include audio cues, ensure they are optional and not overwhelming. A single soft sound per interaction is enough. More sounds can create noise and distract from the visual learning goal.
Performance testing should include low-end devices, because educational apps are often used on older iPads. Optimize for smoothness rather than complex visuals. If you must choose, always favor responsiveness over visual richness.
You can also add a simple “safety rail” for interactions, such as snapping objects back into the visible area if dragged off-screen. This prevents lost objects and reduces confusion.
A small “why” label can be useful for parents. For example, a parent zone could show a one-line description of what each experiment teaches. This adds transparency without changing the child experience.
If you reuse assets across experiments, be careful that an object does not imply a wrong concept. For example, a magnet icon should not appear in the color mixing experiment. Consistency between visuals and concepts builds trust.
Use consistent timing for animations so results feel reliable. A stable rhythm helps children connect action and outcome.
Consistency in feedback colors helps children recognize effects quickly.
Short confirmations like a soft chime can reinforce successful interactions without distracting from visuals.
How this Fits in the Project
Each mini-lab experiment uses the same sandbox pattern: small number of objects, clear boundaries, immediate feedback, and a simple reset.
Definitions & Key Terms
- Sandbox: A safe environment for exploration with boundaries.
- Simulation: A simplified model of real-world behavior.
- Damping: A reduction factor that slows motion over time.
- Reset: A control that returns the experiment to its initial state.
- Cause-and-effect cue: Feedback that links action to result.
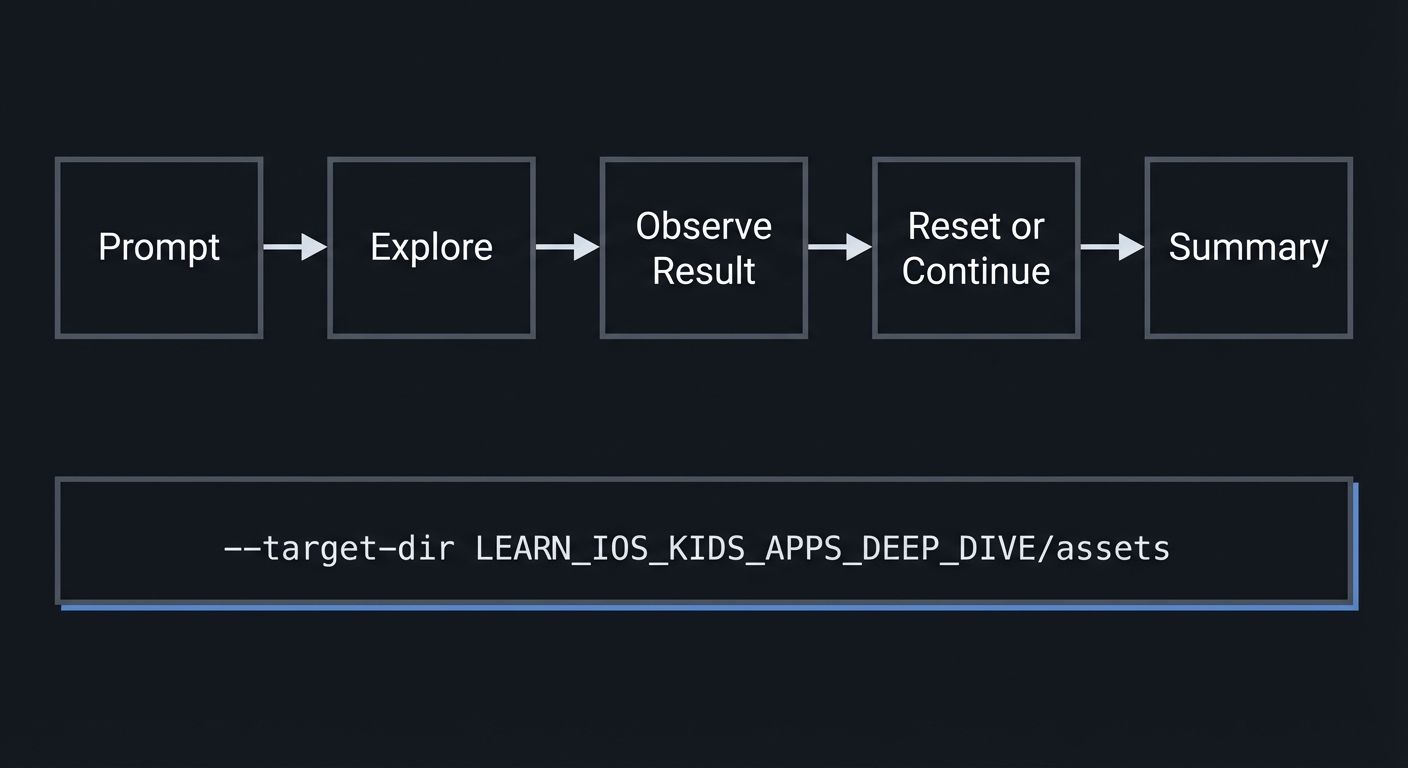
Mental Model Diagram (ASCII)
Prompt -> Explore -> Observe Result -> Reset or Continue -> Summary
How It Works (Step-by-Step)
- Present the experiment with a short prompt.
- Allow the child to manipulate objects.
- Show immediate visual results.
- Allow reset at any time.
- Provide a simple summary cue.
Invariants:
- The experiment never breaks or crashes.
- There is always a path back to a clean state.
Failure modes:
- Too many objects cause lag.
- Unclear feedback makes the concept invisible.
Minimal Concrete Example (Pseudocode)
STATE: objects, experimentMode

ON dragObject:
  UPDATE position
  APPLY simple rules (e.g., mix colors)

ON reset:
  CLEAR objects and restore defaults
Common Misconceptions
- “More realism is better.” Too much realism can confuse.
- “Kids do not need boundaries.” They need boundaries to explore safely.
- “One simulation is enough.” Multiple experiments reinforce learning.
Check-Your-Understanding Questions
- Why should a simulation be simplified for kids?
- How do boundaries improve learning?
- What is the risk of unlimited object creation?
Check-Your-Understanding Answers
- Simplicity makes cause-and-effect clearer.
- Boundaries prevent overwhelm and keep focus.
- Performance drops and the screen becomes chaotic.
Real-World Applications
- Science museum kiosk apps
- Classroom experiment simulators
- Educational game hubs
Where You Will Apply It
- In this project: see Section 3.7 Real World Outcome and Section 5.10 Implementation Phases.
- Also used in: Project 2 for interactive feedback.
References
- “Design It!” by Michael Keeling - Ch. 3
- Apple HIG for interactive content
Key Insight
A good sandbox is a controlled playground: simple rules, strong feedback, and clear boundaries.
Summary
Science simulations for kids should prioritize clarity over realism and keep interactions bounded and responsive.
Homework / Exercises to Practice the Concept
- Define three rules for a simple gravity experiment.
- Choose the maximum number of objects for each experiment and justify it.
- Sketch a reset button placement that is easy but not accidental.
Solutions to the Homework / Exercises
- Objects fall at constant speed, bounce with damping, stop after 3 bounces.
- Five objects to avoid clutter and keep performance stable.
- Place reset in a corner with a clear icon.
3. Project Specification
3.1 What You Will Build
A mini-lab with three experiments: color mixing, gravity drop, and magnet attraction/repulsion. Each experiment has a short prompt, interactive objects, and a reset button.
3.2 Functional Requirements
- Experiment selection: Choose between three experiments.
- Interactive objects: Drag or drop objects to see effects.
- Reset: Clear experiment state at any time.
- Summary: Short prompt or hint after interaction.
3.3 Non-Functional Requirements
- Performance: Smooth animations at all times.
- Reliability: Reset always restores defaults.
- Usability: Clear, large interactive elements.
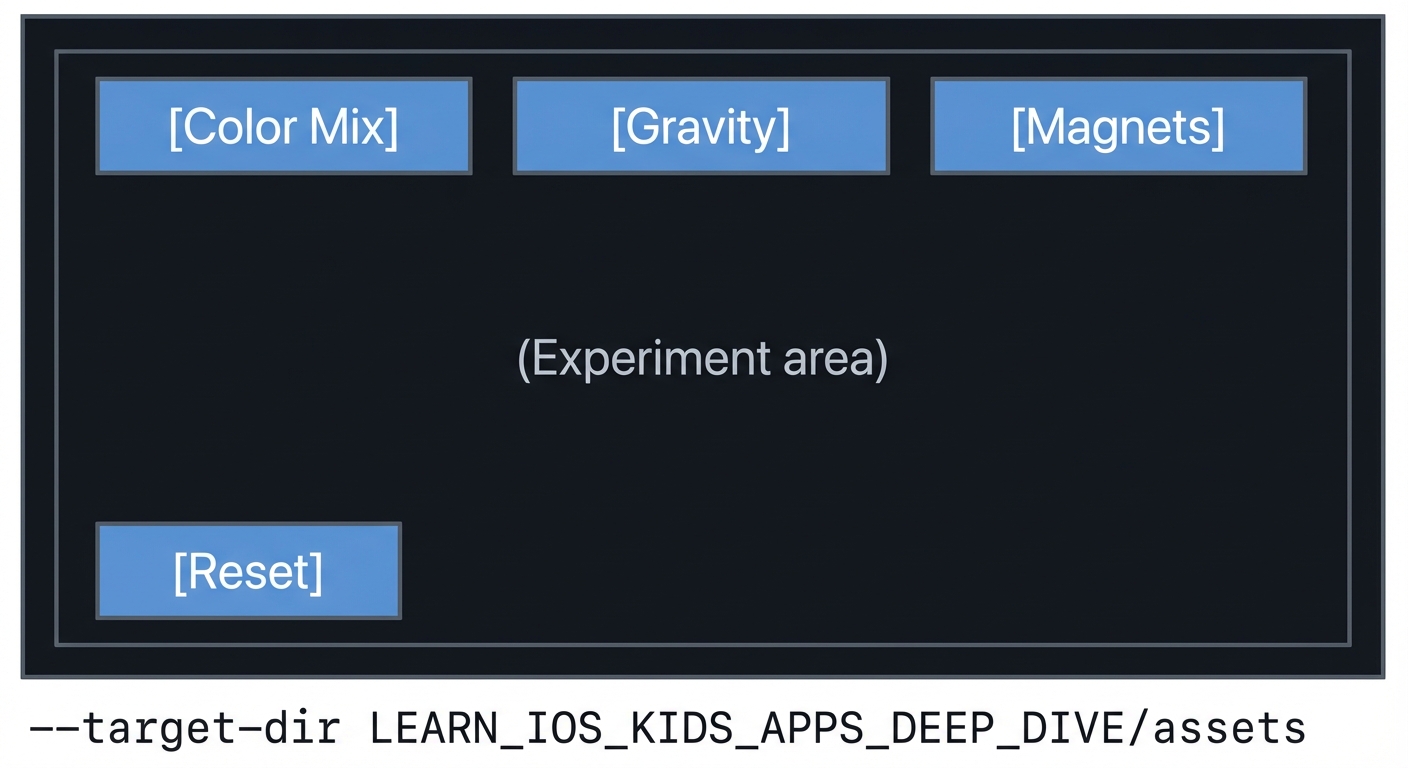
3.4 Example Usage / Output
ASCII wireframe:
+----------------------------------+
| [Color Mix] [Gravity] [Magnets]  |
|                                  |
|   (Experiment area)              |
|                                  |
| [Reset]                          |
+----------------------------------+
3.5 Data Formats / Schemas / Protocols
- Experiment: { id, objects, rules }
- Object: { type, position, state }
3.6 Edge Cases
- Too many objects spawned
- Objects dragged off screen
- Reset during animation
3.7 Real World Outcome
3.7.1 How to Run (Copy/Paste)
- Run on iPad simulator for larger workspace.
3.7.2 Golden Path Demo (Deterministic)
Scenario: Open color mix, drag red and blue droplets into circle.
Expected behavior:
- Mixed color appears as purple.
- A short sound confirms the mix.
3.7.3 Failure Demo (Deterministic)
Scenario: Spawn more than allowed objects.
Expected behavior:
- Additional objects are ignored.
- A gentle cue indicates the limit.
3.7.4 Mobile UI Details
- Experiment selection tabs at top.
- Large interactive area in center.
- Reset button in lower corner.
4. Solution Architecture
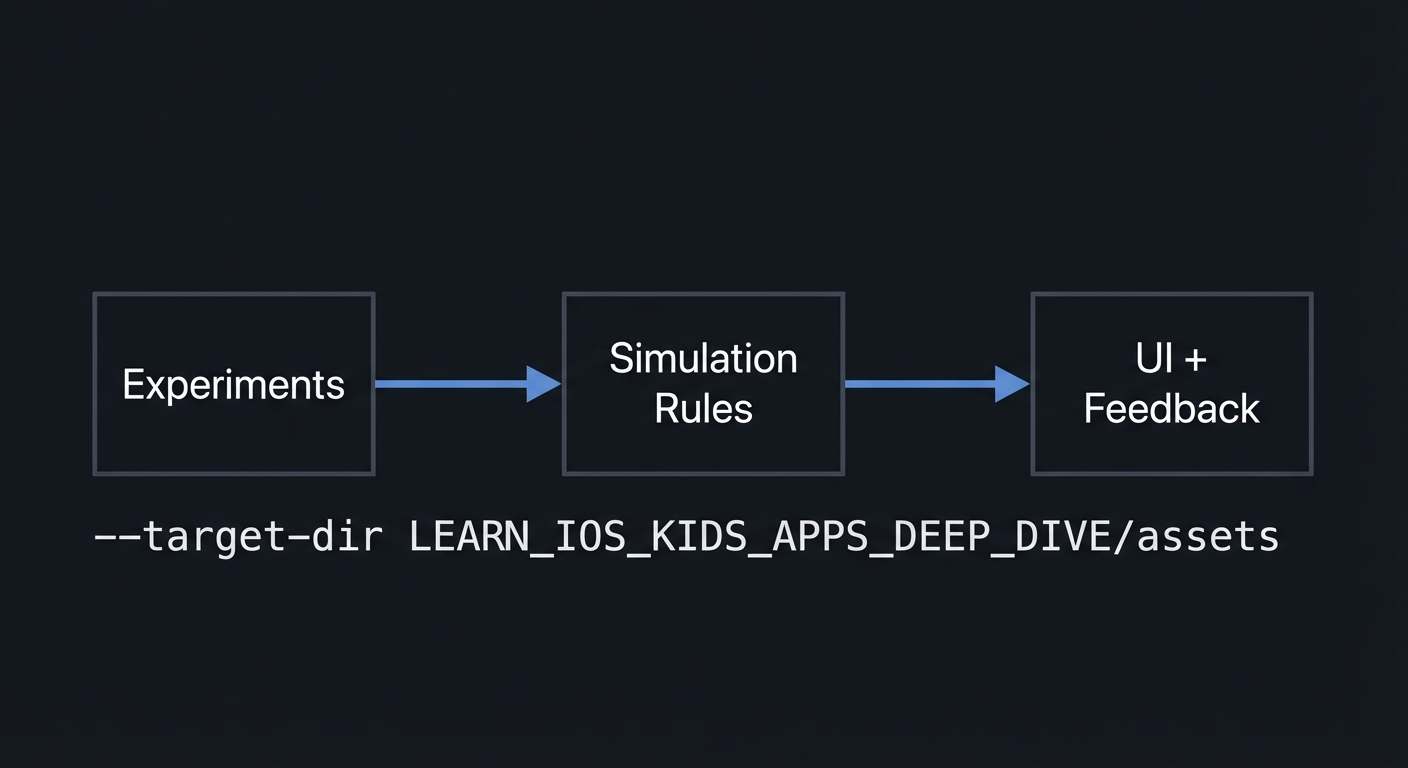
4.1 High-Level Design
+-------------+      +------------------+      +------------------+
| Experiments | ---> | Simulation Rules | ---> | UI + Feedback    |
+-------------+      +------------------+      +------------------+
4.2 Key Components
| Component | Responsibility | Key Decisions |
|---|---|---|
| Experiment Selector | Switch experiments | Tabs or tiles |
| Simulation Engine | Applies rules | Simple deterministic logic |
| Object Manager | Tracks objects | Limit counts |
4.3 Data Structures (No Full Code)
- ExperimentState: { active_experiment, objects }
- Object: { id, type, position, properties }
4.4 Algorithm Overview
Key Algorithm: Apply Rules
- Detect interaction (drag/drop).
- Apply experiment-specific rule.
- Update visuals immediately.
Complexity Analysis:
- Time: O(O) per interaction (O objects)
- Space: O(O) for object list
5. Implementation Guide
5.1 Development Environment Setup
xcodebuild -version
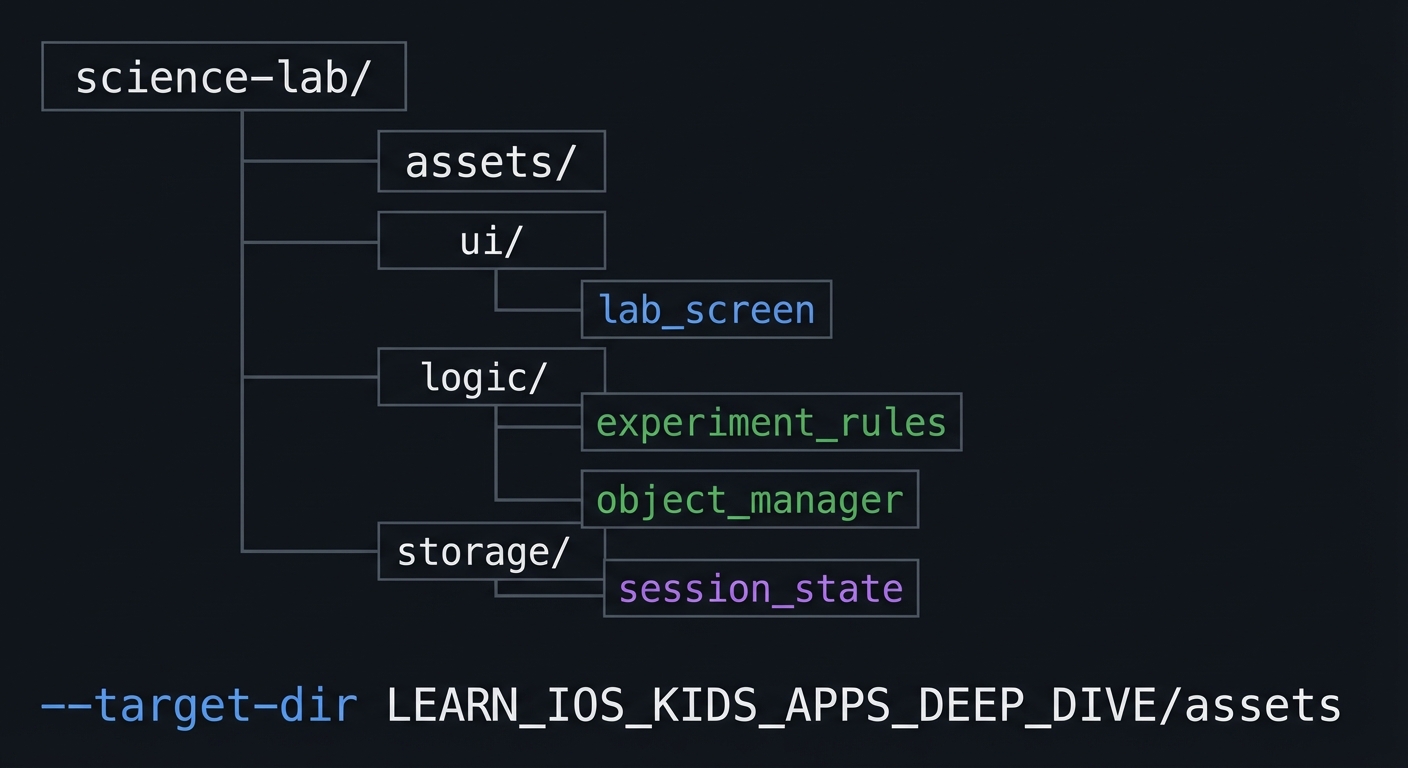
5.2 Project Structure
science-lab/
+-- assets/
+-- ui/
|   `-- lab_screen
+-- logic/
|   +-- experiment_rules
|   `-- object_manager
`-- storage/
    `-- session_state
5.3 The Core Question You’re Answering
“How can I let kids explore science without overwhelming them?”
5.4 Concepts You Must Understand First
- Simplified simulation
- What rules are essential vs optional?
- Book Reference: “Design It!” - Ch. 3
- Boundaries and resets
- How do you keep experiments safe and clear?
- Book Reference: “Design It!” - Ch. 3
5.5 Questions to Guide Your Design
- Object limits
- What is the maximum number of objects per experiment?
- Feedback
- What feedback should occur on interaction?
5.6 Thinking Exercise
Rule Mapping
For each experiment, list the input action and the expected output.
5.7 The Interview Questions They’ll Ask
- “How do you simplify a simulation for kids?”
- “Why are boundaries important in a sandbox?”
- “How do you keep performance stable?”
- “How do you design a reset flow?”
- “How do you explain the concept after exploration?”
5.8 Hints in Layers
Hint 1: Limit objects Start with 2-3 interactive items.
Hint 2: Keep rules simple Use deterministic rules instead of complex physics.
Hint 3: Add reset Reset should always restore a clean state.
Hint 4: Debug with counters Show object count and frame time in debug.
5.9 Books That Will Help
| Topic | Book | Chapter |
|---|---|---|
| Product design | “Design It!” | Ch. 3 |
5.10 Implementation Phases
Phase 1: Foundation (5-8 hours)
Goals:
- Experiment selector
- One experiment prototype
Tasks:
- Build a tabbed experiment selector.
- Implement color mix prototype.
Checkpoint: One experiment works smoothly.
Phase 2: Core Functionality (10-14 hours)
Goals:
- Add remaining experiments
- Add reset
Tasks:
- Add gravity and magnet experiments.
- Add reset button for each.
Checkpoint: All experiments accessible and stable.
Phase 3: Polish & Edge Cases (8-12 hours)
Goals:
- Add prompts and summaries
- Tune performance
Tasks:
- Add short prompts and hints.
- Limit objects and optimize assets.
Checkpoint: App feels responsive and clear.
5.11 Key Implementation Decisions
| Decision | Options | Recommendation | Rationale |
|---|---|---|---|
| Simulation fidelity | High vs simplified | Simplified | Clarity |
| Object count | Unlimited vs capped | Capped | Performance |
| Feedback | Loud vs subtle | Subtle | Calm UX |
6. Testing Strategy
6.1 Test Categories
| Category | Purpose | Examples |
|---|---|---|
| Unit | Rule correctness | Color mix |
| Integration | Reset behavior | Clear objects |
| Edge Case | Object limits | Max count |
6.2 Critical Test Cases
- Mixing red and blue always produces purple.
- Reset clears all objects and states.
- Object limit is enforced.
6.3 Test Data
Color mix: red + blue -> purple
7. Common Pitfalls & Debugging
7.1 Frequent Mistakes
| Pitfall | Symptom | Solution |
|---|---|---|
| Too many objects | Lag | Set cap |
| Complex rules | Confusion | Simplify |
| No reset | Chaos | Add reset |
7.2 Debugging Strategies
- Add a debug counter for object count.
- Log rule evaluations.
7.3 Performance Traps
- Excessive particle effects can drop frames.
8. Extensions & Challenges
8.1 Beginner Extensions
- Add a new experiment (sound waves).
8.2 Intermediate Extensions
- Add difficulty levels (more objects).
8.3 Advanced Extensions
- Add a parent zone with experiment toggles.
9. Real-World Connections
9.1 Industry Applications
- Interactive science museum apps
- Classroom simulation tools
9.2 Related Open Source Projects
- Look for simple physics demos in 2D.
9.3 Interview Relevance
- Simulation design
- Performance optimization
10. Resources
10.1 Essential Reading
- “Design It!” - Ch. 3
10.2 Video Resources
- Talks on simulation design for kids
10.3 Tools & Documentation
- Apple HIG for animations
10.4 Related Projects in This Series
11. Self-Assessment Checklist
11.1 Understanding
- I can explain why boundaries matter.
- I can explain simplified simulation rules.
- I can explain object limits.
11.2 Implementation
- All experiments run smoothly.
- Reset works consistently.
- Performance is stable.
11.3 Growth
- I can propose a new experiment.
- I can explain this project in an interview.
12. Submission / Completion Criteria
Minimum Viable Completion:
- One experiment with reset
Full Completion:
- Three experiments with prompts
Excellence (Going Above & Beyond):
- Additional experiments and parent controls