Project 5: Custom Soundboard with Waveform Display
Comprehensive Learning Guide Build a soundboard plugin that plays configurable audio files and displays animated waveform visualizations on the Stream Deck LCD key during playback
Table of Contents
- Learning Objectives
- Metadata
- Real World Outcome
- The Core Question You’re Answering
- Concepts You Must Understand First
- Deep Theoretical Foundation
- Complete Project Specification
- Solution Architecture
- Phased Implementation Guide
- Questions to Guide Your Design
- Thinking Exercise
- Testing Strategy
- Common Pitfalls & Debugging Tips
- The Interview Questions They’ll Ask
- Hints in Layers
- Extensions & Challenges
- Real-World Connections
- Books That Will Help
- Self-Assessment Checklist
Metadata
| Property | Value |
|---|---|
| Project Number | 5 |
| Difficulty | Level 3: Advanced |
| Time Estimate | 2-3 weeks |
| Coolness Level | Level 3: Genuinely Clever |
| Business Potential | 2. The “Micro-SaaS / Pro Tool” |
| Knowledge Area | Audio Processing / Graphics |
| Programming Language | JavaScript/TypeScript |
| Software or Tool | Web Audio API / Canvas |
| Main Book | “HTML5 Canvas” by Steve Fulton |
Prerequisites
- Strong JavaScript/TypeScript: Comfortable with async/await, Promises, and module patterns
- Understanding of Audio Concepts: Basic knowledge of sample rates, audio buffers, and waveforms
- Canvas Drawing Fundamentals: Experience with HTML5 Canvas API for 2D rendering
- Previous Stream Deck Projects: Completed at least Projects 1-3 in this series
- Node.js Fundamentals: Working with external processes and the filesystem
Learning Objectives
By completing this project, you will master:
Audio Processing in Node.js
-
Platform-Specific Audio APIs: Understand why Node.js lacks built-in audio playback and how libraries like
play-soundbridge this gap by spawning platform-specific commands (afplayon macOS,mplayeron Linux, Windows Media Player on Windows). -
Audio File Decoding: Learn to parse WAV and MP3 files to extract raw PCM sample data, understanding the relationship between file formats, compression, and audio quality.
-
Sample Rate and Buffer Management: Understand how audio is represented as arrays of samples, how sample rates affect quality and file size, and how to manage audio buffers efficiently.
FFT (Fast Fourier Transform) Analysis
-
Time Domain vs Frequency Domain: Grasp the fundamental transformation that converts amplitude-over-time data into frequency-intensity data, enabling visualization of bass, midrange, and treble.
-
FFT Windowing and Chunk Size: Understand how FFT chunk size affects frequency resolution vs time resolution, and why windowing functions matter for visualization quality.
-
Mapping FFT Output to Visual Bars: Learn to convert raw FFT magnitudes into meaningful bar heights, including logarithmic scaling and human-perception adjustments.
Real-Time Animation
-
High-Frequency Canvas Rendering: Master techniques for generating 15-30 frames per second on a constrained 72x72 pixel display without overwhelming the WebSocket connection.
-
Frame Rate Limiting and Adaptive Timing: Implement robust animation loops that adjust to actual render time, preventing queue buildup and jittery playback.
-
Synchronization Challenges: Solve the problem of keeping visual animation in sync with audio playback when they run in separate processes.
Stream Deck Integration
-
File Picker in Property Inspector: Build a file selection interface using HTML5
<input type="file">and communicate selected paths to the plugin backend. -
Cross-Platform File Path Handling: Handle the differences between Windows (
C:\Users\...) and Unix (/Users/...) path formats using Node.js path normalization. -
Dynamic Image Generation Pipeline: Create a complete pipeline from audio data to animated key display, optimizing for Stream Deck’s constraints.
Real World Outcome
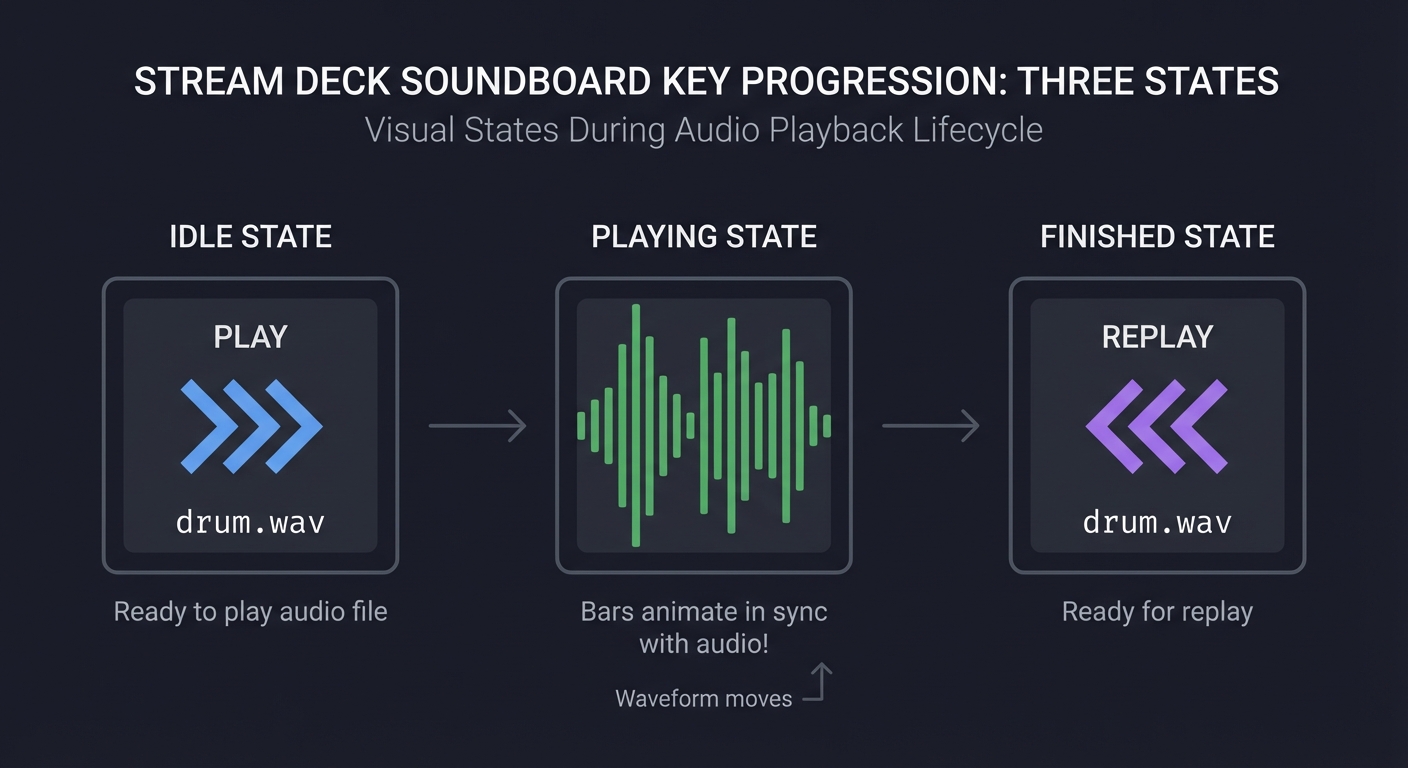
When you complete this project, you will have built a fully functional soundboard where pressing a Stream Deck key plays your chosen audio file while displaying a live, animated waveform visualization on the key’s 72x72 pixel LCD.
Visual Progression of Your Soundboard Key
IDLE STATE              PLAYING STATE              FINISHED STATE
+------------------+    +------------------+       +------------------+
|                  |    |                  |       |                  |
|     +---------+  |    |  |   |     |  |  |       |     +---------+  |
|     |  PLAY   |  |    | ||  ||| | ||||||  |       |     | REPLAY  |  |
|     |   >>>   |  |    ||||||||||||||||||  |       |     |   <<<   |  |
|     +---------+  |    ||||||||||||||||||  |       |     +---------+  |
|                  |    |  ^^^^^^^^^^      |       |                  |
|    drum.wav      |    |  Waveform moves  |       |    drum.wav      |
+------------------+    +------------------+       +------------------+

    Ready to play        Bars animate in           Ready for
    audio file           sync with audio!          replay
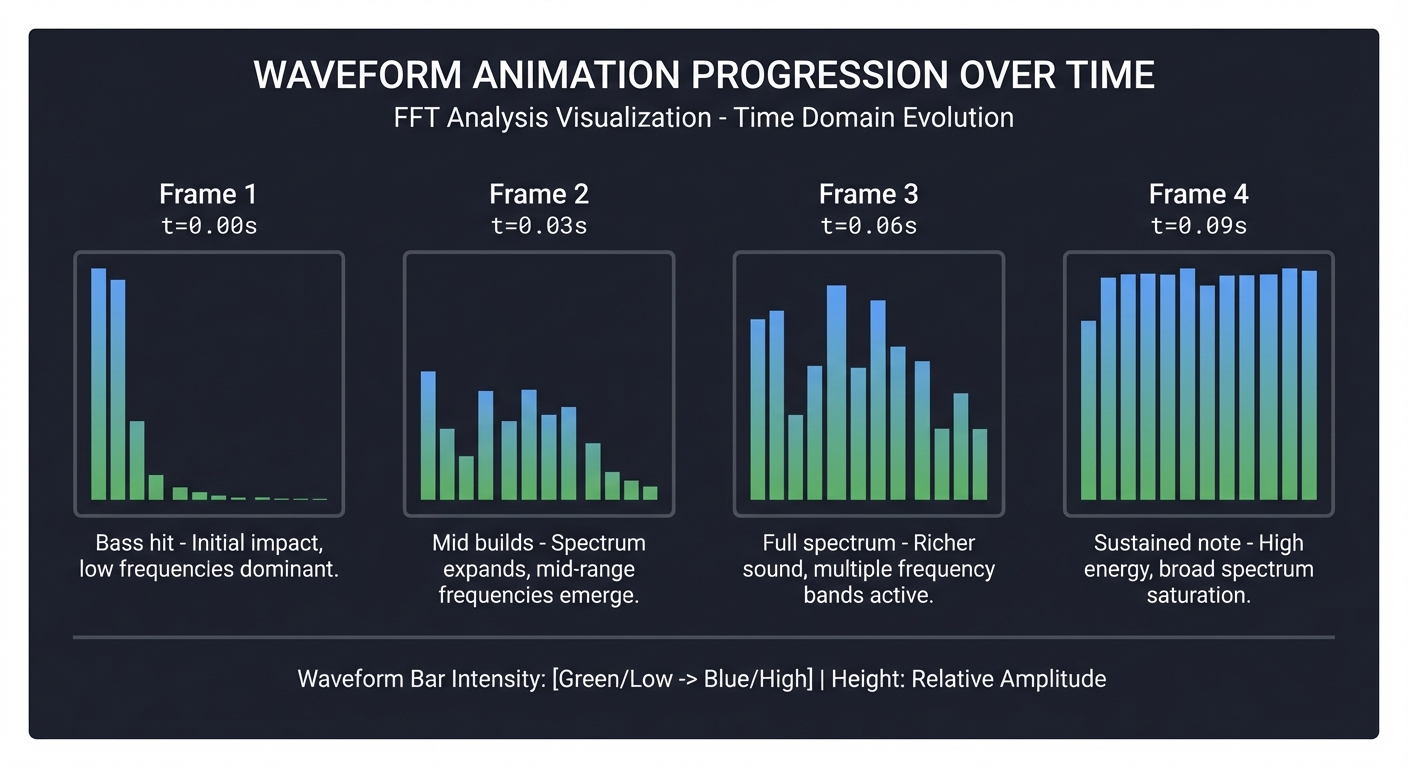
Detailed Waveform Animation Frames
Frame 1 (t=0.00s)    Frame 2 (t=0.03s)    Frame 3 (t=0.06s)    Frame 4 (t=0.09s)
+----------------+   +----------------+   +----------------+   +----------------+
|                |   |                |   |      |         |   |  |   |        |
|  |             |   |  |   |         |   |  |  |||        |   | || |||||      |
| |||            |   | ||| |||        |   | |||||||| |     |   ||||||||||||    |
|||||            |   |||||||||||      |   ||||||||||||||   |   ||||||||||||||  |
|||||            |   |||||||||||      |   ||||||||||||||   |   ||||||||||||||  |
+----------------+   +----------------+   +----------------+   +----------------+
   Bass hit            Mid builds          Full spectrum        Sustained note
Property Inspector Configuration Panel
+----------------------------------------------------------+
|  SOUNDBOARD KEY CONFIGURATION                             |
+----------------------------------------------------------+
|                                                           |
|  AUDIO FILE                                               |
|  +---------------------------------------------------+   |
|  | /Users/me/sounds/airhorn.mp3                      |   |
|  +---------------------------------------------------+   |
|  [ Browse... ]                                            |
|                                                           |
|  File Info: MP3, 2.3s duration, 44.1kHz, Stereo          |
|                                                           |
+----------------------------------------------------------+
|                                                           |
|  PLAYBACK SETTINGS                                        |
|                                                           |
|  Volume:                                                  |
|  [===========---------] 70%                               |
|                                                           |
|  Loop:  [ ] Enable looping                                |
|                                                           |
+----------------------------------------------------------+
|                                                           |
|  VISUALIZATION SETTINGS                                   |
|                                                           |
|  Waveform Style:                                          |
|  (*) Bars    ( ) Wave    ( ) Circle    ( ) Spectrum       |
|                                                           |
|  Bar Count: [12] (4-32)                                   |
|                                                           |
|  Colors:                                                  |
|  Primary:   [#00FF88] [====] (color picker)              |
|  Secondary: [#004422] [====] (color picker)              |
|                                                           |
|  Animation:                                               |
|  [ ] Mirror (top/bottom symmetry)                         |
|  [ ] Glow effect                                          |
|  [x] Smooth transitions                                   |
|                                                           |
+----------------------------------------------------------+
|                                                           |
|  IDLE STATE                                               |
|  (*) Show play icon  ( ) Show waveform preview            |
|  ( ) Show filename   ( ) Custom image                     |
|                                                           |
+----------------------------------------------------------+

What Success Looks Like
When you have successfully completed this project:
- Press a key on your Stream Deck and hear your configured sound file play
- Watch the waveform animate in real-time on the 72x72 pixel key LCD
- Configure any MP3/WAV file through a polished Property Inspector interface
- See visual feedback showing playback progress and audio intensity
- Demonstrate a genuinely impressive feature that showcases Stream Deck’s capabilities
The Core Question You’re Answering
How do I integrate audio playback with real-time visual feedback, processing audio data for animated waveform display on a 72x72 pixel key?
This project forces you to solve a multi-domain problem:
- Audio Processing (a backend concern): Playing audio files from Node.js, which lacks native audio support
- Signal Processing (a mathematics concern): Transforming time-domain audio into frequency-domain visualization data using FFT
- Real-Time Rendering (a graphics concern): Generating and sending 15-30 images per second without overwhelming the system
- Efficient Communication (a systems concern): Managing WebSocket bandwidth and avoiding message queue buildup
- Synchronization (a timing concern): Keeping visual animation perfectly in sync with audio playback
The Stream Deck’s small display and WebSocket-based image updates create unique constraints that make this genuinely challenging and deeply educational.
Concepts You Must Understand First
Before writing any code, you need to understand these foundational concepts. Each builds on the previous, so take them in order.
1. Audio Playback in Node.js (Platform-Specific Approaches)
Unlike the browser where <audio> elements “just work,” Node.js has no built-in audio playback. You must use external libraries that wrap platform-specific audio systems.
Browser Environment:                    Node.js Environment:
====================                    ====================

const audio = new Audio('file.mp3');   // No Audio constructor!
audio.play();  // Just works!          // No Web Audio API!
                                       // Must spawn external processes

                                       macOS:   afplay command
                                       Windows: Windows Media Player COM
                                       Linux:   ALSA or PulseAudio
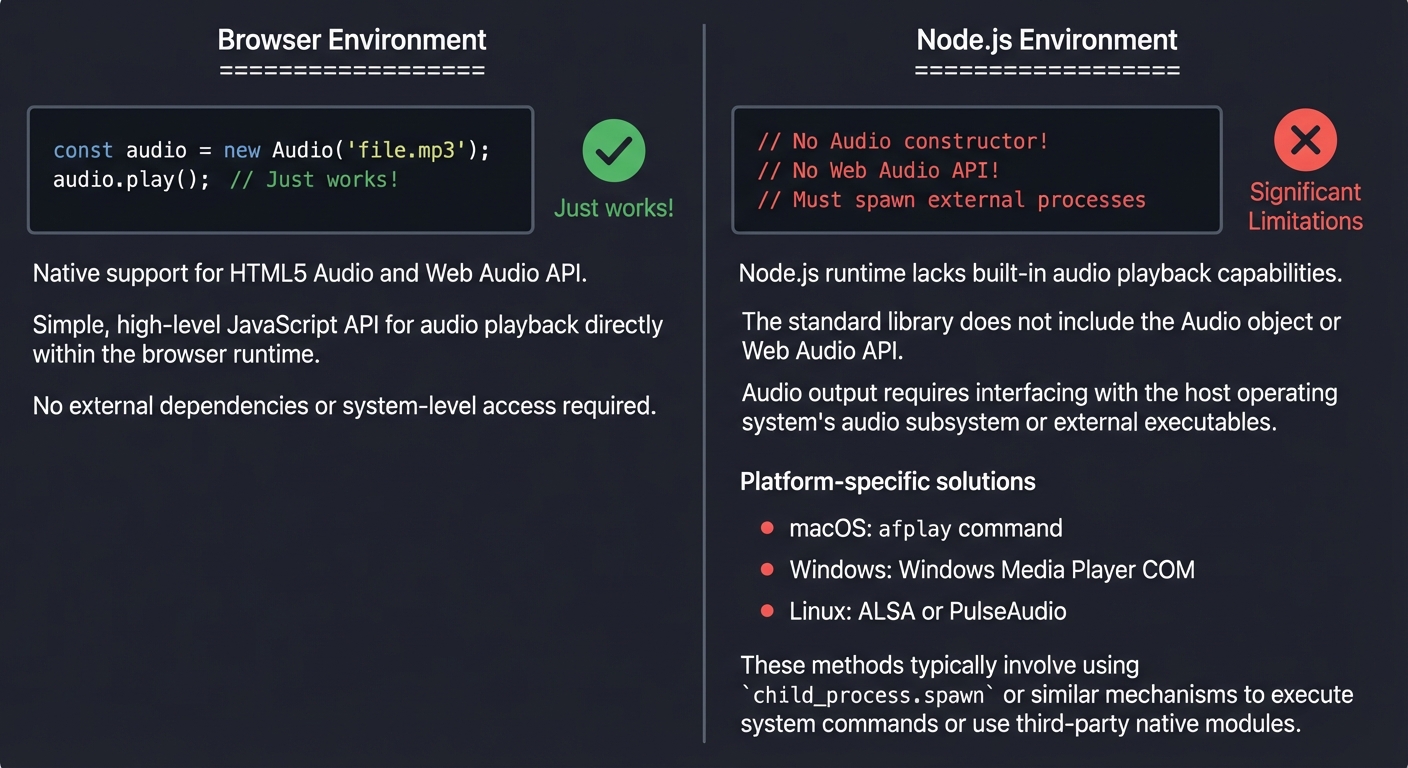
Why does Node.js lack audio?
Node.js is designed for server-side applications where audio playback is rarely needed. Adding audio support would require:
- Platform-specific native bindings
- Significant binary size increase
- Cross-platform compatibility nightmares
Instead, libraries like play-sound provide a thin wrapper that spawns the appropriate system command.
Reference: “Node.js Design Patterns” by Mario Casciaro - Chapter on external process integration
2. FFT (Fast Fourier Transform) for Waveform Analysis
FFT converts audio from the time domain (amplitude over time) to the frequency domain (which frequencies are present). This is how you get those classic “visualizer bars” that react to bass, mids, and treble.
TIME DOMAIN                              FREQUENCY DOMAIN
(Raw Audio Waveform)                     (After FFT Analysis)

Amplitude                                Magnitude
    ^                                        ^
    |      /\      /\                         |  |||
    |    /    \  /    \                       | |||||  ||
    |  /        \/        \                   |||||||||||| |
    | /                      \                |||||||||||||||
    +--------------------------->             +-------------------->
               Time (samples)                     Frequency (Hz)

Shows: How loud the audio is             Shows: Which frequencies
       at each moment in time                   are present and
                                               how loud each is
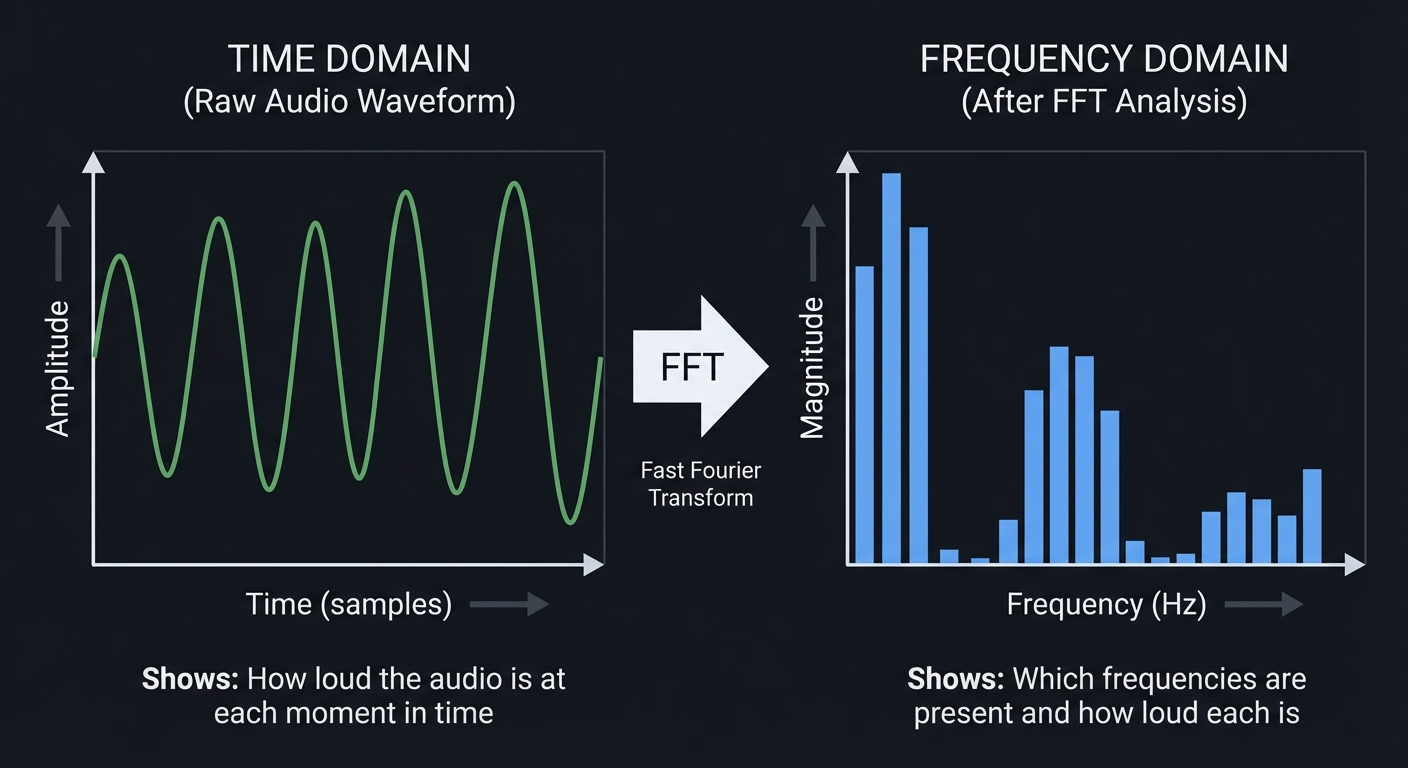
The FFT algorithm takes a “window” of audio samples and produces frequency “bins.” Each bin represents a range of frequencies and contains a magnitude value.
Reference: “Digital Signal Processing” by Steven W. Smith - Chapters 8-12 on FFT (free online at dspguide.com)
3. Time Domain vs Frequency Domain (Deep Understanding)
This transformation is the heart of audio visualization. Let’s trace through a concrete example:
SINGLE SINE WAVE (Pure Tone at 440Hz - Concert A)
=================================================

Time Domain:                    Frequency Domain:

   A                               |
  /|\                              |
 / | \     /                       |
/  |  \   /                        |
   |   \ /                        ||
   +----\/----                  --++--+--+--+--
     time                         220 440 660 880 Hz
                                      ^
Single smooth wave               Single spike at 440Hz
repeating 440 times/sec          (all energy at one frequency)


COMPLEX AUDIO (Voice saying "Ahh")
===================================

Time Domain:                    Frequency Domain:

   /\  /\                          | ||
  /  \/  \   /\                    |||||||
 /        \ /  \                   |||||||||  |
/          v    \                 ||||||||||||| |
   Complex,                       Multiple spikes!
   irregular wave                 Fundamental + harmonics
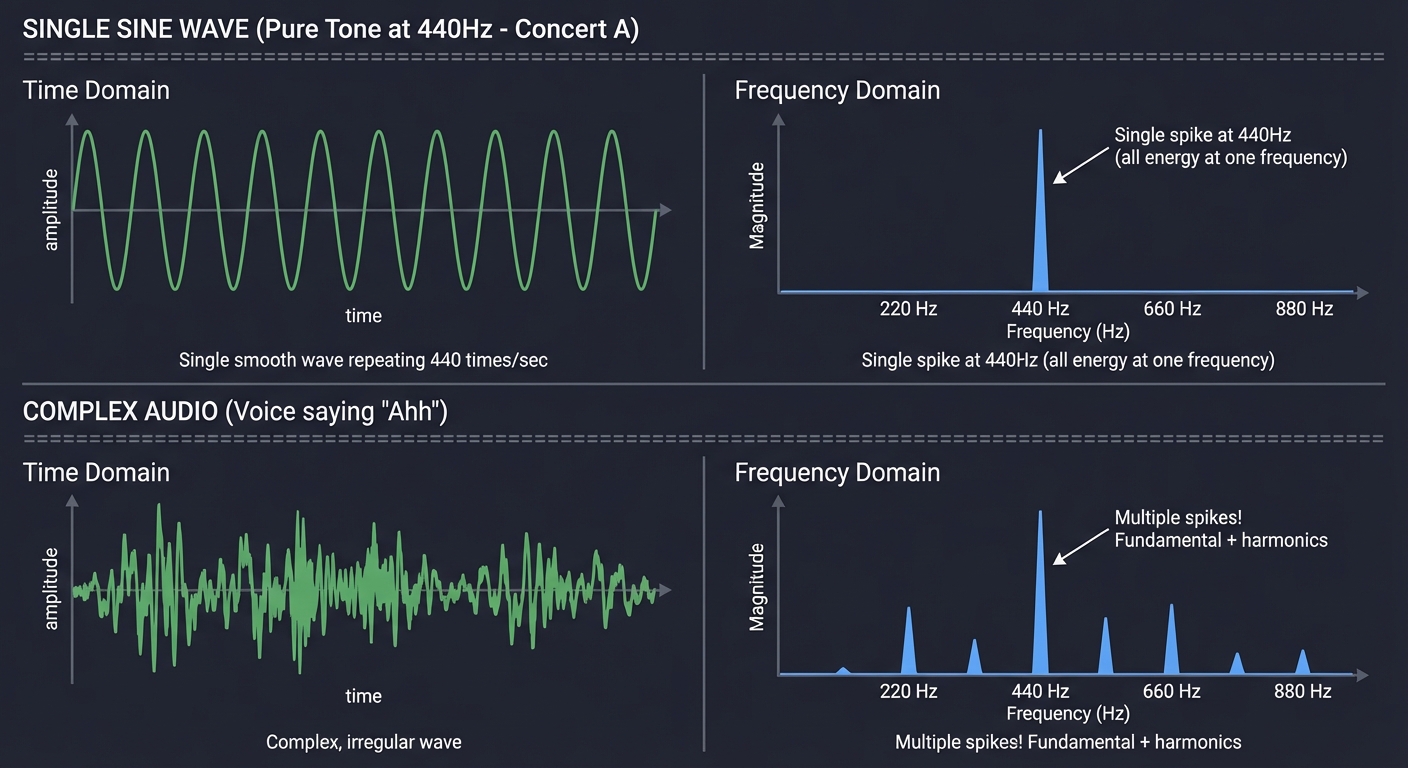
Key Insight: Real audio contains many frequencies simultaneously. The FFT reveals them.
4. Pre-Computed vs Real-Time Waveform Analysis
For Stream Deck visualization, you have two strategies:
STRATEGY 1: PRE-COMPUTED FFT (Recommended)
==========================================

LOADING PHASE                          PLAYBACK PHASE
+------------------+                   +------------------+
| Read audio file  |                   | Start playback   |
| Decode to samples|                   | Start timer      |
| Split into chunks|                   |                  |
| FFT each chunk   |                   | Loop:            |
| Store array of   |-----> [FFT[]]---->|   time = now()   |
|  FFT results     |                   |   index = time/  |
+------------------+                   |      chunkDur    |
                                       |   draw FFT[index]|
    Slow (1-2 seconds)                 |   setImage()     |
    Happens once on load               +------------------+

                                         Fast! Just array lookup


STRATEGY 2: REAL-TIME FFT (More Complex)
=========================================

PLAYBACK PHASE (All work happens here)
+------------------------------------------+
| Start playback                           |
|                                          |
| Loop:                                    |
|   Get current audio buffer (HARD!)       |
|   Run FFT on buffer (CPU intensive)      |
|   Draw visualization                     |
|   setImage()                             |
+------------------------------------------+

Problems:
- Getting real-time audio buffer from external player is difficult
- FFT computation happens 30 times/second
- CPU usage is much higher
- Harder to stay in sync
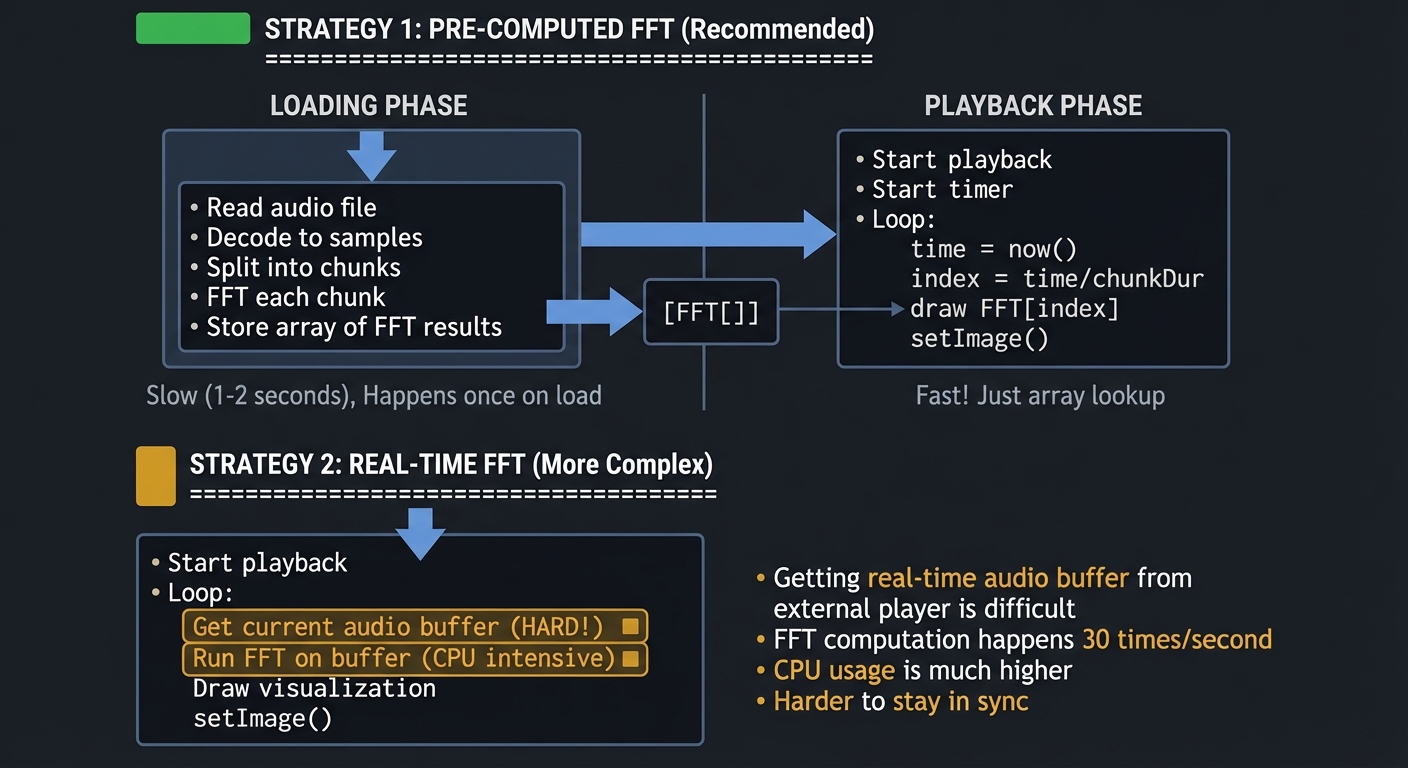
Why pre-computed is better for Stream Deck:
- All heavy computation happens during file load
- Playback loop is just array indexing and drawing
- Perfect synchronization (FFT index matches playback time)
- Lower CPU usage during animation
- Simpler implementation
5. High-Frequency Canvas Rendering (Animation Frames)
You need to generate images fast enough to appear animated (15-30 FPS), but the Stream Deck’s WebSocket can become a bottleneck.
THE ANIMATION PIPELINE
======================

+--------+    +---------+    +----------+    +----------+    +------------+
| FFT    |--->| Canvas  |--->| toDataURL|--->| WebSocket|--->| Stream Deck|
| Data   |    | Drawing |    | (base64) |    | Send     |    | Display    |
+--------+    +---------+    +----------+    +----------+    +------------+

  Fast          ~1-2ms         ~3-5ms         ~5-10ms        ~5-10ms
  (lookup)     (draw ops)     (encoding)     (network)      (hardware)

Total: ~15-25ms per frame = 40-66 FPS theoretical maximum

But with setInterval overhead and GC pauses: realistic 25-30 FPS
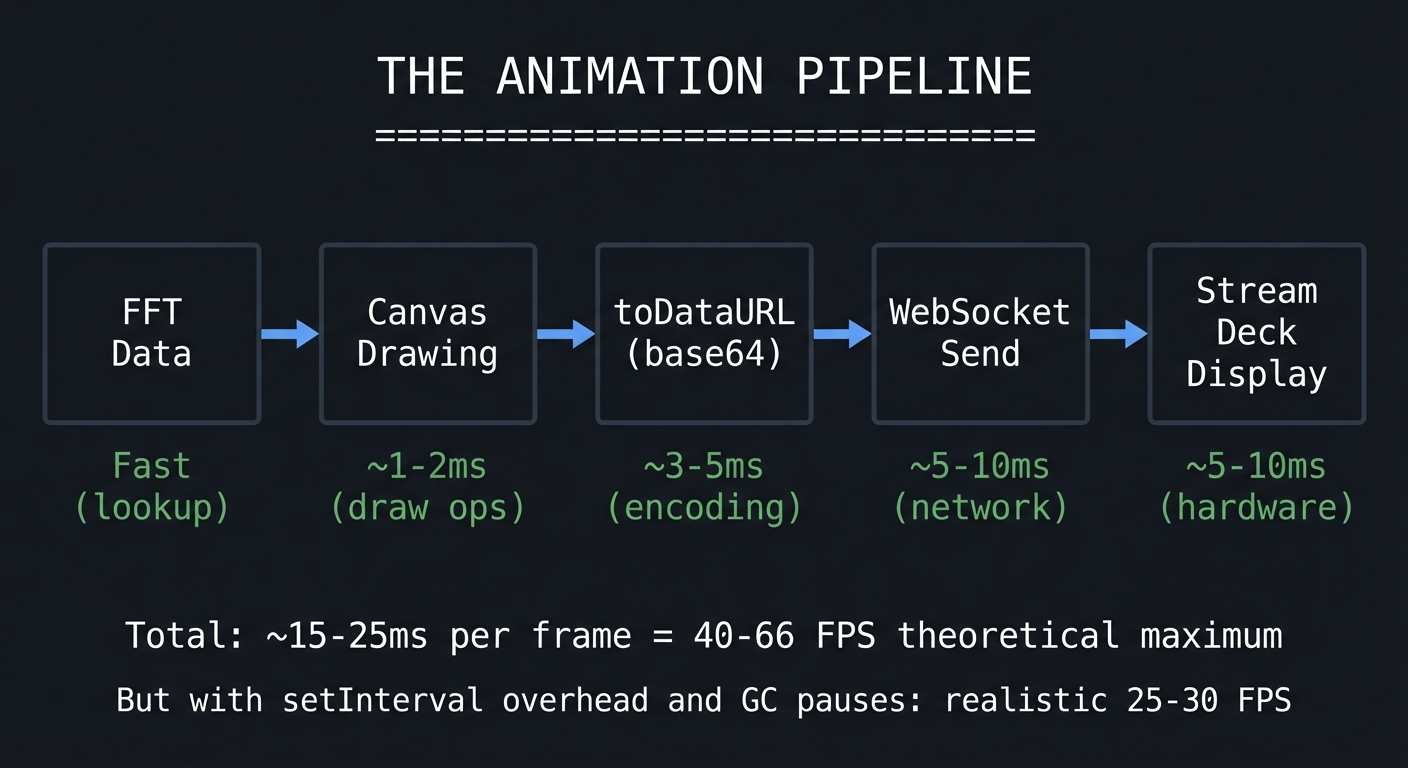
Key Considerations:
- Canvas operations are synchronous and can block the event loop
- Base64 encoding images adds CPU overhead (~3-5ms per frame)
- WebSocket message queuing can cause lag if you send faster than it processes
- The Stream Deck hardware has its own refresh rate limitations
Reference: “HTML5 Canvas” by Steve Fulton - Chapter 5 on animation loops
6. File Picker Integration in Property Inspector
The Property Inspector runs in a web context (essentially a browser), so you cannot directly access the filesystem. You must use HTML5 <input type="file"> and communicate the selected path to the plugin backend.
PROPERTY INSPECTOR (Web Context)          PLUGIN (Node.js Context)
================================          ========================

+---------------------------+             +---------------------------+
| <input type="file">       |             | Receives message:         |
|                           |             | {                         |
| User clicks, selects file |             |   action: "setAudioFile", |
|                           |             |   payload: {              |
| JavaScript gets:          |             |     filename: "x.mp3",    |
|   file.name               |---msg--->   |     path: "/Users/...",   |
|   file.path (Electron)    |             |     data: <ArrayBuffer>   |
|   file.type               |             |   }                       |
| Read as ArrayBuffer       |             | }                         |
+---------------------------+             +---------------------------+
                                          |
                                          v
                                          Save to plugin data directory
                                          or use path directly
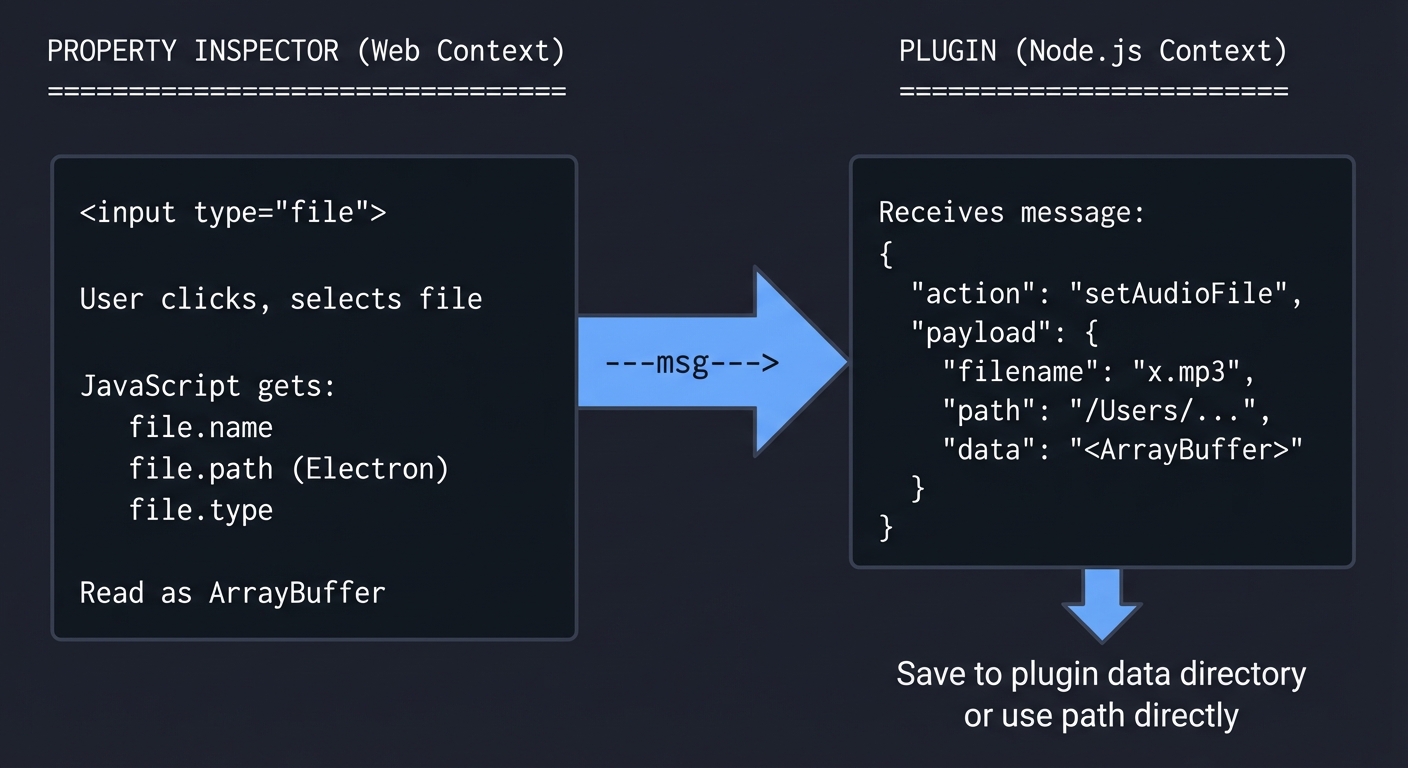
Challenge: file.path is an Electron-specific extension. In standard web contexts, you only get file.name. For Stream Deck’s Property Inspector, you may need to:
- Read the entire file as ArrayBuffer
- Send the data to the plugin
- Save it to a known location
- Reference that saved location for playback
Reference: Stream Deck SDK documentation on Property Inspector communication
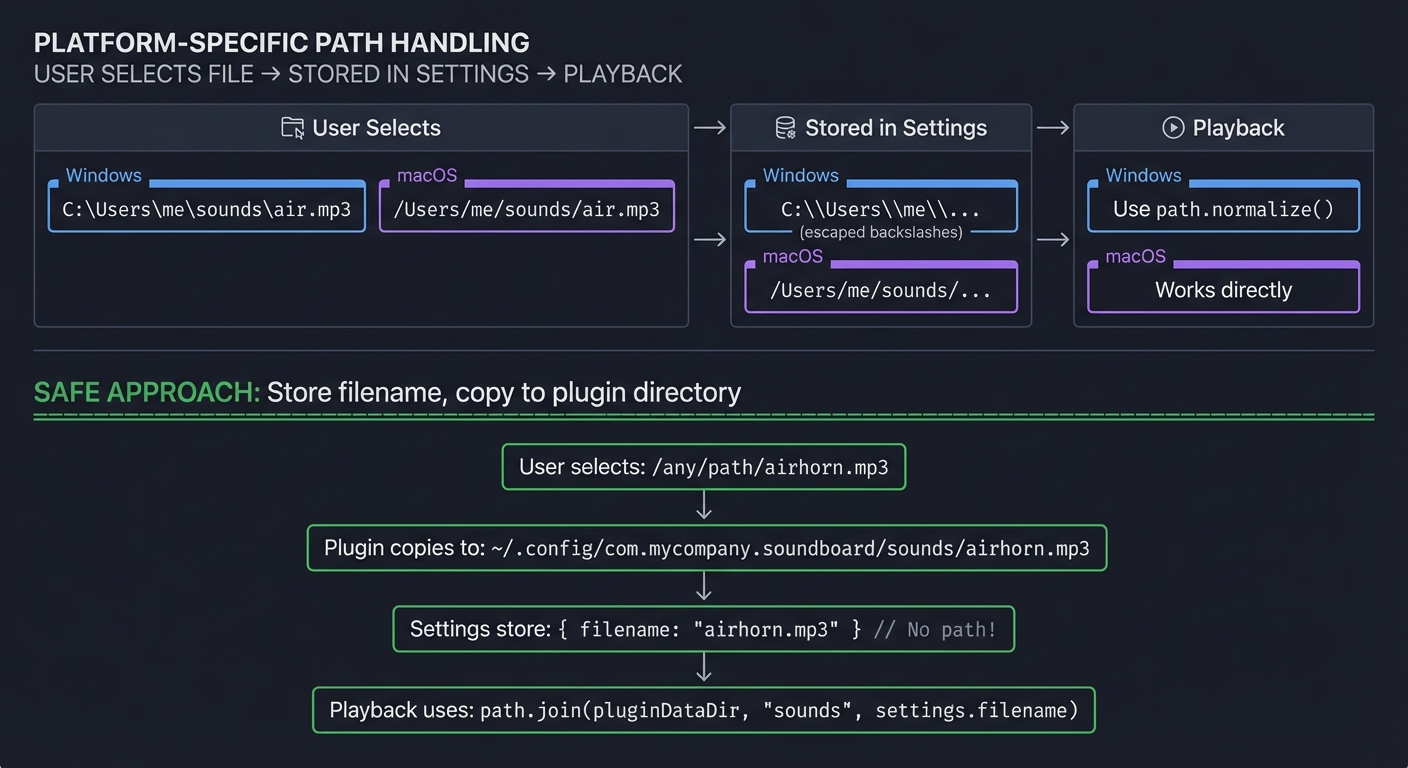
7. Cross-Platform File Path Handling
Windows uses backslashes (C:\Users\...), macOS/Linux use forward slashes (/Users/...). The Node.js path module normalizes this, but you must be careful when storing paths in settings.
USER SELECTS FILE                    STORED IN SETTINGS            PLAYBACK
=================                    ==================            ========

Windows:
C:\Users\me\sounds\air.mp3  --->    C:\\Users\\me\\...   --->   Use path.normalize()
                                    (escaped backslashes)
macOS:
/Users/me/sounds/air.mp3    --->    /Users/me/sounds/... --->   Works directly


SAFE APPROACH: Store filename, copy to plugin directory
=========================================================

User selects: /any/path/airhorn.mp3
              |
              v
Plugin copies to: ~/.config/com.mycompany.soundboard/sounds/airhorn.mp3
              |
              v
Settings store: { filename: "airhorn.mp3" }  // No path!
              |
              v
Playback uses: path.join(pluginDataDir, 'sounds', settings.filename)
Reference: “Node.js in Action” by Mike Cantelon - Chapter on filesystem operations
Deep Theoretical Foundation
Audio Playback in Node.js - Complete Understanding
The play-sound Library Architecture
When you call player.play('file.mp3'), here’s what actually happens:
Your Code                     play-sound Library                Operating System
=========                     ==================                ================

player.play(                  1. Detect platform                macOS:
  'air.mp3',                     - process.platform                afplay air.mp3
  callback                                                         ↓
)                             2. Find available player          Windows:
    |                            macOS: ['afplay']                 mplayer.exe air.mp3
    |                            Win: ['mplayer', 'vlc']           ↓
    |                            Linux: ['mpg123', 'mpg321']    Linux:
    |                                                              mpg123 air.mp3
    |                         3. Spawn child process
    v                            child_process.spawn(
                                   'afplay',
+----------+                       ['air.mp3']
| callback |<--- 4. Return player object with
|          |        .play(), .pause() (if supported)
+----------+        and emit 'complete' event

Platform Differences You Must Handle:
Feature             macOS (afplay)    Windows          Linux (mpg123)
=======             ==============    =======          ==============
Pause/Resume        No (kill/restart) Via COM object   Yes (via signals)
Volume Control      Yes (-v flag)     Yes              Yes
Seek Position       No                Yes              Limited
Formats             MP3, WAV, AAC     MP3, WAV, WMA    MP3 (codec dep.)
Code Pattern for Cross-Platform Audio:
// Pseudo-code showing platform handling
class AudioPlayer {
  private process: ChildProcess | null = null;
  private platform: NodeJS.Platform = process.platform;

  play(filePath: string): Promise<void> {
    return new Promise((resolve, reject) => {
      const cmd = this.getPlayerCommand();
      const args = this.getPlayerArgs(filePath);

      this.process = spawn(cmd, args);

      this.process.on('close', (code) => {
        if (code === 0) resolve();
        else reject(new Error(`Playback failed: ${code}`));
      });

      this.process.on('error', reject);
    });
  }

  private getPlayerCommand(): string {
    switch (this.platform) {
      case 'darwin': return 'afplay';
      case 'win32':  return 'mplayer';
      case 'linux':  return 'mpg123';
      default: throw new Error(`Unsupported platform: ${this.platform}`);
    }
  }
}
FFT (Fast Fourier Transform) - Deep Dive
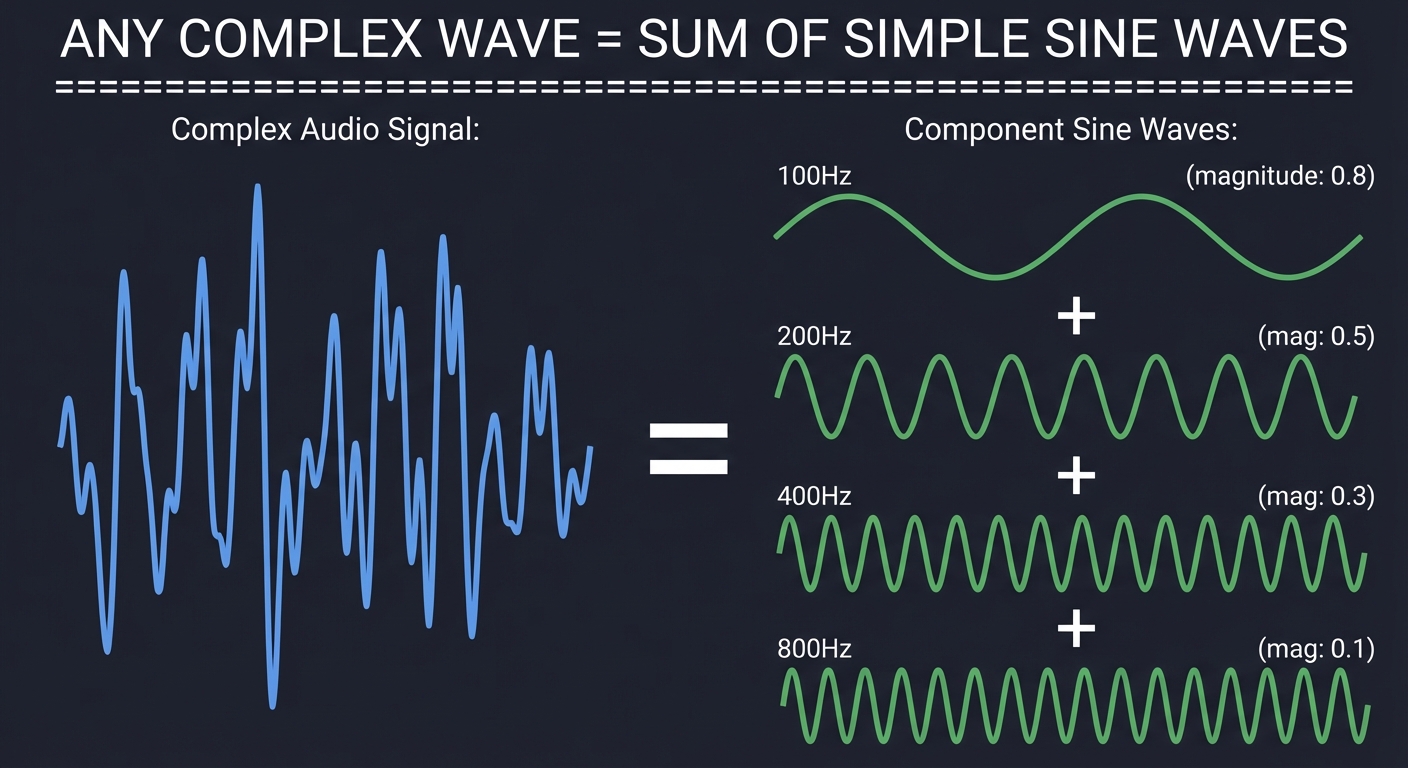
The Mathematical Intuition
Fourier’s insight was that ANY waveform can be represented as a sum of sine waves at different frequencies. FFT is the fast algorithm to find those frequencies.
ANY COMPLEX WAVE = SUM OF SIMPLE SINE WAVES
============================================

Complex Audio Signal:                 Component Sine Waves:

    /\  __                           100Hz:  ∿∿∿∿∿∿∿∿∿∿  (magnitude: 0.8)
   /  \/  \  /\                           +
  /        \/  \   =                 200Hz:  ∿∿∿∿∿∿∿∿∿∿∿∿∿∿∿∿  (mag: 0.5)
 /              \                          +
                                     400Hz:  ∿∿∿∿∿∿∿∿∿∿∿∿∿∿∿∿∿∿∿∿  (mag: 0.3)
                                          +
                                     800Hz:  ∿∿∿∿∿∿∿∿∿∿∿∿∿∿∿∿∿∿∿∿∿∿∿∿  (mag: 0.1)
FFT Input and Output:
INPUT: Array of N time-domain samples (typically power of 2)
======
samples = [0.2, 0.5, 0.8, 0.6, 0.3, -0.1, -0.4, -0.6, ...]
           ^    ^    ^    ^
           |    |    |    |
           Amplitude values at successive time points


OUTPUT: Array of N/2 complex numbers (frequency bins)
=======
bins = [
  { real: 1.2, imag: 0.0 },  // DC component (0 Hz)
  { real: 0.8, imag: 0.3 },  // Bin 1: sampleRate/N Hz
  { real: 0.5, imag: 0.6 },  // Bin 2: 2*sampleRate/N Hz
  { real: 0.2, imag: 0.4 },  // Bin 3: 3*sampleRate/N Hz
  ...
]

MAGNITUDE (what you visualize):
magnitudes = bins.map(b => Math.sqrt(b.real**2 + b.imag**2))
magnitudes = [1.2, 0.85, 0.78, 0.45, ...]
FFT Chunk Size (Window Size) Trade-offs:
SMALL CHUNK (256 samples @ 44.1kHz = 5.8ms window)
==================================================
Frequency resolution: 44100/256 = 172 Hz per bin
Time resolution: 5.8ms

Good for: Fast transients, drums, percussion
Bad for: Distinguishing nearby frequencies

Visualization: Responds quickly but bars may jump erratically
               Bass frequencies all lumped together


LARGE CHUNK (4096 samples @ 44.1kHz = 93ms window)
==================================================
Frequency resolution: 44100/4096 = 10.8 Hz per bin
Time resolution: 93ms

Good for: Detailed frequency analysis, sustained notes
Bad for: Fast-changing audio, looks "laggy"

Visualization: Smooth bars but slow to respond to changes
               Much more detail in bass frequencies


SWEET SPOT FOR VISUALIZATION: 1024 or 2048 samples
==================================================
1024: 23ms window, 43 Hz resolution - good balance
2048: 46ms window, 21.5 Hz resolution - smoother
Mapping FFT Bins to Visual Bars:
PROBLEM: FFT gives linear frequency bins, but music is logarithmic!
===================================================================

Linear FFT Bins (what FFT gives you):
[0-43Hz][43-86Hz][86-129Hz]...[21500-21543Hz][21543-21586Hz]
   ^        ^         ^                ^             ^
   |        |         |                |             |
   All bass squeezed  <<<<<<<<<>>>>>>>  Treble spread out
   into few bins                        across many bins

Human Hearing (logarithmic):
Bass (20-250Hz): Fundamental tones, kick drums
Mids (250-2kHz): Vocals, guitars, most instruments
Treble (2k-20kHz): Cymbals, brightness, detail


SOLUTION: Logarithmic Bin Grouping
==================================

Instead of: bar[i] = bins[i]  (linear)

Use: bar[i] = average(bins[start[i] : end[i]])

Where start/end follow logarithmic scale:

Bar 0:  bins[0-1]      (0-86 Hz)      Sub-bass
Bar 1:  bins[2-3]      (86-172 Hz)    Bass
Bar 2:  bins[4-7]      (172-344 Hz)   Upper bass
Bar 3:  bins[8-15]     (344-688 Hz)   Low mids
Bar 4:  bins[16-31]    (688-1376 Hz)  Mids
Bar 5:  bins[32-63]    (1376-2752 Hz) Upper mids
Bar 6:  bins[64-127]   (2752-5504 Hz) Presence
Bar 7:  bins[128-255]  (5504-11k Hz)  Brilliance

Now each bar represents a perceptually equal frequency range!
Code for Logarithmic Bin Mapping:
function mapFFTToBars(fftData: number[], numBars: number): number[] {
  const bars: number[] = [];
  const binCount = fftData.length;

  for (let i = 0; i < numBars; i++) {
    // Calculate logarithmic bin range
    const lowFreq = Math.pow(2, i / numBars * Math.log2(binCount));
    const highFreq = Math.pow(2, (i + 1) / numBars * Math.log2(binCount));

    const startBin = Math.floor(lowFreq);
    const endBin = Math.min(Math.ceil(highFreq), binCount);

    // Average the bins in this range
    let sum = 0;
    for (let j = startBin; j < endBin; j++) {
      sum += fftData[j];
    }
    bars.push(sum / (endBin - startBin));
  }

  return bars;
}
High-Frequency Canvas Animation - Complete Guide
The Render Loop Problem:
NAIVE APPROACH (Problems Guaranteed)
====================================

setInterval(() => {
  drawFrame();
  ctx.toDataURL();  // ~5ms
  sendToStreamDeck(); // ~10ms
}, 33);  // Target 30 FPS

What happens:
t=0ms:   Start frame 1
t=15ms:  Frame 1 still sending...
t=33ms:  Start frame 2 (while frame 1 still going!)
t=48ms:  Frame 2 still sending, frame 1 maybe done
t=66ms:  Start frame 3... QUEUE BUILDING UP!

Result: Memory fills with queued messages, frames drop, animation stutters


CORRECT APPROACH (Adaptive Timing)
==================================

let isRendering = false;
const TARGET_FPS = 25;
const FRAME_TIME = 1000 / TARGET_FPS;  // 40ms

async function renderLoop() {
  if (isRendering || !isPlaying) return;
  isRendering = true;

  const frameStart = performance.now();

  // Do the work
  const imageData = drawWaveformFrame();
  await action.setImage(imageData);  // Wait for send to complete!

  // Calculate actual elapsed time
  const elapsed = performance.now() - frameStart;

  // Schedule next frame, accounting for render time
  const delay = Math.max(0, FRAME_TIME - elapsed);

  setTimeout(() => {
    isRendering = false;
    if (isPlaying) renderLoop();
  }, delay);
}

What happens:
t=0ms:   Start frame 1
t=18ms:  Frame 1 complete (took 18ms)
t=40ms:  Start frame 2 (waited 22ms)
t=55ms:  Frame 2 complete (took 15ms)
t=80ms:  Start frame 3 (waited 25ms)

Result: Consistent ~25 FPS, no queue buildup, smooth animation
Canvas Optimization Techniques:
OPTIMIZATION 1: Reuse Canvas Context
====================================

BAD:
function drawFrame() {
  const canvas = document.createElement('canvas');  // NEW canvas every frame!
  const ctx = canvas.getContext('2d');
  // draw...
}

GOOD:
const canvas = document.createElement('canvas');
canvas.width = 72;
canvas.height = 72;
const ctx = canvas.getContext('2d');

function drawFrame() {
  ctx.clearRect(0, 0, 72, 72);  // Clear existing canvas
  // draw...
}


OPTIMIZATION 2: Batch Drawing Operations
========================================

BAD:
for (const bar of bars) {
  ctx.fillStyle = bar.color;  // Style change per bar
  ctx.fillRect(bar.x, bar.y, bar.width, bar.height);
}

GOOD:
ctx.fillStyle = primaryColor;  // Set once
ctx.beginPath();
for (const bar of bars) {
  ctx.rect(bar.x, bar.y, bar.width, bar.height);  // Just define path
}
ctx.fill();  // Draw all at once


OPTIMIZATION 3: Pre-Calculate Bar Positions
===========================================

BAD:
function drawFrame(fftData) {
  for (let i = 0; i < numBars; i++) {
    const x = margin + i * (barWidth + gap);  // Calculate EVERY frame
    const height = fftData[i] * canvasHeight;
    // ...
  }
}

GOOD:
// Calculate once at setup
const barPositions = [];
for (let i = 0; i < numBars; i++) {
  barPositions.push({
    x: margin + i * (barWidth + gap),
    width: barWidth
  });
}

function drawFrame(fftData) {
  for (let i = 0; i < numBars; i++) {
    const height = fftData[i] * canvasHeight;  // Only height changes
    ctx.fillRect(barPositions[i].x, canvasHeight - height,
                 barPositions[i].width, height);
  }
}
File Picker in Property Inspector - Complete Pattern
<!-- property-inspector.html -->
<!DOCTYPE html>
<html>
<head>
  <link rel="stylesheet" href="sdpi.css">
</head>
<body>
  <div class="sdpi-wrapper">
    <div class="sdpi-heading">Audio File</div>

    <div class="sdpi-item">
      <div class="sdpi-item-label">File</div>
      <div class="sdpi-item-value">
        <input type="text" id="filePath" readonly
               placeholder="No file selected">
        <button id="browseBtn">Browse...</button>
        <input type="file" id="fileInput"
               accept=".mp3,.wav,.ogg,.m4a"
               style="display: none">
      </div>
    </div>

    <div id="fileInfo" class="sdpi-item" style="display: none">
      <div class="sdpi-item-label">Info</div>
      <div class="sdpi-item-value" id="fileInfoText"></div>
    </div>
  </div>

  <script>
    // Handle file selection
    const browseBtn = document.getElementById('browseBtn');
    const fileInput = document.getElementById('fileInput');
    const filePathInput = document.getElementById('filePath');
    const fileInfo = document.getElementById('fileInfo');
    const fileInfoText = document.getElementById('fileInfoText');

    browseBtn.addEventListener('click', () => fileInput.click());

    fileInput.addEventListener('change', async (e) => {
      const file = e.target.files[0];
      if (!file) return;

      // Display filename
      filePathInput.value = file.name;

      // Read file as ArrayBuffer for sending to plugin
      const reader = new FileReader();
      reader.onload = async (event) => {
        const arrayBuffer = event.target.result;

        // Convert to base64 for JSON transport
        const base64 = btoa(
          new Uint8Array(arrayBuffer)
            .reduce((data, byte) => data + String.fromCharCode(byte), '')
        );

        // Send to plugin
        sendToPlugin({
          event: 'setAudioFile',
          payload: {
            filename: file.name,
            type: file.type,
            size: file.size,
            data: base64  // File contents as base64
          }
        });

        // Show file info
        fileInfo.style.display = 'block';
        fileInfoText.textContent =
          `${file.type}, ${(file.size / 1024).toFixed(1)} KB`;
      };

      reader.readAsArrayBuffer(file);
    });

    function sendToPlugin(data) {
      // Use Stream Deck SDK's sendToPlugin method
      if (window.sendToPlugin) {
        window.sendToPlugin(data);
      }
    }
  </script>
</body>
</html>
Plugin Side - Handling File Upload:
// In your plugin backend
class SoundboardAction {
  private soundsDir: string;

  constructor() {
    // Create sounds directory in plugin data folder
    this.soundsDir = path.join(this.getPluginDataDir(), 'sounds');
    if (!fs.existsSync(this.soundsDir)) {
      fs.mkdirSync(this.soundsDir, { recursive: true });
    }
  }

  onPropertyInspectorMessage(message: any) {
    if (message.event === 'setAudioFile') {
      this.handleAudioFileUpload(message.payload);
    }
  }

  private async handleAudioFileUpload(payload: {
    filename: string;
    type: string;
    size: number;
    data: string;  // base64
  }) {
    try {
      // Decode base64 to buffer
      const buffer = Buffer.from(payload.data, 'base64');

      // Generate unique filename to avoid collisions
      const uniqueName = `${Date.now()}-${payload.filename}`;
      const filePath = path.join(this.soundsDir, uniqueName);

      // Write file to disk
      fs.writeFileSync(filePath, buffer);

      // Update settings with just the filename
      await this.setSettings({
        soundFile: uniqueName
      });

      // Pre-compute waveform data
      await this.precomputeWaveform(filePath);

      console.log(`Audio file saved: ${filePath}`);
    } catch (error) {
      console.error('Failed to save audio file:', error);
    }
  }
}
Complete Project Specification
Functional Requirements
Core Features (Must Have):
| Feature | Description | Priority |
|---|---|---|
| Audio Playback | Press key to play configured audio file | P0 |
| Stop on Re-press | Pressing key during playback stops audio | P0 |
| Waveform Animation | Display animated frequency bars during playback | P0 |
| File Selection | Property Inspector file picker for audio files | P0 |
| Idle State Display | Show play icon or preview when not playing | P0 |
| Playback State Display | Show animated waveform during playback | P0 |
| Finished State | Return to idle state when playback completes | P0 |
| Volume Control | Adjustable volume in Property Inspector | P1 |
| Waveform Style Options | Bars, wave, or spectrum visualization | P1 |
| Color Customization | User-configurable waveform colors | P1 |
| Loop Mode | Option to loop audio continuously | P2 |
| Multiple Formats | Support MP3, WAV, OGG, M4A | P2 |
Non-Functional Requirements:
| Requirement | Target | Rationale |
|---|---|---|
| Animation Frame Rate | 20-30 FPS | Smooth enough for perception, not too taxing |
| Playback Latency | < 100ms | Key press to audio should feel instant |
| File Size Limit | 50 MB max | Reasonable for sound effects |
| Memory Usage | < 100 MB per action | Multiple soundboard keys shouldn’t hog memory |
| CPU during Animation | < 10% | Shouldn’t impact other applications |
Settings Schema
interface SoundboardSettings {
  // Audio settings
  soundFile: string;        // Filename in plugin sounds directory
  volume: number;           // 0.0 to 1.0
  loop: boolean;            // Loop playback

  // Visualization settings
  waveformStyle: 'bars' | 'wave' | 'circle' | 'spectrum';
  barCount: number;         // 4 to 32
  primaryColor: string;     // Hex color for bars
  secondaryColor: string;   // Hex color for background
  mirrorBars: boolean;      // Top/bottom symmetry
  glowEffect: boolean;      // Add glow to bars
  smoothTransitions: boolean; // Interpolate between frames

  // Idle state settings
  idleDisplay: 'icon' | 'preview' | 'filename' | 'custom';
  customIdleImage: string;  // Base64 image data
}
Solution Architecture
System Architecture Diagram
+--------------------------------------------------------------------------+
|                        SOUNDBOARD PLUGIN SYSTEM                           |
+--------------------------------------------------------------------------+
|                                                                           |
|  +-------------------+    +---------------------+    +------------------+ |
|  | Property Inspector|    |    Plugin Backend   |    |  Stream Deck     | |
|  |    (HTML/JS)      |    |     (Node.js)       |    |   Hardware       | |
|  |-------------------|    |---------------------|    |------------------| |
|  | File Picker       |<-->| Audio Manager       |<-->| LCD Keys (72x72) | |
|  | Volume Slider     |    |   - Playback        |    | Button Events    | |
|  | Style Options     |    |   - FFT Pre-compute |    |                  | |
|  | Color Pickers     |    |                     |    |                  | |
|  +-------------------+    | Waveform Renderer   |    +------------------+ |
|           |               |   - Canvas Drawing  |             ^          |
|           |               |   - Animation Loop  |             |          |
|           v               |   - Frame Limiting  |             |          |
|  +-------------------+    |                     |    +------------------+ |
|  | sendToPlugin()    |--->| Settings Manager    |    | Stream Deck App  | |
|  | (WebSocket)       |    |   - Load/Save       |--->| (WebSocket)      | |
|  +-------------------+    |   - Validation      |    +------------------+ |
|                           +---------------------+                         |
|                                    |                                      |
|                                    v                                      |
|                           +---------------------+                         |
|                           |  Plugin Data Dir    |                         |
|                           |---------------------|                         |
|                           | sounds/             |                         |
|                           |   airhorn.mp3       |                         |
|                           |   drumroll.wav      |                         |
|                           | waveforms/          |                         |
|                           |   airhorn.json      | (pre-computed FFT)      |
|                           +---------------------+                         |
+--------------------------------------------------------------------------+
Module Architecture
src/
+-- index.ts                    # Entry point, plugin registration
+-- actions/
|   +-- soundboard.action.ts    # Main soundboard action class
|
+-- audio/
|   +-- player.ts               # Cross-platform audio playback
|   +-- decoder.ts              # Audio file decoding (WAV, MP3)
|   +-- analyzer.ts             # FFT analysis and waveform generation
|   +-- types.ts                # Audio-related TypeScript types
|
+-- renderer/
|   +-- waveform.ts             # Waveform visualization renderer
|   +-- styles/
|   |   +-- bars.ts             # Bar-style visualization
|   |   +-- wave.ts             # Wave-style visualization
|   |   +-- circle.ts           # Circular visualization
|   |   +-- spectrum.ts         # Full spectrum visualization
|   +-- animation.ts            # Animation loop controller
|   +-- canvas.ts               # Canvas utilities
|
+-- storage/
|   +-- settings.ts             # Settings persistence
|   +-- sounds.ts               # Sound file management
|   +-- waveforms.ts            # Pre-computed waveform cache
|
+-- utils/
|   +-- path.ts                 # Cross-platform path handling
|   +-- timing.ts               # Frame timing utilities
|   +-- color.ts                # Color manipulation helpers
|
+-- types/
    +-- settings.ts             # Settings type definitions
    +-- events.ts               # Event type definitions
Data Flow Diagram
FILE SELECTION FLOW
===================

User selects file          Property Inspector         Plugin Backend
in Property Inspector      reads file                 saves and analyzes
        |                        |                          |
        v                        v                          v
+----------------+       +----------------+         +------------------+
| Click Browse   |------>| FileReader     |-------->| Receive base64   |
| Select file    |       | -> ArrayBuffer |         | Decode to buffer |
+----------------+       | -> Base64      |         | Save to disk     |
                         +----------------+         | Pre-compute FFT  |
                                                    +------------------+


PLAYBACK FLOW
=============

Key Press                Audio Manager              Waveform Renderer
Event                    starts playback            starts animation
    |                         |                           |
    v                         v                           v
+----------+           +-------------+             +--------------+
| onKeyDown|---------->| play-sound  |             | Start loop   |
|          |           | spawn audio |             | Get FFT frame|
+----------+           +-------------+             | Draw canvas  |
    |                        |                     | setImage()   |
    |                        v                     +--------------+
    |                  +-------------+                    |
    |                  | Track time  |<-------------------+
    |                  | for sync    |      (sync playback position)
    |                  +-------------+
    |                        |
    |                        v
    |                  +-------------+
    +----------------->| onComplete  |
                       | Stop loop   |
                       | Reset state |
                       +-------------+


ANIMATION FRAME FLOW
====================

Animation Loop              Canvas                  Stream Deck
    |                          |                         |
    v                          v                         v
+----------------+      +--------------+          +-------------+
| Check playing  |      | clearRect()  |          | Receive     |
| Get elapsed ms |----->| Draw bars    |--------->| base64 image|
| Map to FFT idx |      | toDataURL()  |          | Update LCD  |
| Apply smoothing|      +--------------+          +-------------+
+----------------+
    |
    v
+----------------+
| Wait for next  |
| frame (timing) |
| Prevent buildup|
+----------------+
Phased Implementation Guide
Phase 1: Basic Audio Playback (Days 1-2)
Goal: Press a Stream Deck key and hear a hardcoded sound play.
Milestone: onKeyDown event triggers audio playback through Node.js.
Tasks:
- Project Setup
mkdir soundboard-plugin && cd soundboard-plugin pnpm init pnpm add @elgato/streamdeck play-sound pnpm add -D typescript @types/node - Create Basic Action (
src/actions/soundboard.action.ts)- Register action with Stream Deck SDK
- Handle
onKeyDownevent - Log to console on key press
- Add Audio Playback (
src/audio/player.ts)- Import
play-soundlibrary - Create simple
playSound(path)function - Test with hardcoded audio file path
- Import
- Connect Action to Audio
- Call
playSoundfromonKeyDown - Handle playback completion callback
- Add basic error handling
- Call
Success Criteria: Pressing the key plays an audio file.
Code Starting Point:
// src/audio/player.ts
import playSound from 'play-sound';

const player = playSound();

export function playSoundFile(
  filePath: string,
  onComplete?: () => void
): void {
  player.play(filePath, (err) => {
    if (err) {
      console.error('Playback error:', err);
    }
    if (onComplete) onComplete();
  });
}
Phase 2: Settings and File Selection (Days 3-4)
Goal: Select audio files through Property Inspector and store settings.
Milestone: User can browse for and select audio files in the UI.
Tasks:
- Create Property Inspector HTML
- File input element
- Display selected filename
- Basic styling
- Handle File Upload
- Read file as ArrayBuffer in Property Inspector
- Convert to base64 for transmission
- Send to plugin backend
- Save Uploaded Files
- Create sounds directory in plugin data
- Decode base64 and write file
- Store reference in settings
- Load Settings on Init
- Read settings when action appears
- Populate Property Inspector with current values
Success Criteria: Audio files selected in Property Inspector play when key is pressed.
Phase 3: Pre-Computed Waveform Generation (Days 5-7)
Goal: Analyze audio files and pre-compute FFT data for visualization.
Milestone: Audio file upload triggers waveform analysis; data stored as JSON.
Tasks:
- Add Audio Decoding (
src/audio/decoder.ts)- Install
node-wavfor WAV parsing - Install
music-metadatafor MP3/format detection - Create
decodeAudio(path)that returns PCM samples
- Install
- Implement FFT Analysis (
src/audio/analyzer.ts)- Install or implement FFT algorithm
- Split audio into time chunks
- Run FFT on each chunk
- Store array of frequency magnitudes
- Create Waveform Cache (
src/storage/waveforms.ts)- Save computed waveform as JSON
- Load waveform data by filename
- Check if waveform exists before recomputing
- Trigger Analysis on Upload
- After saving audio file, compute waveform
- Show progress indicator if needed
- Store computed data
Success Criteria: Each uploaded audio file has a corresponding waveform JSON file.
Code Starting Point:
// src/audio/analyzer.ts
export interface WaveformData {
  sampleRate: number;
  duration: number;
  framesPerSecond: number;
  frames: number[][];  // Array of FFT magnitudes per frame
}

export function analyzeAudio(
  samples: Float32Array,
  sampleRate: number,
  fps: number = 30
): WaveformData {
  const samplesPerFrame = Math.floor(sampleRate / fps);
  const frames: number[][] = [];

  for (let i = 0; i < samples.length; i += samplesPerFrame) {
    const chunk = samples.slice(i, i + samplesPerFrame);
    const fft = computeFFT(chunk);
    const magnitudes = fftToMagnitudes(fft);
    frames.push(magnitudes);
  }

  return {
    sampleRate,
    duration: samples.length / sampleRate,
    framesPerSecond: fps,
    frames
  };
}
Phase 4: Static Waveform Display (Days 8-10)
Goal: Display pre-computed waveform on key (first frame only, no animation).
Milestone: Key shows visualization bars when sound file is loaded.
Tasks:
- Create Canvas Renderer (
src/renderer/canvas.ts)- Create canvas element (72x72)
- Utility functions for drawing rectangles
- Convert canvas to base64 data URL
- Implement Bar Visualization (
src/renderer/styles/bars.ts)- Draw frequency bars from FFT data
- Apply logarithmic frequency mapping
- Add color gradient
- Update Key Image
- Load waveform data on action appear
- Draw first frame
- Call
action.setImage()with rendered image
- Add Idle State Icons
- Draw play icon when idle
- Switch to waveform when file is loaded
Success Criteria: Key displays static waveform visualization when audio file is configured.
Phase 5: Animated Waveform During Playback (Days 11-14)
Goal: Animate waveform in sync with audio playback.
Milestone: Pressing key shows live waveform animation matching the audio.
Tasks:
- Create Animation Controller (
src/renderer/animation.ts)- Frame timing with adaptive delay
- Prevent queue buildup
- Start/stop animation
- Synchronize with Audio
- Track playback start time
- Calculate current frame index
- Handle edge cases (pause, resume, stop)
- Implement Render Loop
- Get current FFT frame based on elapsed time
- Draw frame to canvas
- Send to Stream Deck
- Schedule next frame
- Add Frame Smoothing
- Interpolate between FFT frames
- Apply decay for smoother bar movement
- Optional: add smooth fall-off
- Handle Playback Events
- Stop animation when audio ends
- Reset to idle state
- Handle re-press to stop
Success Criteria: Waveform animates smoothly in sync with audio playback.
Code Starting Point:
// src/renderer/animation.ts
export class AnimationController {
  private isAnimating = false;
  private startTime = 0;
  private waveformData: WaveformData | null = null;

  start(waveform: WaveformData) {
    this.waveformData = waveform;
    this.startTime = performance.now();
    this.isAnimating = true;
    this.renderLoop();
  }

  stop() {
    this.isAnimating = false;
  }

  private async renderLoop() {
    if (!this.isAnimating || !this.waveformData) return;

    const frameStart = performance.now();
    const elapsed = frameStart - this.startTime;
    const frameIndex = Math.floor(
      elapsed / 1000 * this.waveformData.framesPerSecond
    );

    // Stop if past the end
    if (frameIndex >= this.waveformData.frames.length) {
      this.stop();
      return;
    }

    // Render frame
    const fftData = this.waveformData.frames[frameIndex];
    const imageData = this.renderFrame(fftData);
    await this.sendToStreamDeck(imageData);

    // Schedule next frame
    const renderTime = performance.now() - frameStart;
    const targetFrameTime = 1000 / this.waveformData.framesPerSecond;
    const delay = Math.max(0, targetFrameTime - renderTime);

    setTimeout(() => this.renderLoop(), delay);
  }
}
Phase 6: Polish and Additional Visualization Styles (Days 15-21)
Goal: Add multiple visualization styles and polish the user experience.
Milestone: Full-featured soundboard with customizable visualizations.
Tasks:
- Add Wave Style (
src/renderer/styles/wave.ts)- Draw continuous wave line
- Interpolate between points
- Add fill below line
- Add Circle Style (
src/renderer/styles/circle.ts)- Radial bar layout
- Rotate with playback
- Pulsing center
- Add Spectrum Style (
src/renderer/styles/spectrum.ts)- Full frequency spectrum
- Color gradient by frequency
- Peak hold indicators
- Property Inspector Polish
- Style selector dropdown
- Color pickers
- Preview thumbnail
- Real-time settings updates
- Visual Effects
- Glow effect option
- Mirror mode (top/bottom)
- Smooth transitions toggle
- Error Handling
- Invalid file format message
- File not found recovery
- Playback failure feedback
Success Criteria: Professional-quality plugin with multiple visualization options.
Questions to Guide Your Design
Before implementing, think through these questions:
Audio Playback Questions
- How do you play audio from Node.js (not browser)?
- The plugin runs in Node.js, not a browser. You cannot use
<audio>elements or Web Audio API directly. - What library handles cross-platform audio playback?
- How do you know when playback finishes?
- The plugin runs in Node.js, not a browser. You cannot use
- How do you handle different audio formats (MP3, WAV, OGG)?
- Which formats can you decode in Node.js?
- Do you need external codecs?
- How do you handle unsupported formats gracefully?
- How do you control volume programmatically?
- Does
play-soundsupport volume control? - Are volume controls platform-specific?
- Do you adjust volume in the audio data or the player?
- Does
FFT and Visualization Questions
- How do you extract waveform data from an audio file?
- Do you analyze in real-time during playback, or pre-compute the waveform?
- If pre-computing, how do you synchronize the visualization with playback position?
- What format does FFT output, and how do you map it to bar heights?
- What FFT chunk size should you use?
- Larger chunks = better frequency resolution, worse time resolution
- Smaller chunks = faster response, less frequency detail
- What’s the right balance for visualization?
- How many visualization bars should you display?
- 72 pixels wide limits your options
- More bars = more detail but thinner
- Fewer bars = easier to see but less informative
- What’s readable on a small LCD?
Animation Questions
- How do you animate the key display without overloading the WebSocket?
- What frame rate is “good enough” for a 72x72 display?
- How do you throttle updates without making animation jerky?
- Should you batch multiple frame updates?
- How do you keep animation in sync with audio?
play-soundspawns a separate process- You don’t have direct access to playback position
- How do you estimate current position?
- What happens if rendering falls behind?
- If a frame takes too long, do you skip frames?
- How do you catch up without stuttering?
- What’s your strategy for dropped frames?
Thinking Exercise
Trace the complete audio playback flow from file selection to animated display:
Step 1: File Selected in Property Inspector
+----------------------------------------------------------+
|  User clicks "Browse..." and selects "airhorn.mp3"       |
|  from their computer                                      |
+----------------------------------------------------------+
           |
           | FileReader reads as ArrayBuffer
           | Converts to base64
           v
Step 2: File Data Sent to Plugin Backend
+----------------------------------------------------------+
|  Property Inspector sends WebSocket message:              |
|  {                                                        |
|    event: "setAudioFile",                                 |
|    payload: {                                             |
|      filename: "airhorn.mp3",                             |
|      type: "audio/mpeg",                                  |
|      size: 156432,                                        |
|      data: "SUQzBAAAAAAAI1RTU0UAAAA..."  (base64)         |
|    }                                                      |
|  }                                                        |
+----------------------------------------------------------+
           |
           | Plugin receives message
           | Decodes base64 to buffer
           v
Step 3: Audio File Saved and Analyzed
+----------------------------------------------------------+
|  Plugin saves file to sounds directory:                   |
|  ~/.config/com.soundboard/sounds/1703123456-airhorn.mp3   |
|                                                           |
|  Then runs FFT analysis:                                  |
|  - Decode MP3 to PCM samples                              |
|  - Split into 30 chunks per second                        |
|  - Run FFT on each chunk                                  |
|  - Save to waveforms/1703123456-airhorn.json              |
+----------------------------------------------------------+
           |
           | Analysis complete
           | Update key display to show loaded state
           v
Step 4: Key Shows Idle State with Preview
+----------------------------------------------------------+
|  Key now displays play icon or static waveform preview    |
|  Settings saved: { soundFile: "1703123456-airhorn.mp3" }  |
+----------------------------------------------------------+
           |
           | User presses key
           v
Step 5: Key Pressed - Playback Starts
+----------------------------------------------------------+
|  onKeyDown fires:                                         |
|  1. Load pre-computed waveform data from JSON             |
|  2. Call play-sound to start audio                        |
|  3. Record playback start timestamp                       |
|  4. Start animation loop                                  |
+----------------------------------------------------------+
           |
           | Animation loop runs at ~30 FPS
           v
Step 6: Animation Loop Renders Each Frame
+----------------------------------------------------------+
|  Every ~33ms:                                             |
|  1. Calculate elapsed time since playback start           |
|  2. Map to frame index in waveform data                   |
|  3. Get FFT magnitudes for current frame                  |
|  4. Apply smoothing/interpolation                         |
|  5. Draw bars on 72x72 canvas                             |
|  6. Convert canvas to base64                              |
|  7. Call action.setImage(base64)                          |
|  8. Schedule next frame with adaptive delay               |
+----------------------------------------------------------+
           |
           | Each frame updates the LCD
           v
Step 7: Display Updates on Stream Deck Hardware
+----------------------------------------------------------+
|  Stream Deck receives image data via WebSocket            |
|  Hardware LCD updates with new frame                      |
|  Bars animate in sync with audio!                         |
|                                                           |
|  Visual representation at t=1.5s:                         |
|    +----------------+                                     |
|    |  |   |     |   |                                     |
|    | ||  ||| | |||   |                                     |
|    |||||||||||||||   |                                     |
|    |||||||||||||||   |                                     |
|    +----------------+                                     |
+----------------------------------------------------------+
           |
           | Audio playback completes
           v
Step 8: Playback Finishes
+----------------------------------------------------------+
|  play-sound callback fires (audio ended)                  |
|  Animation controller receives stop signal                |
|  Final frame drawn (or transition to idle)                |
|  Key returns to "REPLAY" or idle state                    |
+----------------------------------------------------------+
Question to ponder: At Step 6, why might pre-computed FFT data be better than real-time analysis? What are the tradeoffs?
Answer exploration:
Pre-computed advantages:
- No CPU-intensive FFT during animation loop
- Perfect synchronization (frame index directly maps to time)
- Consistent frame timing (no FFT computation variance)
- Can pre-process for better visualization (normalize, smooth)
Pre-computed disadvantages:
- Upfront processing time (1-2 seconds per file)
- Storage for waveform JSON files
- Can’t visualize streaming audio
- Changes to visualization require re-analysis
Real-time advantages:
- Works with streaming audio
- No storage needed
- Immediate response to any audio
Real-time disadvantages:
- CPU usage during playback
- Harder to synchronize (FFT takes variable time)
- Getting audio buffer from external player is complex
- May cause frame drops on slower systems
For Stream Deck soundboard, pre-computed is clearly better because:
- Sound files are finite and can be analyzed once
- Animation smoothness is paramount
- CPU should be free for other tasks
- Perfect sync is achievable
Testing Strategy
Testing Audio Playback Without Hardware
You can test most functionality without a physical Stream Deck:
// tests/audio/player.test.ts
import { describe, it, expect, vi, beforeEach, afterEach } from 'vitest';
import { AudioPlayer } from '../../src/audio/player';
import * as childProcess from 'child_process';

vi.mock('child_process');

describe('AudioPlayer', () => {
  let player: AudioPlayer;

  beforeEach(() => {
    player = new AudioPlayer();
    vi.clearAllMocks();
  });

  describe('play', () => {
    it('spawns correct command on macOS', async () => {
      // Mock platform
      Object.defineProperty(process, 'platform', { value: 'darwin' });

      const mockSpawn = vi.mocked(childProcess.spawn);
      mockSpawn.mockReturnValue({
        on: vi.fn((event, cb) => {
          if (event === 'close') setTimeout(() => cb(0), 10);
        }),
      } as any);

      await player.play('/path/to/sound.mp3');

      expect(mockSpawn).toHaveBeenCalledWith('afplay', ['/path/to/sound.mp3']);
    });

    it('spawns correct command on Windows', async () => {
      Object.defineProperty(process, 'platform', { value: 'win32' });

      // Similar test for Windows...
    });

    it('rejects on playback error', async () => {
      const mockSpawn = vi.mocked(childProcess.spawn);
      mockSpawn.mockReturnValue({
        on: vi.fn((event, cb) => {
          if (event === 'error') cb(new Error('File not found'));
        }),
      } as any);

      await expect(player.play('/nonexistent.mp3')).rejects.toThrow();
    });
  });
});
Testing FFT Analysis
// tests/audio/analyzer.test.ts
import { describe, it, expect } from 'vitest';
import { analyzeAudio, computeFFT, mapToLogScale } from '../../src/audio/analyzer';

describe('FFT Analysis', () => {
  describe('computeFFT', () => {
    it('produces correct number of frequency bins', () => {
      const samples = new Float32Array(1024);
      // Fill with test signal
      for (let i = 0; i < samples.length; i++) {
        samples[i] = Math.sin(2 * Math.PI * 440 * i / 44100);
      }

      const fft = computeFFT(samples);
      expect(fft.length).toBe(512); // N/2 bins
    });

    it('detects pure tone frequency correctly', () => {
      const sampleRate = 44100;
      const frequency = 440; // A4
      const samples = new Float32Array(4096);

      for (let i = 0; i < samples.length; i++) {
        samples[i] = Math.sin(2 * Math.PI * frequency * i / sampleRate);
      }

      const fft = computeFFT(samples);
      const magnitudes = fft.map(c => Math.sqrt(c.real**2 + c.imag**2));

      // Find peak frequency
      const maxIndex = magnitudes.indexOf(Math.max(...magnitudes));
      const peakFrequency = maxIndex * sampleRate / samples.length;

      // Should be within 10Hz of 440Hz
      expect(Math.abs(peakFrequency - 440)).toBeLessThan(10);
    });
  });

  describe('mapToLogScale', () => {
    it('maps linear bins to logarithmic bars', () => {
      const linearBins = new Array(512).fill(0).map((_, i) => i);
      const bars = mapToLogScale(linearBins, 8);

      expect(bars.length).toBe(8);
      // First bar should average fewer bins than last bar
      // (logarithmic distribution)
    });
  });

  describe('analyzeAudio', () => {
    it('produces correct number of frames for duration', () => {
      const sampleRate = 44100;
      const duration = 2; // seconds
      const fps = 30;
      const samples = new Float32Array(sampleRate * duration);

      const waveform = analyzeAudio(samples, sampleRate, fps);

      expect(waveform.frames.length).toBeCloseTo(duration * fps, 0);
    });
  });
});
Testing Animation Controller
// tests/renderer/animation.test.ts
import { describe, it, expect, vi, beforeEach, afterEach } from 'vitest';
import { AnimationController } from '../../src/renderer/animation';

describe('AnimationController', () => {
  let controller: AnimationController;
  let mockSetImage: ReturnType<typeof vi.fn>;

  beforeEach(() => {
    vi.useFakeTimers();
    mockSetImage = vi.fn().mockResolvedValue(undefined);
    controller = new AnimationController(mockSetImage);
  });

  afterEach(() => {
    vi.useRealTimers();
  });

  it('calls setImage at target frame rate', async () => {
    const waveform = {
      duration: 1,
      framesPerSecond: 30,
      frames: new Array(30).fill([0.5, 0.5, 0.5, 0.5])
    };

    controller.start(waveform);

    // Advance 100ms (should render ~3 frames)
    await vi.advanceTimersByTimeAsync(100);

    expect(mockSetImage).toHaveBeenCalledTimes(3);
  });

  it('stops at end of waveform', async () => {
    const waveform = {
      duration: 0.1, // 100ms
      framesPerSecond: 30,
      frames: new Array(3).fill([0.5, 0.5, 0.5, 0.5])
    };

    controller.start(waveform);

    // Advance past end
    await vi.advanceTimersByTimeAsync(200);

    // Should have stopped after ~3 frames
    expect(mockSetImage.mock.calls.length).toBeLessThanOrEqual(4);
  });

  it('respects stop() call', async () => {
    const waveform = {
      duration: 1,
      framesPerSecond: 30,
      frames: new Array(30).fill([0.5])
    };

    controller.start(waveform);
    await vi.advanceTimersByTimeAsync(50);

    const callsBefore = mockSetImage.mock.calls.length;
    controller.stop();

    await vi.advanceTimersByTimeAsync(100);

    // No new calls after stop
    expect(mockSetImage.mock.calls.length).toBe(callsBefore);
  });
});
Manual Testing Checklist
PLAYBACK TESTING
----------------
[ ] Play WAV file - audio plays correctly
[ ] Play MP3 file - audio plays correctly
[ ] Play OGG file - audio plays correctly (if supported)
[ ] Press key during playback - stops audio
[ ] Re-press after stop - restarts from beginning
[ ] Multiple keys with different sounds work independently

VISUALIZATION TESTING
--------------------
[ ] Bars style renders correctly
[ ] Wave style renders correctly
[ ] Circle style renders correctly
[ ] Spectrum style renders correctly
[ ] Color settings apply correctly
[ ] Bar count setting changes display
[ ] Mirror mode works
[ ] Glow effect renders

ANIMATION TESTING
----------------
[ ] Animation starts when playback starts
[ ] Animation matches audio timing
[ ] Animation stops when audio ends
[ ] No frame drops during playback
[ ] Smooth transitions enabled/disabled works
[ ] Animation stops on key re-press

EDGE CASES
----------
[ ] Very short sound (<0.5s) plays and animates
[ ] Very long sound (>30s) plays without issues
[ ] Invalid file format shows error
[ ] Missing file shows error
[ ] Settings persist across restart
[ ] Multiple soundboard keys work simultaneously
Common Pitfalls & Debugging Tips
Pitfall 1: Audio Plays But No Visualization
Symptom: Sound plays when key is pressed, but the key display doesn’t animate.
Common Causes:
Cause 1: Waveform data not loaded
----------------------------------
Animation controller needs waveform data before starting.

DEBUG:
console.log('Waveform data:', this.waveformData);
// If null or undefined, the waveform wasn't loaded

FIX:
Ensure analyzeAudio() completes and saves data.
Load waveform data before calling animationController.start()


Cause 2: setImage not being called
----------------------------------
Animation loop might not be reaching setImage call.

DEBUG:
In renderLoop:
console.log('Rendering frame', frameIndex);

FIX:
Check that renderLoop() is actually running
Verify setImage callback isn't throwing


Cause 3: Base64 encoding issue
------------------------------
Canvas toDataURL might be failing.

DEBUG:
const imageData = canvas.toDataURL('image/png');
console.log('Image length:', imageData.length);
// If very short, encoding failed

FIX:
Ensure canvas has content before encoding
Check canvas dimensions are set (72x72)
Pitfall 2: Animation Not In Sync with Audio
Symptom: Waveform animates but is out of sync with the actual audio.
Cause 1: Using wrong time reference
-----------------------------------
You might be using animation frame count instead of actual elapsed time.

BAD:
let frameCount = 0;
function renderLoop() {
  const fftData = waveform.frames[frameCount++]; // WRONG!
}

GOOD:
const startTime = performance.now();
function renderLoop() {
  const elapsed = performance.now() - startTime;
  const frameIndex = Math.floor(elapsed / 1000 * waveform.fps);
  const fftData = waveform.frames[frameIndex];
}


Cause 2: Playback latency not accounted for
-------------------------------------------
Audio playback has startup latency that varies by platform.

FIX:
// Add a small offset to account for typical startup latency
const AUDIO_LATENCY_MS = 100; // Tune for your system
const adjustedStart = startTime + AUDIO_LATENCY_MS;


Cause 3: FFT chunk size mismatch
--------------------------------
If FFT was computed with different fps than animation expects.

FIX:
Ensure analyzeAudio() and AnimationController use same fps value.
Store fps in waveform data and always read from there.
Pitfall 3: Animation Stutters or Drops Frames
Symptom: Animation is jerky, not smooth.
Cause 1: setInterval without completion check
---------------------------------------------
Messages queue up faster than WebSocket can send.

BAD:
setInterval(() => {
  renderAndSend(); // Might still be sending previous!
}, 33);

GOOD:
let isRendering = false;
function renderLoop() {
  if (isRendering) return;
  isRendering = true;

  renderAndSend().then(() => {
    isRendering = false;
    if (isPlaying) setTimeout(renderLoop, delay);
  });
}


Cause 2: Too many draw operations per frame
-------------------------------------------
Complex drawing operations blocking the event loop.

DEBUG:
const start = performance.now();
drawFrame(fftData);
console.log('Draw time:', performance.now() - start);
// If > 10ms, optimize drawing

FIX:
- Reuse canvas context
- Pre-calculate bar positions
- Batch draw operations
- Reduce bar count


Cause 3: Garbage collection pauses
----------------------------------
Creating too many temporary objects per frame.

FIX:
- Reuse arrays instead of creating new ones
- Pre-allocate buffers
- Avoid string concatenation in hot path
Pitfall 4: Platform-Specific Audio Issues
Symptom: Works on one OS but fails on another.
macOS Specific Issues:
----------------------
- afplay doesn't support all formats
- No pause/resume support (must kill and restart)

FIX:
Use ffplay (from FFmpeg) as fallback for more formats


Windows Specific Issues:
------------------------
- mplayer might not be installed
- Path escaping issues with spaces

FIX:
Provide fallback to PowerShell audio
Always quote file paths


Linux Specific Issues:
----------------------
- Multiple audio systems (ALSA, PulseAudio)
- mpg123 might not be installed

FIX:
Check for multiple players in order of preference
Provide clear error message if no player found
Pitfall 5: Property Inspector File Path Issues
Symptom: File selected but playback says “file not found.”
Cause 1: file.path not available
--------------------------------
Standard web file input doesn't provide full path.

FIX:
Read file as ArrayBuffer and send data, not path:
reader.readAsArrayBuffer(file);
// Then base64 encode and send to plugin


Cause 2: Path not normalized for platform
-----------------------------------------
Windows backslashes stored, used on macOS.

FIX:
const fs = require('fs');
const path = require('path');

// Always use path.join() for file paths
const soundPath = path.join(this.soundsDir, settings.soundFile);

// Never store full paths in settings - store just filename
settings.soundFile = 'mysound.mp3'; // NOT full path


Cause 3: Plugin data directory not created
------------------------------------------
Trying to save file to non-existent directory.

FIX:
if (!fs.existsSync(this.soundsDir)) {
  fs.mkdirSync(this.soundsDir, { recursive: true });
}
Debugging Checklist
When something isn’t working, check in this order:
[ ] 1. Console logs - are there any errors?
[ ] 2. Is the audio file accessible? (check path, permissions)
[ ] 3. Is waveform data loaded? (log the data object)
[ ] 4. Is animation loop running? (log frame index)
[ ] 5. Is setImage being called? (log before call)
[ ] 6. What's the render time per frame? (performance.now)
[ ] 7. Is WebSocket connected? (check Stream Deck logs)
[ ] 8. Is the correct action receiving events? (log action ID)
The Interview Questions They’ll Ask
If you can answer these questions thoroughly, you truly understand this project:
1. “How does FFT work for audio visualization?”
Key points to cover:
- FFT transforms time-domain samples into frequency-domain magnitudes
- Input is a window of N samples (typically power of 2: 512, 1024, 2048)
- Output is N/2 frequency bins, each representing a frequency range
- Bin frequency = bin_index * sample_rate / N
- You extract magnitude from complex output: sqrt(real^2 + imag^2)
- For visualization, you map bins to bars using logarithmic scaling
- Human hearing is logarithmic, so bass needs fewer bins than treble
Follow-up: “Why logarithmic scaling?”
Music frequencies are perceived logarithmically. A doubling in frequency (octave) is perceived as an equal step regardless of the starting frequency. 100Hz to 200Hz sounds like the same “distance” as 1000Hz to 2000Hz. Linear mapping would make bass invisible and treble dominate.
2. “What’s your approach to high-frequency image updates?”
Key points to cover:
- Target 20-30 FPS for Stream Deck (higher is wasteful, lower looks choppy)
- Use adaptive timing, not fixed setInterval
- Wait for previous frame to complete before starting next
- Track actual render time and adjust delay accordingly
- Prevent WebSocket message queue buildup
- Use performance.now() for accurate timing
- Pre-calculate static values (bar positions, colors) outside the loop
- Reuse canvas context, don’t recreate each frame
Follow-up: “What happens if rendering falls behind?”
Skip frames to catch up. Calculate target frame from elapsed time, not by incrementing a counter. If elapsed time says we should be on frame 50 but we’re on frame 45, jump to frame 50.
3. “How do you handle cross-platform audio playback?”
Key points to cover:
- Node.js has no built-in audio playback
- Must use external libraries that wrap platform-specific commands
play-soundspawns:afplay(macOS),mplayer(Linux), system player (Windows)- Each platform has different capabilities (pause, volume, seek)
- File path handling differs between platforms
- Need fallback strategy if preferred player isn’t available
- Volume control may require different approaches per platform
Follow-up: “Why not use Web Audio API?”
Web Audio API is browser-only. Stream Deck plugins run in Node.js, which is a server-side environment without browser APIs. We need to use system-level audio playback through child processes.
4. “Why did you choose pre-computed vs real-time waveform analysis?”
Key points to cover:
Pre-computed advantages (why we chose it):
- All heavy FFT computation happens once at file load
- During playback, just index into array - very fast
- Perfect synchronization (frame index = time)
- Consistent frame timing (no FFT variance)
- Lower CPU during animation
Real-time advantages (why someone might choose it):
- Works with streaming audio
- No storage needed for waveform files
- Can handle live audio input
Trade-off decision: For a soundboard with finite audio files that are loaded in advance, pre-computed is clearly better. Real-time only makes sense for live audio or streaming, which isn’t our use case.
5. “How do you synchronize animation with audio playback?”
Key points to cover:
- Record exact timestamp when playback starts
- Calculate elapsed time each frame: now() - startTime
- Map elapsed time to frame index: Math.floor(elapsed * fps)
- Index into pre-computed waveform array
- Account for audio startup latency if needed
- Stop animation when frame index exceeds available frames
- Handle stop/restart by resetting start timestamp
Challenge: Since play-sound spawns a separate process, we don’t have direct access to playback position. We assume playback starts immediately and track our own elapsed time. This works well for sound effects but might drift for longer audio.
6. “Walk me through the complete data flow from file selection to animated display.”
See the Thinking Exercise section for a detailed walkthrough. Key points:
- Property Inspector file input triggers file read
- File data sent to plugin as base64 over WebSocket
- Plugin saves file and runs FFT analysis
- Pre-computed waveform stored as JSON
- Key press loads waveform and starts both audio and animation
- Animation loop indexes into waveform data based on elapsed time
- Each frame renders to canvas, encodes to base64, sends to Stream Deck
- Audio completion callback stops animation and resets state
Hints in Layers
Try to solve each challenge yourself first. Only reveal hints if stuck:
Hint 1: Which library plays audio in Node.js?
The play-sound library is the simplest cross-platform solution. It spawns platform-specific commands:
const player = require('play-sound')();

player.play('/path/to/sound.mp3', (err) => {
  if (err) console.error('Playback failed:', err);
  else console.log('Playback finished');
});
For more control (pause, seek, volume), consider node-audio-player or howler.js (if you can bundle a browser context).
Platform commands used:
- macOS:
afplay - Linux:
mpg123,mpg321,mplayer,play(SoX) - Windows:
mplayer,cmdmp3,cvlc
Hint 2: How do I decode audio files to get PCM samples?
For WAV files (uncompressed):
const wav = require('node-wav');
const fs = require('fs');

const buffer = fs.readFileSync('sound.wav');
const result = wav.decode(buffer);

console.log(result.sampleRate);    // e.g., 44100
console.log(result.channelData);   // Array of Float32Array per channel
console.log(result.channelData[0]); // Left channel samples
For MP3 files (compressed), you need a decoder:
const { Lame } = require('node-lame');
// Or use ffmpeg via fluent-ffmpeg
// Or use music-metadata for reading without decoding
Recommended approach: Convert all uploads to WAV on import using ffmpeg, then always decode WAV. This simplifies format handling.
Hint 3: How do I implement FFT in JavaScript?
You can use the fft.js library or implement a simple radix-2 FFT:
const FFT = require('fft.js');

const fftSize = 1024;
const fft = new FFT(fftSize);

// Input: array of real samples
// Output: array of complex values [real0, imag0, real1, imag1, ...]
const input = new Float32Array(fftSize);
// Fill input with audio samples...

const out = fft.createComplexArray();
fft.realTransform(out, input);

// Convert to magnitudes
const magnitudes = [];
for (let i = 0; i < fftSize; i += 2) {
  const real = out[i];
  const imag = out[i + 1];
  magnitudes.push(Math.sqrt(real * real + imag * imag));
}
Important: Apply a window function (Hanning, Hamming) before FFT to reduce spectral leakage:
function applyHanningWindow(samples) {
  const windowed = new Float32Array(samples.length);
  for (let i = 0; i < samples.length; i++) {
    const multiplier = 0.5 * (1 - Math.cos(2 * Math.PI * i / (samples.length - 1)));
    windowed[i] = samples[i] * multiplier;
  }
  return windowed;
}
Hint 4: Frame rate limiting pattern
Do not use setInterval with exact frame timing - WebSocket latency can cause buildup. Instead, use a “frame complete” pattern:
let isRendering = false;
const TARGET_FPS = 25;
const FRAME_TIME = 1000 / TARGET_FPS;

async function renderLoop() {
  if (isRendering || !isPlaying) return;
  isRendering = true;

  const frameStart = performance.now();

  // Draw frame
  const imageData = drawWaveformFrame(currentPosition);
  await action.setImage(imageData);

  // Schedule next frame, accounting for render time
  const elapsed = performance.now() - frameStart;
  const delay = Math.max(0, FRAME_TIME - elapsed);

  setTimeout(() => {
    isRendering = false;
    if (isPlaying) renderLoop();
  }, delay);
}
Key points:
isRenderingflag prevents overlapping frames- Wait for
setImageto complete before scheduling next - Adaptive delay based on actual render time
- Check
isPlayingbefore scheduling next iteration
Hint 5: File picker in Property Inspector HTML
The Property Inspector uses standard HTML, but file paths need special handling:
<!-- In Property Inspector HTML -->
<input type="file" id="audioFile" accept=".mp3,.wav,.ogg" />

<script>
document.getElementById('audioFile').addEventListener('change', (e) => {
  const file = e.target.files[0];
  if (!file) return;

  // Read file content (path may not be available)
  const reader = new FileReader();
  reader.onload = (event) => {
    const arrayBuffer = event.target.result;

    // Convert to base64 for JSON transport
    const bytes = new Uint8Array(arrayBuffer);
    let binary = '';
    for (let i = 0; i < bytes.length; i++) {
      binary += String.fromCharCode(bytes[i]);
    }
    const base64 = btoa(binary);

    sendToPlugin({
      event: 'setAudioFile',
      payload: {
        filename: file.name,
        type: file.type,
        data: base64
      }
    });
  };
  reader.readAsArrayBuffer(file);
});
</script>
Plugin side: Decode base64, save to plugin data directory, store just the filename in settings.
Hint 6: Drawing frequency bars on canvas
function drawBars(ctx, fftData, options) {
  const { width, height, barCount, primaryColor, secondaryColor } = options;

  // Clear canvas
  ctx.fillStyle = secondaryColor || '#000000';
  ctx.fillRect(0, 0, width, height);

  // Map FFT data to bar heights (logarithmic)
  const bars = mapFFTToBars(fftData, barCount);

  // Calculate bar dimensions
  const barWidth = Math.floor((width - (barCount - 1) * 2) / barCount);
  const gap = 2;

  // Draw bars
  ctx.fillStyle = primaryColor || '#00FF88';

  for (let i = 0; i < barCount; i++) {
    const x = i * (barWidth + gap);
    const barHeight = Math.floor(bars[i] * height);
    const y = height - barHeight;

    ctx.fillRect(x, y, barWidth, barHeight);
  }
}

function mapFFTToBars(fftData, barCount) {
  const bars = new Array(barCount).fill(0);
  const binCount = fftData.length;

  for (let i = 0; i < barCount; i++) {
    // Logarithmic mapping
    const lowBin = Math.floor(Math.pow(binCount, i / barCount));
    const highBin = Math.floor(Math.pow(binCount, (i + 1) / barCount));

    let sum = 0;
    for (let j = lowBin; j < highBin && j < binCount; j++) {
      sum += fftData[j];
    }
    bars[i] = sum / Math.max(1, highBin - lowBin);
  }

  // Normalize to 0-1 range
  const max = Math.max(...bars, 0.001);
  return bars.map(b => b / max);
}
Hint 7: Smooth bar transitions between frames
Abrupt changes look jarring. Apply smoothing between frames:
class SmoothBars {
  constructor(barCount) {
    this.current = new Array(barCount).fill(0);
    this.smoothingUp = 0.3;    // Rise quickly
    this.smoothingDown = 0.1;  // Fall slowly
  }

  update(newValues) {
    for (let i = 0; i < this.current.length; i++) {
      const target = newValues[i] || 0;
      const current = this.current[i];

      if (target > current) {
        // Rising - fast smoothing
        this.current[i] = current + (target - current) * this.smoothingUp;
      } else {
        // Falling - slow smoothing (creates "decay" effect)
        this.current[i] = current + (target - current) * this.smoothingDown;
      }
    }

    return [...this.current];
  }
}

// Usage in render loop:
const smoothBars = new SmoothBars(12);

function renderFrame(rawFFT) {
  const mapped = mapFFTToBars(rawFFT, 12);
  const smoothed = smoothBars.update(mapped);
  drawBars(ctx, smoothed, options);
}
This creates the classic “VU meter” effect where bars rise quickly with the beat and fall slowly.
Extensions & Challenges
Extension 1: Multiple Waveform Styles
Add additional visualization styles beyond basic bars:
Wave Style: Continuous line following audio amplitude
+------------------+
|                  |
|    /\    /\      |
|   /  \  /  \     |
|  /    \/    \    |
| /            \   |
+------------------+
Circle Style: Radial bars emanating from center
+------------------+
|      \ | /       |
|    \   |   /     |
|  ---   O   ---   |
|    /   |   \     |
|      / | \       |
+------------------+
Spectrum Style: Full frequency spectrum with color gradient
+------------------+
|||||||||||||||||  |
|||||||||||||||| | |
|||||||||||||  ||| |
|||||||||||||||||| |
+------------------+
Red=bass Yel=mid Grn=hi
Challenge: Implement all four styles and allow users to switch between them in the Property Inspector. Each style should respond to the same FFT data but render differently.
Extension 2: Volume Control with Visual Feedback
Add volume control that affects both playback and visualization:
Implementation Ideas:
- Slider in Property Inspector (0-100%)
- Volume affects audio output (platform-specific)
- Volume also scales visualization height
- Optional: Show volume bar on idle state
// Platform-specific volume
if (process.platform === 'darwin') {
  // afplay -v 0.5 for 50%
  spawn('afplay', ['-v', volume.toString(), filePath]);
} else if (process.platform === 'linux') {
  // mpg123 uses system volume, or use amixer
}
Extension 3: Multi-Key Mixing
Allow multiple soundboard keys to play simultaneously with mixing:
Challenges:
- Track which keys are currently playing
- Mix visualizations (average or max)
- Handle stop for individual vs all
- Memory management for multiple streams
Advanced: Implement a “solo” mode where pressing one key stops all others.
Extension 4: Beat Detection
Add beat detection to trigger special visual effects on the beat:
function detectBeat(fftData, history) {
  // Look at bass frequencies (first few bins)
  const bassEnergy = fftData.slice(0, 5).reduce((a, b) => a + b, 0);

  // Compare to average of recent history
  const avgEnergy = history.reduce((a, b) => a + b, 0) / history.length;

  // Beat if current is significantly above average
  const threshold = 1.5;
  return bassEnergy > avgEnergy * threshold;
}

// In render loop:
if (detectBeat(fftData, bassHistory)) {
  // Flash the bars brighter
  // Add glow effect
  // Briefly scale bars larger
}
Extension 5: Recording and Playback
Add the ability to record audio through the microphone and use it as a sound:
Challenges:
- Access microphone in Node.js (use
node-record-lpcm16or similar) - Save recording to WAV file
- Generate waveform for recorded audio
- Handle recording state in UI
Extension 6: Sound Banks and Presets
Create a system for organizing multiple sounds into banks:
Features:
- Multiple pages of sounds (swipe to switch)
- Preset configurations (DJ mode, streamer mode)
- Import/export sound banks
- Cloud sync for sounds
Real-World Connections
Understanding the concepts in this project directly translates to many real-world applications:
Music Visualizers
The same FFT-to-bars pipeline powers:
- Winamp visualizations
- iTunes/Spotify visualizers
- VJ software (Resolume, VDMX)
- LED audio visualizers
Career path: Audio software development, creative coding, VJ/lighting design
Audio Production Software
DAWs (Digital Audio Workstations) use these concepts:
- Spectrum analyzers in mixing consoles
- Waveform displays in audio editors
- Real-time monitoring meters
- Audio effects that process frequency data
Career path: Audio plugin development (VST, AU), music software engineering
Game Audio
Game engines need similar capabilities:
- Music that reacts to gameplay
- Lip-sync animation from voice
- Audio-reactive visual effects
- Spatial audio processing
Career path: Game audio programming, middleware development (Wwise, FMOD)
Accessibility Technology
Audio visualization helps accessibility:
- Visual indicators for deaf users
- Sound identification systems
- Speech-to-text visualization
- Hearing aid calibration tools
Career path: Assistive technology development, accessibility engineering
IoT and Hardware
This project teaches patterns used in:
- Smart home audio systems
- Embedded systems with displays
- Hardware prototyping
- Physical computing installations
Career path: IoT development, hardware engineering, installation art
Broadcasting and Streaming
Streamers and broadcasters use these concepts:
- OBS audio visualization overlays
- Podcast waveform generation
- Live audio monitoring
- Sound reactive alerts
Career path: Streaming tool development, broadcast engineering
Books That Will Help
| Book | Author | Relevant Chapters | Why It Helps |
|---|---|---|---|
| “HTML5 Canvas” | Steve Fulton, Jeff Fulton | Ch. 5 (Animation), Ch. 8 (Audio) | Definitive guide to canvas drawing, animation loops, and optimization techniques |
| “Digital Signal Processing” | Steven W. Smith | Ch. 8-12 (FFT), Ch. 18-19 (Audio) | Free online at dspguide.com - explains FFT from first principles with practical examples |
| “Node.js Design Patterns” | Mario Casciaro | Ch. 3 (Callbacks), Ch. 9 (External Processes) | Patterns for async operations and integrating external processes like audio players |
| “Web Audio API” | Boris Smus | Ch. 3-5 (Audio Analysis) | While browser-focused, explains audio analysis concepts that apply to Node.js |
| “Node.js in Action” | Mike Cantelon et al. | Ch. 4 (Filesystem), Ch. 8 (Buffers) | Comprehensive guide including filesystem and buffer handling for audio files |
| “Audio Programming Book” | Boulanger & Lazzarini | Ch. 1-5 (Fundamentals) | Deep dive into audio programming concepts, sample rates, and digital audio |
| “JavaScript: The Good Parts” | Douglas Crockford | Ch. 4 (Functions), Ch. 5 (Inheritance) | Patterns for organizing complex JavaScript like animation and audio managers |
Reading Order Recommendation
- Steven Smith’s DSP Guide (Online, Ch. 8-10) - 2 hours
- Understand FFT fundamentals before implementing
- HTML5 Canvas (Ch. 5) - 1 hour
- Learn animation loop patterns
- Node.js Design Patterns (Ch. 9) - 1 hour
- Understand external process integration
-
Build Phase 1-2 - Then return to reading as needed
- Web Audio API (Ch. 3-5) - Reference as you implement FFT
Self-Assessment Checklist
Before considering this project complete, verify your understanding:
Conceptual Understanding
- Can you explain the difference between time domain and frequency domain to a colleague?
- Can you describe what FFT produces and how to interpret its output?
- Can you explain why Node.js needs external libraries for audio playback?
- Can you describe the trade-offs between pre-computed and real-time FFT analysis?
- Can you explain why logarithmic scaling is needed for visualizing frequencies?
- Can you describe how to prevent animation frame queue buildup?
Audio Implementation
- Can you play audio files from Node.js on at least two platforms?
- Can you handle audio playback completion callbacks?
- Can you decode WAV files to get PCM sample data?
- Can you detect when a file format is unsupported?
- Can you handle the case where no audio player is available?
FFT Implementation
- Can you run FFT on a chunk of audio samples?
- Can you extract magnitudes from complex FFT output?
- Can you map linear frequency bins to logarithmic visual bars?
- Can you apply a window function to reduce spectral leakage?
- Can you explain why different chunk sizes produce different results?
Animation Implementation
- Can you draw frequency bars on an HTML5 canvas?
- Can you convert canvas to base64 data URL efficiently?
- Can you implement an animation loop with adaptive frame timing?
- Can you synchronize animation with audio playback start time?
- Can you implement smooth transitions between animation frames?
- Can you stop animation cleanly when audio ends?
Stream Deck Integration
- Does your Property Inspector file picker work correctly?
- Does your plugin save audio files to a persistent location?
- Does your key display update correctly during playback?
- Does pressing the key during playback stop the audio?
- Do settings persist across Stream Deck restarts?
Code Quality
- Is your code organized into logical modules (audio, renderer, storage)?
- Are platform-specific details isolated from business logic?
- Are async operations properly awaited/handled?
- Is there error handling for file not found, invalid format, etc.?
- Can another developer understand your code structure?
Real-World Readiness
- Does the animation run smoothly at 20-30 FPS?
- Does playback start with <100ms latency?
- Does multiple simultaneous keys work without issues?
- Can you demonstrate the plugin to someone and have it work reliably?
- Would you be proud to show this in a portfolio or interview?
The Core Question You’ve Answered
“How do I integrate audio playback with real-time visual feedback, processing audio data for animated waveform display on a 72x72 pixel key?”
By building this soundboard plugin, you have mastered:
-
Cross-Platform Audio in Node.js: Understanding how to play audio without browser APIs, dealing with platform differences, and managing external processes
-
Digital Signal Processing Fundamentals: Applying FFT to transform audio data, understanding frequency analysis, and mapping mathematical output to visual representation
-
High-Performance Animation: Building efficient render loops, managing frame timing, preventing queue buildup, and optimizing canvas operations
-
Hardware Integration: Understanding how software communicates with physical devices, managing real-time updates to LCD displays, and working within hardware constraints
-
Full-Stack Plugin Development: Connecting Property Inspector UI to backend logic, managing file uploads, persisting settings, and coordinating multiple systems
These skills transfer directly to:
- Audio software development
- Real-time graphics programming
- Game development
- IoT and embedded systems
- Any application requiring hardware integration
You are now equipped to build sophisticated plugins that combine audio, graphics, and hardware interaction - a genuinely impressive demonstration of full-stack development skills.
Project Guide Version 1.0 - December 2025