Zero-Trust Architecture Mastery - Real World Projects
Goal: Deeply understand the principles and implementation of Zero-Trust Architecture—moving beyond perimeter-based security to a model of continuous verification, identity-based access, and micro-segmentation. You will build the core components (PEP, PDP, IAM bridges, and SDP controllers) from first principles to understand how to secure modern, distributed systems where “the network is always hostile.” By the end, you won’t just know what Zero Trust is; you’ll know how to build the infrastructure that enforces it.
Why Zero-Trust Architecture Matters
For decades, cybersecurity relied on the “Castle and Moat” model: a strong perimeter (firewall) protecting a “trusted” internal network. Once inside, you had free rein. But the rise of cloud, remote work, and sophisticated lateral-movement attacks proved this model is dead.
In 2020, the SolarWinds breach showed that even “trusted” software can be a Trojan horse. In 2021, the Colonial Pipeline attack demonstrated how a single leaked password on a legacy VPN could cripple infrastructure.
Zero-Trust (ZT) is the industry’s response. It assumes the network is compromised from day one. It shifts security from “Where are you?” (Network location) to “Who are you, and what is the health of your device?”
Industry Momentum (2025):
- Market Size: The global ZTNA market reached USD 2.48 billion in 2025 and is projected to grow to USD 14.74 billion by 2033 at a CAGR of 25.06% (SNS Insider)
- Adoption Rates: In 2025, 72% of organizations prioritized ZTNA adoption amid escalating cyber threats, with 70% of enterprises accelerating migration from legacy VPNs to ZTNA (SNS Insider)
- Global Growth: ZTNA adoption rose by 53% globally in 2025, with 80% of organizations embracing zero trust to secure cloud migrations and hybrid workforces (SNS Insider)
- Impact: Organizations using ZTNA achieved 50% better visibility, 40% more granular access control, and 60% reduction in breach risks compared to traditional VPNs (SNS Insider)
- Standards: NIST released SP 1800-35 in 2025 with practical implementation guides and reference architectures
- Regional Leadership: North America holds 40% of the ZTNA market, while Asia Pacific is growing fastest at 27.67% CAGR through 2033 (SNS Insider)
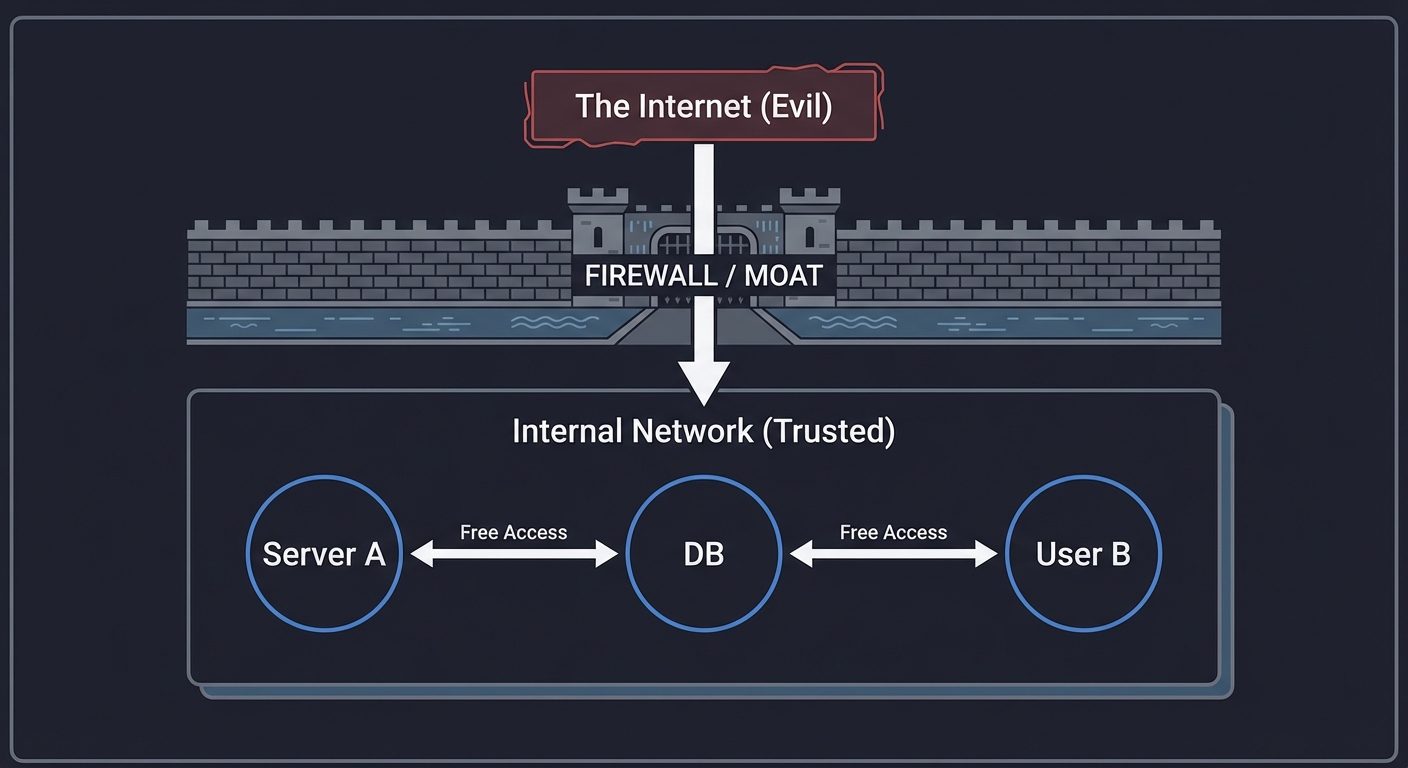
Traditional Security Model (Castle & Moat)
┌───────────────────────────────────────────┐
│              The "Internet"               │
│                   (Evil)                  │
└───────────────┬───────────────────────────┘
                │
         [ FIREWALL / MOAT ]
                │
┌───────────────┴───────────────────────────┐
│           Internal Network (Trusted)      │
│  [ Server A ] <───(Free Access)───> [ DB ]│
│  [ User B   ] <───(Free Access)───> [ DB ]│
└───────────────────────────────────────────┘
Zero-Trust Model (No Moat)
┌───────────────────────────────────────────┐
│              The "Internet"               │
│                  (Hostile)                │
└───────────────┬───────────────────────────┘
                │ (Verify Every Step)
      [ PEP: Gatekeeper ] <───> [ PDP: Brain ]
                │
┌───────────────┴───────────────────────────┐
│           Micro-segmented Enclaves        │
│  [ App A ] ───(mTLS)───> [ PEP ] ───> [ DB ]
│  [ User B] ───(JWT)────> [ PEP ] ───> [ App A ]
└───────────────────────────────────────────┘
The Logical Components (NIST 800-207)
Zero-Trust is defined by the interaction between the Control Plane (where decisions are made) and the Data Plane (where data flows).
    [ SUBJECT ] (User/Device/Service)
        |
        |  1. Request Access (Data Plane)
        v
+--------------------------+          +---------------------------+
|  Policy Decision Point   | <------> |     Policy Engine (PE)    |
|         (PDP)            |          | (Calculates the decision) |
+------------+-------------+          +-------------+-------------+
      ^      |                                      |
      │      | 2. Decision                          | 3. Policy Update
      │      v                                      v
+-----┴--------------------+          +---------------------------+
| Policy Enforcement Point |          |   Policy Administrator    |
|         (PEP)            | <------> |           (PA)            |
+------------+-------------+          +---------------------------+
             |
             | 4. Granted/Denied Traffic (Data Plane)
             v
    [ RESOURCE ] (App/Data/Service)
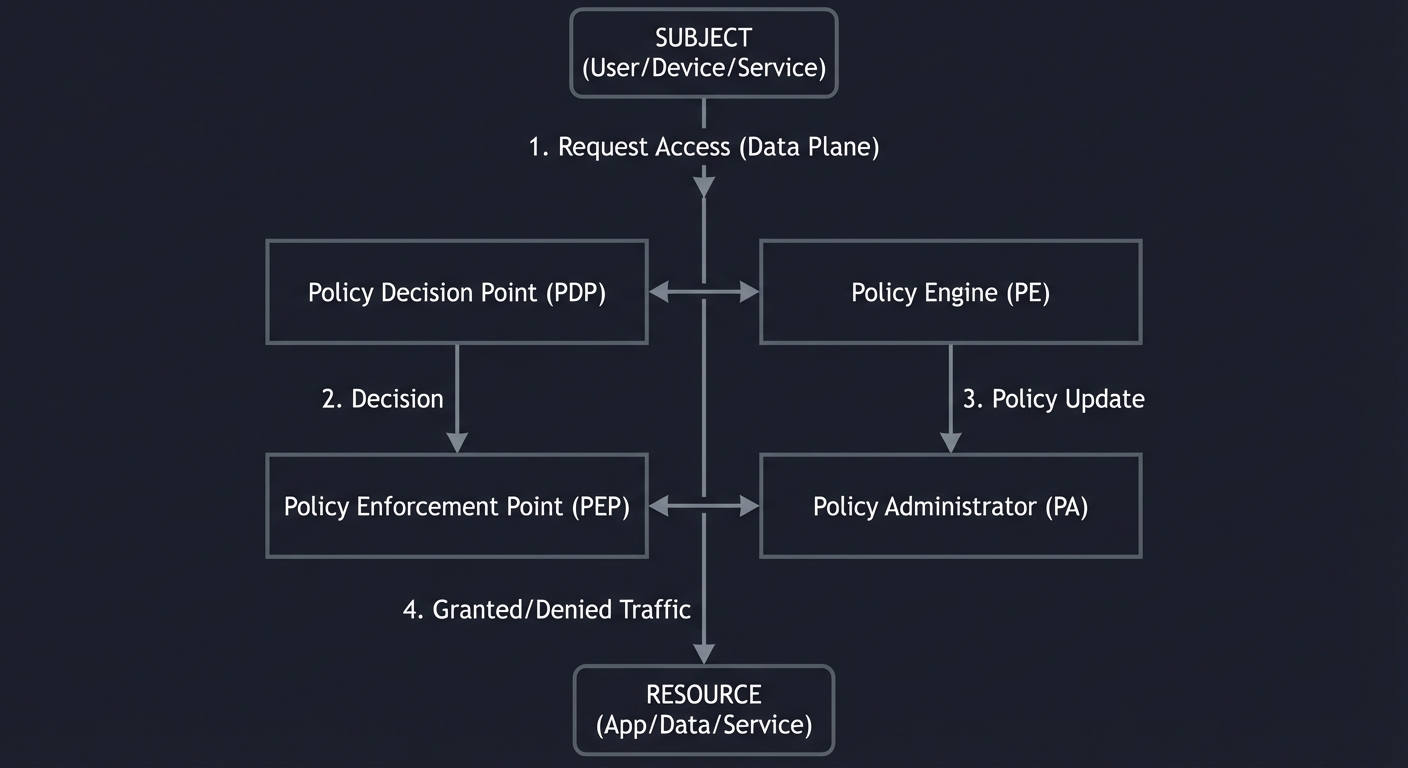
- PE (Policy Engine): The “Brain.” It evaluates the request against trust scores, time of day, and sensitivity. Uses internal sources (IAM, SIEM, CDM tools) and external sources (threat intelligence, vulnerability feeds) to make decisions.
- PA (Policy Administrator): The “Configurator.” It tells the PEP to open or close the gate. Sends authentication results and connection configuration to gateways, agents, or resource portals.
- PEP (Policy Enforcement Point): The “Gatekeeper.” Usually a proxy, firewall, or agent that actually stops the traffic. Executes policy decisions on the data plane where actual application traffic flows. Critical: No resource access occurs without explicit PDP authorization—even from assets inside the network.
- PIP (Policy Information Points): Data sources feeding the PE, including Identity/Credential/Access Management (ICAM), Endpoint Detection and Response (EDR), Security Analytics, and Data Security systems.
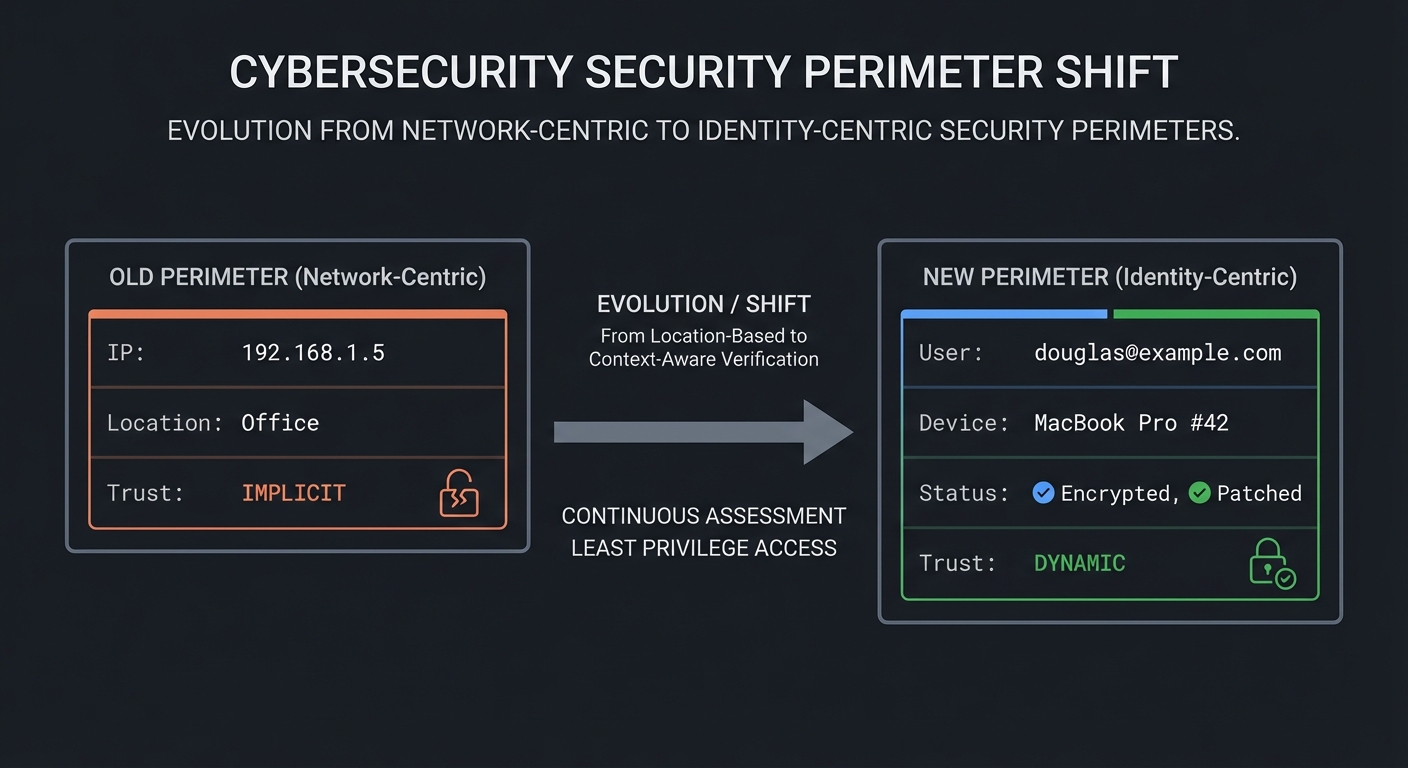
The Shift from Perimeter to Identity
In the old model, the network address (IP) was the proxy for trust. If you were on the 10.0.0.x subnet, you were “in.” In Zero Trust, the network is irrelevant. Identity is the new perimeter.
OLD PERIMETER (Network-Centric)         NEW PERIMETER (Identity-Centric)
┌───────────────────────────┐           ┌───────────────────────────┐
│ IP: 192.168.1.5           │           │ User: douglas@example.com │
│ Location: Office          │           │ Device: MacBook Pro #42   │
│ Trust: IMPLICIT           │           │ Status: Encrypted, Patched│
└───────────────────────────┘           │ Trust: DYNAMIC            │
                                        └───────────────────────────┘
This mastery sprint will take you through the implementation of these components, starting with simple identity proxies and moving to complex behavioral monitoring and software-defined perimeters.
Prerequisites & Background Knowledge
Before starting these projects, you should have foundational understanding in these areas:
Essential Prerequisites (Must Have)
Programming Skills:
- Proficiency in at least one language: Go, Python, Rust, or C
- Understanding of HTTP/REST APIs
- Basic understanding of JSON and data serialization
- Familiarity with command-line tools and bash scripting
Networking Fundamentals:
- TCP/IP stack basics (what is IP, TCP, UDP)
- How HTTP/HTTPS works
- Basic understanding of DNS
- What a proxy is and how it differs from a VPN
- Recommended Reading: “Computer Networks, Fifth Edition” by Tanenbaum — Ch. 1, 5, 6
Security Basics:
- Authentication vs Authorization (who you are vs what you can do)
- Symmetric vs Asymmetric encryption concepts
- What TLS/SSL does (not how it works internally, just what it provides)
- Basic understanding of passwords, tokens, and certificates
- Recommended Reading: “Security in Computing” by Charles Pfleeger — Ch. 1-2
Systems Knowledge:
- How to use a Linux terminal
- Basic file permissions and users/groups
- Environment variables and process concepts
- Recommended Reading: “How Linux Works, 3rd Edition” by Brian Ward — Ch. 1-3
Helpful But Not Required
Advanced Networking:
- Packet structure (Ethernet frames, IP packets, TCP segments)
- How routing works
- Can learn during: Project 3, 7, 9
Cryptography:
- How PKI (Public Key Infrastructure) works
- Digital signatures and hashing
- Can learn during: Project 4
Distributed Systems:
- How microservices communicate
- API design patterns
- Can learn during: Project 2, 6
Linux Systems Programming:
- System calls
- Network sockets
- Can learn during: Project 3, 7
Self-Assessment Questions
Before starting, ask yourself:
- ✅ Can you write a simple HTTP server in your chosen language?
- ✅ Do you know what happens when you type a URL in your browser?
- ✅ Can you explain the difference between a password and a cryptographic key?
- ✅ Are you comfortable reading documentation and debugging errors?
- ✅ Can you read and write JSON?
If you answered “no” to questions 1-3: Spend 1-2 weeks on the “Recommended Reading” books above before starting.
If you answered “yes” to all 5: You’re ready to begin!
Development Environment Setup
To complete these projects, you’ll need:
Required Tools:
- A Linux machine (physical or VM) - Ubuntu 22.04 or Debian 12 recommended
- Your chosen programming language compiler/runtime (Go 1.21+, Python 3.11+, Rust 1.70+)
opensslcommand-line tool for certificate generationcurlfor testing HTTP endpoints- A text editor or IDE
Recommended Tools:
dockeranddocker-composefor running test serviceswiresharkortcpdumpfor packet inspection (Projects 3, 7)redisfor caching (Projects 2, 6)- Two VMs or containers to test network isolation (Project 3)
lldborgdbfor debugging (if using C/Rust)
Cloud/Network (for advanced projects):
- A cloud VM with public IP (Projects 7, 9) - DigitalOcean, Linode, or AWS t2.micro
- Basic understanding of SSH and remote server access
Testing Your Setup:
# Verify you have the basics
$ which curl openssl
/usr/bin/curl
/usr/bin/openssl

# Test Go installation (if using Go)
$ go version
go version go1.21.0 linux/amd64

# Test Python installation (if using Python)
$ python3 --version
Python 3.11.4

# Test Docker (optional but helpful)
$ docker run hello-world
Hello from Docker!
Time Investment:
- Simple projects (1, 5, 8): Weekend (4-8 hours each)
- Moderate projects (2, 4, 6, 9): 1 week (10-20 hours each)
- Complex projects (3, 7): 2+ weeks (20-40 hours each)
- Total sprint: 2-3 months if doing all projects sequentially
Important Reality Check: These are production-grade security concepts. Don’t expect to understand everything immediately. The learning happens in layers:
- First pass: Get it working (copy-paste is okay to start)
- Second pass: Understand what each piece does
- Third pass: Understand why it’s designed that way
- Fourth pass: See the security implications
This is normal. Security engineering is a marathon, not a sprint.
Core Concept Analysis
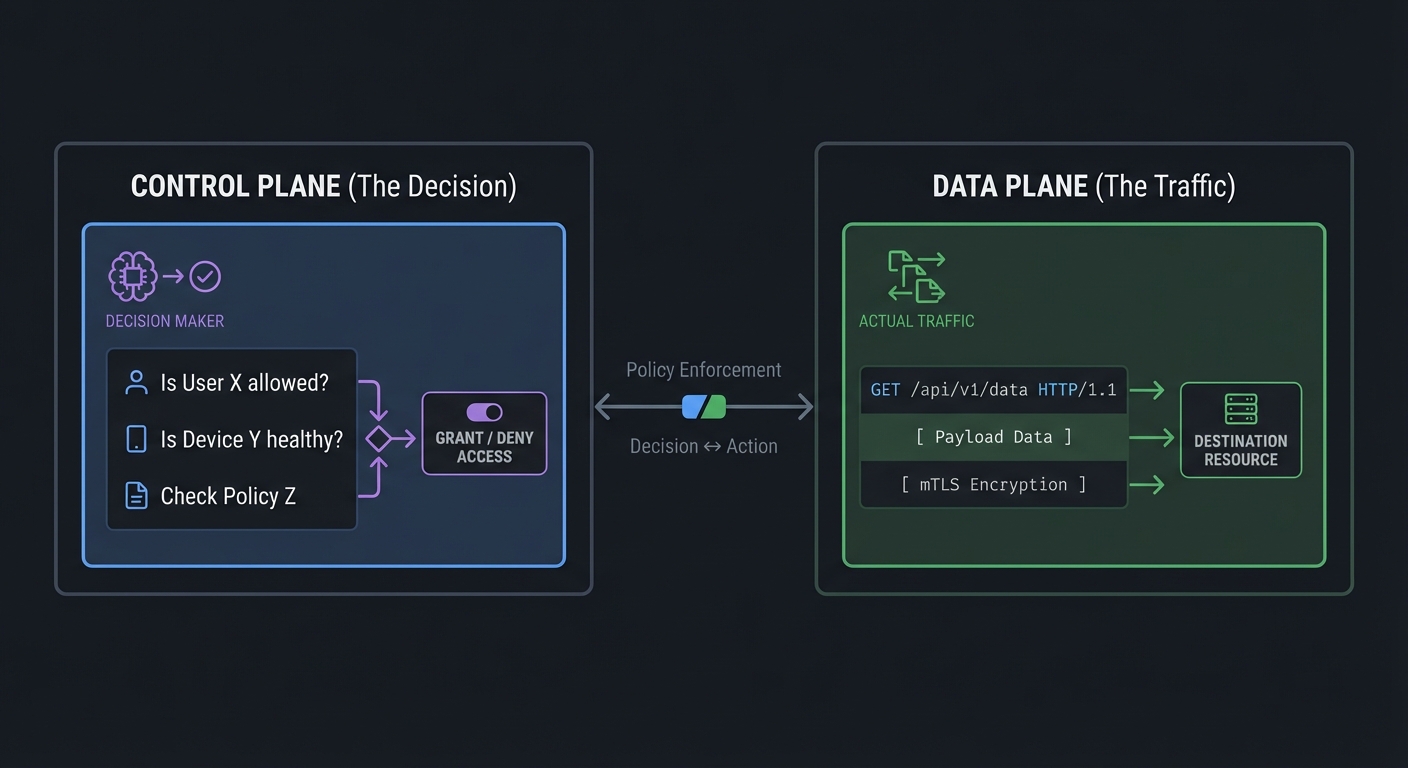
1. Control Plane vs. Data Plane
The separation of concerns is critical. The Data Plane carries the actual application traffic (the packets). The Control Plane carries the security signals (the “Yes/No” decisions). By keeping them separate, you can update security policies without restarting your apps, and you can scale your gatekeepers (PEPs) independently of your brain (PDP).
CONTROL PLANE (The Decision)            DATA PLANE (The Traffic)
┌───────────────────────────┐           ┌───────────────────────────┐
│ "Is User X allowed?"      │           │ GET /api/v1/data HTTP/1.1 │
│ "Is Device Y healthy?"    │ <-------> │ [ Payload Data ]          │
│ "Check Policy Z"          │           │ [ mTLS Encryption ]       │
└───────────────────────────┘           └───────────────────────────┘
2. Continuous Verification
“Authenticate once, access forever” is the old way. In Zero Trust, we perform Continuous Authorization. If a user’s device health changes (e.g., they turn off their firewall), their active session should be terminated within seconds.
3. Least Privilege (Abbreviated: PoLP)
This is the principle of giving a user or process only those privileges which are essential to perform its intended function. For example, a “Backup Service” should have read-only access to a database, and only during the backup window.
4. Software Defined Perimeter (SDP)
SDP makes your infrastructure “dark.” You cannot scan for ports if the ports don’t exist until a cryptographically signed “knock” (Single Packet Authorization) tells the firewall to open a hole specifically for your IP.
Concept Summary Table
This section provides a map of the mental models you will build during these projects.
| Concept Cluster | What You Need to Internalize |
|---|---|
| Control vs Data Plane | Security logic (Control) must be separate from the traffic flow (Data) to prevent bypass. |
| Identity-Based Access | Access is granted to Identities (users/machines), never to Addresses (IPs/MACs). |
| Continuous Verification | Trust is never permanent. Every single request must be re-verified and re-authorized. |
| Least Privilege | Entities get the absolute minimum access required to perform their current task, and nothing more. |
| Micro-segmentation | Network isolation at the service level, preventing lateral movement inside the network. |
| Implicit Trust Zone | The goal of ZT is to shrink the “Implicit Trust Zone” (the area where traffic isn’t checked) to zero. |
| Device Posture | The “health” of the device (encryption, patches, firewall) is as important as the user’s password. |
| SDP & SPA | Making infrastructure invisible and reactive rather than static and reachable. |
Deep Dive Reading by Concept
This section maps each concept to specific book chapters or technical standards for deeper understanding. These readings will build the theoretical foundation you need before implementing the projects.
Zero Trust Fundamentals & Architecture
| Concept | Book & Chapter | Why This Matters |
|---|---|---|
| The Mindset Shift | Zero Trust Networks by Gilman & Barth — Ch. 1: “Zero Trust Fundamentals” | Understand why perimeter security is obsolete |
| NIST Standards | NIST SP 800-207 — Section 2: “Zero Trust Basics” | Learn the official framework used by government & enterprise |
| Logical Components | Zero Trust Networks by Gilman & Barth — Ch. 3: “The Zero Trust Control Plane” | Master the PEP/PDP/PA architecture |
| Control vs Data Plane | Computer Networks, Fifth Edition by Tanenbaum — Ch. 5: “The Network Layer” | See how separation of concerns applies to networks |
Identity, Auth & Crypto
| Concept | Book & Chapter | Why This Matters |
|---|---|---|
| Identity for Services | Zero Trust Networks by Gilman & Barth — Ch. 6: “Trusting Identities” | Services need identity just like users do |
| mTLS & PKI | Security in Computing by Pfleeger — Ch. 12: “Network Security” | Understand certificate-based authentication |
| Authentication Logic | Foundations of Information Security by Jason Andress — Ch. 5: “Authentication and Authorization” | Learn the difference between who you are and what you can do |
| JWT & Token Systems | Security in Computing by Pfleeger — Ch. 3: “Authentication” | Modern stateless authentication patterns |
| Cryptographic Signing | Serious Cryptography, 2nd Edition by Jean-Philippe Aumasson — Ch. 5: “Message Authentication Codes” | How to verify message integrity |
Network Enforcement & Systems
| Concept | Book & Chapter | Why This Matters |
|---|---|---|
| Software Defined Perimeter | Zero Trust Networks by Gilman & Barth — Ch. 10: “The Software-Defined Perimeter” | Making infrastructure invisible to attackers |
| Linux Networking Internals | The Linux Programming Interface by Michael Kerrisk — Ch. 58-61: “Sockets & TCP/IP” | Low-level understanding of network stack |
| Micro-segmentation | Zero Trust Networks by Gilman & Barth — Ch. 5: “Segmentation” | Preventing lateral movement inside networks |
| Firewall Architectures | Security in Computing by Pfleeger — Ch. 11: “Firewall & Network Security” | Different firewall models and when to use them |
| Network Packet Analysis | TCP/IP Illustrated, Volume 1 by W. Richard Stevens — Ch. 1-4 | Understanding what’s actually on the wire |
Advanced Topics
| Concept | Book & Chapter | Why This Matters |
|---|---|---|
| Behavioral Analytics | Foundations of Information Security by Jason Andress — Ch. 8: “Monitoring & Analysis” | Detecting anomalies in user behavior |
| Continuous Authentication | Zero Trust Networks by Gilman & Barth — Ch. 8: “Device Trust” | Trust is never permanent |
| Distributed Systems Patterns | Designing Data-Intensive Applications, 2nd Ed by Kleppmann — Ch. 1-3 | How to build scalable security systems |
| Stream Processing | Designing Data-Intensive Applications, 2nd Ed by Kleppmann — Ch. 11: “Stream Processing” | Real-time security event processing |
Quick Start: Your First 48 Hours
Feeling overwhelmed? Start here instead of reading everything:
Day 1 (4 hours):
- Read only “Why Zero-Trust Matters” and “Core Concept Analysis” sections above
- Watch a 15-min video on JWT tokens (jwt.io has good explanations)
- Start Project 1 - just get a reverse proxy running (use Hint 1)
- Don’t worry about security yet - just proxy HTTP traffic
Day 2 (4 hours):
- Add JWT verification to your proxy (copy-paste is fine)
- Use jwt.io to generate a test token
- See it work: blocked without token, allowed with token
- Read “The Core Question You’re Answering” for Project 1
End of Weekend: You now understand the PEP concept and can explain “identity-based access” to someone. That’s 80% of the mental model. The other projects are just variations on this theme.
Next Steps:
- If it clicked: Continue to Project 2
- If confused: Re-read Project 1’s “Concepts You Must Understand First”
- If frustrated: Take a break! Security is hard. Come back in a week.
Recommended Learning Path
The projects in this sprint are designed to build on each other, but you can also approach them based on your background and interests.
Path 1: The Security Professional (Recommended Start)
Best for: Those with networking or security background who want to implement Zero Trust
- Start with Project 1 (Identity-Aware Proxy) - Get immediate satisfaction by protecting a service
- Then Project 2 (Policy Decision Engine) - Add intelligent decision-making
- Then Project 5 (Device Health) - Add continuous verification
- Then Project 6 (Behavioral Monitoring) - Add anomaly detection
- Advanced: Projects 7, 8, 9 in any order
Path 2: The Systems Programmer
Best for: Those comfortable with Linux, C, and low-level programming
- Start with Project 3 (Micro-segmentation) - Deep dive into iptables/eBPF
- Then Project 7 (SDP Controller) - Packet manipulation and WireGuard
- Then Project 4 (mTLS Mesh) - Certificate management and PKI
- Then Project 1, 2, 5, 6 - Higher-level components
Path 3: The Application Developer
Best for: Backend developers transitioning to security engineering
- Start with Project 1 (Identity-Aware Proxy) - Familiar HTTP/API concepts
- Then Project 8 (JIT Access Broker) - Familiar CRUD + time-based logic
- Then Project 9 (ZTNA Tunnel) - Familiar client-server architecture
- Then Projects 2, 4, 5, 6 - Deepen understanding
Path 4: The Completionist
Best for: Those building a complete Zero Trust lab environment
Phase 1: Foundation (Weeks 1-2)
- Project 1 (Identity Proxy)
- Project 2 (Policy Engine)
Phase 2: Network Layer (Weeks 3-4)
- Project 3 (Micro-segmentation)
- Project 4 (mTLS Mesh)
Phase 3: Continuous Security (Weeks 5-6)
- Project 5 (Device Health)
- Project 6 (Behavioral Monitoring)
Phase 4: Advanced (Weeks 7-10)
- Project 7 (SDP Controller)
- Project 8 (JIT Broker)
- Project 9 (ZTNA Tunnel)
Phase 5: Integration (Week 11)
- Final Overall Project: The Secure Enclave
Project List
The following projects guide you from building the “gatekeeper” (PEP) to the “brain” (PDP) and finally to complex distributed enforcement.
Project 1: Identity-Aware Reverse Proxy (Building a PEP)
- Main Programming Language: Go
- Alternative Programming Languages: Python (FastAPI), Node.js, Rust
- Coolness Level: Level 3: Genuinely Clever
- Business Potential: 2. The “Micro-SaaS / Pro Tool”
- Difficulty: Level 2: Intermediate
- Knowledge Area: Network Security / HTTP Proxies
- Software or Tool: HTTP, JWT, OAuth2
- Main Book: “Zero Trust Networks” by Gilman & Barth
What you’ll build: A transparent reverse proxy that sits in front of a vulnerable “backend” service. It intercepts every request, checks for a valid cryptographically signed identity token (JWT), and only forwards the request if the token is valid. If no token exists, it redirects to a mock Login Provider.
Why it teaches ZTA: This is the implementation of a Policy Enforcement Point (PEP). It teaches you that “The network is hostile”—even if a request reaches your service, you cannot trust it until you verify the identity attached to it.
Core challenges you’ll face:
- Transparent Proxying → Mapping incoming requests to backend addresses without losing headers.
- Cryptographic Token Verification → Verifying JWT signatures using public keys without calling the identity provider every time.
- Header Injection → Passing the verified identity information (User ID, Roles) to the backend service safely.
Real World Outcome
Deliverables:
- Zero trust component with policy config
- Telemetry output for decisions
Validation checklist:
- Identity/device checks gate access
- Policy enforcement is consistent
- Logs provide decision traceability
By the end of this project, you will have a production-grade (conceptually) security gateway. You will see your proxy acting as a “Filter” for all traffic.
What you will see:
- Terminal 1 (Backend): A simple HTTP server (e.g., Python
http.server) running on port 8081. This represents your internal, insecure application. - Terminal 2 (Proxy): Your Go proxy running on port 8080. It logs every request, showing “Blocked” or “Forwarded” based on the JWT presence and validity.
- Browser/Client: When you visit
http://localhost:8080, your request is intercepted.
Command Line Outcome Example:
# 1. Start your 'Vulnerable' Backend (e.g., a simple Python server on port 8081)
$ python3 -m http.server 8081 &

# 2. Start your Identity-Aware Proxy (on port 8080)
$ ./zta-proxy --backend http://localhost:8081 --public-key ./idp_pub.pem
[INFO] Proxy started on :8080. Forwarding to :8081
[DEBUG] GET /index.html -> 401 Unauthorized (No JWT)
[DEBUG] GET /index.html -> 403 Forbidden (Invalid Signature)
[DEBUG] GET /index.html -> 200 OK (Identity: douglas@example.com)

# 3. Attempt access WITHOUT a token
$ curl -i http://localhost:8080/secret.txt
HTTP/1.1 401 Unauthorized
Content-Type: application/json
WWW-Authenticate: Bearer

{"error": "Authentication Required", "message": "No JWT found in Authorization header"}

# 4. Attempt access with an INVALID signature
$ curl -i -H "Authorization: Bearer eyJhbGciOiJSUzI1NiIsInR5cCI6IkpXVCJ9..." http://localhost:8080/secret.txt
HTTP/1.1 403 Forbidden
{"error": "Invalid Token", "message": "Cryptographic signature verification failed"}

# 5. Access with a VALID token (signed by your private key)
$ VALID_TOKEN=$(./generate-test-token --user douglas@example.com --role admin)
$ curl -i -H "Authorization: Bearer $VALID_TOKEN" http://localhost:8080/secret.txt
HTTP/1.1 200 OK
X-ZT-Identity: douglas@example.com
X-ZT-Roles: admin
X-ZT-Verified: true

[ Content of secret.txt from the backend ]

# Note: The 'X-ZT-*' headers are injected by the proxy.
# The backend sees them as if they were always there.
The Core Question You’re Answering
“How can I protect a service that has NO built-in security without changing its code?”
Before you write any code, sit with this question. In Zero-Trust, we assume applications are “dumb” regarding security. The infrastructure (the proxy) is responsible for the “Moat” around each individual “House” (Service).
Concepts You Must Understand First
Stop and research these before coding:
- The HTTP Reverse Proxy Pattern
- How does a proxy differ from a redirect?
- What is the
X-Forwarded-Forheader and why is it often a security risk? - Book Reference: “Go Programming Blueprints” Ch. 4
- JWT Anatomy (Header, Payload, Signature)
- What is inside a JWT payload?
- How does RS256 (Asymmetric) differ from HS256 (Symmetric) in a Zero Trust context?
- Book Reference: “Zero Trust Networks” Ch. 6
- Trusting the Upstream
- Why shouldn’t the backend service trust headers blindly?
- How can you sign the headers between the Proxy and the Backend?
Questions to Guide Your Design
- Failure Modes
- If your Proxy crashes, does the backend become exposed?
- How do you ensure the backend only accepts traffic from the proxy? (Hint: Project 3 will solve this, but think about it now).
- Header Sanitization
- What happens if a malicious user sends their own
X-ZT-Identity: admin@corp.comheader to the proxy? Does your proxy strip it or overwrite it?
- What happens if a malicious user sends their own
Thinking Exercise
The “Confused Deputy” in Proxies
Imagine your backend has an endpoint /admin/delete-all. Your proxy checks the JWT and sees the user is bob@example.com (not an admin). However, the proxy blindly forwards the request. If the backend doesn’t check the roles injected by the proxy, you have a problem.
Trace this: How does the backend know that the X-ZT-Identity header actually came from your proxy and wasn’t spoofed by Bob?
The Interview Questions They’ll Ask
- “Why do we prefer RS256 over HS256 for Zero Trust JWTs?”
- “What is the performance impact of verifying a JWT signature on every request?”
- “How would you handle token revocation (e.g., a user gets fired) if tokens have a 1-hour expiry?”
- “Explain ‘Header Injection’ as an attack vector against an identity-aware proxy.”
Hints in Layers
Hint 1: Start Simple
In Go, start with httputil.NewSingleHostReverseProxy(url). It handles 90% of the heavy lifting.
Hint 2: The Middleware Wrapper Don’t put your security logic inside the proxy handler. Wrap the handler in a middleware:
func authMiddleware(next http.Handler) http.Handler {
    return http.HandlerFunc(func(w http.ResponseWriter, r *http.Request) {
        // 1. Extract Token
        // 2. Verify Signature
        // 3. Inject Headers
        // 4. next.ServeHTTP(w, r)
    })
}
Hint 3: Context over Headers
In Go, pass the verified identity down the chain using r.Context() before it reaches the final proxying step.
Books That Will Help
| Topic | Book | Chapter |
|---|---|---|
| Proxy Internals | “Go Programming Blueprints” | Ch. 4 |
| JWT Security | “Zero Trust Networks” | Ch. 6 |
| Web Security | “The Tangled Web” | Ch. 3 (HTTP) |
| Go Concurrency Patterns | “Learning Go, 2nd Edition” by Jon Bodner | Ch. 10 (Concurrency) |
| HTTP/2 & Web Protocols | “Computer Networks, Fifth Edition” by Tanenbaum | Ch. 7 (Application Layer) |
| Security Best Practices | “Security in Computing” by Charles Pfleeger | Ch. 3 (Authentication) |
| Go Web Development | “Network Programming with Go” by Adam Woodbeck | Ch. 7-8 (HTTP Services) |
Common Pitfalls & Debugging
Problem 1: “Backend still accessible directly on port 8081”
- Why: Your proxy is running, but the backend isn’t isolated
- Fix: Use Project 3 (micro-segmentation) OR run backend on
127.0.0.1:8081(localhost only) - Quick test:
curl http://localhost:8081should work, butcurl http://YOUR_IP:8081from another machine should fail
Problem 2: “JWT verification fails with ‘invalid signature’“
- Why: Your public key doesn’t match the private key that signed the token
- Debug: Print the JWT header to see the algorithm. Ensure your
idp_pub.pemwas generated from the sameidp_priv.pemthat signed the token - Tool: Use jwt.io to decode and inspect your token
Problem 3: “Headers not appearing in backend”
- Why: You’re injecting headers AFTER the proxy forwards the request
- Fix: Headers must be added to
r.HeaderBEFORE callingproxy.ServeHTTP(w, r) - Verification: Add
log.Printf("Headers: %v", r.Header)in your backend
Problem 4: “Proxy crashes on HTTPS backends”
- Why: TLS verification between proxy and backend
- Quick fix (dev only): Use
http.DefaultTransportwithTLSClientConfig: &tls.Config{InsecureSkipVerify: true} - Production fix: Use Project 4 (mTLS) for proper certificate validation
Project 2: Policy Decision Engine (Building a PDP)
- Main Programming Language: Rust or Go
- Alternative Programming Languages: Python, C++
- Coolness Level: Level 4: Hardcore Tech Flex
- Business Potential: 4. The “Open Core” Infrastructure
- Difficulty: Level 3: Advanced
- Knowledge Area: Authorization Logic / Rule Engines
- Software or Tool: JSON, OPA (Open Policy Agent) concepts, Rego-like logic
- Main Book: “Foundations of Information Security” by Jason Andress
What you’ll build: A standalone “Brain” server. It doesn’t handle traffic; it takes “Requests for Decision” (e.g., “Can User A perform Action B on Resource C?”) and returns “Allow” or “Deny” based on a set of dynamic rules stored in a database or JSON file.
Why it teaches ZTA: This is the Policy Decision Point (PDP). It teaches you that authorization logic should be centralized and decoupled from the enforcement point. It allows for “Context-Aware” security (e.g., “Allow only if the user is on a corporate laptop AND it’s between 9 AM and 5 PM”).
Core challenges you’ll face:
- Rule Evaluation Logic → Creating a flexible way to define rules (e.g.,
IF user.role == 'admin' AND resource.type == 'db' THEN ALLOW). - High Performance → Since every request in your system will call this PDP, it must respond in < 5ms.
- Data Enrichment → Fetching extra data (like “Is this device healthy?”) to make the decision.
Real World Outcome
Deliverables:
- Zero trust component with policy config
- Telemetry output for decisions
Validation checklist:
- Identity/device checks gate access
- Policy enforcement is consistent
- Logs provide decision traceability
You will have a high-performance authorization microservice. You can integrate this with the Proxy from Project 1 to create a complete ZT flow.
What you will see:
- A REST API: Listening on port 9090.
- Dynamic Policy Loading: You can change a JSON file on disk, and the PDP will immediately change its decisions without a restart.
- Detailed Decision Logs: The PDP prints why it allowed or denied a request, which is essential for security auditing.
Interaction Example:
# 1. Start your Policy Engine
$ ./zta-pdp --policy-file ./rules.json
[INFO] PDP listening on :9090
[INFO] Loaded 15 security policies.

# 2. Sending a request for a decision (Developer trying to push to Kernel)
$ curl -X POST http://localhost:9090/v1/decide -d '{
  "subject": {"id": "alice", "roles": ["developer"], "device_health": "secure"},
  "action": "git_push",
  "resource": {"id": "kernel-repo", "sensitivity": "high"},
  "environment": {"time": "2024-12-26T14:00:00Z", "location": "NYC"}
}'

# Response (JSON output from your PDP)
{
  "decision": "ALLOW",
  "reason": "Rule 'dev-push-hours' matched: Developers can push to high-sensitivity repos during business hours if device is secure.",
  "request_id": "req-9912",
  "evaluated_at": "2024-12-26T14:00:01Z"
}

# 3. Sending a suspicious request (After Hours)
$ curl -X POST http://localhost:9090/v1/decide -d '{
  "subject": {"id": "alice", "roles": ["developer"]},
  "action": "git_push",
  "resource": {"id": "kernel-repo"},
  "environment": {"time": "2024-12-26T03:00:00Z"}
}'

# Response
{
  "decision": "DENY",
  "reason": "Global Policy 'no-midnight-pushes' triggered. Time 03:00 is outside allowed window (08:00-20:00).",
  "request_id": "req-9913"
}
The Core Question You’re Answering
“How do we make security decisions that are smarter than simple ‘Admin vs User’ roles?”
In Zero-Trust, a password isn’t enough. We need to look at the context. If an admin logs in at 3 AM from a new country on an unpatched laptop, the PDP should say “No.”
Concepts You Must Understand First
Stop and research these before coding:
- RBAC vs ABAC
- What is Role-Based Access Control?
- How does Attribute-Based Access Control (ABAC) provide more granular security?
- Book Reference: “Foundations of Information Security” Ch. 5
- Decoupling Logic from Enforcement
- Why shouldn’t your proxy (PEP) contain the access rules?
- What happens if the PDP is down? (Fail-closed vs Fail-open)
- Domain Specific Languages (DSL) for Policy
- Look at Open Policy Agent (OPA) and the Rego language. You don’t have to implement Rego, but understand why a logic-based language is used for policies.
Questions to Guide Your Design
- Input Schema
- How do you normalize data from different sources (Proxies, Cloud APIs, Device Agents) so the Engine can understand it?
- Policy Storage
- Will you store policies in a SQL database, or as code (GitOps)? How do you “hot-reload” policies without restarting the server?
- Performance
- If your system has 10,000 requests per second, can your PDP keep up? How would you use a Cache (like Redis) or Sidecar to speed it up?
Thinking Exercise
The “Stale Policy” Problem If you update a policy in the PDP, but the PEP (the proxy) has cached the previous “Allow” for a session, how long is the system vulnerable?
Questions while analyzing:
- Should the PDP “push” updates to PEPs, or should PEPs “pull” for every request?
- What is the performance trade-off of “Continuous Authorization”?
The Interview Questions They’ll Ask
- “What is the difference between Authorization and Authentication?”
- “Explain Attribute-Based Access Control (ABAC) with a real-world example.”
- “How do you handle ‘Policy Conflict’ (e.g., one rule says ALLOW, another says DENY)?”
- “Why is centralized policy management key to Zero Trust?”
Hints in Layers
Hint 1: Start with a Hardcoded Map
Don’t build a complex parser first. Use a simple map of Action -> RequiredRole and a function that evaluates it.
Hint 2: Use JSONPath
Use a JSONPath library to extract attributes from the incoming request. This makes your rules more flexible: IF $.subject.roles CONTAINS 'admin' THEN ALLOW.
Hint 3: Audit Logging
Every decision made by the PDP must be logged with the reason. This is vital for compliance. Add a reason field to your JSON output immediately.
Books That Will Help
| Topic | Book | Chapter |
|---|---|---|
| Authorization Logic | “Foundations of Information Security” by Andress | Ch. 5 |
| Policy as Code | “Zero Trust Networks” by Gilman & Barth | Ch. 3 |
| System Performance | “Designing Data-Intensive Applications, 2nd Ed” by Kleppmann | Ch. 1-2 |
| Go Performance Patterns | “Learning Go, 2nd Edition” by Jon Bodner | Ch. 12 (Performance) |
| Concurrent Data Structures | “Algorithms, Fourth Edition” by Sedgewick & Wayne | Ch. 4 (Hash Tables) |
| Access Control Models | “Security in Computing” by Charles Pfleeger | Ch. 4 (Access Control) |
| Rule Engines & Logic | “Design Patterns” by Gamma et al. | Ch. 5 (Behavioral Patterns - Strategy) |
Common Pitfalls & Debugging
Problem 1: “PDP is slow - taking 200ms+ per decision”
- Why: You’re likely making synchronous database or external API calls for every decision, blocking the request thread
- Fix: Implement an in-memory cache (Redis or simple Go map with TTL) for user roles and device health. Only fetch fresh data every 5-10 minutes or on cache miss
- Quick test: Add timing logs around each data fetch. If you see
FetchUserRoles: 150ms, that’s your bottleneck ```go // Before: Slow roles := fetchUserRolesFromDatabase(userID) // 150ms per call
// After: Fast with cache roles := cache.Get(userID, func() { return fetchUserRolesFromDatabase(userID) // Only on cache miss }, 5*time.Minute) // 5 min TTL
**Problem 2: "Policy conflicts - one rule says ALLOW, another says DENY for the same request"**
- **Why:** You haven't defined a conflict resolution strategy. Most PDPs use "Deny Overrides" (any DENY wins) or "First Match" (stop at first rule that applies)
- **Fix:** Choose a strategy and document it. Implement explicit rule ordering with priority levels
- **Quick test:** Create two rules that conflict and see which wins. Add logging to show which rule matched first
```json
{
  "rules": [
    {"priority": 1, "pattern": "admin->*", "decision": "ALLOW"},
    {"priority": 2, "pattern": "*->sensitive_db", "decision": "DENY"}
  ],
  "conflict_resolution": "deny_overrides"
}
Problem 3: “Policy updates don’t take effect until server restart”
- Why: Your PDP loads policies once at startup and never checks for changes
- Fix: Implement file watching (using
fsnotifyin Go) or periodic polling (every 10 seconds) to reload the policy file when it changes - Quick test: Modify your
rules.jsonfile while the PDP is running and send a test request - if behavior doesn’t change, your reload isn’t working// Use fsnotify to watch for file changes watcher.Add("rules.json") go func() { for event := range watcher.Events { if event.Op&fsnotify.Write == fsnotify.Write { log.Println("Policy file changed, reloading...") reloadPolicies() } } }()
Problem 4: “Getting ‘nil pointer dereference’ when evaluating policies”
- Why: Incoming requests might be missing expected fields (e.g.,
subject.device_healthis null), and your code doesn’t handle missing attributes gracefully - Fix: Add validation at the API boundary. Return clear errors for malformed requests. Use default values for optional fields
- Quick test: Send a minimal request with only
subject.idand see if it crashes. Add nil checks before accessing nested fields ```go // Before: Crashes on missing field if req.Subject.DeviceHealth == “secure” { … }
// After: Safe with default deviceHealth := “unknown” if req.Subject != nil && req.Subject.DeviceHealth != “” { deviceHealth = req.Subject.DeviceHealth }
**Problem 5: "Can't audit/debug why a request was denied"**
- **Why:** Your decision response only returns `{"decision": "DENY"}` without explaining which rule triggered or what attribute failed
- **Fix:** Always include a human-readable `reason` field and `rule_id` in your decision response. Log the full evaluation trace for debugging
- **Quick test:** Deny a request and check if you can answer "Which rule caused this?" and "What attribute value caused the mismatch?"
```json
{
  "decision": "DENY",
  "reason": "Rule 'no-weekend-access' matched: Current time (2024-12-28 20:00) is outside allowed window (Mon-Fri 08:00-18:00)",
  "rule_id": "ztna-policy-042",
  "evaluated_attributes": {
    "subject.role": "developer",
    "environment.time": "2024-12-28T20:00:00Z",
    "environment.day_of_week": "Saturday"
  },
  "request_id": "req-1234"
}
Project 3: Host-Level Micro-segmentation (The Data Plane)
- Main Programming Language: C (or Python/Bash for orchestration)
- Alternative Programming Languages: Rust (with
ayafor eBPF) - Coolness Level: Level 4: Hardcore Tech Flex
- Business Potential: 3. The “Service & Support” Model
- Difficulty: Level 4: Expert
- Knowledge Area: Systems Programming / Linux Networking
- Software or Tool:
iptables,nftables, oreBPF - Main Book: “The Linux Programming Interface” by Michael Kerrisk
What you’ll build: A tool that dynamically manages firewall rules on a Linux server to enforce isolation between local processes. Instead of saying “Block Port 80,” it says “Only allow process nginx to talk to process redis on the loopback interface.”
Why it teaches ZTA: This is Micro-segmentation. It teaches you that network security isn’t just about the edge firewall; it’s about the “East-West” traffic inside a single machine or cluster.
Core challenges you’ll face:
- Identifying Processes → Mapping a network packet to the Process ID (PID) that sent it.
- Zero-Downtime Updates → Updating firewall rules without dropping active, valid connections.
- The “Default Deny” mindset → Ensuring that any communication NOT explicitly allowed is immediately dropped.
Real World Outcome
Deliverables:
- Zero trust component with policy config
- Telemetry output for decisions
Validation checklist:
- Identity/device checks gate access
- Policy enforcement is consistent
- Logs provide decision traceability
You will have a host-level security tool that locks down your server using the “Default Deny” principle. You will be able to prove that even with a root-level vulnerability in one app, the attacker is “trapped” and cannot touch other local services.
What you will see:
- Strict Isolation: You will see that processes running as different users are completely isolated at the network level.
- Audit Logs: Your tool will log blocked connection attempts, showing you exactly what an attacker (or misconfigured app) tried to do.
Example Commands & Output:
# 1. Start your services as different users
$ sudo -u web-user python3 -m http.server 80 &
$ sudo -u db-user redis-server --port 6379 &

# 2. Apply your ZT Micro-segmentation tool
$ sudo ./zt-segment --config ./rules.yaml
[INFO] Loading micro-segmentation rules...
[INFO] Applying Default Deny to all egress traffic.
[INFO] Allowing path: web-user (nginx) -> db-user (redis) on port 6379
[INFO] Rule applied: iptables -A OUTPUT -m owner --uid-owner web-user -p tcp --dport 6379 -j ACCEPT
[INFO] Verification: iptables rules verified.

# 3. TEST: web-user can reach DB (Authorized Path)
$ sudo -u web-user curl http://localhost:6379
(Redis response)

# 4. TEST: malicious-user is blocked (Unauthorized Path)
$ sudo -u attacker-user curl http://localhost:6379
curl: (7) Failed to connect to localhost port 6379: Connection refused
# Log entry: [BLOCK] UID: 1005 (attacker-user) -> 127.0.0.1:6379

# 5. TEST: Lateral movement block
$ sudo -u web-user ping 8.8.8.8
PING 8.8.8.8 (8.8.8.8) 56(84) bytes of data.
ping: sendmsg: Operation not permitted
# Log entry: [BLOCK] UID: 1001 (web-user) -> 8.8.8.8:ICMP
The Core Question You’re Answering
“If an attacker compromises one app, how do I stop them from seeing anything else on the same server?”
Traditional firewalls protect the “North-South” traffic (Internet to Server). Micro-segmentation protects the “East-West” traffic (Server to Server, or Process to Process).
Concepts You Must Understand First
Stop and research these before coding:
- Linux Netfilter & Iptables
- What are the
INPUT,OUTPUT, andFORWARDchains? - How does the
ownermodule work iniptables? - Book Reference: “How Linux Works” Ch. 14
- What are the
- Process Isolation
- How do User IDs (UIDs) and Group IDs (GIDs) relate to network sockets?
- What is
/proc/net/tcpand how can it be used to audit connections?
- Default Deny vs. Default Allow
- Why is “Default Deny” the cornerstone of Zero Trust?
- How do you implement a “Deny All” rule without locking yourself out of SSH?
Questions to Guide Your Design
- Rule Persistence
- If the server reboots, do your rules vanish? How do you make them permanent?
- Performance
- Does adding 1,000 firewall rules slow down the network? (Hint: research the difference between
iptablesandnftablessets).
- Does adding 1,000 firewall rules slow down the network? (Hint: research the difference between
- Dynamic Discovery
- How does your tool know when a new service starts up? Should it be reactive or proactive?
Thinking Exercise
The “Shared UID” Problem
If two different apps are running as the same user (e.g., www-data), can they still be isolated by your tool?
Questions while analyzing:
- Can you isolate based on the Process ID (PID) or the binary path?
- Look into eBPF
socket_filter— can it see the binary name of the process sending a packet?
The Interview Questions They’ll Ask
- “What is ‘Lateral Movement’ and how does micro-segmentation prevent it?”
- “Why are traditional subnets insufficient for security in a containerized world?”
- “Explain the difference between a Stateless and a Stateful firewall.”
- “How would you implement micro-segmentation in a Kubernetes environment?”
Hints in Layers
Hint 1: Use iptables manually first
Before writing code, try to block yourself from google.com using iptables -A OUTPUT -d 8.8.8.8 -j REJECT. Once you understand the command, automate it.
Hint 2: The owner module is your friend
iptables -A OUTPUT -p tcp --dport 6379 -m owner --uid-owner 1001 -j ACCEPT
This allows ONLY the user with UID 1001 to talk to Redis.
Hint 3: Use YAML for Rules Don’t hardcode rules. Use a YAML file to define “Allowed Paths”:
rules:
  - from_user: web-app
    to_port: 6379
    action: allow
Hint 4: Clean up! Write a “Flush” function that removes all your custom rules. You’ll need this during development or you’ll accidentally block everything!
Books That Will Help
| Topic | Book | Chapter |
|---|---|---|
| Linux Networking | “How Linux Works, 3rd Edition” by Brian Ward | Ch. 14 (Networking) |
| Systems Programming | “The Linux Programming Interface” by Michael Kerrisk | Ch. 58 (Sockets) |
| eBPF (Advanced) | “BPF Performance Tools” | Ch. 2 |
| Network Security Fundamentals | “Computer Networks, Fifth Edition” by Tanenbaum | Ch. 8 (Security) |
| Firewall Architecture | “The Practice of Network Security Monitoring” by Bejtlich | Ch. 3-4 |
| Linux Network Internals | “Understanding Linux Network Internals” by Christian Benvenuti | Ch. 10-12 (Netfilter) |
| System-Level Security | “Security in Computing” by Charles Pfleeger | Ch. 6 (Operating System Security) |
Common Pitfalls & Debugging
Problem 1: “Rules applied but connections still work”
- Why: Existing connections are already ESTABLISHED in the connection tracking table
- Fix: Either flush connection tracking:
sudo conntrack -FOR restart both services - Rule order matters: Your ACCEPT rules must come BEFORE the default DENY
Problem 2: “Locked myself out via SSH”
- Why: You blocked all OUTPUT without allowing SSH responses
- Fix: Boot into recovery mode OR use cloud console
- Prevention: ALWAYS add this first:
iptables -A OUTPUT -m state --state ESTABLISHED,RELATED -j ACCEPT
Problem 3: “User IDs don’t match”
- Why: Service runs as
www-data(UID 33) but your rule checks forweb-user(UID 1001) - Debug:
ps aux | grep <process>shows the real UID - Fix: Use
id web-userto get the UID, then use-m owner --uid-owner 1001
Problem 4: “eBPF program won’t load”
- Why: Kernel version < 4.18 or missing CONFIG_BPF_SYSCALL
- Check:
uname -randzcat /proc/config.gz | grep CONFIG_BPF - Fallback: Use iptables for this project, explore eBPF separately
Testing Your Rules:
# Save rules before testing (you can restore if locked out)
sudo iptables-save > backup.rules

# Test without persistence first
sudo iptables -A OUTPUT -m owner --uid-owner 1001 -p tcp --dport 6379 -j ACCEPT
sudo iptables -A OUTPUT -j LOG --log-prefix "BLOCKED: "
sudo iptables -A OUTPUT -j DROP

# Watch what gets blocked in real-time
sudo tail -f /var/log/kern.log | grep BLOCKED

# If everything breaks, restore:
sudo iptables-restore < backup.rules
Project 4: Mutual TLS (mTLS) Mesh (Identity at the Wire)
- Main Programming Language: Go
- Alternative Programming Languages: Python, Rust
- Coolness Level: Level 4: Hardcore Tech Flex
- Business Potential: 4. The “Open Core” Infrastructure
- Difficulty: Level 3: Advanced
- Knowledge Area: Cryptography / Distributed Systems
- Software or Tool: OpenSSL, PKI, SPIFFE concepts
- Main Book: “Zero Trust Networks” by Gilman & Barth
What you’ll build: A system that automatically issues short-lived X.509 certificates to your services. You will then configure two services to communicate using Mutual TLS (mTLS), where the client proves its identity to the server AND the server proves its identity to the client.
Why it teaches ZTA: This is the gold standard for “Identity-Based Encryption.” It teaches you that IP-based trust is a myth. By using mTLS, you ensure that even if an attacker is on the network, they cannot spoof a service or sniff the traffic.
Core challenges you’ll face:
- Building a Mini-CA (Certificate Authority) → Managing root certificates and signing requests (CSRs) programmatically.
- Certificate Rotation → Automating the refresh of certificates before they expire without dropping connections.
- Identity Bootstrapping → How does a new service “prove” who it is to the CA in the first place?
Real World Outcome
Deliverables:
- Zero trust component with policy config
- Telemetry output for decisions
Validation checklist:
- Identity/device checks gate access
- Policy enforcement is consistent
- Logs provide decision traceability
You will have a private PKI (Public Key Infrastructure) that automatically secures your internal services. You will see that without the correct, CA-signed “Passport” (Certificate), services cannot even establish a TCP connection with each other.
What you will see:
- Mutual Verification: Both client and server verify each other’s certificates.
- Encrypted Traffic: All data is encrypted with TLS 1.3.
- Automatic Rejection: Any client without a certificate (even if they have the right IP and credentials) is blocked at the handshake level.
Example Usage & Output:
# 1. Start the ZTA Certificate Authority (Your Root of Trust)
$ ./zta-ca --root-cert ./root.crt --root-key ./root.key
[INFO] CA Service started. Issuing short-lived certs (24h TTL).

# 2. Start Service B (Server) with mTLS enabled
$ ./service-b --port 443 --ca-cert ./root.crt --cert ./b.crt --key ./b.key
[INFO] Server listening on :443 with REQUIRED client-auth.

# 3. Attempt access WITHOUT a client certificate (Standard CURL)
$ curl -k https://localhost:443
curl: (35) error:14094412:SSL routines:ssl3_read_bytes:sslv3 alert bad certificate
# (Handshake failed: Client failed to present a certificate)

# 4. Access with an INVALID/Self-Signed certificate (Attacker simulation)
$ openssl req -newkey rsa:2048 -nodes -keyout evil.key -x509 -out evil.crt
$ curl -k --cert evil.crt --key evil.key https://localhost:443
curl: (35) error:14094412:SSL routines:ssl3_read_bytes:sslv3 alert unknown ca
# (Handshake failed: Certificate not signed by our Root CA)

# 5. Access with a VALID certificate signed by your Root CA (Identity: Service-A)
$ curl --cert a.crt --key a.key --cacert root.crt https://localhost:443
{
  "status": "Handshake Successful",
  "verified_identity": "spiffe://corp.internal/service-a",
  "data": "Secret content unlocked"
}
The Core Question You’re Answering
“How can two servers trust each other on a network where anyone can spoof an IP?”
In the old world, we used Firewalls to allow IP 10.0.1.5 to talk to 10.0.1.10. In Zero Trust, we don’t care about the IPs. We care that the connection is encrypted and that both sides hold a valid “Passport” (Certificate) issued by a trusted authority.
Concepts You Must Understand First
Stop and research these before coding:
- X.509 Certificates & CSRs
- What is a Certificate Signing Request (CSR)?
- What is the difference between a Root CA and an Intermediate CA?
- Book Reference: “Security in Computing” Ch. 12
- The TLS Handshake (mTLS version)
- How does the server request a certificate from the client?
- At what stage of the handshake does identity verification happen?
- SPIFFE IDs
- How do you encode service identity into a certificate’s SAN (Subject Alternative Name)?
- Book Reference: “Zero Trust Networks” Ch. 6
Questions to Guide Your Design
- Certificate Lifetime
- Why are short-lived certificates (e.g., 24 hours) better than long-lived ones (e.g., 2 years) in ZTA?
- Revocation
- If a private key is stolen, how do you tell the whole network to stop trusting that certificate? (Research CRLs vs OCSP).
- Automation
- How can you make it so your app doesn’t have to restart when its certificate is renewed?
Thinking Exercise
The “In-Transit” Compromise If an attacker sits in the middle of your network (MITM) and intercepts the traffic, what can they see if you are using standard TLS? What about mTLS?
Questions while analyzing:
- Can the attacker “replay” a client certificate they intercepted? (Hint: No, because they don’t have the private key).
The Interview Questions They’ll Ask
- “What is the difference between standard TLS and Mutual TLS?”
- “How does mTLS solve the problem of ‘Identity’ in a microservices architecture?”
- “What are the biggest operational challenges of running mTLS at scale?”
- “Why is certificate rotation critical in a Zero Trust environment?”
Hints in Layers
Hint 1: Use OpenSSL for the CA first
Don’t write the CA code immediately. Use openssl commands to create a Root CA, sign a certificate, and run a server with openssl s_server.
Hint 2: Go’s crypto/tls package
In Go, mTLS is enabled by setting ClientAuth: tls.RequireAndVerifyClientCert in your tls.Config.
Hint 3: The SAN field
Put the service name (e.g., spiffe://acme.org/service-a) in the Subject Alternative Name (SAN) field of the certificate. This is where modern systems look for identity.
Books That Will Help
| Topic | Book | Chapter |
|---|---|---|
| mTLS Principles | “Zero Trust Networks” | Ch. 6 |
| Cryptography Fundamentals | “Serious Cryptography, 2nd Edition” by Jean-Philippe Aumasson | Ch. 11 (TLS) |
| Public Key Infrastructure | “Security in Computing” by Charles Pfleeger | Ch. 12 (Cryptography & Network Security) |
| Go TLS Programming | “Network Programming with Go” by Adam Woodbeck | Ch. 9 (TLS) |
| Certificate Management | “Zero Trust Networks” | Ch. 7 (Strong Authentication) |
Common Pitfalls & Debugging
Problem 1: “Certificate signed by unknown authority”
- Why: Your server/client doesn’t trust your Root CA certificate
- Fix: Load the Root CA into the trust pool:
caCert, _ := os.ReadFile("root.crt")
caCertPool := x509.NewCertPool()
caCertPool.AppendCertsFromPEM(caCert)
tlsConfig.RootCAs = caCertPool
Problem 2: “Certificate has expired”
- Why: Default openssl validity is 30 days
- Fix: When generating certs:
openssl x509 -req -days 365 ... - Check expiry:
openssl x509 -in cert.pem -noout -dates
Problem 3: “No required SSL certificate was sent”
- Why: Server is set to RequireAndVerifyClientCert but client didn’t send one
- Debug: Check client side has both cert AND key loaded
- Common mistake: Loading cert but forgetting to set
Certificates: []tls.Certificate{cert}
Problem 4: “Name mismatch / CN doesn’t match”
- Why: Certificate CN=”localhost” but you’re connecting to “127.0.0.1”
- Modern fix: Don’t use CN, use SAN (Subject Alternative Name):
# In your openssl.cnf or command:
subjectAltName = DNS:localhost,DNS:service-a,IP:127.0.0.1
Problem 5: “SPIFFE ID not working”
- Why: SPIFFE IDs go in the SAN URI field, not CN
- Fix:
subjectAltName = URI:spiffe://corp.internal/service-a - Verification:
openssl x509 -in cert.pem -noout -text | grep URI
Quick Certificate Debugging:
# View certificate details
openssl x509 -in cert.pem -text -noout

# Test mTLS handshake
openssl s_client -connect localhost:443 \
  -cert client.crt -key client.key -CAfile ca.crt

# Verify certificate chain
openssl verify -CAfile ca.crt client.crt

# Test server WITHOUT client cert (should fail)
curl -v --cacert ca.crt https://localhost:443
Project 5: Device Trust & Health Attestation (The “Healthy” Perimeter)
- Main Programming Language: Go or Python
- Alternative Programming Languages: Swift (macOS), PowerShell (Windows)
- Coolness Level: Level 3: Genuinely Clever
- Business Potential: 2. The “Micro-SaaS / Pro Tool”
- Difficulty: Level 2: Intermediate
- Knowledge Area: Endpoint Security / Operating Systems
- Software or Tool: OS APIs (Disk encryption status, Firewall status)
- Main Book: “Zero Trust Security” by Andravous
What you’ll build: An agent that runs on your laptop/server and reports its “Security Posture” (e.g., “Is disk encryption on? Is the firewall enabled? Are there unpatched CVEs?”). Your PDP (Project 2) will then use this score to decide whether to allow access to sensitive data.
Why it teaches ZTA: One of the core pillars of ZT is Device Trust. You don’t just trust a user; you trust the combination of a valid user and a “Healthy” device.
Core challenges you’ll face:
- Querying OS State → Using system commands or APIs to verify security settings reliably.
- Secure Reporting → Signing the health report so the user can’t “fake” a healthy status.
- Continuous Monitoring → Detecting when a device becomes “unhealthy” (e.g., firewall turned off) and revoking access instantly.
Real World Outcome
Deliverables:
- Zero trust component with policy config
- Telemetry output for decisions
Validation checklist:
- Identity/device checks gate access
- Policy enforcement is consistent
- Logs provide decision traceability
You will have a “Posture-Aware” security system. You will see that your device’s physical security state (encryption, firewall, patches) becomes an active part of your login process.
What you will see:
- A Background Agent: Running on your laptop, periodically checking security settings.
- Dynamic Access Control: You will see your access to sensitive files being granted or revoked in real-time as you toggle your system’s security settings.
- Actionable Alerts: If blocked, you get a clear notification telling you exactly why (e.g., “Firewall is disabled”).
Example Usage & Output:
# 1. Run the Device Agent
$ ./zta-agent --pdp-url http://zta-pdp.internal --interval 60s
[INFO] Scanning device posture...
[INFO] Disk Encryption: ENABLED
[INFO] Firewall: ENABLED
[INFO] OS Version: 14.2.1 (Patched)
[INFO] Sending health report to PDP (Signed with TPM key)...
[SUCCESS] PDP updated status for device-xyz: TRUSTED

# 2. Simulate an UNHEALTHY device (Disable Firewall)
$ sudo ufw disable

# 3. Agent detects change and reports immediately
$ ./zta-agent
[WARN] Firewall disabled!
[WARN] Sending CRITICAL health update...
[SUCCESS] PDP updated status: UNTRUSTED

# [4. Attempt to access a resource (via Project 1 Proxy)](/guides/zero-trust-architecture-deep-dive/P01-identity-aware-reverse-proxy)
$ curl -i http://localhost:8080/sensitive-file
HTTP/1.1 403 Forbidden
Content-Type: application/json

{
  "error": "Device Unhealthy",
  "reason": "Host firewall is disabled. Policy 'secure-device-only' requires active firewall.",
  "remediation": "Please enable your system firewall (e.g., sudo ufw enable) to resume access."
}
The Core Question You’re Answering
“If a user has a valid password but their laptop is infected or unencrypted, should they still have access to corporate data?”
In Zero Trust, the answer is “No.” We treat the device as an extension of the identity. A “compromised” device means a “compromised” session, regardless of the user.
Concepts You Must Understand First
Stop and research these before coding:
- Endpoint Posture Check
- What are the most common security checks for a laptop? (Disk encryption, Firewall, Antivirus, OS Version).
- How do you programmatically check these on your OS?
- TPM (Trusted Platform Module)
- What is a TPM and how does it provide a “Hardware Root of Trust”?
- Why is it important to sign health reports with a hardware-backed key?
- Continuous Monitoring vs. Polling
- What is the difference between checking health once at login vs. checking it every 60 seconds?
Questions to Guide Your Design
- Anti-Tamper
- How do you prevent a clever developer from “mocking” the agent responses?
- Can you use “Attestation” to prove the agent code hasn’t been modified?
- Privacy
- What information is “too much” for an agent to collect? (e.g., list of personal files vs. system firewall status).
- Actionable Feedback
- If a user is blocked, how do you give them clear instructions on how to “fix” their device health?
Thinking Exercise
The “Admin Bypass” If an admin needs to fix a server and the server is currently “unhealthy,” how do you provide a “break-glass” access path without violating ZT principles?
The Interview Questions They’ll Ask
- “What is Device Attestation?”
- “Why is a static login check insufficient for Zero Trust?”
- “How do you handle ‘Bring Your Own Device’ (BYOD) in a Zero Trust model?”
- “What are the common signals used to determine device health?”
Hints in Layers
Hint 1: Use Shell Commands first
Don’t look for complex APIs first. Use exec.Command in Go to run system_profiler SPDiagnosticsDataType (macOS) or Get-BitLockerVolume (Windows) and parse the string output.
Hint 2: Sign the Report Create a simple public/private key pair. The agent signs the JSON health report with the private key. The PDP verifies it with the public key.
Hint 3: Use a ‘Trust Score’ Instead of a binary Yes/No, have the agent report raw data, and let the PDP calculate a “Trust Score” (0-100). Access to “Email” might require a score of 50, while “Production DB” requires 95.
Books That Will Help
| Topic | Book | Chapter |
|---|---|---|
| Device Trust | “Zero Trust Security” by Andravous | Ch. 4 |
| Endpoint Security | “Foundations of Information Security” by Jason Andress | Ch. 6 (Endpoint Security) |
| TPM Fundamentals | “A Practical Guide to TPM 2.0” by Will Arthur | Ch. 1-2 |
| OS Security APIs | “The Linux Programming Interface” by Michael Kerrisk | Ch. 39 (Capabilities) |
| Platform Integrity | “Security in Computing” by Charles Pfleeger | Ch. 6 (Operating System Security) |
| Continuous Monitoring | “Zero Trust Networks” by Gilman & Barth | Ch. 8 (Device Trust) |
Common Pitfalls & Debugging
Problem 1: “Agent reports ‘Disk Encryption: ENABLED’ but the disk is actually unencrypted”
- Why: Your shell command parsing is probably looking for the wrong string or using an old API that’s been deprecated
- Fix: Test your parsing logic manually. On macOS, run
fdesetup statusand verify output is “FileVault is On”. On Windows, checkGet-BitLockerVolumereturnsProtectionStatus: On - Quick test: Disable encryption on a test VM and verify your agent detects it correctly
```bash
macOS verification
$ fdesetup status FileVault is On.
Your code should check for “FileVault is On”, not just “FileVault”
False positive: “FileVault is Off” contains “FileVault”
**Problem 2: "PDP rejects health reports with 'Invalid Signature' even though keys match"**
- **Why:** You're likely signing the JSON string but the JSON formatting is different when it reaches the PDP (whitespace, key ordering). JSON is NOT deterministic for signing
- **Fix:** Sign the canonical form of the data, not the JSON string itself. Use a sorted key order or sign individual fields, not the entire JSON blob
- **Quick test:** Print both the original JSON and the received JSON character-by-character to find formatting differences
```go
// Before: Breaks on whitespace changes
signature := sign(jsonString)  // {"health":"good"} vs {"health": "good"}

// After: Sign canonical data
dataToSign := fmt.Sprintf("%s:%s:%d", deviceID, healthStatus, timestamp)
signature := sign(dataToSign)
Problem 3: “Agent crashes with ‘permission denied’ when checking firewall status”
- Why: Reading firewall status requires elevated privileges on most OSes. Your agent isn’t running as root/admin
- Fix: Either run the agent as root (not recommended for production), or use OS capabilities (Linux) to grant specific privileges, or use a setuid wrapper for only the firewall check
- Quick test: Try running the firewall check command manually as your user - you’ll likely see the same error
```bash
Linux: Grant specific capability instead of running as root
$ sudo setcap cap_net_admin+ep ./zta-agent
Windows: Run as Administrator (in PowerShell)
macOS: Some checks require sudo - wrap in a privileged helper
**Problem 4: "Agent only checks health once at startup, doesn't detect changes"**
- **Why:** Your agent runs the health checks once and exits, or runs them in a loop but doesn't watch for OS events
- **Fix:** Implement a polling loop (check every 60 seconds) OR use OS event watchers (e.g., watching for registry changes on Windows, file changes on Linux)
- **Quick test:** Start the agent, then manually disable your firewall. Wait to see if the agent detects and reports the change
```go
// Polling approach (simple but works)
ticker := time.NewTicker(60 * time.Second)
for {
    select {
    case <-ticker.C:
        health := checkDeviceHealth()
        reportToPDP(health)
    }
}
Problem 5: “Trust score calculation gives same score to partially-compliant and fully-non-compliant devices”
- Why: You’re using a simple pass/fail binary check rather than weighted scoring
- Fix: Assign weights to different security controls. Encryption might be worth 40 points, firewall 25, patches 25, antivirus 10. Sum them up for total score
- Quick test: Create test cases: (1) All checks pass = 100, (2) Only encryption fails = 60, (3) All checks fail = 0 ```go // Weighted scoring approach score := 0 if diskEncrypted { score += 40 } if firewallEnabled { score += 25 } if fullyPatched { score += 25 } if antivirusRunning { score += 10 } // score is now 0-100
// PDP can then enforce: “Allow if score >= 80”
**Problem 6: "False negatives - agent reports 'Firewall: ON' but firewall is actually disabled"**
- **Why:** The OS command you're using might report the firewall service status (running) rather than the actual rule status (enforcing)
- **Fix:** Check BOTH that the service is running AND that rules are active. On Linux with UFW: check both `ufw status` (active) and that there are actual rules loaded
- **Quick test:** Disable all firewall rules but leave the service running - your agent should detect this as "not secure"
```bash
# Linux UFW example
$ sudo ufw status
Status: inactive  # Agent should detect this

# Even if service is running:
$ systemctl status ufw
● ufw.service - Uncomplicated firewall
   Loaded: loaded
   Active: active (exited)  # BUT no rules!

# Check for actual rules:
$ sudo iptables -L | grep -v "^Chain\|^target"
# If empty, firewall is not protecting anything
Project 6: Continuous Authentication Monitor (Behavioral ZT)
- Main Programming Language: Python
- Alternative Programming Languages: Go, Node.js
- Coolness Level: Level 5: Pure Magic (Super Cool)
- Business Potential: 5. The “Industry Disruptor”
- Difficulty: Level 4: Expert
- Knowledge Area: Data Science / Security Analytics
- Software or Tool: Logs, Anomaly Detection
- Main Book: “Security in Computing” by Pfleeger
What you’ll build: A service that monitors access logs in real-time. It learns the “normal” behavior for a user (e.g., Alice usually logs in from NYC at 10 AM). If it detects an anomaly (e.g., Alice’s token is used from London 20 minutes later), it tells the PEP to immediately invalidate that token and force a multi-factor authentication (MFA) prompt.
Why it teaches ZTA: ZTA isn’t a one-time check at login. It is Continuous Verification. This project teaches you that trust must be constantly re-evaluated based on behavior and context.
Core challenges you’ll face:
- Defining “Normal” → Building a simple baseline of user behavior without too many false positives.
- Real-time Signal Propagation → How to notify every proxy in your fleet to block a user within seconds.
- The “Impossible Travel” Problem → Calculating distance/time between log entries.
Real World Outcome
Deliverables:
- Zero trust component with policy config
- Telemetry output for decisions
Validation checklist:
- Identity/device checks gate access
- Policy enforcement is consistent
- Logs provide decision traceability
You will have an “Intelligent” security monitor that can detect account takeover in progress. You will see your system automatically defending itself against impossible login scenarios.
What you will see:
- Trust Score Dashboard: A real-time view of every active user session and their calculated “Trust Score.”
- Automated Revocation: When an anomaly (like “Impossible Travel”) is detected, you will see the user’s session being “Killed” across all proxies simultaneously.
- MFA Step-up: The system forces a high-friction authentication (MFA) only when things look suspicious.
Example Usage & Output:
# 1. Start the Behavior Monitor
$ ./zta-monitor --log-source /var/log/proxy.log
[INFO] Monitoring 450 active sessions...
[INFO] Baseline established for 50 users.

# 2. Normal Activity
[LOG] User: alice | IP: 1.1.1.1 (NYC) | Time: 10:00:00 | Trust Score: 100
[LOG] User: alice | IP: 1.1.1.1 (NYC) | Time: 10:05:00 | Trust Score: 100

# 3. Anomaly Detected: 'Impossible Travel' (London login 15 mins later)
[ALERT] CRITICAL: User 'alice' detected in London (8.8.8.8) at 10:20:00
[ALERT] Logic: NYC -> London in 15 mins (Speed > 10,000 km/h).
[ACTION] Calculating new Trust Score for User 'alice': 0
[ACTION] Sending 'Revoke' signal to all PEP Proxies for User 'alice'...

# 4. PEP Proxy Response (Terminal 2)
[PEP] Received GLOBAL_REVOKE for user 'alice'.
[PEP] Active Session (Token ID: 4412-XA) terminated immediately.

# 5. User (Attacker) Experience
$ curl -i http://localhost:8080/data
HTTP/1.1 401 Unauthorized
Content-Type: application/json

{
  "error": "Session Terminated",
  "reason": "Suspicious login activity detected (Impossible Travel).",
  "remediation": "Please perform a multi-factor authentication (MFA) to restore trust."
}
The Core Question You’re Answering
“If a user’s credentials are stolen, how can we detect the attacker even if the password and MFA are already ‘passed’?”
Attackers don’t behave like your users. By monitoring context (IP, Time, Velocity), we can detect account takeovers that traditional security misses.
Concepts You Must Understand First
Stop and research these before coding:
- UEBA (User and Entity Behavior Analytics)
- What are the common “signals” of human behavior? (Working hours, typical geo-location, frequency of access).
- What is an “Anomaly” vs a “Bug”?
- The ‘Impossible Travel’ Algorithm
- How do you calculate the distance between two IP addresses?
- How do you calculate the minimum time required to travel that distance?
- Session Revocation Patterns
- How do you “kill” a JWT before it expires? (Hint: Token Blacklisting or short-lived tokens with long-lived refresh).
Questions to Guide Your Design
- False Positives
- What if Alice is using a VPN? How do you distinguish between an attacker and a user jumping between VPN nodes?
- Latency
- If an attacker takes over an account, every second counts. How do you make your detection and revocation happen in < 1 second?
- Feedback Loops
- When a session is revoked, how do you allow the real user to “prove” it’s them and get back to work?
Thinking Exercise
The ‘Low and Slow’ Attack Imagine an attacker who knows about your behavior monitor. They log in from a similar IP range at the same time as Alice and only make 1 request per hour.
Questions while analyzing:
- Can behavioral monitoring catch “mimicry” attacks?
- What other signals (e.g., User Agent, Browser fingerprint) could you use to increase accuracy?
The Interview Questions They’ll Ask
- “What is Continuous Authentication?”
- “Explain the ‘Impossible Travel’ problem in security.”
- “How do you handle JWT revocation without a centralized database check on every request?”
- “What are the risks of using Machine Learning for security decisions?”
Hints in Layers
Hint 1: Use an IP-to-Geo Database Download the free GeoLite2 database from MaxMind to map IPs to Latitude/Longitude.
Hint 2: Simple Velocity Check Distance / Time = Speed. If Speed > 1000 km/h (speed of a jet), it’s likely an anomaly.
Hint 3: The Blacklist Sidecar Instead of having the PEP check with the monitor for every request (too slow), have the monitor “push” blocked User IDs to a Redis instance that all PEPs can check in < 1ms.
Books That Will Help
| Topic | Book | Chapter |
|---|---|---|
| Security Analytics | “Security in Computing” by Charles Pfleeger | Ch. 7 (Intrusion Detection) |
| Data Processing | “Designing Data-Intensive Applications, 2nd Ed” by Martin Kleppmann | Ch. 11 (Stream Processing) |
| Behavioral Analysis | “Foundations of Information Security” by Jason Andress | Ch. 8 (Monitoring & Analysis) |
| Geo Algorithms | “Algorithms, Fourth Edition” by Sedgewick & Wayne | Ch. 6 (Context & Applications) |
| Anomaly Detection | “Practical Malware Analysis” by Michael Sikorski | Ch. 14 (Anomaly Detection Techniques) |
| Real-time Systems | “Designing Data-Intensive Applications, 2nd Ed” by Martin Kleppmann | Ch. 3 (Storage & Retrieval) |
Common Pitfalls & Debugging
Problem 1: “Too many false positives - normal users flagged as ‘impossible travel’“
- Why: Your distance calculation doesn’t account for VPNs, mobile networks, or legitimate travel. A user on a train or using a VPN can appear in two cities within minutes
- Fix: Add a “confidence threshold”. Don’t immediately revoke - instead, lower trust score and require step-up authentication. Allow a grace period (30-60 minutes) for legitimate travel
- Quick test: Connect to a VPN, then disconnect. See if your system flags this as suspicious. It should require additional verification, not immediately block
```python
Before: Binary decision
if speed > 1000: # km/h revoke_immediately()
After: Graduated response
if speed > 1000: if speed > 5000: # Physically impossible revoke_immediately() else: # Possible with plane/VPN lower_trust_score(50) require_step_up_auth()
**Problem 2: "Baseline establishment fails - 'Not enough data for user X'"**
- **Why:** New users or infrequent users don't have enough historical data to build a behavioral profile
- **Fix:** Implement a "learning period" where new users aren't subject to behavioral analysis for the first 7 days. Use global baselines (average org behavior) until individual baseline is established
- **Quick test:** Create a brand new user account and try to access resources - system should work but log that it's in learning mode
```python
# Check if user has enough history
if user.login_count < 20:
    log.info(f"User {user.id} in learning mode")
    use_global_baseline()
else:
    use_individual_baseline(user.id)
Problem 3: “PEP proxies don’t receive revocation signals in real-time”
- Why: You’re using polling (PEPs check for revocations every minute) instead of push notifications. This leaves a gap where attackers can operate
- Fix: Implement WebSocket or Server-Sent Events (SSE) from the monitor to all PEPs. When a revocation occurs, push it immediately
- Quick test: Trigger an anomaly and measure how long it takes for the PEP to block the user. Should be <1 second, not 30-60 seconds ```go // Before: Polling (slow) ticker := time.NewTicker(60 * time.Second) revocations := pollForRevocations()
// After: Push (fast) wsConn.OnMessage(func(msg RevokeMessage) { immediatelyRevokeSession(msg.UserID) })
**Problem 4: "Geo-distance calculation completely wrong (NYC to SF = 50km instead of 4000km)"**
- **Why:** You're using simple Euclidean distance on lat/long coordinates, which doesn't account for Earth's curvature
- **Fix:** Use the Haversine formula for great-circle distance between two points on a sphere
- **Quick test:** Calculate distance between known cities. NYC (40.7128°N, 74.0060°W) to LA (34.0522°N, 118.2437°W) should be ~3,944 km
```python
# Before: Wrong
distance = sqrt((lat2-lat1)**2 + (lon2-lon1)**2)

# After: Correct with Haversine
from math import radians, cos, sin, asin, sqrt

def haversine(lon1, lat1, lon2, lat2):
    lon1, lat1, lon2, lat2 = map(radians, [lon1, lat1, lon2, lat2])
    dlon = lon2 - lon1
    dlat = lat2 - lat1
    a = sin(dlat/2)**2 + cos(lat1) * cos(lat2) * sin(dlon/2)**2
    c = 2 * asin(sqrt(a))
    km = 6371 * c  # Earth's radius in kilometers
    return km
Problem 5: “Cannot determine location from IP address - all users show as ‘Unknown’“
- Why: You need a GeoIP database (MaxMind GeoLite2 or similar) to map IPs to locations. You can’t just parse the IP itself
- Fix: Download MaxMind’s free GeoLite2 database and use a library (geoip2 for Python, geoip2-golang) to look up IP locations
- Quick test: Look up a known IP like 8.8.8.8 (Google DNS in Mountain View, CA). Should return approximate location
```bash
Download GeoLite2 database
$ wget https://download.maxmind.com/app/geoip_update # (requires free account)
Install library
$ pip install geoip2 # Python
**Problem 6: "System learns and normalizes malicious behavior if attacker is active for 7+ days"**
- **Why:** Your baseline continuously updates without distinguishing between legitimate and potentially malicious patterns
- **Fix:** Implement "baseline freezing" - once established, the baseline should only drift slowly and require multiple consistent data points. Flag rapid baseline changes for review
- **Quick test:** Simulate an attacker logging in from a new location daily. After 7 days, the original location should still be considered "normal", not the new pattern
```python
# Weighted moving average (slow adaptation)
new_baseline = (old_baseline * 0.95) + (new_pattern * 0.05)

# Require multiple confirmations for baseline change
if new_location_count > 10:  # Seen 10+ times
    slowly_incorporate_into_baseline(new_location)
Project 7: Software Defined Perimeter (SDP) Controller (The “Black Cloud”)
- Main Programming Language: Go
- Alternative Programming Languages: C, Python
- Coolness Level: Level 5: Pure Magic (Super Cool)
- Business Potential: 5. The “Industry Disruptor”
- Difficulty: Level 5: Master
- Knowledge Area: Networking / VPNs / UDP
- Software or Tool: WireGuard, Single Packet Authorization (SPA)
- Main Book: “Zero Trust Networks” by Gilman & Barth — Ch. 10
What you’ll build: A system that makes your services invisible to the public internet. No open ports (not even 443). To gain access, a client sends a single “Knock” packet (SPA) containing a cryptographically signed authorization. The Controller then dynamically opens a firewall hole (or WireGuard peer) ONLY for that client’s IP.
Why it teaches ZTA: This implements the “Dark Cloud” concept. It teaches you that “Attack Surface Reduction” is a fundamental ZT principle. If the attacker can’t see the port, they can’t scan it or exploit it.
Core challenges you’ll face:
- Single Packet Authorization (SPA) → Designing a stateless way to verify a “knock” without keeping a port open.
- Dynamic Firewall Orchestration → Safely opening and closing rules in real-time.
- WireGuard Integration → Automating peer addition and removal via code.
Real World Outcome
Deliverables:
- Zero trust component with policy config
- Telemetry output for decisions
Validation checklist:
- Identity/device checks gate access
- Policy enforcement is consistent
- Logs provide decision traceability
You will have an “Invisible” server that is completely dark to the public internet. You will be able to prove that standard hacking tools (like nmap) cannot even find your server, yet you can access it instantly with a “Magic Knock.”
What you will see:
- Zero Open Ports: Running
nmapagainst your server will show 100% filtered/closed ports. - Stateless Knocking: You will see your server capturing a “Knock” packet and dynamically opening a hole ONLY for your specific IP.
- Automatic Re-cloaking: The firewall hole automatically closes when you disconnect or after a time-to-live (TTL).
Example Usage & Output:
# 1. Attacker tries to scan your server
$ nmap -sS -p- 45.33.22.11
Starting Nmap...
Note: Host seems down. If it is really up, but blocking our ping probes, try -Pn
# All 65535 ports are filtered. The server is 'Dark'.

# 2. You send the 'Knock' (Single Packet Authorization)
$ ./zta-knock --server 45.33.22.11 --key my-secret.key
[INFO] Generating SPA packet for IP 1.2.3.4...
[INFO] Packet signed (HMAC-SHA256) and encrypted (AES-GCM).
[INFO] Sending UDP knock to 45.33.22.11:62201...
[SUCCESS] Knock sent.

# 3. Server-side SDP Controller (Terminal on Server)
$ sudo ./zta-controller --interface eth0
[DEBUG] Captured UDP packet on port 62201 (Raw Packet Sniffing)
[DEBUG] Verifying SPA signature... Valid!
[DEBUG] Source IP: 1.2.3.4 | Identity: Douglas | Action: OPEN_WG
[ACTION] Adding WireGuard peer for 1.2.3.4...
[ACTION] iptables: Allowing UDP 51820 from 1.2.3.4 for 60 minutes.
[INFO] Hole opened for 1.2.3.4.

# 4. Now you can ping and access the internal IP
$ ping 10.0.0.1
64 bytes from 10.0.0.1: icmp_seq=1 ttl=64 time=22.1 ms
# Access granted! To the rest of the world, the server is still a brick.
The Core Question You’re Answering
“How can I protect my server from zero-day exploits if the attacker can’t even connect to it?”
Standard security is: “Port is open, then we check password.” SDP is: “We check authorization, THEN the port is open.”
Concepts You Must Understand First
Stop and research these before coding:
- SPA (Single Packet Authorization)
- How do you send data over UDP without the server having an “open” port in the traditional sense? (Hint: The server uses a raw socket or pcap to sniff the packets).
- Why is SPA better than “Port Knocking”?
- WireGuard Internals
- How do WireGuard peers work?
- How can you add/remove peers dynamically using the
wgcommand or netlink?
- Attack Surface Reduction
- What is the difference between an “unauthenticated” attack surface (SSH login prompt) and a “zero” attack surface (SDP)?
Questions to Guide Your Design
- Anti-Replay
- If an attacker sniffs your “Knock” packet, can they just send it again to gain access? (Hint: Use timestamps and nonces).
- Hidden in Plain Sight
- Why use UDP for the knock instead of TCP?
- Multi-cloud
- How would you use an SDP Controller to link a server in AWS to a server in Azure without using a public VPN?
Thinking Exercise
The ‘UDP Flood’ Problem If your controller is sniffing all UDP traffic on a port to look for knocks, can an attacker DOS you by flooding that port with garbage?
Questions while analyzing:
- How do you make the verification step (SPA) as fast as possible to survive a flood?
The Interview Questions They’ll Ask
- “What is a Software Defined Perimeter (SDP)?”
- “Explain Single Packet Authorization (SPA) vs. Port Knocking.”
- “How does SDP implement the principle of ‘Default Deny’?”
- “Why is SDP considered more secure than a traditional VPN?”
Hints in Layers
Hint 1: Use libpcap or google/gopacket
Your controller needs to “sniff” the wire to see the knock packet. You don’t “listen” on a port; you “watch” the interface.
Hint 2: The Knock Packet Format (CSA SDP v2.0 Standard) Modern SPA implementations use revolving keys (not static) to prevent replay attacks:
- Encapsulate:
[Timestamp][Nonce][Client_IP][Identity][Service_Request][HMAC-SHA256] - Each client-to-controller interaction uses unique keys
- Keys for Gateway communication are separate from Controller keys
- Critical: Implement nonce validation to prevent replay attacks
Hint 3: WireGuard is your Data Plane Don’t write your own encryption for the tunnel. Use WireGuard. Your code is the “Control Plane” that manages who can talk to it.
Hint 4: Multi-Factor SPA (2025 Best Practice) Modern SDP implementations combine SPA with:
- Device attestation
- Geolocation validation
- Integration with standard auth (SAML, OAuth, OpenID)
- Multi-factor authentication before granting access
Books That Will Help
| Topic | Book | Chapter |
|---|---|---|
| SDP & SPA | “Zero Trust Networks” by Gilman & Barth | Ch. 10 (Software-Defined Perimeter) |
| Network Packet Capture | “TCP/IP Illustrated, Volume 1, 2nd Edition” by W. Richard Stevens | Ch. 1-2 (Introduction & Link Layer) |
| UDP Programming | “The Linux Programming Interface” by Michael Kerrisk | Ch. 61 (Sockets: Advanced Topics) |
| Cryptographic Protocols | “Serious Cryptography, 2nd Edition” by Jean-Philippe Aumasson | Ch. 4 (Authenticated Encryption) |
| WireGuard | “WireGuard: Next Generation Kernel Network Tunnel” (Whitepaper) | All |
| Network Security | “Computer Networks, Fifth Edition” by Tanenbaum | Ch. 8 (Network Security) |
| Firewall Design | “Security in Computing” by Charles Pfleeger | Ch. 11 (Firewall & Network Security) |
Common Pitfalls & Debugging
Problem 1: “nmap still shows my server with open ports even after SDP is running”
- Why: Your firewall rules have a default ALLOW policy, or you have residual rules from previous tests. SDP requires default DENY for all ports
- Fix: Set iptables/nftables to DROP by default, then only your SDP controller can add ACCEPT rules dynamically
- Quick test: Before starting SDP, run
sudo iptables -P INPUT DROPand verify ALL ports are filtered from external scan ```bashSet default policy to DROP
$ sudo iptables -P INPUT DROP $ sudo iptables -P FORWARD DROP
Allow only localhost and established connections
$ sudo iptables -A INPUT -i lo -j ACCEPT $ sudo iptables -A INPUT -m state –state ESTABLISHED,RELATED -j ACCEPT
Now nmap from external host should show all ports filtered
$ nmap -p 1-65535 your-server-ip
Should show: All 65535 scanned ports are filtered
**Problem 2: "SPA knock packet is captured but firewall rule never opens"**
- **Why:** Your packet capture is working but the HMAC signature verification is failing, or you're not validating the timestamp window correctly
- **Fix:** Add debug logging to show: (1) Packet received, (2) HMAC validated, (3) Timestamp checked, (4) Firewall rule added. Find which step fails
- **Quick test:** Send a knock packet and watch logs. You should see all 4 steps succeed before the port opens
```go
log.Printf("[1] Received SPA packet from %s", srcIP)
if !verifyHMAC(packet) {
    log.Printf("[2] HMAC verification FAILED")
    return
}
log.Printf("[2] HMAC verified successfully")

if !withinTimeWindow(packet.Timestamp, 30) {
    log.Printf("[3] Timestamp outside 30-second window")
    return
}
log.Printf("[3] Timestamp valid")

addFirewallRule(srcIP, requestedPort)
log.Printf("[4] Firewall rule added for %s:%d", srcIP, requestedPort)
Problem 3: “Replay attack works - old knock packet still opens firewall”
- Why: You’re not tracking nonces or timestamps, so an attacker can capture and replay a valid knock packet
- Fix: Implement nonce tracking. Keep a rolling window (last 60 seconds) of used nonces in memory/Redis. Reject any packet with a duplicate nonce
- Quick test: Capture a valid knock packet with tcpdump, then replay it 5 seconds later. Second replay should be rejected ```go var usedNonces = make(map[string]time.Time) // nonce -> timestamp
func validateNonce(nonce string) bool { // Clean up old nonces (older than 60 seconds) for n, t := range usedNonces { if time.Since(t) > 60*time.Second { delete(usedNonces, n) } }
// Check if already used
if _, exists := usedNonces[nonce]; exists {
    return false  // Replay attack!
}

usedNonces[nonce] = time.Now()
return true } ```
Problem 4: “WireGuard peer addition fails with ‘operation not permitted’“
- Why: Your controller process doesn’t have permission to modify WireGuard configuration, or you’re trying to add peers while the interface is down
- Fix: Run controller as root (or with CAP_NET_ADMIN), and ensure WireGuard interface is up before adding peers
- Quick test: Manually add a peer with
wg set wg0 peer <pubkey> allowed-ips 10.0.0.2/32. If this works manually but not from code, it’s a permissions issue ```bashGrant capability to your binary
$ sudo setcap cap_net_admin+ep ./sdp-controller
Or run as root (less secure)
$ sudo ./sdp-controller
Ensure interface is up
$ sudo wg-quick up wg0 $ sudo wg show wg0 # Should show interface details
**Problem 5: "Client can knock successfully but can't actually connect to service after firewall opens"**
- **Why:** You opened the firewall for the wrong port, or the rule allows the knock UDP port (e.g., 1194) but not the actual service port (e.g., 443)
- **Fix:** The SPA packet should specify which service port the client wants access to. Open that specific port, not the SPA listening port
- **Quick test:** After successful knock, immediately test the actual service: `curl https://your-server:443`. If it hangs, the wrong port was opened
```go
// Extract requested service from SPA packet
type SPAPacket struct {
    ClientIP       string
    RequestedPort  int     // e.g., 443 for HTTPS
    Nonce          string
    Timestamp      int64
    HMAC           []byte
}

// Open the SERVICE port, not the SPA port
addFirewallRule(packet.ClientIP, packet.RequestedPort)  // Open 443, not 1194
Problem 6: “Firewall rules accumulate and never expire - server eventually has 1000s of open rules”
- Why: You’re adding rules on knock but never removing them. Over time, this degrades performance and defeats the purpose of SDP
- Fix: Implement TTL (time-to-live) for each rule. Store rule metadata (IP, port, creation time) and run a cleanup goroutine every minute to remove expired rules
- Quick test: Send 10 knock packets, wait 35 minutes (past TTL), then check
iptables -L -n -v. Old rules should be gone ```go type FirewallRule struct { IP string Port int ExpiresAt time.Time }
var activeRules = []FirewallRule{}
// Cleanup goroutine go func() { ticker := time.NewTicker(1 * time.Minute) for range ticker.C { now := time.Now() for i := len(activeRules) - 1; i >= 0; i– { if now.After(activeRules[i].ExpiresAt) { removeFirewallRule(activeRules[i].IP, activeRules[i].Port) activeRules = append(activeRules[:i], activeRules[i+1:]…) } } } }()
**Problem 7: "Packet capture misses SPA packets - sometimes works, sometimes doesn't"**
- **Why:** You're using a high-level socket that may buffer or drop packets under load. Raw sockets are needed for reliable packet capture
- **Fix:** Use libpcap (via gopacket in Go) or raw sockets (in C) with BPF filter to capture only SPA packets on the specific UDP port
- **Quick test:** Send 100 SPA packets rapidly. Count how many your controller actually processes. Should be 100, not 95
```go
// Use gopacket with BPF filter
handle, _ := pcap.OpenLive("eth0", 1600, true, pcap.BlockForever)
handle.SetBPFFilter("udp and port 1194")  // Only capture SPA packets

packetSource := gopacket.NewPacketSource(handle, handle.LinkType())
for packet := range packetSource.Packets() {
    processSPAPacket(packet)
}
Project 8: Just-In-Time (JIT) Access Broker
- Main Programming Language: Go or Python
- Alternative Programming Languages: Rust, Node.js
- Coolness Level: Level 3: Genuinely Clever
- Business Potential: 3. The “Service & Support” Model
- Difficulty: Level 3: Advanced
- Knowledge Area: Identity Management / Ephemeral Credentials
- Software or Tool: HashiCorp Vault (concepts), AWS IAM (optional)
- Main Book: “Foundations of Information Security” by Jason Andress
What you’ll build: A portal where developers request access to a production database. Instead of a permanent password, the broker generates a temporary credential that expires in 30 minutes and automatically revokes it afterward.
Why it teaches ZTA: It enforces the “Least Privilege” and “Ephemeral” principles. Static credentials are ZT’s worst enemy.
Real World Outcome
Deliverables:
- Zero trust component with policy config
- Telemetry output for decisions
Validation checklist:
- Identity/device checks gate access
- Policy enforcement is consistent
- Logs provide decision traceability
You will have a “Just-In-Time” (JIT) access portal. You will see that permanent database passwords become a thing of the past. Instead, credentials are created “On-Demand” and vanish when no longer needed.
What you will see:
- A Self-Service Portal: Where users can request specific access for a limited time.
- Ephemeral Users: You will see your database (Postgres/MySQL) dynamically populating with new users and then “Cleaning” itself.
- Automatic Revocation: Even if a developer forgets to “log out,” the system kills the session and deletes the user exactly when the timer hits zero.
Example Usage & Output:
# 1. Developer requests access to the Customer DB
$ ./zta-broker request --resource customer-db --reason "Fixing bug #104"
[INFO] Authenticaticating developer 'douglas'...
[INFO] Verifying policy in PDP... (Project 2)
[SUCCESS] Access Approved for 30 minutes.

# 2. Broker generates ephemeral credentials
[INFO] Creating temporary SQL user: 'tmp_douglas_4412'
[INFO] Setting TTL: 1800 seconds (30 mins)
[INFO] Credentials:
  - Host: db.prod.corp
  - User: tmp_douglas_4412
  - Pass: 9kL#m2ZpQx99

# 3. Developer uses credentials to fix the bug
$ psql -h db.prod.corp -U tmp_douglas_4412 ...
customer-db=> SELECT count(*) FROM users;
(Result: 1,247,002 rows)

# 4. 30 Minutes Later (Broker background worker)
[INFO] TTL expired for 'tmp_douglas_4412'.
[ACTION] Revoking SQL access...
[ACTION] Dropping user 'tmp_douglas_4412'.
[ACTION] Closing any active connections for 'tmp_douglas_4412'...

# 5. Developer tries to use the same creds again
$ psql -h db.prod.corp -U tmp_douglas_4412 ...
psql: error: FATAL: password authentication failed for user "tmp_douglas_4412"
# (Access is gone. The 'Blast Radius' of a leaked credential is now limited to 30 mins).
The Core Question You’re Answering
“If every developer has a permanent password to the database, how do we stop a leaked laptop from leaking the entire company?”
Permanent credentials are a liability. By moving to Just-In-Time (JIT) access, we ensure that credentials only exist when they are needed, for the specific person who needs them.
Concepts You Must Understand First
Stop and research these before coding:
- Ephemeral vs. Static Credentials
- Why are static passwords the “root of all evil” in security?
- How does automatic revocation reduce the window of opportunity for an attacker?
- Database Role/User Management
- How do you programmatically create and delete users in MySQL or PostgreSQL?
- What is the
GRANTandREVOKEsyntax?
- TTL (Time To Live) Management
- How do you build a reliable “scheduler” that deletes users exactly when their time is up, even if the broker server restarts?
Questions to Guide Your Design
- Auditability
- Does your broker log who requested access and what reason they gave? This is critical for compliance (SOC2/PCI).
- Automatic Revocation
- If your background worker fails, how do you ensure the temporary users are still deleted? (Hint: Use the database’s own event scheduler if available).
- Identity Linkage
- How does the broker verify that the person requesting access is who they say they are? (Integration with Project 1’s Identity system).
Thinking Exercise
The “Malicious Admin” If an admin requests access for 30 minutes but then uses that time to create a second permanent user for themselves, how do you detect or prevent this?
The Interview Questions They’ll Ask
- “What is Just-In-Time (JIT) access?”
- “Explain the ‘Least Privilege’ principle.”
- “How do you handle credential rotation in a high-scale environment?”
- “Why is a temporary password safer than a permanent one with a 90-day rotation policy?”
Hints in Layers
Hint 1: Start with Shell Scripts Write a script that creates a user in Postgres, waits 60 seconds, and deletes them. Then, wrap this logic in a REST API.
Hint 2: Use a Queue for Revocation
Don’t use time.Sleep() in your code. Use a task queue or a database table pending_revocations and a worker that checks it every minute.
Hint 3: Look at HashiCorp Vault You don’t need to use Vault, but look at its “Database Secrets Engine” documentation to see how professionals solve this problem.
Books That Will Help
| Topic | Book | Chapter |
|---|---|---|
| JIT & Privileged Access | “Foundations of Information Security” by Jason Andress | Ch. 5 (Authentication & Authorization) |
| Access Control Patterns | “Security in Computing” by Charles Pfleeger | Ch. 4 (Access Control) |
| Database Security | “Database Systems: The Complete Book” by Hector Garcia-Molina | Ch. 10 (Security & User Authorization) |
| Credential Management | “Zero Trust Networks” by Gilman & Barth | Ch. 6 (Trusting Identities) |
| Reliability & Automation | “Site Reliability Engineering” (Google) | Ch. 11 (On-Call) |
| Time-based Systems | “Designing Data-Intensive Applications, 2nd Ed” by Martin Kleppmann | Ch. 8 (Distributed Transactions) |
Common Pitfalls & Debugging
Problem 1: “Temporary credentials don’t actually expire - users can still connect after TTL expires”
- Why: You created the database user but never set up the automatic cleanup/revocation mechanism
- Fix: Implement BOTH a background worker that revokes credentials AND use database-level expiration if supported (PostgreSQL
VALID UNTIL, MySQL events) - Quick test: Create a 1-minute credential, wait 90 seconds, try to connect. Should fail with “authentication failed” ```sql – PostgreSQL: Create user with expiration CREATE USER temp_user_123 WITH PASSWORD ‘xyz’ VALID UNTIL ‘2024-12-28 15:30:00’;
– Verify it expires automatically (no cleanup code needed!)
**Problem 2: "Broker creates credentials but background worker never revokes them (worker silently failing)"**
- **Why:** Worker might crash, lose database connection, or skip entries if it uses in-memory queues that don't survive restarts
- **Fix:** Use a persistent queue (database table `pending_revocations` with `expires_at` timestamp). Worker polls this table even after restarts
- **Quick test:** Create credential, kill the worker process, restart it. Worker should still revoke the credential on schedule
```go
// Persistent revocation queue
type PendingRevocation struct {
    UserID    string
    ExpiresAt time.Time
    CreatedAt time.Time
}

// Worker polls database, not memory
func revocationWorker() {
    ticker := time.NewTicker(30 * time.Second)
    for range ticker.C {
        var revocations []PendingRevocation
        db.Where("expires_at < ?", time.Now()).Find(&revocations)
        for _, r := range revocations {
            revokeDBUser(r.UserID)
            db.Delete(&r)
        }
    }
}
Problem 3: “User requests 30-minute access, gets it, then creates permanent access for themselves”
- Why: No monitoring of privileged actions taken during the JIT access window
- Fix: Log ALL DDL/DML statements during JIT sessions. Set database audit flags. Alert on suspicious actions like
CREATE USER,GRANT ALL - Quick test: During JIT session, try to create a new permanent user. System should either block it or trigger an alert ```sql – PostgreSQL: Enable session-specific logging ALTER USER temp_user_123 SET log_statement = ‘all’;
– Or use triggers to detect privilege escalation CREATE TRIGGER detect_user_creation BEFORE CREATE ON SCHEMA public FOR EACH STATEMENT EXECUTE FUNCTION alert_security_team();
**Problem 4: "Race condition - user's access expires mid-transaction, causing data corruption"**
- **Why:** Revocation happens exactly at TTL boundary without checking if user has active transactions
- **Fix:** Implement "grace period" - check for active sessions/transactions before revoking. If user has active work, delay revocation by 5 minutes and alert
- **Quick test:** Start a long-running transaction (sleep 2 minutes in transaction), let TTL expire. Transaction should complete OR you should see a grace period alert
```sql
-- Check for active transactions before revocation
SELECT count(*) FROM pg_stat_activity
WHERE usename = 'temp_user_123' AND state = 'active';

-- If active, delay revocation
Problem 5: “No audit trail - can’t prove who had access when and why”
- Why: You create/delete users but don’t log the justification, requestor identity, or what they actually did
- Fix: Create audit table:
access_log(user_id, requestor, justification, granted_at, revoked_at, actions_taken). Log every request and every action - Quick test: Grant access to Alice for “debugging prod issue #1234”. Later, query: “Who accessed prod DB on Dec 28?” Should return Alice + reason ```go type AccessLog struct { TempUserID string RequestorID string // Who requested access Justification string // “Debugging incident INC-2024” GrantedAt time.Time RevokedAt *time.Time ActionsCount int // How many queries they ran }
// Log on grant db.Create(&AccessLog{…})
// Update on revoke db.Model(&log).Update(“revoked_at”, time.Now())
**Problem 6: "Credentials leaked/stolen during the 30-minute window - attacker uses them"**
- **Why:** JIT credentials are still just passwords - if leaked, they work for anyone until expiration
- **Fix:** Tie credentials to additional context: source IP, client certificate, session token. Even if password leaks, it only works from the original request context
- **Quick test:** Create JIT credential from IP 1.1.1.1, try using it from IP 2.2.2.2. Should fail even with correct password
```sql
-- PostgreSQL: Restrict connection source
ALTER USER temp_user_123 WITH CONNECTION LIMIT 1;

-- Or use pg_hba.conf to restrict by IP
# Only allow temp_user_123 from specific IP
host  all  temp_user_123  1.1.1.1/32  scram-sha-256
Problem 7: “Broker is single point of failure - if it crashes, all pending revocations are lost”
- Why: Revocation logic lives only in the broker application, not persisted
- Fix: Use database-native expiration (PostgreSQL
VALID UNTIL) as primary mechanism, broker as secondary. Even if broker dies, database enforces TTL - Quick test: Grant credential via broker, kill broker, wait for expiration. Credential should still be revoked on time ```sql – Always set DB-level expiration as backup CREATE USER temp_user WITH PASSWORD ‘xyz’ VALID UNTIL NOW() + INTERVAL ‘30 minutes’;
– Broker’s revocation is just cleanup/logging
---

## [Project 9: ZTNA App Tunnel (No more VPNs!)](/guides/zero-trust-architecture-deep-dive/P09-ztna-app-tunnel)

- **Main Programming Language**: Rust or Go
- **Alternative Programming Languages**: C
- **Coolness Level**: Level 4: Hardcore Tech Flex
- **Business Potential**: 4. The "Open Core" Infrastructure
- **Difficulty**: Level 4: Expert
- **Knowledge Area**: L4/L7 Tunneling
- **Software or Tool**: SOCKS5, HTTP Connect, mTLS
- **Main Book**: "TCP/IP Illustrated" for the deep networking bits.

**What you'll build**: A client agent that intercepts traffic only for specific internal URLs (e.g., `internal.corp.com`) and tunnels it over a secure mTLS connection to your Project 1 Proxy. It DOES NOT touch the user's other internet traffic.

**Why it teaches ZTA**: This is **Zero Trust Network Access (ZTNA)**. It replaces the "Full Network VPN" with "App-Specific Access."

---

## Real World Outcome

**Deliverables**:
- Zero trust component with policy config
- Telemetry output for decisions

**Validation checklist**:
- Identity/device checks gate access
- Policy enforcement is consistent
- Logs provide decision traceability

You will have a "VPN-less" remote access system. You will see that internal applications feel like public ones, yet they remain 100% private. Unlike a traditional VPN, your laptop remains "Outside" the corporate network while only the *applications* are brought "Inside" the browser.

**What you will see:**
1.  **Selective Interception**: You will see that traffic to `google.com` goes over your normal internet, while traffic to `jira.internal` is automatically sucked into your secure tunnel.
2.  **App-Level Identity**: You will see your identity headers being injected into every request by the tunnel, making "Login" pages on internal apps redundant.
3.  **Encapsulated mTLS**: All traffic is wrapped in an mTLS tunnel, protecting it from Wi-Fi sniffing.

**Example Usage & Output:**

```bash
# 1. Start the ZTNA Client Agent
$ ./zta-tunnel --config ./corp-apps.yaml
[INFO] Monitoring traffic for *.corp.com and *.internal...
[INFO] Local SOCKS5 Proxy listening on 127.0.0.1:1080
[INFO] Establishing mTLS Control Channel to gateway.corp.com...
[SUCCESS] Connected to ZTNA Gateway.

# 2. Browser configured to use the agent (or using curl)
# When you visit: https://jira.internal

# 3. Agent Log (Terminal)
[DEBUG] Intercepted request for jira.internal:443
[DEBUG] Routing via Secure ZTNA Tunnel (mTLS)...
[DEBUG] Identity: douglas@corp.com | Device: SECURE
[DEBUG] Performing mTLS Handshake with ZT Gateway (Project 1/4)...
[SUCCESS] Stream established for Request ID: a1b2c3

# 4. User Experience (No VPN required!)
$ curl -i https://jira.internal
HTTP/1.1 200 OK
Server: ZTNA-Gateway/1.0
X-ZT-Forwarded-For: 127.0.0.1

[ Internal Jira Dashboard Content ]

# 5. External traffic stays local (Split Tunneling in action)
$ curl -i https://www.google.com
[DEBUG] Bypassing ZTNA Tunnel (Domain 'google.com' not in whitelist).
[INFO] Routing via Local Gateway (192.168.1.1).
# (Traffic goes over public Wi-Fi directly, maintaining privacy and speed)
The Core Question You’re Answering
“How can we give employees access to internal tools without giving their laptop a direct connection to our internal network?”
VPNs are dangerous because they put a remote laptop “inside” the network. ZTNA App Tunnels connect a user to an application, never a user to a network.
Concepts You Must Understand First
Stop and research these before coding:
- Split Tunneling
- What is the difference between a “Full Tunnel” and a “Split Tunnel”?
- Why is split tunneling the default for Zero Trust?
- L4 vs. L7 Proxies
- How does a SOCKS5 proxy (L4) differ from an HTTP Proxy (L7)?
- Which one is better for supporting non-web protocols like SSH or DB connections?
- HTTP CONNECT method
- How do you use the
CONNECTmethod to tunnel TCP traffic through an HTTP proxy?
- How do you use the
Questions to Guide Your Design
- Discovery
- How does the client agent know which domains should be tunneled? (Hint: PAC files or dynamic DNS interception).
- Latency
- Tunneling adds “hops.” How do you minimize the overhead of the tunnel? (Hint: Use HTTP/2 or HTTP/3 for the tunnel transport).
- DNS Leaks
- If the user looks up
jira.corp.com, does the DNS request go to the public Wi-Fi or through your tunnel? (This is a major privacy concern!).
- If the user looks up
Thinking Exercise
The “Compromised Agent” If an attacker gains control of the ZTNA Client Agent, can they use it to scan the internal network?
Questions while analyzing:
- Does your tunnel allow “Range” access (10.0.1.0/24) or only specific Hostname access?
- How does the backend Proxy (PEP) enforce that the user only reaches the app they requested?
The Interview Questions They’ll Ask
- “What is ZTNA and how does it differ from a VPN?”
- “Explain the security benefits of an App-Specific tunnel over a Network-level tunnel.”
- “What is a DNS Leak and how do you prevent it in a ZTNA client?”
- “Why is mTLS essential for the tunnel between the client and the gateway?”
Hints in Layers
Hint 1: Start with SOCKS5 Don’t write a custom protocol. Use the SOCKS5 standard. It’s supported by almost everything and is easy to implement.
Hint 2: The Gateway is Project 1 Your Project 1 Identity-Aware Proxy is the “Gateway” for this tunnel. The tunnel simply wraps the requests and adds the identity headers.
Hint 3: Use HTTP/2 for Multiplexing If the user opens 10 tabs, you don’t want 10 separate TLS handshakes. Use HTTP/2 (or GRPC) to multiplex many internal streams over a single secure tunnel.
Books That Will Help
| Topic | Book | Chapter |
|---|---|---|
| Networking Tunnels | “TCP/IP Illustrated, Volume 1, 2nd Edition” by W. Richard Stevens | Ch. 12 (Tunneling Protocols) |
| SOCKS5 Protocol | RFC 1928 | All |
| Secure Tunnels | “Zero Trust Networks” by Gilman & Barth | Ch. 10 (Software-Defined Perimeter) |
| VPN Architecture | “Computer Networks, Fifth Edition” by Tanenbaum | Ch. 8.8 (Virtual Private Networks) |
| Proxy Design Patterns | “TCP/IP Sockets in C” by Michael J. Donahoo | Ch. 6 (Broadcasting & Multicasting) |
| Application-Level Gateways | “Security in Computing” by Charles Pfleeger | Ch. 11 (Network Security) |
| Split Tunneling | “Zero Trust Networks” by Gilman & Barth | Ch. 9 (Zero Trust for the User) |
Common Pitfalls & Debugging
Problem 1: “Split tunneling not working - ALL traffic goes through tunnel instead of just internal apps”
- Why: Your traffic interception logic is too broad. Either your PAC file/routing rules catch everything, or your SOCKS proxy is set as system-wide default
- Fix: Implement precise domain matching. Only intercept traffic for configured internal domains (e.g.,
*.corp.com,*.internal). Let everything else bypass - Quick test: With tunnel running, visit
google.com- traffic should NOT go through tunnel. Then visitjira.internal- should go through tunnel ```go // Domain whitelist for tunneling internalDomains := []string{“.corp.com”, “.internal”, “jira.company.net”}
func shouldTunnel(domain string) bool { for _, internal := range internalDomains { if strings.HasSuffix(domain, internal) { return true } } return false // Don’t tunnel public domains }
**Problem 2: "DNS leaks - internal DNS queries go to public DNS servers, revealing internal hostnames"**
- **Why:** Your client resolves DNS before checking if domain should be tunneled, leaking internal hostnames to 8.8.8.8
- **Fix:** Intercept DNS queries for internal domains and resolve them through the tunnel. Only resolve public domains locally
- **Quick test:** Run `tcpdump port 53` while accessing `internal.corp.com`. Should see NO DNS query to 8.8.8.8, only through tunnel
```go
// Custom DNS resolver for split DNS
func resolveDomain(domain string) (string, error) {
    if shouldTunnel(domain) {
        // Resolve via tunnel to internal DNS
        return tunnelDNSQuery(domain)
    }
    // Use system resolver for public domains
    return net.LookupHost(domain)
}
Problem 3: “mTLS handshake fails with ‘certificate verify failed’ even though certs are correct”
- Why: Clock skew between client and server, or certificate validation checking server hostname instead of client identity
- Fix: Ensure time synchronization (NTP). For client certs, validate based on subject/SAN, not hostname. Check cert
Not BeforeandNot Afterdates - Quick test: Check both client and server times with
date. If they differ by >5 minutes, sync with NTP ```bashCheck time on both sides
$ date $ ssh server ‘date’
If different, sync time
$ sudo ntpdate -s time.nist.gov
Check cert dates
$ openssl x509 -in client.crt -noout -dates notBefore=Dec 28 00:00:00 2024 GMT notAfter=Dec 28 00:00:00 2025 GMT
**Problem 4: "Tunnel works for HTTP but breaks for WebSockets, gRPC, or other protocols"**
- **Why:** Your tunnel only forwards HTTP/1.1 request-response, doesn't handle protocol upgrades or bidirectional streams
- **Fix:** Use HTTP/2 or implement CONNECT tunnel for raw TCP forwarding. Support `Upgrade: websocket` headers properly
- **Quick test:** Try connecting to a WebSocket endpoint (wss://internal-chat.corp.com). Should maintain persistent connection, not disconnect immediately
```go
// Detect WebSocket upgrade
if req.Header.Get("Upgrade") == "websocket" {
    // Establish bidirectional tunnel, not request-response
    proxyWebSocket(clientConn, serverConn)
    return
}

// Or use HTTP CONNECT for raw TCP
if req.Method == "CONNECT" {
    tunnelRawTCP(clientConn, req.Host)
}
Problem 5: “Performance terrible - tunnel adds 500ms latency to every request”
- Why: Each request creates a new mTLS connection to gateway instead of reusing persistent connection. TLS handshake is expensive
- Fix: Maintain a persistent mTLS connection pool to the gateway. Multiplex many requests over single connection using HTTP/2 or gRPC
- Quick test: Make 10 rapid requests. Latency of request #2-10 should be <50ms if connection pooling works, not 500ms each ```go // Persistent connection pool var gatewayConn *tls.Conn // Reuse this connection
func init() { // Establish persistent mTLS connection once gatewayConn = dialGateway() go keepAlive(gatewayConn) // Send periodic pings }
// Reuse for all requests func tunnelRequest(req *http.Request) { // Use existing gatewayConn, don’t dial each time http2.WriteRequest(gatewayConn, req) }
**Problem 6: "Gateway can't distinguish between different users - all requests look like they're from the tunnel"**
- **Why:** Tunnel forwards requests without adding identity information. Gateway sees tunnel's IP/cert, not end user's identity
- **Fix:** Inject user identity headers into every tunneled request (X-ZT-User, X-ZT-Device-ID). Sign these headers so gateway can verify they weren't tampered
- **Quick test:** Access internal app through tunnel, check server logs. Should show YOUR username, not "tunnel-service"
```go
// Inject identity into request
req.Header.Set("X-ZT-User", currentUser.Email)
req.Header.Set("X-ZT-Device-ID", deviceID)
req.Header.Set("X-ZT-Device-Health", deviceHealthScore)

// Sign headers to prevent tampering
signature := sign(currentUser.Email + deviceID + timestamp, privateKey)
req.Header.Set("X-ZT-Signature", signature)
Problem 7: “Tunnel client crashes with ‘too many open files’ after running for several hours”
- Why: File descriptor leak - connections to gateway or backend apps aren’t being closed properly
- Fix: Ensure ALL connections (both client-side and gateway-side) are closed in defer statements. Use connection pooling with limits
- Quick test: Run
lsof -p <pid> | wc -lperiodically. Number of open files should stabilize, not grow infinitelyfunc handleRequest(clientConn net.Conn) { defer clientConn.Close() // ALWAYS close client connection serverConn, _ := dialBackend() defer serverConn.Close() // ALWAYS close backend connection // Bidirectional copy go io.Copy(serverConn, clientConn) io.Copy(clientConn, serverConn) // Both connections auto-close when function exits }
Problem 8: “App works through tunnel but breaks when tunnel disconnects - no fallback to public access”
- Why: Tunnel is set as mandatory proxy for internal domains, but lacks fallback when gateway is unreachable
- Fix: Implement health checks to gateway. If gateway is down, either (1) fail fast with clear error, or (2) fallback to direct connection IF app has public endpoint
- Quick test: Start tunnel, access internal app (works). Kill tunnel, try again. Should see clear “ZTNA gateway unreachable” error within 5 seconds ```go func dialGateway() (tls.Conn, error) { conn, err := tls.DialWithTimeout(gatewayAddr, 5time.Second) if err != nil { return nil, fmt.Errorf(“ZTNA gateway unreachable: %w. Check network connection.”, err) } return conn, nil }
// In request handler conn, err := dialGateway() if err != nil { return http.StatusBadGateway, “Cannot connect to ZTNA gateway. VPN required if gateway is down.” } ```
Project Comparison Table
| Project | Difficulty | Time | Depth of Understanding | Fun Factor |
|---|---|---|---|---|
| 1. Identity Proxy | Level 2 | Weekend | Medium (Identity flows) | ★★★☆☆ |
| 2. Policy Engine | Level 3 | 1 Week | High (Logic/Auth) | ★★★★☆ |
| 3. Micro-segmentation | Level 4 | 2 Weeks | High (OS/Networking) | ★★★★☆ |
| 4. mTLS Mesh | Level 3 | 1 Week | Medium (Crypto) | ★★★★☆ |
| 5. Device Health | Level 2 | Weekend | Medium (OS APIs) | ★★★☆☆ |
| 6. Behavioral Mon | Level 4 | 2 Weeks | High (Security Analytics) | ★★★★★ |
| 7. SDP Controller | Level 5 | 1 Month | Extreme (Network Ops) | ★★★★★ |
| 8. JIT Broker | Level 3 | 1 Week | Medium (Lifecycle) | ★★★☆☆ |
| 9. ZTNA Tunnel | Level 4 | 2 Weeks | High (Tunnels/Proxies) | ★★★★☆ |
Recommendation
If you are new to ZT: Start with Project 1 (Identity Proxy). It gives you the immediate satisfaction of “locking down” a service using modern tokens.
If you are a Systems/Linux person: Start with Project 3 (Micro-segmentation). You’ll love seeing how iptables or eBPF can be used for more than just blocking IPs.
If you want to build a startup: Focus on Project 7 (SDP Controller). The world is moving away from VPNs, and SDP is the future.
Final Overall Project: The Secure Enclave
The Goal: Combine Projects 1, 2, 3, and 5 into a single “Secure Enclave.”
- Deploy a vulnerable web app in a Linux VM.
- Apply Project 3 to isolate it so only the Proxy can talk to it.
- Deploy Project 1 (Proxy) as the only entry point.
- Deploy Project 2 (PDP) and configure the Proxy to ask it for every request.
- Implement a policy in the PDP that says: “ALLOW access to the web app ONLY if the User is ‘Douglas’ AND the request comes from a device with ‘Disk Encryption: Enabled’ (Project 5).”
Success Criteria: You can demonstrate Alice logging in from a secure device and gaining access, while Bob (even with a stolen password) is blocked because his device is “Unhealthy.”
From Learning to Production: What’s Next?
After completing these projects, you’ve built educational implementations. Here’s how to transition to production-grade systems:
What You Built vs. What Production Needs
| Your Project | Production Equivalent | Gap to Fill |
|---|---|---|
| Project 1 (Proxy) | Pomerium, Ory Oathkeeper | High availability, session management, load balancing |
| Project 2 (PDP) | Open Policy Agent, Keycloak | Policy versioning, distributed consensus, audit logging |
| Project 3 (Micro-seg) | Cilium, Calico | Kubernetes integration, eBPF optimization, API-driven rules |
| Project 4 (mTLS) | cert-manager, SPIRE | Automated rotation, ACME protocol, hardware key storage |
| Project 7 (SDP) | Appgate SDP, Perimeter 81 | Enterprise SSO integration, compliance reporting |
| Project 9 (ZTNA) | Zscaler ZPA, Cloudflare Access | Global PoPs, DDoS protection, mobile SDKs |
Skills You Now Have
You can confidently discuss:
- PEP/PDP/PA architecture in interviews
- Why network location ≠ trust
- How continuous verification works
- The difference between ZTNA and VPN (and why Gartner predicts 70% ZTNA adoption)
You can read source code of:
- Any mTLS implementation
- Kubernetes admission controllers
- Service mesh proxies (Envoy, Linkerd)
You can architect:
- Zero Trust migrations for small companies
- Policy-as-Code systems for DevOps teams
- Identity-based micro-segmentation
Recommended Next Steps
1. Contribute to Open Source (Best for Learning + Resume):
- Open Policy Agent: Write a new built-in function for Rego
- Cilium: Add a feature to the network policy translator
- SPIRE: Improve documentation or write a new attestor plugin
2. Build a SaaS Around One Project:
- Idea: “ZTNA-as-a-Service for freelancers” - use Project 9 as the base
- Monetization: $10/month per user, target remote teams of 5-20 people
- Differentiation: Dead-simple setup (1-click deploy), focused on dev tools (GitHub, Linear, Notion)
3. Get Certified:
- (ISC)² CISSP - Covers Zero Trust in Domain 3 (Security Architecture)
- SANS SEC530 - Defensible Security Architecture and Engineering
- CompTIA Security+ - Entry-level, covers basic ZT concepts
4. Study Real-World Breaches: Read these incident reports and identify where Zero Trust would have stopped the attack:
- SolarWinds (2020) - CISA Report
- Colonial Pipeline (2021) - TSA Security Directive
- Log4Shell Exploitation (2021) - How would micro-segmentation have limited blast radius?
Career Paths Unlocked
With this knowledge, you can pursue:
- Security Engineer at tech companies implementing Zero Trust
- DevSecOps Engineer building policy-as-code systems
- Cloud Security Architect designing Zero Trust for AWS/Azure/GCP
- Penetration Tester (you now understand what to attack in ZT systems)
- Startup Founder in the Zero Trust tooling space (massive market)
Summary
This learning path covers Zero-Trust Architecture through 9 hands-on projects.
| # | Project Name | Main Language | Difficulty | Time Estimate |
|---|---|---|---|---|
| 1 | Identity-Aware Proxy | Go | Intermediate | Weekend |
| 2 | Policy Decision Engine | Rust/Go | Advanced | 1-2 Weeks |
| 3 | Host Micro-segmentation | C/Bash | Expert | 2 Weeks |
| 4 | mTLS Mesh | Go | Advanced | 1 Week |
| 5 | Device Trust Agent | Go/Python | Intermediate | Weekend |
| 6 | Behavioral Monitor | Python | Expert | 2 Weeks |
| 7 | SDP Controller | Go | Master | 1 Month |
| 8 | JIT Access Broker | Go | Advanced | 1 Week |
| 9 | ZTNA App Tunnel | Rust | Expert | 2 Weeks |
Expected Outcomes
After completing these projects, you will:
- Internalize the Control Plane vs Data Plane separation.
- Master Identity-based security over Network-based security.
- Understand how to implement Least Privilege at the packet level.
- Be able to design architectures that resist Lateral Movement.
- Have a portfolio of tools that demonstrate expert-level security engineering.
You’ll have built a complete, working Zero-Trust ecosystem from first principles.
Additional Resources & References
This guide was enhanced with research from the following authoritative sources on Zero Trust Architecture:
Standards & Specifications (Updated for 2025)
- NIST SP 800-207: Zero Trust Architecture - The foundational standard for ZTA
- NIST SP 1800-35: Implementing a Zero Trust Architecture - NEW 2025: Practical implementation guide with reference architecture
- NIST SP 800-207A: Zero Trust Architecture Model for Cloud-Native Applications
- CISA Zero Trust Maturity Model - Practical implementation guidance
- CSA Software-Defined Perimeter Specification v2.0 - Enhanced SPA message formats
Industry Analysis & Comparisons (2025 Data)
- ZTNA vs VPN: What’s the Better Solution? - Gartner predicts 70% adoption by 2025
- VPN vs Zero Trust Transition Guide 2025 - Migration strategies
- Software-Defined Perimeter Overview - SPA implementation best practices
- Zero Trust Architecture Explained (2025) - Latest NIST updates
Books
The book recommendations throughout this guide reference well-established texts, with a focus on:
Zero Trust Specific:
- “Zero Trust Networks” by Evan Gilman and Doug Barth (O’Reilly, 2nd Edition) - The definitive guide to ZT implementation
Security Foundations (from your library):
- “Security in Computing” by Charles Pfleeger - Cryptography, authentication, access control
- “Foundations of Information Security” by Jason Andress - Authorization patterns, behavioral analytics
- “Serious Cryptography, 2nd Edition” by Jean-Philippe Aumasson - TLS, MACs, authenticated encryption
- “Practical Malware Analysis” by Michael Sikorski - Anomaly detection techniques
Systems & Network Programming (from your library):
- “The Linux Programming Interface” by Michael Kerrisk - Sockets, memory allocation, capabilities
- “Computer Networks, Fifth Edition” by Tanenbaum - Network layer, security fundamentals
- “TCP/IP Illustrated, Volume 1, 2nd Edition” by W. Richard Stevens - Tunneling, packet analysis
- “Understanding Linux Network Internals” by Christian Benvenuti - Netfilter internals
Application Development (from your library):
- “Network Programming with Go” by Adam Woodbeck - HTTP services, TLS programming
- “Learning Go, 2nd Edition” by Jon Bodner - Concurrency, performance patterns
- “Designing Data-Intensive Applications, 2nd Edition” by Martin Kleppmann - Stream processing, distributed systems