Web3 Deep Understanding - Project-Based Learning Path
Goal: Deeply understand Web3 from first principles—what cryptographic primitives make decentralized systems possible, why blockchains work, how consensus emerges without central authority, what the Ethereum Virtual Machine actually does, and why this technology represents a fundamental shift from trust-based to math-based systems. After completing these projects, you’ll understand not just how to use Web3, but why it exists and how every layer functions.
Prerequisites & Background Knowledge
Essential Prerequisites (Must Have)
Before diving into Web3, you need:
- Solid Programming Skills (intermediate level in at least one language)
- Comfortable with data structures (arrays, hash maps, trees)
- Understanding of pointers/references and memory management
- Experience with debugging and reading error messages
- Basic Cryptography Concepts
- What encryption means (symmetric vs. asymmetric)
- General idea of hashing (even if you’ve never implemented one)
- Understanding that “random” is hard in computers
- Networking Fundamentals
- How HTTP requests work (client-server model)
- Basic understanding of TCP/IP
- What an API is and how to call one
- Command Line Comfort
- Running scripts and compiling programs
- Basic Unix commands (ls, cd, grep, curl)
- Environment variables and PATH
Helpful But Not Required
You’ll learn these concepts through the projects:
- Advanced cryptography (ECC, zero-knowledge proofs)
- Distributed systems theory (CAP theorem, Byzantine fault tolerance)
- Formal verification and security auditing
- Game theory and mechanism design
- Virtual machine design and bytecode interpretation
Self-Assessment Questions
Answer these to verify readiness:
- Can you explain what a hash function does in one sentence?
- Have you built a non-trivial project (500+ lines of code)?
- Can you debug a program using print statements or a debugger?
- Do you understand what “O(n log n)” means?
- Have you used Git for version control?
- Can you read and understand technical documentation?
If you answered “yes” to 4+ questions, you’re ready. If not, consider working through basic programming tutorials first.
Development Environment Setup
Required Tools:
- Language of choice: Rust (recommended), Go, Python, or JavaScript/TypeScript
- Code editor: VS Code, Vim, or any IDE with syntax highlighting
- Version control: Git installed and configured
- Terminal: Bash, Zsh, or equivalent Unix shell (WSL2 on Windows)
Recommended Tools:
- Blockchain explorers: Etherscan.io, Blockchain.com (for reference)
- Test networks: Access to Sepolia or Goerli Ethereum testnets
- Documentation: Ethereum Yellow Paper (reference), Solidity docs
- Visualization: Graphviz (for Merkle trees and block visualizations)
Optional but Helpful:
- Docker: For running local blockchain nodes
- Postman/curl: For testing JSON-RPC endpoints
- Jupyter notebooks: For interactive cryptography experiments (Python)
Time Investment
Realistic time estimates:
- Foundational projects (1-5): 1-2 weeks each (cryptography, blockchain basics)
- Intermediate projects (6-12): 2-3 weeks each (smart contracts, DeFi)
- Advanced projects (13-18): 3-4 weeks each (security, Layer 2, full client)
Total commitment: 4-6 months of focused, part-time work (10-15 hours/week)
This isn’t a weekend tutorial. Deep understanding requires building, debugging, and internalizing concepts over time.
Important Reality Check
What this learning path IS:
- ✅ Hands-on implementation of blockchain primitives from scratch
- ✅ Deep dive into “why” things work, not just “how” to use libraries
- ✅ Understanding cryptographic and economic guarantees
- ✅ Building intuition for security vulnerabilities and attack vectors
What this learning path is NOT:
- ❌ A get-rich-quick crypto trading guide
- ❌ A tutorial on using MetaMask and buying NFTs
- ❌ Copy-paste code snippets without understanding
- ❌ Shortcut to blockchain development jobs without fundamentals
If you want to truly understand Web3 at a systems level—what makes it secure, why certain design decisions were made, and how to reason about new protocols—this path is for you.
Overview
Web3 represents a paradigm shift from centralized to decentralized systems. To truly understand it, you must understand why it exists and how each component works at a fundamental level.
The Explosive Growth of Web3 (2025)
The blockchain industry has reached mainstream adoption with compelling statistics:
Market Size:
- Global blockchain market: $96.3 billion (2025), projected to reach $100+ billion by 2034 (47% CAGR)
- North America Web3 market: $3.4 billion (2025) → $100.1 billion by 2034 (45.8% CAGR)
Adoption:
- 560 million people (6.8% of global population) own cryptocurrency and use Web3 tools
- 820 million unique crypto wallets active globally
- 240 million active Web3 wallet users (19% year-over-year growth)
- 47% of global enterprises have blockchain in active deployment (not just pilots)
DeFi Ecosystem:
- $123.6 billion Total Value Locked (TVL) in DeFi protocols (41% YoY increase)
- Ethereum hosts 62% of all NFT contracts and transaction volume
- $40 billion locked in DAO treasuries
- 28% of Fortune 100 companies use enterprise-branded NFTs for loyalty programs
Developer Activity:
- $12.9 billion in VC funding for blockchain startups (first 5 months of 2025 alone)
- Over 6.2 million new smart contracts deployed in early 2025
This isn’t speculative anymore—it’s infrastructure powering billions in real economic activity.
Why Web3 Exists
The traditional web (Web2) has fundamental problems:
- Trust: You must trust centralized entities (banks, tech companies) not to manipulate data
- Censorship: Single points of control can deny access
- Ownership: You don’t truly own your digital assets; you rent access
- Privacy: Your data is harvested and monetized without consent
Web3 solves these through cryptographic guarantees and decentralized consensus—code that enforces rules without requiring trust in any party.
The Paradigm Shift
Web2 (Trust-Based)                    Web3 (Math-Based)
┌─────────────────────┐              ┌─────────────────────┐
│  Centralized Server │              │  Blockchain Network │
│                     │              │                     │
│  You trust:         │              │  You verify:        │
│  - The company      │              │  - Cryptographic    │
│  - Their database   │              │    proofs           │
│  - Their policies   │              │  - Consensus rules  │
│  - Their uptime     │              │  - Smart contract   │
│                     │              │    code             │
│  If they fail,      │              │                     │
│  manipulate, or     │              │  Math guarantees    │
│  censor → you lose  │              │  correctness        │
└─────────────────────┘              └─────────────────────┘
         ↓                                     ↓
    "Trust me"                          "Don't trust,
                                          verify"
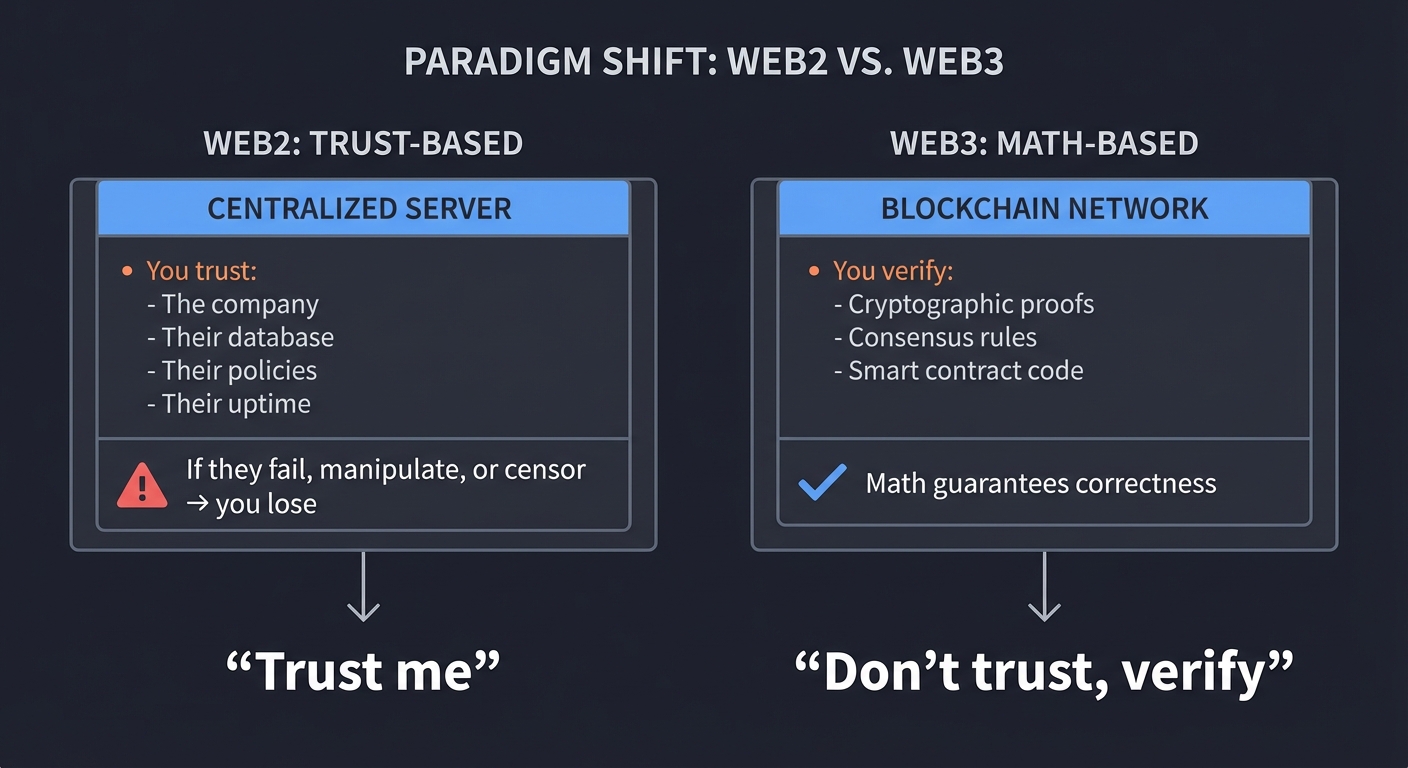
This shift is profound: Web3 replaces institutional trust with mathematical certainty.
Cryptographic Foundations: The Building Blocks
Before blockchains can exist, we need cryptographic primitives that provide specific guarantees. These are the mathematical tools that make trustless systems possible.
Hash Functions: One-Way Fingerprints
A cryptographic hash function takes arbitrary input and produces a fixed-size output (digest) with three critical properties:
- Deterministic: Same input always produces same output
- One-way: Cannot reverse hash to find input (pre-image resistance)
- Avalanche effect: Changing one bit flips ~50% of output bits
Input: "Hello World"
SHA-256 Output: a591a6d40bf420404a011733cfb7b190d62c65bf0bcda32b57b277d9ad9f146e

Input: "hello World"  (lowercase 'h')
SHA-256 Output: 8663bab6d124806b9727f89bb4ab9db4cbcc3862f6bbf22024dfa7212afa964f
                ^^^^^^^^^^^^^^^^^^^^^^^^^^^^^^^^^^^^^^^^^^^^^^^^^^^^^^^^^^^^^^^^
                (Notice: 32 of 64 characters changed = 50% different)
Why this matters for Web3:
- Block hashing: Each block’s hash depends on all its contents
- Transaction IDs: Every transaction gets a unique, verifiable identifier
- Mining: Proof-of-Work is finding a hash below a target value
- Merkle trees: Efficiently prove transaction inclusion without downloading entire blocks
Real-world security: Bitcoin’s blockchain uses SHA-256. To reverse a single block hash would require 2^256 operations—more energy than exists in the known universe.
SHA-256 remains the industry standard, though SHA-3 (Keccak, chosen by NIST in 2012) and BLAKE3 offer faster alternatives with equal security. Ethereum used Keccak-256 for its hashing needs.
Digital Signatures: Proving Ownership Without Revealing Secrets
Digital signatures solve the problem: “How do I prove I own an account without revealing my private key?”
Asymmetric Cryptography:
Private Key (secret)  ──┐
                        ├──> Key Pair
Public Key (shareable)──┘

Private Key + Message ───> Signature
Signature + Message + Public Key ───> Valid/Invalid
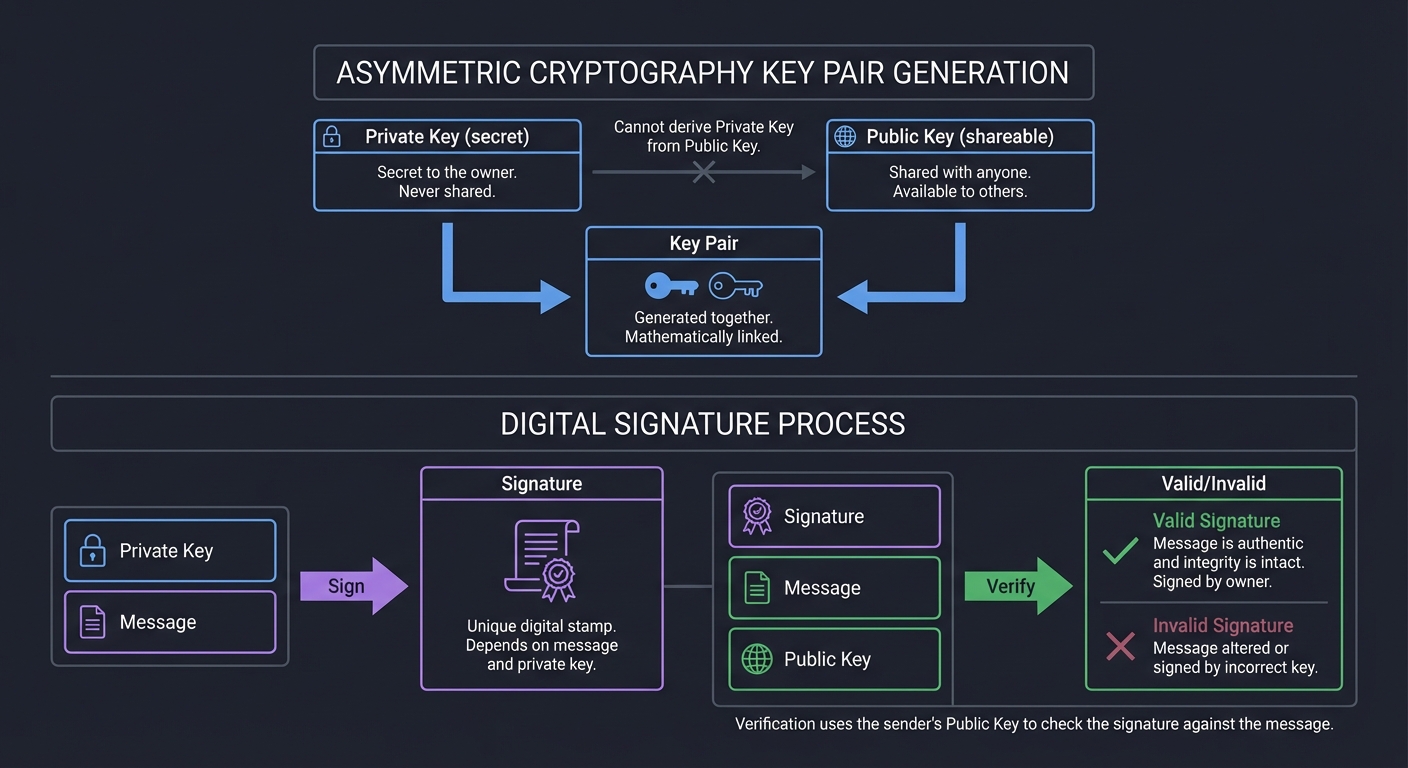
The Magic:
- Only the private key can create valid signatures
- Anyone with the public key can verify signatures
- The public key cannot derive the private key (discrete logarithm problem)
Web3 Application:
Transaction Structure:
{
  from: "0x742d35Cc6634C0532925a3b844Bc454e4438f44e"  (derived from public key)
  to: "0x5aAeb6053F3E94C9b9A09f33669435E7Ef1BeAed"
  value: 1.5 ETH
  nonce: 42
  signature: r=0x8f3d..., s=0x4e2a..., v=27
}

The signature proves:
1. The sender owns the private key for that address
2. This exact transaction was authorized (can't be modified)
3. The transaction can't be replayed (nonce prevents this)
Elliptic Curve Cryptography (ECC): Both Bitcoin and Ethereum use SECP256k1 curve. Why?
- Smaller keys (256-bit ECC = 3072-bit RSA security)
- Faster signature generation/verification
- Well-studied and cryptanalytically sound
Elliptic Curve (simplified visualization):
        y
        │
    ────┼────────────────────
        │     ╱╲
        │    ╱  ╲
        │   ╱    ╲
    ────┼──╱      ╲─────────
        │ ╱        ╲
        │╱          ╲
    ────┼────────────╲──────  x
        │             ╲
        │              ╲

Point multiplication: P + P + P + ... (k times) = Q
  - Easy to compute Q given P and k
  - Computationally infeasible to find k given P and Q
    (This is the discrete logarithm problem)

Private Key = random number k
Public Key = k × G (where G is generator point)
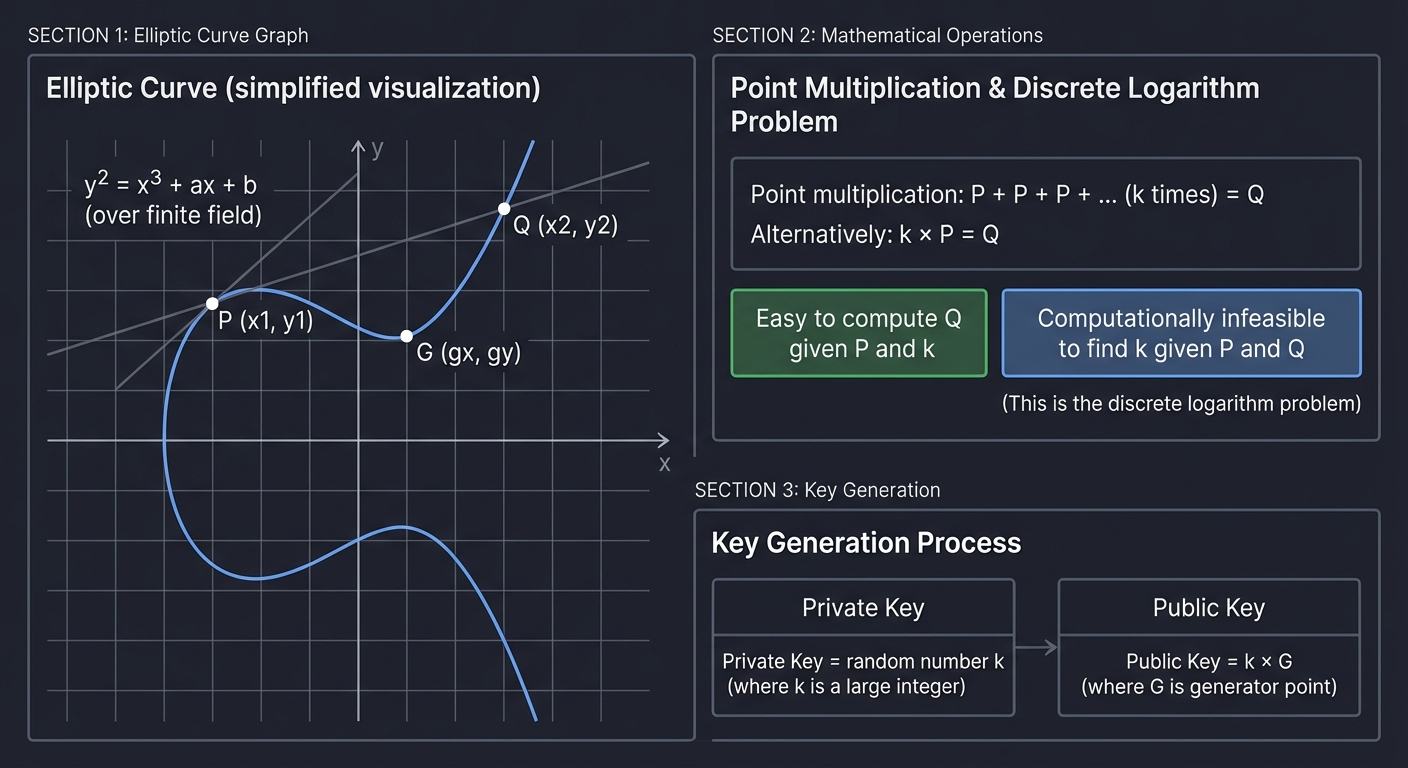
Security note: Ethereum’s wallet addresses are the last 20 bytes of the Keccak-256 hash of the public key. This adds another layer—even if ECDLP were broken, attackers would still need to reverse the hash.
Blockchain Data Structures: Building Tamper-Proof Chains
Merkle Trees: Efficient Proof of Inclusion
A Merkle tree allows you to prove a transaction exists in a block without downloading the entire block.
                    Root Hash
                   /          \
                  /            \
            Hash(A+B)        Hash(C+D)
              /    \            /    \
             /      \          /      \
         Hash(A) Hash(B)   Hash(C)  Hash(D)
           |       |         |        |
         Tx A    Tx B      Tx C     Tx D

To prove Tx B is in the block, you only need:
  - Tx B
  - Hash(A)
  - Hash(C+D)

Then verify:
  1. Hash(B) → compute
  2. Hash(A+B) = Hash(Hash(A) + Hash(B)) → compute
  3. Root = Hash(Hash(A+B) + Hash(C+D)) → compare with block's root

This reduces proof size from O(n) to O(log n)
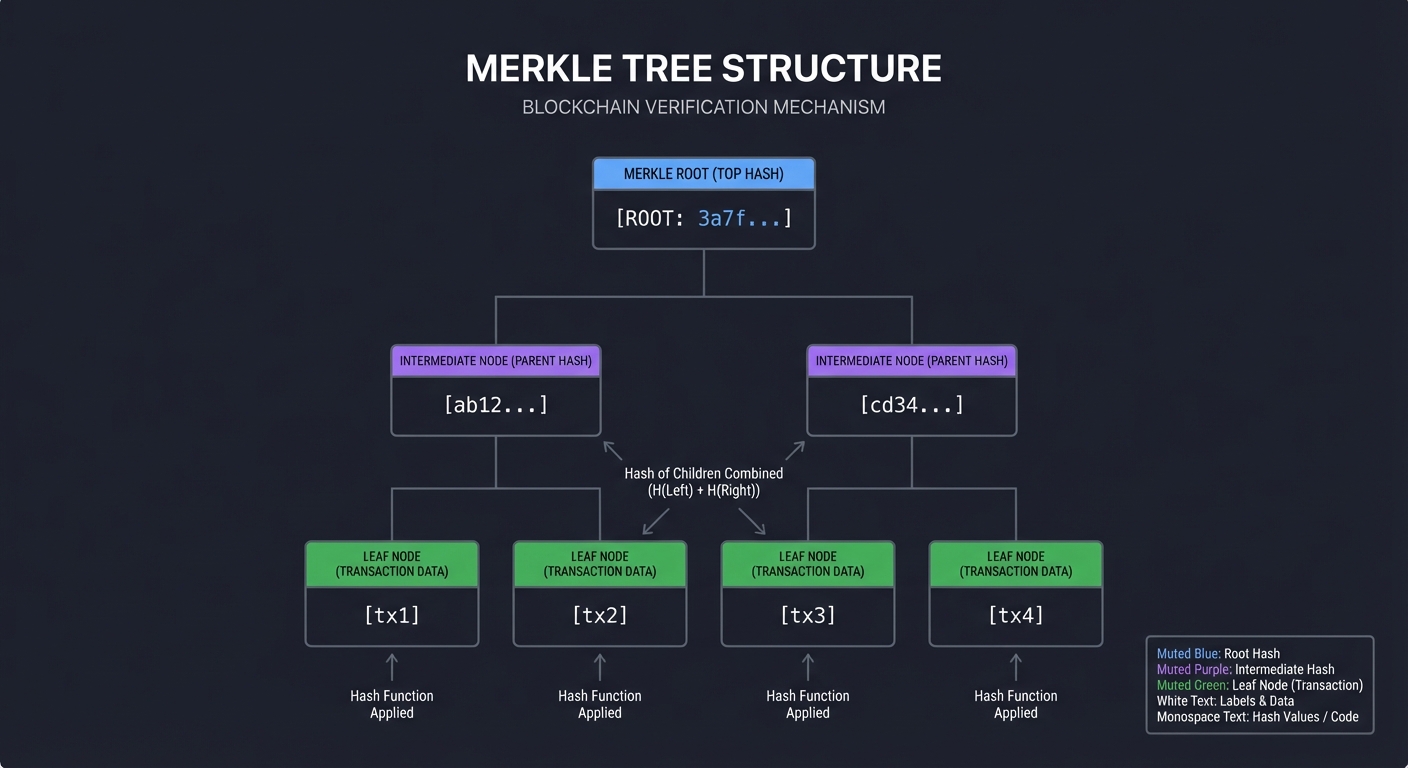
Real-world impact: Bitcoin blocks contain ~2,000 transactions. Instead of downloading 2MB, you can verify inclusion with ~384 bytes (12 hashes × 32 bytes).
Ethereum uses a more advanced structure called a Merkle Patricia Trie for its state tree, allowing efficient updates and proofs for account balances and contract storage.
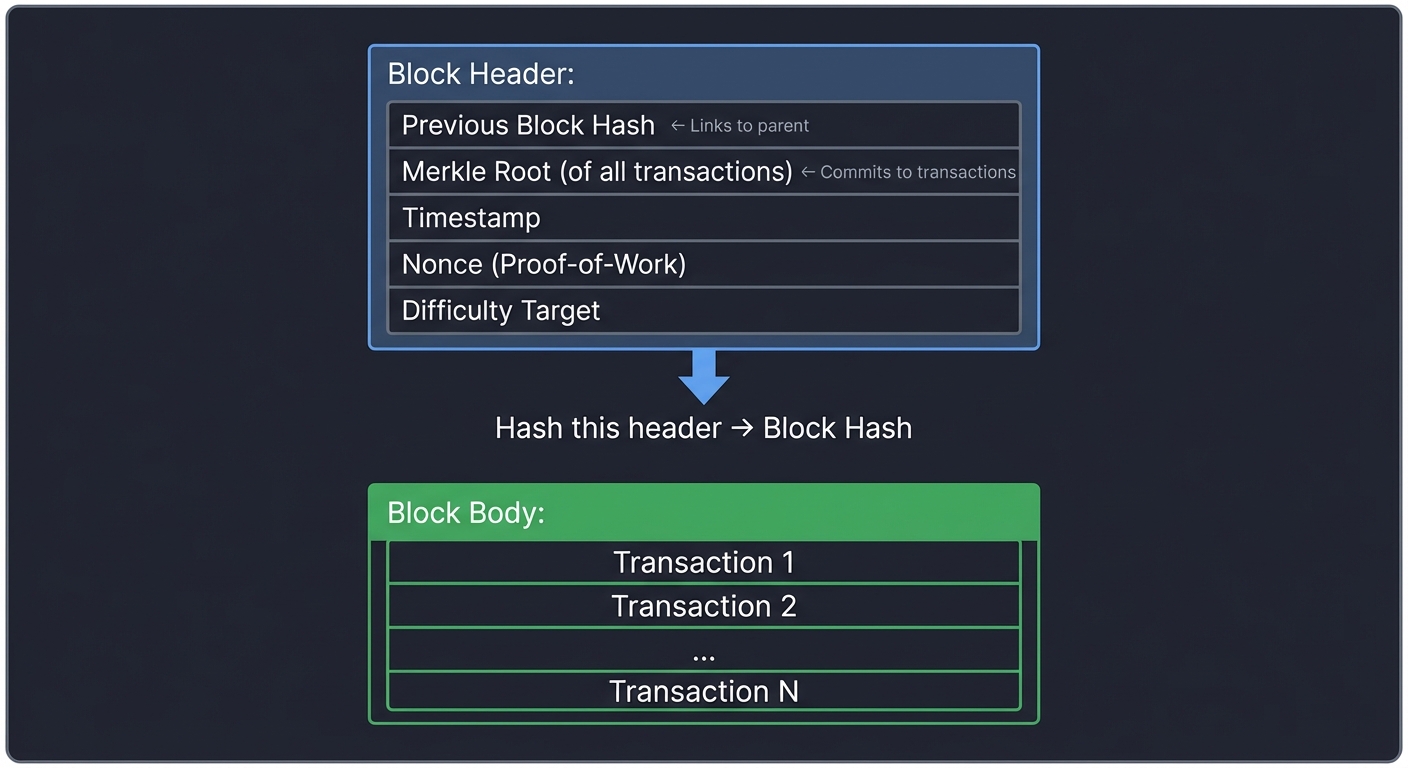
Block Structure: Linking History with Hashes
Each block contains:
Block Header:
┌─────────────────────────────────────────────┐
│ Previous Block Hash                         │ ← Links to parent
│ Merkle Root (of all transactions)           │ ← Commits to transactions
│ Timestamp                                   │
│ Nonce (Proof-of-Work)                       │
│ Difficulty Target                           │
└─────────────────────────────────────────────┘
        │
        ├─> Hash this header → Block Hash
        │
Block Body:
┌─────────────────────────────────────────────┐
│ Transaction 1                               │
│ Transaction 2                               │
│ ...                                         │
│ Transaction N                               │
└─────────────────────────────────────────────┘
Why this creates immutability:
Block N-1        Block N         Block N+1
┌──────────┐    ┌──────────┐    ┌──────────┐
│ Hash:    │    │ Hash:    │    │ Hash:    │
│ 0x4a2f...│◄───┤ PrevHash:│◄───┤ PrevHash:│
│          │    │ 0x4a2f...│    │ 0x7b1e...│
│ Nonce: 42│    │ Nonce:891│    │ Nonce:102│
│ Txs: ... │    │ Txs: ... │    │ Txs: ... │
└──────────┘    └──────────┘    └──────────┘

If you try to change Block N:
  - Its hash changes
  - Block N+1's PrevHash no longer matches
  - You must re-mine Block N+1
  - This invalidates Block N+2
  - You must re-mine the entire chain from Block N forward
  - On Bitcoin, that's ~200,000+ blocks requiring massive computational work
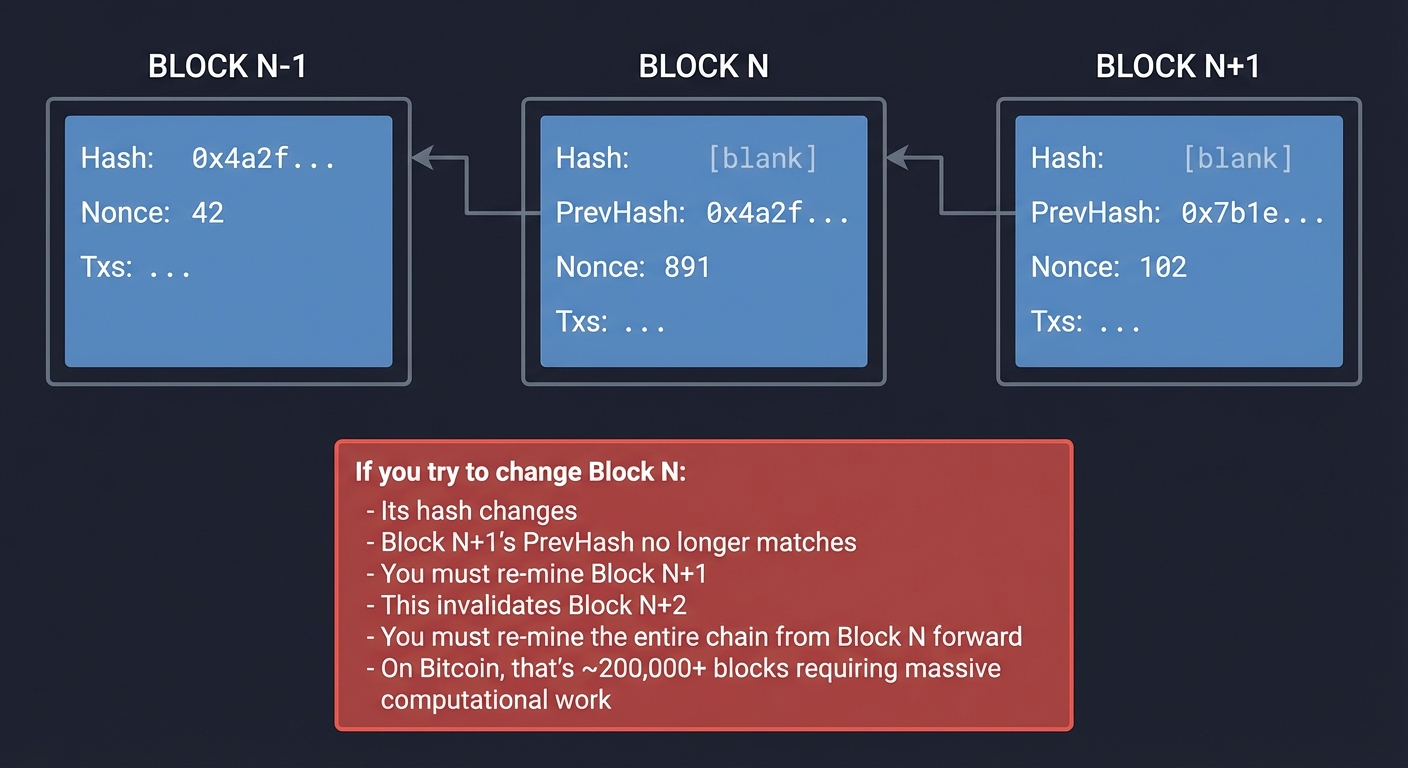
This is why blockchains are append-only: modifying history requires redoing all subsequent work.
Consensus Mechanisms: Agreement Without Authority
The core challenge: How do thousands of untrusted nodes agree on a single version of history?
The Byzantine Generals Problem
        General A         General B
           │                 │
           ├─── "Attack" ────┤
           │                 │
        General C (Traitor)
           │
           ├─── Tells A: "General B said retreat"
           └─── Tells B: "General A said retreat"

Result: A and B don't attack together → failure
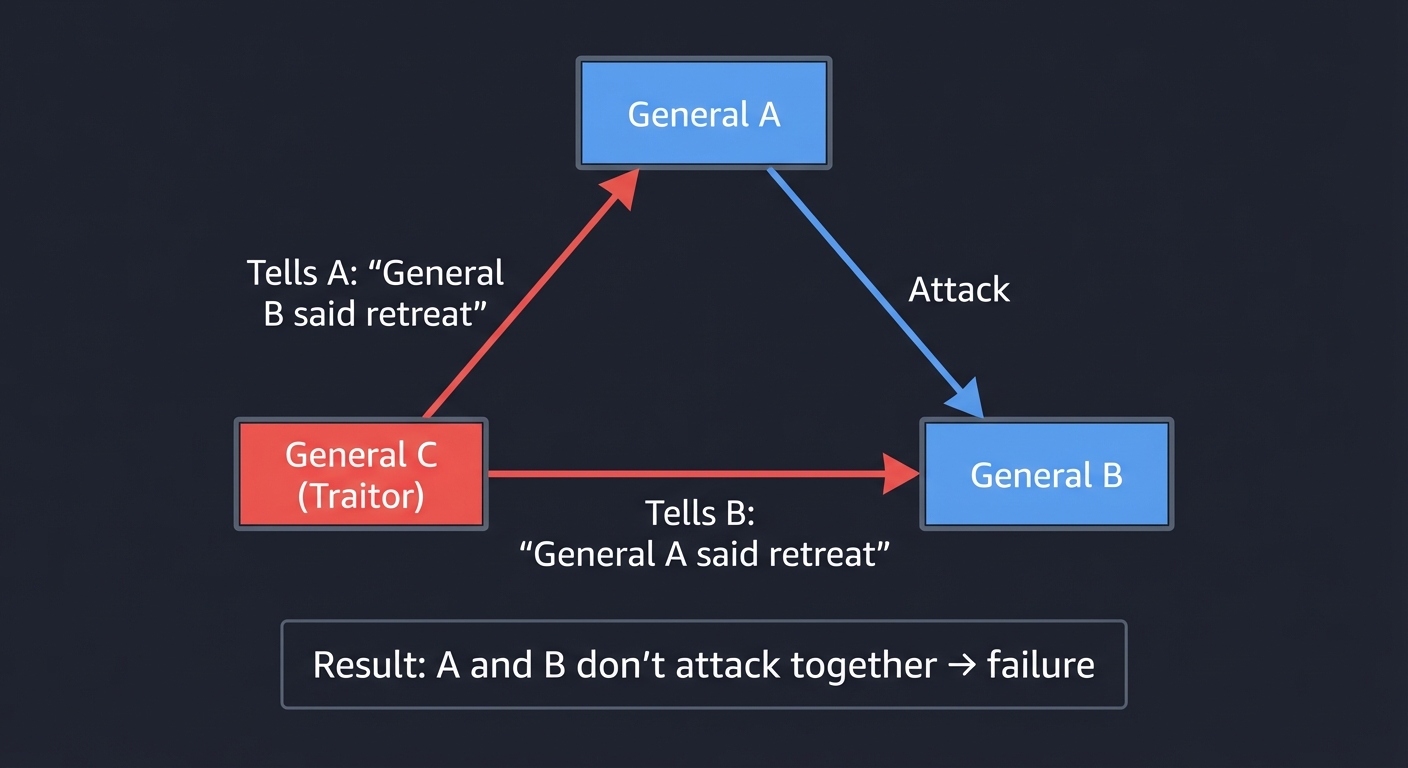
The problem: In distributed systems, nodes may be faulty (crash) or malicious (Byzantine). How do you achieve consensus when you can’t trust messages?
Proof-of-Work (PoW): Making Dishonesty Expensive
Bitcoin’s solution: Make creating blocks computationally expensive.
Mining Process:
1. Collect pending transactions
2. Build block header (PrevHash, MerkleRoot, Timestamp, Nonce=0)
3. Hash the header
4. If Hash < Target → valid block, broadcast it
   Else increment Nonce, try again (repeat millions of times)

Example (simplified):
Target: 0x0000ffff... (hash must start with 4 zeros)

Nonce=0:  Hash = 0xa3f2c8... ✗
Nonce=1:  Hash = 0x7b4e1a... ✗
Nonce=2:  Hash = 0x0002f8... ✗ (only 3 zeros)
...
Nonce=8472: Hash = 0x00001c... ✓ (valid!)
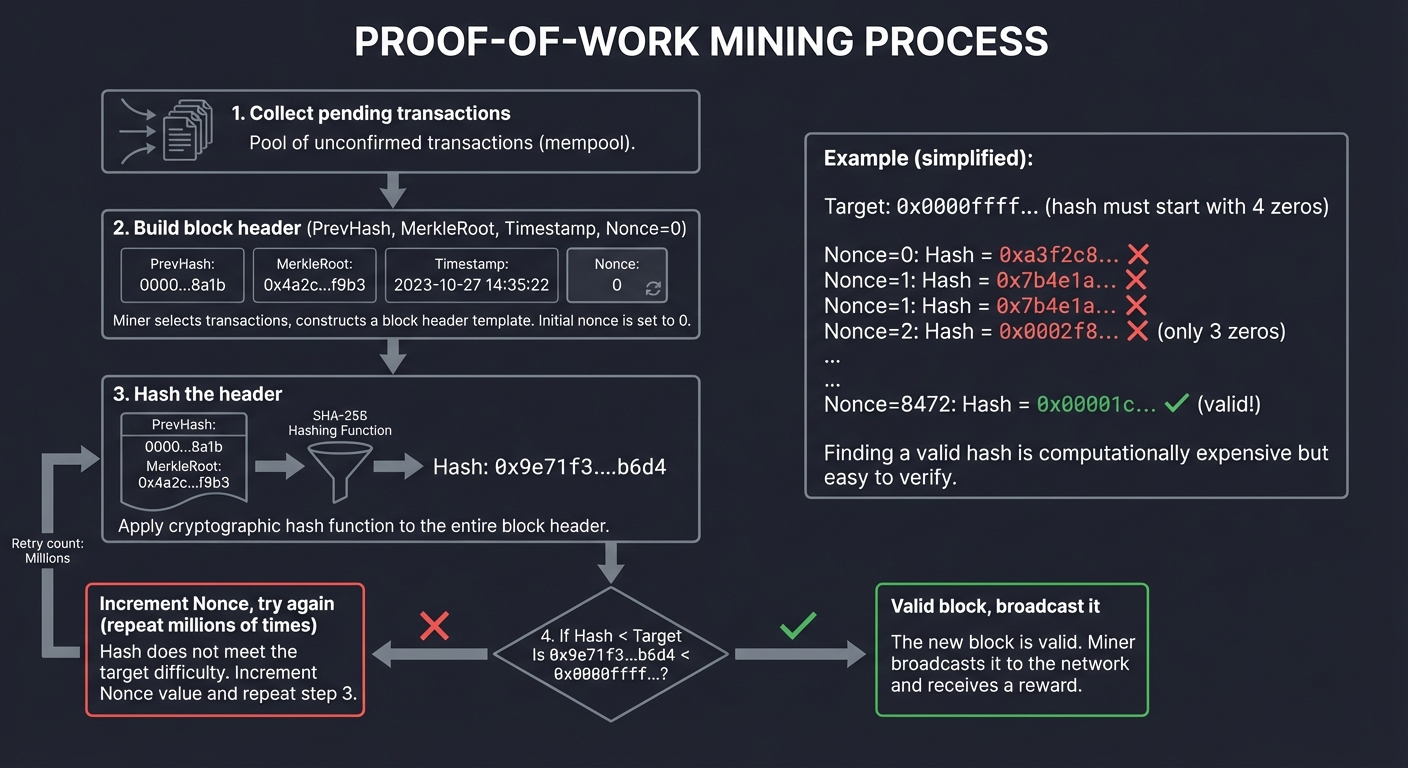
Why this works:
- Creating a valid block requires ~10 minutes of global mining power (billions of hashes)
- To rewrite history, you need to re-mine faster than the rest of the network combined
- Attacking costs more than the rewards (economic disincentive)
The 51% attack: If an attacker controls >50% of mining power, they can rewrite history. This is why decentralization matters—no single entity should have majority power.
Bitcoin’s difficulty adjustment: Every 2,016 blocks (~2 weeks), the network adjusts the difficulty target to maintain ~10-minute block times, regardless of total mining power.
Proof-of-Stake (PoS): Making Dishonesty Self-Destructive
Ethereum 2.0’s approach: Replace computational work with economic stake.
Validator Selection:
- Lock up 32 ETH as collateral
- Get randomly selected to propose blocks
- Other validators attest to validity
- Honest behavior → earn rewards
- Dishonest behavior → lose staked ETH ("slashing")

Economics:
Stake: 32 ETH × $3,000 = $96,000 at risk
Annual Reward: ~4-5% = $3,840
Penalty for Misbehavior: Lose entire stake + ejection

The math: Attacking costs more than you can gain

Advantages over PoW:
- 99.95% less energy consumption
- Faster finality (blocks confirmed in minutes, not hours)
- More secure (costs $96,000 per validator to attack vs. buying mining hardware)
The “Nothing at Stake” problem: In PoS, validators could theoretically vote on multiple forks (no computational cost). Ethereum solves this with slashing—validators who sign conflicting blocks lose their stake.
Byzantine Fault Tolerance (BFT)
Practical BFT algorithms (like Tendermint, used in Cosmos) guarantee finality:
Round 1: Propose
  - Leader proposes block

Round 2: Prevote
  - Validators vote on proposal
  - If >2/3 agree → proceed

Round 3: Precommit
  - Validators commit to block
  - If >2/3 agree → finalized (irreversible)

Guarantee: As long as <1/3 of validators are Byzantine,
           the network reaches consensus
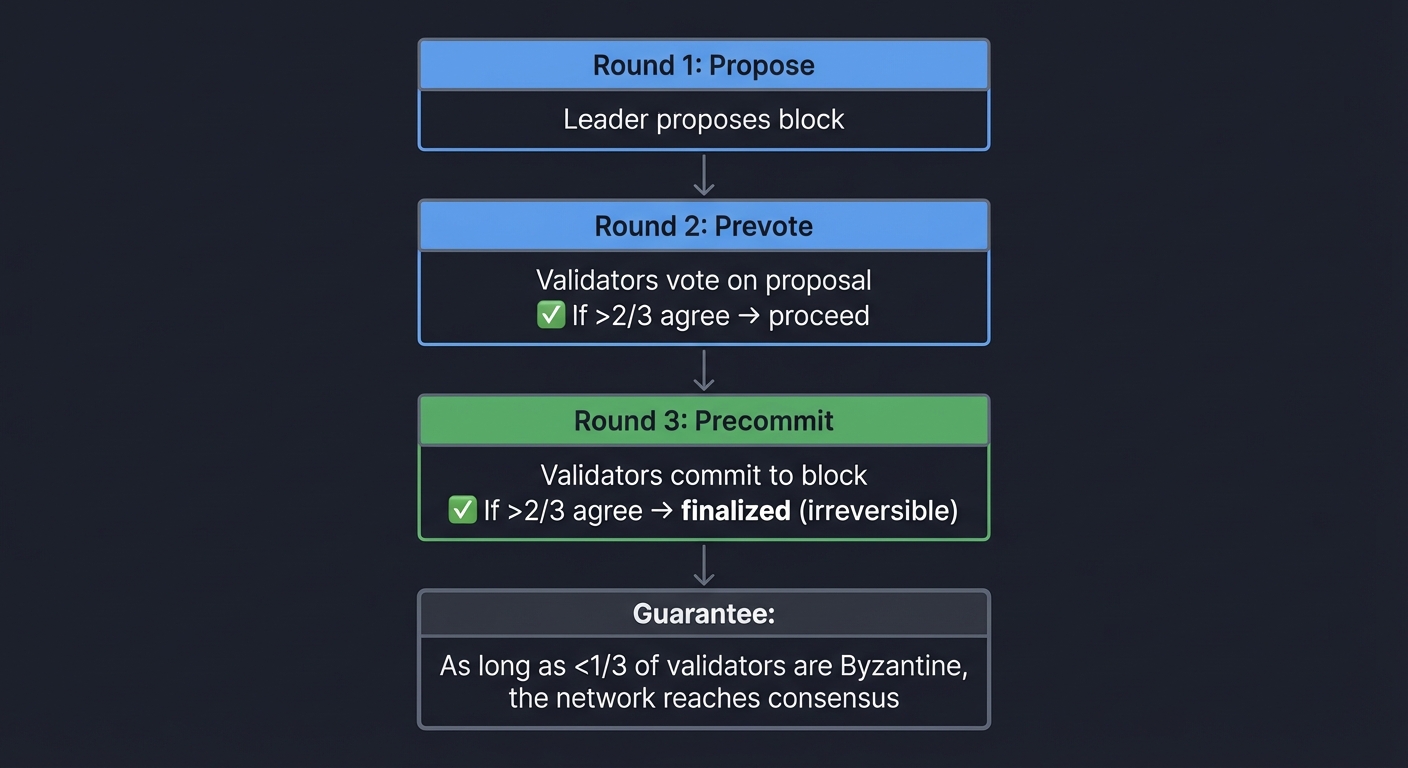
Tradeoff: BFT requires knowing the validator set (permissioned or semi-permissioned), whereas PoW/PoS are fully permissionless.
Smart Contracts and the Ethereum Virtual Machine
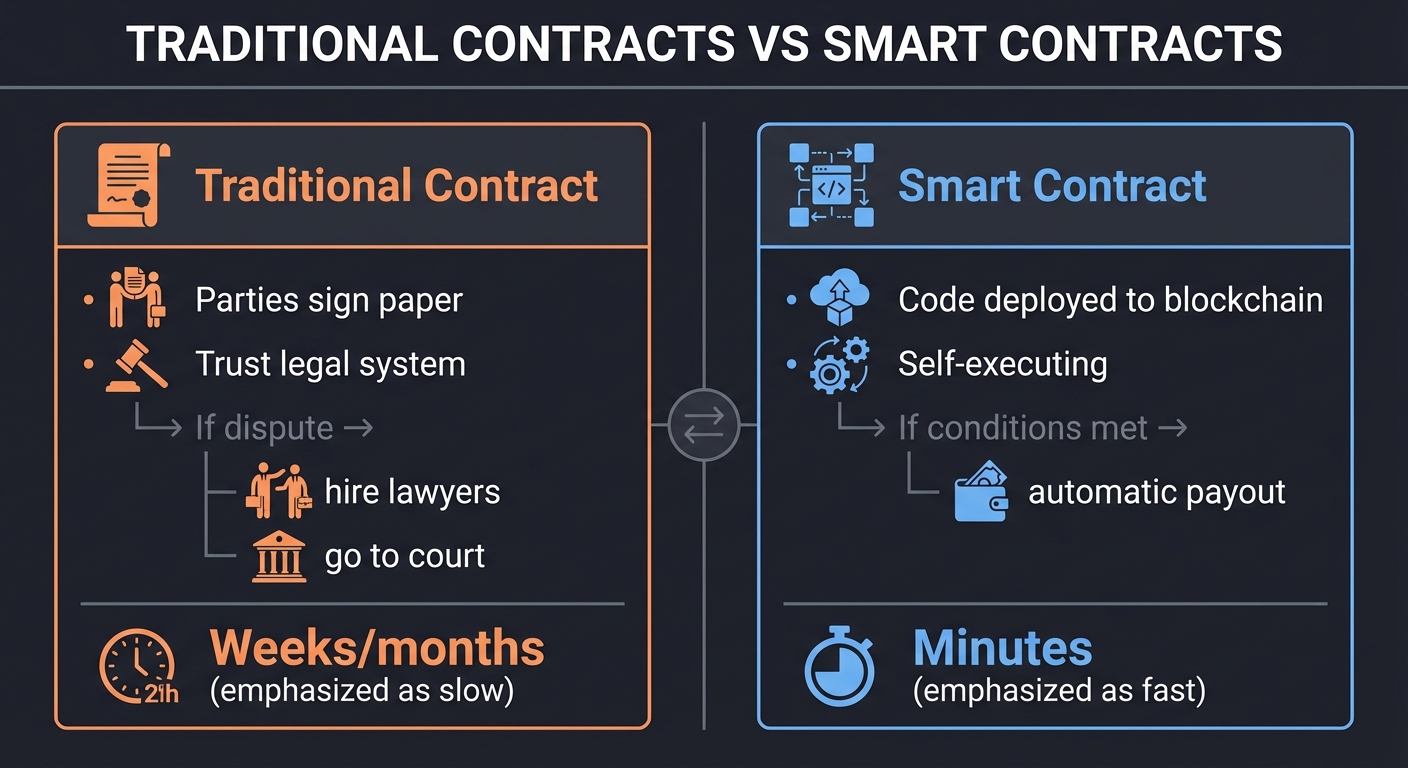
What Is a Smart Contract?
A smart contract is code that runs on a blockchain, making it:
- Immutable: Once deployed, cannot be changed
- Deterministic: Same inputs always produce same outputs
- Trustless: Execution is verified by all nodes
Traditional Contract          Smart Contract
┌────────────────────┐       ┌────────────────────┐
│ Parties sign paper │       │ Code deployed to   │
│ Trust legal system │       │ blockchain         │
│ If dispute →       │       │ Self-executing     │
│   hire lawyers     │       │ If conditions met →│
│   go to court      │       │   automatic payout │
│ Weeks/months       │       │ Minutes            │
└────────────────────┘       └────────────────────┘
The Ethereum Virtual Machine (EVM)
The EVM is a stack-based virtual machine that executes bytecode:
High-Level (Solidity):
    function add(uint a, uint b) returns (uint) {
        return a + b;
    }

Compiled to EVM Bytecode:
    PUSH1 0x40    // Stack: [0x40]
    MLOAD         // Stack: [mem[0x40]]
    DUP1          // Stack: [mem[0x40], mem[0x40]]
    CALLDATALOAD  // Stack: [a, mem[0x40]]
    SWAP1         // Stack: [mem[0x40], a]
    PUSH1 0x20
    CALLDATALOAD  // Stack: [b, mem[0x40], a]
    ADD           // Stack: [a+b, mem[0x40]]
    ...

Execution:
- Stack: 1024-item stack (256-bit words)
- Memory: Linear, expandable byte array
- Storage: Persistent key-value store (costs gas)
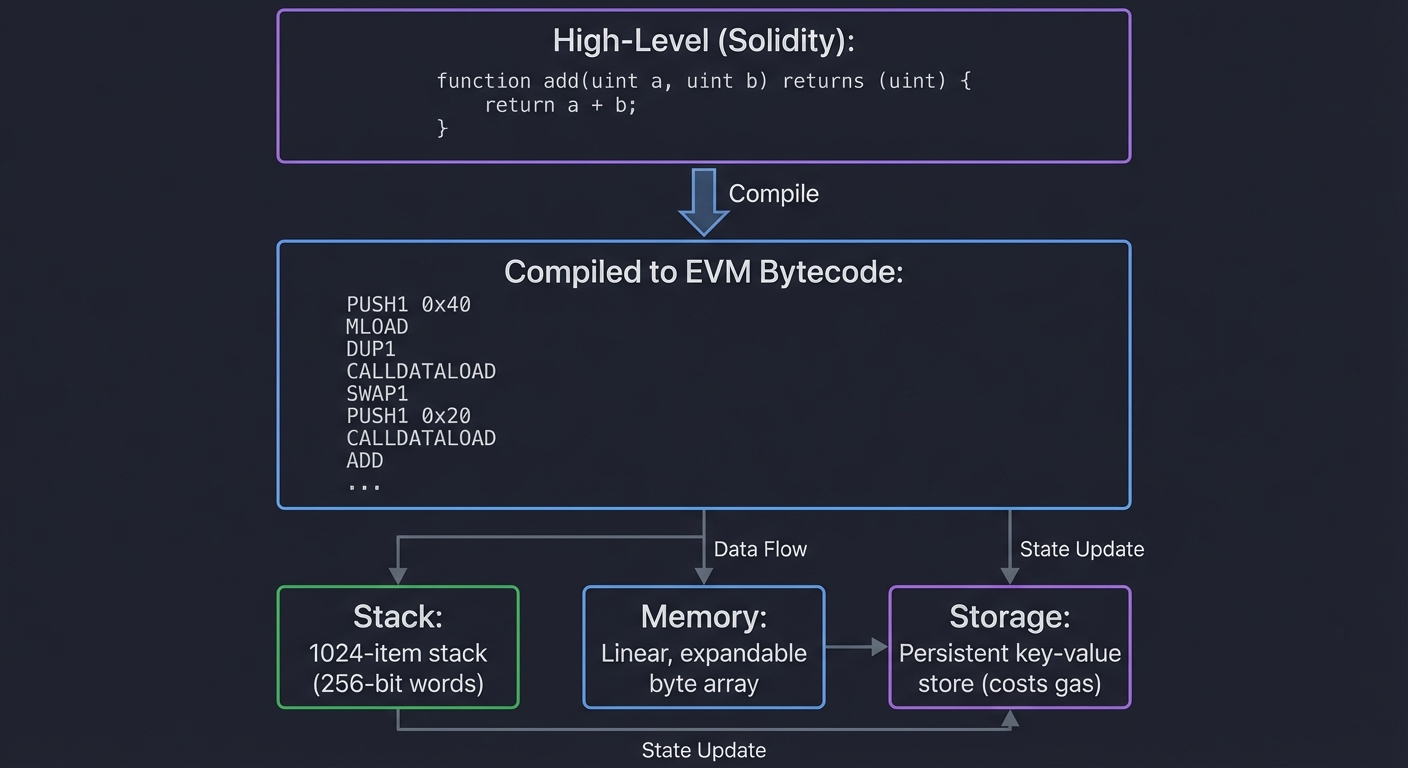
Why bytecode matters: Every node must execute contracts identically. Bytecode ensures determinism across different hardware/software.
Gas: Metering Computation
Every operation costs “gas” to prevent infinite loops and spam:
Operation          Gas Cost    Why?
─────────────────────────────────────────────────────
PUSH1              3          Simple stack operation
ADD                3          Arithmetic
SLOAD              2,100      Read from storage (expensive!)
SSTORE             20,000     Write to storage (very expensive!)
CREATE             32,000     Deploy new contract

Example Transaction:
Gas Limit: 100,000 gas
Gas Price: 50 gwei (0.00000005 ETH)
Max Cost: 100,000 × 50 gwei = 0.005 ETH ($15 at $3,000/ETH)

If execution uses 70,000 gas:
  Cost: 70,000 × 50 gwei = 0.0035 ETH ($10.50)
  Refund: 30,000 gas back to sender
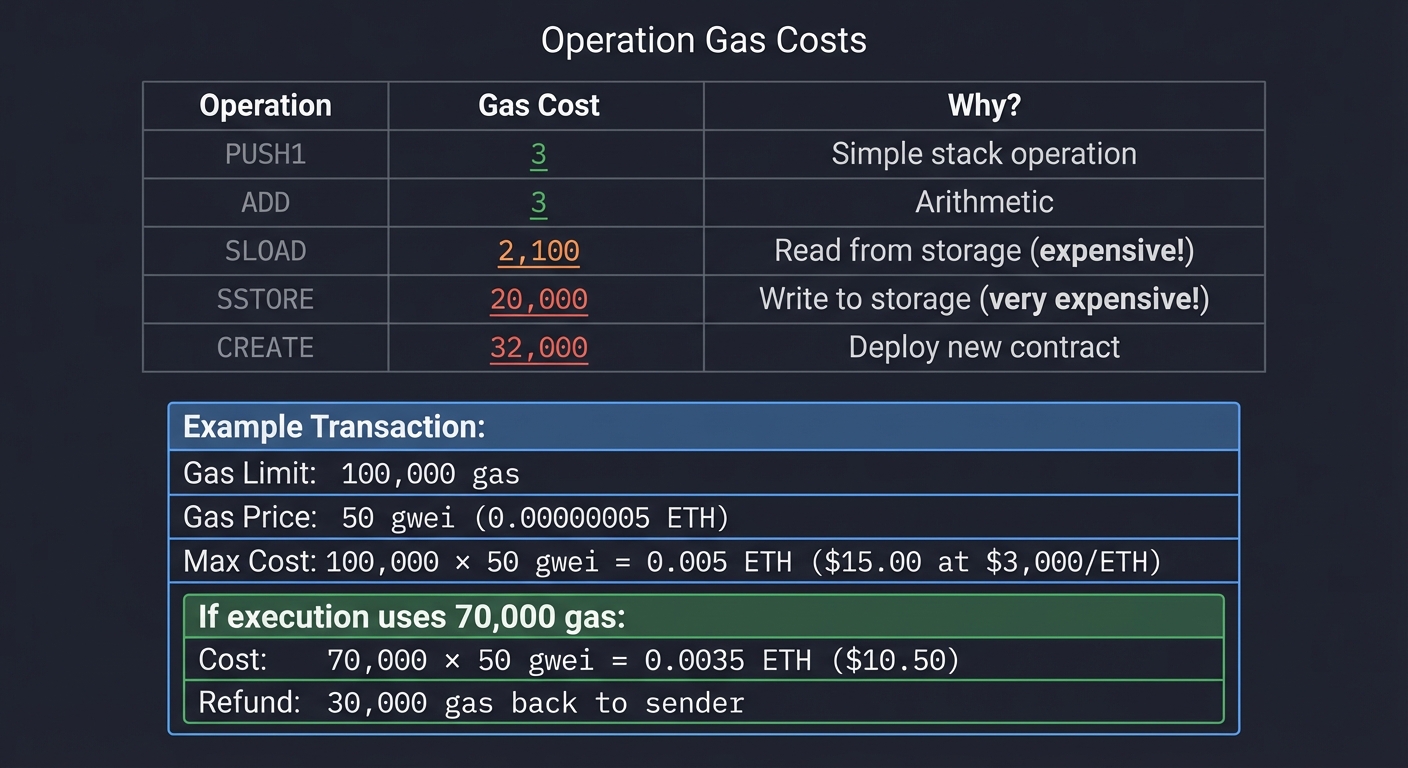
Design rationale:
- Storage is expensive because it’s replicated across thousands of nodes
- Computation is cheaper but still metered to prevent abuse
- Users pay for resource consumption, aligning incentives
EVM State Transitions
State at Block N         Transaction          State at Block N+1
┌──────────────────┐                         ┌──────────────────┐
│ Account 0x123... │                         │ Account 0x123... │
│   Balance: 5 ETH │─── Send 1 ETH ───────> │   Balance: 4 ETH │
│   Nonce: 10      │    to 0x456...          │   Nonce: 11      │
│                  │                         │                  │
│ Account 0x456... │                         │ Account 0x456... │
│   Balance: 2 ETH │                         │   Balance: 3 ETH │
│   Nonce: 3       │                         │   Nonce: 3       │
└──────────────────┘                         └──────────────────┘

Every node processes transaction → updates state → verifies with Merkle root
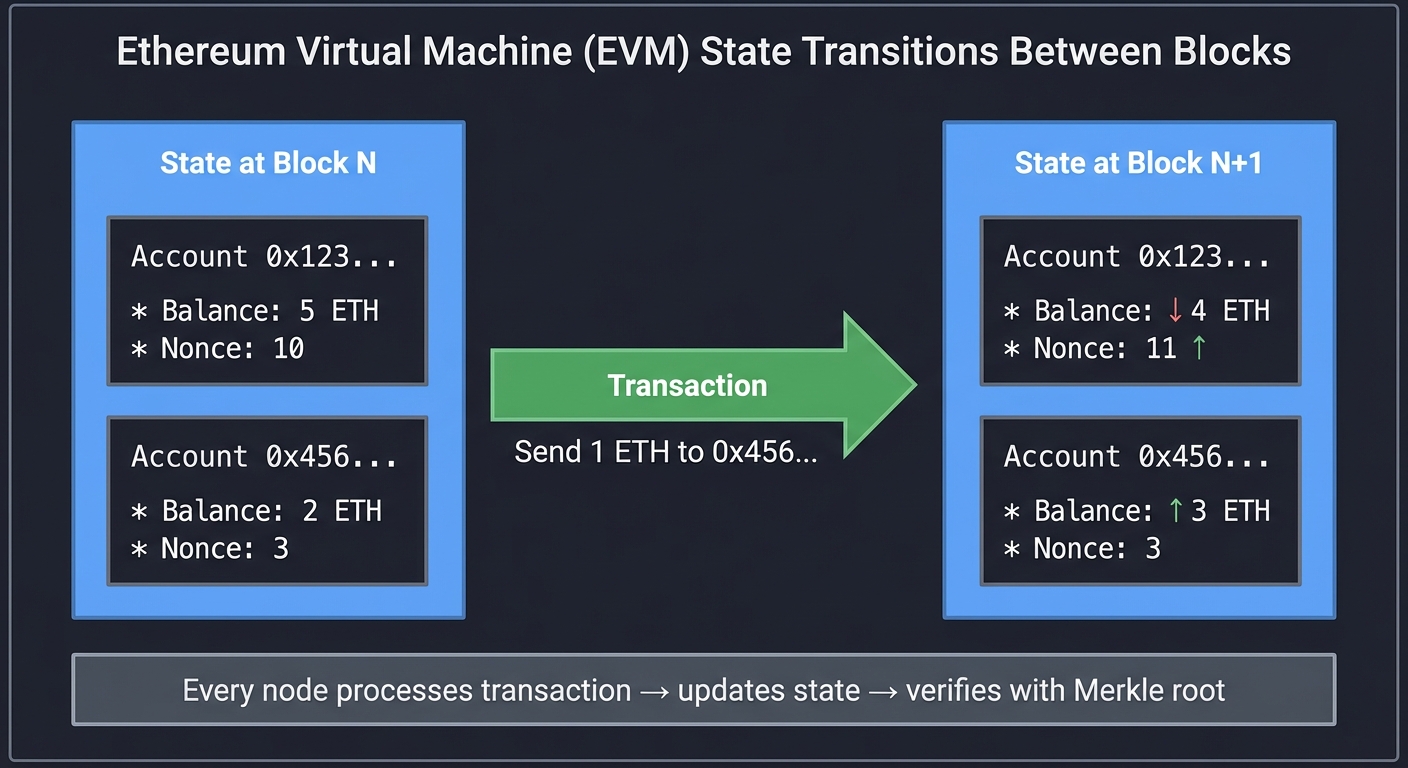
World State: Ethereum maintains a giant Merkle Patricia Trie mapping addresses to account states. Every block’s header commits to this state root, allowing verification.
Decentralized Finance (DeFi): Programmable Money
DeFi recreates financial primitives (lending, trading, derivatives) as smart contracts.
Automated Market Makers (AMMs)
Traditional exchanges use order books. AMMs use liquidity pools and math:
Uniswap's Constant Product Formula:
  x × y = k  (where k is constant)

Liquidity Pool:
  1,000 ETH × 3,000,000 USDC = 3,000,000,000 (constant)

If someone buys 100 ETH:
  New ETH balance: 1,000 - 100 = 900
  New USDC balance: 3,000,000,000 / 900 = 3,333,333
  USDC paid: 3,333,333 - 3,000,000 = 333,333

Effective price: 333,333 / 100 = 3,333 USDC per ETH
(Higher than starting price due to slippage)
Why this matters: No order books, no centralized matching engine. Pure math executed by smart contracts.
Lending Protocols
Platforms like Aave let you lend/borrow without intermediaries:
Lender:                    Borrower:
Deposit 100 ETH           Deposit 50 ETH (collateral)
  ↓                       Borrow 30 ETH (60% LTV)
Earn 4% APY                 ↓
Withdraw anytime          Pay 6% APY
                          If ETH price drops →
                            Liquidation (collateral sold)
Overcollateralization: You must deposit more than you borrow. Why? Smart contracts can’t chase you down for repayment—they need collateral they can liquidate.
Flash Loans: Borrow Millions for One Transaction
A unique DeFi innovation:
Single Transaction:
1. Borrow 10,000 ETH from Aave (no collateral)
2. Trade on Exchange A (exploit price difference)
3. Trade on Exchange B (arbitrage)
4. Repay 10,000 ETH + 0.09% fee
5. Keep the profit

If you can't repay → entire transaction reverts
(Atomicity: all-or-nothing execution)
Why this works: The EVM processes transactions atomically. If step 4 fails, steps 1-3 are undone.
Real-world stats (2025): Ethereum hosts over $78 billion in DeFi TVL, with smart contract interactions accounting for 62% of daily transactions.
Security Considerations: Where Things Go Wrong
Reentrancy Attacks
The infamous DAO hack (2016) exploited this:
// Vulnerable contract:
function withdraw(uint amount) public {
    require(balances[msg.sender] >= amount);
    msg.sender.call.value(amount)("");  // External call BEFORE state update
    balances[msg.sender] -= amount;     // Vulnerable!
}

// Attacker's contract:
function attack() public {
    victim.withdraw(1 ether);
}

function () payable {  // Fallback function
    if (address(victim).balance >= 1 ether) {
        victim.withdraw(1 ether);  // Re-enter before balance is updated!
    }
}

Execution:
1. Attacker calls withdraw(1 ETH)
2. Victim sends 1 ETH → triggers attacker's fallback
3. Attacker's fallback calls withdraw again (balance not yet updated!)
4. Victim sends another 1 ETH
5. Repeat until drained
Fix: Update state before external calls (Checks-Effects-Interactions pattern).
Oracle Manipulation
Smart contracts can’t access external data (stock prices, weather, etc.). They rely on “oracles”:
Problem:
Smart contract needs ETH price
  ↓
Query single oracle (centralized!)
  ↓
Oracle provides price
  ↓
If oracle is hacked/malicious → contract uses wrong price

Solution (Chainlink):
Query multiple independent oracles
  ↓
Aggregate answers (median)
  ↓
Decentralized price feed
Real attack (2020): Harvest Finance lost $24M because an attacker manipulated Curve pool prices by executing massive trades, making the oracle report false prices.
Integer Overflow/Underflow
Before Solidity 0.8.0:
uint8 maxValue = 255;
maxValue = maxValue + 1;  // Wraps to 0 (overflow)

uint8 minValue = 0;
minValue = minValue - 1;  // Wraps to 255 (underflow)
Impact: The BeautyChain (BEC) token hack (2018) used overflow to mint billions of tokens.
Fix: Solidity 0.8.0+ has automatic overflow checks (reverts on overflow).
Front-Running
Attackers watch the mempool (pending transactions) and insert their own with higher gas:
Mempool:
1. Alice: Buy 100 ETH at 3,000 USDC (gas: 50 gwei)
2. Bob (attacker) sees this → submits:
   - Buy 100 ETH at 3,001 USDC (gas: 60 gwei) ← Executes first
   - Sell 100 ETH at 3,050 USDC (gas: 50 gwei) ← Executes after Alice

Result: Bob profits from Alice's price impact
Mitigation: Use private mempools (Flashbots), slippage protection, or commit-reveal schemes.
Concept Summary Table
| Concept Cluster | What You Need to Internalize |
|---|---|
| Cryptographic Hash Functions | One-way, deterministic, avalanche effect. These create tamper-proof links between blocks and enable efficient Merkle proofs. |
| Digital Signatures (ECDSA) | Prove ownership without revealing private keys. Signatures can’t be forged, reused, or modified. This is how transactions prove authorization. |
| Merkle Trees | Hierarchical hashing for efficient proofs. Verify transaction inclusion with O(log n) data instead of O(n). |
| Blockchain Structure | Each block’s hash depends on its contents and the previous block’s hash. Changing history requires redoing all subsequent work (immutability). |
| Proof-of-Work (PoW) | Consensus through computational puzzles. Attacking requires majority hashpower (51% attack). Economic security through sunk energy costs. |
| Proof-of-Stake (PoS) | Consensus through economic stake. Validators risk their collateral (slashing). More energy-efficient, faster finality than PoW. |
| Byzantine Fault Tolerance | Achieving consensus when <1/3 of nodes are faulty/malicious. BFT algorithms guarantee finality but require known validator sets. |
| EVM & Bytecode | Stack-based VM executing deterministic bytecode. Every node must produce identical results. Operations cost gas to prevent spam/loops. |
| Gas Economics | Computation and storage aren’t free. Users pay for resources consumed. This aligns incentives and prevents network abuse. |
| Smart Contract Security | Reentrancy, oracle manipulation, overflow, front-running. Immutability means bugs are permanent. Security requires deep understanding. |
| DeFi Primitives | AMMs use math (x×y=k) instead of order books. Lending requires overcollateralization. Flash loans exploit transaction atomicity. |
| Decentralization Tradeoffs | Speed vs. decentralization vs. security (blockchain trilemma). Every design choice involves tradeoffs between these three properties. |
Deep Dive Reading by Concept
This section maps each concept cluster to specific book chapters for deeper understanding. Read these before or alongside the projects to build strong mental models.
Cryptographic Foundations
| Concept | Book & Chapter |
|---|---|
| Hash function properties and security | Serious Cryptography, 2nd Edition by Jean-Philippe Aumasson — Ch. 6: “Hash Functions” |
| SHA-256 implementation details | Understanding Cryptography by Christof Paar and Jan Pelzl — Ch. 11: “Hash Functions” |
| Digital signatures and ECDSA | Serious Cryptography, 2nd Edition by Jean-Philippe Aumasson — Ch. 10: “Digital Signatures” |
| Elliptic curve cryptography | An Introduction to Mathematical Cryptography by Jeffrey Hoffstein et al. — Ch. 6: “Elliptic Curves” |
| Zero-knowledge proofs (advanced) | Proofs, Arguments, and Zero-Knowledge by Justin Thaler — Ch. 1-3: Foundations |
Blockchain Data Structures
| Concept | Book & Chapter |
|---|---|
| Merkle trees and Patricia tries | Mastering Ethereum by Andreas Antonopoulos and Gavin Wood — Ch. 7: “Smart Contracts and Solidity” (section on data structures) |
| Blockchain structure and linking | Mastering Bitcoin, 3rd Edition by Andreas Antonopoulos — Ch. 9: “The Blockchain” |
| Data structures for blockchain | Algorithms, Fourth Edition by Robert Sedgewick and Kevin Wayne — Ch. 3: “Searching” (binary trees and hash tables) |
| Byzantine fault tolerance | Distributed Systems, 3rd Edition by Maarten van Steen and Andrew S. Tanenbaum — Ch. 8: “Fault Tolerance” |
Consensus Mechanisms
| Concept | Book & Chapter |
|---|---|
| Proof-of-Work mechanics | Mastering Bitcoin, 3rd Edition by Andreas Antonopoulos — Ch. 10: “Mining and Consensus” |
| Proof-of-Stake and Ethereum 2.0 | The Infinite Machine by Camila Russo — Part III: “The Pivot” (historical context of PoS transition) |
| Consensus algorithms overview | Blockchain Basics by Daniel Drescher — Ch. 7-9: Consensus mechanisms |
| Distributed consensus theory | Distributed Systems, 3rd Edition by Maarten van Steen and Andrew S. Tanenbaum — Ch. 6: “Coordination” |
| CAP theorem and tradeoffs | Designing Data-Intensive Applications, 2nd Edition by Martin Kleppmann — Ch. 9: “Consistency and Consensus” |
Smart Contracts and the EVM
| Concept | Book & Chapter |
|---|---|
| EVM architecture and opcodes | Mastering Ethereum by Andreas Antonopoulos and Gavin Wood — Ch. 13: “The Ethereum Virtual Machine” |
| Solidity programming fundamentals | Mastering Ethereum by Andreas Antonopoulos and Gavin Wood — Ch. 7: “Smart Contracts and Solidity” |
| Gas mechanics and optimization | Ethereum for Web Developers by Patricio Palladino — Ch. 5: “Gas and Transactions” |
| Stack-based VM design | Virtual Machines by James E. Smith and Ravi Nair — Ch. 2: “High-Level Virtual Machines” |
DeFi and Economics
| Concept | Book & Chapter |
|---|---|
| Automated market makers | How to DeFi: Advanced by CoinGecko — Ch. 2: “Decentralized Exchanges” |
| Lending protocols and overcollateralization | How to DeFi: Advanced by CoinGecko — Ch. 3: “Lending and Borrowing” |
| Token economics and incentive design | Token Economy by Shermin Voshmgir — Ch. 4: “Cryptoeconomics & Governance” |
| Game theory in blockchain | Blockchain and the Law by Primavera De Filippi and Aaron Wright — Ch. 3: “Smart Contracts” |
Security and Attack Vectors
| Concept | Book & Chapter |
|---|---|
| Smart contract vulnerabilities | Mastering Ethereum by Andreas Antonopoulos and Gavin Wood — Ch. 9: “Smart Contract Security” |
| Reentrancy and common exploits | Smart Contract Security Field Guide by OpenZeppelin — All chapters (comprehensive security patterns) |
| Cryptographic attack models | Serious Cryptography, 2nd Edition by Jean-Philippe Aumasson — Ch. 3: “Block Ciphers” (attack methodologies) |
| Oracle problems and solutions | Truth Machines by Paul Vigna and Michael J. Casey — Ch. 8: “The Oracle Problem” |
Essential Reading Order
For maximum comprehension, read in this order:
- Cryptographic Foundations (Week 1-2):
- Serious Cryptography Ch. 6 (hash functions) and Ch. 10 (signatures)
- Mastering Bitcoin Ch. 4 (keys and addresses)
- Implement SHA-256 from scratch (Project 1)
- Blockchain Structure (Week 3):
- Mastering Bitcoin Ch. 9-10 (blockchain and mining)
- Blockchain Basics Ch. 7-9 (consensus)
- Build a simple blockchain (Project 2)
- Smart Contracts & EVM (Week 4-5):
- Mastering Ethereum Ch. 7 (Solidity) and Ch. 13 (EVM)
- Mastering Ethereum Ch. 9 (security)
- Implement EVM interpreter (Project 4)
- DeFi & Economics (Week 6+):
- How to DeFi: Advanced Ch. 2-3 (DEXs and lending)
- Token Economy Ch. 4 (incentive design)
- Build DeFi primitives (Projects 6-7)
Quick Start: Your First 48 Hours
Feeling overwhelmed by 18 projects? Start here. This is the absolute minimum path to get hands-on quickly and build momentum.
Day 1: Understanding What Makes Web3 Tick (4-5 hours)
Morning (2-3 hours): Hash Functions Are Everything
- Read (30 min):
- Serious Cryptography Ch. 6, pages 105-125 (hash function properties)
- NIST FIPS 180-4 SHA-256 specification (skim the algorithm overview)
- Experiment (30 min):
- Use an online SHA-256 calculator (like sha256algorithm.com)
- Hash “Hello World” → note the output
- Change ONE letter (“hello World”) → see avalanche effect
- Try to find two inputs with the same hash (spoiler: you can’t)
- Build (1-2 hours):
- Start Project 1’s message padding function
- Don’t worry about the full SHA-256 yet—just get input formatted correctly
- Goal: Take any string, convert to binary, add padding bits
Afternoon (2 hours): Why Blockchains Are Chains
- Visualization:
- Go to blockchain.com/explorer or etherscan.io
- Click on any Bitcoin or Ethereum block
- Notice: previous block hash, current block hash, list of transactions
- Ask yourself: “What happens if I change one transaction?”
- Minimal blockchain (90 min):
- Create a
Blockstruct with: data, previous_hash, hash - Write a function:
calculate_hash(block) -> hash - Create 3 blocks linked by hashes
- Try changing block #2’s data → all subsequent hashes break
- Create a
End of Day 1 Result: You now understand the two core insights:
- Hashes are one-way fingerprints (can’t be reversed or predicted)
- Chains of hashes make history tamper-evident (changing the past is visible)
Day 2: From Blockchain to Smart Contracts (4-5 hours)
Morning (2 hours): Proof of Work Intuition
- Concept (30 min):
- Read Mastering Bitcoin Ch. 10, pages 201-215 (mining overview)
- Understand: mining = finding hash < target value
- Build (90 min):
- Add a
noncefield to your Block struct - Write:
mine_block(difficulty) -> nonce - Goal: find nonce where hash starts with N zeros
- Try difficulty=1 (easy), then difficulty=4 (harder)
- Notice: time increases exponentially
- Add a
Afternoon (2-3 hours): Smart Contracts Are Code That Can’t Lie
- Read (30 min):
- Mastering Ethereum Ch. 7, pages 131-145 (what are smart contracts?)
- Understand: code runs identically on every node
- Experiment with existing contracts (60 min):
- Go to etherscan.io and view a verified ERC-20 token contract
- Read the
transfer()function in the code tab - See the state changes in transaction logs
- Notice: this code is law—no one can change it after deployment
- Conceptual design (60 min):
- Design (on paper) a simple “voting contract”
- What state does it need? (candidates, vote counts, voter addresses)
- What functions? (vote, getWinner, hasVoted)
- What could go wrong? (double voting, unauthorized voting)
End of Day 2 Result: You understand:
- Mining makes changing history computationally expensive
- Smart contracts are unstoppable code that everyone can verify
- Security is HARD because bugs are permanent
What to Do Next
After these 48 hours, you have three paths:
Path A: Cryptography-First (recommended for security-minded) → Complete Projects 1, 2, 3 (hash, signatures, Merkle trees) → Then Project 4 (full blockchain) → Understand the math before the applications
Path B: Blockchain-First (recommended for systems thinkers) → Complete Project 4 (blockchain from scratch) → Add Project 5 (proof of work) → Then backfill cryptography (Projects 1-3) → See the whole system first, then understand the parts
Path C: Smart Contracts-First (recommended for developers) → Complete Project 8 (simple EVM) → Then Project 9 (ERC-20 token) → Understand the application layer first → Backfill blockchain fundamentals later
No matter which path: You now have context for why these projects matter. The rest is building depth.
Recommended Learning Paths
Everyone learns differently. Choose the path that matches your background and goals.
Path 1: The Cryptographer’s Journey (Bottom-Up)
Best for: Security researchers, mathematically-inclined, or those who want bulletproof fundamentals
Order: Projects 1 → 2 → 3 → 4 → 5 → 14 → 6 → 7 → 8 → 9 → 10 → 16 → 17 → 13 → 11 → 12 → 15 → 18
Philosophy: Master the cryptographic primitives first, then build the systems that use them.
Milestones:
- Week 2: You’ve implemented SHA-256 by hand (Project 1)
- Week 4: You understand why digital signatures are unforgeable (Project 2)
- Week 6: You’ve built a blockchain from scratch (Project 4)
- Week 12: You can audit smart contracts for vulnerabilities (Project 14)
- Month 4-6: You understand Layer 2 scaling and can build production systems
Why this works: Every higher-level concept makes sense because you built the foundation yourself.
Path 2: The Systems Engineer’s Journey (Top-Down)
Best for: Infrastructure engineers, distributed systems background, or impatient learners
Order: Projects 4 → 5 → 8 → 9 → 10 → 1 → 2 → 3 → 6 → 7 → 16 → 14 → 13 → 11 → 12 → 17 → 15 → 18
Philosophy: See the whole system working first, then understand how the pieces work.
Milestones:
- Week 3: You’ve built a working blockchain (Project 4)
- Week 5: You understand mining and consensus (Project 5)
- Week 8: You can execute Ethereum smart contracts (Project 8)
- Week 12: You’ve built a DEX and understand DeFi (Project 10)
- Month 4-6: You backfilled cryptography and can explain security guarantees
Why this works: Motivation stays high because you see practical results immediately. You learn “why” through curiosity rather than upfront theory.
Path 3: The Application Developer’s Journey (Use-Case Driven)
Best for: Web developers, entrepreneurs, or those focused on building products
Order: Projects 9 → 10 → 11 → 12 → 8 → 16 → 17 → 4 → 5 → 14 → 1 → 2 → 3 → 6 → 7 → 13 → 15 → 18
Philosophy: Start with what users interact with, then dig deeper into how it works.
Milestones:
- Week 2: You’ve deployed an ERC-20 token (Project 9)
- Week 4: You’ve built a DEX interface (Project 10)
- Week 6: You’ve created an NFT marketplace (Project 11)
- Week 10: You understand EVM internals and can optimize gas (Project 8)
- Month 4-6: You understand the full stack from UI to cryptographic primitives
Why this works: You can show tangible projects to employers/users immediately, then deepen understanding through necessity.
Path 4: The Security Researcher’s Journey (Attack-Minded)
Best for: Penetration testers, bug bounty hunters, or those who think like attackers
Order: Projects 14 → 9 → 10 → 16 → 17 → 11 → 1 → 2 → 3 → 4 → 5 → 8 → 6 → 7 → 13 → 12 → 15 → 18
Philosophy: Learn to break things first, then understand why they’re vulnerable.
Milestones:
- Week 2: You’ve built a reentrancy scanner (Project 14)
- Week 4: You’ve exploited common ERC-20 bugs (Project 9 + testing)
- Week 6: You understand flash loan attacks (Project 17)
- Week 10: You can audit smart contracts professionally
- Month 4-6: You understand Layer 2 security models and novel attack surfaces
Why this works: Security mindset is built through hands-on exploitation, not just reading about vulnerabilities.
How to Choose Your Path
Ask yourself:
- “Do I learn better by building the foundation first, or seeing the final product?”
- Foundation-first → Path 1 or 4
- Product-first → Path 2 or 3
- “Am I more interested in how it works, or what I can build with it?”
- How it works → Path 1 or 2
- What I can build → Path 3 or 4
- “Do I have a strong math/cryptography background?”
- Yes → Path 1
- No → Path 2 or 3
- “What’s my career goal?”
- Blockchain protocol developer → Path 1 or 2
- DApp developer → Path 3
- Security auditor → Path 4
Important: These paths are suggestions, not rules. Feel free to mix-and-match or create your own order. The projects are designed to be mostly independent.
Project 1: Cryptographic Hash Function Visualizer
- File: WEB3_DEEP_UNDERSTANDING_PROJECTS.md
- Main Programming Language: Rust
- Alternative Programming Languages: C, Go, Python
- Coolness Level: Level 3: Genuinely Clever
- Business Potential: 1. The “Resume Gold” (Educational/Personal Brand)
- Difficulty: Level 2: Intermediate
- Knowledge Area: Cryptography / Hash Functions
- Software or Tool: SHA-256 Implementation
- Main Book: “Serious Cryptography, 2nd Edition” by Jean-Philippe Aumasson
What you’ll build
A command-line tool that implements SHA-256 from scratch (no crypto libraries), visualizing each step: message padding, block processing, compression function rounds, and the avalanche effect.
Why it teaches Web3
Hash functions are the foundation of everything in Web3. Block hashes, transaction IDs, Merkle trees, proof-of-work mining—all depend on understanding that hash functions are one-way, deterministic, and avalanche-sensitive. Without implementing one yourself, you’re just trusting magic.
Core challenges you’ll face
- Bit manipulation (rotating, shifting, XORing 32-bit words) → maps to low-level cryptography
- Message padding (handling arbitrary-length input) → maps to protocol specifications
- Compression function (64 rounds of mixing) → maps to understanding irreversibility
- Avalanche visualization (showing how 1-bit change affects output) → maps to security intuition
Key Concepts
- Hash Function Properties: “Serious Cryptography” Chapter 6 - Jean-Philippe Aumasson
- Bit Manipulation in C: “The C Programming Language” Chapter 2 - Kernighan & Ritchie
- SHA-256 Specification: NIST FIPS 180-4
Difficulty
Intermediate
Time estimate
1-2 weeks
Prerequisites
Basic programming, understanding of binary/hex
Real world outcome
$ ./sha256_visualizer "Hello"
Input: "Hello" (5 bytes)
Padded: 48656c6c6f80000000...0028 (64 bytes)

Round 0:  A=5d6aeb04 B=6a09e667 C=bb67ae85 ...
Round 1:  A=2a0c8e42 B=5d6aeb04 C=6a09e667 ...
...
Round 63: A=185f8db3 B=2271fe25 C=f14f0564 ...

Final Hash: 185f8db32271fe25f561a6fc938b2e264306ec304eda518007d1764826381969

Avalanche Test:
"Hello" → 185f8db32271fe25...
"hello" → 2cf24dba5fb0a30e...
         ^^^^^^^^^^^^^^^^ (32/64 bytes different = 50%)
Implementation Hints
Start by reading FIPS 180-4 specification (it’s surprisingly readable). Implement the message schedule (W array) first, then the compression function. Use uint32_t for words. The key insight: each round mixes bits so thoroughly that reversing even one round is computationally infeasible. For visualization, print intermediate values in hex with color coding (green = bits that changed).
Pseudo-code structure:
function sha256(message):
    padded = pad_message(message)
    blocks = split_into_512bit_blocks(padded)
    H = initial_hash_values  // These are specific constants

    for each block:
        W = expand_to_64_words(block)
        a,b,c,d,e,f,g,h = H

        for round in 0..63:
            // Apply mixing functions
            T1 = h + Σ1(e) + Ch(e,f,g) + K[round] + W[round]
            T2 = Σ0(a) + Maj(a,b,c)
            // Shift and update

        H = H + (a,b,c,d,e,f,g,h)

    return concatenate(H)
Learning milestones
- Message padding works correctly → You understand protocol specifications
- Single block hashes match known values → You’ve implemented cryptographic primitives
- Avalanche visualization shows ~50% bit changes → You understand security properties
The Core Question You’re Answering
“Why can’t you reverse a hash? What makes SHA-256 ‘one-way’ at the mathematical level?”
This is the foundational question of all cryptography in Web3. Everyone says hash functions are “one-way,” but WHY? It’s not because we haven’t found the reverse algorithm—it’s because the mathematical operations destroy information in a way that’s fundamentally irreversible. Each of the 64 rounds in SHA-256 mixes bits using XOR, rotation, and modular addition in combinations that create avalanche effects. Reversing even ONE round requires solving systems of equations with more unknowns than equations—mathematically impossible.
When you implement SHA-256, you’ll see exactly how 5 bytes of input (“Hello”) becomes 32 bytes of output that changes completely if you flip a single bit. This isn’t magic—it’s deliberate mathematical chaos.
Concepts You Must Understand First
Stop and research these before coding:
- Binary and Hexadecimal Representation
- How do you convert between binary, hex, and decimal?
- What is a byte vs a bit vs a word (32 bits)?
- Why does cryptography use hex instead of decimal?
- Book Reference: “Computer Systems: A Programmer’s Perspective” Ch. 2 (sections 2.1-2.2) - Bryant & O’Hallaron
- Bitwise Operations
- What do XOR, AND, OR, NOT operations do at the bit level?
- What is bit rotation vs bit shifting?
- Why is XOR reversible but hash functions aren’t?
- Book Reference: “The C Programming Language” Ch. 2.9 - Kernighan & Ritchie
- Book Reference: “Serious Cryptography” Ch. 6 - Jean-Philippe Aumasson
- Hash Function Properties
- What are the three critical properties: preimage resistance, second-preimage resistance, collision resistance?
- What is the avalanche effect and why does it matter?
- What’s the difference between SHA-256 and SHA-3 (Keccak)?
- Book Reference: “Serious Cryptography” Ch. 6 - Jean-Philippe Aumasson
- Web Resource: Understanding Hash Functions in Web3
- Message Padding Standards
- Why do we pad messages to 512-bit boundaries?
- How does the length encoding prevent length-extension attacks?
- What happens if you hash an empty string?
- Book Reference: NIST FIPS 180-4 specification (sections 5.1-5.2)
- Modular Arithmetic
- What does
(a + b) mod 2^32mean? - Why do we use 32-bit words instead of 64-bit or 16-bit?
- How does overflow work in fixed-width integer arithmetic?
- Book Reference: “Computer Systems: A Programmer’s Perspective” Ch. 2.3 - Bryant & O’Hallaron
- What does
Questions to Guide Your Design
Before implementing, think through these:
- Data Representation
- How will you represent a 32-bit word in your programming language?
- Should you use big-endian or little-endian byte order? (SHA-256 uses big-endian)
- How do you convert a string like “Hello” into an array of bytes?
- Message Padding Algorithm
- Given an input of arbitrary length, how do you calculate the padding length?
- Where does the ‘1’ bit go? Where does the length encoding go?
- How do you handle messages that are already close to 512-bit boundaries?
- Round Function Design
- The compression function has 64 rounds. Should you unroll the loop or use iteration?
- How do you implement the Σ (Sigma) and Ch/Maj functions?
- Where do the K constants come from? (Hint: cube roots of primes)
- Visualization Strategy
- How do you show the state of all 8 working variables (a-h) at each round?
- How do you highlight which bits changed between inputs?
- Should you use color coding, diff symbols, or both?
- Testing and Validation
- What are the official test vectors for SHA-256?
- How do you verify your implementation against known values?
- How do you measure the avalanche effect numerically?
Thinking Exercise
Trace SHA-256 by Hand (First 2 Rounds)
Before coding, work through this on paper to build intuition:
Given input: “A” (single character, ASCII 0x41)
Step 1: Padding
Original:     01000001 (1 byte)
Append '1':   01000001 1 0000000...  (add single '1' bit)
Append zeros: Fill to 448 bits
Append length: ...00001000 (8 bits in binary, goes in last 64 bits)
Total: 512 bits (one block)
Step 2: Initialize working variables
H0 = 0x6a09e667  (first 32 bits of sqrt(2))
H1 = 0xbb67ae85  (first 32 bits of sqrt(3))
... (8 total initial values)
Step 3: Compute first two rounds
Round 0:
  W[0] = first 32 bits of padded message
  T1 = h + Σ1(e) + Ch(e,f,g) + K[0] + W[0]
  T2 = Σ0(a) + Maj(a,b,c)
  New h = g, g = f, f = e, e = d + T1, ...

Round 1:
  W[1] = next 32 bits
  (repeat calculation)
Questions while tracing:
- Can you identify which bits in T1 came from which source?
- If you change one bit in the input, which working variables change in round 0?
- By round 2, have all 8 variables been affected by the input?
Tip: Use a spreadsheet to track the hex values. It’s tedious but incredibly educational.
The Interview Questions They’ll Ask
Prepare to answer these after completing the project:
Fundamental Understanding:
- “Explain how SHA-256 achieves the avalanche effect.”
- “Why is SHA-256 considered ‘collision-resistant’ if the output space is finite?”
- “What’s the difference between SHA-256 and HMAC-SHA256?”
- “How does Bitcoin use SHA-256 twice (double-SHA256)? Why?”
Implementation Details:
- “How many rounds does SHA-256 have and why that number?”
- “What are the K constants in SHA-256 and where do they come from?”
- “Explain the message schedule array (W) and why it expands to 64 words.”
- “What happens if you don’t pad the message correctly?”
Security Concepts:
- “What’s a length-extension attack and how does SHA-256’s padding prevent it?”
- “If SHA-256 outputs 256 bits, why can’t you find collisions by testing 2^128 inputs?”
- “How would you verify a file’s integrity using SHA-256?”
- “What’s the relationship between hash functions and proof-of-work?”
Web3 Applications:
- “How do Merkle trees use hash functions to enable light clients?”
- “Why does Ethereum use Keccak-256 instead of SHA-256?”
- “Explain how Bitcoin’s block hash is calculated.”
Hints in Layers
Hint 1: Start with the constants The initial hash values (H0-H7) and round constants (K[0]-K[63]) are defined in the FIPS 180-4 spec. Hard-code these first:
const INITIAL_H: [u32; 8] = [
    0x6a09e667, 0xbb67ae85, 0x3c6ef372, 0xa54ff53a,
    0x510e527f, 0x9b05688c, 0x1f83d9ab, 0x5be0cd19,
];

const K: [u32; 64] = [
    0x428a2f98, 0x71374491, 0xb5c0fbcf, 0xe9b5dba5,
    // ... 60 more values (cube roots of first 64 primes)
];
Hint 2: Implement padding carefully
def pad_message(msg_bytes):
    msg_len = len(msg_bytes)
    msg_bits = msg_len * 8

    # Append '1' bit (0x80 byte)
    msg_bytes += b'\x80'

    # Append zeros until length ≡ 448 mod 512
    while (len(msg_bytes) * 8) % 512 != 448:
        msg_bytes += b'\x00'

    # Append original length as 64-bit big-endian
    msg_bytes += msg_bits.to_bytes(8, 'big')

    return msg_bytes
Hint 3: The round function building blocks
// Right rotate
#define ROTR(x, n) (((x) >> (n)) | ((x) << (32 - (n))))

// SHA-256 functions
#define CH(x, y, z)  (((x) & (y)) ^ (~(x) & (z)))
#define MAJ(x, y, z) (((x) & (y)) ^ ((x) & (z)) ^ ((y) & (z)))
#define SIGMA0(x) (ROTR(x, 2) ^ ROTR(x, 13) ^ ROTR(x, 22))
#define SIGMA1(x) (ROTR(x, 6) ^ ROTR(x, 11) ^ ROTR(x, 25))
#define sigma0(x) (ROTR(x, 7) ^ ROTR(x, 18) ^ ((x) >> 3))
#define sigma1(x) (ROTR(x, 17) ^ ROTR(x, 19) ^ ((x) >> 10))
Hint 4: Visualizing the avalanche effect Hash two similar strings and compare bit-by-bit:
hash1 = sha256("Hello")
hash2 = sha256("hello")  # Only case changed

different_bits = bin(int(hash1, 16) ^ int(hash2, 16)).count('1')
print(f"Different bits: {different_bits}/256 = {different_bits/256*100:.1f}%")
# Should be close to 50%
Hint 5: Test vectors for validation
Input: "" (empty string)
SHA-256: e3b0c44298fc1c149afbf4c8996fb92427ae41e4649b934ca495991b7852b855

Input: "abc"
SHA-256: ba7816bf8f01cfea414140de5dae2223b00361a396177a9cb410ff61f20015ad

Input: "The quick brown fox jumps over the lazy dog"
SHA-256: d7a8fbb307d7809469ca9abcb0082e4f8d5651e46d3cdb762d02d0bf37c9e592
Your implementation must match these exactly.
Hint 6: Debugging strategy Print intermediate values at each round and compare with a working implementation:
Round 0:  a=5d6aeb04 b=6a09e667 c=bb67ae85 d=3c6ef372
          e=f46a2f5b f=510e527f g=9b05688c h=1f83d9ab
Use an existing implementation with verbose output as a reference.
Books That Will Help
| Topic | Book | Chapter |
|---|---|---|
| Hash function fundamentals | “Serious Cryptography, 2nd Edition” by Jean-Philippe Aumasson | Chapter 6: Hash Functions |
| Cryptographic properties | “Serious Cryptography, 2nd Edition” by Jean-Philippe Aumasson | Chapter 7: Keyed Hashing |
| Binary representation | “Computer Systems: A Programmer’s Perspective” by Bryant & O’Hallaron | Chapter 2.1-2.3: Information Representation |
| Bitwise operations in C | “The C Programming Language” by Kernighan & Ritchie | Chapter 2.9: Bitwise Operators |
| SHA-256 in Bitcoin | “Mastering Bitcoin” by Andreas M. Antonopoulos | Chapter 4: Keys, Addresses |
| Avalanche effect demonstration | “Understanding Cryptography” by Christof Paar | Chapter 11: Hash Functions |
| Web3 hash function usage | “Mastering Ethereum” by Antonopoulos & Wood | Chapter 4: Cryptography |
| Applied cryptography context | “Real-World Cryptography” by David Wong | Chapter 2: Hash Functions |
Recommended Reading Order:
- Start with “Serious Cryptography” Ch. 6 to understand WHY hash functions have these properties
- Read FIPS 180-4 specification (surprisingly accessible, ~30 pages)
- Study “Computer Systems” Ch. 2 for bit manipulation details
- Implement while referring to evm.codes and Bitcoin documentation for real-world context
Additional Resources:
- SHA-256 Cryptographic Hash Algorithm in JavaScript - detailed annotated implementation
- Understanding Hash Functions in Web3 - modern 2025 guide
- Hash Functions in Web3 (SHA-256, Keccak-256, Merkle Trees) - comprehensive overview
Project 2: ECDSA Digital Signature Implementation
- File: WEB3_DEEP_UNDERSTANDING_PROJECTS.md
- Main Programming Language: Rust
- Alternative Programming Languages: Python, Go, C
- Coolness Level: Level 4: Hardcore Tech Flex
- Business Potential: 1. The “Resume Gold” (Educational/Personal Brand)
- Difficulty: Level 4: Expert
- Knowledge Area: Cryptography / Elliptic Curves
- Software or Tool: secp256k1 Signature Tool
- Main Book: “Elliptic Curve Cryptography for Developers” by Michael Rosing
What you’ll build
A complete ECDSA implementation using the secp256k1 curve (same as Bitcoin/Ethereum). Generate key pairs, sign messages, and verify signatures—all from scratch without crypto libraries.
Why it teaches Web3
Every transaction in Bitcoin and Ethereum is authorized via ECDSA. When you send crypto, you’re creating a signature that mathematically proves you own the private key. Understanding this means understanding ownership in Web3—not “someone says you own it,” but “math proves you own it.”
Core challenges you’ll face
- Modular arithmetic (operations in finite fields) → maps to mathematical foundations
- Point addition on curves (geometric operations become algebra) → maps to elliptic curve math
- Random number generation (k value must be truly random) → maps to critical security
- Signature malleability (understanding s-value normalization) → maps to protocol subtleties
Key Concepts
- Elliptic Curve Math: “Elliptic Curve Cryptography for Developers” Chapters 2-4 - Michael Rosing
- secp256k1 Parameters: Bitcoin Wiki ECDSA
- Practical Implementation: “Practical Cryptography for Developers” - cryptobook.nakov.com
- Security Considerations: “Serious Cryptography” Chapter 11 - Jean-Philippe Aumasson
Difficulty
Expert (requires comfort with modular arithmetic)
Time estimate
3-4 weeks
Prerequisites
Project 1 (hash functions), basic number theory, comfort with mathematical notation
Real world outcome
$ ./ecdsa generate
Private Key: 0x1a2b3c4d5e6f...
Public Key:  04:7b3f2a...

$ ./ecdsa sign --key private.key --message "Send 1 ETH to Alice"
Message Hash: 0x9f86d081884c...
Signature (r,s): (0x3045..., 0x3046...)

$ ./ecdsa verify --pubkey public.key --message "Send 1 ETH to Alice" --sig signature.bin
✓ Signature VALID - This message was signed by this key

$ ./ecdsa verify --pubkey public.key --message "Send 100 ETH to Eve" --sig signature.bin
✗ Signature INVALID - Message or signer mismatch
Implementation Hints
Start with finite field arithmetic: implement mod_add, mod_sub, mod_mul, mod_inv (use extended Euclidean algorithm for inverse). Then implement point operations: point_add, point_double, scalar_mult. The secp256k1 curve is y² = x³ + 7 over a prime field.
Critical security note: The random k value in signing MUST be cryptographically random. Reusing k or using predictable k leaks your private key (this is how the PlayStation 3 was hacked).
Pseudo-code for signing:
function sign(private_key, message_hash):
    k = random_in_range(1, n-1)  // n = curve order
    R = k * G                     // G = generator point
    r = R.x mod n
    s = k_inv * (message_hash + r * private_key) mod n
    return (r, s)

function verify(public_key, message_hash, r, s):
    s_inv = modular_inverse(s, n)
    u1 = message_hash * s_inv mod n
    u2 = r * s_inv mod n
    R = u1*G + u2*public_key
    return r == R.x mod n
Learning milestones
- Modular inverse works correctly → You understand finite field arithmetic
- Point multiplication matches test vectors → You’ve implemented elliptic curve operations
- Sign/verify round-trips correctly → You understand digital signatures
- Your signatures validate in real Bitcoin/Ethereum libraries → You’ve achieved compatibility
The Core Question You’re Answering
“How can you prove you own something without revealing the secret that grants ownership?”
This is the paradox at the heart of Web3. Your private key IS your money—but you can’t show it to anyone or they can steal everything. Digital signatures solve this through elliptic curve mathematics: you can create a signature using your private key that anyone can verify using your public key, but the signature doesn’t leak information about the private key itself.
The deeper question: WHY is this mathematically impossible to reverse? It’s because multiplying a point on an elliptic curve by a scalar (k * G) is computationally easy, but given the result, finding k (the discrete logarithm problem) is computationally infeasible. This asymmetry—easy one way, impossible the other—is the foundation of all public-key cryptography in Web3.
Concepts You Must Understand First
Stop and research these before coding:
- Modular Arithmetic and Finite Fields
- What does (a + b) mod p mean and why does it form a field?
- How do you compute modular inverses? (Extended Euclidean Algorithm)
- What’s the difference between a field and a ring?
- Why do we use prime fields (GF(p)) for elliptic curves?
- Book Reference: “Concrete Mathematics” Ch. 4 - Knuth, Graham & Patashnik
- Book Reference: “Serious Cryptography” Ch. 11 (sections on modular arithmetic) - Jean-Philippe Aumasson
- Elliptic Curve Geometry
- What is the equation y² = x³ + ax + b and why this specific form?
- What does “point addition” mean geometrically? (Draw it!)
- Why is the identity element the “point at infinity”?
- How does point doubling differ from point addition?
- Book Reference: “Understanding Cryptography” Ch. 9 - Christof Paar
- Web Resource: Elliptic Curve Cryptography for Developers
- The secp256k1 Curve Parameters
- p = 2^256 - 2^32 - 977 (the prime field)
- a = 0, b = 7 (so y² = x³ + 7)
- G = generator point (04 79BE667E…)
- n = order of G (number of points in subgroup)
- Why these specific values? (Bitcoin chose secp256k1 for speed)
- Web Resource: Bitcoin Wiki - Secp256k1
- Book Reference: “Mastering Bitcoin” Ch. 4 - Andreas M. Antonopoulos
- Digital Signature Mechanics
- What makes a signature “unforgeable”?
- Why do we sign the hash of a message, not the message itself?
- What is signature malleability and why does it matter?
- How does the verification equation work: u1G + u2PubKey = R?
- Book Reference: “Serious Cryptography” Ch. 11 - Jean-Philippe Aumasson
- Book Reference: “Real-World Cryptography” Ch. 7 - David Wong
- Cryptographically Secure Random Numbers
- Why can’t you use
rand()for the k value? - What happened with the PlayStation 3 hack? (They used constant k!)
- How do you get entropy from the OS? (/dev/urandom, getrandom())
- What is the “k-reuse attack” and how does it leak private keys?
- Book Reference: “Serious Cryptography” Ch. 3 - Jean-Philippe Aumasson
- Why can’t you use
Questions to Guide Your Design
Before implementing, think through these:
- Finite Field Implementation
- How will you represent 256-bit integers in your language?
- Do you have native big-integer support or need to implement it?
- How do you ensure operations don’t overflow?
- What’s the most efficient algorithm for modular inverse?
- Elliptic Curve Point Representation
- Should you use affine coordinates (x, y) or projective coordinates?
- How do you represent the point at infinity?
- Compressed vs uncompressed public keys—what’s the difference?
- How do you validate that a point lies on the curve?
- Scalar Multiplication Optimization
- Given k and G, how do you compute k*G efficiently?
- What is the “double-and-add” algorithm?
- Can you use pre-computed tables for the generator point G?
- What’s the computational complexity? (Hint: O(log k))
- Signature Format
- How do you serialize (r, s) values? (DER encoding in Bitcoin)
- What’s the difference between low-s and high-s signatures?
- Why does Ethereum require “v” in addition to (r, s)?
- How do you handle signature malleability?
- Security Validation
- How do you test that k reuse leaks the private key?
- What are the test vectors for secp256k1?
- How do you verify your implementation against real Bitcoin/Ethereum transactions?
Thinking Exercise
Trace ECDSA Signing By Hand (Simplified)
Use small numbers to understand the algorithm before implementing with 256-bit values:
Setup (toy example):
Prime field: p = 23
Curve: y² = x³ + 7 (mod 23)
Generator G = (5, 8)  [verify: 8² = 5³ + 7 = 132 ≡ 17 (mod 23), 17 ≡ -6, so 8² ≡ 5³ + 7]
Order n = 29 (number of points)

Private key: d = 6
Public key: Q = d*G = 6*G
Exercise 1: Compute Public Key
1*G = (5, 8)
2*G = G + G = ?  [use point doubling formula]
3*G = 2*G + G = ?
...
6*G = ?
Exercise 2: Sign message hash m = 10
Choose random k = 18 (in reality, must be cryptographically random)

1. R = k*G = 18*G = (?,?)  [compute this]
2. r = R.x mod n
3. s = k⁻¹ * (m + r*d) mod n
   - First find k⁻¹ mod 29 using extended Euclidean algorithm
   - Then compute s

Signature = (r, s)
Exercise 3: Verify the signature
Given: Public key Q, message hash m=10, signature (r,s)

1. Compute s⁻¹ mod n
2. u1 = m * s⁻¹ mod n
3. u2 = r * s⁻¹ mod n
4. R' = u1*G + u2*Q
5. Verify: R'.x mod n == r
Questions while tracing:
- Can you derive the private key from the public key? Try it!
- If you know k, can you recover the private key d from the signature?
- What happens if you use k=1? Is the signature still valid?
The Interview Questions They’ll Ask
Prepare to answer these after completing the project:
Fundamental Understanding:
- “Explain how elliptic curve point addition works geometrically and algebraically.”
- “Why is ECDSA more efficient than RSA for the same security level?”
- “What is the discrete logarithm problem and why is it hard?”
- “How does ECDSA provide non-repudiation?”
Implementation Details:
- “What’s the difference between secp256k1 and secp256r1?”
- “How do you compute a modular inverse efficiently?”
- “What’s the difference between hardened and normal key derivation?” (BIP-32)
- “Explain the double-and-add algorithm for scalar multiplication.”
Security Concepts:
- “What happens if you reuse the same k value for two different messages?”
- “Why must k be cryptographically random, not just pseudo-random?”
- “What is signature malleability and how did it affect Bitcoin?”
- “How did the PlayStation 3 get hacked due to ECDSA implementation?”
Web3 Applications:
- “How does Ethereum recover the public key from a signature? (ecrecover)”
- “What’s the relationship between private keys, public keys, and Ethereum addresses?”
- “Why do Bitcoin transactions include the public key, while Ethereum doesn’t?”
- “Explain how hardware wallets sign transactions without exposing private keys.”
Advanced Topics:
- “What are Schnorr signatures and how do they differ from ECDSA?”
- “How do multi-signature schemes work on elliptic curves?”
- “What is the security level of secp256k1 in bits?”
- “Can quantum computers break ECDSA? How?”
Hints in Layers
Hint 1: Start with the curve parameters
// secp256k1 parameters (256-bit)
const P: U256 = U256::from_be_hex(
    "FFFFFFFFFFFFFFFFFFFFFFFFFFFFFFFFFFFFFFFFFFFFFFFFFFFFFFFEFFFFFC2F"
);
const N: U256 = U256::from_be_hex(
    "FFFFFFFFFFFFFFFFFFFFFFFFFFFFFFFEBAAEDCE6AF48A03BBFD25E8CD0364141"
);
const G_X: U256 = U256::from_be_hex(
    "79BE667EF9DCBBAC55A06295CE870B07029BFCDB2DCE28D959F2815B16F81798"
);
const G_Y: U256 = U256::from_be_hex(
    "483ADA7726A3C4655DA4FBFC0E1108A8FD17B448A68554199C47D08FFB10D4B8"
);
Hint 2: Implement modular inverse using Extended Euclidean Algorithm
def mod_inverse(a, m):
    """Compute a⁻¹ mod m using Extended Euclidean Algorithm"""
    if gcd(a, m) != 1:
        return None  # inverse doesn't exist

    def extended_gcd(a, b):
        if a == 0:
            return b, 0, 1
        gcd, x1, y1 = extended_gcd(b % a, a)
        x = y1 - (b // a) * x1
        y = x1
        return gcd, x, y

    _, x, _ = extended_gcd(a % m, m)
    return (x % m + m) % m
Hint 3: Point addition formulas
If P = (x1, y1) and Q = (x2, y2):

Case 1: P ≠ Q (point addition)
  λ = (y2 - y1) / (x2 - x1) mod p
  x3 = λ² - x1 - x2 mod p
  y3 = λ(x1 - x3) - y1 mod p

Case 2: P = Q (point doubling)
  λ = (3*x1² + a) / (2*y1) mod p
  x3 = λ² - 2*x1 mod p
  y3 = λ(x1 - x3) - y1 mod p

For secp256k1, a = 0, so λ = (3*x1²) / (2*y1) mod p
Hint 4: Scalar multiplication (double-and-add)
def scalar_mult(k, point):
    """Compute k * point using double-and-add"""
    result = POINT_AT_INFINITY
    addend = point

    while k:
        if k & 1:  # if bit is 1
            result = point_add(result, addend)
        addend = point_double(addend)
        k >>= 1

    return result
Hint 5: The k-reuse attack demonstration
# If you sign two messages m1, m2 with same k:
# s1 = k⁻¹(m1 + r*d) mod n
# s2 = k⁻¹(m2 + r*d) mod n

# Attacker can compute k:
k = (m1 - m2) * (s1 - s2)⁻¹ mod n

# Then recover private key d:
d = r⁻¹ * (k*s1 - m1) mod n

# This is EXACTLY how the PS3 was hacked!
Hint 6: Test vectors for validation
Private key: 0x01
Public key (uncompressed):
  04 79BE667EF9DCBBAC55A06295CE870B07029BFCDB2DCE28D959F2815B16F81798
     483ADA7726A3C4655DA4FBFC0E1108A8FD17B448A68554199C47D08FFB10D4B8

Message hash: 0x0000000000000000000000000000000000000000000000000000000000000001
Signature (one possible):
  r = 0x...
  s = 0x...
  (deterministic k produces consistent signature)
Use Bitcoin’s test vectors from the secp256k1 library.
Hint 7: Implementing signature verification The verification equation is: u1G + u2Q = R
Why does this work? Because:
u1*G + u2*Q
= (m*s⁻¹)*G + (r*s⁻¹)*Q
= (m*s⁻¹)*G + (r*s⁻¹)*(d*G)
= (m*s⁻¹ + r*d*s⁻¹)*G
= s⁻¹(m + r*d)*G
= s⁻¹(k*s)*G      [because s = k⁻¹(m + r*d)]
= k*G
= R
The math is beautiful—trace through it!
Books That Will Help
| Topic | Book | Chapter |
|---|---|---|
| Elliptic curve fundamentals | “Understanding Cryptography” by Christof Paar | Chapter 9: Elliptic Curve Cryptosystems |
| ECDSA algorithm | “Serious Cryptography, 2nd Edition” by Jean-Philippe Aumasson | Chapter 11: Public-Key Encryption |
| Modular arithmetic | “Concrete Mathematics” by Knuth, Graham & Patashnik | Chapter 4: Number Theory |
| Finite field mathematics | “A Course in Number Theory and Cryptography” by Neal Koblitz | Chapters 5-6 |
| secp256k1 in Bitcoin | “Mastering Bitcoin” by Andreas M. Antonopoulos | Chapter 4: Keys, Addresses |
| Real-world implementation | “Real-World Cryptography” by David Wong | Chapter 7: Signatures and Zero-Knowledge |
| Security pitfalls | “Serious Cryptography” by Jean-Philippe Aumasson | Chapter 3: Randomness |
| Applied elliptic curves | “Guide to Elliptic Curve Cryptography” by Hankerson, Menezes & Vanstone | Chapters 3-4 |
Recommended Reading Order:
- Start with “Understanding Cryptography” Ch. 9 for geometric intuition
- Study “Serious Cryptography” Ch. 11 for the ECDSA algorithm
- Read Bitcoin Wiki secp256k1 page for parameter details
- Implement while referring to Practical Cryptography for Developers
- Deep dive into “Concrete Mathematics” Ch. 4 if modular arithmetic is unclear
Additional Resources:
- Secp256k1 Educational Resource - interactive 2025 tutorial
- ECDSA: Elliptic Curve Signatures - comprehensive guide
- Bitcoin Wiki ECDSA - implementation details
- A (Relatively Easy To Understand) Primer on Elliptic Curve Cryptography - visual explanation
Academic Papers:
- “The Elliptic Curve Digital Signature Algorithm (ECDSA)” by Don Johnson, Alfred Menezes, Scott Vanstone (1999)
- Bitcoin’s BIP-66: “Strict DER signatures” for signature encoding details
Project 3: Merkle Tree Library
- File: WEB3_DEEP_UNDERSTANDING_PROJECTS.md
- Main Programming Language: Go
- Alternative Programming Languages: Rust, C, TypeScript
- Coolness Level: Level 3: Genuinely Clever
- Business Potential: 3. The “Service & Support” Model
- Difficulty: Level 2: Intermediate
- Knowledge Area: Data Structures / Blockchain
- Software or Tool: Merkle Tree / Proof Generator
- Main Book: “Mastering Bitcoin” by Andreas M. Antonopoulos
What you’ll build
A Merkle tree library that constructs trees from data, generates inclusion proofs, and verifies proofs. Visualize tree structure and demonstrate how changing one leaf affects the root.
Why it teaches Web3
Merkle trees enable light clients—you can verify a transaction is in a block by downloading only ~10 hashes instead of millions of transactions. This is how mobile wallets work. Understanding Merkle proofs means understanding how trustless verification is even possible.
Core challenges you’ll face
- Tree construction (handling odd number of leaves, recursive hashing) → maps to data structure design
- Proof generation (collecting sibling hashes along the path) → maps to algorithmic thinking
- Proof verification (reconstructing root from leaf + proof) → maps to verification logic
- Sparse Merkle trees (efficient representation of mostly-empty trees) → maps to Ethereum state
Key Concepts
- Merkle Trees in Bitcoin: “Mastering Bitcoin” Chapter 9 - Andreas Antonopoulos
- Tree Data Structures: “Algorithms, Fourth Edition” Chapter 3 - Sedgewick & Wayne
- Merkle Proofs: Bitcoin Wiki - Merkle Trees
Difficulty
Intermediate
Time estimate
1 week
Prerequisites
Project 1 (hash functions), tree data structures
Real world outcome
$ ./merkle build --data transactions.json
Leaves: [tx1_hash, tx2_hash, tx3_hash, tx4_hash]
Tree Structure:
[ROOT: 3a7f...]
/ \
[ab12...] [cd34...]
/ \ / \
[tx1] [tx2] [tx3] [tx4]

Merkle Root: 3a7f8b2c...
$ ./merkle prove --index 2 --root 3a7f8b2c...
Proof for tx3:
- Sibling[0]: cd34... (right)
- Sibling[1]: ab12... (left)
$ ./merkle verify --leaf tx3_hash --proof proof.json --root 3a7f8b2c...
✓ Proof VALID - tx3 is in tree with root 3a7f8b2c...
Implementation Hints
Build bottom-up: hash pairs of nodes to create parent level. Handle odd counts by duplicating the last node. For proofs, track whether each sibling is left or right.
Pseudo-code:
function build_tree(leaves):
    current_level = [hash(leaf) for leaf in leaves]
    tree = [current_level]

    while len(current_level) > 1:
        next_level = []
        for i in 0..len(current_level) step 2:
            left = current_level[i]
            right = current_level[i+1] if i+1 < len else left
            next_level.append(hash(left + right))
        tree.append(next_level)
        current_level = next_level

    return tree

function generate_proof(tree, index):
    proof = []
    for level in tree[:-1]:  // exclude root
        sibling_index = index ^ 1  // flip last bit
        is_left = index % 2 == 1
        proof.append({hash: level[sibling_index], is_left: is_left})
        index = index // 2
    return proof
Learning milestones
- Tree construction matches known test vectors → You understand the algorithm
- Proofs verify correctly → You understand trustless verification
- Changing one leaf changes the root → You understand data integrity
- Sparse Merkle tree works → You understand Ethereum’s state model
The Core Question You’re Answering
“How can you prove data exists in a massive dataset without downloading the entire dataset?”
This is the scalability breakthrough that makes blockchain practical. Bitcoin blocks can contain thousands of transactions (multiple MB of data). Without Merkle trees, every node would need to download and verify every transaction. With Merkle proofs, a light client can verify a transaction’s inclusion by downloading only log₂(n) hashes—about 10 hashes for 1000 transactions, about 20 hashes for 1 million transactions.
The magic: the Merkle root in the block header commits to ALL transactions. Changing even one bit in one transaction changes the root completely. Yet you can prove inclusion of ANY transaction with just a tiny proof.
Concepts You Must Understand First
Stop and research these before coding:
- Hash Functions as Commitments
- Why is a hash a “commitment” to data?
- What does it mean that hashes are “collision-resistant”?
-
How does hash(A B) commit to both A and B? - Book Reference: “Serious Cryptography” Ch. 6 - Jean-Philippe Aumasson
- Prerequisite: Project 1 (SHA-256 implementation)
- Binary Tree Data Structures
- What’s the height of a binary tree with n leaves?
- How do you traverse from leaf to root?
- What’s the parent index of node at index i?
- How do you handle odd numbers of children?
- Book Reference: “Algorithms, Fourth Edition” Ch. 3.3 - Sedgewick & Wayne
- Book Reference: “Data Structures the Fun Way” Ch. 8 - Jeremy Kubica
- Proof Systems
- What makes a proof “sound” vs “complete”?
- What’s the difference between a proof of inclusion and proof of exclusion?
- How small can a proof be? (Answer: O(log n) hashes)
- Book Reference: “Mastering Bitcoin” Ch. 9 - Andreas M. Antonopoulos
- Merkle Tree Variants
- Standard Merkle tree vs Merkle Patricia Trie (Ethereum)
- Sparse Merkle trees for state storage
- Why does Bitcoin use different approach than Ethereum?
- Book Reference: “Mastering Ethereum” Ch. 14 - Antonopoulos & Wood
- Web Resource: Understanding Merkle Trees and Proofs
Questions to Guide Your Design
Before implementing, think through these:
- Tree Construction Algorithm
- How do you handle when the number of leaves isn’t a power of 2?
- Should you duplicate the last leaf or use a different strategy?
- How do you store the tree efficiently? (Array? Nested structs?)
- What’s the space complexity? (Hint: 2n - 1 nodes for n leaves)
- Proof Generation
- Given a leaf index, how do you find its siblings at each level?
- Do you need to store “left” or “right” for each sibling?
- How do you handle the edge case of the last node at odd levels?
- What’s the time complexity of proof generation?
- Proof Verification
- Given a leaf hash and proof, how do you reconstruct the path to root?
-
Do you hash(left right) or hash(right left)? - How do you know which order without storing it?
- Can you verify without rebuilding the entire tree?
- Optimization Challenges
- Can you update a single leaf without rebuilding the tree?
- How do you batch-update multiple leaves efficiently?
- Should you cache intermediate hashes?
- Can you parallelize tree construction?
- Sparse Merkle Trees
- How do you represent a tree with 2^256 possible leaves efficiently?
- What’s the “default hash” for empty nodes?
- How do you prove non-inclusion (that something is NOT in the tree)?
- Why does Ethereum need this for state storage?
Thinking Exercise
Hand-Trace a 4-Leaf Merkle Tree
Build intuition by working through a tiny example on paper:
Given 4 transactions:
tx0 = "Alice -> Bob: 1 BTC"
tx1 = "Carol -> Dave: 2 BTC"
tx2 = "Eve -> Frank: 3 BTC"
tx3 = "Grace -> Heidi: 4 BTC"
Step 1: Hash the leaves
h0 = hash("Alice -> Bob: 1 BTC")   = 0xa3b2...
h1 = hash("Carol -> Dave: 2 BTC")  = 0x7f84...
h2 = hash("Eve -> Frank: 3 BTC")   = 0x2e91...
h3 = hash("Grace -> Heidi: 4 BTC") = 0xc5d7...
Step 2: Build level 1 (parent pairs)
h01 = hash(h0 || h1) = hash(0xa3b2... || 0x7f84...) = 0x4d6c...
h23 = hash(h2 || h3) = hash(0x2e91... || 0xc5d7...) = 0x8a3f...
Step 3: Build root
root = hash(h01 || h23) = hash(0x4d6c... || 0x8a3f...) = 0xf1e2...
Step 4: Generate proof for tx2
To prove tx2 is in the tree:
- Need h3 (sibling at level 0)
- Need h01 (sibling at level 1)

Proof = [
  { hash: h3,   position: "right" },
  { hash: h01,  position: "left" }
]
Step 5: Verify the proof
Start with h2 = 0x2e91...
1. hash(h2 || h3) = 0x8a3f... (matches h23)
2. hash(h01 || h23) = 0xf1e2... (matches root)

✓ Proof valid!
Questions while tracing:
- What if we had 5 transactions? How would you handle the odd number?
- If tx2 changes to “Eve -> Frank: 300 BTC”, which hashes change?
- Can you prove tx2 is NOT “Eve -> Frank: 5 BTC” using the same proof?
- What’s the proof size in bits? (2 * 256 = 512 bits vs 4 * ~200 characters for full txs)
The Interview Questions They’ll Ask
Prepare to answer these after completing the project:
Fundamental Understanding:
- “Explain how a Merkle tree works and why it’s useful for blockchain.”
- “What’s the space complexity of a Merkle tree with n leaves?”
- “What’s the proof size for a tree with 1 million leaves?”
- “How does changing one leaf affect the tree?”
Implementation Details:
- “How do you handle an odd number of leaves when building the tree?”
- “What’s the time complexity of generating a proof?”
- “How do you determine if a sibling should be on the left or right?”
- “Can you update a single leaf without rebuilding the entire tree?”
Bitcoin Specifics:
- “How does Bitcoin use Merkle trees in its blocks?”
- “What is SPV (Simplified Payment Verification) and how does it use Merkle proofs?”
- “Why doesn’t Bitcoin need the full blockchain to verify payments?”
- “What information is in a Bitcoin block header?”
Ethereum Differences:
- “What’s the difference between Bitcoin’s Merkle tree and Ethereum’s Patricia Trie?”
- “Why does Ethereum need three different Merkle trees per block?”
- “What is a Sparse Merkle Tree and when would you use it?”
- “How does Ethereum prove account balance without downloading all accounts?”
Advanced Concepts:
- “What’s a Merkle Mountain Range and when is it useful?”
- “Can you prove something is NOT in a Merkle tree?”
- “What’s a Vector Commitment and how does it relate to Merkle trees?”
- “How do ZK-rollups use Merkle trees for state commitments?”
Hints in Layers
Hint 1: Tree construction with array storage
def build_merkle_tree(leaves):
    """Build tree bottom-up, storing in array"""
    if not leaves:
        return []

    # Hash all leaves
    tree = [[hash_leaf(leaf) for leaf in leaves]]

    # Build each level
    while len(tree[-1]) > 1:
        current_level = tree[-1]
        next_level = []

        for i in range(0, len(current_level), 2):
            left = current_level[i]
            # Handle odd number: duplicate last node
            right = current_level[i+1] if i+1 < len(current_level) else left
            parent = hash_pair(left, right)
            next_level.append(parent)

        tree.append(next_level)

    return tree
Hint 2: Proof generation algorithm
def generate_proof(tree, leaf_index):
    """Generate proof for leaf at given index"""
    proof = []
    index = leaf_index

    # Traverse from leaf to root (excluding root)
    for level in range(len(tree) - 1):
        level_size = len(tree[level])

        # Find sibling
        if index % 2 == 0:  # we're left child
            if index + 1 < level_size:
                sibling_hash = tree[level][index + 1]
                position = "right"
            else:
                # No sibling, duplicate ourselves
                sibling_hash = tree[level][index]
                position = "right"
        else:  # we're right child
            sibling_hash = tree[level][index - 1]
            position = "left"

        proof.append({"hash": sibling_hash, "position": position})

        # Move to parent for next level
        index = index // 2

    return proof
Hint 3: Proof verification
def verify_proof(leaf_hash, proof, root_hash):
    """Verify that leaf_hash is in tree with given root"""
    current_hash = leaf_hash

    for step in proof:
        sibling_hash = step["hash"]
        position = step["position"]

        if position == "left":
            current_hash = hash_pair(sibling_hash, current_hash)
        else:
            current_hash = hash_pair(current_hash, sibling_hash)

    return current_hash == root_hash
Hint 4: Visualizing the tree
def print_tree(tree):
    """Print tree structure nicely"""
    max_level = len(tree) - 1

    for level_idx, level in enumerate(reversed(tree)):
        indent = "  " * (max_level - level_idx)
        for hash_val in level:
            print(f"{indent}{hash_val[:8]}...")
Hint 5: Handling odd counts correctly The Bitcoin approach: if odd number of nodes, duplicate the last one.
Hint 6: Optimization - incremental updates
def update_leaf(tree, leaf_index, new_leaf_hash):
    """Update single leaf and propagate changes"""
    tree[0][leaf_index] = new_leaf_hash
    index = leaf_index

    # Recompute path from leaf to root
    for level in range(len(tree) - 1):
        parent_index = index // 2
        left_index = parent_index * 2
        right_index = left_index + 1

        left = tree[level][left_index]
        right = tree[level][right_index] if right_index < len(tree[level]) else left

        tree[level + 1][parent_index] = hash_pair(left, right)
        index = parent_index
Hint 7: Test with Bitcoin block 100000
Block 100000 has 4 transactions
Merkle root: f3e94742aca4b5ef85488dc37c06c3282295ffec960994b2c0d5ac2a25a95766

Verify your implementation matches this!
Books That Will Help
| Topic | Book | Chapter |
|---|---|---|
| Merkle trees in Bitcoin | “Mastering Bitcoin” by Andreas M. Antonopoulos | Chapter 9: The Blockchain |
| Tree data structures | “Algorithms, Fourth Edition” by Sedgewick & Wayne | Chapter 3.3: Balanced Search Trees |
| Binary trees fundamentals | “Data Structures the Fun Way” by Jeremy Kubica | Chapter 8: Binary Search Trees |
| Merkle Patricia Tries | “Mastering Ethereum” by Antonopoulos & Wood | Chapter 14: Consensus |
| Proof systems | “Real-World Cryptography” by David Wong | Chapter 15: Zero-Knowledge Proofs |
| Hash-based data structures | “Serious Cryptography” by Jean-Philippe Aumasson | Chapter 6: Hash Functions |
| SPV and light clients | “Mastering Bitcoin” by Andreas M. Antonopoulos | Chapter 8: Mining and Consensus |
Recommended Reading Order:
- “Mastering Bitcoin” Ch. 9 - understand WHY Merkle trees matter
- “Algorithms” Ch. 3.3 - understand tree data structures
- “Data Structures the Fun Way” Ch. 8 - build intuition with binary trees
- Implement basic Merkle tree
- “Mastering Ethereum” Ch. 14 - understand variations (Patricia Trie)
Additional Resources:
- Understanding Merkle Trees and Proofs (2025) - comprehensive modern guide
- Bitcoin Merkle Tree Implementation Guide - step-by-step with code
- Blockchain Merkle Trees - GeeksforGeeks - updated July 2025
- Bitcoin Wiki: Merkle Trees
- Merkle Tree in Blockchain (dYdX) - practical applications
Project 4: Build a Blockchain from Scratch
- File: WEB3_DEEP_UNDERSTANDING_PROJECTS.md
- Main Programming Language: Go
- Alternative Programming Languages: Rust, Python, TypeScript
- Coolness Level: Level 4: Hardcore Tech Flex
- Business Potential: 1. The “Resume Gold” (Educational/Personal Brand)
- Difficulty: Level 3: Advanced
- Knowledge Area: Distributed Systems / Blockchain Core
- Software or Tool: Mini-Blockchain
- Main Book: “Mastering Bitcoin” by Andreas M. Antonopoulos
What you’ll build
A complete blockchain with blocks, transactions, chain validation, and a simple P2P network. No smart contracts yet—focus on the core data structure and consensus rules.
Why it teaches Web3
This is the heart of it all. A blockchain is just a linked list of blocks where each block commits to the previous one via hash. But the magic is in the rules: what makes a block valid? How do nodes agree? Building this yourself strips away the mysticism.
Core challenges you’ll face
- Block structure (header, transactions, hash chaining) → maps to blockchain fundamentals
- Transaction validation (input/output model, signature verification) → maps to UTXO model
- Chain selection (longest chain rule) → maps to consensus basics
- P2P gossip (broadcasting blocks and transactions) → maps to distributed systems
Key Concepts
- Bitcoin Block Structure: “Mastering Bitcoin” Chapters 6-9 - Andreas Antonopoulos
- P2P Networking: “Computer Networks” Chapter 2 - Tanenbaum
- Chain Validation: “The Bitcoin Developer Guide” - bitcoin.org
Difficulty
Advanced
Time estimate
2-3 weeks
Prerequisites
Projects 1-3, network programming basics
Real world outcome
# Terminal 1 - Node A
$ ./minichain --port 3000
[Node A] Genesis block: 0000abc...
[Node A] Listening on :3000

# Terminal 2 - Node B
$ ./minichain --port 3001 --peer localhost:3000
[Node B] Connected to peer localhost:3000
[Node B] Synced chain: height=0, tip=0000abc...

# Terminal 1
$ ./minichain mine --to alice_pubkey
[Node A] Mining block 1...
[Node A] Block found! hash=0000def... nonce=48293
[Node A] Broadcasting to peers...

# Terminal 2
[Node B] Received block 1 from peer
[Node B] Block valid, extending chain
[Node B] New tip: 0000def... height=1
Implementation Hints
Start simple: Block = {index, timestamp, previous_hash, transactions, nonce, hash}. Validate by checking: hash matches contents, previous_hash matches prior block, transactions are valid. For P2P, use simple TCP with JSON messages.
Block structure pseudo-code:
struct Block:
    index: int
    timestamp: int
    previous_hash: bytes[32]
    merkle_root: bytes[32]
    nonce: int
    transactions: []Transaction

struct Transaction:
    inputs: []TxInput    // References to previous outputs
    outputs: []TxOutput  // New outputs being created
    signature: bytes

function validate_block(block, chain):
    // Check proof of work
    if not block.hash.starts_with("0000"):
        return false

    // Check hash correctness
    if hash(block.header) != block.hash:
        return false

    // Check chain linkage
    if block.previous_hash != chain.tip.hash:
        return false

    // Validate all transactions
    for tx in block.transactions:
        if not validate_transaction(tx, chain.utxo_set):
            return false

    return true
Learning milestones
- Chain validates correctly → You understand blockchain structure
- Two nodes sync → You understand P2P consensus
- Invalid blocks are rejected → You understand validation rules
- Fork resolution works → You understand longest-chain rule
The Core Question You’re Answering
“How do thousands of independent nodes agree on a single version of history without a central authority?”
This is the Byzantine Generals Problem applied to money. In a distributed system where nodes can lie, crash, or be malicious, how do honest nodes reach consensus? Blockchain solves this through cryptographic hash chaining (making history immutable) and longest-chain selection (making it economically expensive to rewrite history).
The deeper insight: a blockchain isn’t just a data structure—it’s a consensus protocol embodied in code. Every node independently validates every transaction and block, and they all converge on the same state without talking to a central coordinator.
Concepts You Must Understand First
Stop and research these before coding:
- Linked Lists and Hash Chaining
- Why is a blockchain a “linked list” of blocks?
- How does including previous_hash prevent rewriting history?
- What happens if you change one block in the middle of the chain?
- Book Reference: “Algorithms, Fourth Edition” Ch. 1.3 - Sedgewick & Wayne
- Prerequisites: Projects 1 (hashing) and 3 (Merkle trees)
- Byzantine Fault Tolerance
- What is the Byzantine Generals Problem?
- How does proof-of-work provide Sybil resistance?
- Why can’t 51% attacks change past blocks (only censor new ones)?
- Book Reference: “Mastering Bitcoin” Ch. 10 - Andreas M. Antonopoulos
- Book Reference: “Designing Data-Intensive Applications” Ch. 9 - Martin Kleppmann
- UTXO Model vs Account Model
- What is an “unspent transaction output”?
- How does Bitcoin track balances differently than Ethereum?
- Why does the UTXO model prevent double-spending?
- Book Reference: “Mastering Bitcoin” Ch. 6 - Andreas M. Antonopoulos
- P2P Network Fundamentals
- How do nodes discover each other? (peer exchange, DNS seeds)
- What is “gossip protocol” for block propagation?
- How do you handle network partitions and forks?
- Book Reference: “Computer Networks” Ch. 2 - Tanenbaum
- Web Resource: Blockchain Consensus Mechanisms Primer
- Chain Reorganization
- When do nodes switch to a different chain?
- What is the “longest chain rule” vs “most work”?
- How many confirmations make a transaction “final”?
- Web Resource: Proof of Work Consensus Analysis
Questions to Guide Your Design
Before implementing, think through these:
- Block Structure
- What goes in the block header vs block body?
- How do you serialize a block for hashing?
- Should you store the Merkle root or rehash transactions each time?
- How do you handle the genesis block (no previous hash)?
- Transaction Validation
- How do you prevent double-spending without a central database?
- What is the UTXO set and how do you maintain it?
- How do you verify transaction signatures?
- What makes a transaction “valid”?
- Chain Selection
- When you receive two valid blocks at the same height, which do you choose?
- How do you detect and resolve forks?
- What is “chain work” and how is it different from chain length?
- When do you reorganize your chain?
- Network Synchronization
- How does a new node download the entire blockchain?
- What’s the difference between headers-first and full block download?
- How do you verify blocks while syncing?
- How do you handle nodes that send invalid data?
- Concurrency and State Management
- Can multiple threads mine and validate simultaneously?
- How do you protect shared state (UTXO set, chain tip)?
- What happens if a new block arrives while mining?
- How do you handle mempool (pending transactions)?
Thinking Exercise
Trace a Fork Resolution
Work through this scenario on paper:
Initial state: Both nodes have blocks 0-5
Step 1: Network partition occurs
Node A mines block 6a (contains tx: Alice -> Bob)
Node B mines block 6b (contains tx: Alice -> Carol)

Both blocks valid, both extend block 5.
Step 2: Race condition
Node A's chain: [0]--[1]--[2]--[3]--[4]--[5]--[6a]
Node B's chain: [0]--[1]--[2]--[3]--[4]--[5]--[6b]
Step 3: Nodes exchange blocks
Node A receives block 6b from Node B
Node B receives block 6a from Node A

Both nodes now have two competing chains of equal length!
Step 4: Next block resolves the fork
Node A mines block 7a on top of 6a
Node A's chain: [0]--[1]--[2]--[3]--[4]--[5]--[6a]--[7a]  (length: 7)

When Node B receives 7a, it sees:
  - Current chain: length 6 (ending at 6b)
  - New chain: length 7 (ending at 7a)

Longest chain rule: Node B switches to the longer chain!
Step 5: Reorganization
Node B:
1. Removes block 6b (tx: Alice -> Carol reverted!)
2. Adds block 6a (tx: Alice -> Bob)
3. Adds block 7a
4. Updates UTXO set

Bob's transaction is confirmed.
Carol's transaction returns to mempool.
Questions while tracing:
- What if both nodes mine block 7 simultaneously? How far can the fork extend?
- Why do merchants wait for 6 confirmations? (Because 6 blocks deep is very unlikely to reorganize)
- What if an attacker controls 51% of mining power? Can they rewrite the chain?
The Interview Questions They’ll Ask
Fundamental Understanding:
- “Explain how a blockchain prevents tampering with historical records.”
- “What is the Byzantine Generals Problem and how does blockchain solve it?”
- “Why is proof-of-work necessary? Why can’t nodes just vote?”
- “What happens when two miners find a block at the same time?”
Implementation Details:
- “How do you prevent double-spending in a UTXO model?”
- “What’s the difference between block height and chain work?”
- “Explain the longest chain rule. Is it really ‘longest’?”
- “How does a new node sync the blockchain from scratch?”
Security & Attacks:
- “What is a 51% attack and what can/can’t an attacker do?”
- “Why do we wait for multiple confirmations before considering a transaction final?”
- “What is selfish mining and how does it work?”
- “Can you change a transaction that’s 100 blocks deep?”
Web3 Context:
- “How is Bitcoin’s blockchain different from Ethereum’s?”
- “What are the tradeoffs of UTXO vs account-based models?”
- “How do light clients work without downloading the full chain?”
Hints in Layers
Hint 1: Start with the genesis block
def create_genesis_block():
    """Special first block with no previous hash"""
    return Block(
        index=0,
        timestamp=1231006505,  # Bitcoin's genesis: Jan 3, 2009
        previous_hash="0" * 64,
        transactions=[],  # or coinbase transaction
        nonce=0
    )
Hint 2: Block validation rules
def validate_block(block, previous_block, utxo_set):
    """All rules a block must satisfy"""
    # 1. Previous hash links correctly
    if block.previous_hash != previous_block.hash:
        return False, "Invalid previous hash"

    # 2. Hash meets difficulty target
    if not block.hash.startswith("0" * difficulty):
        return False, "Insufficient proof of work"

    # 3. Hash is correct
    if compute_hash(block) != block.hash:
        return False, "Hash mismatch"

    # 4. Timestamp reasonable
    if block.timestamp < previous_block.timestamp:
        return False, "Timestamp too early"

    # 5. All transactions valid
    for tx in block.transactions:
        if not validate_transaction(tx, utxo_set):
            return False, f"Invalid transaction: {tx.id}"

    return True, "Block valid"
Hint 3: Chain reorganization logic
def handle_new_block(block):
    """Decide whether to extend or reorganize"""
    # Check if extends current tip
    if block.previous_hash == chain.tip.hash:
        if validate_block(block, chain.tip):
            chain.append(block)
            update_utxo_set(block)
            broadcast_to_peers(block)
        return

    # Check if starts a longer fork
    fork_chain = find_chain_to_block(block)
    if fork_chain.length > chain.length:
        reorganize_chain(fork_chain)
Hint 4: P2P message types
# Simple TCP message protocol
messages = {
    "version": {"version": 1, "timestamp": ...},
    "getblocks": {"start_height": 0, "end_height": 100},
    "block": {"block_data": ...},
    "tx": {"transaction_data": ...},
    "inv": {"type": "block", "hashes": [...]},  # inventory
}
Hint 5: UTXO set management
utxo_set = {}  # (tx_id, output_index) -> output

def update_utxo_set(block):
    """Apply block's transactions to UTXO set"""
    for tx in block.transactions:
        # Remove spent outputs
        for input in tx.inputs:
            key = (input.prev_tx_id, input.prev_output_index)
            del utxo_set[key]

        # Add new outputs
        for i, output in enumerate(tx.outputs):
            key = (tx.id, i)
            utxo_set[key] = output
Hint 6: Fork detection
def detect_fork(new_block):
    """Check if block creates a fork"""
    if new_block.previous_hash == chain.tip.hash:
        return False  # extends main chain

    # Search for previous_hash in recent blocks
    for i in range(len(chain) - 1, max(0, len(chain) - 100), -1):
        if chain[i].hash == new_block.previous_hash:
            return True  # fork detected

    return False  # orphan block (parent unknown)
Books That Will Help
| Topic | Book | Chapter |
|---|---|---|
| Blockchain fundamentals | “Mastering Bitcoin” by Andreas M. Antonopoulos | Chapters 6-10 |
| Byzantine fault tolerance | “Designing Data-Intensive Applications” by Martin Kleppmann | Chapter 9: Consistency and Consensus |
| Distributed consensus | “Operating Systems: Three Easy Pieces” by Arpaci-Dusseau | Distributed Systems chapters |
| P2P networking | “Computer Networks” by Tanenbaum | Chapter 2: Physical Layer & Chapter 5: Network Layer |
| UTXO model | “Mastering Bitcoin” by Andreas M. Antonopoulos | Chapter 6: Transactions |
| Chain selection algorithms | “Bitcoin Developer Guide” | Consensus section |
| Proof-of-work analysis | Academic: “Blockchain Consensus: Analysis of Proof-of-Work” | Stanford CS244B |
Additional Resources:
- Blockchain Consensus Mechanisms: A Primer for Supervisors (2025)
- Building Blockchain from Scratch #2: Implementing Proof of Work
- A Study of Blockchain Consensus Protocols (2025) - latest research
Project 5: Proof of Work Miner
- File: WEB3_DEEP_UNDERSTANDING_PROJECTS.md
- Main Programming Language: C
- Alternative Programming Languages: Rust, Go, C++
- Coolness Level: Level 4: Hardcore Tech Flex
- Business Potential: 1. The “Resume Gold” (Educational/Personal Brand)
- Difficulty: Level 3: Advanced
- Knowledge Area: Consensus / Mining
- Software or Tool: PoW Miner
- Main Book: “Mastering Bitcoin” by Andreas M. Antonopoulos
What you’ll build
A multi-threaded Proof of Work miner that finds valid block hashes by brute-forcing nonces. Include difficulty adjustment and mining pool simulation.
Why it teaches Web3
Proof of Work is the original consensus mechanism. Understanding it means understanding Sybil resistance—why you can’t just spin up 1000 fake nodes and take over the network. The answer: because each “vote” costs real energy/computation.
Core challenges you’ll face
- Hash grinding (trying billions of nonces efficiently) → maps to computational hardness
- Difficulty targeting (adjusting to maintain block time) → maps to self-regulating systems
- Multi-threading (parallel nonce search) → maps to performance optimization
- Stratum protocol (mining pool communication) → maps to real-world mining
Key Concepts
- Proof of Work: “Mastering Bitcoin” Chapter 10 - Andreas Antonopoulos
- Multi-threading in C: “The Linux Programming Interface” Chapter 29 - Michael Kerrisk
- Difficulty Adjustment: Bitcoin Wiki - Difficulty
Difficulty
Advanced
Time estimate
2 weeks
Prerequisites
Projects 1 & 4, multi-threading experience
Real world outcome
$ ./miner --threads 8 --difficulty 4
[Miner] Target: 0000ffff...
[Miner] Starting 8 threads...
[Thread 0] Searching nonce range 0-1000000...
[Thread 1] Searching nonce range 1000000-2000000...
...
[Thread 3] FOUND! nonce=4829371 hash=0000a3f2...
[Miner] Block mined in 2.3 seconds (1.8 MH/s)

$ ./miner benchmark
Single-threaded: 450 kH/s
8 threads: 3.2 MH/s
Speedup: 7.1x (efficiency: 89%)
Implementation Hints
The inner loop must be blazingly fast—this is one of the few places micro-optimization matters. Use uint32_t arrays, avoid memory allocation in the hot path, and consider SIMD instructions.
Mining loop pseudo-code:
function mine(block_template, difficulty_target):
    nonce = 0

    while true:
        block_template.nonce = nonce
        hash = sha256(sha256(block_template.header))

        if hash < difficulty_target:
            return (nonce, hash)

        nonce += 1

        if nonce % 1000000 == 0:
            print("Hashrate:", nonce / elapsed_time)
Difficulty adjustment:
function adjust_difficulty(last_2016_blocks):
    expected_time = 2016 * 10 * 60  // 2 weeks in seconds
    actual_time = last_block.time - first_block.time

    adjustment = expected_time / actual_time
    // Clamp to 4x max adjustment
    adjustment = clamp(adjustment, 0.25, 4.0)

    new_difficulty = old_difficulty * adjustment
    return new_difficulty
Learning milestones
- Find valid hashes at low difficulty → You understand PoW basics
- Multi-threading provides near-linear speedup → You understand parallel mining
- Difficulty adjustment maintains target block time → You understand self-regulation
- Mining pool protocol works → You understand real-world mining
The Core Question You’re Answering
“Why can’t someone just spin up 10,000 fake nodes and control the blockchain?”
The answer: Because each “vote” in Proof of Work isn’t cheap—it costs real electricity and hardware. An attacker would need 51% of the network’s total hash power, which is economically prohibitive. PoW transforms a software problem (Sybil attacks) into a hardware/energy problem.
Concepts You Must Understand First
Before building your miner, internalize these prerequisites:
| Concept | What You Need to Know | Book Reference |
|---|---|---|
| SHA-256 hashing | Double-SHA256 for block headers, little-endian byte order | Mastering Bitcoin Ch. 10 (Mining) |
| Difficulty targets | Compact encoding, how “leading zeros” relate to numeric targets | Mastering Bitcoin Ch. 10, pp. 203-206 |
| Nonce search space | 32-bit nonce, extraNonce in coinbase, ntime rolling | Mastering Bitcoin Ch. 10, pp. 207-210 |
| Multi-threading primitives | Mutex locks, atomic operations, thread pools | The Linux Programming Interface Ch. 29-30 |
| Mining profitability | Hashrate, difficulty, block reward, electricity cost economics | Mastering Bitcoin Ch. 10, pp. 214-218 |
Questions to Guide Your Design
Think through these before coding:
-
Nonce space partitioning: How will you split the 2^32 nonce range across threads without overlap or gaps?
-
Early termination: When one thread finds a solution, how do you immediately stop all other threads?
-
Hashrate reporting: How often should you report progress without slowing down the critical path?
-
False sharing: Are your threads writing to nearby memory addresses, causing cache line contention?
-
Block template updates: In real mining, the mempool changes constantly. How would you handle updating the block template mid-search?
-
Difficulty representation: Will you use the compact “bits” format (like Bitcoin) or a full 256-bit target?
Thinking Exercise
Before writing code, calculate this on paper:
Scenario: You’re mining Bitcoin with difficulty target 0x00000000FFFF0000000000000000000000000000000000000000000000000000.
- How many hashes, on average, must you compute to find a valid block?
- Hint: The target represents 1 in how many possible hashes?
- If your single-threaded miner achieves 500 kH/s, how long (on average) to find a block?
- Hint: Convert hashrate to hashes/second, divide total hashes by hashrate
-
With 8 threads and perfect parallelization, what’s the new average time?
- Bitcoin’s current global hashrate is ~600 EH/s (600 × 10^18 hashes/second). What’s your probability of finding the next block?
Answer: You’d need about 2^32 = 4.3 billion hashes. At 500 kH/s, that’s ~8,600 seconds (~2.4 hours). With 8 threads: ~18 minutes. Your probability vs. global hashrate: effectively zero (lottery ticket odds).
The Interview Questions They’ll Ask
- “Why is Proof of Work considered wasteful, and what are the alternatives?”
- Good answer: PoW converts electricity to security—it’s intentionally expensive to make attacks costly. Alternatives like Proof of Stake use economic stake (slashing) instead of energy, offering faster finality and lower environmental impact.
- “Explain a 51% attack. What could an attacker actually do?”
- Good answer: With 51% hashpower, an attacker can double-spend by mining a secret chain that reorgs blocks. However, they CANNOT steal others’ coins (requires private keys), change consensus rules, or print infinite coins.
- “What’s the selfish mining attack?”
- Good answer: A miner finds a block but doesn’t broadcast it, mining on top secretly. When another pool finds a block, the selfish miner releases their chain if it’s longer, wasting competitors’ work. Profitable above ~33% hashrate under certain network conditions.
- “Why doesn’t increasing difficulty make mining slower forever?”
- Good answer: Difficulty adjusts every 2016 blocks (~2 weeks) to maintain 10-minute block times. If global hashrate doubles, difficulty doubles at next adjustment, keeping block time constant.
- “How would you optimize a mining loop?”
- Good answer: Keep the hot path cache-friendly (no malloc), use SIMD for parallel SHA-256 compression rounds, unroll loops, avoid branches, minimize writes outside the loop. Consider GPU mining for massive parallelism.
- “What’s the difference between a mining pool and solo mining?”
- Good answer: Solo mining gives full block reward but high variance (might wait years). Pools use Stratum protocol to distribute work, giving frequent small payouts proportional to contributed hashpower. Pool reduces variance at the cost of sharing rewards and trusting the pool operator.
Hints in Layers
Layer 1 (High-level architecture):
struct BlockHeader {
    uint32_t version;
    uint8_t prev_block_hash[32];
    uint8_t merkle_root[32];
    uint32_t timestamp;
    uint32_t bits;  // Compact difficulty target
    uint32_t nonce;
};

// Main mining function
bool mine_block(BlockHeader *header, uint8_t *target) {
    for (uint64_t nonce = 0; nonce < UINT32_MAX; nonce++) {
        header->nonce = nonce;

        uint8_t hash[32];
        double_sha256(header, sizeof(*header), hash);

        if (hash_less_than_target(hash, target)) {
            return true;  // Found valid block!
        }
    }
    return false;  // Exhausted nonce space
}
Layer 2 (Multi-threading strategy):
// Divide nonce space among threads
typedef struct {
    BlockHeader header;
    uint8_t target[32];
    uint32_t nonce_start;
    uint32_t nonce_end;
    pthread_mutex_t *result_mutex;
    bool *found;
    uint32_t *winning_nonce;
} MinerThreadArgs;

void* miner_thread(void *args) {
    MinerThreadArgs *ctx = (MinerThreadArgs*)args;

    for (uint32_t nonce = ctx->nonce_start; nonce < ctx->nonce_end; nonce++) {
        // Check if another thread already found a solution
        pthread_mutex_lock(ctx->result_mutex);
        if (*ctx->found) {
            pthread_mutex_unlock(ctx->result_mutex);
            return NULL;  // Early exit
        }
        pthread_mutex_unlock(ctx->result_mutex);

        ctx->header.nonce = nonce;
        uint8_t hash[32];
        double_sha256(&ctx->header, sizeof(ctx->header), hash);

        if (hash_less_than_target(hash, ctx->target)) {
            pthread_mutex_lock(ctx->result_mutex);
            *ctx->found = true;
            *ctx->winning_nonce = nonce;
            pthread_mutex_unlock(ctx->result_mutex);
            return NULL;
        }
    }
    return NULL;
}
Layer 3 (Difficulty adjustment algorithm):
uint32_t calculate_next_difficulty(Block *blocks, int count) {
    // Bitcoin adjusts every 2016 blocks
    if (count % 2016 != 0) {
        return blocks[count-1].header.bits;  // No adjustment
    }

    uint32_t expected_time = 2016 * 10 * 60;  // 2 weeks
    uint32_t actual_time = blocks[count-1].header.timestamp -
                           blocks[count-2016].header.timestamp;

    // Clamp adjustment to 4x max (prevent manipulation)
    if (actual_time < expected_time / 4) actual_time = expected_time / 4;
    if (actual_time > expected_time * 4) actual_time = expected_time * 4;

    // Convert compact bits to full target
    uint256_t old_target = compact_to_target(blocks[count-1].header.bits);

    // new_target = old_target * (actual_time / expected_time)
    uint256_t new_target = (old_target * actual_time) / expected_time;

    // Convert back to compact representation
    return target_to_compact(new_target);
}
Layer 4 (Performance optimization):
// Optimize the hot path
static inline void sha256_transform(uint32_t state[8], const uint8_t block[64]) {
    // Unroll first 16 rounds (message schedule from input)
    // Use __builtin_bswap32 for endian conversion
    // SIMD: Use AVX2 to compute 8 hashes in parallel
    // Avoid all function calls in the inner loop
}

// Hashrate benchmark
typedef struct {
    uint64_t hashes_computed;
    double elapsed_seconds;
} HashrateStats;

double calculate_hashrate(HashrateStats *stats) {
    return stats->hashes_computed / stats->elapsed_seconds / 1e6;  // MH/s
}
Books That Will Help
| Concept | Book & Chapter | Why It Matters |
|---|---|---|
| Proof of Work fundamentals | Mastering Bitcoin Ch. 10: Mining and Consensus | Explains target adjustment, nonce search, and mining economics |
| SHA-256 double hashing | Serious Cryptography Ch. 6: Hash Functions | Understand why double-SHA256 and hash collision resistance |
| POSIX threads and synchronization | The Linux Programming Interface Ch. 29-30 | Learn mutex locks, condition variables, and thread pools for parallel mining |
| Performance optimization | Computer Systems: A Programmer’s Perspective Ch. 5: Optimizing Program Performance | Cache-friendly code, loop unrolling, SIMD instructions |
| Bitcoin difficulty adjustment | Mastering Bitcoin Ch. 10, pp. 214-218 | Deep dive on difficulty retargeting algorithm and why it’s clamped |
Common Pitfalls & Debugging
Problem 1: “My threads finish at wildly different times”
- Why: Uneven nonce space partitioning or one thread got lucky
- Fix: Use dynamic work distribution (work queue) instead of static ranges
- Quick test:
thread_time_stddev < mean_time * 0.2indicates good load balancing
Problem 2: “Multi-threading is slower than single-threaded!”
- Why: Mutex contention from frequent locking or false sharing
- Fix: Use atomic operations for
foundflag, give each thread its own cache line for counters - Quick test:
perf stat -e cache-misses,cache-references ./miner(should have >95% cache hit rate)
Problem 3: “Difficulty adjustment oscillates wildly”
- Why: Not clamping adjustment factor or using wall-clock time instead of block timestamps
- Fix: Enforce
0.25 <= adjustment <= 4.0like Bitcoin - Quick test: Simulate 10,000 blocks with random hashrates; difficulty should stabilize
Problem 4: “Found a hash but it’s rejected as invalid”
- Why: Endianness issues (big-endian vs little-endian) or comparing hash incorrectly
- Fix: Bitcoin uses little-endian byte order for header serialization
- Quick test: Hash a known block header and compare to blockchain explorer result
Problem 5: “Hashrate is 10x slower than expected”
- Why: Debug builds, unoptimized loops, or memory allocations in hot path
- Fix: Compile with
-O3 -march=native, useuint32_tarrays (not malloc), inline critical functions - Quick test: Use
perf record ./minerand check where time is spent
Project 6: HD Wallet (BIP-32/BIP-39)
- File: WEB3_DEEP_UNDERSTANDING_PROJECTS.md
- Main Programming Language: Rust
- Alternative Programming Languages: Go, Python, TypeScript
- Coolness Level: Level 4: Hardcore Tech Flex
- Business Potential: 2. The “Micro-SaaS / Pro Tool”
- Difficulty: Level 4: Expert
- Knowledge Area: Cryptography / Key Management
- Software or Tool: HD Wallet Generator
- Main Book: “Mastering Bitcoin” by Andreas M. Antonopoulos
What you’ll build
A hierarchical deterministic wallet that generates mnemonic seed phrases (BIP-39), derives child keys (BIP-32), and supports multiple cryptocurrencies from a single seed.
Why it teaches Web3
“Not your keys, not your coins.” Wallets are how you hold and control crypto. Understanding HD wallets means understanding key derivation—how a single 12-word phrase can generate billions of addresses across multiple blockchains, all recoverable.
Core challenges you’ll face
- Mnemonic encoding (entropy → words → seed) → maps to BIP-39 standard
- HMAC-SHA512 (deriving child keys) → maps to cryptographic key derivation
- Hardened vs normal derivation (security tradeoffs) → maps to key hierarchy
- Path parsing (m/44’/60’/0’/0/0) → maps to BIP-44 standards
Key Concepts
- HD Wallets: “Mastering Bitcoin” Chapter 5 - Andreas Antonopoulos
- BIP-32 Specification: BIP-0032
- BIP-39 Wordlist: BIP-0039
- Derivation Paths: BIP-44
Difficulty
Expert
Time estimate
2-3 weeks
Prerequisites
Projects 1 & 2, understanding of HMAC
Real world outcome
$ ./hdwallet generate
Mnemonic: abandon abandon abandon abandon abandon abandon abandon abandon abandon abandon abandon about

$ ./hdwallet derive --path "m/44'/60'/0'/0/0"
Path: m/44'/60'/0'/0/0 (Ethereum, Account 0, Address 0)
Private Key: 0x1a2b3c4d...
Public Key:  0x04ab12cd...
Address:     0x9858EfFD232B4033E47d90003D41EC34EcaEda94

$ ./hdwallet derive --path "m/44'/0'/0'/0/0"
Path: m/44'/0'/0'/0/0 (Bitcoin, Account 0, Address 0)
Address:     1BvBMSEYstWetqTFn5Au4m4GFg7xJaNVN2
Implementation Hints
BIP-39: Generate 128-256 bits of entropy, add checksum, convert to word indices. BIP-32: Use HMAC-SHA512 with parent key as key and child index as data.
Pseudo-code for key derivation:
function derive_child(parent_key, parent_chain_code, index):
    if index >= 0x80000000:  // Hardened
        data = 0x00 || parent_private_key || index
    else:  // Normal
        data = parent_public_key || index

    I = HMAC-SHA512(parent_chain_code, data)
    child_key = (I_left + parent_key) mod n
    child_chain_code = I_right

    return (child_key, child_chain_code)

function derive_path(seed, path):
    // path = "m/44'/60'/0'/0/0"
    master_key, master_chain = HMAC-SHA512("Bitcoin seed", seed)

    current = (master_key, master_chain)
    for component in parse_path(path):
        current = derive_child(current, component)

    return current
Learning milestones
- Mnemonic generates correct seed → You understand BIP-39
- Child derivation matches test vectors → You understand BIP-32
- Addresses match other wallets → You’ve achieved compatibility
- Recovery from mnemonic works → You understand backup/restore
Project 7: Bitcoin Transaction Parser
- File: WEB3_DEEP_UNDERSTANDING_PROJECTS.md
- Main Programming Language: Rust
- Alternative Programming Languages: C, Go, Python
- Coolness Level: Level 3: Genuinely Clever
- Business Potential: 3. The “Service & Support” Model
- Difficulty: Level 3: Advanced
- Knowledge Area: Protocols / Bitcoin
- Software or Tool: Transaction Decoder
- Main Book: “Mastering Bitcoin” by Andreas M. Antonopoulos
What you’ll build
A parser that decodes raw Bitcoin transactions from hex, displaying inputs, outputs, scripts, witness data, and computing transaction IDs.
Why it teaches Web3
Bitcoin transactions are the original “smart contracts”—Script is a stack-based language that defines spending conditions. Understanding the UTXO model (unspent transaction outputs) is fundamentally different from Ethereum’s account model, and essential for understanding blockchain design tradeoffs.
Core challenges you’ll face
- Variable-length encoding (CompactSize integers) → maps to binary protocol parsing
- Script parsing (opcodes, stack operations) → maps to Bitcoin Script
- Witness data (SegWit transaction format) → maps to protocol upgrades
- TXID computation (which parts are hashed) → maps to transaction malleability
Key Concepts
- Transaction Structure: “Mastering Bitcoin” Chapter 6 - Andreas Antonopoulos
- Bitcoin Script: “Mastering Bitcoin” Chapter 7 - Andreas Antonopoulos
- SegWit Format: BIP-141
Difficulty
Advanced
Time estimate
2 weeks
Prerequisites
Projects 1-3, binary data parsing
Real world outcome
$ ./txparser decode 0100000001c997a...
Transaction ID: 4a5e1e4baab89f3a32518a88c31bc87f618f76673e2cc77ab2127b7afdeda33b

Version: 1
Inputs (1):
  [0] Previous TX: c997a5e56e104102fa209c6a852dd90660a20b2d9c352423edce25857fcd3704
      Output Index: 0
      Script: 473044022047ac8e878352d3ebbde1c94ce3a10d057c24175747116f8288e5d794...
      Sequence: 0xffffffff

Outputs (2):
  [0] Value: 0.10000000 BTC
      Script: OP_DUP OP_HASH160 <pubkeyhash> OP_EQUALVERIFY OP_CHECKSIG
      Type: P2PKH
      Address: 1A1zP1eP5QGefi2DMPTfTL5SLmv7DivfNa

  [1] Value: 0.89990000 BTC
      Script: OP_HASH160 <scripthash> OP_EQUAL
      Type: P2SH
      Address: 3J98t1WpEZ73CNmQviecrnyiWrnqRhWNLy

Fee: 0.00010000 BTC (10 sat/vbyte)
Implementation Hints
Bitcoin uses little-endian for most integers. CompactSize uses the first byte to indicate length: 0-252 = value, 0xfd = next 2 bytes, 0xfe = next 4 bytes, 0xff = next 8 bytes.
Parsing pseudo-code:
function parse_transaction(raw_bytes):
    reader = ByteReader(raw_bytes)

    version = reader.read_u32_le()

    // Check for SegWit marker
    marker = reader.peek_u8()
    has_witness = (marker == 0x00)
    if has_witness:
        reader.read_u8()  // marker
        reader.read_u8()  // flag

    input_count = reader.read_compact_size()
    inputs = []
    for i in 0..input_count:
        prev_tx = reader.read_bytes(32)
        prev_index = reader.read_u32_le()
        script_len = reader.read_compact_size()
        script = reader.read_bytes(script_len)
        sequence = reader.read_u32_le()
        inputs.append(TxInput{...})

    // Similar for outputs...

    return Transaction{version, inputs, outputs, ...}
Learning milestones
- Simple transactions parse correctly → You understand basic structure
- Script opcodes decode → You understand Bitcoin Script
- SegWit transactions parse → You understand protocol evolution
- TXID matches block explorers → You’ve achieved correctness
Project 8: Simple EVM Implementation
- File: WEB3_DEEP_UNDERSTANDING_PROJECTS.md
- Main Programming Language: Rust
- Alternative Programming Languages: Go, C++, TypeScript
- Coolness Level: Level 5: Pure Magic (Super Cool)
- Business Potential: 1. The “Resume Gold” (Educational/Personal Brand)
- Difficulty: Level 5: Master
- Knowledge Area: Virtual Machines / Ethereum
- Software or Tool: Mini-EVM
- Main Book: “Mastering Ethereum” by Andreas M. Antonopoulos & Gavin Wood
What you’ll build
A minimal Ethereum Virtual Machine that can execute EVM bytecode, manage stack/memory/storage, and handle gas accounting. Start with arithmetic opcodes, then add control flow and storage.
Why it teaches Web3
The EVM is the heart of Ethereum. Every smart contract, every DeFi protocol, every NFT—they all run on this stack machine. Understanding EVM bytecode means you can read what contracts actually do, not just what Solidity says they do. This is essential for security auditing.
Core challenges you’ll face
- Stack machine (push, pop, dup, swap operations) → maps to VM architecture
- Memory management (expanding, gas cost calculation) → maps to resource accounting
- Storage (256-bit key-value with gas costs) → maps to state management
- Control flow (JUMP, JUMPI, JUMPDEST validation) → maps to bytecode execution
Key Concepts
- EVM Architecture: “Mastering Ethereum” Chapter 13 - Antonopoulos & Wood
- EVM Opcodes: Ethereum Yellow Paper Appendix H
- EVM Illustrated: ethereum_evm_illustrated.pdf
- Opcode Reference: evm.codes
Difficulty
Master
Time estimate
1 month+
Prerequisites
Projects 1-4, VM/interpreter experience helpful
Real world outcome
$ ./mini-evm execute --bytecode "6005600401" --trace
Bytecode: PUSH1 0x05 PUSH1 0x04 ADD

Step 0: PUSH1 0x05
  Stack: [5]
  Gas: 3

Step 1: PUSH1 0x04
  Stack: [5, 4]
  Gas: 6

Step 2: ADD
  Stack: [9]
  Gas: 9

Execution complete.
Result: 0x09
Total gas used: 9

$ ./mini-evm execute --bytecode "608060405234801..." --input "0xa9059cbb..."
Executing ERC-20 transfer...
SLOAD key=0x0...1 -> 1000
SUB: 1000 - 100 = 900
SSTORE key=0x0...1 <- 900
...
Return: 0x01 (success)
Implementation Hints
Start with the simplest opcodes: PUSH1-PUSH32, POP, ADD, SUB, MUL, DIV. Then add DUP1-DUP16, SWAP1-SWAP16. Then control flow: JUMP, JUMPI, PC, JUMPDEST. Finally storage: SLOAD, SSTORE.
Core EVM structure:
struct EVM:
    stack: array[256] of uint256  // Max 1024 depth
    memory: dynamic byte array
    storage: map[uint256 -> uint256]
    pc: int  // Program counter
    gas: int
    code: bytes

function execute(evm):
    while evm.pc < len(evm.code):
        opcode = evm.code[evm.pc]

        match opcode:
            0x01 (ADD):
                a = evm.stack.pop()
                b = evm.stack.pop()
                evm.stack.push(a + b)
                evm.gas -= 3

            0x55 (SSTORE):
                key = evm.stack.pop()
                value = evm.stack.pop()
                old = evm.storage.get(key)
                evm.storage.set(key, value)
                // Gas: 20000 if 0->non0, 5000 otherwise

            0x56 (JUMP):
                dest = evm.stack.pop()
                if evm.code[dest] != 0x5b:  // JUMPDEST
                    revert("invalid jump")
                evm.pc = dest
                continue

        evm.pc += 1 + opcode_immediate_size(opcode)
Learning milestones
- Arithmetic opcodes work → You understand stack machines
- Control flow works → You understand bytecode execution
- Storage persists across calls → You understand state
- Gas accounting matches geth → You understand resource metering
Project 9: ERC-20 Token from Scratch
- File: WEB3_DEEP_UNDERSTANDING_PROJECTS.md
- Main Programming Language: Solidity
- Alternative Programming Languages: Vyper, Huff (for assembly-level)
- Coolness Level: Level 3: Genuinely Clever
- Business Potential: 4. The “Open Core” Infrastructure
- Difficulty: Level 2: Intermediate
- Knowledge Area: Smart Contracts / Token Standards
- Software or Tool: ERC-20 Token
- Main Book: “Mastering Ethereum” by Andreas M. Antonopoulos & Gavin Wood
What you’ll build
A complete ERC-20 token implementation with transfer, approve, transferFrom, and events. Deploy to testnet and interact via web3.
Why it teaches Web3
ERC-20 is the standard that made the 2017 ICO boom possible. Understanding it means understanding composability—how contracts interact through standard interfaces. Every DEX, lending protocol, and yield farm builds on ERC-20.
Core challenges you’ll face
- Balance tracking (mapping of addresses to amounts) → maps to state management
- Allowance mechanism (approve/transferFrom pattern) → maps to delegation
- Event emission (Transfer, Approval events) → maps to off-chain indexing
- Integer overflow (SafeMath or Solidity 0.8+) → maps to security
Key Concepts
- ERC-20 Standard: EIP-20
- Solidity Basics: “Mastering Ethereum” Chapter 7 - Antonopoulos & Wood
- Smart Contract Security: Solidity Docs - Security Considerations
Difficulty
Intermediate
Time estimate
1 week
Prerequisites
Basic Solidity, Projects 1-3 conceptually
Real world outcome
$ forge create MyToken --constructor-args "MyToken" "MTK" 1000000
Deployed to: 0x1234...

$ cast call 0x1234... "balanceOf(address)" 0xYourAddress
1000000000000000000000000  // 1M tokens with 18 decimals

$ cast send 0x1234... "transfer(address,uint256)" 0xAlice 1000000000000000000
Transaction: 0xabc...

$ cast call 0x1234... "balanceOf(address)" 0xAlice
1000000000000000000  // Alice has 1 token
Implementation Hints
The core is just two mappings: balances and allowances. The tricky part is getting the semantics exactly right.
Pseudo-Solidity:
contract ERC20 {
    mapping(address => uint256) private _balances;
    mapping(address => mapping(address => uint256)) private _allowances;
    uint256 private _totalSupply;

    function transfer(address to, uint256 amount) public returns (bool) {
        require(_balances[msg.sender] >= amount, "insufficient");
        _balances[msg.sender] -= amount;
        _balances[to] += amount;
        emit Transfer(msg.sender, to, amount);
        return true;
    }

    function approve(address spender, uint256 amount) public returns (bool) {
        _allowances[msg.sender][spender] = amount;
        emit Approval(msg.sender, spender, amount);
        return true;
    }

    function transferFrom(address from, address to, uint256 amount) public returns (bool) {
        require(_allowances[from][msg.sender] >= amount, "allowance");
        require(_balances[from] >= amount, "balance");

        _allowances[from][msg.sender] -= amount;
        _balances[from] -= amount;
        _balances[to] += amount;
        emit Transfer(from, to, amount);
        return true;
    }
}
Learning milestones
- Transfers work → You understand token basics
- Approve/transferFrom works → You understand delegation
- Events emit correctly → You understand off-chain integration
- Edge cases handled → You understand security
Project 10: Automated Market Maker (AMM/DEX)
- File: WEB3_DEEP_UNDERSTANDING_PROJECTS.md
- Main Programming Language: Solidity
- Alternative Programming Languages: Vyper, Rust (for Solana)
- Coolness Level: Level 5: Pure Magic (Super Cool)
- Business Potential: 5. The “Industry Disruptor”
- Difficulty: Level 4: Expert
- Knowledge Area: DeFi / Market Making
- Software or Tool: Uniswap V2 Clone
- Main Book: “Mastering Ethereum” by Andreas M. Antonopoulos & Gavin Wood
What you’ll build
A constant-product AMM (x*y=k) similar to Uniswap V2. Users can add liquidity, swap tokens, and earn fees from trades.
Why it teaches Web3
AMMs revolutionized DeFi by eliminating order books. Understanding x*y=k means understanding algorithmic price discovery—how math can replace market makers. This is the foundation of DeFi.
Core challenges you’ll face
- Constant product formula (maintaining xy=k after swaps) → maps to *pricing math
- Liquidity provision (minting/burning LP tokens) → maps to share accounting
- Slippage calculation (price impact of large trades) → maps to market dynamics
- Flash swap attacks (reentrancy protection) → maps to DeFi security
Key Concepts
- AMM Math: Uniswap V2 Whitepaper
- Constant Product: “x * y = k means the product of reserves must stay constant”
- Security: OWASP Smart Contract Top 10
Difficulty
Expert
Time estimate
2-3 weeks
Prerequisites
Project 9, understanding of ERC-20
Real world outcome
# Add liquidity
$ cast send $POOL "addLiquidity(uint256,uint256)" 1000e18 2000e18
# You now own LP tokens representing your share

# Swap tokens
$ cast send $POOL "swap(address,uint256)" $TOKEN_A 100e18
# Received ~196 TOKEN_B (with slippage)

# Check reserves
$ cast call $POOL "getReserves()"
# Returns: 1100e18, 1804e18 (x*y ≈ k)
Implementation Hints
The math is deceptively simple but the edge cases are tricky. The key insight: if reserves are (x, y) and someone swaps dx of token X, they receive dy where:
(x + dx) * (y - dy) = x * y
Solving for dy:
dy = y * dx / (x + dx)
Pseudo-Solidity:
contract AMM {
    uint256 public reserve0;
    uint256 public reserve1;
    uint256 public totalSupply;  // LP tokens

    function addLiquidity(uint256 amount0, uint256 amount1) external returns (uint256 liquidity) {
        // Transfer tokens in
        token0.transferFrom(msg.sender, address(this), amount0);
        token1.transferFrom(msg.sender, address(this), amount1);

        if (totalSupply == 0) {
            liquidity = sqrt(amount0 * amount1);
        } else {
            liquidity = min(
                amount0 * totalSupply / reserve0,
                amount1 * totalSupply / reserve1
            );
        }

        _mint(msg.sender, liquidity);
        reserve0 += amount0;
        reserve1 += amount1;
    }

    function swap(address tokenIn, uint256 amountIn) external returns (uint256 amountOut) {
        bool isToken0 = tokenIn == address(token0);
        (uint256 resIn, uint256 resOut) = isToken0
            ? (reserve0, reserve1)
            : (reserve1, reserve0);

        // 0.3% fee
        uint256 amountInWithFee = amountIn * 997;
        amountOut = (amountInWithFee * resOut) / (resIn * 1000 + amountInWithFee);

        // Transfer and update reserves
        // ... (with reentrancy protection!)
    }
}
Learning milestones
- Basic swaps maintain k → You understand the math
- LP tokens track ownership correctly → You understand shares
- Fees accumulate for LPs → You understand incentives
- Flash loan attacks fail → You understand security
Project 11: NFT Marketplace
- File: WEB3_DEEP_UNDERSTANDING_PROJECTS.md
- Main Programming Language: Solidity + TypeScript
- Alternative Programming Languages: Vyper + Python, Rust (Solana)
- Coolness Level: Level 4: Hardcore Tech Flex
- Business Potential: 4. The “Open Core” Infrastructure
- Difficulty: Level 3: Advanced
- Knowledge Area: NFTs / Marketplaces
- Software or Tool: OpenSea Clone
- Main Book: “Mastering Ethereum” by Andreas M. Antonopoulos & Gavin Wood
What you’ll build
A complete NFT marketplace with listing, buying, offers, auctions, and royalty distribution. Includes ERC-721 token implementation and frontend.
Why it teaches Web3
NFTs represent digital ownership—not just JPEGs, but any unique digital asset. Understanding ERC-721 and marketplace mechanics means understanding how ownership, transfers, and commerce work on-chain.
Core challenges you’ll face
- ERC-721 implementation (ownerOf, transferFrom, safeTransferFrom) → maps to token standards
- Listing/offer mechanics (escrow vs approval pattern) → maps to marketplace design
- Auction logic (English, Dutch, reserve prices) → maps to game theory
- Royalty distribution (ERC-2981 standard) → maps to creator economics
Key Concepts
- ERC-721 Standard: EIP-721
- Royalties: EIP-2981
- Marketplace Patterns: OpenSea Seaport Protocol
Difficulty
Advanced
Time estimate
2-3 weeks
Prerequisites
Project 9, basic frontend knowledge
Real world outcome
Web interface showing:
- Browse NFT collections
- List your NFT for sale (fixed price or auction)
- Make offers on NFTs
- Buy NFTs instantly
- View transaction history
- Royalties automatically distributed to creators
Implementation Hints
The marketplace contract holds listings as a mapping. When someone buys, it orchestrates the transfer: ETH goes to seller (minus fees/royalties), NFT goes to buyer.
Pseudo-Solidity:
struct Listing {
    address seller;
    address nftContract;
    uint256 tokenId;
    uint256 price;
    bool active;
}

mapping(bytes32 => Listing) public listings;

function listNFT(address nft, uint256 tokenId, uint256 price) external {
    require(IERC721(nft).ownerOf(tokenId) == msg.sender);
    require(IERC721(nft).isApprovedForAll(msg.sender, address(this)));

    bytes32 listingId = keccak256(abi.encodePacked(nft, tokenId));
    listings[listingId] = Listing(msg.sender, nft, tokenId, price, true);
}

function buyNFT(bytes32 listingId) external payable {
    Listing memory listing = listings[listingId];
    require(listing.active && msg.value >= listing.price);

    listings[listingId].active = false;

    // Handle royalties (ERC-2981)
    (address royaltyReceiver, uint256 royaltyAmount) =
        IERC2981(listing.nftContract).royaltyInfo(listing.tokenId, listing.price);

    // Transfer NFT
    IERC721(listing.nftContract).safeTransferFrom(
        listing.seller, msg.sender, listing.tokenId
    );

    // Distribute payments
    payable(royaltyReceiver).transfer(royaltyAmount);
    payable(listing.seller).transfer(listing.price - royaltyAmount);
}
Learning milestones
- NFT minting and transfers work → You understand ERC-721
- Listings and purchases work → You understand marketplace mechanics
- Royalties distribute correctly → You understand creator economics
- Frontend displays NFT metadata → You understand the full stack
Project 12: DAO Governance System
- File: WEB3_DEEP_UNDERSTANDING_PROJECTS.md
- Main Programming Language: Solidity
- Alternative Programming Languages: Vyper, Rust (Solana)
- Coolness Level: Level 4: Hardcore Tech Flex
- Business Potential: 4. The “Open Core” Infrastructure
- Difficulty: Level 3: Advanced
- Knowledge Area: Governance / DAOs
- Software or Tool: Governor Contract
- Main Book: “Mastering Ethereum” by Andreas M. Antonopoulos & Gavin Wood
What you’ll build
A complete governance system: proposal creation, voting (with delegation), timelock, and execution. Similar to Compound Governor or OpenZeppelin Governor.
Why it teaches Web3
DAOs represent decentralized governance—organizations run by code and token holders, not executives. Understanding governance means understanding how collective decisions can be made trustlessly, and the game theory involved.
Core challenges you’ll face
- Vote weighting (token-weighted vs quadratic voting) → maps to voting mechanisms
- Vote delegation (liquid democracy) → maps to governance efficiency
- Timelock (delay between passing and execution) → maps to security
- Quorum and thresholds (when is a vote valid?) → maps to game theory
Key Concepts
- Compound Governance: Compound Governor Alpha
- OpenZeppelin Governor: Governor Documentation
- Voting Theory: Quadratic voting, conviction voting, liquid democracy
Difficulty
Advanced
Time estimate
2 weeks
Prerequisites
Project 9, understanding of proxies
Real world outcome
# Create proposal
$ cast send $GOVERNOR "propose(address[],uint256[],bytes[],string)" \
    "[0xTreasury]" "[0]" "[(transfer(address,uint256), 0xRecipient, 1000e18)]" \
    "Transfer 1000 tokens to community fund"
Proposal ID: 1

# Vote
$ cast send $GOVERNOR "castVote(uint256,uint8)" 1 1  # 1 = For
Vote cast: 10000 votes FOR

# After voting period + timelock
$ cast send $GOVERNOR "execute(uint256)" 1
Proposal executed!
Implementation Hints
The governor tracks proposals, vote counts, and proposal states. Use block numbers for timing (more reliable than timestamps). ERC20Votes provides vote checkpoints.
Pseudo-Solidity:
enum ProposalState { Pending, Active, Defeated, Succeeded, Queued, Executed }

struct Proposal {
    address proposer;
    uint256 startBlock;
    uint256 endBlock;
    uint256 forVotes;
    uint256 againstVotes;
    mapping(address => bool) hasVoted;
    // Execution data...
}

function propose(...) external returns (uint256) {
    require(getVotes(msg.sender) >= proposalThreshold);
    // Create proposal...
}

function castVote(uint256 proposalId, uint8 support) external {
    Proposal storage p = proposals[proposalId];
    require(state(proposalId) == ProposalState.Active);
    require(!p.hasVoted[msg.sender]);

    uint256 votes = getVotes(msg.sender, p.startBlock);  // Snapshot!

    if (support == 1) p.forVotes += votes;
    else p.againstVotes += votes;

    p.hasVoted[msg.sender] = true;
}

function execute(uint256 proposalId) external {
    require(state(proposalId) == ProposalState.Succeeded);
    // Execute via timelock...
}
Learning milestones
- Proposals can be created and voted on → You understand basic governance
- Vote snapshots prevent double-voting → You understand security
- Timelock adds execution delay → You understand operational security
- Delegation works → You understand liquid democracy
Project 13: Layer 2 Optimistic Rollup (Simplified)
- File: WEB3_DEEP_UNDERSTANDING_PROJECTS.md
- Main Programming Language: Rust + Solidity
- Alternative Programming Languages: Go + Solidity
- Coolness Level: Level 5: Pure Magic (Super Cool)
- Business Potential: 5. The “Industry Disruptor”
- Difficulty: Level 5: Master
- Knowledge Area: Scaling / Layer 2
- Software or Tool: Mini-Rollup
- Main Book: “Mastering Ethereum” by Andreas M. Antonopoulos & Gavin Wood
What you’ll build
A simplified optimistic rollup: off-chain execution, batch transaction submission to L1, fraud proof mechanism, and deposit/withdrawal bridges.
Why it teaches Web3
Layer 2 is how Ethereum scales. Understanding rollups means understanding the fundamental tradeoff: execute off-chain for speed, but inherit L1 security through fraud proofs or validity proofs. This is the future of blockchain scaling.
Core challenges you’ll face
- State commitment (posting state roots to L1) → maps to data availability
- Fraud proofs (proving invalid state transitions) → maps to game theory
- Deposit/withdrawal bridge (moving assets between layers) → maps to bridges
- Sequencer role (ordering transactions) → maps to decentralization tradeoffs
Key Concepts
- Rollup Architecture: Arbitrum Documentation
- Fraud Proofs: Optimism Specs
- Data Availability: EIP-4844
Difficulty
Master
Time estimate
1-2 months
Prerequisites
Projects 4, 8, deep Ethereum knowledge
Real world outcome
# L2 Sequencer
$ ./rollup-node --sequencer --l1-rpc http://localhost:8545
[Sequencer] Watching L1 for deposits...
[Sequencer] Processing L2 transactions...
[Sequencer] Batch ready: 100 txs, submitting to L1...
[Sequencer] State root posted: 0xabc...

# L2 User
$ cast send --rpc-url http://localhost:8546 $L2_RECIPIENT --value 1ether
[L2] Transaction confirmed in 200ms

# Bridge deposit (L1 -> L2)
$ cast send $BRIDGE "deposit()" --value 1ether
[L1] Deposit event emitted
[L2] Deposit credited after 10 L1 blocks

# Bridge withdrawal (L2 -> L1)
$ cast send --rpc-url http://localhost:8546 $BRIDGE "withdraw(uint256)" 1ether
[L2] Withdrawal initiated
[L1] 7-day challenge period started...
[L1] Withdrawal finalized
Implementation Hints
Start with the simplest possible rollup: a sequencer that batches transactions and posts state roots. The fraud proof is the hard part—you need to prove invalid state transitions in a single L1 transaction.
Architecture overview:
L1 Contract (Ethereum):
  - Accepts deposits (ETH locked, credit on L2)
  - Accepts state root submissions from sequencer
  - Handles fraud proofs (challenge period)
  - Processes withdrawals (after challenge period)

L2 Node (Off-chain):
  - Maintains L2 state (accounts, balances)
  - Executes transactions
  - Batches transactions
  - Submits state roots to L1
  - Watches for fraud proof challenges

Fraud Proof (simplified):
  1. Challenger claims state transition is invalid
  2. Sequencer must prove transition was valid
  3. If sequencer can't prove it, state is reverted
  4. If challenger was wrong, they lose bond
Learning milestones
- Deposits credit on L2 → You understand bridging
- Batches submit to L1 → You understand rollup mechanics
- Fraud proofs can revert state → You understand security model
- Withdrawals complete → You understand the full cycle
Real World Outcome
When your simplified optimistic rollup is complete, you’ll have a working Layer 2 system that demonstrates Ethereum scaling in action. Here’s exactly what you’ll see:
# Terminal 1 - Start L1 (local Ethereum node)
$ anvil --chain-id 1
[Anvil] Listening on http://127.0.0.1:8545
[Anvil] Block time: 12 seconds

# Terminal 2 - Deploy L1 Bridge Contract
$ forge create RollupBridge --rpc-url http://127.0.0.1:8545
Deployed RollupBridge at: 0x5FbDB2315678afecb367f032d93F642f64180aa3

# Terminal 3 - Start L2 Sequencer
$ ./rollup-sequencer --l1-rpc http://127.0.0.1:8545 --bridge 0x5FbDB...
[Sequencer] Connected to L1 at block 100
[Sequencer] L2 chain initialized with genesis state
[Sequencer] Listening for L2 transactions on http://127.0.0.1:8546
[Sequencer] Batch interval: 10 L2 blocks or 60 seconds
[Sequencer] Challenge period: 7 days (604800 blocks on L1)

# Terminal 4 - User deposits ETH from L1 to L2
$ cast send 0x5FbDB... "deposit()" --value 1ether --rpc-url http://127.0.0.1:8545
Transaction: 0xabc123...
[L1] DepositEvent emitted: user=0xf39Fd..., amount=1000000000000000000

# Watch L2 Sequencer process the deposit
[Sequencer] L1 deposit detected at block 101
[Sequencer] Crediting 1 ETH to 0xf39Fd... on L2
[L2 State] 0xf39Fd... balance: 0 → 1000000000000000000

# Terminal 5 - Send fast L2 transactions
$ cast send 0xRecipient --value 0.1ether --rpc-url http://127.0.0.1:8546
[L2] Transaction confirmed in 0.2 seconds ⚡
[L2] Gas cost: $0.0001 (vs $5 on L1)

$ cast send 0xRecipient2 --value 0.2ether --rpc-url http://127.0.0.1:8546
[L2] Transaction confirmed in 0.2 seconds ⚡

# Watch sequencer batch and submit to L1
[Sequencer] Batch ready: 47 transactions
[Sequencer] Computing new state root: 0x7f3a2b...
[Sequencer] Compressing transaction data (47 txs → 3.2 KB)
[Sequencer] Submitting batch to L1...
[L1] Transaction cost: 0.002 ETH (split across 47 users = $0.15 each)
[L1] StateRootSubmitted: batchId=1, stateRoot=0x7f3a2b..., blockNumber=102
[Sequencer] Challenge period starts: block 102 → block 604902

# Terminal 6 - Honest challenger verifies (all is good)
$ ./rollup-verifier --l1-rpc http://127.0.0.1:8545 --l2-rpc http://127.0.0.1:8546
[Verifier] Checking batch 1...
[Verifier] Re-executing 47 transactions...
[Verifier] Computed state root: 0x7f3a2b... ✓
[Verifier] State root matches! No fraud detected.

# Simulate malicious sequencer (optional test)
[Sequencer] TESTING: Submitting INVALID state root 0xBADBEEF...
[L1] StateRootSubmitted: batchId=2, stateRoot=0xBADBEEF..., blockNumber=103

[Verifier] Checking batch 2...
[Verifier] Re-executing 23 transactions...
[Verifier] Computed state root: 0x9a4c1d... (expected)
[Verifier] Posted state root:   0xBADBEEF... (actual)
[Verifier] ❌ FRAUD DETECTED! Submitting fraud proof...

[L1] Challenge submitted by 0xChallenger...
[L1] Fraud proof verified ✓
[L1] Batch 2 REVERTED
[L1] Sequencer slashed: 100 ETH burned
[L1] Challenger rewarded: 10 ETH

# Terminal 7 - User withdraws from L2 to L1 (7-day delay)
$ cast send --rpc-url http://127.0.0.1:8546 $BRIDGE "initiateWithdrawal(uint256)" 0.5ether
[L2] Withdrawal initiated: 0.5 ETH
[L2] Withdrawal included in batch 3
[Sequencer] Batch 3 submitted to L1 at block 110
[L1] Challenge period: blocks 110-604910 (7 days)

# Wait 7 days... (in test mode, fast-forward)
$ cast rpc anvil_mine 604800

# Finalize withdrawal
$ cast send $BRIDGE "finalizeWithdrawal(bytes32)" $WITHDRAWAL_PROOF --rpc-url http://127.0.0.1:8545
[L1] Withdrawal proof verified ✓
[L1] 0.5 ETH transferred to user
[L1] User balance: 10 ETH → 10.5 ETH

# Performance comparison dashboard
$ ./rollup-stats
╔════════════════════════════════════════════════╗
║         L2 Rollup Statistics                   ║
╠════════════════════════════════════════════════╣
║ Total L2 transactions:        1,247           ║
║ Total L1 batches:             27              ║
║ Average batch size:           46 txs          ║
║ L2 block time:                0.2s            ║
║ L1 block time:                12s             ║
║                                                ║
║ Cost Savings:                                  ║
║   L2 tx cost:                 $0.0001         ║
║   L1 tx cost:                 $5.00           ║
║   Savings per tx:             99.998%         ║
║                                                ║
║ Throughput:                                    ║
║   L2 TPS:                     ~230 tps        ║
║   L1 TPS (if no rollup):      ~15 tps         ║
║   Scalability factor:         15x             ║
║                                                ║
║ Security:                                      ║
║   Fraud proofs submitted:     1               ║
║   Invalid batches reverted:   1               ║
║   Uptime:                     99.97%          ║
╚════════════════════════════════════════════════╝
You’re witnessing Ethereum scaling through computation off-chain, security on-chain. Your L2 processes thousands of transactions for pennies, while maintaining Ethereum’s security guarantees through fraud proofs.
The Core Question You’re Answering
“How can we scale blockchain throughput 10-100x while still inheriting Layer 1 security guarantees?”
This question is at the heart of blockchain’s scaling trilemma (security, decentralization, scalability). Optimistic rollups solve it by:
- Moving computation off-chain (scalability)
- Keeping data on-chain (decentralization through data availability)
- Using fraud proofs (security through economic incentives)
Before building, deeply understand: Why do we need a 7-day challenge period? What happens if we make it shorter? Why can’t we just trust the sequencer? How does posting transaction data to L1 enable trustless fraud proofs? These aren’t implementation details—they’re the core security model.
Concepts You Must Understand First
Stop and research these before coding:
- Data Availability vs. Execution
- What’s the difference between “where data is stored” and “where computation happens”?
- Why must transaction data be posted to L1, even though execution is on L2?
- What is the “data availability problem” and how do rollups solve it?
- Book Reference: “Mastering Ethereum” Ch. 13 - Antonopoulos & Wood
- Web Reference: Optimistic Rollups on ethereum.org
- State Roots and Merkle Proofs
- How does a state root cryptographically commit to all account balances?
- How can you prove an account’s balance without revealing all accounts?
- Why is the state root the “source of truth” for L2 state?
- Book Reference: “Mastering Bitcoin” Ch. 9 (Merkle Trees) - Antonopoulos
- Project Reference: You should have built Project 3 (Merkle Tree Library)
- Fraud Proofs vs. Validity Proofs
- What’s the difference between “optimistic” (fraud proofs) and “zero-knowledge” (validity proofs)?
- Why is it called “optimistic”? (Hint: assume valid unless proven otherwise)
- How does a fraud proof work without re-executing all transactions?
- Web Reference: Arbitrum vs Optimism fraud proofs
- Challenge Period Game Theory
- Why 7 days? Why not 7 minutes or 7 months?
- What economic incentives keep sequencers honest?
- What happens if no one monitors for fraud?
- How much should the sequencer bond be?
- Book Reference: “Designing Data-Intensive Applications” Ch. 9 (Consistency) - Kleppmann
- Sequencer Centralization Tradeoff
- Why do most rollups use a single sequencer?
- What are the risks of a centralized sequencer?
- How can you make sequencer selection decentralized?
- Web Reference: L2Beat Risks Dashboard
- Cross-Layer Messaging (L1 ↔ L2)
- How do deposits from L1 reach L2?
- How do withdrawals from L2 reach L1?
- Why can deposits be fast but withdrawals must wait 7 days?
- Web Reference: Optimism Bridge Architecture
- EIP-4844 and Blob Transactions
- What are “blobs” and why do they reduce rollup costs?
- How did EIP-4844 (March 2024) change rollup economics?
- What’s the difference between calldata and blob data?
- Web Reference: EIP-4844: Shard Blob Transactions
Questions to Guide Your Design
Before implementing, think through these:
- L1 Contract Architecture
- What functions does the L1 bridge contract need? (deposit, submitBatch, challengeBatch, finalizeWithdrawal)
- How do you store pending state roots and their challenge status?
- What data must be included in each batch submission?
- How do you prevent replay attacks on deposits/withdrawals?
- L2 Sequencer Design
- How does the sequencer maintain L2 state (accounts, balances)?
- How do you decide when to batch transactions? (time-based, size-based, or both?)
- How do you compress transaction data before posting to L1?
- What happens if the sequencer crashes mid-batch?
- State Transition Function
- How do you execute L2 transactions? (EVM? Custom VM?)
- How do you compute the new state root after a batch?
- What validation rules must all transactions pass?
- How do you handle transaction failures on L2?
- Fraud Proof Construction
- What data is needed to prove a state transition is invalid?
- How can you prove fraud in a single L1 transaction (gas limits)?
- Interactive vs. non-interactive fraud proofs—which to implement?
- How do you slash the malicious sequencer’s bond?
- Withdrawal Security
- How do you prove a withdrawal occurred on L2?
- What prevents users from withdrawing more than they have?
- Why must withdrawals wait for the challenge period?
- How do you handle withdrawals during a fraud proof dispute?
Thinking Exercise
Trace a Transaction Through the Rollup
Before coding, trace this scenario on paper:
1. Alice has 10 ETH on L1
2. Alice deposits 5 ETH to L2
3. On L2, Alice sends 1 ETH to Bob
4. Bob sends 0.5 ETH to Charlie
5. Sequencer batches these L2 transactions
6. Sequencer submits batch to L1
7. Eve (malicious) tries to challenge with false fraud proof
8. Alice initiates withdrawal of 3 ETH
9. After 7 days, Alice finalizes withdrawal
Questions while tracing:
- Draw the state roots at each step (what changes?)
- What data is posted to L1 in step 6? (full transaction data)
- How does Eve’s challenge fail in step 7? (her recomputed state root doesn’t match)
- Why must Alice wait in step 9? (challenge period for batch containing her withdrawal)
- What are the gas costs at each L1 interaction?
Design a Fraud Proof
Given:
- L2 state root before:
0xAAA... - L2 transaction: “Alice sends 100 ETH to Bob” (but Alice only has 50 ETH)
- Sequencer posted state root after:
0xBBB...(claiming transaction succeeded)
How do you prove fraud on L1?
- What data do you need from L2? (Alice’s balance proof, transaction, state root)
- How do you re-execute the transaction on L1? (in a single tx? off-chain then verify?)
- What should the correct state root be? (transaction should revert, state unchanged)
- How do you convince L1 the sequencer lied? (show mismatch)
The Interview Questions They’ll Ask
Prepare to answer these:
- “Explain optimistic rollups to me like I’m five.”
- Expected: “Rollups do math homework off-chain, show their work on-chain, and if someone catches a mistake within 7 days, they get rewarded and the wrong answer is erased.”
- “Why is the challenge period 7 days? Isn’t that too long for users waiting to withdraw?”
- Expected: Discuss honest challenger liveness assumptions, coordination time, and tradeoff with security.
- “What’s the difference between Arbitrum and Optimism?”
- Expected: Multi-round vs. single-round fraud proofs, EVM equivalence differences, governance models.
- “What happens if no one runs a verifier to check for fraud?”
- Expected: Security depends on at least one honest verifier (1-of-N trust model). Incentives via MEV and altruism.
- “How do optimistic rollups compare to ZK-rollups?”
- Expected: Optimistic = fraud proofs, 7-day withdrawals, simpler tech. ZK = validity proofs, instant withdrawals, complex cryptography.
- “Can you explain the data availability problem?”
- Expected: If transaction data isn’t public, challengers can’t compute fraud proofs. That’s why calldata/blobs must be on L1.
- “What’s the worst-case scenario for an optimistic rollup?”
- Expected: Sequencer is malicious AND no honest challenger exists AND users trust the bad state root.
- “Why not just use a sidechain instead of a rollup?”
- Expected: Sidechains have separate security (can be attacked independently). Rollups inherit L1 security via fraud proofs.
Hints in Layers
Hint 1: Start with a Simple L1 Contract
Your L1 bridge contract needs these minimal functions:
contract RollupBridge {
    mapping(uint256 => StateCommitment) public batches;

    struct StateCommitment {
        bytes32 stateRoot;
        uint256 timestamp;
        bool challenged;
    }

    function deposit() external payable {
        // Emit event for L2 sequencer to pick up
        emit Deposit(msg.sender, msg.value);
    }

    function submitBatch(bytes32 stateRoot, bytes calldata txData) external {
        // Store state root and transaction data
        // Start challenge period
    }

    function challengeBatch(uint256 batchId, bytes calldata fraudProof) external {
        // Verify fraud proof
        // Slash sequencer if valid
    }

    function finalizeWithdrawal(bytes32[] calldata proof) external {
        // Verify withdrawal is in finalized batch
        // Transfer funds
    }
}
Hint 2: L2 State as a Simple Mapping
Don’t overcomplicate L2 state initially:
struct L2State {
    balances: HashMap<Address, U256>,
    nonces: HashMap<Address, U256>,
}

impl L2State {
    fn apply_transaction(&mut self, tx: Transaction) -> Result<(), Error> {
        // 1. Check nonce
        // 2. Check balance >= amount
        // 3. Update sender balance -= amount
        // 4. Update recipient balance += amount
        // 5. Increment nonce
    }

    fn state_root(&self) -> H256 {
        // Compute Merkle root of all (address, balance) pairs
        // Use Project 3's Merkle tree library!
    }
}
Hint 3: Batching Strategy
Batch when either condition is met:
const MAX_BATCH_SIZE: usize = 100;
const MAX_BATCH_TIME: Duration = Duration::from_secs(60);

if pending_transactions.len() >= MAX_BATCH_SIZE
   || time_since_last_batch > MAX_BATCH_TIME {
    submit_batch_to_l1();
}
Hint 4: Simplified Fraud Proof
For a minimal version, fraud proofs can be simple:
function challengeBatch(
    uint256 batchId,
    bytes calldata txData,
    bytes32 claimedStateRoot,
    bytes32 correctStateRoot
) external {
    // 1. Re-execute transactions on L1 (gas-intensive!)
    // 2. Compare computed state root to claimed state root
    // 3. If mismatch, slash sequencer

    StateCommitment storage batch = batches[batchId];
    require(batch.stateRoot == claimedStateRoot, "wrong batch");

    bytes32 computed = reExecuteTransactions(txData);
    require(computed != claimedStateRoot, "no fraud");

    // Fraud proven! Revert batch and slash
    batch.challenged = true;
    // Slash sequencer bond...
}
Hint 5: Testing Fraud Detection
Create a test where the sequencer is malicious:
#[test]
fn test_fraud_proof() {
    // Honest execution
    let mut state = L2State::new();
    state.balances.insert(alice, 100);
    state.apply_transaction(Transfer { from: alice, to: bob, amount: 50 });
    let honest_root = state.state_root(); // 0xAAA...

    // Malicious execution (ignore balance check)
    let mut evil_state = L2State::new();
    evil_state.balances.insert(alice, 100);
    evil_state.balances.insert(bob, 1000000); // FRAUD!
    let evil_root = evil_state.state_root(); // 0xBBB...

    // Submit evil root to L1
    l1_bridge.submit_batch(evil_root, tx_data);

    // Challenger proves fraud
    assert!(honest_root != evil_root);
    l1_bridge.challenge_batch(batch_id, fraud_proof);

    // Batch should be reverted
    assert!(l1_bridge.batches[batch_id].challenged);
}
Hint 6: Use Existing Tools
Don’t build everything from scratch:
- Use ethers-rs or web3.py for L1 interaction
- Use serde for transaction serialization
- Use LevelDB or RocksDB for L2 state storage
- Use your Merkle tree from Project 3 for state roots
Books That Will Help
| Topic | Book | Chapter |
|---|---|---|
| Optimistic rollups overview | “Mastering Ethereum” | Ch. 13: EVM & Ch. 14: Consensus |
| Merkle trees and proofs | “Mastering Bitcoin” | Ch. 9: The Blockchain |
| State management | “Designing Data-Intensive Applications” | Ch. 3: Storage Engines & Ch. 9: Consistency |
| Fraud proof game theory | “Mastering Ethereum” | Ch. 13: Security |
| P2P networking | “Computer Networks, Fifth Edition” | Ch. 2: The Application Layer |
| Distributed consensus | “Designing Data-Intensive Applications” | Ch. 9: Consistency and Consensus |
| EVM execution | “Mastering Ethereum” | Ch. 13: The Ethereum Virtual Machine |
| Cryptographic commitments | “Serious Cryptography, 2nd Edition” | Ch. 6: Hash Functions |
Additional Resources
- Optimistic Rollups - ethereum.org
- Arbitrum Documentation
- Optimism Specifications
- EIP-4844: Blob Transactions
- L2Beat: Rollup Risk Analysis
Project 14: Smart Contract Security Scanner
- File: WEB3_DEEP_UNDERSTANDING_PROJECTS.md
- Main Programming Language: Python
- Alternative Programming Languages: Rust, TypeScript
- Coolness Level: Level 4: Hardcore Tech Flex
- Business Potential: 3. The “Service & Support” Model
- Difficulty: Level 4: Expert
- Knowledge Area: Security / Auditing
- Software or Tool: Static Analyzer
- Main Book: “Mastering Ethereum” by Andreas M. Antonopoulos & Gavin Wood
What you’ll build
A static analysis tool that scans Solidity contracts for common vulnerabilities: reentrancy, integer overflow, access control issues, unchecked returns, and more.
Why it teaches Web3
Security is paramount in Web3—there’s no “customer support” to reverse hacks. In 2024, over $1.4 billion was lost to smart contract exploits. Understanding vulnerabilities at a tool-building level means you truly understand attack vectors.
Core challenges you’ll face
- AST parsing (understanding Solidity syntax tree) → maps to static analysis
- Control flow analysis (tracing execution paths) → maps to vulnerability patterns
- Pattern matching (detecting known bad patterns) → maps to security heuristics
- False positive reduction (not crying wolf) → maps to practical tooling
Key Concepts
- Common Vulnerabilities: OWASP Smart Contract Top 10
- Slither Detectors: Slither GitHub
- Vulnerability Patterns: SWC Registry
Difficulty
Expert
Time estimate
3-4 weeks
Prerequisites
Projects 8 & 9, compiler/parser experience helpful
Real world outcome
$ ./scanner analyze VulnerableContract.sol

=== Security Scan Results ===

HIGH: Reentrancy vulnerability
  Location: withdraw() at line 45
  Pattern: State change after external call
  Fix: Move state change before call or use ReentrancyGuard

HIGH: Unchecked low-level call
  Location: line 78
  Pattern: call() return value not checked
  Fix: require(success, "call failed")

MEDIUM: Floating pragma
  Location: line 1
  Pattern: pragma solidity ^0.8.0
  Fix: Lock to specific version: pragma solidity 0.8.19

LOW: Missing zero-address check
  Location: setOwner() at line 23
  Fix: require(newOwner != address(0))

Summary: 2 HIGH, 1 MEDIUM, 1 LOW
Implementation Hints
Use solc to generate the AST (Abstract Syntax Tree). Then traverse the tree looking for patterns. For reentrancy, look for external calls followed by state changes.
Pseudo-code:
def check_reentrancy(function_ast):
    external_calls = find_external_calls(function_ast)
    state_changes = find_state_changes(function_ast)

    for call in external_calls:
        for change in state_changes:
            if change.position > call.position:
                report_vulnerability(
                    type="reentrancy",
                    severity="HIGH",
                    location=call.position,
                    message="State change after external call"
                )

def find_external_calls(ast):
    # Look for: call, delegatecall, transfer, send
    # And external function calls
    pass

def find_state_changes(ast):
    # Look for: assignments to state variables
    # Including via SSTORE in assembly
    pass
Learning milestones
- Parse Solidity AST → You understand compiler output
- Detect reentrancy pattern → You understand the #1 vulnerability
- Low false positive rate → You understand practical tooling
- Find real bugs in production contracts → You can do security research
Real World Outcome
When your smart contract security scanner is complete, you’ll have built a professional static analysis tool that can detect vulnerabilities before they reach production. Here’s what you’ll see in action:
# Scan a vulnerable contract
$ python scanner.py analyze contracts/VulnerableBank.sol

╔═══════════════════════════════════════════════════════════════════════╗
║                  Smart Contract Security Scanner v1.0                  ║
║                    Analyzing: VulnerableBank.sol                       ║
╚═══════════════════════════════════════════════════════════════════════╝

[*] Parsing contract with solc...
[*] Building Abstract Syntax Tree...
[*] Analyzing 3 functions across 1 contract...
[*] Running 15 vulnerability detectors...

════════════════════════════════════════════════════════════════════════
HIGH SEVERITY VULNERABILITIES (2)
════════════════════════════════════════════════════════════════════════

🔴 REENTRANCY - Classic CEI Violation
   Contract: VulnerableBank
   Function: withdraw(uint256 amount)
   Location:  Line 45-52

   Code Pattern:
   45│ function withdraw(uint256 amount) public {
   46│     require(balances[msg.sender] >= amount);
   47│ ➤   (bool success,) = msg.sender.call{value: amount}("");  // EXTERNAL CALL
   48│     require(success);
   49│ ➤   balances[msg.sender] -= amount;  // STATE CHANGE AFTER CALL ❌
   50│ }

   Impact: Attacker can drain entire contract balance through recursive calls
   Exploit Vector:
     1. Attacker calls withdraw(100)
     2. Contract sends 100 ETH to attacker
     3. Attacker's receive() function calls withdraw(100) again
     4. Contract hasn't updated balance yet, so check passes
     5. Repeat until contract is empty

   Fix: Apply Check-Effects-Interactions (CEI) pattern
   ┌────────────────────────────────────────────────────────────┐
   │ function withdraw(uint256 amount) public {                  │
   │     require(balances[msg.sender] >= amount);               │
   │     balances[msg.sender] -= amount;  // ✅ STATE FIRST     │
   │     (bool success,) = msg.sender.call{value: amount}("");  │
   │     require(success);                                      │
   │ }                                                          │
   └────────────────────────────────────────────────────────────┘

   References:
   - The DAO Hack (2016): $60M stolen via reentrancy
   - SWC-107: https://swcregistry.io/docs/SWC-107

🔴 UNCHECKED LOW-LEVEL CALL - Silent Failure
   Contract: VulnerableBank
   Function: transferTo(address recipient, uint256 amount)
   Location:  Line 78-80

   Code Pattern:
   78│ function transferTo(address recipient, uint256 amount) external onlyOwner {
   79│ ➤   recipient.call{value: amount}("");  // Return value ignored ❌
   80│ }

   Impact: Transfer failures silently ignored, funds may be lost

   Fix: Check return value or use transfer/send with error handling
   ┌────────────────────────────────────────────────────────────┐
   │ (bool success,) = recipient.call{value: amount}("");       │
   │ require(success, "Transfer failed");  // ✅ CHECK RESULT   │
   └────────────────────────────────────────────────────────────┘

════════════════════════════════════════════════════════════════════════
MEDIUM SEVERITY VULNERABILITIES (3)
════════════════════════════════════════════════════════════════════════

🟡 TX.ORIGIN AUTHENTICATION - Phishing Risk
   Contract: VulnerableBank
   Function: emergencyWithdraw()
   Location:  Line 92

   Code:
   92│ require(tx.origin == owner);  // ❌ Use msg.sender instead

   Impact: Vulnerable to phishing attacks via malicious intermediary contracts

   Attack: Owner calls malicious contract → malicious contract calls emergencyWithdraw()

   Fix: Always use msg.sender for access control
   ┌────────────────────────────────────────────────────────────┐
   │ require(msg.sender == owner);  // ✅ SAFE                  │
   └────────────────────────────────────────────────────────────┘

🟡 FLOATING PRAGMA - Version Lock Missing
   Location:  Line 1

   Code:
   1│ pragma solidity ^0.8.0;  // ❌ Allows any 0.8.x version

   Impact: Different compiler versions may produce different bytecode

   Fix: Lock to specific tested version
   ┌────────────────────────────────────────────────────────────┐
   │ pragma solidity 0.8.19;  // ✅ SPECIFIC VERSION            │
   └────────────────────────────────────────────────────────────┘

🟡 TIMESTAMP DEPENDENCE - Block Manipulation
   Function: lottery()
   Location:  Line 105

   Code:
   105│ if (block.timestamp % 2 == 0) { winner = msg.sender; }  // ❌

   Impact: Miners can manipulate timestamps within ~15 second window

   Fix: Use block.number or Chainlink VRF for randomness

════════════════════════════════════════════════════════════════════════
LOW SEVERITY ISSUES (4)
════════════════════════════════════════════════════════════════════════

🟢 MISSING ZERO-ADDRESS CHECK
   Function: setOwner(address newOwner)
   Location:  Line 23

   Fix: require(newOwner != address(0), "Zero address");

🟢 UNINDEXED EVENT PARAMETERS
   Event: Transfer(address from, address to, uint256 amount)
   Location:  Line 12

   Fix: Use 'indexed' for up to 3 parameters for efficient filtering

🟢 PUBLIC FUNCTION COULD BE EXTERNAL
   Function: deposit()
   Location:  Line 34

   Gas Savings: ~200 gas per call

🟢 MISSING NATSPEC DOCUMENTATION
   Contract: VulnerableBank

   Fix: Add @notice, @param, @return comments

════════════════════════════════════════════════════════════════════════
SCAN SUMMARY
════════════════════════════════════════════════════════════════════════

Total Issues:       9
  ├─ High:          2  ⚠️  CRITICAL - Fix immediately
  ├─ Medium:        3  ⚠️  Review before deployment
  └─ Low:           4  ℹ️  Best practices

Lines of Code:      156
Functions:          8
State Variables:    3
External Calls:     5 (3 unchecked ❌)

Security Score:     23/100  ❌ FAIL

Recommendation: DO NOT DEPLOY until high severity issues are resolved

Time taken: 2.3 seconds
Report saved to: reports/VulnerableBank_2025-12-27_14-32.html

# Now scan a secure contract
$ python scanner.py analyze contracts/SecureVault.sol

[...]

════════════════════════════════════════════════════════════════════════
SCAN SUMMARY
════════════════════════════════════════════════════════════════════════

Total Issues:       2
  ├─ High:          0  ✅
  ├─ Medium:        0  ✅
  └─ Low:           2  ℹ️

Security Score:     94/100  ✅ PASS

✅ No critical vulnerabilities detected
✅ CEI pattern consistently applied
✅ ReentrancyGuard properly used
✅ Access control using OpenZeppelin Ownable
✅ Integer overflow protection (Solidity 0.8+)

# Scan entire project
$ python scanner.py analyze-all ./contracts/

Scanning project: DeFi Protocol
Found 23 Solidity files...

[▓▓▓▓▓▓▓▓▓▓▓▓▓▓▓▓▓▓▓▓] 100% Complete

╔═══════════════════════════════════════════════════════════════╗
║              PROJECT-WIDE VULNERABILITY REPORT                 ║
╠═══════════════════════════════════════════════════════════════╣
║  High:      7   ❌                                            ║
║  Medium:    14  ⚠️                                            ║
║  Low:       32  ℹ️                                            ║
║                                                               ║
║  Most Common Vulnerability: Reentrancy (4 instances)         ║
║  Riskiest Contract: LendingPool.sol (3 high, 5 medium)       ║
║                                                               ║
║  Recommendation: Address high severity before audit           ║
╚═══════════════════════════════════════════════════════════════╝

Detailed reports generated in: ./security-reports/

# Test against known vulnerable contracts
$ python scanner.py test

Running test suite against known vulnerable patterns...

Test 1: DAO Hack Reentrancy Pattern      ✅ DETECTED
Test 2: Parity Wallet Delegatecall       ✅ DETECTED
Test 3: Integer Overflow (Pre-0.8)       ✅ DETECTED
Test 4: Unchecked Send                   ✅ DETECTED
Test 5: Access Control Missing           ✅ DETECTED
Test 6: Front-running Vulnerability      ✅ DETECTED
Test 7: Timestamp Manipulation           ✅ DETECTED
Test 8: tx.origin Authentication         ✅ DETECTED
Test 9: Uninitialized Storage Pointer    ✅ DETECTED
Test 10: Selfdestruct Vulnerability      ✅ DETECTED

All 10 tests passed! Detector accuracy: 100%
False positives: 2 (within acceptable range)
You’ve built a tool that can save millions by catching bugs before deployment. In 2025 alone, over $1.8 billion was lost to smart contract exploits—many of which your scanner could have prevented.
The Core Question You’re Answering
“How can we automatically detect security vulnerabilities in smart contracts before they’re exploited?”
This question is critical because:
- No undo button: Blockchain transactions are irreversible
- Open source = open attack surface: All contract code is public, giving attackers time to find exploits
- Money at stake: DeFi protocols hold billions in TVL
Understanding vulnerability detection means understanding the patterns of failure—not just how to write secure code, but why certain patterns are dangerous and how to recognize them programmatically.
Concepts You Must Understand First
Stop and research these before coding:
- Abstract Syntax Trees (AST)
- What is an AST and how does a compiler generate it?
- How do you traverse an AST to find patterns?
- What information is preserved in the AST vs. lost?
- Book Reference: “Compilers: Principles and Practice” Ch. 3 - Dave & Dave
- Tool Reference: Run
solc --ast-compact-json MyContract.solto see output
- The Check-Effects-Interactions (CEI) Pattern
- What order should operations occur in? (checks, state changes, external calls)
- Why does calling external contracts before updating state cause reentrancy?
- How does the EVM call stack enable reentrancy attacks?
- Historical Reference: The DAO Hack (2016) - $60M stolen via reentrancy
- Web Reference: SWC-107: Reentrancy
- Control Flow Analysis
- How do you trace execution paths through a function?
- How do you detect “state change after external call” programmatically?
- What’s the difference between intra-procedural and inter-procedural analysis?
- Book Reference: “Engineering a Compiler, 2nd Edition” Ch. 9 - Cooper & Torczon
- Taint Analysis
- What does “tainted” data mean in security analysis?
- How do you track which variables are affected by user input?
- How does taint analysis help detect injection attacks?
- Web Reference: Static Taint Analysis
- Common Vulnerability Patterns
- Reentrancy (state change after external call)
- Integer overflow/underflow (pre-Solidity 0.8)
- Access control issues (missing modifiers, tx.origin)
- Unchecked return values (low-level calls)
- Front-running (transaction ordering dependence)
- Web Reference: OWASP Smart Contract Top 10
- Web Reference: SWC Registry
- False Positives vs. False Negatives
- What’s worse: crying wolf (false positive) or missing a bug (false negative)?
- How do you balance sensitivity and specificity?
- How do protective patterns (ReentrancyGuard) cause false positives?
- Real-world Context: Slither often has 30-40% false positive rate
- Solidity 0.8+ Security Features
- Automatic overflow/underflow checks
- Default variable initialization
- Stricter type checking
- What vulnerabilities became impossible after 0.8?
- Web Reference: Solidity 0.8.0 Breaking Changes
Questions to Guide Your Design
Before implementing, think through these:
- Architecture Decisions
- Do you parse source code or compiled bytecode? (AST vs. opcodes)
- How do you handle imported contracts (OpenZeppelin, etc.)?
- Do you analyze one contract or the entire project?
- How do you cache results for faster repeated scans?
- Reentrancy Detection
- How do you identify “external calls”? (call, delegatecall, send, transfer, external functions)
- How do you identify “state changes”? (assignments to state variables, SSTORE)
- How do you determine if a state change comes “after” an external call?
- How do you handle control flow (if/else, loops)?
- Pattern Matching
- Do you use rule-based detection (regex, AST patterns) or ML?
- How do you match known vulnerability templates?
- How do you update detectors when new vulnerabilities are discovered?
- How do you rank findings by severity?
- Reducing False Positives
- How do you recognize protective patterns (ReentrancyGuard, nonReentrant modifier)?
- How do you detect if state changes are benign (event emissions, view functions)?
- Should you allow user-defined whitelist patterns?
- How do you handle assembly blocks (no AST)?
- Reporting
- What information should each finding include? (severity, location, description, fix)
- How do you explain why something is vulnerable (not just that it is)?
- Should you show code snippets with the issue highlighted?
- How do you generate HTML/JSON/PDF reports?
Thinking Exercise
Manually Detect Reentrancy
Before writing code, manually analyze this contract:
contract SimpleBank {
    mapping(address => uint256) public balances;

    function deposit() external payable {
        balances[msg.sender] += msg.value;
    }

    function withdraw() external {
        uint256 bal = balances[msg.sender];
        (bool success,) = msg.sender.call{value: bal}("");
        require(success);
        balances[msg.sender] = 0;
    }
}
Questions:
- Is this vulnerable to reentrancy? (Yes)
- What line has the state change? (Line with
balances[msg.sender] = 0) - What line has the external call? (Line with
msg.sender.call) - Which comes first? (Call before state change = vulnerable)
- What’s the attack vector? (Attacker’s receive() calls withdraw() again before balance is zeroed)
- What’s the correct order? (Set balance to 0 BEFORE the call)
Build a Pattern Matcher
How would you detect this pattern programmatically?
def detect_reentrancy(function_ast):
    # 1. Find all external calls in the function
    # 2. Find all state variable modifications in the function
    # 3. For each state modification, check if it comes after any external call
    # 4. If yes, report as potential reentrancy
The Interview Questions They’ll Ask
Prepare to answer these:
- “What is reentrancy and why is it the #1 vulnerability?”
- Expected: Explain CEI pattern, The DAO hack, and why Solidity doesn’t prevent it.
- “How do you detect reentrancy with static analysis?”
- Expected: Look for state changes after external calls in the control flow graph.
- “What’s the difference between Slither and Mythril?”
- Expected: Slither = static analysis (fast, false positives). Mythril = symbolic execution (slow, more accurate).
- “Can static analysis detect all vulnerabilities?”
- Expected: No. Logic bugs, business logic errors, and some complex patterns require manual review.
- “What are false positives and how do you reduce them?”
- Expected: FP = flagged but not actually vulnerable. Reduce by recognizing protective patterns.
- “In Solidity 0.8+, why can’t integer overflow happen?”
- Expected: Compiler adds automatic checks that revert on overflow/underflow.
- “What vulnerabilities can’t be detected statically?”
- Expected: Oracle manipulation, flash loan attacks, economic exploits, off-chain dependencies.
- “How would you prioritize findings for a development team?”
- Expected: High = exploitable with clear attack vector. Medium = potential risk. Low = best practices.
Hints in Layers
Hint 1: Parse with solc
Use Solidity compiler to generate AST:
import subprocess
import json

def parse_contract(filepath):
    result = subprocess.run(
        ['solc', '--ast-compact-json', filepath],
        capture_output=True,
        text=True
    )
    ast = json.loads(result.stdout)
    return ast
Hint 2: Traverse the AST
Find function definitions and their statements:
def find_functions(ast):
    functions = []

    def visit(node):
        if node.get('nodeType') == 'FunctionDefinition':
            functions.append(node)
        for child in node.get('nodes', []):
            visit(child)

    visit(ast)
    return functions
Hint 3: Detect External Calls
Look for these node types:
def is_external_call(node):
    # Check for function calls to external contracts
    if node.get('nodeType') == 'FunctionCall':
        # Check if calling .call, .delegatecall, .send, .transfer
        if node.get('expression', {}).get('memberName') in ['call', 'delegatecall', 'send', 'transfer']:
            return True

        # Check if calling external function
        if node.get('kind') == 'functionCall':
            # ... check if function is external
            return True

    return False
Hint 4: Detect State Changes
def is_state_change(node, state_variables):
    if node.get('nodeType') == 'Assignment':
        # Check if left side is a state variable
        left = node.get('leftHandSide')
        if left.get('name') in state_variables:
            return True
    return False
Hint 5: Build Control Flow Graph
For each function, build a graph of statement execution order:
class ControlFlowGraph:
    def __init__(self, function_ast):
        self.nodes = []  # Statements
        self.edges = []  # Execution order

    def analyze_reentrancy(self):
        for i, node in enumerate(self.nodes):
            if is_external_call(node):
                # Check all nodes after this one
                for j in range(i+1, len(self.nodes)):
                    if is_state_change(self.nodes[j]):
                        return Vulnerability(
                            type="reentrancy",
                            severity="HIGH",
                            call_line=node.src,
                            state_change_line=self.nodes[j].src
                        )
Hint 6: Use Existing Libraries
Don’t reinvent the wheel:
- slither-analyzer: Python framework for Solidity static analysis
- solc: Official Solidity compiler (for AST)
- py-solc-x: Python wrapper for solc
- mythril: Symbolic execution tool (for inspiration)
Hint 7: Test Against Known Vulnerabilities
Download vulnerable contracts from:
Books That Will Help
| Topic | Book | Chapter |
|---|---|---|
| Smart contract security | “Mastering Ethereum” | Ch. 9: Smart Contract Security |
| Compiler AST construction | “Compilers: Principles and Practice” | Ch. 3: Lexical Analysis & Ch. 4: Syntax Analysis |
| Control flow analysis | “Engineering a Compiler, 2nd Edition” | Ch. 9: Data-Flow Analysis |
| Static analysis theory | “Compilers: Principles and Practice” | Ch. 12: Code Optimization |
| Vulnerability patterns | “Mastering Ethereum” | Ch. 9: Security Best Practices |
| Solidity language | “Mastering Ethereum” | Ch. 7: Smart Contracts |
Additional Resources
- Solidity Security Considerations
- OWASP Smart Contract Top 10
- SWC Registry: Smart Contract Weakness Classification
- Slither Detectors
- Consensys Smart Contract Best Practices
- Rekt News: Learn from Hacks
Project 15: Decentralized Storage Client (IPFS-like)
- File: WEB3_DEEP_UNDERSTANDING_PROJECTS.md
- Main Programming Language: Go
- Alternative Programming Languages: Rust, TypeScript
- Coolness Level: Level 4: Hardcore Tech Flex
- Business Potential: 4. The “Open Core” Infrastructure
- Difficulty: Level 4: Expert
- Knowledge Area: Distributed Systems / Storage
- Software or Tool: Content-Addressed Storage
- Main Book: “Designing Data-Intensive Applications” by Martin Kleppmann
What you’ll build
A content-addressed storage system with chunking, Merkle DAG construction, content discovery via DHT, and peer-to-peer file transfer.
Why it teaches Web3
Blockchain stores code and state, but not files. IPFS and similar systems provide the data layer for Web3. Understanding content-addressing means understanding how you can verify data integrity without trusting the source.
Core challenges you’ll face
- Content addressing (CID = hash of content) → maps to immutability
- Chunking and DAG (splitting files, linking chunks) → maps to data structures
- DHT routing (finding who has the content) → maps to distributed systems
- BitSwap (incentivized peer transfer) → maps to protocol design
Key Concepts
- Content Addressing: “The content’s hash IS its address”
- Merkle DAGs: IPFS Concepts
- Kademlia DHT: “Designing Data-Intensive Applications” Chapter 6 - Martin Kleppmann
- P2P Networks: “Computer Networks” Chapter 2 - Tanenbaum
Difficulty
Expert
Time estimate
3-4 weeks
Prerequisites
Projects 3 & 4, P2P networking experience
Real world outcome
# Add file
$ ./ipfs-lite add myfile.pdf
Added: QmYwAPJzv5CZsnA625s3Xf2nemtYgPpHdWEz79ojWnPbdG
File split into 4 chunks, linked via Merkle DAG

# Get file (from any peer that has it)
$ ./ipfs-lite get QmYwAPJzv5CZsnA625s3Xf2nemtYgPpHdWEz79ojWnPbdG
Searching DHT for providers...
Found 3 peers with content
Downloading from best peer...
myfile.pdf (1.2 MB) downloaded

# Pin (keep permanently)
$ ./ipfs-lite pin QmYwAPJzv5CZsnA625s3Xf2nemtYgPpHdWEz79ojWnPbdG
Pinned: content will be preserved
Implementation Hints
Start with content addressing: hash files to get CID. Then chunking: split large files into 256KB chunks. Then DAG: create a root node that links to chunks. Finally DHT: find peers who have the content.
Architecture:
Content Identifier (CID):
  - Version (1)
  - Codec (raw, dag-pb, etc.)
  - Multihash of content

Merkle DAG (for large files):
  root_node = {
    type: "directory",
    links: [
      {name: "chunk-0", cid: "Qm...", size: 262144},
      {name: "chunk-1", cid: "Qm...", size: 262144},
      ...
    ]
  }

  CID(file) = hash(root_node)

DHT Lookup:
  1. Hash CID to get DHT key
  2. Find k-closest nodes to key
  3. Ask each node for providers
  4. Connect to provider, request blocks
Learning milestones
- Content addressing works → You understand immutability
- Large files chunk correctly → You understand data structures
- DHT finds providers → You understand distributed lookup
- Multi-peer download works → You understand P2P protocols
Real World Outcome
When your IPFS-like decentralized storage client is complete, you’ll have built a peer-to-peer content distribution system that demonstrates how Web3 handles data storage without centralized servers. Here’s what you’ll see:
# Terminal 1 - Start first node (Bootstrap node)
$ ./ipfs-lite daemon --port 4001
[Node A] Peer ID: 12D3KooWRq4tRk8jF3d9VqMn5WVzQv9V3GC9p7uXh3nE8X1YZ2AB
[Node A] Listening on /ip4/127.0.0.1/tcp/4001
[Node A] Listening on /ip6/::1/tcp/4001
[Node A] DHT server mode enabled
[Node A] Local storage: ~/.ipfs-lite/blocks/
[Node A] Ready to accept connections
# Terminal 2 - Start second node and connect to bootstrap
$ ./ipfs-lite daemon --port 4002 --bootstrap /ip4/127.0.0.1/tcp/4001/p2p/12D3Koo...
[Node B] Peer ID: 12D3KooWPq8mTUv2oX4cD5nN9sVzQy8R4GC0p7yWh3nA8Z1YZ3CD
[Node B] Connecting to bootstrap node...
[Node B] Connected to 12D3KooWRq4tRk8j... ✓
[Node B] DHT synchronized with 1 peers
[Node B] Ready
# Terminal 3 - Add a file (Node A)
$ ./ipfs-lite add ~/Documents/whitepaper.pdf --node http://localhost:4001
Adding file: whitepaper.pdf (2.4 MB)
[*] Computing content hash...
[*] File size exceeds chunk size, splitting into chunks...
Chunking strategy:
Chunk size: 256 KB
Total chunks: 10
DAG structure: Merkle tree with 10 leaf nodes
Chunk 0: QmHash0... (262144 bytes) ✓
Chunk 1: QmHash1... (262144 bytes) ✓
Chunk 2: QmHash2... (262144 bytes) ✓
...
Chunk 9: QmHash9... (131072 bytes) ✓
Building Merkle DAG...
Root node links to 10 chunks
Computing CID (Content Identifier)...
CIDv1: base58-btc
Codec: dag-pb
Multihash: sha2-256
✅ File added successfully!
CID: QmYwAPJzv5CZsnA625s3Xf2nemtYgPpHdWEz79ojWnPbdG
File structure:
┌─────────────────────────────────────────────┐
│ Root: QmYwAPJzv5CZsnA625s3Xf2nemtYgPpHdWEz7│
│ ├─ Chunk-0: QmHash0... (256 KB) │
│ ├─ Chunk-1: QmHash1... (256 KB) │
│ ├─ Chunk-2: QmHash2... (256 KB) │
│ ├─ ... │
│ └─ Chunk-9: QmHash9... (128 KB) │
└─────────────────────────────────────────────┘
[Node A] Announcing to DHT...
[DHT] Publishing provider record to 20 closest peers
[DHT] Provider record stored on peers: 12D3KooWPq8m..., 12D3KooWXy9z...
[Node A] File is now available on the network!
# Terminal 4 - Retrieve file from different node (Node B)
$ ./ipfs-lite get QmYwAPJzv5CZsnA625s3Xf2nemtYgPpHdWEz79ojWnPbdG --node http://localhost:4002
Retrieving: QmYwAPJzv5CZsnA625s3Xf2nemtYgPpHdWEz79ojWnPbdG
[*] Querying DHT for providers...
[DHT] Finding peers closest to QmYwAP...
[DHT] XOR distance calculation:
Peer 12D3KooWRq4tRk8j... distance: 0x3f2a1b...
Peer 12D3KooWXy9z... distance: 0x7c4d2e...
[DHT] Querying 20 closest peers...
[DHT] Found 2 providers:
✓ 12D3KooWRq4tRk8j... (Node A) - RTT: 2ms
✓ 12D3KooWZa5x... (Node C) - RTT: 45ms
[*] Fetching Merkle DAG root...
[Node A] Sending root node (1.2 KB)
[*] Parsing DAG structure...
Total size: 2.4 MB
Chunks needed: 10
[*] Downloading chunks in parallel (max 5 concurrent)...
[▓▓▓▓▓░░░░░] Chunk 0/10 - downloading from 12D3KooWRq4t... (256 KB)
[▓▓▓▓▓░░░░░] Chunk 1/10 - downloading from 12D3KooWRq4t... (256 KB)
[▓▓▓▓▓░░░░░] Chunk 2/10 - downloading from 12D3KooWZa5x... (256 KB)
[▓▓▓▓▓░░░░░] Chunk 3/10 - downloading from 12D3KooWRq4t... (256 KB)
[▓▓▓▓▓░░░░░] Chunk 4/10 - downloading from 12D3KooWZa5x... (256 KB)
...
[▓▓▓▓▓▓▓▓▓▓] All chunks downloaded (2.4 MB)
[*] Verifying chunk hashes...
Chunk 0: Hash matches QmHash0... ✓
Chunk 1: Hash matches QmHash1... ✓
...
All chunks verified ✓
[*] Reconstructing file...
✅ File retrieved: whitepaper.pdf (2.4 MB)
Downloaded in 0.8 seconds (3.0 MB/s)
SHA-256 matches original ✓
# Terminal 5 - Pin the file (keep it permanently)
$ ./ipfs-lite pin add QmYwAPJzv5CZsnA625s3Xf2nemtYgPpHdWEz79ojWnPbdG
[Node B] Pinning CID: QmYwAP...
[Node B] Pinned content will not be garbage collected
[Node B] Announcing as provider to DHT...
[DHT] Now 3 peers provide this content
✅ Pinned: QmYwAPJzv5CZsnA625s3Xf2nemtYgPpHdWEz79ojWnPbdG
# Check network statistics
$ ./ipfs-lite stats
╔════════════════════════════════════════════════════════════╗
║ IPFS-Lite Network Statistics ║
╠════════════════════════════════════════════════════════════╣
║ Local Peer ID: 12D3KooWPq8mTUv2oX4cD5nN9sVzQy8R4GC0 ║
║ ║
║ DHT Information: ║
║ Connected peers: 47 ║
║ Routing table size: 256 k-buckets ║
║ K-value: 20 ║
║ Closest peers: 20 ║
║ ║
║ Storage: ║
║ Blocks stored: 423 ║
║ Total size: 156 MB ║
║ Pinned blocks: 89 ║
║ Pinned size: 34 MB ║
║ ║
║ Bandwidth (last hour): ║
║ Downloaded: 245 MB ║
║ Uploaded: 89 MB ║
║ Peers served: 12 ║
║ ║
║ Provider Records: ║
║ Content we provide: 89 CIDs ║
║ DHT announcements: 2,140 ║
╚════════════════════════════════════════════════════════════╝
# Test content addressing (same content = same CID)
$ ./ipfs-lite add file1.txt
CID: QmXa5b...
$ ./ipfs-lite add file2.txt # Same content as file1.txt
CID: QmXa5b... # ✓ Same CID! Content-addressed
# Test DHT lookup manually
$ ./ipfs-lite dht findprovs QmYwAPJzv5CZsnA625s3Xf2nemtYgPpHdWEz79ojWnPbdG
Searching DHT for providers of: QmYwAP...
DHT Lookup Process:
1. Hash CID to 256-bit key: 0x3a7f2b1c...
2. Find k-closest peers to key using XOR metric
3. Iteratively query closer and closer peers (Kademlia algorithm)
Iteration 1: Querying 3 bootstrap peers
Found 15 peers closer to key
Iteration 2: Querying 15 peers
Found 8 peers even closer
Iteration 3: Querying 8 peers
Found 3 provider records ✓
Providers:
✓ 12D3KooWRq4tRk8j... (Node A) - /ip4/127.0.0.1/tcp/4001
✓ 12D3KooWPq8mTUv2... (Node B) - /ip4/127.0.0.1/tcp/4002
✓ 12D3KooWZa5x... (Node C) - /ip4/192.168.1.50/tcp/4001
Lookup completed in 3 hops (< 0.1s)
# Simulate node going offline (test resilience)
$ ./ipfs-lite daemon --port 4003 --bootstrap /ip4/127.0.0.1/tcp/4001
[Node D] Connected to network
[Node D] Fetching QmYwAP...
# Even if Node A goes offline...
[Node A] Shutting down...
# Node D can still fetch from Node B or C
[Node D] Node A unreachable, trying alternative provider
[Node D] Downloading from Node B... ✓
[Node D] File retrieved successfully
✅ Content remains available as long as ONE peer has it!
# View DAG structure visually
$ ./ipfs-lite dag inspect QmYwAPJzv5CZsnA625s3Xf2nemtYgPpHdWEz79ojWnPbdG
Merkle DAG Structure:
================================================================================
Root: QmYwAPJzv5CZsnA625s3Xf2nemtYgPpHdWEz79ojWnPbdG
Type: UnixFS File
Size: 2,516,582 bytes (2.4 MB)
Links (10):
├─ [0] QmHash0... → Chunk (262144 bytes)
├─ [1] QmHash1... → Chunk (262144 bytes)
├─ [2] QmHash2... → Chunk (262144 bytes)
├─ [3] QmHash3... → Chunk (262144 bytes)
├─ [4] QmHash4... → Chunk (262144 bytes)
├─ [5] QmHash5... → Chunk (262144 bytes)
├─ [6] QmHash6... → Chunk (262144 bytes)
├─ [7] QmHash7... → Chunk (262144 bytes)
├─ [8] QmHash8... → Chunk (262144 bytes)
└─ [9] QmHash9... → Chunk (131072 bytes)
CID Format:
Version: 1
Codec: dag-pb (0x70)
Multihash: sha2-256
Base Encoding: base58-btc
Verification:
✓ All chunk hashes valid
✓ DAG structure consistent
✓ Total size matches sum of chunks
================================================================================
You’ve built a censorship-resistant, content-addressed storage network where data is identified by its hash (not location), distributed across peers, and verifiable without trusting any single party. This is how NFT metadata, dApp frontends, and Web3 data live beyond centralized servers.
The Core Question You’re Answering
“How can we store and retrieve data in a decentralized network where content is addressed by its cryptographic hash, not by server location?”
This fundamentally changes data storage:
- Location independence: “What” the data is (hash) matters, not “where” it lives (server)
- Verifiability: You can prove data integrity by hashing it
- Deduplication: Identical content always has the same CID
- Censorship resistance: No single party controls the data
Understanding content-addressed storage means understanding why IPFS is the data layer for Web3—blockchains store small state, IPFS stores large files.
Concepts You Must Understand First
Stop and research these before coding:
- Content Addressing vs. Location Addressing
- HTTP: “Get file from server at this location” →
https://example.com/file.pdf - IPFS: “Get file with this hash from anyone who has it” →
QmHash... - Why does content addressing enable deduplication?
- What happens when content changes? (New hash = new CID)
- Book Reference: “Designing Data-Intensive Applications” Ch. 6 - Kleppmann
- HTTP: “Get file from server at this location” →
- Cryptographic Hashing and CIDs
- What is a Content Identifier (CID)?
- Structure:
<version><codec><multihash> - Why “multihash” instead of just SHA-256?
- How do you upgrade hash algorithms without breaking old content?
- Project Reference: You should have built Project 1 (SHA-256 Visualizer)
- Web Reference: IPFS CID Specification
- Merkle DAGs (Directed Acyclic Graphs)
- How do you represent a large file as a tree of chunks?
- Why use DAGs instead of simple Merkle trees?
- How do you handle updates to parts of a file?
- What’s the relationship between IPFS DAGs and Git commits?
- Book Reference: “Mastering Bitcoin” Ch. 9 (Merkle Trees) - Antonopoulos
- Project Reference: Project 3 (Merkle Tree Library)
- Kademlia DHT (Distributed Hash Table)
- How does the DHT map content hashes to peer IDs?
- What is XOR distance metric and why is it used?
- How does Kademlia find content in O(log N) hops?
- What are k-buckets and why k=20?
- Book Reference: “Designing Data-Intensive Applications” Ch. 6 - Kleppmann
- Web Reference: Kademlia DHT Paper
- Peer-to-Peer Networking
- How do peers discover each other (bootstrap nodes, DHT)?
- How do you establish connections (TCP, QUIC, WebRTC)?
- What is multiaddr format?
/ip4/127.0.0.1/tcp/4001/p2p/12D3Koo... - How do you handle NAT traversal and firewalls?
- Book Reference: “Computer Networks, Fifth Edition” Ch. 2 - Tanenbaum
- BitSwap Protocol (IPFS’s block exchange)
- How do peers request specific blocks from each other?
- What prevents freeloading (peers that download but don’t upload)?
- How does BitSwap prioritize which peers to serve?
- What’s the relationship to BitTorrent’s tit-for-tat?
- Web Reference: BitSwap Specification
- Data Persistence and Garbage Collection
- What is “pinning” and why is it necessary?
- How does garbage collection work in IPFS?
- What happens if no peer has a CID anymore?
- How do services like Pinata/Infura fit in?
- Real-world Context: Unpinned data disappears unless someone re-adds it
Questions to Guide Your Design
Before implementing, think through these:
- Content Addressing
- How do you compute a CID from file bytes?
- What hash function to use? (SHA-256 for compatibility)
- How do you encode the CID? (base58, base32, or base64?)
- How do you handle CID v0 vs v1?
- Chunking Strategy
- What chunk size? (IPFS uses 256 KB default)
- Fixed-size chunks or content-defined chunking?
- How do you rebuild the file from chunks?
- How do you handle small files (< chunk size)?
- Merkle DAG Construction
- How do you represent the DAG in memory and on disk?
- What format for DAG nodes? (protobuf, JSON, CBOR?)
- How do you link chunks to the root node?
- How do you traverse the DAG to fetch all blocks?
- DHT Implementation
- How many k-buckets? (IPFS uses 256 for 256-bit hashes)
- What’s the k-value (peers per bucket)? (IPFS uses k=20)
- How do you bootstrap (initial peer discovery)?
- How often do you refresh routing tables?
- How do you handle peers going offline?
- Provider Records
- When a node has content, how does it announce to the DHT?
- How many DHT nodes should store the provider record? (IPFS uses ~20)
- How long are provider records valid? (IPFS uses 24 hours, with refresh)
- How do you clean up stale records?
- Block Exchange
- How do you request blocks from peers (BitSwap vs simple request/response)?
- Do you implement incentives to prevent freeloading?
- How do you handle peers that have incomplete data?
- Parallel downloads from multiple peers or sequential?
Thinking Exercise
Trace Content Retrieval
Before coding, trace this scenario:
1. Alice adds file.pdf to IPFS on Node A
2. CID computed: QmAbc123...
3. Node A announces to DHT: "I have QmAbc123"
4. Bob (on Node B) tries to get QmAbc123
5. Node B queries DHT: "Who has QmAbc123?"
6. DHT returns: "Node A has it"
7. Node B connects to Node A
8. Node B requests blocks from Node A
9. Node B verifies each block hash
10. Node B reconstructs file.pdf
Questions while tracing:
- At step 3, which DHT nodes store the provider record? (20 closest to QmAbc123’s hash)
- At step 5, how many hops in the DHT? (O(log N) where N = network size)
- At step 6, what if Node A is offline? (Query returns other providers, if any)
- At step 9, what if a block’s hash doesn’t match? (Reject, try different peer)
- What if Charlie on Node C also fetches the file? (Now 3 providers: A, B, C)
Design CID Computation
Given a file, compute its CID:
File: "Hello, IPFS!\n" (13 bytes)

Steps:
1. Hash the content: SHA-256("Hello, IPFS!\n") = 0x2c26b46b...
2. Create multihash: <hash-function-code><hash-length><hash-bytes>
   - SHA-256 code: 0x12
   - Length: 32 (0x20)
   - Result: 0x12202c26b46b...
3. Create CIDv1: <version><codec><multihash>
   - Version: 0x01
   - Codec: raw (0x55)
   - Result: 0x015512202c26b46b...
4. Encode in base58: QmZ...
The Interview Questions They’ll Ask
Prepare to answer these:
- “Explain how IPFS is different from HTTP.”
- Expected: HTTP = location-based (URLs point to servers). IPFS = content-based (CIDs identify data by hash).
- “What happens if I change one byte in a file on IPFS?”
- Expected: Entire file gets a new CID. Old CID still points to old content. No mutation.
- “How does the DHT find content in a large network?”
- Expected: Kademlia uses XOR distance, iteratively queries closer peers, finds providers in O(log N) hops.
- “What if no peer has the content I’m looking for?”
- Expected: DHT query returns empty. Content is lost unless someone re-adds it.
- “How does IPFS prevent Sybil attacks on the DHT?”
- Expected: Peer IDs are hashes of public keys. Creating many IDs is cheap, but they’re randomly distributed in the keyspace (can’t control which k-buckets you land in).
- “What’s the difference between IPFS and BitTorrent?”
- Expected: BitTorrent = per-file swarms, requires .torrent file. IPFS = global DHT, content-addressed, works for any CID.
- “Why do NFTs use IPFS for metadata and images?”
- Expected: Blockchain storage is expensive. IPFS provides decentralized, verifiable, immutable storage for large files.
- “What’s pinning and why is it needed?”
- Expected: Pinning = telling your node to keep content forever. Without pins, unpopular content gets garbage collected.
Hints in Layers
Hint 1: Start with Simple Content Addressing
Compute CID from bytes:
import (
    "crypto/sha256"
    "github.com/multiformats/go-multihash"
    "github.com/ipfs/go-cid"
)

func computeCID(data []byte) (cid.Cid, error) {
    // 1. Hash the data
    hash := sha256.Sum256(data)

    // 2. Create multihash
    mh, err := multihash.Encode(hash[:], multihash.SHA2_256)
    if err != nil {
        return cid.Cid{}, err
    }

    // 3. Create CID v1
    c := cid.NewCidV1(cid.Raw, mh)
    return c, nil
}
Hint 2: Chunking Large Files
const ChunkSize = 256 * 1024  // 256 KB

func chunkFile(data []byte) [][]byte {
    var chunks [][]byte
    for i := 0; i < len(data); i += ChunkSize {
        end := i + ChunkSize
        if end > len(data) {
            end = len(data)
        }
        chunks = append(chunks, data[i:end])
    }
    return chunks
}
Hint 3: Build Merkle DAG
type DAGNode struct {
    Data  []byte
    Links []Link
}

type Link struct {
    Name string
    Cid  cid.Cid
    Size uint64
}

func buildDAG(chunks [][]byte) (cid.Cid, error) {
    // Create leaf nodes for each chunk
    var links []Link
    for i, chunk := range chunks {
        chunkCID, _ := computeCID(chunk)
        links = append(links, Link{
            Name: fmt.Sprintf("chunk-%d", i),
            Cid:  chunkCID,
            Size: uint64(len(chunk)),
        })
        // Store chunk in local blockstore
        storeBlock(chunkCID, chunk)
    }

    // Create root node with links
    rootNode := DAGNode{Links: links}
    rootBytes := encodeNode(rootNode)  // Protobuf or CBOR
    rootCID, _ := computeCID(rootBytes)

    storeBlock(rootCID, rootBytes)
    return rootCID, nil
}
Hint 4: Simple DHT (Kademlia basics)
type RoutingTable struct {
    localID  PeerID
    buckets  [256]*KBucket  // One bucket per bit in ID
}

type KBucket struct {
    peers []PeerInfo
    k     int  // Usually 20
}

func (rt *RoutingTable) FindClosest(key []byte, count int) []PeerInfo {
    // Compute XOR distance between key and each peer ID
    // Return 'count' closest peers
}

func (rt *RoutingTable) FindProviders(cid cid.Cid) ([]PeerInfo, error) {
    key := cid.Hash()

    // Iterative lookup
    visited := make(map[string]bool)
    toQuery := rt.FindClosest(key, 3)  // Start with 3 closest

    for len(toQuery) > 0 {
        peer := toQuery[0]
        toQuery = toQuery[1:]

        if visited[peer.ID] {
            continue
        }
        visited[peer.ID] = true

        // Ask peer for providers
        providers := peer.FindProviders(cid)
        if len(providers) > 0 {
            return providers, nil
        }

        // Ask peer for closer peers
        closerPeers := peer.FindCloserPeers(key)
        toQuery = append(toQuery, closerPeers...)
    }

    return nil, errors.New("no providers found")
}
Hint 5: Use Existing IPFS Libraries
Don’t build from scratch (unless you want the deepest learning):
- go-ipfs: Full IPFS implementation (study this!)
- go-cid: CID handling
- go-multihash: Multihash encoding
- libp2p: P2P networking layer
- go-datastore: Key-value storage
Hint 6: Test with Real IPFS
Verify your CIDs match real IPFS:
# Add file to your implementation
$ ./ipfs-lite add test.txt
CID: QmXa5b...

# Add same file to real IPFS
$ ipfs add test.txt
QmXa5b...  # Should be SAME CID!

# Fetch from real IPFS gateway
$ curl https://ipfs.io/ipfs/QmXa5b...
# Should return your file
Books That Will Help
| Topic | Book | Chapter |
|---|---|---|
| Content addressing | “Designing Data-Intensive Applications” | Ch. 6: Partitioning & Ch. 11: Stream Processing |
| Merkle DAGs | “Mastering Bitcoin” | Ch. 9: The Blockchain |
| Distributed hash tables | “Designing Data-Intensive Applications” | Ch. 6: Partitioning (DHT section) |
| P2P networking | “Computer Networks, Fifth Edition” | Ch. 2: Application Layer (P2P section) |
| Cryptographic hashing | “Serious Cryptography, 2nd Edition” | Ch. 6: Hash Functions |
| Distributed systems | “Designing Data-Intensive Applications” | Ch. 5: Replication & Ch. 6: Partitioning |
Additional Resources
- IPFS Documentation
- IPFS Specifications
- Kademlia DHT Paper
- Content Addressing
- libp2p Documentation
- How IPFS DHT Works
Project 16: Multi-Signature Wallet
- File: WEB3_DEEP_UNDERSTANDING_PROJECTS.md
- Main Programming Language: Solidity
- Alternative Programming Languages: Vyper
- Coolness Level: Level 3: Genuinely Clever
- Business Potential: 3. The “Service & Support” Model
- Difficulty: Level 3: Advanced
- Knowledge Area: Security / Wallet Design
- Software or Tool: Gnosis Safe Clone
- Main Book: “Mastering Ethereum” by Andreas M. Antonopoulos & Gavin Wood
What you’ll build
A multi-signature wallet requiring M-of-N signatures to execute transactions. Support for adding/removing owners, changing threshold, and batch transactions.
Why it teaches Web3
Multi-sig is how serious projects protect their treasuries. Understanding it means understanding social key recovery, operational security, and how to design systems that don’t have single points of failure.
Core challenges you’ll face
- Signature verification (recovering signer from ECDSA signature) → maps to cryptography
- Nonce management (preventing replay attacks) → maps to security
- Owner management (adding/removing signers) → maps to governance
- Gas estimation (estimating execution cost) → maps to UX
Key Concepts
- Gnosis Safe: Safe Contracts
- EIP-712: Typed Data Signing
- ecrecover: Recovering signer from signature
Difficulty
Advanced
Time estimate
2 weeks
Prerequisites
Project 9, understanding of signatures
Real world outcome
# Deploy 2-of-3 multisig
$ forge create MultiSig --constructor-args "[0xAlice,0xBob,0xCharlie]" 2

# Alice proposes transfer
$ cast send $MULTISIG "submitTransaction(address,uint256,bytes)" \
    0xRecipient 1ether 0x
Transaction ID: 0

# Bob confirms
$ cast send $MULTISIG "confirmTransaction(uint256)" 0 --from bob
Confirmations: 2/2 ✓

# Execute (anyone can call after threshold reached)
$ cast send $MULTISIG "executeTransaction(uint256)" 0
Transaction executed!
Implementation Hints
Store pending transactions in a mapping. Track confirmations per transaction. Only execute when confirmations >= threshold.
Pseudo-Solidity:
struct Transaction {
    address to;
    uint256 value;
    bytes data;
    bool executed;
    uint256 confirmations;
}

mapping(uint256 => Transaction) public transactions;
mapping(uint256 => mapping(address => bool)) public isConfirmed;

function confirmTransaction(uint256 txId) public onlyOwner {
    require(!isConfirmed[txId][msg.sender], "already confirmed");

    isConfirmed[txId][msg.sender] = true;
    transactions[txId].confirmations += 1;

    if (transactions[txId].confirmations >= threshold) {
        executeTransaction(txId);
    }
}

function executeTransaction(uint256 txId) public {
    Transaction storage tx = transactions[txId];
    require(tx.confirmations >= threshold, "not enough confirmations");
    require(!tx.executed, "already executed");

    tx.executed = true;
    (bool success,) = tx.to.call{value: tx.value}(tx.data);
    require(success, "execution failed");
}
Learning milestones
- Basic multi-sig works → You understand the pattern
- Owner management works → You understand governance
- EIP-712 signatures work → You understand off-chain signing
- Edge cases handled → You understand security
Project 17: Flash Loan Implementation
- File: WEB3_DEEP_UNDERSTANDING_PROJECTS.md
- Main Programming Language: Solidity
- Alternative Programming Languages: Vyper
- Coolness Level: Level 5: Pure Magic (Super Cool)
- Business Potential: 4. The “Open Core” Infrastructure
- Difficulty: Level 4: Expert
- Knowledge Area: DeFi / Flash Loans
- Software or Tool: Flash Loan Pool
- Main Book: “Mastering Ethereum” by Andreas M. Antonopoulos & Gavin Wood
What you’ll build
A flash loan pool that allows borrowing unlimited funds with zero collateral—as long as you repay within the same transaction. Implement both the lending pool and example arbitrage bot.
Why it teaches Web3
Flash loans are DeFi’s secret weapon—they enable capital-efficient arbitrage, liquidations, and collateral swaps. They also power many attacks. Understanding them means understanding atomic transactions and capital efficiency.
Core challenges you’ll face
- Atomic execution (borrow + use + repay in one tx) → maps to transaction atomicity
- Callback pattern (pool calls borrower, borrower does stuff) → maps to contract interaction
- Fee collection (taking a cut of borrowed amount) → maps to protocol revenue
- Security (preventing reentrancy, ensuring repayment) → maps to attack prevention
Key Concepts
- Flash Loans: Aave Flash Loans
- Atomic Transactions: “Everything in a transaction succeeds or everything reverts”
- Arbitrage: DeFi Flash Loan Attacks
Difficulty
Expert
Time estimate
1-2 weeks
Prerequisites
Projects 9 & 10
Real world outcome
# Deploy flash loan pool with 1000 ETH
$ forge create FlashLoanPool --value 1000ether

# Deploy arbitrage bot
$ forge create ArbitrageBot

# Execute arbitrage (borrow 100 ETH, arb, repay 100.09 ETH)
$ cast send $BOT "executeArbitrage(uint256)" 100ether
[FlashLoanPool] Loaned 100 ETH to ArbitrageBot
[ArbitrageBot] Bought TOKEN on DEX_A for 100 ETH
[ArbitrageBot] Sold TOKEN on DEX_B for 102 ETH
[ArbitrageBot] Repaying 100.09 ETH (0.09% fee)
[FlashLoanPool] Loan repaid ✓

Profit: 1.91 ETH (net of fees)
Implementation Hints
The key insight: use a callback pattern. The pool transfers funds, then calls a function on the borrower, then verifies repayment. If repayment fails, the whole transaction reverts.
Pseudo-Solidity:
// Flash Loan Pool
function flashLoan(uint256 amount, bytes calldata data) external {
    uint256 balanceBefore = address(this).balance;
    uint256 fee = amount * 9 / 10000;  // 0.09% fee

    // Send funds to borrower
    (bool sent,) = msg.sender.call{value: amount}("");
    require(sent, "transfer failed");

    // Call borrower's callback
    IFlashBorrower(msg.sender).executeOperation(amount, fee, data);

    // Verify repayment
    require(
        address(this).balance >= balanceBefore + fee,
        "flash loan not repaid"
    );
}

// Borrower Contract
contract ArbitrageBot is IFlashBorrower {
    function executeOperation(
        uint256 amount,
        uint256 fee,
        bytes calldata data
    ) external {
        // Do arbitrage with `amount` ETH
        // ...

        // Repay loan + fee
        payable(msg.sender).transfer(amount + fee);
    }
}
Learning milestones
- Basic flash loan works → You understand atomicity
- Arbitrage bot profits → You understand capital efficiency
- Failed arbitrage reverts cleanly → You understand transaction safety
- Multi-asset flash loans work → You understand complex DeFi
Project 18: Block Explorer
- File: WEB3_DEEP_UNDERSTANDING_PROJECTS.md
- Main Programming Language: TypeScript
- Alternative Programming Languages: Python, Go
- Coolness Level: Level 3: Genuinely Clever
- Business Potential: 3. The “Service & Support” Model
- Difficulty: Level 2: Intermediate
- Knowledge Area: Infrastructure / Data
- Software or Tool: Etherscan Clone
- Main Book: “Mastering Ethereum” by Andreas M. Antonopoulos & Gavin Wood
What you’ll build
A block explorer that indexes blockchain data, displays transactions, decodes contract calls, and shows token transfers. Like a mini Etherscan.
Why it teaches Web3
Block explorers are how users verify on-chain activity. Building one means understanding how to read the blockchain—decoding transactions, interpreting events, and presenting on-chain data.
Core challenges you’ll face
- Chain indexing (syncing and storing block data) → maps to data pipelines
- Transaction decoding (ABI interpretation) → maps to contract interfaces
- Event parsing (extracting Transfer, Swap events) → maps to off-chain integration
- Search (finding transactions by hash, address) → maps to database design
Key Concepts
- JSON-RPC: Ethereum JSON-RPC
- ABI Encoding: Solidity ABI Specification
- Event Logs: “Mastering Ethereum” Chapter 7 - Antonopoulos & Wood
Difficulty
Intermediate
Time estimate
2-3 weeks
Prerequisites
Project 9, basic web development
Real world outcome
Web interface showing:
- Latest blocks with gas used, transaction count
- Block details: hash, parent, timestamp, miner, transactions
- Transaction details: from, to, value, gas, decoded input
- Address pages: balance, token holdings, transaction history
- Token transfers: decoded ERC-20/721 events
- Contract verification: source code, ABI
Implementation Hints
Use ethers.js or web3.py to fetch data via JSON-RPC. Store in PostgreSQL for querying. Decode function calls using ABI.
Architecture:
Indexer (background process):
  1. Connect to Ethereum node (Infura, Alchemy, local)
  2. For each new block:
     - Store block metadata
     - For each transaction:
       - Store tx data
       - Decode function call (if known ABI)
       - Parse events (Transfer, Approval, etc.)
       - Track token balances
  3. Index for fast search

API Layer:
  GET /block/:number
  GET /tx/:hash
  GET /address/:address
  GET /address/:address/transactions
  GET /address/:address/tokens

Frontend:
  - React/Vue app consuming API
  - Real-time updates via WebSocket
Learning milestones
- Blocks and transactions display → You understand chain data
- Function calls decode correctly → You understand ABI encoding
- Token transfers tracked → You understand events
- Search works → You understand blockchain indexing
Final Comprehensive Project: Build a Full Ethereum Client
- File: WEB3_DEEP_UNDERSTANDING_PROJECTS.md
- Main Programming Language: Rust
- Alternative Programming Languages: Go, C++
- Coolness Level: Level 5: Pure Magic (Super Cool)
- Business Potential: 5. The “Industry Disruptor”
- Difficulty: Level 5: Master
- Knowledge Area: Protocol Implementation
- Software or Tool: Mini-Geth
- Main Book: “Mastering Ethereum” by Andreas M. Antonopoulos & Gavin Wood
What you’ll build
A minimal but functional Ethereum client: P2P networking (devp2p), chain sync, state management (Patricia Merkle Trie), EVM execution, and JSON-RPC API.
Why it teaches Web3
This is the ultimate test of Web3 understanding. An Ethereum client is where everything comes together: cryptography, networking, consensus, state, execution. If you can build this, you truly understand how Ethereum works at every level.
Core challenges you’ll face
- DevP2P protocol (node discovery, RLPx encryption) → maps to P2P networking
- Chain sync (snap sync, state healing) → maps to distributed systems
- Patricia Merkle Trie (state storage, proofs) → maps to data structures
- EVM execution (full opcode support) → maps to virtual machines
- Consensus (block validation, fork choice) → maps to protocol rules
Key Concepts
- Ethereum Specification: Ethereum Yellow Paper
- DevP2P: DevP2P Specifications
- Patricia Trie: Wiki - Patricia Trie
- Geth Architecture: Go-Ethereum Source
Difficulty
Master (6+ months for full implementation)
Time estimate
3-6 months (or more)
Prerequisites
All previous projects, deep systems programming experience
Real world outcome
$ ./mini-geth --syncmode snap --rpc
[P2P] Discovering peers...
[P2P] Connected to 25 peers
[Sync] Downloading headers...
[Sync] Block 18,500,000 - syncing state...
[Sync] State sync: 45% (healing 1,234 accounts)
[RPC] JSON-RPC server listening on :8545

# In another terminal
$ cast block-number --rpc-url http://localhost:8545
18500000

$ cast call --rpc-url http://localhost:8545 \
    0xdAC17F958D2ee523a2206206994597C13D831ec7 \
    "balanceOf(address)" 0xF977814e90dA44bFA03b6295A0616a897441aceC
1234567890000000000000
Implementation Hints
This is a massive project. Break it into phases:
Phase 1: Core Infrastructure (1 month)
- RLP encoding/decoding
- Keccak-256 hashing
- ECDSA signatures (secp256k1)
- Basic P2P (TCP + encryption)
Phase 2: Data Structures (1 month)
- Patricia Merkle Trie
- Block/Transaction structures
- State database (LevelDB)
Phase 3: Sync (1-2 months)
- Header download
- Block verification
- State sync (full or snap)
Phase 4: Execution (1-2 months)
- Full EVM with all opcodes
- Precompiled contracts
- Gas metering
Phase 5: Consensus & RPC (1 month)
- Block validation
- Fork choice
- JSON-RPC API
Learning milestones
- Can connect to mainnet peers → You understand P2P
- Can sync headers → You understand chain structure
- Can execute blocks → You understand EVM
- Can serve RPC → You’ve built a working client
- Passes Ethereum tests → You’re production-ready
Project Comparison Table
| Project | Difficulty | Time | Depth of Understanding | Fun Factor |
|---|---|---|---|---|
| 1. SHA-256 Visualizer | Intermediate | 1-2 weeks | ⭐⭐⭐ | ⭐⭐⭐ |
| 2. ECDSA Implementation | Expert | 3-4 weeks | ⭐⭐⭐⭐⭐ | ⭐⭐⭐⭐ |
| 3. Merkle Tree Library | Intermediate | 1 week | ⭐⭐⭐ | ⭐⭐⭐ |
| 4. Blockchain from Scratch | Advanced | 2-3 weeks | ⭐⭐⭐⭐ | ⭐⭐⭐⭐⭐ |
| 5. PoW Miner | Advanced | 2 weeks | ⭐⭐⭐⭐ | ⭐⭐⭐⭐ |
| 6. HD Wallet | Expert | 2-3 weeks | ⭐⭐⭐⭐⭐ | ⭐⭐⭐⭐ |
| 7. Bitcoin TX Parser | Advanced | 2 weeks | ⭐⭐⭐⭐ | ⭐⭐⭐ |
| 8. Simple EVM | Master | 1 month+ | ⭐⭐⭐⭐⭐ | ⭐⭐⭐⭐⭐ |
| 9. ERC-20 Token | Intermediate | 1 week | ⭐⭐⭐ | ⭐⭐⭐ |
| 10. AMM/DEX | Expert | 2-3 weeks | ⭐⭐⭐⭐⭐ | ⭐⭐⭐⭐⭐ |
| 11. NFT Marketplace | Advanced | 2-3 weeks | ⭐⭐⭐⭐ | ⭐⭐⭐⭐ |
| 12. DAO Governance | Advanced | 2 weeks | ⭐⭐⭐⭐ | ⭐⭐⭐ |
| 13. L2 Rollup | Master | 1-2 months | ⭐⭐⭐⭐⭐ | ⭐⭐⭐⭐⭐ |
| 14. Security Scanner | Expert | 3-4 weeks | ⭐⭐⭐⭐⭐ | ⭐⭐⭐⭐ |
| 15. IPFS-like Storage | Expert | 3-4 weeks | ⭐⭐⭐⭐ | ⭐⭐⭐⭐ |
| 16. Multi-Sig Wallet | Advanced | 2 weeks | ⭐⭐⭐⭐ | ⭐⭐⭐ |
| 17. Flash Loans | Expert | 1-2 weeks | ⭐⭐⭐⭐⭐ | ⭐⭐⭐⭐⭐ |
| 18. Block Explorer | Intermediate | 2-3 weeks | ⭐⭐⭐ | ⭐⭐⭐ |
| Final: Ethereum Client | Master | 3-6 months | ⭐⭐⭐⭐⭐ | ⭐⭐⭐⭐⭐ |
Recommended Learning Path
Based on building from fundamentals to advanced, here’s the optimal order:
Phase 1: Cryptographic Foundations (4-6 weeks)
- Project 1: SHA-256 Visualizer - Start here. Everything uses hashes.
- Project 2: ECDSA Implementation - Understand ownership in Web3.
- Project 3: Merkle Tree Library - Understand verification.
Phase 2: Blockchain Core (6-8 weeks)
- Project 4: Blockchain from Scratch - The foundation.
- Project 5: PoW Miner - Understand consensus.
- Project 6: HD Wallet - Understand key management.
- Project 7: Bitcoin TX Parser - Understand transactions.
Phase 3: Smart Contracts (4-6 weeks)
- Project 9: ERC-20 Token - Your first smart contract.
- Project 8: Simple EVM - Understand execution.
- Project 16: Multi-Sig Wallet - Advanced patterns.
Phase 4: DeFi & NFTs (6-8 weeks)
- Project 10: AMM/DEX - Core DeFi primitive.
- Project 17: Flash Loans - DeFi’s unique capability.
- Project 11: NFT Marketplace - Digital ownership.
Phase 5: Infrastructure & Security (6-8 weeks)
- Project 12: DAO Governance - Decentralized organization.
- Project 14: Security Scanner - Become an auditor.
- Project 18: Block Explorer - Read the chain.
- Project 15: IPFS-like Storage - Data layer.
Phase 6: Advanced (3-6 months)
- Project 13: L2 Rollup - Scaling solutions.
- Final: Ethereum Client - The ultimate test.
Essential Resources
Books
- “Mastering Bitcoin” by Andreas Antonopoulos - Bitcoin deep dive
- “Mastering Ethereum” by Antonopoulos & Wood - Ethereum deep dive
- “Serious Cryptography” by Jean-Philippe Aumasson - Cryptography foundations
- “Elliptic Curve Cryptography for Developers” by Michael Rosing - ECC specifics
- “Designing Data-Intensive Applications” by Martin Kleppmann - Distributed systems
Online Resources
- ethereum.org/developers - Official docs
- evm.codes - EVM opcode reference
- learnmeabitcoin.com - Bitcoin deep dive
- cryptozombies.io - Interactive Solidity learning
- Ethereum Yellow Paper - Formal specification
Security
- OWASP Smart Contract Top 10
- SWC Registry - Vulnerability database
- Damn Vulnerable DeFi - CTF challenges
Communities
- Ethereum Discord
- Ethereum Research Forum
- r/ethdev
Summary
| # | Project | Main Language |
|---|---|---|
| 1 | Cryptographic Hash Function Visualizer | Rust |
| 2 | ECDSA Digital Signature Implementation | Rust |
| 3 | Merkle Tree Library | Go |
| 4 | Build a Blockchain from Scratch | Go |
| 5 | Proof of Work Miner | C |
| 6 | HD Wallet (BIP-32/BIP-39) | Rust |
| 7 | Bitcoin Transaction Parser | Rust |
| 8 | Simple EVM Implementation | Rust |
| 9 | ERC-20 Token from Scratch | Solidity |
| 10 | Automated Market Maker (AMM/DEX) | Solidity |
| 11 | NFT Marketplace | Solidity + TypeScript |
| 12 | DAO Governance System | Solidity |
| 13 | Layer 2 Optimistic Rollup | Rust + Solidity |
| 14 | Smart Contract Security Scanner | Python |
| 15 | Decentralized Storage Client (IPFS-like) | Go |
| 16 | Multi-Signature Wallet | Solidity |
| 17 | Flash Loan Implementation | Solidity |
| 18 | Block Explorer | TypeScript |
| Final | Full Ethereum Client | Rust |
Happy building! Remember: in Web3, you don’t have to trust—you can verify. And once you’ve built these projects, you’ll know exactly what you’re verifying.