VS Code Mastery - Real World Projects
Goal: Deeply understand VS Code from first principles—not just as a text editor, but as a programmable development environment. Master the architecture that powers the world’s most popular code editor, understand how extensions work, learn to customize every aspect of the editor, and build your own extensions to solve custom problems. By the end of these projects, you’ll have transformed VS Code from a tool you use into a tool you control.
Why VS Code Mastery Matters
In 2015, Microsoft shocked the developer world by releasing Visual Studio Code—a free, open-source, cross-platform code editor. Built by Erich Gamma (of “Gang of Four” Design Patterns fame), it was designed to be fast, extensible, and developer-friendly.
That bet paid off spectacularly:
- 14 million active users worldwide (6sense Tech Market Share)
- 73.6% market share among professional developers (Stack Overflow Developer Survey 2024)
- 60,000+ extensions in the marketplace created by 45,000+ publishers (VS Code Marketplace Stats)
- 3.3 billion total extension downloads with developers installing ~40 extensions on average
- 54.1% market share of the entire coding tools market
- Used by Microsoft, Google, Facebook, Netflix and virtually every tech company
- GitHub Codespaces is VS Code running in the cloud
- The reference implementation for the Language Server Protocol (LSP), now adopted by 150+ language servers (LSP Official Site)
Why does VS Code dominate? Because it’s not just an editor—it’s a platform:
What you see                          What it actually is
     ↓                                        ↓
  Text Editor                        Electron App (Chromium + Node.js)
     ↓                                        ↓
  Code highlighting        →          Monaco Editor (powers browser editors)
  Auto-complete                        Language Server Protocol (LSP)
  Debugging                            Debug Adapter Protocol (DAP)
  Extensions                           Extension Host (isolated Node.js process)
  Remote Development                   VS Code Server architecture

Every feature you use is built on standardized protocols and APIs. Learn VS Code deeply, and you understand:
- How modern editors work (Atom, Sublime’s LSP, JetBrains’ Protocol)
- Browser-based development (Monaco powers CodeSandbox, StackBlitz, GitHub’s web editor)
- Extension architecture (marketplace, activation, security)
- Remote development (Dev Containers, SSH, WSL, Codespaces)
The Market Reality: Why This Matters to Your Career
Understanding VS Code isn’t just about productivity—it’s about career leverage:
| Skill | Career Impact |
|---|---|
| Creating VS Code extensions | Build internal tools at any company, 50k+ developers could use your public extension |
| Dev Containers expertise | Senior-level DevOps/Platform Engineering skill, critical for team standardization |
| LSP knowledge | Transferable to any modern editor, foundational for tooling/compiler teams |
| Debugging configuration | Distinguish yourself in interviews, most devs only know console.log |
| Task automation | Build custom workflows, make teams 10x more efficient |
According to GitHub’s Octoverse 2023 report, repositories with Dev Container configurations see 40% faster onboarding times. Companies pay premiums for developers who can set these up.
The VS Code Architecture: What You’re Actually Learning
VS Code is built on Electron, but it’s far more sophisticated than “just a Chromium wrapper.” Understanding its architecture unlocks deep insights into how modern development tools work.
The Multi-Process Architecture
┌─────────────────────────────────────────────────────────────────────┐
│                         VS Code Application                          │
├─────────────────────────────────────────────────────────────────────┤
│                                                                       │
│  ┌───────────────────────────────────────────────────────┐          │
│  │         Main Process (Electron/Node.js)               │          │
│  │  - Window management                                  │          │
│  │  - File system access                                 │          │
│  │  - Native menus and dialogs                           │          │
│  │  - Update management                                  │          │
│  └──────────────────┬────────────────────────────────────┘          │
│                     │                                                │
│  ┌──────────────────┴────────────────────────────────────┐          │
│  │      Renderer Process (Chromium/Browser)              │          │
│  │  ┌─────────────────────────────────────────────────┐  │          │
│  │  │         Monaco Editor (Core Editor)             │  │          │
│  │  │  - Text rendering and editing                   │  │          │
│  │  │  - Syntax highlighting (TextMate grammars)      │  │          │
│  │  │  - Cursor management                            │  │          │
│  │  │  - Editor decorations                           │  │          │
│  │  └─────────────────────────────────────────────────┘  │          │
│  │  ┌─────────────────────────────────────────────────┐  │          │
│  │  │         Workbench (VS Code UI)                  │  │          │
│  │  │  - Activity bar, sidebar, panels                │  │          │
│  │  │  - Command palette                              │  │          │
│  │  │  - Status bar                                   │  │          │
│  │  │  - Settings UI                                  │  │          │
│  │  └─────────────────────────────────────────────────┘  │          │
│  └──────────────────┬────────────────────────────────────┘          │
│                     │                                                │
│  ┌──────────────────┴────────────────────────────────────┐          │
│  │    Extension Host Process (Isolated Node.js)          │          │
│  │  - Runs all extensions (sandboxed)                    │          │
│  │  - Cannot directly access DOM                         │          │
│  │  - Communicates via message passing                   │          │
│  │  - If an extension crashes, editor stays alive        │          │
│  └──────────────────┬────────────────────────────────────┘          │
│                     │                                                │
│  ┌──────────────────┴────────────────────────────────────┐          │
│  │    Language Server (Separate Process)                 │          │
│  │  - Language-specific intelligence                     │          │
│  │  - Auto-completion (IntelliSense)                     │          │
│  │  - Go-to-definition, find references                  │          │
│  │  - Diagnostics (errors, warnings)                     │          │
│  │  - Can be written in ANY language                     │          │
│  └────────────────────────────────────────────────────────┘          │
│                                                                       │
└─────────────────────────────────────────────────────────────────────┘
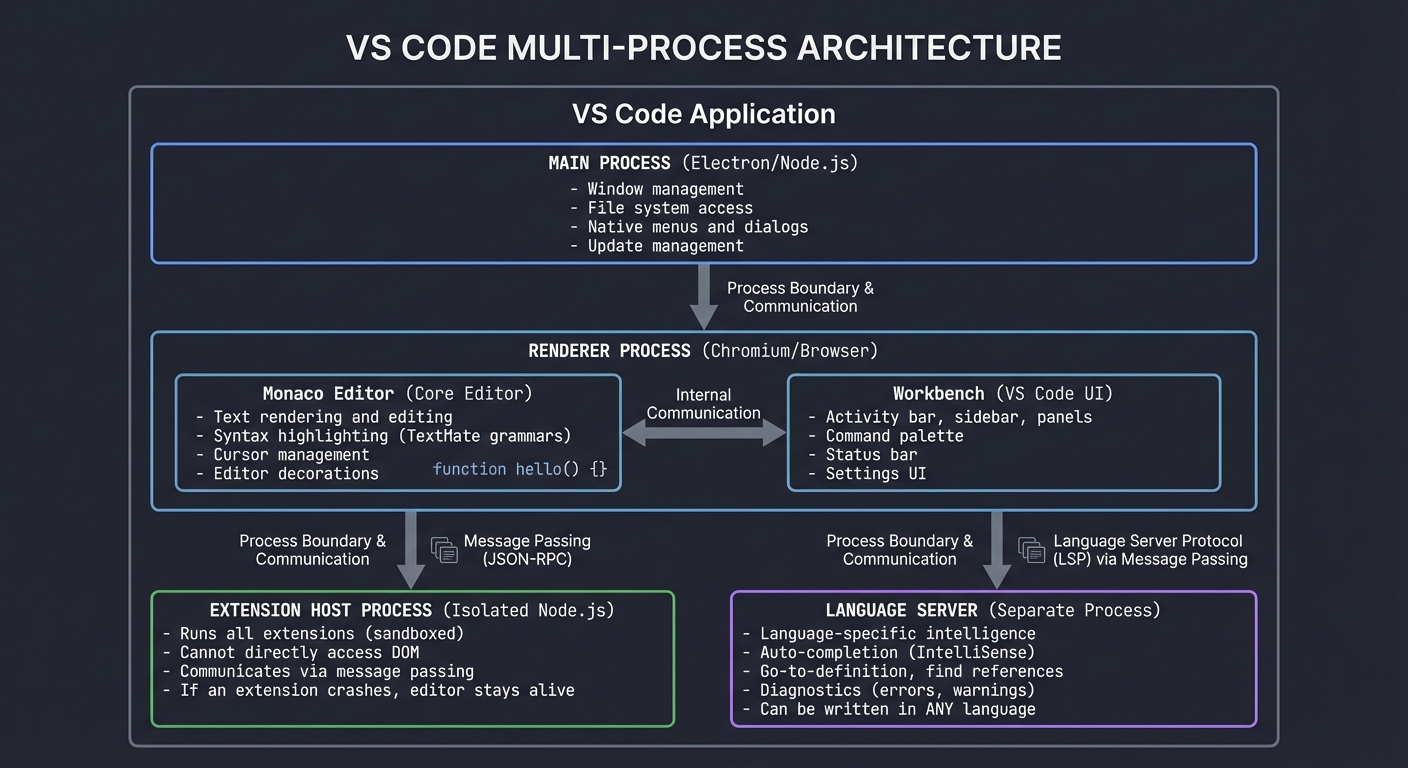
Why this architecture matters:
- Security: Extensions can’t directly manipulate the DOM or crash the editor
- Performance: Language servers run in separate processes, can be multi-threaded
- Reliability: One extension can’t break another (process isolation)
- Scalability: Each language server can be optimized independently
The Language Server Protocol (LSP): VS Code’s Killer Feature
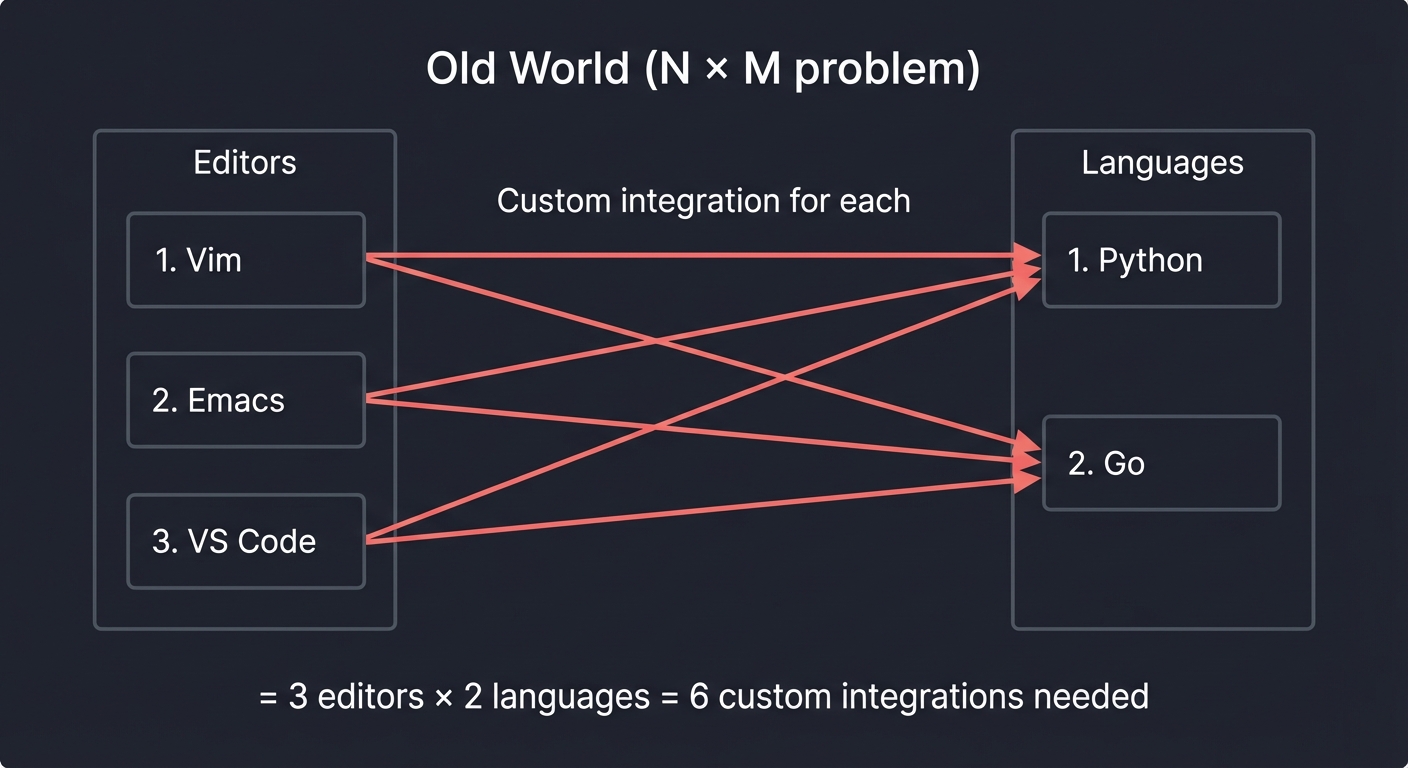
Before LSP (2016), every editor needed custom integration for every language:
Old World (N × M problem):
┌──────────┐     ┌──────────┐     ┌──────────┐
│  Vim     │────►│ Python   │     │   Go     │
└──────────┘     └──────────┘     └──────────┘
┌──────────┐     Custom integration for each
│  Emacs   │────►│ Python   │     │   Go     │
└──────────┘     └──────────┘     └──────────┘
┌──────────┐
│ VS Code  │────►│ Python   │     │   Go     │
└──────────┘     └──────────┘     └──────────┘

= 3 editors × 2 languages = 6 custom integrations needed
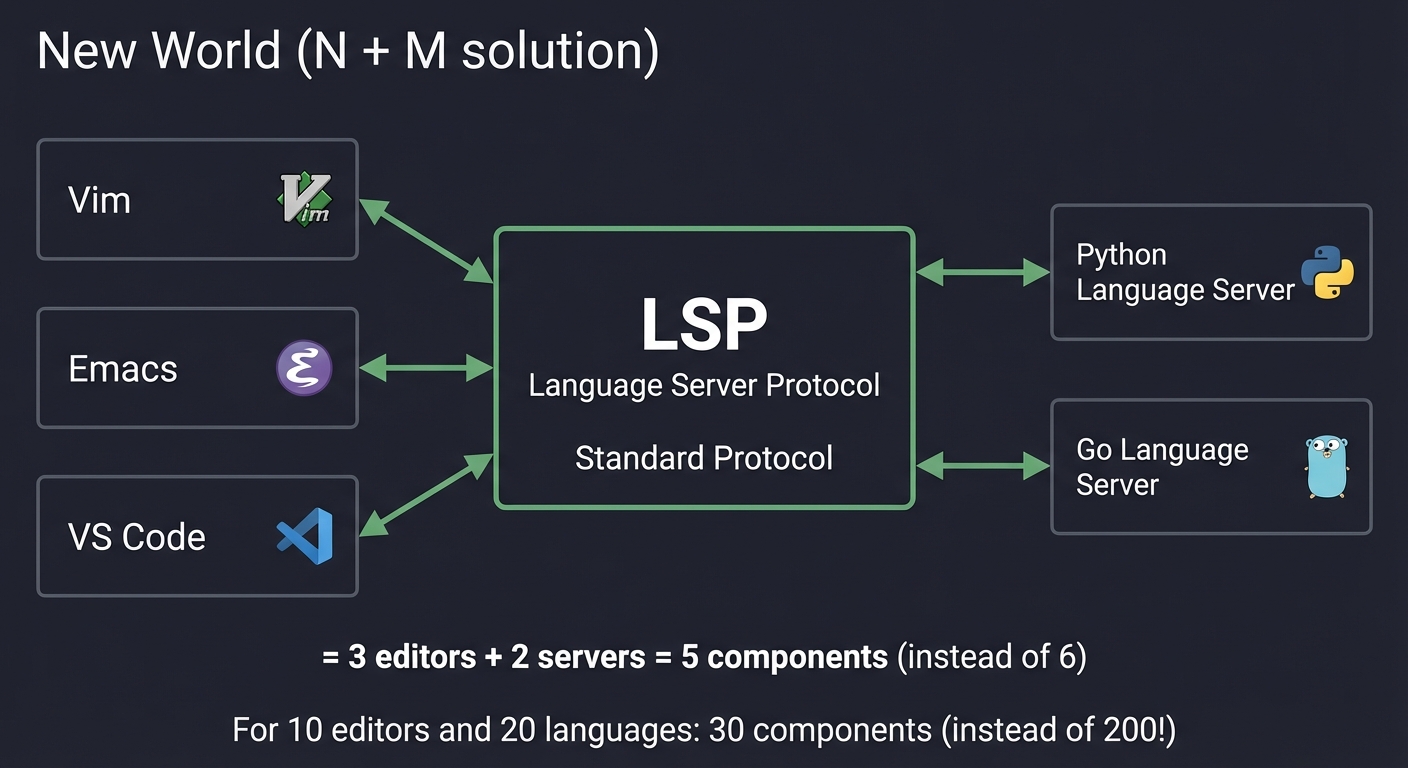
With LSP (Microsoft + Red Hat, 2016):
New World (N + M solution):
┌──────────┐          LSP           ┌──────────────────┐
│  Vim     │◄────────────────────────┤  Python Language │
└──────────┘                         │     Server       │
┌──────────┐        Standard         └──────────────────┘
│  Emacs   │◄────────Protocol        ┌──────────────────┐
└──────────┘                         │   Go Language    │
┌──────────┐                         │     Server       │
│ VS Code  │◄────────────────────────└──────────────────┘
└──────────┘

= 3 editors + 2 servers = 5 components (instead of 6)
For 10 editors and 20 languages: 30 components (instead of 200!)
LSP is JSON-RPC over stdin/stdout. Here’s what a real request looks like:
// Editor sends: "What's at line 10, column 5?"
{
  "jsonrpc": "2.0",
  "id": 1,
  "method": "textDocument/definition",
  "params": {
    "textDocument": { "uri": "file:///path/to/file.py" },
    "position": { "line": 10, "character": 5 }
  }
}

// Language server responds:
{
  "jsonrpc": "2.0",
  "id": 1,
  "result": {
    "uri": "file:///path/to/other_file.py",
    "range": {
      "start": { "line": 42, "character": 4 },
      "end": { "line": 42, "character": 20 }
    }
  }
}
Impact: Neovim, Sublime, Emacs, Eclipse, and dozens of other editors now use LSP. Learn it once, benefit everywhere.
Core Concepts Analysis
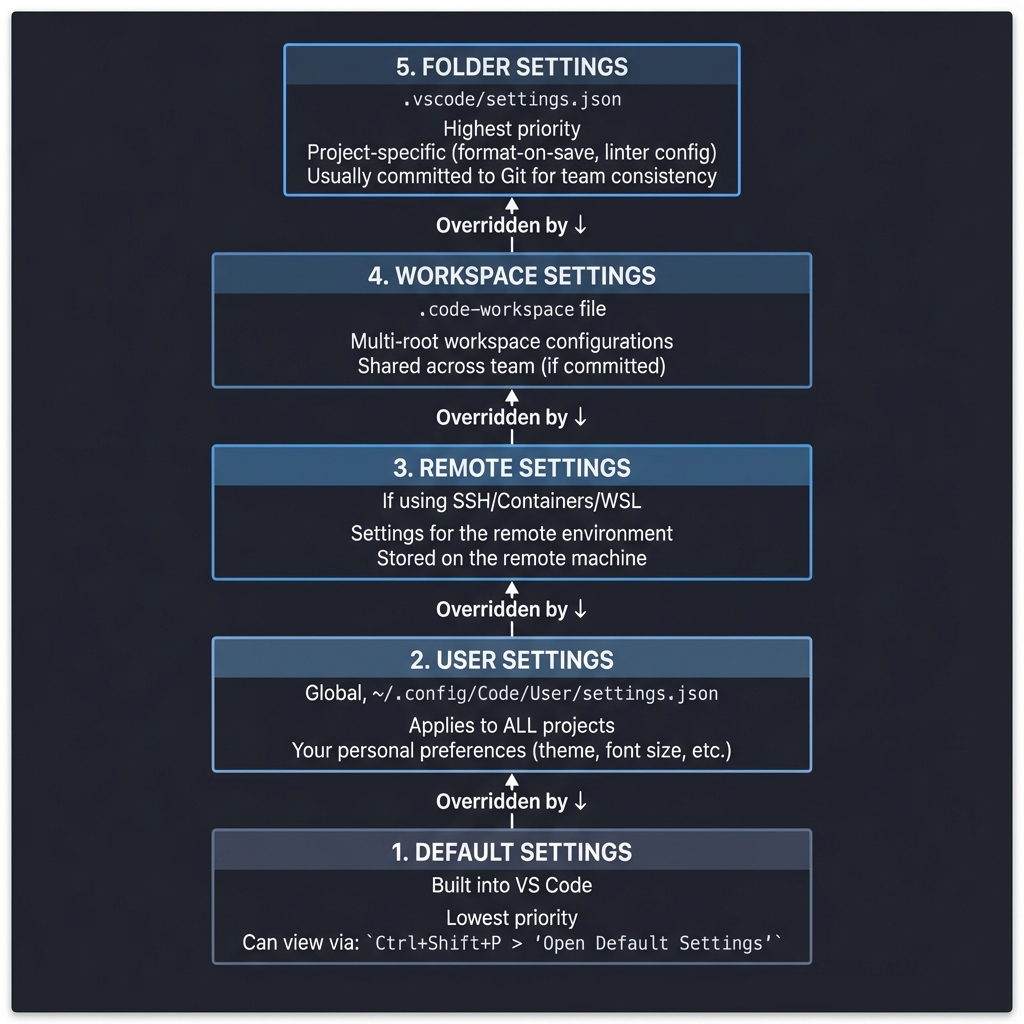
1. Settings Hierarchy: The Configuration Cascade
VS Code’s settings system is a layered precedence model. Understanding it prevents “Why isn’t my setting working?” confusion:
┌──────────────────────────────────────────────────────────┐
│  Default Settings (Built into VS Code)                   │
│  - Lowest priority                                        │
│  - Can view via: Ctrl+Shift+P > "Open Default Settings"  │
└────────────────────┬─────────────────────────────────────┘
                     │ Overridden by ↓
┌────────────────────┴─────────────────────────────────────┐
│  User Settings (Global, ~/.config/Code/User/settings.json)│
│  - Applies to ALL projects                               │
│  - Your personal preferences (theme, font size, etc.)    │
└────────────────────┬─────────────────────────────────────┘
                     │ Overridden by ↓
┌────────────────────┴─────────────────────────────────────┐
│  Remote Settings (If using SSH/Containers/WSL)           │
│  - Settings for the remote environment                   │
│  - Stored on the remote machine                          │
└────────────────────┬─────────────────────────────────────┘
                     │ Overridden by ↓
┌────────────────────┴─────────────────────────────────────┐
│  Workspace Settings (.code-workspace file)               │
│  - Multi-root workspace configurations                   │
│  - Shared across team (if committed)                     │
└────────────────────┬─────────────────────────────────────┘
                     │ Overridden by ↓
┌────────────────────┴─────────────────────────────────────┐
│  Folder Settings (.vscode/settings.json)                 │
│  - Highest priority                                      │
│  - Project-specific (format-on-save, linter config)      │
│  - Usually committed to Git for team consistency         │
└──────────────────────────────────────────────────────────┘
Example Conflict Resolution:
// User Settings (global)
{
  "editor.tabSize": 4,
  "editor.formatOnSave": true
}

// Folder Settings (.vscode/settings.json)
{
  "editor.tabSize": 2  // This WINS (higher priority)
}

// Result: This project uses 2 spaces, but others use 4
Language-Specific Overrides:
{
  "editor.tabSize": 4,  // Default for all languages
  "[python]": {
    "editor.tabSize": 4  // Python uses 4
  },
  "[javascript]": {
    "editor.tabSize": 2  // JavaScript uses 2
  }
}
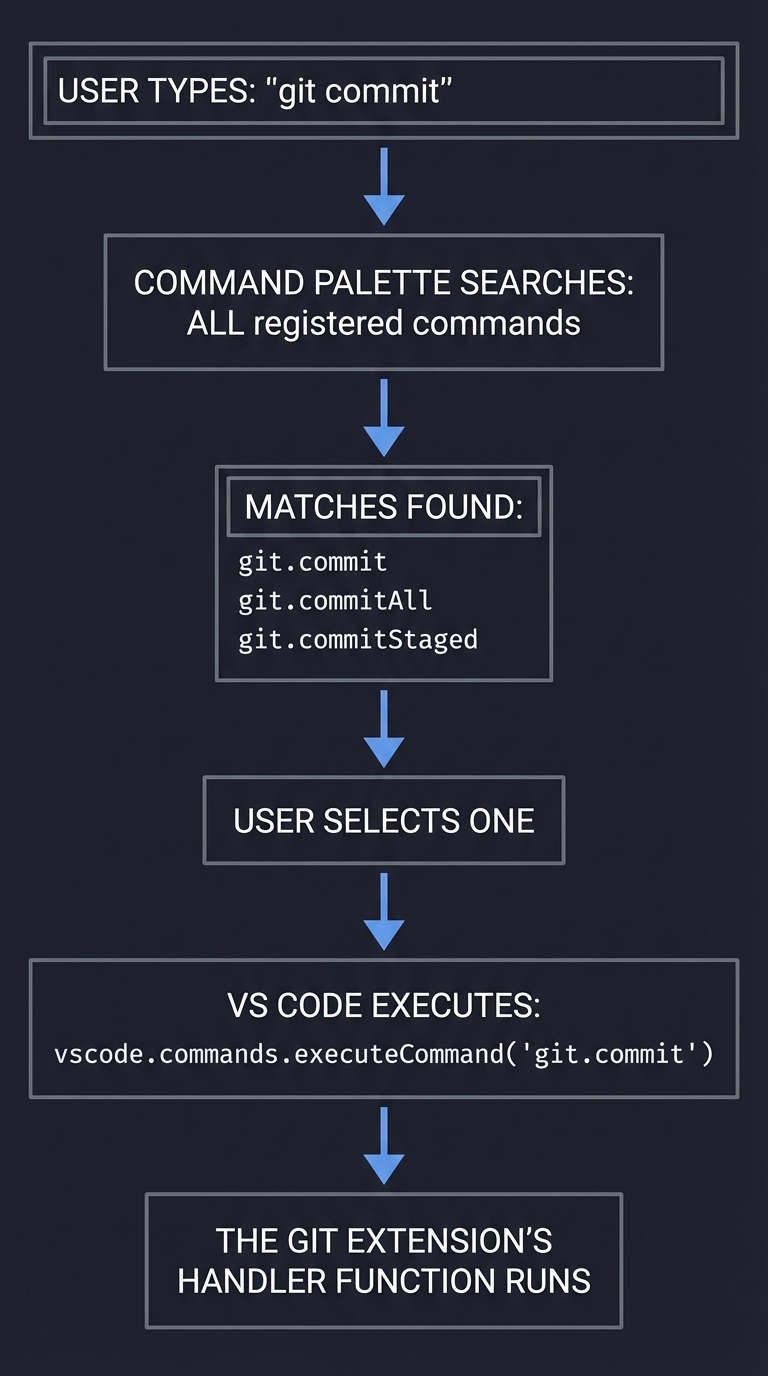
2. The Command Palette: The Command System
Every action in VS Code is a command with a unique identifier. The Command Palette (Ctrl+Shift+P) is just a fuzzy-searchable list of these commands.
User types: "git commit"
     ↓
Command Palette searches ALL registered commands
     ↓
Matches: "git.commit", "git.commitAll", "git.commitStaged"
     ↓
User selects one
     ↓
VS Code executes: vscode.commands.executeCommand('git.commit')
     ↓
The Git extension's handler function runs
Extensions register commands via package.json:
{
  "contributes": {
    "commands": [
      {
        "command": "myExtension.helloWorld",
        "title": "Hello World",
        "category": "My Extension"
      }
    ]
  }
}
In code (extension.ts):
vscode.commands.registerCommand('myExtension.helloWorld', () => {
    vscode.window.showInformationMessage('Hello World!');
});
Why this matters: Everything in VS Code is a command—formatting, refactoring, git operations. Extensions expose functionality by contributing commands. You can even run commands programmatically from other extensions.
3. Keybindings: The Keyboard System
Keybindings map key combinations to commands. They’re JSON with conditions:
{
  "key": "ctrl+shift+r",
  "command": "editor.action.refactor",
  "when": "editorHasCodeActionsProvider && editorTextFocus"
}
The “when” clause is a boolean expression:
{
  "key": "enter",
  "command": "acceptSuggestion",
  "when": "suggestWidgetVisible && textInputFocus"
}
// Only triggers if autocomplete is open AND cursor is in text
Context keys you can use:
editorTextFocus- Cursor is in an editoreditorLangId == python- Current file is PythondebugState == 'running'- Debugger is activeresourceExtname == .md- File has .md extension
Why this matters: You can create mode-specific keybindings (like Vim’s insert vs normal mode) or language-specific shortcuts.
4. The Task System: Build Automation
Tasks let you run shell commands with rich integration (problem matchers, dependencies, error parsing):
// .vscode/tasks.json
{
  "version": "2.0.0",
  "tasks": [
    {
      "label": "Build Project",
      "type": "shell",
      "command": "make",
      "args": ["all"],
      "group": {
        "kind": "build",
        "isDefault": true  // Runs with Ctrl+Shift+B
      },
      "problemMatcher": "$gcc"  // Parses compiler errors
    }
  ]
}
Problem Matchers parse output and create clickable errors:
Input (compiler output):
  src/main.c:42:5: error: 'x' undeclared

VS Code parses this and creates:
  - Clickable error in Problems panel
  - Red squiggle at line 42, column 5
  - Jump to file src/main.c
Task Dependencies:
{
  "label": "Deploy",
  "dependsOn": ["Build", "Test"],  // Runs Build, then Test, then Deploy
  "command": "./deploy.sh"
}
5. Debug Adapter Protocol (DAP): Universal Debugging
Like LSP, but for debuggers. VS Code doesn’t know how to debug Python vs Node.js—it uses adapters:
┌──────────────┐         DAP          ┌────────────────────┐
│   VS Code    │◄─────────────────────┤  Python Debugger   │
│  (Debugger   │    (JSON-RPC)        │     (debugpy)      │
│     UI)      │                      └────────────────────┘
└──────────────┘                      ┌────────────────────┐
      ▲                               │   Node Debugger    │
      │                               │   (node-inspect)   │
      └───────────────────────────────└────────────────────┘

A minimal launch.json:
{
  "version": "0.2.0",
  "configurations": [
    {
      "name": "Debug Python",
      "type": "python",  // Which debug adapter to use
      "request": "launch",
      "program": "${file}",  // Run current file
      "console": "integratedTerminal"
    }
  ]
}
Variables you can use:
${workspaceFolder}- The opened folder’s path${file}- Current file’s full path${fileBasename}- Current file’s name${env:HOME}- Environment variable
6. TextMate Grammars: Syntax Highlighting
VS Code doesn’t parse code—it uses regular expressions to tokenize text. These are TextMate grammars:
{
  "scopeName": "source.python",
  "patterns": [
    {
      "match": "\\b(def)\\s+([a-zA-Z_][a-zA-Z0-9_]*)",
      "captures": {
        "1": { "name": "keyword.control.def.python" },
        "2": { "name": "entity.name.function.python" }
      }
    }
  ]
}
How it works:
Input: def hello_world():

Tokenization:
  "def" → keyword.control.def.python
  "hello_world" → entity.name.function.python
  "(" → punctuation.section.function.begin.python

Theme applies colors:
  keyword.control → blue
  entity.name.function → yellow
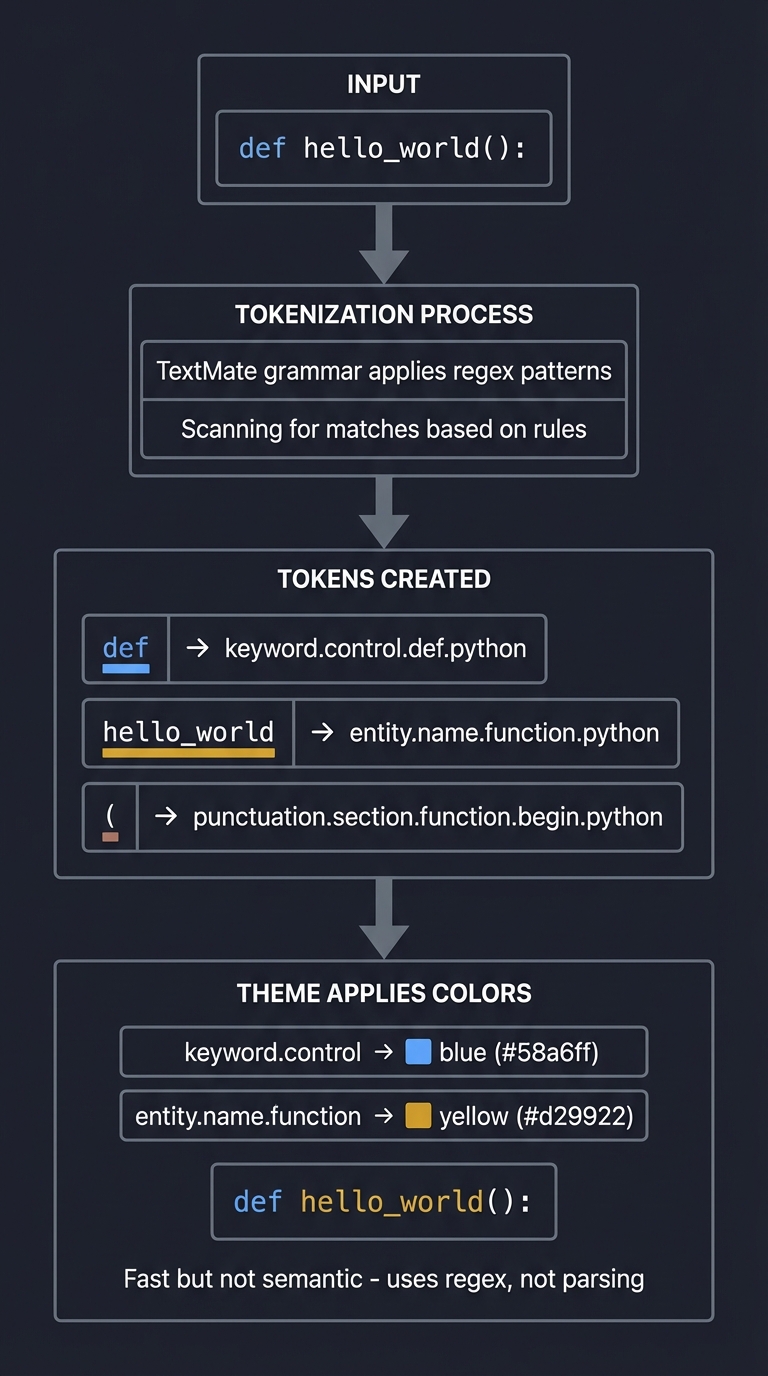
Why this matters: Syntax highlighting is NOT parsing. It’s fast but dumb (can’t understand context). That’s why LSP is needed for semantic highlighting.
7. Dev Containers: The Future of Development
Dev Containers solve “works on my machine” by running VS Code’s backend inside a Docker container:
┌─────────────────────────────────────────────────────────┐
│  Your Laptop (VS Code UI)                               │
│  ┌───────────────────────────────────────────┐          │
│  │  Renderer Process (just the UI)           │          │
│  └──────────────────┬────────────────────────┘          │
│                     │ Network (HTTP over Docker socket) │
│  ┌──────────────────┴────────────────────────┐          │
│  │  Docker Container (VS Code Server)        │          │
│  │  ┌─────────────────────────────────────┐  │          │
│  │  │ Extension Host (runs in container)  │  │          │
│  │  └─────────────────────────────────────┘  │          │
│  │  ┌─────────────────────────────────────┐  │          │
│  │  │ Language Servers (in container)     │  │          │
│  │  └─────────────────────────────────────┘  │          │
│  │  ┌─────────────────────────────────────┐  │          │
│  │  │ Your Code (bind-mounted)            │  │          │
│  │  └─────────────────────────────────────┘  │          │
│  └─────────────────────────────────────────────┘        │
└─────────────────────────────────────────────────────────┘
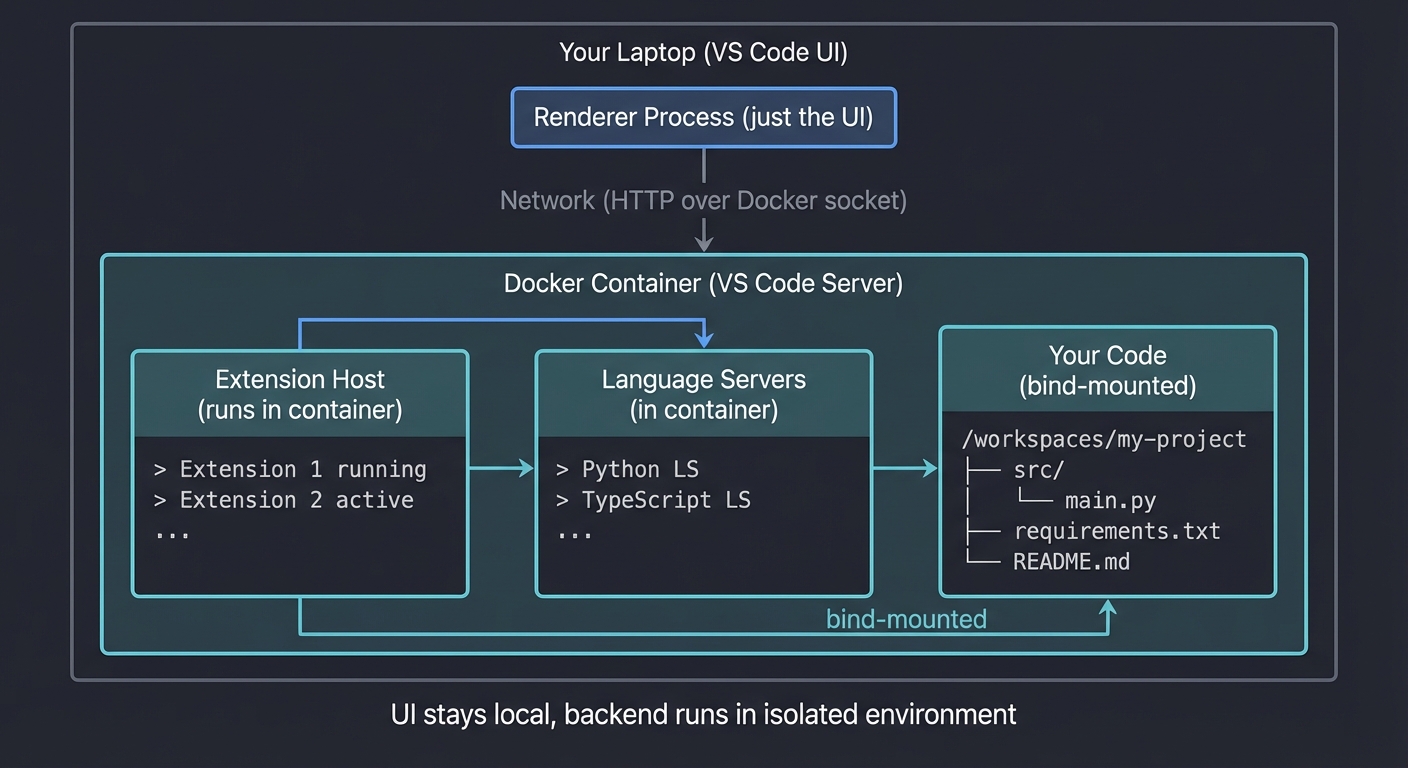
What gets installed where:
| Component | Where It Runs | Why |
|---|---|---|
| UI Extensions (themes, keybindings) | Local laptop | Need to affect the UI |
| Workspace Extensions (linters, formatters) | Inside container | Need access to project dependencies |
| Your source code | Bind-mounted (both) | Edited locally, run in container |
Example .devcontainer/devcontainer.json:
{
  "name": "Python 3.11",
  "image": "mcr.microsoft.com/devcontainers/python:3.11",
  "customizations": {
    "vscode": {
      "extensions": ["ms-python.python", "ms-python.vscode-pylance"]
    }
  },
  "postCreateCommand": "pip install -r requirements.txt",
  "forwardPorts": [8000]
}
What happens when you “Reopen in Container”:
- VS Code builds/pulls the Docker image
- Starts the container with your code bind-mounted
- Installs VS Code Server inside the container
- Installs extensions inside the container
- Runs
postCreateCommand - Your local VS Code UI connects to the containerized backend
Result: Delete Python from your laptop. Every project has its own isolated environment.
Concept Summary Table
| Concept Cluster | What You Need to Internalize |
|---|---|
| Multi-process architecture | VS Code runs in separate processes (Main, Renderer, Extension Host). Extensions can’t crash the editor. Security through isolation. |
| Settings hierarchy | Five layers: Default → User → Remote → Workspace → Folder. Higher layers override lower. Language-specific overrides exist. |
| Command system | Everything is a command with an ID. Extensions contribute commands. Keybindings map keys to commands. Command Palette is fuzzy search. |
| Keybindings | JSON mappings with “when” clauses (context). You can create mode-specific or language-specific shortcuts. |
| Task system | Automate builds/tests with shell commands. Problem matchers parse errors. Tasks can have dependencies. |
| Language Server Protocol | Standardized JSON-RPC protocol for editor ↔ language server communication. N + M solution instead of N × M. |
| Debug Adapter Protocol | Standardized protocol for debugging. VS Code is just the UI; adapters handle language specifics. |
| Extension API | Extensions run in isolated Node.js process. Use vscode.* APIs. Contribute commands, views, settings, languages. |
| TextMate grammars | Regex-based syntax highlighting. Fast but not semantic. Themes apply colors to scopes. |
| Monaco Editor | The core editor component. Powers VS Code, but also browser editors (CodeSandbox, StackBlitz). |
| Dev Containers | VS Code Server runs in Docker. UI stays local. Extensions run remotely. True environment reproducibility. |
| Remote Development | Same architecture as Dev Containers, but over SSH or WSL. Backend is separated from frontend. |
Deep Dive Reading by Concept
This section maps each concept from above to specific book chapters and official documentation for deeper understanding. Read these before or alongside the projects to build strong mental models.
VS Code Fundamentals (Architecture & Core Concepts)
| Concept | Book & Chapter / Resource |
|---|---|
| VS Code architecture overview | “Visual Studio Code: End-to-End Editing and Debugging Tools for Web Developers” by Bruce Johnson — Ch. 1: “Introducing Visual Studio Code” & Ch. 2: “Exploring the User Interface” |
| Settings system and customization | “Visual Studio Code Distilled” by Alessandro Del Sole — Ch. 2: “Getting Started with VS Code” & Ch. 3: “Customizing Visual Studio Code” |
| Extension marketplace and installation | “Visual Studio Code Distilled” by Alessandro Del Sole — Ch. 7: “Extending Visual Studio Code” |
| Command palette and keyboard shortcuts | “Visual Studio Code: End-to-End Editing and Debugging Tools” by Bruce Johnson — Ch. 3: “Editing Code” |
| Workspaces and multi-root projects | “Visual Studio Code Distilled” by Alessandro Del Sole — Ch. 2: “Managing Folders and Files” |
Electron and Monaco Editor (The Foundation)
| Concept | Book & Chapter / Resource |
|---|---|
| Electron architecture (Main vs Renderer) | “Electron in Action” by Steve Kinney — Ch. 2: “Your First Electron Application” & Ch. 3: “Building a Notes Application” |
| Inter-process communication in Electron | “Electron in Action” by Steve Kinney — Ch. 5: “Inter-process Communication” |
| Monaco Editor fundamentals | Official Monaco Editor Docs — https://microsoft.github.io/monaco-editor/ |
| How browsers render text | “High Performance Browser Networking” by Ilya Grigorik — Ch. 11: “HTTP/2” (rendering pipeline sections) |
Extension Development (VS Code API)
| Concept | Book & Chapter / Resource |
|---|---|
| Extension anatomy and structure | “Visual Studio Code: End-to-End Editing and Debugging Tools” by Bruce Johnson — Ch. 10: “Building Your Own Extensions” |
| Extension API fundamentals | Official VS Code Extension API Docs — https://code.visualstudio.com/api |
| Activation events and lifecycle | VS Code Extension Guides — “Extension Capabilities” & “Extension Anatomy” |
| Commands and menus | VS Code Extension Guides — “Command API” & “Menu Contributions” |
| TextDocument and TextEditor APIs | VS Code Extension API Reference — vscode.TextDocument and vscode.TextEditor interfaces |
| Webview API (custom UI in extensions) | VS Code Extension Guides — “Webview API” |
| Extension testing | “Visual Studio Code Distilled” by Alessandro Del Sole — Ch. 7: “Testing Extensions” |
Language Server Protocol (LSP)
| Concept | Book & Chapter / Resource |
|---|---|
| LSP specification and architecture | Official Language Server Protocol Specification — https://microsoft.github.io/language-server-protocol/ |
| Building a language server | “Programming Typescript” by Boris Cherny — Ch. 11: “Advanced Types” (sections on tooling) |
| JSON-RPC protocol | JSON-RPC 2.0 Specification — https://www.jsonrpc.org/specification |
| LSP message types (requests, notifications, responses) | LSP Specification — “Base Protocol” section |
| IntelliSense and code completion | “Visual Studio Code: End-to-End Editing and Debugging Tools” by Bruce Johnson — Ch. 4: “IntelliSense” |
Debugging and Debug Adapter Protocol (DAP)
| Concept | Book & Chapter / Resource |
|---|---|
| Debug Adapter Protocol specification | Official DAP Specification — https://microsoft.github.io/debug-adapter-protocol/ |
| Debugging configurations (launch.json) | “Visual Studio Code: End-to-End Editing and Debugging Tools” by Bruce Johnson — Ch. 7: “Debugging” |
| Breakpoints, watches, and call stacks | “Visual Studio Code Distilled” by Alessandro Del Sole — Ch. 5: “Debugging Code” |
| Multi-target debugging | VS Code Debugging Guide — “Multi-target debugging” |
| Custom debug adapters | DAP Specification — “Implementing a Debug Adapter” |
Task System and Automation
| Concept | Book & Chapter / Resource |
|---|---|
| Tasks.json configuration | “Visual Studio Code Distilled” by Alessandro Del Sole — Ch. 4: “Working with Tasks” |
| Problem matchers | VS Code Tasks Documentation — “Defining a Problem Matcher” |
| Task providers (extension API) | VS Code Extension API — “Task Provider API” |
| Shell commands and cross-platform compatibility | “Shell Programming in Unix, Linux and OS X, Fourth Edition” by Stephen G. Kochan — Ch. 1-3: Shell basics |
TextMate Grammars and Syntax Highlighting
| Concept | Book & Chapter / Resource |
|---|---|
| TextMate grammar syntax | TextMate Manual — https://macromates.com/manual/en/language_grammars |
| Regex for tokenization | “Mastering Regular Expressions, 3rd Edition” by Jeffrey Friedl — Ch. 3: “Regex Features and Flavors” |
| Scope naming conventions | TextMate Scope Naming Conventions — https://www.sublimetext.com/docs/scope_naming.html |
| Semantic highlighting vs TextMate | VS Code Syntax Highlighting Guide — “Semantic Highlighting” |
Snippets and Code Templates
| Concept | Book & Chapter / Resource |
|---|---|
| Snippet syntax and variables | “Visual Studio Code Distilled” by Alessandro Del Sole — Ch. 3: “Snippets” |
| Tabstops and placeholders | VS Code Snippet Guide — https://code.visualstudio.com/docs/editor/userdefinedsnippets |
| Variable transformations (regex) | Snippet Syntax Documentation — “Transform” section |
| Creating snippet extensions | VS Code Extension Guides — “Snippet Guide” |
Dev Containers and Remote Development
| Concept | Book & Chapter / Resource |
|---|---|
| Docker fundamentals | “Docker for Developers” by Richard Bullington-McGuire, Andrew K. Dennis, Michael Schwartz — Ch. 1-4: Docker basics |
| Container images and Dockerfiles | “Docker Deep Dive” by Nigel Poulton — Ch. 6: “Images” & Ch. 7: “Containers” |
| Dev Container configuration | VS Code Dev Containers Documentation — https://code.visualstudio.com/docs/devcontainers/containers |
| Volume mounts and bind mounts | “Docker for Developers” — Ch. 5: “Working with Volumes” |
| VS Code Server architecture | VS Code Remote Development Architecture — Official blog posts and documentation |
| Lifecycle scripts (postCreateCommand) | Dev Container Specification — “Lifecycle scripts” |
| Remote SSH development | “The Linux Programming Interface” by Michael Kerrisk — Ch. 59-61: Sockets and Network Programming |
Configuration and Settings
| Concept | Book & Chapter / Resource |
|---|---|
| Settings.json structure | “Visual Studio Code Distilled” by Alessandro Del Sole — Ch. 3: “Settings” |
| Settings precedence (User/Workspace/Folder) | VS Code Settings Documentation — “Settings precedence” |
| Language-specific settings | VS Code Docs — “Language specific editor settings” |
| Settings UI vs JSON | “Visual Studio Code: End-to-End Editing and Debugging Tools” by Bruce Johnson — Ch. 2: “Settings” |
TypeScript for Extension Development
| Concept | Book & Chapter / Resource |
|---|---|
| TypeScript basics | “Programming TypeScript” by Boris Cherny — Ch. 1-5: TypeScript fundamentals |
| Node.js module system | “Node.js Design Patterns, 3rd Edition” by Mario Casciaro, Luciano Mammino — Ch. 1-2: Node.js platform and module system |
| Async/await in TypeScript | “Programming TypeScript” by Boris Cherny — Ch. 8: “Asynchronous Programming, Concurrency, and Parallelism” |
| Type definitions (@types) | “Programming TypeScript” by Boris Cherny — Ch. 10: “Namespaces and Declaration Merging” |
Git Integration and Source Control
| Concept | Book & Chapter / Resource |
|---|---|
| Git integration in VS Code | “Visual Studio Code Distilled” by Alessandro Del Sole — Ch. 6: “Source Control with Git” |
| Git internals (for extension dev) | “Pro Git, 2nd Edition” by Scott Chacon and Ben Straub — Ch. 10: “Git Internals” |
| Source Control API (extensions) | VS Code Extension API — “Source Control API” |
Performance and Optimization
| Concept | Book & Chapter / Resource |
|---|---|
| Extension performance best practices | VS Code Extension Guides — “Performance Best Practices” |
| Profiling JavaScript/TypeScript | “High Performance JavaScript” by Nicholas C. Zakas — Ch. 10: “Tools” |
| Understanding V8 (Chrome’s JS engine) | “JavaScript: The Definitive Guide, 7th Edition” by David Flanagan — Appendix: “JavaScript Engines” |
Essential Reading Order
For maximum comprehension, follow this learning path:
- Foundation (Week 1):
- Visual Studio Code Distilled Ch. 1-3 (basics, UI, customization)
- VS Code: End-to-End Editing and Debugging Tools Ch. 1-3 (architecture overview)
- Official VS Code User Guide (get comfortable with the tool first)
- Extension Development Basics (Week 2):
- Programming TypeScript Ch. 1-5 (TypeScript fundamentals)
- Electron in Action Ch. 2-3 (understand the platform)
- VS Code: End-to-End Editing and Debugging Tools Ch. 10 (first extension)
- Advanced Protocols (Week 3):
- LSP Specification (skim overview, focus on message types)
- DAP Specification (understand debugging architecture)
- Visual Studio Code Distilled Ch. 5 (debugging deep dive)
- Containerization and Remote Dev (Week 4):
- Docker for Developers Ch. 1-5 (Docker fundamentals)
- VS Code Dev Containers Documentation (official guide)
- Build your first Dev Container setup
- Deep Mastery (Ongoing):
- Visual Studio Code Extension API (reference as needed)
- Study open-source extensions on GitHub
- Contribute to VS Code or popular extensions
Prerequisites & Background Knowledge
Before diving into these projects, you should have a solid foundation in these areas:
Essential Prerequisites (Must Have)
Programming Skills:
- Proficiency in at least one language: JavaScript/TypeScript, Python, Go, Rust, or C/C++
- You should be comfortable reading and writing functions, classes, and modules
- Basic async programming understanding (promises, async/await, callbacks)
- Understanding of HTTP/REST APIs: Know what a request/response cycle is
- Basic command-line proficiency: Navigate directories, run commands, edit files via terminal
- JSON and data serialization basics: Read and write JSON, understand key-value structures
Development Fundamentals:
- Text editor basics: You’ve used ANY code editor before (Sublime, Atom, Notepad++, etc.)
- Version control with Git: Know
git add,commit,push,pull(doesn’t need to be expert level) - Basic debugging concepts: Understand what a breakpoint is, what a stack trace shows
- Recommended Reading: “The Pragmatic Programmer” by Thomas & Hunt — Ch. 1-3: The basics of professional development
Computer Science Fundamentals:
- How programs run: Understand that code is compiled/interpreted into machine instructions
- Process vs Thread: Basic understanding of execution contexts
- What an API is: How software components communicate
- Recommended Reading: “Code: The Hidden Language of Computer Hardware and Software” by Petzold — Ch. 17-24: How software works
Helpful But Not Required
Advanced JavaScript/TypeScript:
- You’ll learn this during extension development projects (Projects 7-10)
- Node.js module system and package.json
- Can learn during: Projects 7, 8, 9, 10, 11
Docker and Containers:
- You’ll learn this during Dev Containers project (Project 5)
- Understanding of images vs containers
- Can learn during: Project 5, 11
Regular Expressions:
- Helpful for snippet and keybinding projects
- Can learn during: Projects 1, 4, 12
JSON-RPC Protocol:
- You’ll learn this when building LSP/DAP projects (Project 13)
- Can learn during: Project 13
Self-Assessment Questions
Before starting, ask yourself:
- ✅ Can you write a function in at least one programming language and run it?
- ✅ Have you used a terminal/command prompt to run commands?
- ✅ Do you know what JSON is and can you read a JSON file?
- ✅ Have you debugged a program before (even with print statements)?
- ✅ Can you install software and follow technical documentation?
- ✅ Do you understand what a keyboard shortcut is and have you customized any software before?
If you answered “no” to questions 1-3: Spend 1-2 weeks learning basic programming first. Complete a beginner programming course in JavaScript, Python, or your language of choice before attempting these projects.
If you answered “no” to questions 4-6 but yes to 1-3: You’re ready! Start with Project 1 (Keyboard Warrior) which is designed for beginners.
If you answered “yes” to all 6: You’re well-prepared! Start with any project that interests you, or follow the Recommended Learning Path below.
Development Environment Setup
To complete these projects, you’ll need:
Required Tools:
- VS Code itself - Download from code.visualstudio.com (obviously!)
- Version 1.80 or later recommended
- Node.js - Version 18+ for extension development projects
- Download from nodejs.org
- Verify installation:
node --version(should show v18+)
- Git - For version control
- Verify installation:
git --version
- Verify installation:
- A terminal/command prompt - Built into VS Code (Ctrl+` or Cmd+`)
Recommended Tools:
- Docker Desktop - For Dev Containers project (Project 5, 11)
- Download from docker.com
- Only needed for Projects 5, 11
- TypeScript globally installed - For extension projects
- Install:
npm install -g typescript - Verify:
tsc --version
- Install:
- Yeoman and VS Code Extension Generator - For scaffolding extensions
- Install:
npm install -g yo generator-code - Only needed for Projects 7-13
- Install:
Testing Your Setup:
# Verify Node.js and npm
$ node --version
v20.10.0

$ npm --version
10.2.3

# Verify Git
$ git --version
git version 2.42.0

# Optional: Verify Docker (for Dev Containers)
$ docker --version
Docker version 24.0.6

# Optional: Verify TypeScript
$ tsc --version
Version 5.3.3
Time Investment
Based on your experience level, here’s what to expect:
- Simple projects (1, 4, 6): Weekend (4-8 hours each)
- Moderate projects (2, 3, 5, 12): 1 week (10-20 hours each)
- Complex projects (7, 8, 9, 10, 11, 13): 2+ weeks (20-40 hours each)
- Total sprint: 6-12 months if doing all 13 projects sequentially (2-3 hours/day)
- To reach proficiency: 3-4 months doing Projects 1-6
- To become an expert: 9-12 months completing all projects
Important Reality Check
VS Code mastery is not about memorizing shortcuts—it’s about understanding the mental models behind modern development tools. These are production-grade concepts. Don’t expect to understand everything immediately. The learning happens in layers:
- First pass: Get it working (copy-paste is okay to start)
- Second pass: Understand what each piece does
- Third pass: Understand why it’s designed that way
- Fourth pass: See the architectural implications and trade-offs
This is normal. VS Code mastery is a marathon, not a sprint.
What “mastery” actually means:
- You can customize VS Code to fit any workflow without fighting the tool
- You understand how extensions work, so you can build internal tools for your team
- You can read any project’s
.vscode/folder and immediately understand the setup - You can debug complex issues using proper debugging tools, not console.log
- You can onboard new developers faster by sharing configurations and containers
Quick Start: Your First 48 Hours
Feeling overwhelmed by all the concepts above? Start here instead of reading everything:
Day 1 (4 hours):
- Read only the “Why VS Code Matters” and “Core Concepts Analysis” sections above
- Install VS Code and configure it with a theme you like
- Watch VS Code’s official “Getting Started” video (15 minutes): code.visualstudio.com/docs/getstarted/tips-and-tricks
- Start Project 1: “Keyboard Warrior” - just learn 5 keyboard shortcuts (use Hint 1)
- Don’t worry about extension development yet - just focus on navigating with the keyboard
Day 2 (4 hours):
- Continue Project 1: Learn multi-cursor editing with
Cmd+D(orCtrl+Don Windows) - Practice refactoring a simple file using only keyboard shortcuts
- Install the “Learn VS Code Shortcuts” extension to see shortcuts as you use commands
- Read “The Core Question You’re Answering” for Project 1
- Try the Thinking Exercise for Project 1
End of Weekend: You now understand how VS Code’s command system works and can navigate without touching the mouse. That’s 60% of productivity gains. You’ve also internalized that VS Code is built on commands - everything is a command with a keyboard shortcut.
Next Steps:
- If it clicked: Continue to Project 2 (Time Travel Debugger)
- If confused: Re-read “Concepts You Must Understand First” for Project 1, watch more YouTube tutorials on multi-cursor editing
- If frustrated: Take a break! VS Code mastery takes time. Come back in a week and try Project 1 again from scratch.
What NOT to do:
- Don’t try to memorize all shortcuts at once
- Don’t skip to extension development (Projects 7+) without finishing Projects 1-3
- Don’t feel like you need to finish all projects in a month - pace yourself
Recommended Learning Paths
The projects in this sprint are designed to build on each other, but you can also approach them based on your background and interests.
Path 1: The Efficiency Maximizer (Recommended Start)
Best for: Developers who want to become 10x more productive in their daily work
- Start with Project 1 (“Keyboard Warrior”) - Learn keyboard-first workflows
- Then Project 2 (“Time Travel Debugger”) - Master debugging configurations
- Then Project 3 (“One-Touch Automation”) - Automate repetitive tasks
- Then Project 4 (“Dynamic Snippet Library”) - Speed up code generation
- Then Project 6 (“Focus Mode Workspace”) - Optimize your environment
- Advanced: Projects 5, 7-13 in any order
Why this path: You’ll see immediate productivity gains from day one. Each project makes you faster at what you already do, building confidence before tackling advanced topics.
Path 2: The Extension Developer
Best for: Developers who want to build internal tools or public extensions
- Start with Project 1 (“Keyboard Warrior”) - Understand the command system
- Then Project 7 (“Code Butler”) - Build your first extension
- Then Project 8 (“Syntax Highlighter”) - Learn TextMate grammars
- Then Project 9 (“Tree View Explorer”) - Custom UI components
- Then Project 10 (“Code Lens Badge”) - Advanced extension APIs
- Advanced: Projects 11, 12, 13
Why this path: Focuses on extension development from the start, skipping productivity optimization projects (which you can return to later).
Path 3: The Team Standardizer
Best for: Tech leads, DevOps engineers, or developers setting up team workflows
- Start with Project 5 (“Works on My Machine Killer”) - Dev Containers mastery
- Then Project 3 (“One-Touch Automation”) - Standardize build tasks
- Then Project 6 (“Focus Mode Workspace”) - Create team workspace templates
- Then Project 2 (“Time Travel Debugger”) - Standardize debugging configs
- Then Project 11 (“Polyglot Container Studio”) - Multi-language environments
- Advanced: Project 7 (to build custom tooling extensions)
Why this path: Emphasizes team collaboration, reproducible environments, and standardization - critical for platform engineering roles.
Path 4: The Language Tooling Expert
Best for: Compiler developers, tooling engineers, or those wanting to build language support
- Start with Project 1 (“Keyboard Warrior”) - Understand the foundations
- Then Project 8 (“Syntax Highlighter”) - TextMate grammars
- Then Project 13 (“Mini Language Server”) - Build LSP support
- Then Project 12 (“Snippet Metaprogrammer”) - Advanced snippet systems
- Advanced: Project 10 (Code Lens), Project 9 (Custom views)
Why this path: Focuses on language-specific tooling, LSP, and semantic highlighting - the foundation of modern language support.
Path 5: The Completionist
Best for: Those building comprehensive VS Code expertise for career advancement
Phase 1: Foundation (Weeks 1-3)
- Project 1: “Keyboard Warrior”
- Project 2: “Time Travel Debugger”
- Project 3: “One-Touch Automation”
Phase 2: Customization (Weeks 4-6)
- Project 4: “Dynamic Snippet Library”
- Project 6: “Focus Mode Workspace”
- Project 5: “Works on My Machine Killer”
Phase 3: Extension Development (Weeks 7-10)
- Project 7: “Code Butler”
- Project 8: “Syntax Highlighter”
- Project 9: “Tree View Explorer”
Phase 4: Advanced Topics (Weeks 11-16)
- Project 10: “Code Lens Badge”
- Project 11: “Polyglot Container Studio”
- Project 12: “Snippet Metaprogrammer”
- Project 13: “Mini Language Server”
Why this path: Systematic progression from beginner to expert, building on each skill incrementally.
Project 1: “Keyboard Warrior” — Refactoring Kata
| Attribute | Value |
|---|---|
| File | VS_CODE_MASTERY_LEARNING_PROJECTS.md |
| Main Programming Language | Text / Regex |
| Coolness Level | Level 3: Elegant Solution |
| Business Potential | 1. Resume Gold (Productivity mastery) |
| Difficulty | Level 1: Beginner |
| Knowledge Area | Editor Navigation / Multi-cursor Editing |
| Software or Tool | VS Code Keyboard Shortcuts |
| Main Book | “Visual Studio Code: End-to-End Editing and Debugging Tools” |
What you’ll build: A complete refactoring workflow using ONLY keyboard shortcuts. You will take a messy codebase (intentionally poorly formatted) and refactor it using multi-cursor editing, selection expansion, symbol navigation, and quick fixes—all without touching the mouse. You’ll document every keyboard shortcut you use to create a personal “cheat sheet.”
Why it teaches Efficiency: The mouse is a productivity killer. Every time you move your hand from the keyboard, you lose 0.5-1 second. Over a day, that adds up to 30+ minutes. This project forces you to internalize muscle memory for navigation, selection, and transformation. You’ll learn how VS Code’s command palette, multi-cursor system, and refactoring engine work together.
Core challenges you’ll face:
- Multi-cursor Mastery → maps to Editing multiple locations simultaneously
- Symbol Navigation → maps to Jumping to definitions and references
- Selection Expansion → maps to Smart Expand Selection (Cmd+Shift+Right Arrow)
- Refactoring Commands → maps to Extract Method, Rename Symbol
Key Concepts:
- Multi-cursor editing:
Cmd+D(select next occurrence),Cmd+Shift+L(select all occurrences),Option+Click(add cursor at position). - Quick Fix:
Cmd+.to trigger refactorings and code actions. - Symbol Navigation:
F12(Go to Definition),Shift+F12(Find All References),Cmd+T(Go to Symbol). - Selection Expansion:
Ctrl+Shift+Cmd+Right Arrow(Expand Selection),Ctrl+Shift+Cmd+Left Arrow(Shrink Selection).
Difficulty: Beginner Time estimate: Weekend Prerequisites: Basic understanding of any programming language (JavaScript, Python, etc.)
Real World Outcome
You receive a pull request with 500+ lines of code. Instead of scrolling and clicking, you:
- Press
Cmd+Shift+Fto search for a pattern. - Press
Cmd+Drepeatedly to select all instances of a variable name. - Type once to rename them all simultaneously.
- Press
F2to invoke smart rename (refactoring with scope awareness). - Use
Cmd+Shift+Oto navigate between symbols in the file. - Press
Cmd+.to extract a method from selected code.
Example Transformation: Before (messy code):
function processUser(u) {
  console.log(u.name);
  console.log(u.email);
  let result = u.age > 18 ? "adult" : "minor";
  console.log(result);
  return result;
}
After (refactored using keyboard only):
function processUser(user) {
  logUserInfo(user);
  const ageCategory = categorizeAge(user.age);
  console.log(ageCategory);
  return ageCategory;
}

function logUserInfo(user) {
  console.log(user.name);
  console.log(user.email);
}

function categorizeAge(age) {
  return age > 18 ? "adult" : "minor";
}
Shortcuts used:
F2to renameutouseracross the function- Select lines 2-3, then
Cmd+.→ “Extract to function” → typelogUserInfo - Select the ternary expression,
Cmd+.→ “Extract to constant” → typeageCategory Cmd+.again → “Extract to function” → typecategorizeAge
The Core Question You’re Answering
“How can I refactor code at the speed of thought without breaking my flow state?”
Concepts You Must Understand First
- The Command Palette (
Cmd+Shift+P): The universal search for ALL VS Code actions. If you don’t know a shortcut, type what you want to do here.- Reference: “Visual Studio Code: End-to-End Editing and Debugging Tools” - Chapter 2: “The Command Palette: Your Universal Interface”
- Multi-cursor Editing: VS Code allows you to have multiple cursors active simultaneously. Each cursor acts independently.
Cmd+D: Add next occurrence of current selection to cursorsCmd+Shift+L: Select all occurrences of current selectionOption+Cmd+Up/Down: Add cursor above/belowShift+Option+I: Add cursors to end of each line in selection- Reference: “Visual Studio Code Distilled” - Chapter 4: “Multi-cursor Editing Patterns”
- Symbol Navigation: VS Code understands the syntax tree of your code (via Language Server Protocol).
Cmd+T: Go to Symbol in WorkspaceCmd+Shift+O: Go to Symbol in FileF12: Go to DefinitionShift+F12: Find All ReferencesOption+F12: Peek Definition (inline view)- Reference: “VS Code Tips and Tricks” (Official Docs) - “Navigation” section
- Refactoring vs Find-Replace: Refactoring is scope-aware. When you rename a variable with
F2, VS Code only renames it in the current scope, not every string match.- Reference: “Refactoring: Improving the Design of Existing Code” by Martin Fowler - Chapter 1 (applied to VS Code)
- Selection Expansion: Instead of manually selecting characters, use
Ctrl+Shift+Cmd+Right Arrow(macOS) orShift+Alt+Right Arrow(Windows) to expand selection to the next logical boundary (word → line → block → function).- Reference: “Visual Studio Code: End-to-End Editing and Debugging Tools” - Chapter 3: “Smart Selection”
Questions to Guide Your Design
- When to use Multi-cursor vs Refactor?
- Multi-cursor is for simple, mechanical edits (e.g., adding quotes around multiple strings).
- Refactoring (
F2,Cmd+.) is for semantic changes (renaming variables, extracting functions). - Exercise: Try renaming a variable with
Cmd+D+ typing. Then undo and useF2. Notice howF2handles scopes and imports automatically.
- How do you navigate a 2000-line file without scrolling?
- Use
Cmd+Shift+Oto see an outline of all functions/classes. - Use
Cmd+Pto jump to a file by name. - Use
Cmd+Gto go to a specific line number. - Exercise: Open a large file. Challenge yourself to jump to line 500, then to a specific function, without using the scrollbar or mouse.
- Use
- How do you select “just the right amount” of code?
- Use Expand Selection (
Ctrl+Shift+Cmd+Right Arrowon macOS). - Start with cursor inside a word. Press once: selects word. Press again: selects expression. Press again: selects statement. Press again: selects block.
- Exercise: Place your cursor inside a function call like
calculateTotal(a, b, c). Press Expand Selection repeatedly and watch how the selection grows intelligently.
- Use Expand Selection (
Thinking Exercise
Scenario: You have a JavaScript file with 50 instances of var. You want to replace them with const or let depending on whether the variable is reassigned.
Wrong approach: Cmd+F → find “var” → replace all with “let”. This is dangerous because it’s not scope-aware.
Right approach:
- Enable TypeScript checking for JS files (add
// @ts-checkat the top). - VS Code will underline variables that should be
constwith a warning. - Use
Cmd+.on each one to apply the “Convert to const” Quick Fix. - For bulk changes, use the Problems panel (
Cmd+Shift+M) to see all issues, then apply fixes.
Challenge: Try this in a real file. Compare the time it takes vs manual replacement.
The Interview Questions They’ll Ask
- “How do you refactor code efficiently without introducing bugs?”
- Answer: “I use language-aware refactoring tools like VS Code’s
F2rename andCmd+.extract method. These use the Language Server Protocol to understand scope, so they don’t accidentally rename unrelated variables. I also use multi-cursor editing for mechanical transformations that don’t require semantic understanding.”
- Answer: “I use language-aware refactoring tools like VS Code’s
- “What’s the difference between Find-Replace and Refactoring?”
- Answer: “Find-Replace is text-based and doesn’t understand code structure. Refactoring is syntax-aware. For example, if I rename a function parameter with Find-Replace, it might change string literals or comments that happen to have the same name. Refactoring only changes the actual parameter.”
- “How do you navigate a large codebase without relying on a mouse?”
- Answer: “I use
Cmd+Tto search for symbols across the workspace,Cmd+Pto open files by name, andF12to jump to definitions. For exploring code, I useShift+F12to see all references of a function. For file-level navigation, I useCmd+Shift+Oto see an outline.”
- Answer: “I use
- “Describe a time you used multi-cursor editing to save time.”
- Answer: “I had to convert 100+ lines of JSON to TypeScript interface properties. I used
Cmd+Dto select all instances of"and replaced them with nothing, then used multi-cursor (Option+Cmd+Down) to add semicolons at the end of each line. What would have taken 30 minutes took 2 minutes.”
- Answer: “I had to convert 100+ lines of JSON to TypeScript interface properties. I used
Hints in Layers
Hint 1 - Getting Started:
- Install the “Learn VS Code Shortcuts” extension to see shortcuts as you use commands.
- Print a keyboard shortcut cheatsheet for your OS (macOS/Windows/Linux) from the official VS Code site.
Hint 2 - Building Muscle Memory:
- Create a practice file with intentionally messy code. Examples:
- Inconsistent naming (mixedCase, snake_case, PascalCase).
- Repeated code blocks (copy-paste).
- Overly long functions (100+ lines).
- Set a timer for 10 minutes. Refactor as much as you can using ONLY keyboard shortcuts.
Hint 3 - Advanced Multi-cursor:
- To select multiple arbitrary locations: Hold
Option(macOS) orAlt(Windows) and click each location. - To select a rectangular block: Hold
Shift+Option(macOS) orShift+Alt(Windows) and drag with the mouse OR use keyboard:Ctrl+Shift+Cmd+Arrow keys. - To add cursors to the end of selected lines: Select multiple lines, then press
Shift+Option+I.
Hint 4 - Refactoring Workflow:
- Place your cursor on a variable → Press
F2→ Type new name → Press Enter. VS Code renames it everywhere in scope. - Select a block of code → Press
Cmd+.→ Choose “Extract to function” or “Extract to constant.” - Place cursor on an import → Press
Cmd+.→ Choose “Add missing imports” or “Organize imports.”
Hint 5 - Navigation Patterns:
Cmd+Shift+E: Toggle file explorer (but minimize its use).Cmd+B: Toggle sidebar (for distraction-free coding).Ctrl+-(macOS) orAlt+Left Arrow(Windows): Go back to previous cursor position.Ctrl+Shift+-(macOS) orAlt+Right Arrow(Windows): Go forward.
Hint 6 - The Ultimate Test:
- Unplug your mouse/trackpad for a full work session.
- If you get stuck, use
Cmd+Shift+Pto search for the action you want. - Note: Some actions (like resizing panes) are easier with keyboard if you learn
Cmd+Kchords.
Books That Will Help
| Book | Author | Relevant Chapters | Why It Helps |
|---|---|---|---|
| Visual Studio Code: End-to-End Editing and Debugging Tools | Bruce Johnson | Ch 2 (Command Palette), Ch 3 (Editing), Ch 4 (Navigation) | Comprehensive guide to all editor features including keyboard shortcuts and refactoring workflows |
| Visual Studio Code Distilled | Alessandro Del Sole | Ch 3 (Editing Code), Ch 4 (Multi-cursor Editing) | Focused guide on productivity features and keyboard-first workflows |
| Refactoring: Improving the Design of Existing Code | Martin Fowler | Ch 1 (Refactoring Principles), Ch 6 (Extract Function) | Teaches the theory behind refactoring, which helps you understand when to use VS Code’s refactoring commands |
| The Pragmatic Programmer | David Thomas, Andrew Hunt | Tip 22 (Use a Single Editor Well) | Emphasizes the importance of mastering your tools to achieve flow state |
Common Pitfalls & Debugging
Problem 1: “I pressed Cmd+D but it’s selecting the whole word, not the next occurrence”
- Why: Your cursor needs to be in the middle of the word, or you need to have the word already selected for
Cmd+Dto find the next occurrence - Fix: First select the text you want to find (double-click the word or use
Cmd+Donce to select current word), then pressCmd+Dagain to add the next occurrence - Quick test: Type
hello hello helloon a line. Place cursor in firsthello. PressCmd+Donce (selects current word). PressCmd+Dagain (adds next occurrence). PressCmd+Dagain (adds third occurrence).
Problem 2: “Multi-cursor editing isn’t working across multiple lines”
- Why: You may be using the wrong shortcut. Column selection (
Shift+Option+Drag) creates a rectangular selection, whileOption+Cmd+Downadds cursors vertically. - Debug: Try these different techniques:
- For vertical alignment:
Option+Cmd+Up/Down(macOS) orCtrl+Alt+Up/Down(Windows) - For arbitrary positions: Hold
Option(macOS) orAlt(Windows) and click each position - For line endings: Select multiple lines, then press
Shift+Option+Ito add cursors at end of each line
- For vertical alignment:
- Fix: Use the technique that matches your use case
- Tool: The Command Palette (
Cmd+Shift+P) → type “cursor” to see all cursor-related commands
Problem 3: “F2 rename isn’t working / just opens a popup menu”
- Why:
F2might be mapped to system shortcuts (brightness on Mac, or other OS shortcuts) - Fix (macOS): System Settings → Keyboard → Shortcuts → Function Keys → Enable “Use F1, F2, etc. keys as standard function keys”
- Alternative: Use the Command Palette:
Cmd+Shift+P→ type “Rename Symbol” → Enter - Verification: Open a JavaScript file, place cursor on a variable name, press
F2. Should show inline rename widget.
Problem 4: “Selection expansion (Expand Selection) isn’t working”
- Why: The default keybinding varies by OS and may conflict with system shortcuts
- Default shortcuts:
- macOS:
Ctrl+Shift+Cmd+Right Arrow(expand) /Ctrl+Shift+Cmd+Left Arrow(shrink) - Windows/Linux:
Shift+Alt+Right Arrow(expand) /Shift+Alt+Left Arrow(shrink)
- macOS:
- Fix: Open Keyboard Shortcuts (
Cmd+K Cmd+S), search for “Expand Selection”, see what it’s bound to - Alternative: Command Palette → “Expand Selection” / “Shrink Selection”
- Quick test: Place cursor inside a function call like
foo(bar, baz). Press expand selection repeatedly. Should select:bar→bar, baz→(bar, baz)→foo(bar, baz)
Problem 5: “Refactoring commands (Extract Method, etc.) are grayed out”
- Why: Language server isn’t running, or the language doesn’t support that refactoring
- Debug:
- Check the bottom right corner of VS Code - it should show the language mode (e.g., “JavaScript”, “TypeScript”)
- If it says “Plain Text”, click it and select the correct language
- Open the Output panel (
Cmd+Shift+U) and select the language server from the dropdown to see errors
- Fix (for JavaScript): Ensure you have a
jsconfig.jsonortsconfig.jsonfile in your project root - Fix (for TypeScript): Ensure TypeScript extension is installed and enabled
- Verification: Open a .js or .ts file, select a block of code, press
Cmd+.- should show “Extract to function” option
Problem 6: “Go to Definition (F12) just says ‘No definition found’“
- Why: The language server can’t resolve the symbol (missing types, wrong import, or language server crashed)
- Debug:
- Check if the language server is running: Command Palette → “TypeScript: Restart TS Server” (for JS/TS)
- For other languages, check the Output panel for errors
- Ensure you’re in a project (have a folder open, not just a single file)
- Fix (JavaScript/TypeScript): Create a
jsconfig.jsonortsconfig.jsonwith"include": ["**/*"] - Fix (Python): Ensure Pylance extension is installed
- Tool: Use “Peek Definition” (
Option+F12) as an alternative - it shows definition inline
Project 2: “Time Travel Debugger” — Configuration Mastery
| Attribute | Value |
|---|---|
| File | VS_CODE_MASTERY_LEARNING_PROJECTS.md |
| Main Programming Language | Node.js / JSON |
| Alternative Programming Languages | Python, C++, Go |
| Coolness Level | Level 4: Hardcore Tech Flex |
| Business Potential | 1. Resume Gold (Debugging expertise) |
| Difficulty | Level 2: Intermediate |
| Knowledge Area | Debugging / Configuration |
| Software or Tool | VS Code Debugger |
| Main Book | “Node.js Debugging Guide” (Official Docs) |
What you’ll build: A sophisticated debugging setup for a Node.js application (or Python/Go if you prefer). You will create a launch.json file with multiple configurations: one for launching the app normally, one for attaching to a running process, and one for debugging tests. You’ll configure conditional breakpoints, logpoints, watch expressions, and call stack navigation. You’ll also set up source maps for TypeScript.
Why it teaches Debugging: Most developers debug with console.log statements. This is slow and pollutes the codebase. Professional debugging means pausing execution, inspecting state, stepping through code, and traveling back in time (via the call stack). Understanding launch.json unlocks the full power of the debugger, including environment variables, pre-launch tasks, and compound configurations.
Core challenges you’ll face:
- Launch vs Attach Configurations → maps to Starting a new process vs connecting to existing one
- Source Maps → maps to Debugging TypeScript/minified code
- Breakpoint Types → maps to Conditional, logpoints, hit counts
- Environment Variables → maps to Passing configuration to the debugger
Key Concepts:
- launch.json: The configuration file that tells VS Code how to start or attach to a process.
- Source Maps: Files that map compiled/minified code back to the original source (e.g., TypeScript → JavaScript).
- Breakpoints: Pause execution at a specific line.
- Conditional Breakpoints: Only pause if a condition is true (e.g.,
user.age > 18). - Logpoints: Like
console.logbut without modifying code—logs a message when execution hits that line. - Watch Expressions: Monitor specific variables or expressions as you step through code.
Difficulty: Intermediate Time estimate: Weekend Prerequisites: Node.js installed, basic understanding of async code
Real World Outcome
You have a bug in production: “Users with premium accounts can’t checkout.” You can’t reproduce it locally. You:
- Open
launch.jsonand create an “Attach to Process” configuration. - Start the production server locally with
--inspectflag. - Attach the debugger.
- Set a conditional breakpoint on the checkout function:
user.isPremium === true. - The breakpoint only fires for premium users.
- You inspect the call stack and see that the payment gateway client is initialized with the wrong API key.
- You add a watch expression for
process.env.PAYMENT_API_KEYand see it’s undefined. - Problem solved in 5 minutes instead of 5 hours of logging.
Example launch.json:
{
  "version": "0.2.0",
  "configurations": [
    {
      "type": "node",
      "request": "launch",
      "name": "Launch Program",
      "skipFiles": ["<node_internals>/**"],
      "program": "${workspaceFolder}/src/index.ts",
      "preLaunchTask": "tsc: build",
      "outFiles": ["${workspaceFolder}/dist/**/*.js"],
      "env": {
        "NODE_ENV": "development",
        "DEBUG": "app:*"
      },
      "sourceMaps": true
    },
    {
      "type": "node",
      "request": "attach",
      "name": "Attach to Process",
      "port": 9229,
      "restart": true,
      "skipFiles": ["<node_internals>/**"]
    },
    {
      "type": "node",
      "request": "launch",
      "name": "Debug Tests",
      "program": "${workspaceFolder}/node_modules/mocha/bin/_mocha",
      "args": ["--timeout", "10000", "--colors", "${workspaceFolder}/test/**/*.test.js"],
      "console": "integratedTerminal"
    }
  ],
  "compounds": [
    {
      "name": "Server + Client",
      "configurations": ["Launch Program", "Launch Chrome"]
    }
  ]
}
What this enables:
- Launch Program: Builds TypeScript, sets environment variables, and starts the app with debugger attached.
- Attach to Process: Connects to a running Node.js process started with
node --inspect. - Debug Tests: Runs Mocha tests with debugger attached (set breakpoints in tests!).
- Compound Configuration: Starts both server and client simultaneously for full-stack debugging.
The Core Question You’re Answering
“How do I inspect what my code is actually doing at runtime, not what I think it’s doing?”
Concepts You Must Understand First
- The Debug Lifecycle: When you press
F5in VS Code:- VS Code reads
launch.json. - If there’s a
preLaunchTask, it runs that first (e.g., compile TypeScript). - It starts the process with debug flags (e.g.,
node --inspect). - It connects the Debug Adapter Protocol (DAP) to the running process.
- You can now pause, step, and inspect.
- Reference: “Debug Code with Visual Studio Code” (Official Docs) - “How Debugging Works” section
- VS Code reads
- Launch vs Attach:
- Launch: VS Code starts the process for you. Use this for development.
- Attach: You start the process manually (e.g.,
node --inspect app.js), then VS Code connects to it. Use this for debugging production or long-running processes. - Reference: “Node.js Debugging in VS Code” (Official Docs) - “Launch versus Attach configurations”
- Source Maps: When you debug TypeScript or minified JavaScript, the debugger needs to map the running code back to your source files.
- TypeScript compiler generates
.js.mapfiles. - In
launch.json, set"sourceMaps": trueand"outFiles": ["dist/**/*.js"]. - Reference: “Debugging TypeScript” (Official Docs) - “Source Maps” section
- TypeScript compiler generates
- Breakpoint Types:
- Regular Breakpoint: Always pauses.
- Conditional Breakpoint: Right-click breakpoint → “Edit Breakpoint” → enter condition (e.g.,
index > 100). - Logpoint: Right-click line → “Add Logpoint” → enter message (e.g.,
User ID: {userId}). Doesn’t pause execution, just logs. - Hit Count Breakpoint: Only pauses after N hits (e.g., “Hit when hit count is greater than 50”).
- Reference: “Debugging” (Official Docs) - “Breakpoints” section
- The Call Stack: Shows the sequence of function calls that led to the current line. You can click on any frame to see the state at that point.
- Example:
main()→processOrder()→validatePayment()→ (current line). - This is “time travel”—you can inspect what happened before the current moment.
- Reference: “Debugging Fundamentals” - “Understanding the Call Stack”
- Example:
- Watch Expressions: Instead of checking variables manually, add them to the Watch panel. They update automatically as you step through code.
- Example: Add
user.cart.items.lengthto watch how the cart size changes. - Reference: “Debug Code with Visual Studio Code” - “Watch Expressions”
- Example: Add
Questions to Guide Your Design
- When should you use a Logpoint instead of a Breakpoint?
- Logpoints are perfect when you want to trace execution without stopping the program. Especially useful in loops or async code.
- Exercise: Set a logpoint in a loop that processes 1000 items. Log the item ID at each iteration without pausing.
- How do you debug code that only breaks in production?
- Use Attach configuration. Start your production build locally with
node --inspect, then attach. - Use Conditional Breakpoints to only pause when the bug condition occurs (e.g.,
userId === '12345'). - Exercise: Simulate a production environment locally. Attach the debugger and set a conditional breakpoint based on environment variables.
- Use Attach configuration. Start your production build locally with
- How do you debug tests?
- Create a configuration that runs your test runner (Jest, Mocha, etc.) with the debugger attached.
- Set breakpoints in both test code and application code.
- Exercise: Write a failing test, set a breakpoint in the test, run it with
F5, and step into the application code to find the bug.
Thinking Exercise
Scenario: You have an async function that fetches user data from an API. Sometimes it returns null, but you don’t know why.
async function getUser(userId) {
  const response = await fetch(`/api/users/${userId}`);
  const data = await response.json();
  return data.user; // Sometimes null
}
Bad debugging approach: Add console.log statements everywhere:
console.log('Response:', response);
console.log('Data:', data);
console.log('User:', data.user);
Good debugging approach:
- Set a breakpoint on line 3 (
const data = await response.json();). - Run the debugger.
- When it pauses, inspect
responsein the Variables panel. Checkresponse.status. - Step over to line 4.
- Inspect
data. Is the structure what you expected? - Add a watch expression:
response.status === 404to see if the user doesn’t exist. - Add a conditional breakpoint:
response.status !== 200to only pause on errors.
Challenge: Implement this in a real async function. Practice stepping through async code with the debugger.
The Interview Questions They’ll Ask
- “How do you debug asynchronous code?”
- Answer: “I use breakpoints and step through the code. VS Code’s debugger automatically handles async/await—it pauses at each
awaitand shows the call stack. I also use watch expressions to monitor promises and their resolved values. For complex async flows, I use logpoints to trace execution without stopping the program.”
- Answer: “I use breakpoints and step through the code. VS Code’s debugger automatically handles async/await—it pauses at each
- “Explain the difference between launch and attach configurations in VS Code.”
- Answer: “A launch configuration starts a new process with the debugger attached. I use this during development. An attach configuration connects to a process that’s already running. I use this to debug production builds or long-running servers that I don’t want to restart.”
- “How do you debug TypeScript code in VS Code?”
- Answer: “TypeScript compiles to JavaScript, so I need source maps to map the running JS back to the TS source. In
launch.json, I setsourceMaps: trueand specify theoutFilespattern where the compiled JS lives. The TypeScript compiler generates.mapfiles automatically with thesourceMapoption intsconfig.json.”
- Answer: “TypeScript compiles to JavaScript, so I need source maps to map the running JS back to the TS source. In
- “What are conditional breakpoints and when would you use them?”
- Answer: “Conditional breakpoints only pause when a condition is true. I use them when debugging loops or code paths that execute many times but only fail under specific conditions. For example, if a function fails only for premium users, I’d set a condition like
user.isPremium === true. This saves time compared to pausing on every execution.”
- Answer: “Conditional breakpoints only pause when a condition is true. I use them when debugging loops or code paths that execute many times but only fail under specific conditions. For example, if a function fails only for premium users, I’d set a condition like
- “How do you debug a Node.js application running in Docker?”
- Answer: “I expose the debug port in the Dockerfile (e.g.,
EXPOSE 9229) and run the container withdocker run -p 9229:9229. Then I use an attach configuration inlaunch.jsonwithport: 9229andremoteRootset to the container’s working directory. VS Code connects to the container’s debug port.”
- Answer: “I expose the debug port in the Dockerfile (e.g.,
Hints in Layers
Hint 1 - Creating Your First Configuration:
- Open the Debug panel (
Cmd+Shift+DorCtrl+Shift+D). - Click “create a launch.json file.”
- Select your environment (Node.js, Python, etc.).
- VS Code generates a basic configuration.
Hint 2 - Setting Breakpoints:
- Click in the gutter (left of line numbers) to set a breakpoint. It appears as a red dot.
- Press
F5to start debugging. - The debugger pauses at the first breakpoint.
- Use
F10to step over,F11to step into,Shift+F11to step out.
Hint 3 - Conditional Breakpoints:
- Right-click an existing breakpoint → “Edit Breakpoint…”
- Choose “Expression” and enter a condition (e.g.,
i > 100oruser.role === 'admin'). - The breakpoint changes to a red dot with an equals sign.
Hint 4 - Logpoints:
- Right-click in the gutter → “Add Logpoint…”
- Enter a message with expressions in curly braces (e.g.,
User {user.name} logged in). - The logpoint appears as a red diamond.
- Messages appear in the Debug Console without pausing execution.
Hint 5 - Watch Expressions:
- In the Debug panel, find the “Watch” section.
- Click the
+icon and enter an expression (e.g.,user.cart.total). - As you step through code, the watch value updates automatically.
Hint 6 - Debugging Tests:
- Example for Jest:
{ "type": "node", "request": "launch", "name": "Jest Tests", "program": "${workspaceFolder}/node_modules/.bin/jest", "args": ["--runInBand", "--no-cache"], "console": "integratedTerminal", "internalConsoleOptions": "neverOpen" } - Set breakpoints in test files or source code.
- Press
F5to run tests with debugger attached.
Hint 7 - Attach Configuration:
- Start your Node app with:
node --inspect-brk=9229 app.js(breaks on first line) ornode --inspect=9229 app.js(runs normally until you attach). - Create an attach configuration:
{ "type": "node", "request": "attach", "name": "Attach to Process", "port": 9229 } - Press
F5and select “Attach to Process.”
Hint 8 - Source Maps for TypeScript:
- In
tsconfig.json:"sourceMap": true. - In
launch.json:{ "type": "node", "request": "launch", "name": "Debug TypeScript", "program": "${workspaceFolder}/src/app.ts", "preLaunchTask": "tsc: build - tsconfig.json", "outFiles": ["${workspaceFolder}/dist/**/*.js"], "sourceMaps": true }
Books That Will Help
| Book | Author | Relevant Chapters | Why It Helps |
|---|---|---|---|
| Node.js Debugging in VS Code (Official Docs) | Microsoft | All sections | Comprehensive guide to debugging Node.js with launch configurations, attach modes, and source maps |
| Debugging TypeScript (Official Docs) | Microsoft | Source Maps, Breakpoints | Specific guidance on debugging TypeScript with VS Code |
| Python Debugging in VS Code (Official Docs) | Microsoft | All sections | If you’re using Python instead of Node, this covers launch.json for Python debugger |
| Debug Code with Visual Studio Code (Official Docs) | Microsoft | Breakpoints, Watch Expressions, Call Stack | General debugging concepts applicable to all languages |
| The Art of Debugging with GDB, DDD, and Eclipse | Norman Matloff, Peter Jay Salzman | Ch 2 (Debugging Principles) | Teaches fundamental debugging concepts (stack traces, watchpoints) that apply to all debuggers |
| Effective Debugging | Diomidis Spinellis | Ch 1 (High-Level Strategies), Ch 3 (Debugger Use) | General debugging strategies and when to use a debugger vs other techniques |
Common Pitfalls & Debugging
Problem 1: “Debugger won’t start - ‘Cannot connect to runtime process’“
- Why: The port specified in
launch.json(usually 9229 for Node.js) is already in use, or the application isn’t running with the--inspectflag - Debug:
- Check if another process is using the port:
lsof -i :9229(macOS/Linux) ornetstat -ano | findstr :9229(Windows) - Ensure your app is started with
--inspectflag:node --inspect index.js
- Check if another process is using the port:
- Fix: Either kill the process using the port, or change the port in
launch.jsonto9230or another free port - Quick test:
node --inspect=9230 index.jsthen set"port": 9230in your attach configuration
Problem 2: “Breakpoints are grayed out and show ‘Unverified breakpoint’“
- Why: Source maps aren’t configured correctly, or VS Code is debugging the compiled code but showing the source code
- Fix (TypeScript):
- Ensure
"sourceMap": trueintsconfig.json - Ensure
"sourceMaps": trueinlaunch.json - Verify
"outFiles": ["${workspaceFolder}/dist/**/*.js"]points to compiled output
- Ensure
- Fix (Webpack/Babel): Configure source maps in your bundler config
- Verification: After compilation, check that
.js.mapfiles exist next to.jsfiles. Open one - it should reference the original.tsfile - Tool: Add
"trace": truetolaunch.jsonto see source map resolution logs in Debug Console
Problem 3: “Breakpoints hit, but variable values show ‘undefined’ or wrong values”
- Why: Code is minified/optimized, or source maps are mapping incorrectly
- Fix:
- For development builds, disable minification
- For TypeScript: Ensure
"sourceMap": trueand"inlineSourceMap": falseintsconfig.json - Check that you’re running the debug build, not production build
- Debug: Add
console.log()statements to verify the actual execution vs what debugger shows - Tool: Use “Step Into” (
F11) to see the actual execution flow - if it jumps unexpectedly, source maps are wrong
Problem 4: “Environment variables from launch.json aren’t being passed to the app”
- Why: Syntax error in the
envblock, or app is reading from a different source (.envfile) - Fix:
- Ensure
envis a flat object:"env": { "NODE_ENV": "development" } - Not an array:
"env": [{"NODE_ENV": "development"}] - Use
${env:VARIABLE}to reference existing environment variables
- Ensure
- Verification: Add this to your code:
console.log('NODE_ENV:', process.env.NODE_ENV)and check Debug Console output - Production fix: Use
envFileproperty to load from.env:"envFile": "${workspaceFolder}/.env"
Problem 5: “Debugging tests - debugger starts but doesn’t stop at breakpoints in test files”
- Why: The
programpath inlaunch.jsonis wrong, or test runner needs special configuration - Fix (Mocha):
- Ensure
"program": "${workspaceFolder}/node_modules/mocha/bin/_mocha"(note the underscore_mocha) - Add
"args": ["--no-timeouts"]to prevent tests timing out while debugging
- Ensure
- Fix (Jest): Use
"runtimeExecutable": "npm","runtimeArgs": ["run-script", "test"] - Fix (Python pytest): Set
"type": "python","request": "launch","module": "pytest" - Quick test: Set a breakpoint in a test file’s first line. Run the debug configuration. Should pause immediately.
Problem 6: “Can’t attach to running process - ‘Timeout waiting for debugger connection’“
- Why: Process wasn’t started with
--inspectflag, or firewall is blocking the connection - Fix:
- Restart the process with
node --inspect index.js - For a process that’s already running, send
SIGUSR1signal:kill -USR1 <PID>(enables inspector on running Node process) - Check firewall settings if connecting to remote process
- Restart the process with
- Debug: Verify the inspect port is listening:
curl http://localhost:9229/json- should return JSON with process info - Production fix: For remote debugging, use SSH port forwarding:
ssh -L 9229:localhost:9229 user@remote-host
Problem 7: “Source maps work locally but not in Docker container”
- Why: Paths in source maps are absolute and don’t match container paths
- Fix:
- Use relative paths in source maps
- Configure
sourceMapPathOverridesinlaunch.json:"sourceMapPathOverrides": { "/usr/src/app/*": "${workspaceFolder}/*" }
- For Dev Containers: Paths usually match automatically, but verify
${workspaceFolder}resolves correctly - Tool: Check the Debug Console for “SourceMaps: resolved source file to…” messages to see path resolution
Project 3: “One-Touch Automation” — Task Runner
| Attribute | Value |
|---|---|
| File | VS_CODE_MASTERY_LEARNING_PROJECTS.md |
| Main Programming Language | Shell / JSON |
| Alternative Programming Languages | Node.js (for custom scripts) |
| Coolness Level | Level 3: Elegant Solution |
| Business Potential | 2. Micro-SaaS (Team productivity tools) |
| Difficulty | Level 2: Intermediate |
| Knowledge Area | Build Automation / Configuration |
| Software or Tool | VS Code Tasks |
| Main Book | “Integrate with External Tools via Tasks” (Official Docs) |
What you’ll build: A complete automated workflow using tasks.json. You will create tasks for building, testing, linting, and deploying a project. You’ll configure problem matchers to parse compiler/linter output and display errors in the Problems panel. You’ll set up task dependencies so running “Deploy” automatically runs “Build” and “Test” first. You’ll create background tasks for watch modes and composite tasks for complex workflows.
Why it teaches Automation: Switching between the terminal and editor breaks flow. VS Code tasks integrate external tools (npm, make, cargo, go, etc.) directly into the editor. You press Cmd+Shift+B and your project builds, tests run, and errors appear inline. Understanding problem matchers means you can integrate ANY tool with VS Code, even custom scripts.
Core challenges you’ll face:
- Problem Matchers → maps to Parsing tool output to populate Problems panel
- Task Dependencies → maps to Chaining tasks in the right order
- Background Tasks → maps to Long-running processes like dev servers
- Custom Scripts → maps to Wrapping shell commands in tasks
Key Concepts:
- tasks.json: Configuration file that defines tasks (build, test, etc.).
- Problem Matchers: Regex patterns that parse tool output (compiler errors, linter warnings) and create clickable problems.
- Task Dependencies: Use
dependsOnto run prerequisite tasks before the main task. - Background Tasks: Tasks that run continuously (e.g.,
npm run watch). Require special problem matchers to know when they’re “ready.” - Compound Tasks: Run multiple tasks in parallel or sequence.
Difficulty: Intermediate Time estimate: Weekend Prerequisites: Basic command line knowledge, understanding of build tools (npm, make, etc.)
Real World Outcome
You join a new TypeScript project at a startup. The README says “Install dependencies, build, lint, test, then deploy.” Instead of fumbling through 5 separate terminal commands and copy-pasting error messages into Google, you experience this workflow:
Step 1: Open the Project
$ cd ~/projects/typescript-api
$ code .
VS Code opens. You see a .vscode/tasks.json file already configured by your team.
Step 2: Trigger the Build Task
Press Cmd+Shift+B (or Ctrl+Shift+B on Windows/Linux). VS Code’s Command Palette briefly shows:
> Tasks: Run Build Task
  Running task: Build TypeScript
Step 3: Watch the Integrated Terminal Execute the Task Chain
Because your “Build TypeScript” task has "dependsOn": ["Install Dependencies"], VS Code automatically runs npm install first:
Terminal Output (Task: Install Dependencies):
> Executing task: npm install <

added 342 packages in 4.2s
Terminal will be reused by tasks, press any key to close it.
Then it proceeds to the main build task:
Terminal Output (Task: Build TypeScript):
> Executing task: npm run build <

> typescript-api@1.0.0 build
> tsc

src/controllers/user.controller.ts(23,10): error TS2339: Property 'emaill' does not exist on type 'User'. Did you mean 'email'?
src/services/auth.service.ts(45,5): error TS2322: Type 'string' is not assignable to type 'number'.
src/utils/validator.ts(12,3): warning: Unused variable 'result'

Found 2 errors, 1 warning. Watching for file changes...
Step 4: Problems Panel Populates Automatically
Because you configured "problemMatcher": "$tsc", VS Code parses that terminal output and populates the Problems panel at the bottom:
Problems Panel:
  ERRORS (2)
    ⓧ Property 'emaill' does not exist on type 'User'. Did you mean 'email'?
       src/controllers/user.controller.ts [23, 10]

    ⓧ Type 'string' is not assignable to type 'number'.
       src/services/auth.service.ts [45, 5]

  WARNINGS (1)
    ⚠ Unused variable 'result'
       src/utils/validator.ts [12, 3]
Step 5: Click to Navigate to Error
You click on the first error: Property 'emaill' does not exist...
VS Code instantly jumps to src/controllers/user.controller.ts, line 23, column 10. Your cursor is positioned exactly at the typo:
// Before (cursor is blinking at 'emaill'):
const userEmail = user.emaill; // ← typo here
                       ↑
Step 6: Fix and Rebuild
You correct the typo:
// After:
const userEmail = user.email; // ✓ fixed
Press Cmd+S to save, then press Cmd+Shift+B again. This time the terminal shows:
> Executing task: npm run build <

> typescript-api@1.0.0 build
> tsc

Compilation complete. Watching for file changes...
The Problems panel now shows:
Problems Panel:
  ERRORS (1)  ← down from 2
    ⓧ Type 'string' is not assignable to type 'number'.
       src/services/auth.service.ts [45, 5]

  WARNINGS (1)
    ⚠ Unused variable 'result'
       src/utils/validator.ts [12, 3]
Step 7: Run Tests Before Deploy
Your team’s tasks.json includes a “Deploy” task with dependencies:
{
  "label": "Deploy",
  "dependsOn": ["Build TypeScript", "Run Tests"],
  "dependsOrder": "sequence"
}
You press Cmd+Shift+P → Tasks: Run Task → Deploy
VS Code runs the task chain:
- Build TypeScript → compiles code
- Run Tests → runs Jest test suite
- Deploy → only runs if tests pass
Terminal output:
> Executing task: npm test <

> typescript-api@1.0.0 test
> jest

 PASS  tests/user.controller.test.ts
 PASS  tests/auth.service.test.ts
 FAIL  tests/validator.test.ts
  ● validates email format
    Expected "invalid@" to be invalid

      12 |   it('validates email format', () => {
      13 |     expect(validateEmail('invalid@')).toBe(false);
    > 14 |   });
         |   ^

Test Suites: 1 failed, 2 passed, 3 total
Tests:       1 failed, 5 passed, 6 total
Time:        1.234s

npm ERR! Test failed. See above for more details.
Because the test task exited with code 1 (failure), VS Code stops the task chain. The “Deploy” task never runs.
You see a notification:
[VS Code Notification]
ⓘ Task 'Deploy' terminated with exit code 1.
This prevents you from deploying broken code to production.
Step 8: Background Watch Mode for Continuous Feedback
Your team also configured a “Watch Mode” task:
{
  "label": "Watch Mode",
  "command": "npm run watch",
  "isBackground": true,
  "problemMatcher": { /* ... background patterns ... */ }
}
You run this task once at the start of your workday. It runs in the background, recompiling TypeScript every time you save a file. The Problems panel updates in real-time as you type, without you manually triggering builds.
The Transformation:
Before (Manual Workflow):
Terminal 1: $ npm install          # Wait 5 seconds
Terminal 1: $ npm run build        # Copy/paste error line numbers into editor
            # Manually navigate to file
            # Fix error
Terminal 1: $ npm run build        # Rebuild
Terminal 1: $ npm run lint         # Check for style issues
Terminal 1: $ npm test             # Run tests
Terminal 1: $ npm run deploy       # Deploy if everything passed
# Total time: ~2 minutes, lots of context switching
After (Task Automation):
VS Code: Press Cmd+Shift+B         # Builds automatically
         Click error in Problems   # Jump to exact line
         Fix error
         Press Cmd+Shift+B         # Rebuild
VS Code: Press Cmd+Shift+P → Deploy # Runs build + test + deploy chain
# Total time: ~30 seconds, zero context switching
What You’ve Built:
A frictionless development loop where:
- Build tools integrate directly into the editor
- Errors are clickable and navigable
- Task dependencies prevent out-of-order execution
- Failed tests block deployments
- Watch modes provide instant feedback
- Zero manual terminal commands required
The Core Question You’re Answering
“How do I eliminate context switching between terminal and editor while automating repetitive workflows?”
Concepts You Must Understand First
Stop and research these before coding:
- The Task System Architecture
- VS Code tasks wrap command-line tools in a structured JSON configuration
- Instead of running
npm run buildin a terminal, you define it as a task and trigger it with keyboard shortcuts - Tasks run in VS Code’s integrated terminal but are controlled by the editor
- Example: A build task is just a wrapper around
npm run build, but with superpowers (problem matching, dependencies, presentation control) - Book Reference: “Integrate with External Tools via Tasks” (Official Microsoft Docs) - “Overview” section, “Tasks in Visual Studio Code” (Official Docs) - “Auto-detection” section
- Problem Matchers - The Bridge Between Tools and Editor
- Problem matchers are regex patterns that parse command-line tool output
- When a tool prints an error like
src/app.ts:42:5 - error TS2339: Property 'foo' does not exist, the problem matcher extracts:- File path:
src/app.ts - Line number:
42 - Column number:
5 - Severity:
error - Error code:
TS2339 - Message:
Property 'foo' does not exist
- File path:
- This data populates the Problems panel, making errors clickable
- Concrete Example:
{ "problemMatcher": { "owner": "typescript", "pattern": { "regexp": "^(.*)\\((\\d+),(\\d+)\\):\\s+(error|warning)\\s+(TS\\d+):\\s+(.*)$", "file": 1, // First capture group "line": 2, // Second capture group "column": 3, // Third capture group "severity": 4, // Fourth capture group "code": 5, // Fifth capture group "message": 6 // Sixth capture group } } } - When TypeScript outputs:
src/app.ts(42,5): error TS2339: Property 'foo' does not exist - The regex captures: file=
src/app.ts, line=42, column=5, severity=error, code=TS2339, message=Property 'foo' does not exist - Book Reference: “Tasks in Visual Studio Code” (Official Docs) - “Defining a Problem Matcher” section, “Processing Task Output with Problem Matchers” subsection
- Built-in Problem Matchers - Don’t Reinvent the Wheel
- VS Code includes pre-configured matchers for common tools:
$tsc: TypeScript compiler (tsc)$eslint-stylish: ESLint with stylish formatter$eslint-compact: ESLint with compact formatter$msCompile: Microsoft C# compiler$go: Go compiler$gcc: GCC C/C++ compiler$rustc: Rust compiler
- You reference these by name without defining the regex yourself
- Example:
{ "label": "Build TypeScript", "command": "tsc", "problemMatcher": "$tsc" // ← Uses built-in matcher } - Book Reference: “Tasks Appendix” (Official Docs) - “Problem Matchers” table with complete list
- VS Code includes pre-configured matchers for common tools:
- Task Dependencies - Orchestrating Complex Workflows
- Use
dependsOnto create task chains: if task B depends on task A, VS Code runs A first - Use
"dependsOrder": "sequence"to run dependencies one after another (synchronous) - Use
"dependsOrder": "parallel"to run dependencies simultaneously (asynchronous) - Concrete Example:
{ "label": "Deploy", "type": "shell", "command": "npm run deploy", "dependsOn": ["Install Dependencies", "Build", "Test"], "dependsOrder": "sequence" } - Execution order:
Install Dependencies→ waits to complete →Build→ waits to complete →Test→ waits to complete →Deploy - If any task fails (exits with non-zero code), the chain stops
- Book Reference: “Tasks in Visual Studio Code” (Official Docs) - “Compound Tasks” section, “Task Dependencies” subsection
- Use
- Background Tasks - Long-Running Processes
- Some tasks run continuously (watch modes, dev servers, file watchers)
- These require
"isBackground": trueto prevent VS Code from waiting forever - You must define a background problem matcher with patterns to detect when the task is “ready”
- Concrete Example:
{ "label": "Watch TypeScript", "command": "tsc --watch", "isBackground": true, "problemMatcher": { "owner": "typescript", "fileLocation": "relative", "pattern": { /* ... regex pattern ... */ }, "background": { "activeOnStart": true, "beginsPattern": "^\\s*\\d{1,2}:\\d{2}:\\d{2} (AM|PM) - File change detected\\.", "endsPattern": "^\\s*\\d{1,2}:\\d{2}:\\d{2} (AM|PM) - Compilation complete\\." } } } beginsPattern: Regex that matches when compilation starts (e.g.,"File change detected. Starting incremental compilation...")endsPattern: Regex that matches when compilation ends (e.g.,"Compilation complete. Watching for file changes.")- This allows VS Code to show a spinner during compilation and clear it when done
- Book Reference: “VS Code launch.json & tasks.json — The Ultimate Practical Guide” by Mykola Aleksandrov (2025) - “Background Tasks” section
- Task Groups - Keyboard Shortcut Assignment
- Tasks can belong to groups that map to keyboard shortcuts:
"group": "build": Triggered byCmd+Shift+B(orCtrl+Shift+Bon Windows/Linux)"group": "test": Triggered byCmd+Shift+T(if you configure a keybinding)
- Set
"isDefault": trueto make a task the default for its group - Concrete Example:
{ "label": "Build Production", "command": "npm run build", "group": { "kind": "build", "isDefault": true // ← This task runs when you press Cmd+Shift+B } } - Without
isDefault, VS Code prompts you to choose which build task to run - Book Reference: “Tasks in Visual Studio Code” (Official Docs) - “Task Groups” section, “Output Behavior” subsection
- Tasks can belong to groups that map to keyboard shortcuts:
- Presentation Options - Controlling Terminal Behavior
- The
presentationproperty controls how the terminal appears when a task runs:"reveal": "always"→ Always show the terminal"reveal": "never"→ Never show the terminal (silent task)"reveal": "silent"→ Only show terminal if task fails"panel": "shared"→ Reuse the same terminal for all tasks"panel": "dedicated"→ Create a new terminal for this task"panel": "new"→ Always create a fresh terminal"focus": true→ Give terminal focus when task runs"focus": false→ Keep focus in editor"clear": true→ Clear terminal before running
- Concrete Example:
{ "label": "Run Tests", "command": "npm test", "presentation": { "reveal": "always", // Always show terminal "panel": "dedicated", // Dedicated terminal for tests "focus": true, // Focus terminal (so you see results) "clear": true, // Clear before running "showReuseMessage": false // Hide "Terminal will be reused" message } } - Book Reference: “Tasks in Visual Studio Code” (Official Docs) - “Customizing Auto-detected Tasks” section, “Output Behavior” subsection
- The
Questions to Guide Your Design
- When should you create a task vs just use the terminal?
- Use tasks for frequently-run commands (build, test, lint).
- Use tasks when you want errors to appear in the Problems panel.
- Use the terminal for one-off commands (installing a new package, debugging scripts).
- Exercise: Create a task for your most commonly-run command. Assign it to the build or test group so you can trigger it with a keyboard shortcut.
- How do you handle tasks that depend on each other?
- Use
dependsOnto create a dependency chain. - Example: “Deploy” depends on “Test,” which depends on “Build,” which depends on “Install.”
- Exercise: Create a deployment task that won’t run unless all tests pass.
- Use
- How do you integrate a custom tool that VS Code doesn’t know about?
- Create a custom problem matcher. Parse the tool’s output format.
- Example: A custom linter that prints
[ERROR] file.js:42: Undefined variable. - Regex:
^\\[ERROR\\] (.+):(\\d+): (.+)$. - Exercise: Write a problem matcher for a tool you use that doesn’t have built-in support.
Thinking Exercise
Scenario: You’re working on a TypeScript project. Every time you make a change, you need to:
- Compile TypeScript to JavaScript.
- Run ESLint.
- Run tests.
- If tests pass, copy files to a
distfolder.
Manual approach: Run four commands in sequence:
npm run build
npm run lint
npm test
npm run copy-files
This takes 30 seconds and you have to remember the order.
Automated approach (with tasks):
- Create a “Build” task for
npm run buildwith$tscproblem matcher. - Create a “Lint” task for
npm run lintwith$eslint-stylishproblem matcher. - Create a “Test” task for
npm testwith$jestproblem matcher. - Create a “Package” task for
npm run copy-files. - Make “Package” depend on [“Build”, “Lint”, “Test”] with
"dependsOrder": "sequence". - Press
Cmd+Shift+P→ “Tasks: Run Task” → “Package”. Everything runs in order. If any step fails, the pipeline stops.
Challenge: Implement this for a real project. Time how long it takes to run manually vs with tasks.
The Interview Questions They’ll Ask
- “How do you integrate build tools into your editor workflow?”
- Answer: “I use VS Code tasks to wrap build tools like TypeScript, ESLint, and Jest. I define tasks in
tasks.jsonwith problem matchers that parse the tool’s output and display errors in the Problems panel. I assign tasks to groups so I can run them with keyboard shortcuts likeCmd+Shift+Bfor building.”
- Answer: “I use VS Code tasks to wrap build tools like TypeScript, ESLint, and Jest. I define tasks in
- “What are problem matchers and why are they useful?”
- Answer: “Problem matchers are regex patterns that parse the output of command-line tools to extract file paths, line numbers, and error messages. This populates the Problems panel in VS Code, so I can click on an error and jump directly to the problematic line. It eliminates the need to manually read terminal output and search for files.”
- “How do you ensure tasks run in the correct order?”
- Answer: “I use the
dependsOnproperty intasks.jsonto create dependencies between tasks. For example, my ‘Test’ task depends on ‘Build’, so the build runs first. I can control whether dependencies run in sequence or parallel usingdependsOrder. This ensures I never accidentally run tests on stale builds.”
- Answer: “I use the
- “Explain how you would set up a continuous build/test workflow in VS Code.”
- Answer: “I’d create a background task that runs
npm run watchortsc --watch. I’d mark it asisBackground: trueand define a background problem matcher with patterns to detect when compilation starts and ends. This task runs continuously and updates the Problems panel in real-time as I edit code. I can combine this with a test watcher using a compound task configuration.”
- Answer: “I’d create a background task that runs
- “How do you handle deployment tasks that should only run if tests pass?”
- Answer: “I create a ‘Deploy’ task that has
dependsOn: ['Build', 'Test']withdependsOrder: 'sequence'. If the test task exits with a non-zero code (indicating failure), VS Code stops the task chain and doesn’t run the deploy task. I can also use thepresentationproperty to control whether the terminal stays open on failure so I can see the error.”
- Answer: “I create a ‘Deploy’ task that has
Hints in Layers
Hint 1 - Creating Your First Task:
- Press
Cmd+Shift+P→ “Tasks: Configure Task” → “Create tasks.json from template” → Select your build tool (npm, Maven, etc.). - VS Code generates a basic
tasks.jsonwith common tasks. - Edit the
commandfield to match your scripts.
Hint 2 - Using Built-in Problem Matchers:
- For TypeScript:
"problemMatcher": "$tsc" - For ESLint:
"problemMatcher": "$eslint-stylish"or"$eslint-compact" - For Jest:
"problemMatcher": "$jest" - For Go:
"problemMatcher": "$go" - These are defined by VS Code and handle the regex automatically.
Hint 3 - Creating a Default Build Task:
{
  "label": "Build",
  "type": "shell",
  "command": "npm run build",
  "group": {
    "kind": "build",
    "isDefault": true
  },
  "problemMatcher": "$tsc"
}
- Now you can press
Cmd+Shift+Bto build instantly.
Hint 4 - Task Dependencies:
{
  "label": "Deploy",
  "type": "shell",
  "command": "npm run deploy",
  "dependsOn": ["Build", "Test"],
  "dependsOrder": "sequence"
}
- Running “Deploy” will first run “Build”, then “Test”, then “Deploy.”
- If any task fails, the chain stops.
Hint 5 - Background Tasks for Watch Mode:
{
  "label": "Watch",
  "type": "shell",
  "command": "npm run watch",
  "isBackground": true,
  "problemMatcher": {
    "owner": "typescript",
    "fileLocation": "relative",
    "pattern": {
      "regexp": "^(.*)\\((\\d+),(\\d+)\\):\\s+(error|warning|info)\\s+(TS\\d+):\\s+(.*)$",
      "file": 1,
      "line": 2,
      "column": 3,
      "severity": 4,
      "code": 5,
      "message": 6
    },
    "background": {
      "activeOnStart": true,
      "beginsPattern": "^\\s*\\d{1,2}:\\d{2}:\\d{2}(?: AM| PM)? - File change detected\\. Starting incremental compilation\\.\\.\\.",
      "endsPattern": "^\\s*\\d{1,2}:\\d{2}:\\d{2}(?: AM| PM)? - (?:Compilation complete\\.|Found \\d+ errors?\\. Watching for file changes\\.)"
    }
  }
}
- This task runs continuously and updates problems as files change.
Hint 6 - Custom Problem Matcher:
If your tool outputs: ERROR in src/app.ts:42:5 - Undefined variable 'foo'
{
  "problemMatcher": {
    "owner": "custom",
    "fileLocation": "relative",
    "pattern": {
      "regexp": "^ERROR in (.+):(\\d+):(\\d+) - (.+)$",
      "file": 1,
      "line": 2,
      "column": 3,
      "message": 4
    }
  }
}
Hint 7 - Presentation Options: Control how the terminal appears:
{
  "presentation": {
    "reveal": "always",        // Always show terminal
    "panel": "shared",         // Reuse same terminal
    "focus": false,            // Don't steal focus
    "clear": true,             // Clear terminal before running
    "showReuseMessage": false  // Hide "Terminal will be reused" message
  }
}
Hint 8 - Compound Tasks: Run multiple tasks in parallel:
{
  "label": "Build All",
  "dependsOn": ["Build Frontend", "Build Backend"],
  "dependsOrder": "parallel",
  "problemMatcher": []
}
Books That Will Help
| Book | Author | Relevant Chapters | Why It Helps |
|---|---|---|---|
| Integrate with External Tools via Tasks (Official Docs) | Microsoft | All sections | Comprehensive guide to tasks.json including problem matchers, dependencies, and background tasks |
| VS Code launch.json & tasks.json — The Ultimate Practical Guide | Mykola Aleksandrov | Tasks section | Practical 2025 guide with real-world examples of task configurations, problem matchers, and workflows |
| Tasks in Visual Studio Code (Official Docs) | Microsoft | Problem Matchers, Task Groups, Dependencies | Detailed reference on all task configuration options |
| VSCode Tasks Problem Matchers | Allison Thackston | Custom Problem Matcher Examples | Blog post with practical examples of creating custom problem matchers |
| Mastering Tasks JSON in VSCode - A Practical Guide | Howik | All sections | Step-by-step guide to building complex task workflows |
| Continuous Integration: Improving Software Quality and Reducing Risk | Paul Duvall | Ch 2 (Build Automation) | Explains CI/CD principles that inform how to structure tasks for automated workflows |
Common Pitfalls & Debugging
Problem 1: “Task runs but errors don’t appear in Problems panel”
- Why: Problem matcher isn’t configured correctly, or the regex pattern doesn’t match the tool’s output format
- Debug:
- Run the task and copy the exact error output from the terminal
- Test your regex against it using a regex tester (regex101.com)
- Add
"$schema"to tasks.json for autocomplete on problem matcher properties
- Fix: Use a built-in problem matcher first (
$tsc,$eslint,$gcc, etc.) before creating custom ones - Quick test: Run task, check if errors appear in Problems panel (
Cmd+Shift+M). If not, your problem matcher is wrong.
Problem 2: “preLaunchTask doesn’t run before debugging”
- Why: The task label doesn’t match exactly (case-sensitive, whitespace matters)
- Fix:
- In
launch.json, ensure"preLaunchTask": "Build"matches exactly"label": "Build"intasks.json - Not “build” or “Build “ (trailing space)
- In
- Verification: Try to debug. VS Code should show “Running preLaunchTask ‘Build’…” in the Debug Console
- Tool: Command Palette → “Tasks: Run Task” → see list of available task labels
Problem 3: “Task dependency chain doesn’t run in the right order”
- Why:
dependsOnruns tasks in parallel by default, not sequentially - Fix: Use
dependsOrder: "sequence"to force sequential execution:{ "label": "Deploy", "dependsOn": ["Build", "Test"], "dependsOrder": "sequence" } - Debug: Watch the terminal output carefully - if “Test” starts before “Build” finishes, you’re running in parallel
- Quick test: Add
sleep 5to Build task, verify Test waits for it to complete
Problem 4: “Background task never finishes - keeps running and blocks other tasks”
- Why: Background task’s
beginsPatternandendsPatternaren’t matching the tool’s output - Debug:
- Look at the exact terminal output when the background task starts and ends
- Ensure your regex matches those patterns
- Test patterns at regex101.com
- Fix: Copy the exact output strings and turn them into regex patterns:
"beginsPattern": "^Starting compilation in watch mode\\.\\.\\.$", "endsPattern": "^Compilation complete\\. Watching for file changes\\.$" - Tool: Add
"reveal": "always"to task to always show terminal output
Problem 5: “Task runs the wrong command / ‘command not found’“
- Why: Command isn’t in PATH, or shell environment differs from terminal
- Fix:
- Use full path to executable:
"/usr/local/bin/node"instead of"node" - For npm scripts, use
"type": "npm"instead of"type": "shell" - Check VS Code’s integrated terminal:
echo $PATH(macOS/Linux) orecho %PATH%(Windows)
- Use full path to executable:
- Verification: Run
which node(macOS/Linux) orwhere node(Windows) in VS Code’s terminal to get full path - Production fix: Add to task:
"options": { "env": { "PATH": "/usr/local/bin:${env:PATH}" } }
Problem 6: “Problem matcher creates duplicate errors”
- Why: Multiple tasks are running with the same problem matcher owner, or task is running multiple times
- Fix:
- Give each problem matcher a unique
"owner"value:"problemMatcher": { "owner": "my-unique-linter" } - Or clear previous problems: Command Palette → “Problems: Clear All Diagnostics”
- Give each problem matcher a unique
- Debug: Check the Problems panel - look at the “source” column to see which task created each error
- Tool: Use
"fileLocation": "absolute"if problems appear in wrong files
Problem 7: “Cross-platform task doesn’t work on Windows / macOS / Linux”
- Why: Shell syntax differs (
rmvsdel,/vs\, etc.) - Fix: Use Node.js scripts instead of shell commands for cross-platform compatibility:
{ "label": "Clean", "type": "shell", "command": "node", "args": ["-e", "require('fs').rmSync('dist', {recursive: true})"] } - Alternative: Use separate tasks with
"windows","linux","osx"properties:{ "label": "Clean", "windows": { "command": "del /S /Q dist" }, "linux": { "command": "rm -rf dist" }, "osx": { "command": "rm -rf dist" } } - Tool: Test on all platforms using VS Code’s Remote Development or GitHub Actions
Project 4: “Dynamic Snippet Library” — Metaprogramming
| Attribute | Value |
|---|---|
| File | VS_CODE_MASTERY_LEARNING_PROJECTS.md |
| Main Programming Language | JSON / TextMate Snippet Syntax |
| Coolness Level | Level 2: Practical but Forgettable |
| Business Potential | 2. Micro-SaaS (Productivity packs) |
| Difficulty | Level 1: Beginner |
| Knowledge Area | Templating / Efficiency |
| Software or Tool | VS Code Snippets |
| Main Book | “Visual Studio Code: End-to-End Editing and Debugging Tools” |
What you’ll build: A “Smart Snippet” library that doesn’t just paste code, but transforms it. You will create snippets that take a filename (e.g., user.controller.ts), extract the class name (UserController), and generate a full boilerplate class structure using Variable Transformations and Regex.
Why it teaches Efficiency: Typing boilerplate is a waste of life. Snippets allow you to define the structure of your code once and reuse it infinite times. Advanced snippets feel like magic because they “know” context (dates, filenames, clipboard content).
Core challenges you’ll face:
- Snippet Syntax Variables → maps to TextMate grammar
- Regex Transformations → maps to Advanced string manipulation
- Tabstops & Placeholders → maps to Cursor flow control
Key Concepts:
- TextMate Snippets: The underlying engine VS Code uses.
- Variable Substitution:
${TM_FILENAME_BASE/(.*)/${1:/upcase}/}.
Difficulty: Beginner Time estimate: Weekend Prerequisites: Basic Regex
Real World Outcome
You’re building a React application with dozens of components. Every time you create a new component file, you type the same boilerplate: imports, interface definitions, function signature, export statement. It takes 2 minutes and you make typos. After building smart snippets, this is what happens instead:
Scenario: Creating a New React Component
Step 1: Create a New File
You create a file named product-card.tsx in your components folder:
$ touch src/components/product-card.tsx
$ code src/components/product-card.tsx
VS Code opens an empty file. Your cursor is blinking on line 1.
Step 2: Trigger the Snippet
You type rfc (React Functional Component) and press Tab.
Step 3: Watch the Magic Happen
VS Code instantly generates this code, extracting the component name from the filename:
import React from 'react';

interface ProductCardProps {
  ← Cursor is here, ready for you to type the first prop
}

export const ProductCard: React.FC<ProductCardProps> = (props) => {
  return (
    <div className="product-card">
      {/* ProductCard content */}
    </div>
  );
};

export default ProductCard;
How It Worked:
- The snippet read the filename:
product-card.tsx - It extracted the base name (without extension):
product-card - It applied a regex transformation:
product-card→ProductCard(kebab-case to PascalCase) - It inserted that name in 4 places: interface name, component name, export name, and comment
- It positioned your cursor inside the
ProductCardPropsinterface, ready for you to define props
Step 4: Fill in the Props
Your cursor is inside ProductCardProps. You press Tab to jump to the next tabstop and type:
interface ProductCardProps {
  title: string;        ← You typed this
  price: number;        ← and this
  imageUrl: string;     ← and this
}
Press Tab again. The cursor jumps inside the component body, ready for implementation.
The Full Workflow in Action:
Before (Manual Typing - 2 minutes):
// Type manually:
import React from 'react';  // ← typo: forgot 'react', typed 'reat'

interface ProductCardProps {  // ← typo: 'ProductCArdProps'
  // Define props
}

export const ProductCard: React.FC<ProductCardProps> = (props) => {  // ← forgot 'export'
  return (
    <div>

    </div>
  );
};

export default ProductCard;  // ← inconsistent: used different name
Total: 2 minutes, 3 typos to fix, inconsistent naming
After (With Smart Snippet - 10 seconds):
// Type: rfc<Tab>
// Result: Perfect boilerplate in 1 second
// Time spent: 10 seconds (including typing props)
More Examples of Smart Snippets You’ll Build:
1. API Route Handler (Node.js/Express)
File: user-routes.ts
Type: api-route<Tab>
Result:
import { Router, Request, Response } from 'express';

const userRoutes = Router();  // ← Extracted from filename

/**
 * GET /users
 * Description: [cursor here]
 */
userRoutes.get('/', async (req: Request, res: Response) => {
  try {
    // Implementation
    res.json({ success: true });
  } catch (error) {
    res.status(500).json({ error: error.message });
  }
});

export default userRoutes;
2. Test File (Jest/Vitest)
File: auth-service.test.ts
Type: test-suite<Tab>
Result:
import { describe, it, expect } from 'vitest';
import { authService } from './auth-service';  // ← Auto-imports from filename

describe('AuthService', () => {  // ← Extracted 'AuthService' from 'auth-service'
  it('[cursor here]', () => {
    // Test implementation
  });
});
3. Database Model (Mongoose/TypeORM)
File: blog-post.model.ts
Type: model<Tab>
Result:
import { Schema, model, Document } from 'mongoose';

interface BlogPost extends Document {  // ← Extracted from filename
  // Schema fields [cursor here]
}

const BlogPostSchema = new Schema<BlogPost>({
  // Schema definition
}, {
  timestamps: true  // ← Auto-includes timestamps
});

export const BlogPostModel = model<BlogPost>('BlogPost', BlogPostSchema);
4. Context-Aware Snippets
Some snippets can read your clipboard or insert dynamic values:
File: user-api.ts
Type: fetch<Tab>
Result:
const response = await fetch('https://api.example.com', {
  method: 'GET',
  headers: {
    'Content-Type': 'application/json',
    'Authorization': `Bearer ${token}`
  }
});

if (!response.ok) {
  throw new Error(`HTTP error! status: ${response.status}`);
}

const data = await response.json();
5. Current Date/Time Insertion
Type: log-date<Tab>
Result:
console.log('[2024-12-27 14:32:15] User action completed'); // ← Auto-inserted current date/time
What You’ve Achieved:
By building smart snippets, you’ve created:
- Filename-Aware Templates: Snippets that extract component/class names from filenames
- Case Transformations: Converting
kebab-case→PascalCase,snake_case→camelCase - Multi-Cursor Tabstops: Snippets that guide your cursor through logical editing points
- Dynamic Content: Date/time insertion, clipboard integration, environment-aware values
- Language-Scoped Snippets: Different snippets for TypeScript vs JavaScript vs Python
- Project-Specific Snippets: Team-shared snippets in
.vscodefolder for consistency
Time Savings:
- Per component: 1 minute, 50 seconds saved
- Over 100 components: 3 hours saved
- Over a year: 20+ hours saved
- Typos prevented: Hundreds
- Code consistency: 100%
The Core Question You’re Answering
“How can I code at the speed of thought without getting bogged down by syntax?”
Concepts You Must Understand First
Stop and research these before coding:
- Tabstops - Cursor Flow Control
- Tabstops define where the cursor jumps when you press
Tabafter triggering a snippet - Syntax:
$1,$2,$3, …,$0 $0is special: it’s the final cursor position (where the cursor ends after all tabs)- Concrete Example:
{ "Function Component": { "prefix": "rfc", "body": [ "const $1 = () => {", " return (", " <div>", " $2", " </div>", " );", "};", "", "export default $1;$0" ] } } - When you type
rfc<Tab>:- Cursor appears at
$1(component name position) - you typeMyComponent - Press
Tab, cursor jumps to$2(inside the div) - you type component content - Press
Tab, cursor jumps to$0(after the export) - snippet complete
- Cursor appears at
- Book Reference: “Mastering Regular Expressions” by Jeffrey E.F. Friedl - Ch. 3: “Regex Features and Flavors” (understanding capture groups), “Visual Studio Code Distilled” by Alessandro Del Sole - Ch. 5: “Customizing VS Code” (Snippets section)
- Tabstops define where the cursor jumps when you press
- Placeholders - Default Values for Tabstops
- Placeholders provide default text that’s selected when the cursor reaches a tabstop
- Syntax:
${1:defaultText} - The default text is highlighted, so typing replaces it, or pressing Tab keeps it
- Concrete Example:
{ "Import Statement": { "prefix": "imp", "body": [ "import { ${1:Component} } from '${2:./component}';$0" ] } } - When you type
imp<Tab>:Componentis highlighted - type to replace, or Tab to keep it./componentis highlighted - type the actual path- Cursor ends after the semicolon
- Book Reference: “Visual Studio Code Distilled” by Alessandro Del Sole - Ch. 5: “Customizing VS Code” (detailed snippet syntax), “TextMate Bundle Development” documentation - “Snippet Syntax” section
- Variables - Context-Aware Dynamic Content
- VS Code provides variables that insert dynamic content based on context:
$TM_FILENAME: Full filename with extension (e.g.,user-controller.ts)$TM_FILENAME_BASE: Filename without extension (e.g.,user-controller)$TM_DIRECTORY: Directory path of the file$TM_FILEPATH: Full file path$CLIPBOARD: Current clipboard content$CURRENT_YEAR: Current year (e.g.,2024)$CURRENT_MONTH: Current month (01-12)$CURRENT_DATE: Current day of month (01-31)$CURRENT_HOUR,$CURRENT_MINUTE,$CURRENT_SECOND: Time values$WORKSPACE_NAME: Name of the workspace folder
- Concrete Example:
{ "File Header": { "prefix": "header", "body": [ "/**", " * File: $TM_FILENAME", " * Author: Your Name", " * Created: $CURRENT_YEAR-$CURRENT_MONTH-$CURRENT_DATE", " * Description: $1", " */", "$0" ] } } - Result in file
auth-service.tson Dec 27, 2024: ```typescript /** - File: auth-service.ts
- Author: Your Name
- Created: 2024-12-27
- Description: [cursor here] */ ```
- Book Reference: “Visual Studio Code Distilled” by Alessandro Del Sole - Ch. 5: “Customizing VS Code” (Variables in Snippets section), VS Code Official Docs - “Snippets in Visual Studio Code” (Variables reference table)
- VS Code provides variables that insert dynamic content based on context:
- Regex Transformations - The Real Power
- Transform variables using regex:
${VARIABLE/REGEX/REPLACEMENT/OPTIONS} - Syntax breakdown:
VARIABLE: Which variable to transform (e.g.,TM_FILENAME_BASE)REGEX: Pattern to match (e.g.,(.*)matches everything)REPLACEMENT: What to replace it with (e.g.,${1:/upcase}uppercase first capture group)OPTIONS: Flags likeg(global),i(case-insensitive)
- Common Transformations:
a) kebab-case → PascalCase:
${TM_FILENAME_BASE/^(.)|-(.)/${1:/upcase}${2:/upcase}/g}- Input:
user-profile.ts - Regex:
^(.)|-(.)matches first character AND any character after a dash - Replacement:
${1:/upcase}${2:/upcase}uppercases both - Output:
UserProfile
b) snake_case → camelCase:
${TM_FILENAME_BASE/_(.)/\u$1/g}- Input:
user_profile.ts - Regex:
_(.)matches underscore + next character - Replacement:
\u$1uppercases the captured character, removes underscore - Output:
userProfile
c) Capitalize first letter:
${1/(.)/${1:/upcase}/}- Input:
hello - Regex:
(.)captures first character - Replacement:
${1:/upcase}uppercases it - Output:
Hello
Concrete Example:
{ "React Component": { "prefix": "rfc", "body": [ "import React from 'react';", "", "interface ${TM_FILENAME_BASE/^(.)|-(.)/${1:/upcase}${2:/upcase}/g}Props {", " $1", "}", "", "export const ${TM_FILENAME_BASE/^(.)|-(.)/${1:/upcase}${2:/upcase}/g}: React.FC<${TM_FILENAME_BASE/^(.)|-(.)/${1:/upcase}${2:/upcase}/g}Props> = (props) => {", " return (", " <div>", " $2", " </div>", " );", "};", "", "export default ${TM_FILENAME_BASE/^(.)|-(.)/${1:/upcase}${2:/upcase}/g};$0" ] } }- In file
product-card.tsx, typingrfc<Tab>generates: ```typescript import React from ‘react’;
interface ProductCardProps { // ← Transformed from ‘product-card’ [cursor] }
export const ProductCard: React.FC
= (props) => { return ( <div> </div> ); };export default ProductCard; ```
- Book Reference: “Mastering Regular Expressions” by Jeffrey E.F. Friedl - Ch. 4: “The Mechanics of Expression Processing” (how regex engines work), Ch. 5: “Practical Regex Techniques” (practical transformation examples), Ch. 6: “Crafting an Efficient Expression” (optimization)
- Transform variables using regex:
- Choice Elements - Dropdown Options
- Syntax:
${1|option1,option2,option3|} - Creates a dropdown menu with predefined choices
- Concrete Example:
{ "HTTP Method": { "prefix": "api-method", "body": [ "router.${1|get,post,put,delete,patch|}('/${2:path}', async (req, res) => {", " $0", "});" ] } } - When you type
api-method<Tab>, VS Code shows a dropdown:┌────────┐ │ get │ ← Selected │ post │ │ put │ │ delete │ │ patch │ └────────┘ - Arrow keys select, Enter confirms
- Book Reference: “Visual Studio Code Distilled” by Alessandro Del Sole - Ch. 5: “Customizing VS Code” (Choice syntax section)
- Syntax:
- Scope - Controlling Where Snippets Appear
- The
scopeproperty limits snippets to specific languages - Without scope, snippets appear in ALL files (annoying!)
- Concrete Example:
{ "React Component": { "prefix": "rfc", "scope": "typescriptreact,javascriptreact", // ← Only in .tsx and .jsx files "body": [ "..." ] }, "Python Function": { "prefix": "def", "scope": "python", // ← Only in .py files "body": [ "def ${1:function_name}($2):", " \"\"\"$3\"\"\"", " $0" ] } } - Common scope values:
javascript: .js filestypescript: .ts filesjavascriptreact: .jsx filestypescriptreact: .tsx filespython: .py filesgo: .go filesrust: .rs filesmarkdown: .md files
- Book Reference: “Visual Studio Code Distilled” by Alessandro Del Sole - Ch. 5: “Customizing VS Code” (Snippet Scope section)
- The
- Multi-Line Snippets - Formatting Considerations
- Use JSON array for body: each string is a line
- VS Code preserves indentation based on the trigger location
- Use
\tfor tabs,\nfor line breaks within a string - Concrete Example:
{ "Try-Catch": { "prefix": "try", "body": [ "try {", "\t$1", "} catch (error) {", "\tconsole.error('${2:Error}:', error);", "\t$0", "}" ] } } - The
\tinserts a tab, respecting your editor’s tab settings (spaces or tabs) - When triggered at indentation level 2, the entire snippet indents 2 levels
- Book Reference: “TextMate Bundle Development” documentation - “Snippet Formatting and Indentation” section
Why These Concepts Matter:
Without understanding transformations, your snippets are just static templates. With transformations, you create context-aware code generators that:
- Extract meaning from filenames
- Apply naming conventions automatically
- Reduce boilerplate by 80%
- Enforce team coding standards
- Save hours per week
Questions to Guide Your Design
Before implementing, think through these:
- Scope - Where Should This Snippet Appear?
- Should this snippet appear in ALL languages or just TypeScript/React files?
- Use the
scopeproperty to limit snippets to specific file types - Example Decision: A React component snippet should ONLY appear in
.tsxand.jsxfiles - Implementation:
{ "scope": "typescriptreact,javascriptreact" } - Exercise: Create a snippet library with language-specific scopes (Python functions for
.py, Go structs for.go, etc.)
- Naming Conventions - How Do You Transform Filenames?
- Your project uses
kebab-casefor filenames butPascalCasefor component names - How do you transform
user-profile-card.tsx→UserProfileCard? - Regex Breakdown:
- Pattern:
^(.)|-(.) - Matches: First character (
^(.)) OR any character after a dash (-(.)) - Replacement:
${1:/upcase}${2:/upcase}(uppercase both capture groups) - Removes dashes automatically
- Pattern:
- Exercise: Write transformations for:
snake_case→camelCasecamelCase→PascalCaseCONSTANT_CASE→kebab-case
- Your project uses
- Tabstop Flow - What’s the Logical Editing Order?
- When a user triggers your snippet, where should the cursor go first?
- Example Workflow (React component):
$1: Props definition (most important - defines component interface)$2: Component body (implementation)$0: After the export (completion)
- Anti-pattern: Jumping to the export name before props are defined
- Exercise: Create a snippet for a database model. What’s the logical order of fields?
- Default Values - Should Tabstops Have Placeholders?
- Placeholders provide hints and defaults:
${1:defaultValue} - When to use:
- Common patterns (e.g.,
${1:Component}for import statements) - Type hints (e.g.,
${2:string}for type annotations) - Documentation prompts (e.g.,
${3:Description}in JSDoc)
- Common patterns (e.g.,
- When to skip:
- Values that MUST be unique (component names)
- Values with no sensible default
- Exercise: Create an API route snippet with sensible defaults for HTTP methods, status codes, and error messages
- Placeholders provide hints and defaults:
- Variable Reuse - How Do You Avoid Repetition?
- If a value appears multiple times, should you:
- Option A: Use the same tabstop number (typing once updates all instances)
- Option B: Use transformation/variables (extracted from context)
- Example: Component name appears 4 times:
{ "body": [ "interface ${TM_FILENAME_BASE/...}Props {", // ← Use variable transformation "}", "export const ${TM_FILENAME_BASE/...}: React.FC<...> = (props) => {", " // ...", "};", "export default ${TM_FILENAME_BASE/...};" ] } - Benefit: User never types the component name - it’s extracted automatically
- Exercise: Create a test file snippet that auto-imports the file being tested based on filename
- If a value appears multiple times, should you:
- Project-Wide vs User-Wide Snippets - Where Do They Live?
- User snippets:
~/Library/Application Support/Code/User/snippets/(personal, all projects) - Workspace snippets:
.vscode/*.code-snippets(team-shared, version controlled) - Decision criteria:
- Personal preferences → User snippets
- Team conventions → Workspace snippets
- Framework boilerplate (React, Vue, etc.) → User snippets
- Company-specific patterns → Workspace snippets
- Example: A company’s API route pattern should be in
.vscode/api-routes.code-snippetsso all team members use it - Exercise: Create a workspace snippet for your team’s error handling pattern
- User snippets:
- Multi-Language Support - Should You Create Variants?
- If you support both TypeScript and JavaScript, do you:
- Option A: Create separate snippets (
rfc-ts,rfc-js) - Option B: Create one snippet with choice elements:
${1|React.FC,React.Component|}
- Option A: Create separate snippets (
- Example:
{ "React Component (Flexible)": { "prefix": "rfc", "scope": "typescriptreact,javascriptreact", "body": [ "import ${1|React,{useState}|} from 'react';", "", "export const ${TM_FILENAME_BASE/...} = (${2|props,{...props}|}) => {", " return <div>$3</div>;", "};" ] } } - Exercise: Create a snippet that works for both functional and class components using choice elements
- If you support both TypeScript and JavaScript, do you:
Thinking Exercise
Regex Transformation Challenge:
Before implementing any snippets, work through this problem on paper to build your mental model:
Goal: Transform kebab-case-file-name into PascalCaseClassName
Step 1: Understand the Pattern
Input examples:
user-profile→UserProfileauth-service→AuthServiceproduct-card-list→ProductCardList
What needs to happen:
- First character: lowercase → uppercase (
u→U) - Characters after dashes: lowercase → uppercase, remove dash (
-p→P) - Other characters: keep as-is
Step 2: Build the Regex
Try to write the regex yourself before looking at the solution:
Pattern to match: _______________
Replacement: _______________
Step 3: Test Your Regex
Test cases:
Input: user-profile
Expected: UserProfile
Your output: _______________

Input: product-card
Expected: ProductCard
Your output: _______________

Input: auth
Expected: Auth
Your output: _______________
Solution (Don’t peek until you’ve tried!):
Pattern: ^(.)|-(.)
Explanation:
  ^(.)     → Match first character (capture group 1)
  |        → OR
  -(.)     → Match dash + next character (capture group 2)

Replacement: ${1:/upcase}${2:/upcase}
Explanation:
  ${1:/upcase}  → Uppercase first capture group (first char)
  ${2:/upcase}  → Uppercase second capture group (char after dash)
  Dash is automatically removed because it's not in a capture group
Step 4: Apply to VS Code Snippet Syntax
Now write the full snippet transformation:
{
  "React Component": {
    "prefix": "rfc",
    "body": [
      "export const ${TM_FILENAME_BASE/___FILL_IN_REGEX___/___FILL_IN_REPLACEMENT___/} = () => {",
      "  return <div></div>;",
      "};"
    ]
  }
}
Step 5: Advanced Challenge - snake_case to camelCase
Input examples:
user_profile→userProfileauth_service→authServiceget_user_data→getUserData
Rules:
- First character: keep lowercase
- Characters after underscores: uppercase, remove underscore
- Other characters: keep as-is
Try to write this regex yourself:
Pattern: _______________
Replacement: _______________
Solution:
Pattern: _(.)
Explanation:
  _(.)     → Match underscore + next character (capture group 1)

Replacement: ${1:/upcase}
Explanation:
  ${1:/upcase}  → Uppercase the captured character
  Underscore is removed because it's not captured
Step 6: Real-World Scenario
You’re creating a snippet for Express.js API routes. The filename is user-routes.ts.
Required transformations:
- Filename (
user-routes) → Variable name (userRoutes) → camelCase - Filename (
user-routes) → Path (/users) → plural, lowercase - Filename (
user-routes) → Description (User Routes) → Title Case
Write the regex patterns for each:
camelCase:     _______________
Plural path:   _______________
Title Case:    _______________
Hints:
- camelCase: First word lowercase, subsequent words uppercase (different from PascalCase!)
- Plural: Might need to just add ‘s’ (simplified)
- Title Case: Uppercase first letter of each word, keep spaces
Solution for camelCase (different from PascalCase):
Pattern: -(.)/replace
Replacement: ${1:/upcase}
Note: This keeps first character as-is (already lowercase)
Full snippet example:
{
  "Express Route": {
    "prefix": "route",
    "body": [
      "import { Router } from 'express';",
      "",
      "const ${TM_FILENAME_BASE/-(.)/${1:/upcase}/g} = Router();",
      "",
      "${TM_FILENAME_BASE/-(.)/${1:/upcase}/g}.get('/${TM_FILENAME_BASE/-.*$//}s', async (req, res) => {",
      "  res.json({ message: '${TM_FILENAME_BASE/^(.)|-(.)/\${1:/upcase}\${2:/upcase}/g}' });",
      "});",
      "",
      "export default ${TM_FILENAME_BASE/-(.)/${1:/upcase}/g};"
    ]
  }
}
In file user-routes.ts, this generates:
import { Router } from 'express';

const userRoutes = Router();  // ← camelCase

userRoutes.get('/users', async (req, res) => {  // ← plural path
  res.json({ message: 'User Routes' });  // ← Title Case
});

export default userRoutes;
Why This Exercise Matters:
90% of snippet power comes from regex transformations. Without understanding these patterns, your snippets are just fancy copy-paste. With them, you create intelligent code generators that adapt to context.
The Interview Questions They’ll Ask
Prepare to answer these (with example code):
- “How do you enforce code consistency across a team of 20 developers?”
- Good Answer: “I create workspace-specific snippets in the
.vscodefolder that are version-controlled with the project. For example, our team has a strict API route pattern. Instead of writing documentation that people might not read, I created a snippet:”{ "Company API Route": { "prefix": "api", "scope": "typescript", "body": [ "import { Request, Response, NextFunction } from 'express';", "import { ApiError } from '@company/errors';", "import { logger } from '@company/logger';", "", "export const ${TM_FILENAME_BASE/-(.)/${1:/upcase}/g} = async (", " req: Request,", " res: Response,", " next: NextFunction", ") => {", " try {", " logger.info('${TM_FILENAME_BASE/-(.)/${1:/upcase}/g} called', { userId: req.user?.id });", " $1", " res.status(200).json({ success: true, data: $2 });", " } catch (error) {", " next(new ApiError(500, error.message));", " }", "};$0" ] } } - “Every developer types
api<Tab>and gets the exact same structure: proper error handling, logging, and type safety. This ensures 100% consistency without code reviews catching these issues.”
- Good Answer: “I create workspace-specific snippets in the
- “What’s the difference between
$1and${1:placeholder}in snippets?”- Good Answer: “
$1is just a tabstop - the cursor jumps there, and you start typing from scratch.${1:placeholder}provides a default value that’s selected. For example:”{ "Import": { "body": [ "import { ${1:Component} } from '${2:react}';$0" ] } } - “When triggered,
Componentis highlighted. If you press Tab without typing, it keeps ‘Component’. If you type, it replaces it. This is useful for common patterns where there’s a sensible default but customization is likely.”
- Good Answer: “
- “How would you create a snippet that generates different code based on file type?”
- Good Answer: “I’d use the
scopeproperty to create language-specific snippets. For example, a test file snippet that works differently for TypeScript vs Python:”{ "TypeScript Test": { "prefix": "test", "scope": "typescript", "body": [ "import { describe, it, expect } from 'vitest';", "", "describe('${TM_FILENAME_BASE/.test/}', () => {", " it('${1:should}', () => {", " expect($2).toBe($3);", " });", "});$0" ] }, "Python Test": { "prefix": "test", "scope": "python", "body": [ "import unittest", "", "class Test${TM_FILENAME_BASE/_test/}(unittest.TestCase):", " def test_${1:should}(self):", " self.assertEqual($2, $3)$0" ] } } - “Same prefix (
test), different implementations based on language context.”
- Good Answer: “I’d use the
- “Explain how you would extract a component name from a kebab-case filename.”
- Good Answer: “I use a regex transformation on
TM_FILENAME_BASE. The pattern^(.)|-(.)matches two cases: the first character and any character after a dash. Then I uppercase both capture groups:${1:/upcase}${2:/upcase}. For example:” user-profile.tsx→$TM_FILENAME_BASE=user-profile- Apply
^(.)|-(.)→ captures:u,p,r,o,f,i,l,e - Apply
${1:/upcase}${2:/upcase}/g→UserProfile - “The dash disappears because it’s not in a capture group.”
- Good Answer: “I use a regex transformation on
- “How do you handle snippets that need current date/time?”
- Good Answer: “VS Code provides built-in variables like
$CURRENT_YEAR,$CURRENT_MONTH,$CURRENT_DATE, etc. For example, I created a snippet for file headers:”{ "File Header": { "prefix": "header", "body": [ "/**", " * @file $TM_FILENAME", " * @author ${1:Your Name}", " * @created $CURRENT_YEAR-$CURRENT_MONTH-$CURRENT_DATE", " * @modified $CURRENT_YEAR-$CURRENT_MONTH-$CURRENT_DATE", " * @description $2", " */", "$0" ] } } - “This automatically inserts the current date in ISO format. For more complex date formatting, I’d use a VS Code extension or a custom script.”
- Good Answer: “VS Code provides built-in variables like
- “What’s a real-world use case where snippets saved you significant time?”
- Good Answer: “At my last company, we used GraphQL with strict schema patterns. Every resolver had the same structure: auth check, input validation, database query, error handling. I created a snippet:”
{ "GraphQL Resolver": { "prefix": "resolver", "scope": "typescript", "body": [ "export const ${TM_FILENAME_BASE/-(.)/${1:/upcase}/g} = async (", " parent: any,", " args: { $1 },", " context: Context", ") => {", " // Auth check", " if (!context.user) {", " throw new AuthenticationError('Not authenticated');", " }", "", " // Validation", " const { error } = ${2:schema}.validate(args);", " if (error) throw new UserInputError(error.message);", "", " // Query", " const result = await context.db.${3:query}($4);", "", " return result;", "};$0" ] } } - “Before: 5 minutes per resolver, lots of copy-paste errors. After: 30 seconds, zero errors. Over 100 resolvers, this saved ~8 hours and eliminated dozens of bugs.”
- Good Answer: “At my last company, we used GraphQL with strict schema patterns. Every resolver had the same structure: auth check, input validation, database query, error handling. I created a snippet:”
- “How do you share snippets across a team?”
- Good Answer: “Three approaches:
- Workspace snippets: Create
.vscode/*.code-snippetsfiles in the project repository. These are version-controlled and automatically available to all team members. - VS Code extension: Package snippets into a private extension and publish to your company’s extension marketplace.
- Settings Sync: Use VS Code’s Settings Sync feature, but this shares personal preferences too, so workspace snippets are better for team standards.
- Workspace snippets: Create
- “We use workspace snippets for project-specific patterns (API routes, database models) and encourage developers to create personal snippets for their own productivity hacks.”
- Good Answer: “Three approaches:
Hints in Layers
Hint 1 - Creating Your First Snippet:
- Press
Cmd+Shift+P→ “Preferences: Configure User Snippets” - Choose “New Global Snippets file” for personal snippets OR
- Choose a specific language (e.g., “typescript.json”) for language-specific snippets
- VS Code creates a JSON file with example structure:
{ "Print to console": { "prefix": "log", "body": [ "console.log('$1');", "$2" ], "description": "Log output to console" } } - The key (
"Print to console") is the snippet name (shown in IntelliSense) prefix: What you type to trigger itbody: The code that gets inserted (array of lines)description: Shown in IntelliSense popup
Hint 2 - Using Built-in Variables: Most useful variables:
$TM_FILENAME: Full filename →user-controller.ts$TM_FILENAME_BASE: Without extension →user-controller$TM_DIRECTORY: Directory name →/src/controllers$TM_FILEPATH: Full path →/Users/you/project/src/controllers/user-controller.ts$CLIPBOARD: Current clipboard content$CURRENT_YEAR: 2024$CURRENT_MONTH: 12$CURRENT_DATE: 27
Test them:
{
  "Variable Test": {
    "prefix": "vars",
    "body": [
      "// Filename: $TM_FILENAME",
      "// Base: $TM_FILENAME_BASE",
      "// Date: $CURRENT_YEAR-$CURRENT_MONTH-$CURRENT_DATE",
      "// Clipboard: $CLIPBOARD"
    ]
  }
}
Hint 3 - Simple Transformations: Start with basic case transformations:
Uppercase first letter:
${1/(.)/${1:/upcase}/}
(.)captures first character${1:/upcase}uppercases it
Lowercase entire string:
${1/(.*)/\L$1/}
(.*)captures everything\L$1lowercases capture group 1
Remove dashes:
${TM_FILENAME_BASE/-//g}
-matches dash//replaces with nothing (empty string)gflag = global (all occurrences)
Hint 4 - kebab-case to PascalCase (Step-by-Step):
This is the most common transformation. Build it gradually:
Step 1: Match first character:
${TM_FILENAME_BASE/(.)/${1:/upcase}/}
Result: user-profile → User-profile
Step 2: Also match characters after dashes:
${TM_FILENAME_BASE/(.)|-(.)/x/}
Result: user-profile → xxx... (testing pattern)
Step 3: Uppercase both:
${TM_FILENAME_BASE/(.)|-(.)/\${1:/upcase}\${2:/upcase}/}
Result: user-profile → UP (only first occurrence)
Step 4: Add global flag:
${TM_FILENAME_BASE/(.)|-(.)/\${1:/upcase}\${2:/upcase}/g}
Result: user-profile → Doesn’t work as expected
Step 5: Fix the pattern:
${TM_FILENAME_BASE/^(.)|-(.)/${1:/upcase}${2:/upcase}/g}
^(.)explicitly matches START of string|-(.)OR matches dash + next char- Result:
user-profile→UserProfile✓
Hint 5 - Creating a React Component Snippet:
Build incrementally:
Version 1 - Static:
{
  "React Component": {
    "prefix": "rfc",
    "body": [
      "const MyComponent = () => {",
      "  return <div></div>;",
      "};"
    ]
  }
}
Version 2 - Add Tabstops:
{
  "React Component": {
    "prefix": "rfc",
    "body": [
      "const ${1:MyComponent} = () => {",
      "  return <div>$2</div>;",
      "};$0"
    ]
  }
}
Version 3 - Use Filename:
{
  "React Component": {
    "prefix": "rfc",
    "body": [
      "const ${TM_FILENAME_BASE} = () => {",
      "  return <div>$1</div>;",
      "};$0"
    ]
  }
}
Version 4 - Transform Filename:
{
  "React Component": {
    "prefix": "rfc",
    "body": [
      "const ${TM_FILENAME_BASE/^(.)|-(.)/${1:/upcase}${2:/upcase}/g} = () => {",
      "  return <div>$1</div>;",
      "};$0"
    ]
  }
}
Version 5 - Add Props Interface:
{
  "React Component": {
    "prefix": "rfc",
    "scope": "typescriptreact",
    "body": [
      "import React from 'react';",
      "",
      "interface ${TM_FILENAME_BASE/^(.)|-(.)/${1:/upcase}${2:/upcase}/g}Props {",
      "  $1",
      "}",
      "",
      "export const ${TM_FILENAME_BASE/^(.)|-(.)/${1:/upcase}${2:/upcase}/g}: React.FC<${TM_FILENAME_BASE/^(.)|-(.)/${1:/upcase}${2:/upcase}/g}Props> = (props) => {",
      "  return (",
      "    <div>",
      "      $2",
      "    </div>",
      "  );",
      "};",
      "",
      "export default ${TM_FILENAME_BASE/^(.)|-(.)/${1:/upcase}${2:/upcase}/g};$0"
    ]
  }
}
Hint 6 - Debugging Snippets:
If a snippet doesn’t work:
- Test the regex separately: Use a tool like regex101.com
- Input:
user-profile - Pattern:
^(.)|-(.) - Replacement:
$1$2(without upcase first, to see if pattern matches)
- Input:
- Simplify the body: Remove transformations temporarily
"body": ["const $TM_FILENAME_BASE = () => {};"]If this works, the problem is in your regex
- Check escape sequences: JSON requires double backslashes
- Wrong:
\d+ - Right:
\\d+
- Wrong:
-
Use the Output panel: Go to “Output” → select “Log (Extension Host)” to see snippet errors
- Test incrementally: Add one transformation at a time
Hint 7 - Creating Workspace Snippets:
For team-shared snippets:
- Create
.vscodefolder in your project root (if it doesn’t exist) - Create a
.code-snippetsfile (name doesn’t matter):mkdir -p .vscode touch .vscode/company-standards.code-snippets - Add snippets:
{ "Company API Route": { "prefix": "api", "scope": "typescript", "body": [ "// Team standard API route", "$0" ] } } - Commit to version control:
git add .vscode/company-standards.code-snippets
git commit -m "Add team snippet standards"
Now all team members see these snippets automatically!
Hint 8 - Using Choice Elements:
For dropdowns with predefined options:
{
  "HTTP Method": {
    "prefix": "route",
    "body": [
      "router.${1|get,post,put,delete,patch|}('/${2:path}', (req, res) => {",
      "  res.status(${3|200,201,400,404,500|}).json({ $4 });",
      "});$0"
    ]
  }
}
When triggered:
$1shows dropdown:get, post, put, delete, patch$3shows dropdown:200, 201, 400, 404, 500
Hint 9 - Multi-Line String Handling:
For code with quotes:
{
  "Fetch API": {
    "body": [
      "const response = await fetch('${1:url}', {",
      "  method: '${2|GET,POST,PUT,DELETE|}',",
      "  headers: {",
      "    'Content-Type': 'application/json'",  // ← Escape quotes
      "  }",
      "});$0"
    ]
  }
}
Use single quotes inside double-quoted JSON strings, or escape:
'Content-Type': 'application/json'✓\"Content-Type\": \"application/json\"✓
Hint 10 - Combining Multiple Transformations:
Advanced: Different transformations on the same variable:
{
  "Model + Test": {
    "prefix": "model",
    "body": [
      "// Model: PascalCase",
      "class ${TM_FILENAME_BASE/^(.)|-(.)/${1:/upcase}${2:/upcase}/g} {",
      "  $1",
      "}",
      "",
      "// Test file: kebab-case.test.ts",
      "// import { ${TM_FILENAME_BASE/^(.)|-(.)/${1:/upcase}${2:/upcase}/g} } from './${TM_FILENAME_BASE}';",
      "",
      "// Variable: camelCase",
      "const ${TM_FILENAME_BASE/-(.)/${1:/upcase}/g} = new ${TM_FILENAME_BASE/^(.)|-(.)/${1:/upcase}${2:/upcase}/g}();$0"
    ]
  }
}
Same filename (user-model.ts), three transformations:
UserModel(PascalCase):^(.)|-(.)→${1:/upcase}${2:/upcase}user-model(original):${TM_FILENAME_BASE}userModel(camelCase):-(.)→${1:/upcase}(keeps first char lowercase)
Books That Will Help
| Book | Author | Relevant Chapters | Why It Helps |
|---|---|---|---|
| Mastering Regular Expressions | Jeffrey E.F. Friedl | Ch 4: The Mechanics of Expression Processing, Ch 5: Practical Regex, Ch 6: Crafting an Efficient Expression | Essential for understanding regex transformations in snippets. Chapter 4 explains how regex engines work, and Chapter 5 provides practical examples for transformations like kebab-case to PascalCase |
| Visual Studio Code Distilled | Alessandro Del Sole | Ch 5: Customizing VS Code | Provides official VS Code settings and customization patterns, including how user snippets integrate into the broader customization ecosystem |
| TextMate Bundle Development | Various | Snippet Syntax Documentation | TextMate documentation covers the snippet syntax engine that VS Code uses, essential for understanding variable transformations and tabstop mechanics |
Project 5: “Works on My Machine Killer” — Dev Containers
| Attribute | Value |
|---|---|
| File | VS_CODE_MASTERY_LEARNING_PROJECTS.md |
| Main Programming Language | Dockerfile / JSON |
| Alternative Programming Languages | Bash |
| Coolness Level | Level 4: Hardcore Tech Flex |
| Business Potential | 4. Open Core (DevOps Infrastructure) |
| Difficulty | Level 3: Advanced |
| Knowledge Area | Virtualization / Containers |
| Software or Tool | Docker / Remote - Containers Extension |
| Main Book | “Docker for Developers” |
What you’ll build: A Fully Reproducible Development Environment. You will create a .devcontainer folder that defines a Docker image containing specific versions of Node, Python, and Go, plus VS Code extensions and settings. When you open this folder, VS Code will restart inside the container.
Why it teaches Infrastructure: This is the future of development. You stop polluting your Mac/Windows with random npm packages. You learn how the Remote Extension Host works—separating the UI (local) from the Compute (container).
Core challenges you’ll face:
- Docker Networking → maps to Exposing ports for localhost
- Volume Mounting → maps to Persisting files across container rebuilds
- Lifecycle Scripts → maps to postCreateCommand hooks
Key Concepts:
- Containerization: Isolating dependencies.
- Remote Development: The architecture of VS Code Server.
Difficulty: Advanced Time estimate: 1 Week Prerequisites: Docker Desktop installed
Real World Outcome
You’ve built a completely reproducible development environment that eliminates “works on my machine” problems forever. Here’s exactly what happens when you or a teammate opens this project:
Step 1: Opening the Project
You clone a repository containing a .devcontainer folder and open it in VS Code. Immediately, you see this notification in the bottom-right corner:
┌─────────────────────────────────────────────────────────────┐
│ Folder contains a Dev Container configuration file.         │
│ Reopen in Container    Show Config    Don't Show Again      │
└─────────────────────────────────────────────────────────────┘
Step 2: Container Build Process Click “Reopen in Container”. VS Code’s integrated terminal shows the Docker build process:
[2024-12-27 14:32:15] Starting Dev Container...
[2024-12-27 14:32:16] Building image..
[2024-12-27 14:32:16] Step 1/8 : FROM mcr.microsoft.com/devcontainers/typescript-node:18
[2024-12-27 14:32:18] ---> 3c5d9a4f2b1e
[2024-12-27 14:32:18] Step 2/8 : RUN apt-get update && apt-get install -y git
[2024-12-27 14:32:22] ---> Running in d3f4e8c9b2a1
[2024-12-27 14:32:25] ---> 7a9b3f2e1c4d
[2024-12-27 14:32:25] Successfully built 7a9b3f2e1c4d
[2024-12-27 14:32:26] Starting container...
[2024-12-27 14:32:27] Container started. Configuring VS Code server...
[2024-12-27 14:32:29] Installing extensions in container: dbaeumer.vscode-eslint
[2024-12-27 14:32:31] Running postCreateCommand: npm install
[2024-12-27 14:32:45] Dev container is ready!
Step 3: Inside the Container
VS Code restarts. Notice the green indicator in the bottom-left corner showing Dev Container: My Ultimate Dev Stack. The window title bar now displays the container name.
Open the integrated terminal (Ctrl+~), and you see:
vscode ➜ /workspaces/my-project $ node --version
v18.19.0

vscode ➜ /workspaces/my-project $ which node
/usr/local/bin/node

vscode ➜ /workspaces/my-project $ npm --version
10.2.3

vscode ➜ /workspaces/my-project $ ls -la
total 48
drwxr-xr-x  6 vscode vscode  4096 Dec 27 14:32 .
drwxr-xr-x  3 vscode vscode  4096 Dec 27 14:32 ..
drwxr-xr-x  3 vscode vscode  4096 Dec 27 14:32 .devcontainer
-rw-r--r--  1 vscode vscode   245 Dec 27 14:32 package.json
drwxr-xr-x 89 vscode vscode  4096 Dec 27 14:32 node_modules
-rw-r--r--  1 vscode vscode 15234 Dec 27 14:32 package-lock.json
Step 4: Testing Port Forwarding Start your development server:
vscode ➜ /workspaces/my-project $ npm run dev

> my-project@1.0.0 dev
> node server.js

Server running on port 3000
VS Code automatically detects the forwarded port and shows a notification:
┌─────────────────────────────────────────────────────────────┐
│ Your application running on port 3000 is available          │
│ Open in Browser    Preview in Editor    Ignore             │
└─────────────────────────────────────────────────────────────┘
Click “Open in Browser” and http://localhost:3000 opens on your host machine, even though the server is running inside the container!
Step 5: The Magic – No Local Installation On your host machine (outside the container):
# On your Mac/Windows/Linux host
$ node --version
-bash: node: command not found

# Node.js doesn't exist on your laptop!
# Yet you're running a Node.js app.
# Everything runs isolated in the container.
Step 6: Extensions Running in Container Open the Extensions sidebar. You’ll see two sections:
- LOCAL - INSTALLED: Extensions running on your host machine
- DEV CONTAINER: MY ULTIMATE DEV STACK - INSTALLED: Extensions running inside the container
The ESLint extension shows in the container section, using the Linux binary of ESLint, not your host OS version.
Example .devcontainer/devcontainer.json:
{
  "name": "My Ultimate Dev Stack",
  "image": "mcr.microsoft.com/devcontainers/typescript-node:18",
  "customizations": {
    "vscode": {
      "extensions": ["dbaeumer.vscode-eslint"],
      "settings": { "terminal.integrated.defaultProfile.linux": "zsh" }
    }
  },
  "forwardPorts": [3000],
  "postCreateCommand": "npm install"
}
The Real Power: Delete this container, rebuild it, and everything is identical. Share this .devcontainer folder with your team, and everyone has the exact same environment—same Node version, same extensions, same tools. No more “works on my machine” debugging sessions.
The Core Question You’re Answering
“How do I onboard a new developer in 5 minutes instead of 5 hours?”
Concepts You Must Understand First
Stop and research these before coding:
- Containerization vs Virtualization
- What’s the difference between Docker containers and virtual machines?
- How does Docker share the kernel with the host OS while providing isolation?
- Why are containers lighter weight than VMs?
- Concrete Example: A VM running Ubuntu on your Mac requires allocating 2GB of RAM and virtualizing an entire OS. A Docker container running Ubuntu shares your Mac’s kernel and only allocates memory for the application processes—typically 50-200MB.
- Book Reference: “How Linux Works” by Brian Ward — Ch. 17: “Virtualization”
- The Extension Host Architecture
- What is the VS Code Extension Host and why does it run as a separate process?
- How does VS Code communicate between the UI process (local) and the Extension Host (remote/container)?
- Why do language servers (ESLint, TypeScript) need to run inside the container, not on your host?
- Concrete Example: When you open a Python file in a Dev Container, the Python extension’s language server runs inside the container using the container’s Python interpreter (e.g.,
/usr/local/bin/python3.11), not your host machine’s Python. This ensures linting and IntelliSense match the runtime environment. - Book Reference: VS Code Extension API Documentation — “Extension Host” section
- Bind Mounts and Volume Persistence
- What does it mean to “mount” a directory into a container?
- What happens to your code changes when the container is destroyed?
- What’s the difference between a bind mount (host directory) and a named volume (Docker-managed)?
- Concrete Example: Your project at
/Users/you/my-projecton your Mac is mounted to/workspaces/my-projectinside the container. When you save a file in VS Code, it writes to the host filesystem through the mount. If you runrm -rf /workspaces/my-projectinside the container, you’ll delete files on your host machine. - Book Reference: “Docker for Developers” by Rafael Gomes — Ch. 2: “Docker Images and Containers” (Volume Management section)
- Docker Networking and Port Forwarding
- How does
forwardPortsindevcontainer.jsonmake a container port accessible onlocalhost? - What’s the difference between exposing a port (
EXPOSE 3000) and publishing a port? - Why can you access
localhost:3000on your browser when the server runs on0.0.0.0:3000inside the container? - Concrete Example: A Node.js server inside the container listens on
0.0.0.0:3000(all container interfaces). VS Code’s Dev Container extension creates a port forward: your host’s127.0.0.1:3000→ container’s172.17.0.2:3000. Your browser connects to localhost, but the traffic tunnels into the container. - Book Reference: “Computer Networks” by Andrew S. Tanenbaum — Ch. 5: “Network Layer” (NAT and Port Mapping)
- How does
- Lifecycle Hooks in Dev Containers
- What’s the difference between
postCreateCommand,postStartCommand, andpostAttachCommand? - When would you use
initializeCommand(runs on the host before the container is created)? - Why does
postCreateCommand: "npm install"run only once, butpostStartCommandruns every container start? - Concrete Example:
postCreateCommand: "npm install"runs when the container is first created from the image. If you rebuild the container, it runs again.postStartCommand: "npm run setup-db"runs every time you start the existing container (e.g., reopening VS Code).- Use
postCreateCommandfor one-time setup; usepostStartCommandfor starting services.
- Book Reference: VS Code Dev Containers Documentation — “devcontainer.json reference” (Lifecycle Scripts)
- What’s the difference between
- Image Layers and Caching
- How does Docker cache image layers to speed up rebuilds?
- Why does changing a
RUNcommand in your Dockerfile invalidate all subsequent layers? - How can you optimize your Dockerfile for faster rebuilds?
- Concrete Example:
# Bad: Changing package.json invalidates the apt-get cache COPY package.json . RUN apt-get update && apt-get install -y git # Good: System dependencies first (rarely change) RUN apt-get update && apt-get install -y git COPY package.json . RUN npm install - Book Reference: “Docker for Developers” by Rafael Gomes — Ch. 3: “Building Images” (Layer Caching section)
Questions to Guide Your Design
- Dotfiles
- How do you get your personal zsh/bash aliases into the container? (VS Code has a “Dotfiles” setting for this).
Thinking Exercise
If you need ffmpeg for your app, where do you install it? You can’t just apt-get it every time. You need a custom Dockerfile referenced by devcontainer.json.
The Interview Questions They’ll Ask
- “What are the benefits of developing inside a container versus locally?”
- “How do you handle credentials (git, aws) in a Dev Container?” (VS Code forwards the SSH agent).
Hints in Layers
Hint 1: Install the “Dev Containers” extension.
Hint 2: Use Cmd+Shift+P > Dev Containers: Add Dev Container Configuration Files.
Hint 3: If you need extra tools, uncomment the Dockerfile reference and add RUN apt-get install ....
Books That Will Help
| Topic | Book | Specific Chapters | Why It Helps |
|---|---|---|---|
| Docker fundamentals and containerization | Docker for Developers by Rafael Gomes | Ch. 1: “Running Software in Containers”, Ch. 2: “Images and Containers”, Ch. 3: “Building Images” | Covers the core concepts of containerization, image layers, Dockerfile syntax, and how containers differ from VMs. Essential for understanding what happens when VS Code builds your Dev Container |
| Container networking and port mapping | Docker for Developers by Rafael Gomes | Ch. 4: “Networking” (Port Publishing section) | Explains how Docker networking works, how port forwarding maps container ports to localhost, and the difference between EXPOSE and -p flags. Critical for understanding forwardPorts in devcontainer.json |
| Linux process isolation and namespaces | The Linux Programming Interface by Michael Kerrisk | Ch. 6: “Processes” (sections 6.4-6.5), Ch. 28: “Process Creation and Program Execution” | Provides deep understanding of how Linux namespaces and cgroups enable container isolation. Explains the fundamental OS primitives that Docker uses to create isolated environments |
| Filesystem and mount points | How Linux Works, 3rd Edition by Brian Ward | Ch. 4: “Disks and Filesystems” (section 4.2: “Filesystem Hierarchy”), Ch. 17: “Virtualization” (Container section) | Explains Linux filesystem hierarchy, mount points, and how bind mounts work. Critical for understanding how your source code is mounted into /workspaces in the container |
| VS Code Extension Host architecture | Visual Studio Code Distilled by Alessandro Del Sole | Ch. 6: “Installing and Managing Extensions” (Extension Host section) | Covers the architecture of VS Code’s Extension Host, how extensions run in separate processes, and how the Remote Development extensions work |
| Dev Containers configuration | VS Code Dev Containers Documentation | “devcontainer.json reference”, “Dockerfile and Docker Compose”, “Lifecycle scripts” | Official comprehensive reference for all devcontainer.json properties, including lifecycle hooks (postCreateCommand, postStartCommand), features, and Docker Compose integration |
| Understanding virtualization vs containers | How Linux Works, 3rd Edition by Brian Ward | Ch. 17: “Virtualization” (sections on VMs vs Containers) | Explains the fundamental difference between virtualization (VMs) and containerization, including performance implications and resource usage |
| Docker image optimization | Docker for Developers by Rafael Gomes | Ch. 3: “Building Images” (Layer Caching and Multi-stage Builds sections) | Teaches how to write efficient Dockerfiles with proper layer caching, reducing rebuild times from minutes to seconds |
Project 6: “Focus Mode Workspace” — Settings Profiles
| Attribute | Value |
|---|---|
| File | VS_CODE_MASTERY_LEARNING_PROJECTS.md |
| Main Programming Language | JSON |
| Coolness Level | Level 2: Practical |
| Business Potential | 1. Resume Gold (Workflow optimization) |
| Difficulty | Level 1: Beginner |
| Knowledge Area | Environment Configuration |
| Software or Tool | VS Code Settings Profiles |
| Main Book | “Visual Studio Code Distilled” |
What you’ll build: Customized “Profiles” for different contexts. You will create a “Writing” Profile (Minimalist, spell-checker enabled, sidebar hidden) and a “Coding” Profile (Dense, debugger visible, strict linting). You will learn the hierarchy of settings (User > Remote > Workspace > Folder).
Why it teaches Configuration: VS Code is hyper-configurable, but “one size fits all” fails when you switch languages or tasks. Understanding Settings Precedence ensures you know why a setting is being applied (or ignored).
Core challenges you’ll face:
- Settings Hierarchy → maps to Overriding rules
- UI Customization → maps to hiding elements via APC or settings
- Profile Switching → maps to Context switching efficiency
Key Concepts:
- Settings Scopes: User vs Workspace.
- Profiles: Isolated sets of extensions and configs.
Difficulty: Beginner Time estimate: Weekend Prerequisites: None
Real World Outcome
You’ve created multiple VS Code “personalities” optimized for different tasks. Here’s exactly what happens when you switch between them:
Step 1: Creating Your First Profile
Open the Command Palette (Cmd+Shift+P / Ctrl+Shift+P) and search for “Profiles: Create Profile”:
┌─────────────────────────────────────────────────────────────┐
│ > Profiles: Create Profile                                   │
│   Profiles: Create from Current Profile                      │
│   Profiles: Import Profile...                                │
│   Profiles: Export Profile...                                │
└─────────────────────────────────────────────────────────────┘
Select “Create from Current Profile”. You see a dialog:
┌─────────────────────────────────────────────────────────────┐
│ Profile name: Zen Writer                                     │
│                                                              │
│ Copy from: Default                                           │
│                                                              │
│ ☑ Settings                                                   │
│ ☑ Keyboard Shortcuts                                         │
│ ☑ User Snippets                                              │
│ ☑ User Tasks                                                 │
│ ☑ Extensions                                                 │
│                                                              │
│                          [Create]    [Cancel]                │
└─────────────────────────────────────────────────────────────┘
Step 2: Customizing the Profile After creating “Zen Writer”, VS Code switches to it immediately. The bottom-left corner now shows the profile indicator:
┌─────────────────────────┐
│ ⚙️ Zen Writer          │ ← Click to switch profiles
└─────────────────────────┘
Open Settings (Cmd+,) and notice the top bar now shows:
┌─────────────────────────────────────────────────────────────┐
│ User Settings (Zen Writer)                                   │
│ Search settings                                              │
└─────────────────────────────────────────────────────────────┘
Modify settings for this profile:
- Editor: Line Numbers →
off - Workbench: Sidebar: Visible →
false(or useCmd+Bto hide) - Workbench: Color Theme → “Quiet Light” (minimal, high-contrast)
- Editor: Font Size →
16(larger for reading)
Step 3: Profile-Specific Extensions Open the Extensions sidebar. Notice each extension now has a profile gear icon. Disable ESLint and Prettier for this profile:
┌─────────────────────────────────────────────────────────────┐
│ INSTALLED                                                    │
│                                                              │
│ ESLint                                                       │
│ Microsoft      ⚙️ Enabled                                    │
│ [Disable (Zen Writer)]  [Disable (Everywhere)]              │
│                                                              │
│ Code Spell Checker                                           │
│ Street Side Software      ⚙️ Disabled                        │
│ [Enable (Zen Writer)]  [Enable (Everywhere)]                │
└─────────────────────────────────────────────────────────────┘
After disabling ESLint and enabling Code Spell Checker, only this profile is affected.
Step 4: Creating a “Coding” Profile Create another profile called “Deep Focus Coding” with:
- Zen Mode enabled by default
- Activity Bar hidden
- Minimap enabled
- Strict linting extensions enabled (ESLint, Prettier)
- Dark theme (e.g., “One Dark Pro”)
Step 5: The Magic – Instant Switching Click the profile indicator in the bottom-left corner:
┌─────────────────────────────────────────────────────────────┐
│ Select Profile                                               │
│                                                              │
│ ● Default                                                    │
│   Zen Writer                                                 │
│   Deep Focus Coding                                          │
│                                                              │
│ ─────────────────────                                        │
│ Create Profile...                                            │
│ Import Profile...                                            │
│ Export Profile...                                            │
└─────────────────────────────────────────────────────────────┘
Before switching (Zen Writer active):
┌──────────────────────────────────────────────────────────────┐
│                                                              │ (no sidebar)
│  README.md                                                   │
│                                                              │
│  # My Writing Project                                        │ (large font, 16px)
│                                                              │ (no line numbers)
│  This is a documentation file. I can focus on writing        │
│  without distractions from linters or toolbars.              │
│                                                              │
│                                                              │
│ ⚙️ Zen Writer    README.md                                  │ (bottom: profile indicator)
└──────────────────────────────────────────────────────────────┘
Click “Deep Focus Coding” and watch VS Code transform in under 1 second:
After switching (Deep Focus Coding active):
┌──────────────────────────────────────────────────────────────┐
│ [ZEN MODE ACTIVE]                                            │ (full screen, distraction-free)
│                                                              │
│  1  import express from 'express';                           │ (line numbers back)
│  2  import { router } from './routes';                       │ (smaller font, 14px)
│  3                                                            │
│  4  const app = express();                                   │
│  5  app.use('/api', router);                                 │
│  6                                                            │ (ESLint red squiggles appear)
│  7  app.listen(3000);                                        │
│                                                              │
│ ⚙️ Deep Focus Coding    index.ts    1 problem              │
└──────────────────────────────────────────────────────────────┘
Step 6: Verifying Extension Changes Open the Extensions sidebar in your new profile. You’ll see:
- ESLint:
Enabled (Deep Focus Coding)butDisabled (Zen Writer) - Code Spell Checker:
Enabled (Zen Writer)butDisabled (Deep Focus Coding)
Step 7: Exporting and Sharing Right-click the profile name and select “Export Profile”:
# VS Code generates a.code-profile file
$ ls ~/Downloads/
zen-writer.code-profile  # 4KB JSON file

$ cat zen-writer.code-profile
{
  "name": "Zen Writer",
  "settings": {
    "editor.lineNumbers": "off",
    "editor.fontSize": 16,
    "workbench.colorTheme": "Quiet Light"
  },
  "extensions": [
    { "identifier": "streetsidesoftware.code-spell-checker" }
  ]
}
Share this file with teammates. They can import it via Profiles: Import Profile... and get your exact setup.
The Real Power: Switch contexts instantly without manually toggling 15 settings. Writing documentation? One click → distraction-free mode. Code review? One click → dense, linter-heavy mode. Teaching a workshop? One click → high-contrast, large-font mode.
The Core Question You’re Answering
“How do I optimize my tool for the specific task at hand?”
Concepts You Must Understand First
Stop and research these before coding:
- VS Code Settings Hierarchy and Precedence
- What’s the difference between User settings, Workspace settings, and Folder settings?
- When settings conflict, which one wins?
- How do profiles fit into this hierarchy?
- Concrete Example: You set
"editor.fontSize": 14in User settings, but a workspace has"editor.fontSize": 12in.vscode/settings.json. Which applies? Answer: Workspace (12) wins because it’s more specific. The precedence order is: Folder > Workspace > Profile > User. - Book Reference: “Visual Studio Code Distilled” by Alessandro Del Sole — Ch. 5: “Customizing VS Code” (Settings Hierarchy section)
- JSON Settings and the Settings UI
- How does the visual Settings UI (
Cmd+,) map tosettings.json? - What’s the relationship between a setting’s name in the UI (“Editor: Font Size”) and its JSON key (
editor.fontSize)? - When should you edit
settings.jsondirectly vs using the UI? - Concrete Example: Searching for “line numbers” in Settings UI shows “Editor: Line Numbers” with dropdown options
on,off,relative. Behind the scenes, this modifies"editor.lineNumbers": "off"insettings.json. Some complex settings (like language-specific overrides) are easier to configure directly in JSON. - Book Reference: “Visual Studio Code Distilled” by Alessandro Del Sole — Ch. 5: “Customizing VS Code” (Settings JSON section)
- How does the visual Settings UI (
- Language-Specific Settings Overrides
- How do you configure different settings for different programming languages?
- What’s the syntax for language-specific overrides in
settings.json? - Why would you want different tab sizes for Python vs JavaScript?
- Concrete Example:
{
  "editor.tabSize": 4,  // Default for all files
  "[python]": {
    "editor.tabSize": 4,
    "editor.formatOnSave": true
  },
  "[javascript]": {
    "editor.tabSize": 2,  // JS community prefers 2 spaces
    "editor.defaultFormatter": "esbenp.prettier-vscode"
  }
}
When you open a
.pyfile, tab size is 4. When you open a.jsfile, tab size is 2. Same editor, different rules. - Book Reference: VS Code Documentation — “Language-specific editor settings”
- Profiles: Isolated Configuration Contexts
- What exactly gets isolated in a profile? (Settings, extensions, keybindings, snippets)
- What remains global across all profiles? (Recent files, Git credentials, installed VS Code version)
- How are profiles stored on disk?
- Concrete Example: Profiles live in
~/Library/Application Support/Code/User/profiles/(macOS) or%APPDATA%\Code\User\profiles\(Windows). Each profile has its ownsettings.json,keybindings.json, and extension list. Your workspace history (recent folders) is shared across profiles. - Book Reference: VS Code Profiles Documentation — “What’s in a profile?”
- Workspace Trust and Security Boundaries
- Why does VS Code ask “Do you trust the authors of this folder?” when opening projects?
- Which settings are restricted in untrusted workspaces?
- How does this protect you from malicious code?
- Concrete Example: You download a random GitHub repo. VS Code shows a warning and runs in “Restricted Mode.” Settings like
"python.pythonPath": "/evil/script.sh"or task runners in.vscode/tasks.jsonare disabled. This prevents the repo from executing arbitrary commands when you open it. After you trust the folder, these settings activate. - Book Reference: “Visual Studio Code Distilled” by Alessandro Del Sole — Ch. 5: “Customizing VS Code” (Workspace Trust section)
- Extension Activation and Deactivation Per Profile
- When you disable an extension in one profile, how does VS Code track that?
- What’s the difference between “Disable” vs “Disable (Workspace)”?
- How do you verify which extensions are active in the current profile?
- Concrete Example: The extension state is stored in each profile’s configuration. If you disable ESLint in the “Zen Writer” profile, VS Code writes to
~/.../profiles/zen-writer/extensions.json:{"disabled": ["dbaeumer.vscode-eslint"]}. When you switch profiles, VS Code unloads ESLint’s extension host process and reloads only the extensions enabled in the new profile. - Book Reference: VS Code Extension API Documentation — “Activation Events”
Questions to Guide Your Design
- Extension Sets
- Can I have different extensions enabled for different profiles? (Yes, this is the main feature of Profiles).
Thinking Exercise
Go through your settings.json. How many are “global” (font size) vs “language specific” (python formatter)? Separate them.
The Interview Questions They’ll Ask
- “How do you manage project-specific settings in VS Code?” (The
.vscodefolder).
Hints in Layers
Hint 1: Cmd+Shift+P > Profiles: Create Profile.
Hint 2: Use "[python]": { ... } in settings to scope configs to languages.
Hint 3: Check .vscode/settings.json for project-level overrides.
Books That Will Help
| Topic | Book | Specific Chapters | Why It Helps |
|---|---|---|---|
| VS Code settings hierarchy and configuration | Visual Studio Code Distilled by Alessandro Del Sole | Ch. 5: “Customizing VS Code” (Settings Hierarchy, User vs Workspace Settings sections) | Comprehensive explanation of the three-tier settings system (User/Workspace/Folder), how precedence works, and when each scope should be used. Essential for understanding profiles |
| JSON configuration and settings.json | Visual Studio Code Distilled by Alessandro Del Sole | Ch. 5: “Customizing VS Code” (Editing settings.json section) | Covers the relationship between the Settings UI and the underlying JSON, language-specific overrides syntax, and advanced configuration patterns |
| Workspace trust and security | Visual Studio Code Distilled by Alessandro Del Sole | Ch. 5: “Customizing VS Code” (Workspace Trust section) | Explains VS Code’s security model, why untrusted workspaces restrict certain settings, and how to manage trust boundaries when working with external code |
| Profile management and use cases | VS Code Profiles Documentation | “Profiles in Visual Studio Code”, “Profile Templates” | Official guide to creating, exporting, and sharing profiles. Includes common profile templates (Teaching, Presentations, Data Science) and best practices for profile organization |
| Extension architecture and activation | VS Code Extension API Documentation | “Extension Manifest”, “Activation Events” | Explains how extensions are loaded/unloaded, how per-profile extension state is managed, and the performance implications of having many extensions |
| Context switching and productivity | Deep Work by Cal Newport | Ch. 1: “Deep Work Is Valuable” (Context Switching Cost section) | While not VS Code-specific, explains the cognitive cost of context switching and how environmental optimization (like profiles) reduces friction and improves focus |
| Configuration management patterns | The Pragmatic Programmer by Andrew Hunt and David Thomas | Ch. 3: “The Basic Tools” (Power Editing section) | Discusses the importance of customizing your development environment and maintaining different configurations for different tasks |
Project 7: “Code Butler” — Command Extension
| Attribute | Value |
|---|---|
| File | VS_CODE_MASTERY_LEARNING_PROJECTS.md |
| Main Programming Language | TypeScript |
| Alternative Programming Languages | JavaScript |
| Coolness Level | Level 4: Hardcore Tech Flex |
| Business Potential | 3. Service & Support (Internal tooling) |
| Difficulty | Level 3: Advanced |
| Knowledge Area | VS Code API / Plugin Architecture |
| Software or Tool | Yeoman / VS Code Extension API |
| Main Book | “Visual Studio Code Extension API” (Docs) |
What you’ll build: A real VS Code Extension. It will register a command in the Command Palette (e.g., “Butler: Sort Imports & Remove Logs”). When run, it will programmatically parse the current document, apply edits via the API, and show a notification.
Why it teaches Architecture: You effectively “break the fourth wall.” You aren’t just using the tool; you are modifying the tool. You will understand the Extension Host, Activations Events, and the TextDocument object model.
Core challenges you’ll face:
- Asynchronous API → maps to Editing text documents safely
- Manifest Configuration → maps to
package.jsoncontributes - Extension Lifecycle → maps to activation/deactivation
Key Concepts:
- vscode.TextEdit: The atomic unit of changing code.
- Commands: Registering functionality.
- Webviews: (Optional) Rendering HTML inside VS Code.
Difficulty: Advanced Time estimate: 1-2 Weeks Prerequisites: TypeScript, Node.js
Real World Outcome
You’ve built a custom VS Code extension that adds functionality tailored to your specific workflow. Here’s the complete journey from scaffolding to using your extension:
Step 1: Scaffolding the Extension In your terminal, generate the extension boilerplate:
$ npm install -g yo generator-code
$ yo code

     _-----_     ╭──────────────────────────╮
    |       |    │   Welcome to the VS Code │
    |--(o)--|    │   Extension generator!   │
   `---------´   ╰──────────────────────────╯
    ( _´U`_ )
    /___A___\   /
     |  ~  |
   __'.___.'__
 ´   `  |° ´ Y `

? What type of extension do you want to create? New Extension (TypeScript)
? What's the name of your extension? Code Butler
? What's the identifier of your extension? code-butler
? What's the description of your extension? Automate repetitive code cleanup tasks
? Initialize a git repository? Yes
? Which package manager to use? npm

Creating extension code-butler...
✔ Extension created successfully!

$ cd code-butler
$ ls -la
-rw-r--r--   1 user  staff    245 Dec 27 15:00 package.json
-rw-r--r--   1 user  staff    124 Dec 27 15:00 tsconfig.json
drwxr-xr-x   3 user  staff     96 Dec 27 15:00 src/
drwxr-xr-x   2 user  staff     64 Dec 27 15:00 .vscode/
Step 2: Understanding the Project Structure Open the generated project in VS Code:
code-butler/
├── src/
│   ├── extension.ts       ← Your extension code
│   └── test/
│       └── suite/
├── package.json           ← Extension manifest
├── tsconfig.json
└── .vscode/
    └── launch.json        ← Debug configuration
Step 3: Implementing Your Command
Edit src/extension.ts to add the “clean logs” functionality:
import * as vscode from 'vscode';

export function activate(context: vscode.ExtensionContext) {
    console.log('Code Butler extension activated');

    let disposable = vscode.commands.registerCommand('code-butler.clean', () => {
        const editor = vscode.window.activeTextEditor;
        if (!editor) {
            vscode.window.showErrorMessage('No active editor found');
            return;
        }

        const document = editor.document;
        const text = document.getText();

        // Count console.log statements before removal
        const logMatches = text.match(/console\.log\(.*?\);?/g);
        const logCount = logMatches ? logMatches.length : 0;

        if (logCount === 0) {
            vscode.window.showInformationMessage('No console.log statements found');
            return;
        }

        // Remove console.log statements
        const newText = text.replace(/console\.log\(.*?\);?\n?/g, '');

        editor.edit(editBuilder => {
            const firstLine = document.lineAt(0);
            const lastLine = document.lineAt(document.lineCount - 1);
            const range = new vscode.Range(firstLine.range.start, lastLine.range.end);
            editBuilder.replace(range, newText);
        });

        vscode.window.showInformationMessage(`Code Butler: Removed ${logCount} console.log statement(s)!`);
    });

    context.subscriptions.push(disposable);
}

export function deactivate() {}
Step 4: Configuring the Command in package.json
Edit package.json to register your command in the Command Palette:
{
  "name": "code-butler",
  "displayName": "Code Butler",
  "description": "Automate repetitive code cleanup tasks",
  "version": "0.0.1",
  "engines": {
    "vscode": "^1.85.0"
  },
  "activationEvents": [],
  "main": "./out/extension.js",
  "contributes": {
    "commands": [
      {
        "command": "code-butler.clean",
        "title": "Butler: Clean Console Logs"
      }
    ]
  }
}
Step 5: Testing the Extension
Press F5 in VS Code. A new “Extension Development Host” window opens:
┌─────────────────────────────────────────────────────────────┐
│ [Extension Development Host] - Visual Studio Code           │ ← New window
│                                                              │
│ This window is running your extension in debug mode         │
└─────────────────────────────────────────────────────────────┘
Step 6: Using Your Extension
In the Extension Development Host, create a test file test.js:
function processData(data) {
    console.log('Starting processing...');

    const result = data.map(item => {
        console.log('Processing item:', item);
        return item * 2;
    });

    console.log('Result:', result);
    return result;
}
Open the Command Palette (Cmd+Shift+P) and search for your command:
┌─────────────────────────────────────────────────────────────┐
│ > butler                                                     │
│                                                              │
│ > Butler: Clean Console Logs                                │ ← Your command!
└─────────────────────────────────────────────────────────────┘
Press Enter. VS Code shows a notification:
┌─────────────────────────────────────────────────────────────┐
│ Code Butler: Removed 3 console.log statement(s)!            │
└─────────────────────────────────────────────────────────────┘
The file is now cleaned:
function processData(data) {

    const result = data.map(item => {
        return item * 2;
    });

    return result;
}
Step 7: Debugging Your Extension Back in the main VS Code window (not the Extension Development Host), you can see debug output:
DEBUG CONSOLE:
[Extension Host] Code Butler extension activated
[Extension Host] Command 'code-butler.clean' executed
[Extension Host] Removed 3 console.log statements
Set breakpoints in extension.ts and run F5 again to step through your code.
Step 8: Packaging the Extension
Install the packaging tool and create a .vsix file:
$ npm install -g @vscode/vsce
$ vsce package

Executing prepublish script 'npm run compile'...
> code-butler@0.0.1 compile
> tsc -p ./

DONE  Packaged: /Users/you/code-butler/code-butler-0.0.1.vsix (5 files, 8.2KB)
Step 9: Installing Your Extension
Install the .vsix file in any VS Code instance:
$ code --install-extension code-butler-0.0.1.vsix

Installing extension 'code-butler-0.0.1.vsix'...
Extension 'code-butler' v0.0.1 was successfully installed.
Or use the UI: Extensions sidebar → ... menu → “Install from VSIX…”
Step 10: The Magic – It Just Works Restart VS Code. Open any JavaScript file with console.log statements. Open the Command Palette. Your command appears:
┌─────────────────────────────────────────────────────────────┐
│ > Butler: Clean Console Logs                                │
└─────────────────────────────────────────────────────────────┘
You’ve modified the tool you use every day. No more copy-pasting regex patterns to remove debug logs. One command, instant cleanup.
Example Advanced Features to Add:
- Keybinding: Add
"keybindings": [{"command": "code-butler.clean", "key": "cmd+shift+l"}]topackage.json - Context Menu: Add to right-click menu with
"menus": {"editor/context": [...]} - Status Bar Item: Show a counter of console.log statements in the status bar
- Configuration: Let users customize the regex pattern via settings
The Real Power: You can build extensions for workflows that no existing extension handles—project-specific code generators, API client testers, custom linters. VS Code becomes infinitely extensible.
The Core Question You’re Answering
“If the tool doesn’t do what I want, how do I teach it?”
Concepts You Must Understand First
Stop and research these before coding:
- The VS Code Extension Architecture
- What is the Extension Host and how does it relate to the main VS Code process?
- Why do extensions run in a separate process?
- How does VS Code protect itself from poorly-written or crashing extensions?
- Concrete Example: VS Code runs as multiple processes: the main UI process (Electron renderer), the Extension Host process (Node.js), and language server processes. When you install an extension, its code runs in the Extension Host. If your extension crashes with an infinite loop, the Extension Host process dies and restarts, but VS Code’s UI remains responsive.
- Book Reference: VS Code Extension API Documentation — “Extension Host” architecture overview
- Activation Events and Lazy Loading
- What does it mean that extensions are “lazy loaded”?
- What are activation events and how do they trigger extension loading?
- Why is
activationEvents: [](empty array) now the recommended approach? - Concrete Example: Without activation events, an extension only loads when its command is explicitly invoked. If you register
onCommand:code-butler.clean, the extension loads when the user searches for that command. With the newer approach (activationEvents: []), VS Code automatically detects commands inpackage.jsonand lazy-loads them. This prevents 50 extensions from loading at startup, keeping VS Code fast. - Book Reference: VS Code Extension API Documentation — “Activation Events” reference
- The Command Registration System
- How do you register a command that appears in the Command Palette?
- What’s the relationship between
package.jsoncontributions andregisterCommand()in code? - Can you register commands dynamically at runtime?
- Concrete Example:
// In extension.ts
vscode.commands.registerCommand('myext.hello', () => {
  vscode.window.showInformationMessage('Hello!');
});
// In package.json "contributes": { "commands": [ {"command": "myext.hello", "title": "My Extension: Hello"} ] }The
package.jsondeclares the command exists (making it searchable in the palette), andregisterCommand()defines what happens when it runs. They must match. - Book Reference: VS Code Extension API Documentation — “Contribution Points” (Commands section)
- The TextDocument and TextEditor APIs
- What’s the difference between a
TextDocument(model) and aTextEditor(view)? - How do you safely modify document text without race conditions?
- Why must edits happen inside
editor.edit()callbacks? - Concrete Example:
TextDocumentrepresents the file’s content in memory.TextEditorrepresents the view of that document (cursor position, selection, visible range). Multiple editors can show the same document (split view). When you edit:// Bad: Direct text manipulation (doesn't work) let text = document.getText(); text = text.replace('foo', 'bar'); // This does nothing! // Good: Use edit builder editor.edit(editBuilder => { const range = new vscode.Range(0, 0, document.lineCount, 0); editBuilder.replace(range, newText); }); - Book Reference: “Programming TypeScript” by Boris Cherny — Ch. 5: “Classes and Interfaces” (Understanding object models)
- What’s the difference between a
- Disposables and Resource Management
- What is a Disposable in VS Code?
- Why must you push disposables to
context.subscriptions? - What happens if you don’t dispose of event listeners?
- Concrete Example: Every event listener, command registration, and status bar item is a Disposable. If you register a command but never dispose of it, it leaks memory when the extension deactivates:
// Bad: Memory leak export function activate(context: vscode.ExtensionContext) { vscode.commands.registerCommand('myext.cmd', () => {}); // Not pushed to context.subscriptions! } // Good: Proper cleanup export function activate(context: vscode.ExtensionContext) { let cmd = vscode.commands.registerCommand('myext.cmd', () => {}); context.subscriptions.push(cmd); // Auto-disposed on deactivate } - Book Reference: “Node.js Design Patterns” by Mario Casciaro — Ch. 3: “Callbacks and Events” (Resource cleanup patterns)
- The Extension Manifest (package.json)
- What are “contribution points” in
package.json? - How do
engines.vscodeversions affect compatibility? - What’s the difference between
dependenciesanddevDependenciesfor extensions? - Concrete Example: The
contributessection declares what your extension adds to VS Code:{ "contributes": { "commands": [...], // Command Palette entries "menus": { // Context menu items "editor/context": [...] }, "keybindings": [...], // Keyboard shortcuts "configuration": { // Settings in Preferences UI "properties": { "myext.setting": {"type": "boolean"} } } } }engines.vscode: "^1.85.0"means “requires VS Code 1.85 or newer.” If a user has 1.84, the extension won’t install. - Book Reference: VS Code Extension API Documentation — “Extension Manifest” reference
- What are “contribution points” in
- Asynchronous Programming in Extensions
- When should extension commands be async?
- How do you show progress for long-running operations?
- What’s the
withProgressAPI? - Concrete Example: Commands can be async. Use
vscode.window.withProgressfor long operations:vscode.commands.registerCommand('myext.slow', async () => { await vscode.window.withProgress({ location: vscode.ProgressLocation.Notification, title: "Processing...", cancellable: true }, async (progress, token) => { for (let i = 0; i < 100; i++) { if (token.isCancellationRequested) break; await sleep(50); progress.report({ increment: 1 }); } }); });VS Code shows a progress bar. The user can cancel.
- Book Reference: “Programming TypeScript” by Boris Cherny — Ch. 8: “Asynchronous Programming, Concurrency, and Parallelism”
- Extension Development Workflow
- How does the “Extension Development Host” work?
- How do you debug TypeScript source code (not compiled JavaScript)?
- What’s the role of
launch.jsonin extension projects? - Concrete Example: When you press
F5in an extension project, VS Code:- Compiles TypeScript to JavaScript (
tsc -watch) - Launches a new VS Code window (Extension Development Host)
- Loads your extension from
out/extension.js - Attaches a debugger with source maps, so breakpoints in
.tsfiles work
The
.vscode/launch.jsonconfigures this:{ "type": "extensionHost", "request": "launch", "args": ["--extensionDevelopmentPath=${workspaceFolder}"] } - Compiles TypeScript to JavaScript (
- Book Reference: “Node.js Design Patterns” by Mario Casciaro — Ch. 13: “Messaging and Integration Patterns” (Debugging distributed systems)
Questions to Guide Your Design
- Performance
- Why shouldn’t you do heavy computation in the extension host? (It blocks other extensions).
Thinking Exercise
Imagine you want to count every time you save a file. How do you hook into that event? (workspace.onDidSaveTextDocument).
The Interview Questions They’ll Ask
- “How does VS Code ensure a crashing extension doesn’t crash the editor?” (Process isolation).
Hints in Layers
Hint 1: Install yo and generator-code: npm install -g yo generator-code.
Hint 2: Run yo code to scaffold a TypeScript extension.
Hint 3: Press F5 inside the extension project to open a “Extension Development Host” window to test it.
Books That Will Help
| Topic | Book | Specific Chapters | Why It Helps |
|---|---|---|---|
| TypeScript fundamentals for extensions | Programming TypeScript by Boris Cherny | Ch. 4: “Functions” (Function types, overloads), Ch. 5: “Classes and Interfaces” (Object models), Ch. 8: “Asynchronous Programming, Concurrency, and Parallelism” | Essential for writing type-safe extension code. Chapter 4 covers function signatures for command handlers. Chapter 5 explains the TextDocument/TextEditor object model. Chapter 8 covers async/await patterns used in VS Code APIs |
| Asynchronous patterns and event handling | Node.js Design Patterns (Third Edition) by Mario Casciaro & Luciano Mammino | Ch. 3: “Callbacks and Events” (Event emitter patterns), Ch. 11: “Advanced Asynchronous Recipes” (Async initialization) | Covers the event-driven architecture that VS Code extensions use. Explains disposables, event listeners, and how to avoid memory leaks when registering commands. Chapter 11 covers async activation patterns |
| VS Code Extension Host architecture | VS Code Extension API Documentation | “Extension Host” overview, “Extension Anatomy” | Explains the multi-process architecture of VS Code, how the Extension Host runs in isolation, and why this protects the main UI from extension crashes. Critical for understanding the extension lifecycle |
| Command registration and contribution points | VS Code Extension API Documentation | “Contribution Points” (Commands, Menus, Keybindings), “Command API” | Comprehensive reference for registering commands, adding them to menus, and binding keyboard shortcuts. Shows the relationship between package.json declarations and runtime registration |
| TextDocument and TextEditor APIs | VS Code Extension API Documentation | “Text Document” API, “Text Editor” API, “Working with Text” guide | Detailed documentation on the model-view separation in VS Code. Explains how to safely edit documents, handle selections, and work with ranges. Includes code samples for common editing patterns |
| Activation events and lazy loading | VS Code Extension API Documentation | “Activation Events” reference, “Extension Lifecycle” | Explains the 15+ activation event types (onCommand, onLanguage, workspaceContains, etc.) and how VS Code uses them to lazy-load extensions. Critical for keeping VS Code startup fast |
| Extension packaging and distribution | VS Code Extension API Documentation | “Publishing Extensions” guide, “VSIX Package Format” | Covers using vsce to package extensions into .vsix files, testing extensions locally, and publishing to the VS Code Marketplace. Includes best practices for versioning and changelogs |
| Debugging TypeScript in VS Code | Programming TypeScript by Boris Cherny | Ch. 12: “Building and Running TypeScript” (Source maps section) | Explains how source maps enable debugging TypeScript source code instead of compiled JavaScript. Essential for understanding the Extension Development Host workflow |
| Error handling and resource cleanup | Node.js Design Patterns (Third Edition) by Mario Casciaro & Luciano Mammino | Ch. 3: “Callbacks and Events” (Memory leaks and resource cleanup) | Covers the Disposable pattern used throughout VS Code’s API. Explains why you must push disposables to context.subscriptions and what happens when you don’t |
| Extension testing patterns | VS Code Extension API Documentation | “Testing Extensions” guide, “Extension Testing Sample” | Shows how to write unit tests and integration tests for extensions. Covers mocking the VS Code API and running tests in the Extension Development Host |
Project Comparison Table
| Project | Difficulty | Time | Depth of Understanding | Fun Factor |
|---|---|---|---|---|
| 1. Keyboard Refactoring | Beginner | Weekend | ⭐⭐⭐ | ⭐⭐⭐ |
| 2. Debugger Config | Intermediate | Weekend | ⭐⭐⭐ | ⭐⭐ |
| 3. Task Automation | Intermediate | Weekend | ⭐⭐⭐ | ⭐⭐⭐ |
| 4. Snippet Library | Beginner | Weekend | ⭐⭐ | ⭐⭐⭐⭐ |
| 5. Dev Containers | Advanced | 1 Week | ⭐⭐⭐⭐⭐ | ⭐⭐⭐⭐⭐ |
| 6. Focus Profiles | Beginner | Weekend | ⭐⭐ | ⭐⭐⭐ |
| 7. Custom Extension | Advanced | 1-2 Weeks | ⭐⭐⭐⭐⭐ | ⭐⭐⭐⭐⭐ |
Recommendation
- Start with Project 1 (Keyboard Refactoring): It gives immediate ROI. You will feel faster instantly.
- Do Project 4 (Snippets) next: It’s easy, fun, and saves you typing.
- Tackle Project 5 (Dev Containers): This is the biggest career booster. Understanding containerized dev environments is a senior-level skill.
Final Overall Project: The “Meta-Developer” Workspace
- File: VS_CODE_MASTERY_LEARNING_PROJECTS.md
- Main Programming Language: TypeScript + Docker + JSON
- Difficulty: Master
What you’ll build: A standardized, portable, and automated development environment for a team. It will include:
- A Dev Container that installs the toolchain.
- Recommended Extensions (
extensions.json) so the team has the same tools. - Shared Settings (
settings.json) for formatting and linting rules. - Shared Tasks (
tasks.json) for building and testing. - Shared Snippets (
.code-snippets) for boilerplate. - A Custom Extension specific to your team’s workflow (e.g., a ticket fetcher).
Why it integrates everything: You are moving from “optimizing for yourself” to “optimizing for the team.” You use every part of VS Code’s configuration surface to create a “Golden Path” for development.
Real World Outcome:
A new hire joins. They clone the repo. VS Code asks “Reopen in Container?”. They say Yes. 3 minutes later, they press F5 and the app runs with debugger attached. They press Cmd+Shift+B and it builds. No wiki pages to read. No “install dependency X” errors. It just works.
Summary
This learning path covers VS Code Mastery through 7 hands-on projects. Here’s the complete list:
| # | Project Name | Main Language | Difficulty | Time Estimate |
|---|---|---|---|---|
| 1 | The “Keyboard Warrior” Refactoring Kata | Text/Regex | Beginner | Weekend |
| 2 | The “Time Travel” Debugger Configuration | Node.js/JSON | Intermediate | Weekend |
| 3 | The “One-Touch” Automation Task Runner | Shell/JSON | Intermediate | Weekend |
| 4 | The Dynamic Snippet Library | TextMate/JSON | Beginner | Weekend |
| 5 | The “Works on My Machine” Killer | Docker/JSON | Advanced | 1 Week |
| 6 | The “Focus Mode” Workspace Profiles | JSON | Beginner | Weekend |
| 7 | The “Code Butler” Command Extension | TypeScript | Advanced | 1-2 Weeks |
Recommended Learning Path
For beginners: Start with projects #1, #4, #6. For intermediate: Jump to projects #2, #3. For advanced: Focus on projects #5, #7.
Expected Outcomes
After completing these projects, you will:
- Navigate codebases entirely via keyboard.
- Debug complex applications without
console.log. - Automate build and test workflows within the editor.
- Containerize development environments for perfect reproducibility.
- Extend the editor itself to solve custom problems.
You’ll have built 7 working projects that demonstrate deep understanding of VS Code from first principles.