Video Streaming Deep Dive: From Progressive Download to Adaptive Bitrate
Goal: By completing these 20 projects, you will deeply understand how modern video streaming platforms like Netflix, YouTube, and Twitch work from first principles. You’ll build everything from low-level MP4 parsers that understand container formats and codec structures, to complete adaptive bitrate streaming systems that dynamically adjust quality based on network conditions. You’ll implement the core technologies behind live streaming (RTMP ingest servers, WebRTC peer-to-peer delivery), content delivery networks with edge caching strategies, and digital rights management systems that protect premium content. Most importantly, you’ll understand why the industry evolved from simple progressive download to sophisticated multi-bitrate HLS/DASH protocols, and gain the expertise to debug streaming issues, optimize quality of experience, and architect scalable video platforms that serve millions of concurrent users.
Why Video Streaming Matters
The Dominance of Video in Modern Internet
Video streaming has become the primary use case of the modern internet, fundamentally reshaping how we consume media, learn, communicate, and entertain ourselves:
-
Market Scale: The video streaming market reached $192 billion in 2025 and is projected to grow to $787 billion by 2035 (12.3% CAGR), representing one of the fastest-growing sectors in technology (Video Streaming Market Growth Analysis).
-
Internet Traffic: Video accounts for 82% of global internet traffic in 2025, making it the dominant workload that drives infrastructure decisions from CDN architecture to ISP capacity planning (Video Marketing Statistics).
-
Platform Reach: Netflix alone has 301.6 million users worldwide (market leader), while YouTube serves billions of hours of video daily, and live streaming platforms like Twitch have created entirely new industries (Video Streaming App Report).
-
Protocol Adoption: HLS is used by 78% of streaming platforms, while DASH is used by 56%, with adaptive bitrate streaming being the industry standard that replaced simple progressive download (Bitmovin Survey).
The Evolution: Why Adaptive Streaming Won
Progressive Download Era (2005-2010)
┌────────────────────────────────────────────┐
│  HTTP Server                               │
│  ┌──────────────────────┐                  │
│  │  video.mp4 (720p)    │                  │
│  │  Single bitrate      │───────────────►  │  User gets buffering on slow networks
│  └──────────────────────┘                  │  or wastes bandwidth on fast networks
└────────────────────────────────────────────┘

Adaptive Bitrate Streaming Era (2010-Present)
┌─────────────────────────────────────────────────────────────────┐
│  Origin Server + CDN Edge Caches                                │
│  ┌──────────────────────────────────────────────────────────┐   │
│  │  Manifest (playlist.m3u8 or manifest.mpd)                │   │
│  │  ├── 360p @ 800 kbps  ──► segments: 0.ts, 1.ts, 2.ts...  │   │
│  │  ├── 720p @ 2500 kbps ──► segments: 0.ts, 1.ts, 2.ts...  │   │
│  │  ├── 1080p @ 5000 kbps ──► segments: 0.ts, 1.ts, 2.ts... │   │
│  │  └── 4K @ 15000 kbps  ──► segments: 0.ts, 1.ts, 2.ts...  │   │
│  └──────────────────────────────────────────────────────────┘   │
│                           │                                      │
│                           ▼                                      │
│  Client-Side ABR Algorithm                                      │
│  ┌────────────────────────────────────────┐                     │
│  │ Measure: network speed, buffer level   │                     │
│  │ Decide: switch to optimal bitrate      │───────────►  Smooth playback
│  │ Request: next segment at chosen quality│          No buffering, optimal quality
│  └────────────────────────────────────────┘          Uses only available bandwidth
└─────────────────────────────────────────────────────────────────┘
Real-World Impact & Industry Applications
- Streaming Platforms (Netflix, Disney+, HBO Max)
- Multi-CDN strategies to serve 300M+ users globally
- Per-title encoding optimization to reduce bandwidth costs by 30-50%
- A/B testing of ABR algorithms to improve Quality of Experience (QoE)
- Live Streaming (Twitch, YouTube Live, sports broadcasting)
- Ultra-low latency requirements (sub-3 second glass-to-glass)
- RTMP ingest → HLS/DASH distribution pipelines
- WebRTC for interactive streaming (gaming, video calls)
- Enterprise Video (corporate training, video conferencing)
- DRM integration for protected content
- Analytics for viewer engagement and completion rates
- Adaptive streaming for varying corporate network conditions
- Edge Computing & 5G
- CDN edge nodes processing video at the network edge
- Mobile-first adaptive streaming for cellular networks
- Real-time transcoding to optimize for device capabilities
Why Engineers Need to Understand This Deeply
-
Debugging Production Issues: When users report buffering, you need to understand whether it’s a CDN cache miss, ABR algorithm failing to downshift, or segment duration misconfiguration.
-
Cost Optimization: Video delivery is expensive (bandwidth costs can reach millions/month). Understanding codec efficiency (H.265 vs. H.264), segment sizing, and CDN hit ratios directly impacts infrastructure costs.
-
Quality of Experience: The difference between a good and great streaming platform is in the details: startup time, rebuffering ratio, bitrate switching smoothness, and live latency.
-
Architectural Decisions: Should you use HLS or DASH? What segment duration? How many bitrate ladders? These decisions require deep understanding of trade-offs.
Core Concept Analysis
To truly understand how YouTube works, you need to grasp these fundamental layers:
Layer 1: Video Basics (The “What”)
- Container formats: MP4, WebM, MKV are just “boxes” holding video/audio streams
- Codecs: H.264, H.265, VP9, AV1 - compression algorithms that make video transmittable
- Resolution & Bitrate: The fundamental tradeoff between quality and bandwidth
Layer 2: Delivery Evolution (The “How It Changed”)
- Progressive Download (Pre-2007): Download the whole file, play as it downloads
- Pseudo-streaming (2007-2010): Seek to any point, server sends from there
- Adaptive Streaming (2010-present): Multiple quality levels, switch on-the-fly
Layer 3: Modern Streaming Architecture (The “How It Works Now”)
- HLS/DASH protocols: Video split into 2-10 second chunks, served over plain HTTP
- Manifest files: Playlists that tell the player what chunks exist at what quality
- ABR algorithms: Client-side logic deciding which quality to fetch next
- CDN edge caching: Video chunks cached at 200+ global locations
Layer 4: Real-Time (The “Live” Challenge)
- RTMP ingest: How creators push live video to YouTube
- Low-latency HLS/DASH: Reducing the 10-30 second delay
- WebRTC: Sub-second latency for video calls
The Historical Context: Why Streaming Was Hard
Before diving into projects, understand why this problem was unsolved for so long:
1995-2005: The Dark Ages
- Videos were downloaded completely before playing
- A 3-minute video at 320x240 was 15MB - took 30+ minutes on dial-up
- RealPlayer and Windows Media Player tried proprietary streaming (terrible)
- Flash Video (.flv) emerged but still required full download
2005-2010: The YouTube Revolution
- YouTube launched using Flash with progressive download
- “Buffering” spinner became iconic - you’d wait, watch 30 seconds, wait again
- Key insight: HTTP works everywhere, proprietary protocols get blocked
2010-Present: Adaptive Streaming
- Apple invented HLS (HTTP Live Streaming) for iPhone
- DASH (Dynamic Adaptive Streaming over HTTP) became the open standard
- Key insight: Split video into small HTTP-fetchable chunks, let client choose quality
Prerequisites & Background Knowledge
Essential Prerequisites (Must Have)
Before starting these projects, you should have:
- Programming Fundamentals
- Proficiency in at least one language (Python, C, Go, or Rust recommended)
- Understanding of HTTP protocols and REST APIs
- Basic command-line skills and text editor/IDE familiarity
- Networking Basics
- TCP/IP fundamentals (what IP addresses, ports, and sockets are)
- HTTP request/response cycle
- Understanding of bandwidth, latency, and throughput
- Binary & Data Formats
- Hexadecimal notation
- Byte order (big-endian vs little-endian)
- Basic file I/O operations
- Web Development (for player projects)
- HTML5
<video>tag basics - JavaScript DOM manipulation
- Browser developer tools (Network tab, Console)
- HTML5
Helpful But Not Required
These topics will be learned through the projects, but having exposure helps:
- Video/Audio Concepts: Frame rates, codecs, bitrates
- Async Programming: Promises, callbacks, event loops
- Systems Programming: C pointers, memory management
- Docker/Containers: For deployment projects
- WebRTC: For P2P projects
Self-Assessment Questions
Can you answer YES to these questions?
- Can you write a program that reads a binary file and prints bytes in hex?
- Do you understand what an HTTP GET request looks like at the protocol level?
- Can you explain what a “codec” is in one sentence?
- Have you used browser DevTools to inspect network requests?
- Can you write a simple HTTP server in your chosen language?
If you answered YES to 4+, you’re ready. If not, consider reviewing HTTP and binary file basics first.
Development Environment Setup
Required Tools:
# FFmpeg - The Swiss Army knife of video
brew install ffmpeg          # macOS
apt install ffmpeg          # Ubuntu/Debian
choco install ffmpeg        # Windows

# Verify installation
ffmpeg -version
ffprobe -version            # Analyze video files
Recommended Tools:
- Media Inspector: MediaInfo - GUI for analyzing video files
- Network Analysis: Wireshark or Chrome DevTools Network tab
- Hex Editor: HexFiend (macOS), HxD (Windows),
hexdump(Linux) - Video Test Files: Big Buck Bunny - free test content
Optional Cloud Accounts (for later projects):
- AWS Free Tier (for CDN projects)
- Cloudflare Workers (for edge computing)
- GitHub Pages (for hosting players)
Time Investment
Realistic Estimates Per Project:
- Beginner Projects (1-5): 2-5 days each (part-time)
- Intermediate Projects (6-12): 1-2 weeks each
- Advanced Projects (13-19): 2-4 weeks each
- Capstone Project (20): 4-8 weeks
Total Time for All 20 Projects: 6-12 months (part-time), 3-6 months (full-time)
Important Reality Check
These projects are challenging. You will:
- Get stuck debugging binary parsing errors
- Spend hours reading RFCs and specifications
- Rebuild things 2-3 times as understanding deepens
- Encounter cryptic FFmpeg errors
- Deal with timing bugs in video players
This is normal and valuable. The struggle is where the learning happens. When you’re stuck:
- Read the relevant book chapter listed
- Use
ffprobeto analyze video files - Check the RFCs/specs (they’re drier than books but authoritative)
- Build a minimal test case to isolate the issue
- Ask specific questions in communities (Stack Overflow, Discord)
Concept Summary Table
| Concept Cluster | What You Need to Internalize |
|---|---|
| Container Formats | MP4, WebM, and MKV are “boxes within boxes” - structured binary formats that package video/audio streams with metadata. Not the video itself, but the wrapper. |
| Codecs & Compression | H.264, H.265, VP9, AV1 are compression algorithms. They turn raw frames (50 Mbps) into transmittable streams (5 Mbps) using temporal/spatial compression. |
| Progressive Download | The pre-streaming era: download a file, play as it arrives. HTTP Range requests enable seeking. Simple but inflexible. |
| Adaptive Bitrate Streaming (ABR) | The modern approach: encode video at multiple quality levels, split into chunks, let client choose quality per-chunk based on network speed. |
| HLS vs DASH | HLS (Apple’s .m3u8) and DASH (industry standard .mpd) are chunk-based protocols. Same concept, different manifest formats. |
| Manifests & Playlists | Text files that list available chunks, qualities, and URLs. The “table of contents” for streaming. |
| Client-Side ABR Algorithms | Logic that measures network speed and buffer level to decide which quality chunk to fetch next. The “brain” of adaptive streaming. |
| CDN Edge Caching | Video chunks cached at 200+ global locations. Reduces latency and origin load. Critical for scale. |
| Live Streaming (RTMP/HLS) | RTMP ingest (upload) → transcoding → HLS/DASH (delivery). Adds 10-30 second delay. |
| WebRTC | Peer-to-peer video with sub-second latency. Completely different architecture (UDP, not HTTP). Used for video calls. |
| DRM (Digital Rights Management) | Encryption + license servers to protect premium content. Widevine, PlayReady, FairPlay. |
| Quality Metrics (QoE) | VMAF, SSIM, PSNR - objective measures of video quality. Rebuffering ratio, startup time - user experience metrics. |
Deep Dive Reading by Concept
This section maps each concept from above to specific book chapters for deeper understanding. Read these before or alongside the projects to build strong mental models.
Video Fundamentals
| Concept | Book & Chapter |
|---|---|
| Container Formats (MP4, WebM) | “Practical Binary Analysis” by Dennis Andriesse — Ch. 2: “The ELF Format” (sections 2.1–2.3) (Apply binary parsing techniques to video containers) |
| Codecs & Compression | “Digital Video and HD” by Charles Poynton — Ch. 9: “Raster Images” & Ch. 20: “Video Compression” |
| Frame Types (I, P, B frames) | “Digital Video and HD” by Charles Poynton — Ch. 20: “Video Compression” (sections on GOP structure) |
| Bitrate vs Quality Tradeoff | “High Performance Browser Networking” by Ilya Grigorik — Ch. 16: “Optimizing Application Delivery” |
HTTP & Networking
| Concept | Book & Chapter |
|---|---|
| HTTP Protocol Basics | “TCP/IP Illustrated, Volume 1” by W. Richard Stevens — Ch. 14: “TCP Connection Management” |
| HTTP Range Requests | RFC 7233 — Sections 2 (“Range Units”) and 4 (“Responses”) Free online: https://tools.ietf.org/html/rfc7233 |
| CDN Architecture | “High Performance Browser Networking” by Ilya Grigorik — Ch. 14: “Primer on Web Performance” |
| Bandwidth Estimation | “Computer Networks, Fifth Edition” by Tanenbaum & Wetherall — Ch. 5: “The Network Layer” (section 5.3 on congestion control) |
Streaming Protocols
| Concept | Book & Chapter |
|---|---|
| HLS (HTTP Live Streaming) | RFC 8216 — Apple’s HLS specification Free online: https://tools.ietf.org/html/rfc8216 |
| DASH (Dynamic Adaptive Streaming) | ISO/IEC 23009-1 specification (overview available free) |
| Adaptive Bitrate Algorithms | Academic paper: “A Survey on Bitrate Adaptation Schemes for Streaming Media Over HTTP” — IEEE 2019 |
| Segmentation & Chunking | “Streaming Systems” by Tyler Akidau et al. — Ch. 2: “The What, Where, When, and How of Data Processing” |
Live Streaming
| Concept | Book & Chapter |
|---|---|
| RTMP Protocol | “Programming with RTMP” — Free guide from Adobe (archived) |
| WebRTC Fundamentals | “High Performance Browser Networking” by Ilya Grigorik — Ch. 18: “WebRTC” |
| Low-Latency HLS | Apple Developer Documentation — “Enabling Low-Latency HLS” |
Advanced Topics
| Concept | Book & Chapter |
|---|---|
| DRM (Widevine, PlayReady) | W3C Encrypted Media Extensions (EME) specification Free online: https://www.w3.org/TR/encrypted-media/ |
| Video Quality Metrics (VMAF) | Netflix Tech Blog — “Toward A Practical Perceptual Video Quality Metric” |
| FFmpeg Internals | “FFmpeg Basics” by Frantisek Korbel — Entire book (covers command-line usage and concepts) |
Essential Reading Order
For maximum comprehension, read in this order:
- Foundation (Week 1):
- “High Performance Browser Networking” Ch. 14 (HTTP basics)
- RFC 7233 (Range requests)
- “Digital Video and HD” Ch. 9 (raster images)
- Streaming Protocols (Week 2-3):
- RFC 8216 (HLS) — skim sections 4 and 6
- “High Performance Browser Networking” Ch. 16 (delivery optimization)
- DASH specification overview
- Advanced Topics (Week 4+):
- “Practical Binary Analysis” Ch. 2 (for MP4 parser)
- “High Performance Browser Networking” Ch. 18 (WebRTC)
- Netflix VMAF paper
Quick Start: Your First 48 Hours
Feeling overwhelmed by 20 projects? Start here.
Day 1: See It Working (2-3 hours)
Goal: Understand what you’re building toward by playing with finished tools.
- Download test video:
wget http://commondatastorage.googleapis.com/gtv-videos-bucket/sample/BigBuckBunny.mp4 - Analyze with ffprobe:
ffprobe -v quiet -print_format json -show_format -show_streams BigBuckBunny.mp4 > analysis.json
cat analysis.json | grep -A 5 "codec_name"
What you’re seeing: Container format, codecs, bitrates - the “DNA” of the video.
- Serve with Range requests:
python3 -m http.server 8080Open browser to
http://localhost:8080/BigBuckBunny.mp4. Seek around. Open DevTools Network tab. See theRangerequests. - Generate HLS chunks:
ffmpeg -i BigBuckBunny.mp4 \
  -c:v copy -c:a copy \
  -f hls -hls_time 6 -hls_playlist_type vod \
  output.m3u8

ls -lh output*.ts    # See the chunks!
cat output.m3u8      # See the manifest!
What you learned: The progression from monolithic file → HTTP-served file → chunked HLS.
Day 2: Build Something (3-4 hours)
Goal: Get your hands dirty with Project 2 (simplest web project).
Follow Project 2 (Progressive Download Server) and build a Python server that:
- Serves a video file
- Handles Range requests
- Visualizes buffering
By end of Day 2, you’ll have a working video server and understand HTTP Range requests.
Next Steps
After the first 48 hours, choose a learning path below based on your interests.
Recommended Learning Paths
Different engineers need different journeys. Choose your path:
Path 1: The Full Stack Engineer (Web-Focused)
Goal: Build video platforms (think YouTube clone).
Projects in Order:
- Project 2 (Progressive Download) → Understand HTTP delivery
- Project 4 (HLS Segmenter) → Learn chunking
- Project 5 (HLS Player) → Build client-side player
- Project 6 (ABR Algorithm) → Implement adaptive bitrate
- Project 8 (Mini-CDN) → Add caching
- Project 20 (YouTube Clone) → Capstone
Time: 3-4 months part-time
Skills Gained: End-to-end streaming platform, deployable portfolio project
Path 2: The Systems Engineer (Low-Level Focused)
Goal: Understand video internals, debug production issues.
Projects in Order:
- Project 1 (MP4 Parser) → Binary formats
- Project 14 (MPEG-TS Demuxer) → Transport streams
- Project 3 (Transcoder) → FFmpeg pipelines
- Project 10 (VMAF Quality) → Quality metrics
- Project 12 (Codec Comparison) → Compression algorithms
Time: 2-3 months part-time
Skills Gained: Deep video expertise, debugging skills, performance optimization
Path 3: The Live Streaming Specialist
Goal: Build Twitch-like live platforms.
Projects in Order:
- Project 2 (Progressive Download) → HTTP basics
- Project 7 (RTMP to HLS) → Live pipeline
- Project 9 (WebRTC) → P2P streaming
- Project 18 (LL-HLS) → Low-latency streaming
- Project 11 (Bandwidth Estimator) → Network simulation
Time: 3-4 months part-time
Skills Gained: Real-time video systems, low-latency optimization
Path 4: The Infrastructure Engineer (Scale-Focused)
Goal: Optimize for millions of users.
Projects in Order:
- Project 8 (Mini-CDN) → Edge caching
- Project 16 (Thumbnail Generator) → Batch processing
- Project 19 (Analytics Pipeline) → Data collection
- Project 17 (P2P Delivery) → Distribution optimization
- Project 20 (YouTube Clone) → Full system integration
Time: 4-5 months part-time
Skills Gained: Scalability, cost optimization, distributed systems
Path 5: The Interview Prep Path (Fastest)
Goal: Understand core concepts for FAANG interviews in 1 month.
Projects in Order:
- Project 1 (MP4 Parser) → Binary parsing (systems design)
- Project 5 (HLS Player) → Event-driven architecture
- Project 6 (ABR Algorithm) → Algorithm design
- Project 8 (Mini-CDN) → Caching strategies
- Project 11 (Bandwidth Estimator) → Network protocols
Time: 4-6 weeks intensive (full-time equivalent)
Skills Gained: Interview-relevant depth, design pattern knowledge
Project 1: Video File Dissector (Container Format Parser)
- File: VIDEO_STREAMING_DEEP_DIVE_PROJECTS.md
- Main Programming Language: C
- Alternative Programming Languages: Rust, Python, Go
- Coolness Level: Level 3: Genuinely Clever
- Business Potential: 1. The “Resume Gold”
- Difficulty: Level 3: Advanced
- Knowledge Area: Binary Parsing / Media Containers
- Software or Tool: MP4/WebM Parser
- Main Book: “Practical Binary Analysis” by Dennis Andriesse
What you’ll build: A tool that opens MP4/WebM files and displays their internal structure - showing you exactly where the video frames, audio samples, and metadata live inside the file.
Why it teaches video fundamentals: Before you can stream video, you must understand what video IS. An MP4 file isn’t a blob of pixels—it’s a carefully structured binary format with “atoms” (boxes) containing codec info, timestamps, keyframe locations, and compressed frame data. This knowledge is essential for understanding why seeking is instant vs slow, why some videos won’t play, and how streaming protocols work.
Core challenges you’ll face:
- Binary parsing (reading bytes, handling endianness) → maps to understanding file formats
- Recursive structures (atoms contain atoms contain atoms) → maps to container hierarchy
- Codec identification (finding the avc1/hev1/vp09 codec box) → maps to codec awareness
- Timestamp math (timescale, duration, sample tables) → maps to media timing
- Finding keyframes (sync sample table) → maps to why seeking works
Key Concepts:
- Binary File Parsing: “Practical Binary Analysis” Chapter 2 - Dennis Andriesse
- MP4 Box Structure: ISO 14496-12 specification (free online) - ISO/IEC
- Endianness & Byte Order: “Computer Systems: A Programmer’s Perspective” Chapter 2 - Bryant & O’Hallaron
- Media Timing: “Digital Video and HD” Chapter 20 - Charles Poynton
Difficulty: Intermediate-Advanced Time estimate: 1-2 weeks Prerequisites: C basics, familiarity with binary/hex
Real world outcome:
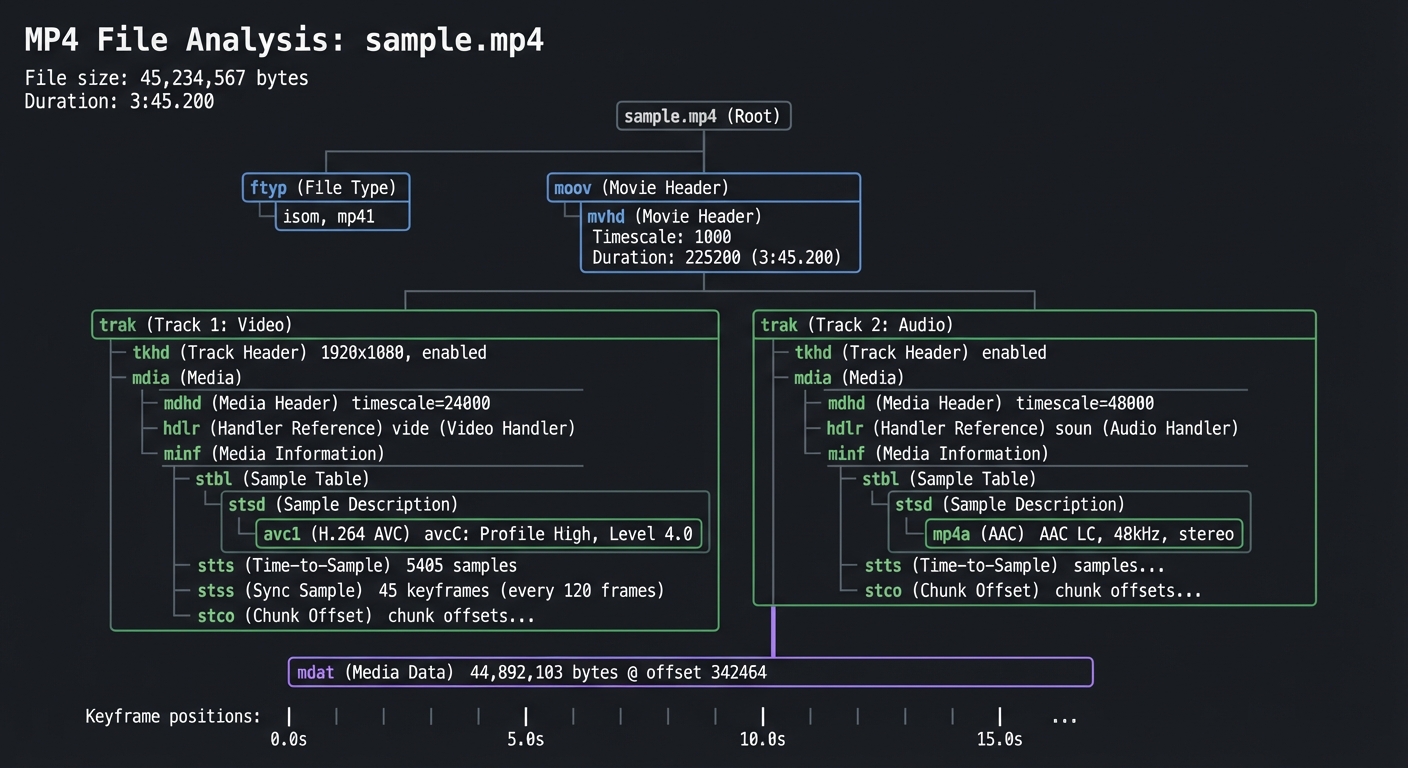
$ ./mp4dissect sample.mp4

MP4 File Analysis: sample.mp4
================================
File size: 45,234,567 bytes
Duration: 3:45.200

Container Structure:
├── ftyp (File Type): isom, mp41
├── moov (Movie Header)
│   ├── mvhd (Movie Header)
│   │   ├── Timescale: 1000
│   │   └── Duration: 225200 (3:45.200)
│   ├── trak (Track 1: Video)
│   │   ├── tkhd: 1920x1080, enabled
│   │   └── mdia
│   │       ├── mdhd: timescale=24000
│   │       ├── hdlr: vide (Video Handler)
│   │       └── minf/stbl
│   │           ├── stsd: avc1 (H.264 AVC)
│   │           │   └── avcC: Profile High, Level 4.0
│   │           ├── stts: 5405 samples
│   │           ├── stss: 45 keyframes (every 120 frames)
│   │           └── stco: chunk offsets...
│   └── trak (Track 2: Audio)
│       └── ... (AAC LC, 48kHz, stereo)
└── mdat (Media Data): 44,892,103 bytes @ offset 342464

Keyframe positions: 0.0s, 5.0s, 10.0s, 15.0s...
Implementation Hints: MP4 files use a “box” (or “atom”) structure. Each box has:
- 4 bytes: size (big-endian)
- 4 bytes: type (ASCII, like ‘moov’, ‘trak’, ‘mdat’)
- (size-8) bytes: payload
Some boxes are containers (moov, trak, mdia) and contain other boxes. Others are leaf boxes with actual data. Start by reading the file and printing all top-level boxes. Then recursively parse container boxes.
The ‘stss’ (Sync Sample) box tells you which frames are keyframes—this is crucial for understanding why seeking is fast (you can only seek TO keyframes).
Learning milestones:
- Parse top-level boxes → You understand binary formats
- Navigate the moov/trak hierarchy → You understand container structure
- Extract codec info from stsd → You understand what a “codec” actually means in practice
- Map keyframes to timestamps → You understand why YouTube can seek instantly
The Core Question You’re Answering
“What IS a video file? Is it just pixels and audio, or is there more structure?”
Before you write any code, sit with this question. Most developers think of video files as blobs of frames. In reality, MP4 is an intricate database: a hierarchical structure of “atoms” containing metadata tables (keyframe positions, timestamps, codec configs) and the actual compressed media data. Understanding this structure is the difference between using FFmpeg blindly vs. understanding WHY certain operations are instant (seek) vs. slow (re-encode).
Concepts You Must Understand First
Stop and research these before coding:
- Binary File Formats
- How do you read 4 bytes and interpret them as a 32-bit integer?
- What is big-endian vs little-endian, and why does it matter?
- How do you navigate a file using byte offsets?
- Book Reference: “Practical Binary Analysis” Ch. 2 (“The ELF Format”) - Dennis Andriesse
- Recursive Tree Structures
- How do you parse a container that contains containers (atoms within atoms)?
- When do you recurse vs. when do you read raw data?
- How do you track your current position in a deeply nested structure?
- Book Reference: “Computer Systems: A Programmer’s Perspective” Ch. 2 (“Representing and Manipulating Information”) - Bryant & O’Hallaron
- Video Fundamentals
- What is a codec (H.264, H.265, VP9) vs. a container (MP4, WebM)?
- What is a keyframe (I-frame) vs. a delta frame (P/B frames)?
- Why can you only seek TO keyframes, not between them?
- Book Reference: “Digital Video and HD” Ch. 20 (“Video Compression”) - Charles Poynton
Questions to Guide Your Design
Before implementing, think through these:
- Parsing Strategy
- Will you recursively parse all atoms at once, or lazily parse on-demand?
- How will you handle atoms with unknown types (forward compatibility)?
- Will you build an in-memory tree, or just print as you discover?
- Error Handling
- What if an atom’s size is corrupted (claims to be 2GB but file is 50MB)?
- What if the atom hierarchy is malformed (moov appears after mdat)?
- Will you validate checksums or trust the data?
- Display Format
- How will you visualize the nested structure (tree view, JSON, indented text)?
- Will you display byte offsets for debugging?
- How much detail: just atom types, or full codec configs?
Thinking Exercise
Exercise: Trace an MP4 by Hand
Before coding, download a small MP4 file and open it in a hex editor. Find the first 12 bytes:
Offset    Hex                                            ASCII
00000000: 0000 0020 6674 7970 6973 6f6d 0000 0200  ... ftypisom....
          └─┬─┘ └─┬─┘
           Size   Type
Questions while exploring:
- At offset 0: What are the first 4 bytes (in decimal)? That’s the atom size.
- At offset 4: What are the next 4 bytes (as ASCII)? That’s the atom type (‘ftyp’).
- If size is 32 bytes, where does the next atom start?
- Navigate to the ‘moov’ atom. How deep is the nesting?
- Find ‘stsd’ (sample description). Can you identify the codec name in ASCII?
The Interview Questions They’ll Ask
Prepare to answer these:
- “Explain why seeking is instant in some video files but slow in others.”
- “You’re building a video streaming service. Why do you need to understand container formats?”
- “A user reports that your player won’t seek past 1:30 in a 5-minute video. What could cause this?”
- “What’s the difference between a codec and a container? Give examples.”
- “Walk me through what happens when a browser requests a 10MB MP4 file with Range: bytes=5000000-5999999.”
- “Why do MP4 files have ‘moov’ before ‘mdat’ for streaming, but ‘mdat’ before ‘moov’ for download?”
Hints in Layers
Hint 1: Start Simple Don’t parse everything at once. Write a function that reads one atom: size (4 bytes, big-endian uint32), type (4 bytes ASCII), then skip the payload. Print all top-level atoms first.
Hint 2: Handle Container Atoms Certain atom types (‘moov’, ‘trak’, ‘mdia’, ‘minf’, ‘stbl’) are containers. After reading their header (8 bytes), their payload contains child atoms. Recursively parse these.
Hint 3: Extract Keyframe Data The ‘stss’ atom contains the “sync sample table”—a list of frame numbers that are keyframes. It’s in ‘moov/trak/mdia/minf/stbl/stss’. The structure is:
uint32_t version_flags;  // Usually 0
uint32_t entry_count;
uint32_t sample_numbers[entry_count];  // 1-indexed frame numbers
Hint 4: Debugging Tools
Use ffprobe to verify your parsing:
ffprobe -v quiet -print_format json -show_format -show_streams file.mp4
Compare your output to ffprobe’s. Use a hex editor to cross-reference byte offsets.
Books That Will Help
| Topic | Book | Chapter |
|---|---|---|
| Binary File Parsing | “Practical Binary Analysis” by Dennis Andriesse | Ch. 2: “The ELF Format” (apply techniques to MP4) |
| Endianness & Byte Order | “Computer Systems: A Programmer’s Perspective” by Bryant & O’Hallaron | Ch. 2: “Representing and Manipulating Information” (sections 2.1-2.3) |
| MP4 Container Spec | ISO/IEC 14496-12 (Free online) | Sections 4-8 (atom structure) |
| Video Compression Basics | “Digital Video and HD” by Charles Poynton | Ch. 20: “Video Compression” |
Common Pitfalls & Debugging
Problem 1: “My parser claims the file is 4GB but it’s only 10MB”
- Why: You’re reading the size field as little-endian instead of big-endian. MP4 uses network byte order (big-endian).
- Fix: Use
ntohl()in C orstruct.unpack('>I', bytes)in Python. - Quick test: The first atom is always ‘ftyp’, usually 20-32 bytes. If your size is wrong, endianness is the culprit.
Problem 2: “I can’t find the codec information”
- Why: You’re not recursing into ‘moov/trak/mdia/minf/stbl/stsd’.
- Fix: Print the full path as you traverse. The codec is in the ‘stsd’ atom, which contains child atoms like ‘avc1’ (H.264), ‘hev1’ (H.265), ‘vp09’ (VP9).
- Quick test:
ffprobeshows codec_name. Cross-reference with your output.
Problem 3: “Some atoms have weird sizes (1 or 0)”
- Why: Size 1 means the atom uses extended size (next 8 bytes are the real size). Size 0 means “rest of the file”.
- Fix: Check if size == 1, read 8 more bytes for the real size. If size == 0 and atom type is ‘mdat’, it extends to EOF.
- Quick test: Large files (>4GB) often use extended size for ‘mdat’.
Problem 4: “Keyframe table shows frame 1, 121, 241… What’s the timestamp?”
- Why: Frame numbers aren’t timestamps. You need the ‘stts’ (time-to-sample) table to convert frame numbers to time.
- Fix: ‘stts’ is a run-length-encoded table: “frames 1-120 have duration 41 (1/24000 sec each)”. Sum up durations.
- Quick test:
ffprobe -show_frames file.mp4 | grep key_frameshows actual keyframe timestamps.
Project 2: Progressive Download Server & Player
- File: VIDEO_STREAMING_DEEP_DIVE_PROJECTS.md
- Main Programming Language: Python
- Alternative Programming Languages: Go, Node.js, Rust
- Coolness Level: Level 2: Practical but Forgettable
- Business Potential: 1. The “Resume Gold”
- Difficulty: Level 2: Intermediate
- Knowledge Area: HTTP / Network Protocols
- Software or Tool: HTTP Server
- Main Book: “TCP/IP Illustrated, Volume 1” by W. Richard Stevens
What you’ll build: A simple HTTP server that serves video files with proper support for Range requests, and a web page that plays video showing exactly what bytes are being downloaded in real-time.
Why it teaches pre-streaming video: This is how YouTube worked in 2005-2008. The browser requests the video file, the server sends bytes, the <video> tag buffers and plays. But here’s the magic—HTTP Range requests let you seek! When you click the progress bar, the browser sends Range: bytes=1000000- and the server responds with just those bytes. Understanding this is the foundation for understanding why modern streaming works.
Core challenges you’ll face:
- HTTP Range requests (parsing Range header, responding with 206 Partial Content) → maps to seeking mechanism
- Content-Length and Accept-Ranges headers → maps to seekability negotiation
- Buffering visualization (showing what’s downloaded vs playing) → maps to buffer understanding
- Bandwidth throttling (simulate slow connections) → maps to understanding buffering
Key Concepts:
- HTTP Range Requests: RFC 7233 - IETF (read sections 2 and 4)
- HTTP Protocol: “TCP/IP Illustrated, Volume 1” Chapter 14 - W. Richard Stevens
- HTML5 Video API: MDN Web Docs - Mozilla
- Buffer Management: “High Performance Browser Networking” Chapter 16 - Ilya Grigorik
Difficulty: Beginner-Intermediate Time estimate: 3-5 days Prerequisites: Basic Python, HTTP understanding
Real world outcome:
$ python progressive_server.py --port 8080 --video big_buck_bunny.mp4
Serving video on http://localhost:8080
Open browser, see:
- Video player with progress bar
- Real-time visualization showing:
- Blue bar: bytes downloaded
- Green bar: playback position
- Red markers: keyframe positions
- Network log showing each Range request:
GET /video.mp4 Range: bytes=0-999999 → 206 (1MB)
GET /video.mp4 Range: bytes=1000000-1999999 → 206 (1MB)
[User seeks to 2:30]
GET /video.mp4 Range: bytes=45000000-45999999 → 206 (1MB)
Implementation Hints:
The key insight is that browsers handle most of the work. When you provide Accept-Ranges: bytes in your response headers, the browser knows it can request specific byte ranges.
Your server needs to:
- Check for
Rangeheader in requests - If present, parse
bytes=START-ENDformat - Return status 206 (not 200) with
Content-Rangeheader - Send only the requested bytes
Bonus: Add bandwidth throttling (time.sleep() between chunks) to simulate slow connections and watch buffering behavior.
Learning milestones:
- Basic file serving works → You understand HTTP fundamentals
- Range requests enable seeking → You understand how “skip to 2:00” works without downloading everything
- Buffer visualization shows fetch-ahead → You understand why videos “buffer”
- Throttled connection shows buffering pain → You understand why adaptive streaming was invented
The Core Question You’re Answering
“How can a user jump to any point in a video without downloading the entire file first?”
This question drove the entire evolution of web video. Before HTTP Range requests, seeking required downloading everything up to that point, or using proprietary protocols like RTSP. Understanding why Range requests work—and their limitations—explains why we eventually needed adaptive streaming protocols like HLS and DASH.
Concepts You Must Understand First
Stop and research these before coding:
- HTTP Request/Response Cycle
- What happens between when you type a URL and when bytes arrive?
- How does TCP connection establishment relate to HTTP?
- Book Reference: “TCP/IP Illustrated, Volume 1” Ch. 14 - W. Richard Stevens
- HTTP Status Codes (206 vs 200)
- Why does 206 Partial Content exist as a separate status?
- What happens if you send 200 OK with only partial bytes?
- Book Reference: RFC 7233 Sections 2 and 4
- File I/O and Byte Seeking
- How does
file.seek()work at the operating system level? - What’s the performance difference between sequential and random access?
- Book Reference: “Computer Systems: A Programmer’s Perspective” Ch. 10 - Bryant & O’Hallaron
- How does
Questions to Guide Your Design
Before implementing, think through these:
- Range Request Parsing
- How will you handle
Range: bytes=0-499,bytes=500-, andbytes=-500? - What should you do if the range is invalid or exceeds file size?
- How will you handle
- Connection Management
- Should you support keep-alive connections for sequential range requests?
- How many simultaneous connections should a player be allowed to make?
- Buffer Strategy
- Should your server pre-fetch the next likely range request?
- How much should the browser buffer ahead of current playback position?
Thinking Exercise
Before writing code, trace this scenario on paper:
A user opens your video player. The video is 100MB, 10 minutes long. Trace:
- What HTTP requests are sent in the first 5 seconds?
- User seeks to 5:00 (50% through). What requests now?
- Connection drops to 100 KB/s (was 1 MB/s). What happens to playback?
Draw the timeline with bytes downloaded vs bytes played. Where does it break?
The Interview Questions They’ll Ask
Prepare to answer these:
- “Explain the difference between HTTP 200 and 206 responses. When would you use each?”
- “A user seeks to 80% through a video, then immediately seeks back to 10%. How many bytes did they waste downloading?”
- “Why can’t progressive download support live streaming?”
- “How would you implement bandwidth throttling without affecting other HTTP traffic on the system?”
- “What’s the relationship between video keyframes and seek accuracy in progressive download?”
Hints in Layers
Hint 1: Start with the headers
The browser tells you what it wants. Read the Range header, parse it, check if it’s valid against your file size.
Hint 2: Use the right status code
If you see a Range header, respond with 206, not 200. Include Content-Range: bytes START-END/TOTAL and Content-Length: (END-START+1).
Hint 3: Python file seeking
with open('video.mp4', 'rb') as f:
    f.seek(start_byte)
    chunk = f.read(end_byte - start_byte + 1)
Hint 4: Verify with curl Test your server without a browser first:
curl -H "Range: bytes=0-999" http://localhost:8080/video.mp4 -v
# Should see: HTTP/1.1 206 Partial Content
# Should see: Content-Range: bytes 0-999/FILESIZE
Books That Will Help
| Topic | Book | Chapter | |——-|——|———| | HTTP Protocol Fundamentals | “TCP/IP Illustrated, Volume 1” by W. Richard Stevens | Ch. 14 | | Range Requests Specification | RFC 7233 (free online) | Sections 2, 4 | | Browser Networking Behavior | “High Performance Browser Networking” by Ilya Grigorik | Ch. 14, 16 | | File I/O and Buffering | “Computer Systems: A Programmer’s Perspective” by Bryant & O’Hallaron | Ch. 10 | | HTML5 Video API | MDN Web Docs (free online) | Video/Audio APIs |
Common Pitfalls & Debugging
Problem 1: “Seeking doesn’t work - video restarts from beginning”
- Why: You’re sending 200 OK instead of 206 Partial Content, so browser thinks it’s a new file
- Fix: Check your status code logic. If
Rangeheader exists, use 206 - Quick test:
curl -I -H "Range: bytes=0-999" http://localhost:8080/video.mp4should show206
Problem 2: “Video plays but seeking is slow/unreliable”
- Why: Your file seeks are inefficient, or you’re reading too much into memory
- Fix: Use
os.stat()to get file size without reading. Seek directly to byte offset - Quick test: Add logging for file.seek() calls and chunk sizes
Problem 3: “Browser makes dozens of tiny range requests”
- Why: Browser is trying to fetch exact byte ranges for optimal buffering
- Fix: This is normal! Modern browsers are smart. Watch the pattern to understand buffering
- Quick test: Open browser DevTools Network tab, filter by your video file
Problem 4: “Content-Length doesn’t match actual bytes sent”
- Why: Off-by-one error in range calculation.
bytes=0-999is 1000 bytes, not 999 - Fix: Length = (end - start + 1)
- Quick test:
curl -H "Range: bytes=0-10" http://localhost:8080/video.mp4 | wc -cshould show 11
Project 3: Video Transcoder & Quality Ladder Generator
- File: VIDEO_STREAMING_DEEP_DIVE_PROJECTS.md
- Main Programming Language: Python (with FFmpeg)
- Alternative Programming Languages: Go, Rust, Node.js
- Coolness Level: Level 3: Genuinely Clever
- Business Potential: 3. The “Service & Support” Model
- Difficulty: Level 2: Intermediate
- Knowledge Area: Video Encoding / Compression
- Software or Tool: FFmpeg
- Main Book: “Video Encoding by the Numbers” by Jan Ozer
What you’ll build: A tool that takes a source video and generates a complete “quality ladder” - multiple versions at different resolutions and bitrates (1080p, 720p, 480p, 360p, 240p), ready for adaptive streaming.
Why it teaches video encoding: This is exactly what YouTube does when you upload a video. Within minutes, your 4K upload becomes available in 8+ quality levels. Understanding the relationship between resolution, bitrate, and perceptual quality is crucial for understanding why streaming works. A 1080p video can be 1 Mbps (blocky) or 20 Mbps (pristine)—the encoder decides.
Core challenges you’ll face:
- Resolution vs bitrate tradeoff → maps to quality perception
- Codec selection (H.264 vs H.265 vs VP9) → maps to compression efficiency
- Two-pass encoding → maps to quality optimization
- Keyframe alignment → maps to why chunks must start with keyframes
- Audio normalization → maps to complete media pipeline
Key Concepts:
- Video Compression Fundamentals: “Video Encoding by the Numbers” Chapter 1-3 - Jan Ozer
- H.264 Encoding: “H.264 and MPEG-4 Video Compression” Chapter 5 - Iain Richardson
- Rate Control: Apple Tech Note TN2224 - Apple Developer
- FFmpeg Usage: FFmpeg official documentation - FFmpeg.org
Difficulty: Intermediate Time estimate: 1 week Prerequisites: Command line familiarity, basic video concepts
Real world outcome:
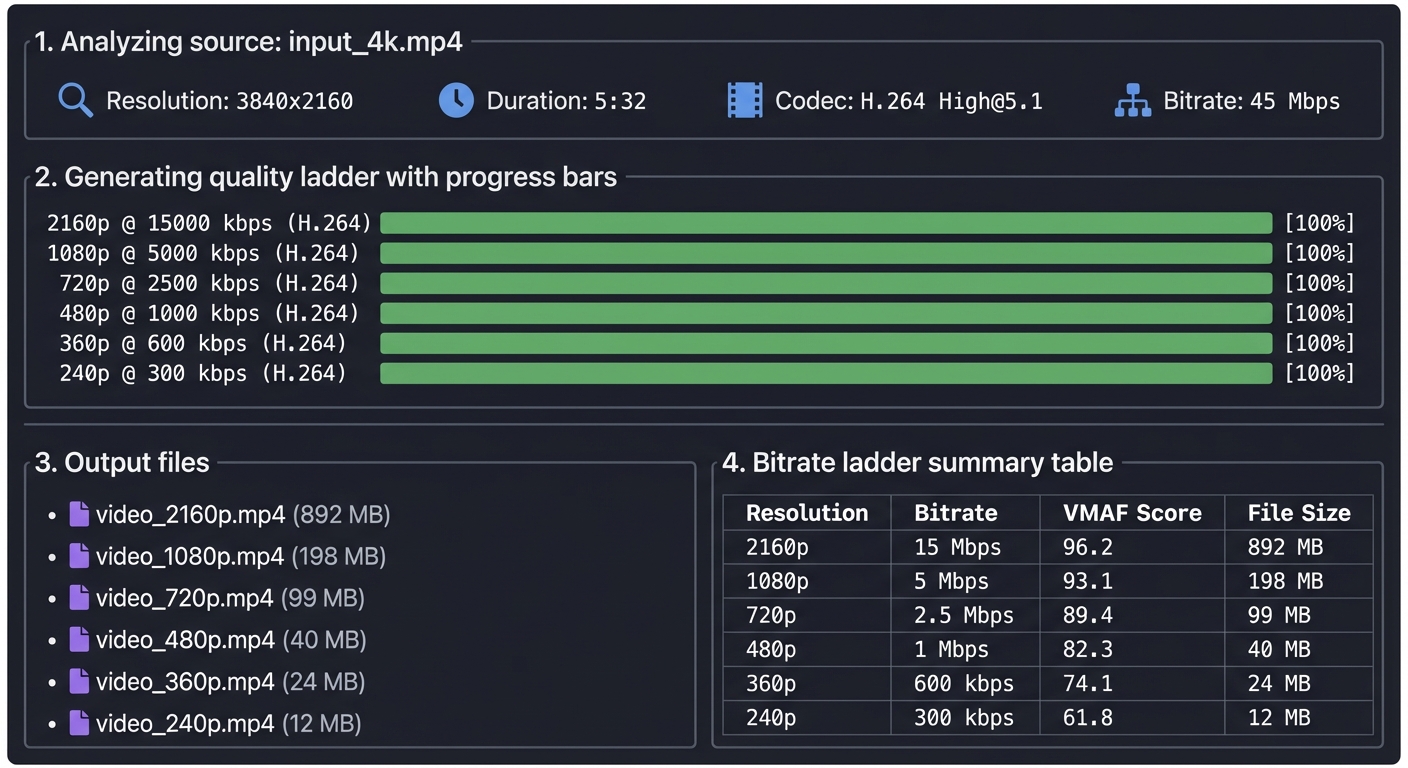
$ ./transcode.py input_4k.mp4 --output-dir ./ladder/

Analyzing source: input_4k.mp4
  Resolution: 3840x2160
  Duration: 5:32
  Codec: H.264 High@5.1
  Bitrate: 45 Mbps

Generating quality ladder...
  [████████████████████] 2160p @ 15000 kbps (H.264)
  [████████████████████] 1080p @ 5000 kbps (H.264)
  [████████████████████] 720p @ 2500 kbps (H.264)
  [████████████████████] 480p @ 1000 kbps (H.264)
  [████████████████████] 360p @ 600 kbps (H.264)
  [████████████████████] 240p @ 300 kbps (H.264)

Output:
  ./ladder/video_2160p.mp4 (892 MB)
  ./ladder/video_1080p.mp4 (198 MB)
  ./ladder/video_720p.mp4 (99 MB)
  ./ladder/video_480p.mp4 (40 MB)
  ./ladder/video_360p.mp4 (24 MB)
  ./ladder/video_240p.mp4 (12 MB)

Bitrate ladder summary:
  Resolution  | Bitrate  | VMAF Score | File Size
  ------------|----------|------------|----------
  2160p       | 15 Mbps  | 96.2       | 892 MB
  1080p       | 5 Mbps   | 93.1       | 198 MB
  720p        | 2.5 Mbps | 89.4       | 99 MB
  480p        | 1 Mbps   | 82.3       | 40 MB
  360p        | 600 kbps | 74.1       | 24 MB
  240p        | 300 kbps | 61.8       | 12 MB
Implementation Hints: FFmpeg is the industry standard tool. Your Python script will call FFmpeg with appropriate parameters. Key FFmpeg flags:
-vf scale=1280:720for resolution-b:v 2500kfor target bitrate-c:v libx264 -preset mediumfor H.264 encoding-g 48 -keyint_min 48for keyframe interval (crucial for streaming!)-x264-params "scenecut=0"to prevent unaligned keyframes
The keyframe alignment is critical: all quality levels must have keyframes at exactly the same timestamps, or switching between qualities mid-stream will fail.
Learning milestones:
- Generate multiple quality levels → You understand resolution/bitrate relationship
- Compare quality at same resolution, different bitrates → You understand why bitrate matters more than resolution
- Align keyframes across all levels → You understand the streaming constraint
- Compare H.264 vs H.265 file sizes → You understand codec efficiency evolution
The Core Question You’re Answering
“Why does the same video at 720p look crystal clear on Netflix but blocky on a low-quality stream?”
Resolution is just pixel count—quality comes from bitrate. A 1080p video encoded at 1 Mbps looks worse than 720p at 5 Mbps. This project forces you to understand the relationship between resolution, bitrate, codec settings, and perceptual quality—the same tradeoffs YouTube, Netflix, and Twitch make when processing uploads.
Concepts You Must Understand First
Stop and research these before coding:
- Video Compression Fundamentals (I/P/B Frames)
- Why can’t you start playback from a P-frame?
- What’s a Group of Pictures (GOP), and why does GOP size matter for streaming?
- Book Reference: “Digital Video and HD” by Charles Poynton - Ch. 20 (Video Compression)
- Bitrate vs Quality Tradeoff
- How does Constant Bitrate (CBR) differ from Variable Bitrate (VBR)?
- Why do streaming services use two-pass encoding?
- Book Reference: “Video Encoding by the Numbers” Ch. 1-3 - Jan Ozer
- Codec Efficiency (H.264 vs H.265 vs AV1)
- What does “50% better compression” mean in practice?
- Why hasn’t H.265 replaced H.264 everywhere?
- Book Reference: “H.264 and MPEG-4 Video Compression” Ch. 5 - Iain Richardson
Questions to Guide Your Design
Before implementing, think through these:
- Quality Ladder Strategy
- How do you decide which resolutions/bitrates to generate? (240p, 360p, 480p, 720p, 1080p?)
- Should you ever upscale? (e.g., 720p source to 1080p output?)
- Keyframe Alignment
- Why must all quality levels have keyframes at the exact same timestamps?
- What breaks if keyframes are misaligned by even 100ms?
- Encoding Performance
- Should you encode all qualities in parallel or sequentially?
- How would you estimate total encoding time for a 2-hour video?
Thinking Exercise
Before writing code, think through this scenario:
You have a 1080p 60fps source video (10 Mbps bitrate). You need to create:
- 1080p @ 5 Mbps
- 720p @ 3 Mbps
- 480p @ 1.5 Mbps
- 360p @ 0.8 Mbps
For each output:
- What resolution will you target?
- What bitrate will you use?
- What’s your keyframe interval (in seconds and frames)?
- How will you verify keyframes are aligned across all outputs?
The Interview Questions They’ll Ask
Prepare to answer these:
- “Explain the difference between resolution and bitrate. Which matters more for perceived quality?”
- “Why do streaming platforms use fixed keyframe intervals instead of scene-based keyframe insertion?”
- “How would you determine the optimal bitrate for a 720p stream?”
- “A user complains that quality switching causes brief freezes. What encoding parameter is likely misconfigured?”
- “Why is two-pass encoding better than one-pass for streaming, and when would you skip it?”
Hints in Layers
Hint 1: Start with FFmpeg basics You don’t need to understand video codecs at the bit level. FFmpeg does the heavy lifting. Your job is to call it with the right parameters.
Hint 2: The critical parameters For streaming-compatible output, you must set:
- Resolution:
-vf scale=W:H - Bitrate:
-b:v XMbpsor-crf XX(Constant Rate Factor) - Keyframe interval:
-g FRAMES -keyint_min FRAMES - Disable scene detection:
-x264-params "scenecut=0"
Hint 3: Alignment verification
Use ffprobe to extract keyframe timestamps:
ffprobe -select_streams v -show_frames -show_entries frame=pkt_pts_time,key_frame \
  output_720p.mp4 | grep key_frame=1
Compare timestamps across all quality levels—they should match exactly.
Hint 4: Quality comparison Generate a test file at the same resolution but different bitrates (e.g., 720p @ 1, 2, 3, 5 Mbps). Play them side-by-side. Where do you stop seeing improvement? That’s your diminishing returns point.
Books That Will Help
| Topic | Book | Chapter | |——-|——|———| | Video Compression Basics | “Digital Video and HD” by Charles Poynton | Ch. 20 | | Practical Encoding Guide | “Video Encoding by the Numbers” by Jan Ozer | Ch. 1-3 | | H.264 Deep Dive | “H.264 and MPEG-4 Video Compression” by Iain Richardson | Ch. 5 | | FFmpeg Reference | FFmpeg Official Docs (free online) | Encoding Guide | | Adaptive Streaming Encoding | Apple Tech Note TN2224 (free online) | Best Practices |
Common Pitfalls & Debugging
Problem 1: “Quality switching causes video freezes or glitches”
- Why: Keyframes are not aligned across quality levels. Player can only switch at keyframes
- Fix: Use fixed keyframe interval (
-g 48 -keyint_min 48for 2-sec at 24fps) and disable scene cut (scenecut=0) - Quick test:
ffprobe -show_framesand grep for keyframes, verify timestamps match across files
Problem 2: “720p output looks worse than the 1080p source, even at high bitrate”
- Why: You might be using a fast preset that sacrifices quality for speed
- Fix: Use
-preset mediumor-preset slow. Slower = better quality at same bitrate - Quick test: Encode same clip with
-preset ultrafastvs-preset slow, compare file sizes and visual quality
Problem 3: “Encoding takes forever (hours for a 10-minute video)”
- Why: Using
-preset veryslowor doing two-pass on every quality level - Fix: For testing, use
-preset fastor-preset medium. Two-pass is optional for local testing - Quick test: Encode a 10-second clip first to estimate time:
(clip_time / 10) * video_duration
Problem 4: “Output file is larger than input, even at lower resolution”
- Why: You’re not setting bitrate constraints. FFmpeg defaults to quality-based encoding (CRF)
- Fix: Use
-b:vfor target bitrate and-maxrate/-bufsizefor rate control - Quick test:
ffprobe output.mp4 | grep bitrateshould show lower bitrate than source
Project 4: HLS Segmenter & Manifest Generator
- File: VIDEO_STREAMING_DEEP_DIVE_PROJECTS.md
- Main Programming Language: Python
- Alternative Programming Languages: Go, Rust, C
- Coolness Level: Level 3: Genuinely Clever
- Business Potential: 3. The “Service & Support” Model
- Difficulty: Level 3: Advanced
- Knowledge Area: Streaming Protocols
- Software or Tool: HLS
- Main Book: “High Performance Browser Networking” by Ilya Grigorik
What you’ll build: A tool that takes the quality ladder from Project 3 and segments each quality level into 4-6 second chunks, generating HLS playlists (M3U8 files) that any video player can consume.
Why it teaches streaming: This is the core of how YouTube/Netflix/Twitch work. Instead of one big file, you have thousands of tiny files. The player fetches a playlist, then fetches chunks one by one. If your bandwidth drops, it fetches lower quality chunks. If it improves, it fetches higher quality. This is the magic of adaptive streaming.
Core challenges you’ll face:
- Segment boundary alignment (must be on keyframes) → maps to why encoding matters for streaming
- Playlist generation (#EXTINF, #EXT-X-STREAM-INF) → maps to manifest structure
- Master playlist with multiple qualities → maps to adaptive bitrate selection
- Segment duration consistency → maps to buffer management
Key Concepts:
- HLS Specification: RFC 8216 (HTTP Live Streaming) - IETF
- M3U8 Playlist Format: Apple HLS Authoring Specification - Apple Developer
- Segment Alignment: “High Performance Browser Networking” Chapter 16 - Ilya Grigorik
- Adaptive Streaming: “Streaming Media with HTML5” - Nigel Thomas
Difficulty: Intermediate-Advanced Time estimate: 1 week Prerequisites: Project 3 completed, HTTP understanding
Real world outcome:
$ ./hls_segmenter.py ./ladder/ --segment-duration 6 --output ./hls/

Segmenting quality levels...
  1080p: 56 segments (6s each)
  720p: 56 segments (6s each)
  480p: 56 segments (6s each)
  360p: 56 segments (6s each)

Generated files:
  ./hls/
  ├── master.m3u8 (master playlist)
  ├── 1080p/
  │   ├── playlist.m3u8
  │   ├── segment_000.ts
  │   ├── segment_001.ts
  │   └── ... (56 segments)
  ├── 720p/
  │   └── ... (56 segments)
  ├── 480p/
  │   └── ... (56 segments)
  └── 360p/
      └── ... (56 segments)

Master playlist (master.m3u8):
#EXTM3U
#EXT-X-STREAM-INF:BANDWIDTH=5000000,RESOLUTION=1920x1080
1080p/playlist.m3u8
#EXT-X-STREAM-INF:BANDWIDTH=2500000,RESOLUTION=1280x720
720p/playlist.m3u8
#EXT-X-STREAM-INF:BANDWIDTH=1000000,RESOLUTION=854x480
480p/playlist.m3u8
#EXT-X-STREAM-INF:BANDWIDTH=600000,RESOLUTION=640x360
360p/playlist.m3u8
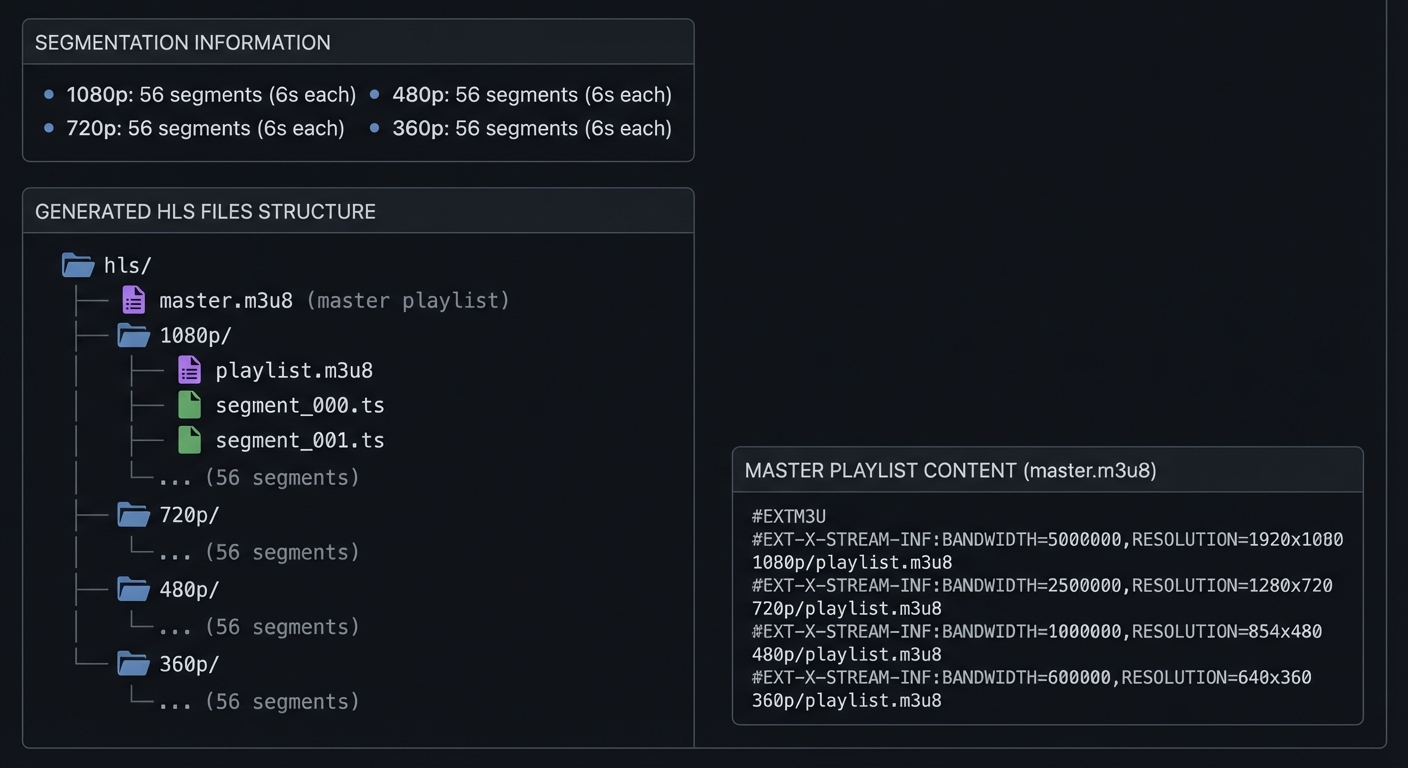
You can now serve ./hls/ with any HTTP server and play with hls.js or VLC:
$ python -m http.server 8080 --directory ./hls/
# Open http://localhost:8080/master.m3u8 in VLC
Implementation Hints:
Use FFmpeg to create segments: -f hls -hls_time 6 -hls_segment_filename "segment_%03d.ts". But the real learning is understanding what those playlists mean:
Media playlist (per quality):
#EXTM3U
#EXT-X-VERSION:3
#EXT-X-TARGETDURATION:6
#EXT-X-MEDIA-SEQUENCE:0
#EXTINF:6.006,
segment_000.ts
#EXTINF:6.006,
segment_001.ts
...
#EXT-X-ENDLIST
Each #EXTINF:6.006 tells the player that segment’s duration. The player sums these to build a timeline. When you seek to 2:30, it calculates which segment contains that timestamp.
Learning milestones:
- Generate valid HLS that plays in VLC → You understand HLS basics
- Master playlist with quality switching → You understand adaptive streaming structure
- Verify segments are keyframe-aligned → You understand why encoding parameters matter
- Calculate which segment contains any timestamp → You understand seeking in chunked streaming
The Core Question You’re Answering
“How does a video player know which 6-second chunk to download next when the video is split into hundreds of pieces?”
This is the fundamental problem HLS solves: breaking a video into small HTTP-fetchable chunks, then providing a manifest (playlist) that tells the player the sequence, duration, and location of each chunk. Understanding M3U8 playlist structure is the key to understanding all modern streaming protocols (HLS, DASH, Smooth Streaming).
Concepts You Must Understand First
Stop and research these before coding:
- HLS Protocol & M3U8 Format
- What’s the difference between a master playlist and media playlist?
- Why does HLS use MPEG-TS (.ts) segments instead of MP4?
- Book Reference: RFC 8216 (HLS Specification) - Sections 4 and 8
- Container Formats (MPEG-TS vs MP4)
- How does MPEG-TS allow arbitrary byte-range cutting without breaking?
- What’s a “muxer” and “demuxer” in FFmpeg terminology?
- Book Reference: “Digital Video and HD” by Charles Poynton - Ch. 9
- Seeking in Segmented Streams
- How do you calculate which segment contains timestamp 2:35?
- What happens if segment durations are variable?
- Book Reference: “Streaming Systems” Ch. 2 - Tyler Akidau et al.
Questions to Guide Your Design
Before implementing, think through these:
- Segmentation Strategy
- Should all segments be exactly 6 seconds, or allow variable duration?
- How do you handle the last segment if video duration doesn’t divide evenly?
- Playlist Generation
- Should you generate master + media playlists in one pass or two?
- How do you compute
#EXT-X-TARGETDURATION(max segment duration)?
- Live vs VOD
- What changes in the M3U8 for a live stream vs video-on-demand?
- How would you update the playlist for a live stream every 6 seconds?
Thinking Exercise
Before writing code, manually create this M3U8:
You have a 30-second video encoded at 720p. You want 6-second segments.
- How many segments will you have?
- Write out the media playlist by hand (segment filenames, #EXTINF tags)
- Now add a 1080p version. Write the master playlist that references both
- What happens if you seek to 20 seconds? Which segment number is that?
The Interview Questions They’ll Ask
Prepare to answer these:
- “Explain the difference between a master playlist and a media playlist in HLS.”
- “Why does HLS use MPEG-TS segments instead of MP4? What breaks if you use MP4?”
- “How would you implement seeking in an HLS player? What information from the playlist do you need?”
- “A client downloads master.m3u8 and sees two quality options. How does it decide which to start with?”
- “What’s the purpose of #EXT-X-TARGETDURATION, and why must it be accurate?”
Hints in Layers
Hint 1: Use FFmpeg for segmentation
You don’t need to write a video segmenter from scratch. FFmpeg’s -f hls output format does the heavy lifting:
ffmpeg -i input.mp4 -f hls -hls_time 6 -hls_list_size 0 -hls_segment_filename "seg_%03d.ts" output.m3u8
Hint 2: Parse the FFmpeg output FFmpeg generates the media playlist. Your job is to:
- Generate multiple qualities (run FFmpeg multiple times with different resolutions/bitrates)
- Create a master playlist that references each media playlist
- Verify segment alignment (check that all qualities have same number of segments)
Hint 3: Master playlist structure
#EXTM3U
#EXT-X-STREAM-INF:BANDWIDTH=5000000,RESOLUTION=1920x1080
1080p.m3u8
#EXT-X-STREAM-INF:BANDWIDTH=2500000,RESOLUTION=1280x720
720p.m3u8
Hint 4: Verify with VLC The fastest way to test:
python -m http.server 8080
# Open http://localhost:8080/master.m3u8 in VLC
If it plays and you can switch qualities (Tools > Track > Video Track), it works.
Books That Will Help
| Topic | Book | Chapter | |——-|——|———| | HLS Protocol Specification | RFC 8216 (free online) | Sections 4, 8 | | Container Formats | “Digital Video and HD” by Charles Poynton | Ch. 9 | | Segmentation & Chunking | “Streaming Systems” by Tyler Akidau et al. | Ch. 2 | | FFmpeg HLS Guide | FFmpeg Official Docs (free online) | HLS Muxer | | HTTP Streaming Overview | “High Performance Browser Networking” by Ilya Grigorik | Ch. 16 |
Common Pitfalls & Debugging
Problem 1: “VLC plays the stream but can’t seek”
- Why: You’re missing
#EXT-X-ENDLISTat the end of media playlists (tells player it’s VOD, not live) - Fix: Add
#EXT-X-ENDLISTas the last line of each media playlist - Quick test:
tail -1 output.m3u8should show#EXT-X-ENDLIST
Problem 2: “Master playlist shows multiple qualities but only one plays”
- Why: Paths in master playlist are wrong, or files don’t exist
- Fix: Use relative paths from master.m3u8 location. If master is in
/hls/, media playlists should be/hls/720p.m3u8 - Quick test:
curl http://localhost:8080/720p.m3u8should return the media playlist, not 404
Problem 3: “Segments play but quality switching causes freezes”
- Why: Keyframes aren’t aligned—you encoded each quality separately without matching GOP structure
- Fix: Use same
-gvalue for all qualities (e.g.,-g 48for 2-sec keyframes at 24fps) - Quick test: Count segments in each quality’s playlist—should be identical
Problem 4: “Player downloads all segments immediately instead of one at a time”
- Why: This is actually correct behavior for VOD! Players pre-fetch for smooth playback
- Fix: Not a bug. To see sequential fetching, simulate live stream (update playlist every 6 seconds, don’t include
#EXT-X-ENDLIST) - Quick test: Open DevTools Network tab, watch segment requests happen in order as buffer fills
Project 5: HLS Player from Scratch (No Libraries)
- File: VIDEO_STREAMING_DEEP_DIVE_PROJECTS.md
- Main Programming Language: JavaScript
- Alternative Programming Languages: TypeScript, Rust (WebAssembly)
- Coolness Level: Level 4: Hardcore Tech Flex
- Business Potential: 1. The “Resume Gold”
- Difficulty: Level 4: Expert
- Knowledge Area: Media APIs / Streaming
- Software or Tool: HTML5 Media Source Extensions
- Main Book: “High Performance Browser Networking” by Ilya Grigorik
What you’ll build: A web-based HLS player that parses M3U8 manifests, fetches TS segments, and plays video using the Media Source Extensions API—without using hls.js or any video library.
Why it teaches streaming internals: hls.js and video.js hide all the magic. By building from scratch, you’ll understand exactly how browsers handle streaming: parsing playlists, managing buffers, feeding raw bytes to the decoder, handling seek operations, and dealing with quality switches mid-stream. This is the deepest understanding of streaming possible.
Core challenges you’ll face:
- M3U8 parsing (regex/state machine for playlist format) → maps to protocol parsing
- Media Source Extensions API (SourceBuffer, appendBuffer) → maps to browser media internals
- Buffer management (keeping ~30s ahead of playback) → maps to streaming buffer strategy
- Transmuxing TS to fMP4 (browsers need fMP4, not TS) → maps to container transformation
- Seek implementation (find correct segment, flush buffer, refill) → maps to playback control
Key Concepts:
- Media Source Extensions: W3C MSE Specification - W3C
- M3U8 Parsing: RFC 8216 - IETF
- Transmuxing: “mux.js” source code - Brightcove (open source)
- Buffer Management: “hls.js” architecture docs - video-dev GitHub
Difficulty: Advanced-Expert Time estimate: 2-3 weeks Prerequisites: Strong JavaScript, Projects 3-4 completed
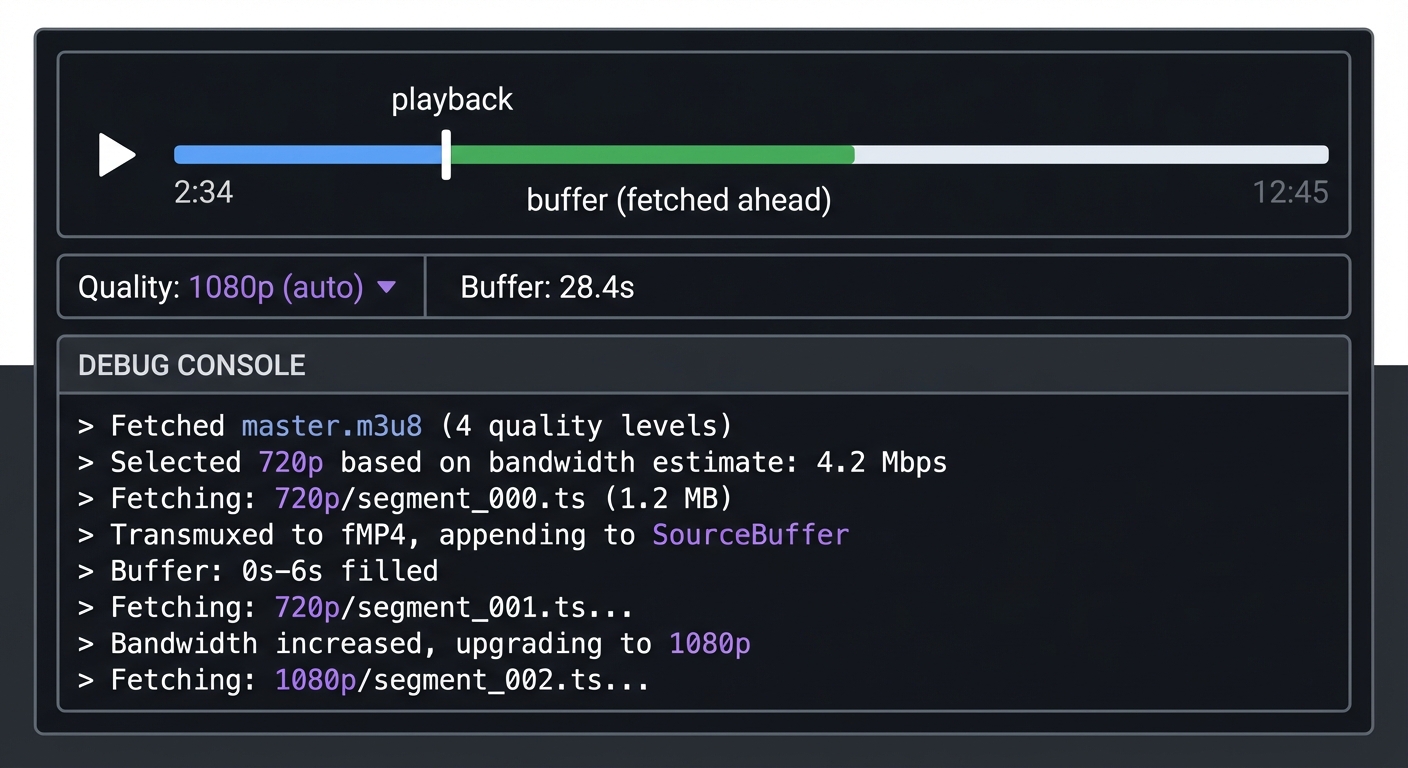
Real world outcome: A web page with your custom player:
┌─────────────────────────────────────────────────────────────┐
│  ▶ [==================|==========                    ] 2:34 │
│     └── playback      └── buffer (fetched ahead)            │
├─────────────────────────────────────────────────────────────┤
│  Quality: 1080p (auto) ▼     Buffer: 28.4s                  │
├─────────────────────────────────────────────────────────────┤
│  Debug Console:                                             │
│  > Fetched master.m3u8 (4 quality levels)                   │
│  > Selected 720p based on bandwidth estimate: 4.2 Mbps      │
│  > Fetching: 720p/segment_000.ts (1.2 MB)                   │
│  > Transmuxed to fMP4, appending to SourceBuffer            │
│  > Buffer: 0s-6s filled                                     │
│  > Fetching: 720p/segment_001.ts...                         │
│  > Bandwidth increased, upgrading to 1080p                  │
│  > Fetching: 1080p/segment_002.ts...                        │
└─────────────────────────────────────────────────────────────┘
Implementation Hints: The key APIs are:
MediaSource- Create a source for your<video>elementSourceBuffer- Append media data to be decodedfetch()- Get playlist and segment files
The tricky part is that browsers expect fragmented MP4 (fMP4), but HLS uses MPEG-TS (.ts) segments. You’ll need to transmux—convert TS container to fMP4 container without re-encoding the video. Study mux.js source code or implement the container transformation yourself (very educational but adds 1-2 weeks).
const mediaSource = new MediaSource();
video.src = URL.createObjectURL(mediaSource);
mediaSource.addEventListener('sourceopen', () => {
  const sourceBuffer = mediaSource.addSourceBuffer('video/mp4; codecs="avc1.64001f"');
  // Fetch segment, transmux to fMP4, then:
  sourceBuffer.appendBuffer(fmp4Data);
});
Learning milestones:
- Parse M3U8 and log segment URLs → You understand playlist structure
- Fetch segments and append to SourceBuffer → You understand MSE basics
- Implement seek (flush and refetch) → You understand buffer management
- Switch quality mid-stream without glitches → You understand seamless ABR
The Core Question You’re Answering
“How does Netflix seamlessly switch from 1080p to 480p when your Wi-Fi slows down, without pausing or rebuffering?”
This is the magic of HLS and adaptive bitrate streaming: the player downloads chunks sequentially, parses playlists, manages a buffer, and decides quality on-the-fly. Building a player from scratch—without hls.js—forces you to understand Media Source Extensions (MSE), buffer management, and transmuxing (MPEG-TS to fragmented MP4).
Concepts You Must Understand First
Stop and research these before coding:
- Media Source Extensions (MSE) API
- What’s the difference between
MediaSourceandSourceBuffer? - Why can’t you just set
video.src = "segment_000.ts"? - Book Reference: MDN Web Docs (free online) - Media Source Extensions API
- What’s the difference between
- Container Transmuxing (MPEG-TS to fMP4)
- Why does HLS use MPEG-TS but browsers expect fragmented MP4?
- What’s the difference between transcoding and transmuxing?
- Book Reference: “Digital Video and HD” by Charles Poynton - Ch. 9 (Container Formats)
- Buffer Management & State Machines
- What are the MSE
readyStatevalues and what do they mean? - How do you handle buffer stalls vs intentional pauses?
- Book Reference: “High Performance Browser Networking” Ch. 16 - Ilya Grigorik
- What are the MSE
Questions to Guide Your Design
Before implementing, think through these:
- Playlist Parsing
- How will you parse M3U8 (regex, line-by-line, or a parser library)?
- Should you handle both master and media playlists in one function?
- Segment Fetching Strategy
- Should you pre-fetch the next segment while the current one plays?
- How much buffer should you maintain ahead of playback position?
- Quality Switching
- Can you switch mid-segment, or only at segment boundaries?
- How do you prevent a “quality thrashing” loop (switching constantly)?
Thinking Exercise
Before writing code, trace this flow on paper:
User clicks play. Your player must:
- Fetch
master.m3u8→ parse quality options - Choose starting quality (how?)
- Fetch that quality’s media playlist (
720p.m3u8) - Parse segment URLs and durations
- Fetch
segment_000.ts, transmux to fMP4, append toSourceBuffer - Fetch
segment_001.tswhilesegment_000plays - User seeks to 2:30. What happens to the buffer? What segments do you fetch?
Draw this as a state machine with 5 states: IDLE, LOADING_MANIFEST, BUFFERING, PLAYING, SEEKING.
The Interview Questions They’ll Ask
Prepare to answer these:
- “Explain how Media Source Extensions work. What’s the relationship between MediaSource and SourceBuffer?”
- “Why can’t you just set video.src to an MPEG-TS segment URL? What has to happen first?”
- “How would you implement seeking in an HLS player? What state changes occur?”
- “A user seeks forward 30 seconds. Should you flush the entire buffer or keep some?”
- “What’s the difference between transmuxing and transcoding? Which does an HLS player do?”
Hints in Layers
Hint 1: Start with M3U8 parsing Don’t build the player yet. First, write a function that fetches and parses a master playlist, extracts quality options, then fetches a media playlist and extracts segment URLs and durations.
Hint 2: Use MediaSource API
Create a MediaSource, attach it to a <video> element, then add a SourceBuffer. The SourceBuffer is where you append decoded media data.
const mediaSource = new MediaSource();
video.src = URL.createObjectURL(mediaSource);
mediaSource.addEventListener('sourceopen', () => {
  const sourceBuffer = mediaSource.addSourceBuffer('video/mp4; codecs="avc1.64001f"');
  // Now fetch and append segments
});
Hint 3: Transmuxing is hard—use a library (or challenge yourself) The browser expects fragmented MP4 (fMP4), but HLS segments are MPEG-TS. You can:
- Use
mux.jslibrary (easiest, good for learning MSE) - Study mux.js source and implement yourself (advanced, 1-2 weeks extra)
- Use
ffmpeg.wasmto convert in-browser (creative but overkill)
Hint 4: Test incrementally
- First, parse M3U8 and log segment URLs to console
- Fetch one segment, log its size
- Transmux one segment, append to SourceBuffer, verify playback
- Fetch and append segments in sequence
- Finally, add seeking and quality switching
Books That Will Help
| Topic | Book | Chapter | |——-|——|———| | Media Source Extensions API | MDN Web Docs (free online) | MSE Guide | | Browser Media Processing | “High Performance Browser Networking” by Ilya Grigorik | Ch. 16 | | Container Formats | “Digital Video and HD” by Charles Poynton | Ch. 9 | | HLS Protocol | RFC 8216 (free online) | Sections 4, 8 | | JavaScript Async Patterns | “JavaScript: The Definitive Guide” by David Flanagan | Ch. 13 |
Common Pitfalls & Debugging
Problem 1: “MediaSource throws ‘QuotaExceededError’ when appending segments”
- Why: You’re appending segments faster than the browser can process, or buffer is too large
- Fix: Wait for
sourceBuffer.updating === falsebefore appending next segment - Quick test: Add
sourceBuffer.addEventListener('updateend', () => { /* append next */ })
Problem 2: “Video plays first segment then stops”
- Why: You’re not fetching and appending subsequent segments
- Fix: Use
video.addEventListener('timeupdate')to monitor playback position and fetch next segment when buffer is running low - Quick test: Log
video.buffered.end(0) - video.currentTime(should stay above 6 seconds)
Problem 3: “Seeking causes ‘Failed to execute appendBuffer’ error”
- Why: You didn’t flush the old buffer before appending new segments
- Fix: Call
sourceBuffer.remove(0, sourceBuffer.buffered.end(0))before seeking, then append new segments - Quick test: Add logging around
remove()andappendBuffer()during seek
Problem 4: “MPEG-TS segments won’t play—’codec not supported’ error”
- Why: Browsers don’t support MPEG-TS containers directly via MSE. You must transmux to fMP4
- Fix: Use
mux.jsto convert TS to fMP4 before appending to SourceBuffer - Quick test: Check
MediaSource.isTypeSupported('video/mp2t')→ returnsfalse
Problem 5: “Quality switching works but causes brief playback pause”
- Why: You’re flushing the entire buffer on quality switch, causing rebuffering
- Fix: Only remove buffered data ahead of current playback position, keep already-played buffer
- Quick test: Log buffer ranges before/after switch:
video.buffered.start(0)andend(0)
Project 6: Adaptive Bitrate Algorithm
- File: VIDEO_STREAMING_DEEP_DIVE_PROJECTS.md
- Main Programming Language: JavaScript
- Alternative Programming Languages: TypeScript, Python (simulation), Rust
- Coolness Level: Level 3: Genuinely Clever
- Business Potential: 2. The “Micro-SaaS / Pro Tool”
- Difficulty: Level 3: Advanced
- Knowledge Area: Algorithms / Control Systems
- Software or Tool: ABR Algorithm
- Main Book: “Computer Networks” by Andrew Tanenbaum
What you’ll build: Multiple ABR (Adaptive Bitrate) algorithms that decide which quality level to fetch next, based on bandwidth measurements and buffer status. Compare throughput-based, buffer-based, and hybrid approaches.
Why it teaches the “magic” of YouTube quality: Ever notice how YouTube starts fuzzy, gets sharp, and rarely buffers? That’s the ABR algorithm. It’s constantly making decisions: “I have 15 seconds buffered, bandwidth looks good, let me try 1080p for the next chunk.” If bandwidth drops, it switches down before you see a stall. This is the core intelligence of modern streaming.
Core challenges you’ll face:
- Bandwidth estimation (segment download time, exponential moving average) → maps to measurement
- Buffer-based selection (more buffer = be aggressive, less = be conservative) → maps to control theory
- Quality oscillation prevention (don’t switch every segment) → maps to stability
- Startup optimization (fast quality ramp-up) → maps to user experience
Key Concepts:
- Throughput-Based ABR: “A Buffer-Based Approach to Rate Adaptation” - Stanford Paper (Te-Yuan Huang)
- BBA Algorithm: “Buffer-Based Rate Selection” - Stanford/Netflix Research
- BOLA Algorithm: “BOLA: Near-Optimal Bitrate Adaptation” - Kevin Spiteri et al.
- MPC-Based ABR: “A Control-Theoretic Approach” - MIT CSAIL
Difficulty: Advanced Time estimate: 1-2 weeks Prerequisites: Project 5 completed or understanding of streaming basics
Real world outcome:
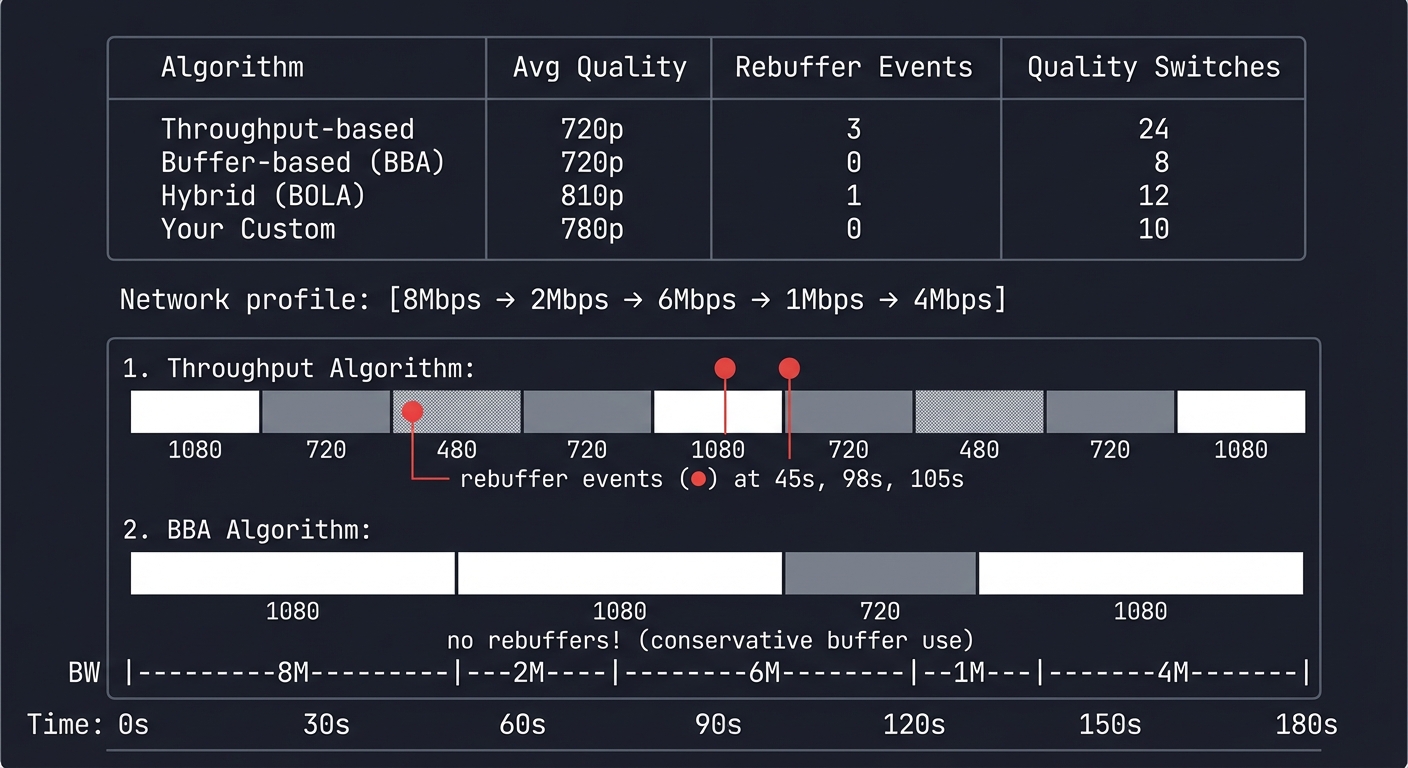
ABR Algorithm Comparison (3-minute video, variable network)

Network profile: [8Mbps → 2Mbps → 6Mbps → 1Mbps → 4Mbps]

Algorithm          | Avg Quality | Rebuffer Events | Quality Switches
-------------------|-------------|-----------------|------------------
Throughput-based   | 720p        | 3               | 24
Buffer-based (BBA) | 720p        | 0               | 8
Hybrid (BOLA)      | 810p        | 1               | 12
Your Custom        | 780p        | 0               | 10

Timeline visualization:
Time:    0s      30s     60s     90s     120s    150s    180s
BW:      |---8M---|--2M--|---6M---|--1M--|---4M---|
Throughput: ████│▓▓░░▓▓│████│▓▓░░░░│▓▓████│
             1080 720 480 720  1080 720 480   720 1080
             └── rebuffer events (●) at 45s, 98s, 105s

BBA:     ████│████│████│▓▓▓▓│▓▓▓▓│████│████│
             1080      1080       720         1080
             └── no rebuffers! (conservative buffer use)
Implementation Hints: The simplest ABR: measure how long each segment takes to download, calculate bandwidth, pick the highest quality that fits.
function selectQuality(downloadTimeMs, segmentBytes, bufferLevel, qualities) {
  const bandwidthBps = (segmentBytes * 8) / (downloadTimeMs / 1000);
  const safeBandwidth = bandwidthBps * 0.8; // 20% safety margin

  // Pick highest quality below safe bandwidth
  for (let i = qualities.length - 1; i >= 0; i--) {
    if (qualities[i].bitrate <= safeBandwidth) return qualities[i];
  }
  return qualities[0]; // Lowest quality fallback
}
Buffer-based adds: “If buffer > 30s, be aggressive. If buffer < 10s, be very conservative.”
Learning milestones:
- Throughput-based works → You understand bandwidth measurement
- Buffer-based prevents rebuffers → You understand the quality/stall tradeoff
- Oscillation damping works → You understand stability in control systems
- Compare algorithms on same network trace → You understand engineering tradeoffs
The Core Question You’re Answering
“How does a video player predict future network conditions and choose the optimal quality level in real-time, balancing the competing goals of high quality, zero rebuffering, and smooth playback?”
YouTube doesn’t just react to network changes—it anticipates them. The ABR algorithm is a prediction and control system that must make decisions under uncertainty. Too aggressive and you’ll rebuffer. Too conservative and users watch blurry video on a fast connection. This is the essence of adaptive streaming.
Concepts You Must Understand First
Stop and research these before coding:
- Bandwidth Estimation Techniques
- How do you calculate throughput from segment download time? (bytes / seconds = bps)
- Why use exponential moving average instead of raw measurements? (smooths noise, gives recent values more weight)
- What’s the difference between instantaneous bandwidth and sustainable bandwidth? (burst vs steady-state)
- Book Reference: “Computer Networks” Ch. 6.3 - Andrew Tanenbaum (congestion control, bandwidth probing)
- Buffer Management & Control Theory
- Why does buffer level matter more than bandwidth for preventing rebuffering? (buffer is time-to-stall, bandwidth is just prediction)
- How does a buffer-based algorithm work without measuring bandwidth at all? (BBA maps buffer level to quality: high buffer = high quality)
- What’s the difference between buffer-based and throughput-based ABR? (reactive vs predictive)
- Book Reference: “Streaming Systems” Ch. 8 - Tyler Akidau (buffer management, watermarks)
- Quality Oscillation & Stability
- Why is switching quality every segment a bad user experience? (human eye notices changes, visual distraction)
- How do you prevent oscillation without being too slow to adapt? (hysteresis, minimum switch interval)
- What’s the tradeoff between responsiveness and stability? (fast changes vs smooth experience)
- Book Reference: “Feedback Control of Dynamic Systems” Ch. 7 - Franklin (stability analysis, overshoot prevention)
Questions to Guide Your Design
Before implementing, think through these:
- Measurement Strategy
- How long should you observe network conditions before making a decision? (one segment? five segments? exponential average?)
- What safety margin should you apply to bandwidth estimates? (80%? 90%? depends on risk tolerance)
- How do you handle startup when you have no bandwidth measurements yet? (start low and ramp up, or probe aggressively?)
- Decision Logic
- Should you prioritize quality or rebuffer avoidance? (depends on content type: live sports vs on-demand movie)
- How do you detect when network conditions have truly changed vs temporary fluctuation? (threshold crossing, sustained change)
- When should you switch down preemptively vs waiting for buffer to drain? (proactive vs reactive)
- Algorithm Selection
- When would throughput-based ABR fail? (variable latency, bursty networks, bufferbloat)
- When would buffer-based ABR fail? (initial buffering, network improves but buffer already full)
- Why do production systems use hybrid approaches? (combine strengths, handle edge cases)
Thinking Exercise
Trace this scenario through your algorithm:
You’re streaming a video with quality levels: 360p (500 kbps), 720p (2 Mbps), 1080p (5 Mbps).
Network timeline:
- 0-20s: 8 Mbps available, buffer fills to 25 seconds
- 20-30s: Network drops to 1.5 Mbps
- 30-50s: Network recovers to 6 Mbps
- 50-60s: Network crashes to 300 kbps for 5 seconds
For each algorithm, determine:
- Throughput-based: What quality does it pick at 25s? At 35s? Does it rebuffer?
- Buffer-based (BBA): How does it react differently? When does it switch quality?
- What goes wrong? Which algorithm rebuffers? Which one stays at low quality too long?
Draw a timeline showing buffer level, network bandwidth, and selected quality for each algorithm.
The Interview Questions They’ll Ask
Prepare to answer these:
- “Explain the difference between throughput-based and buffer-based ABR algorithms.”
- Throughput-based: Measures download speed, picks quality that fits bandwidth (reactive to network)
- Buffer-based: Uses buffer level as signal, high buffer = aggressive, low buffer = conservative (reactive to stall risk)
- Hybrid (BOLA): Combines both, optimizes utility function balancing quality and rebuffer risk
- “How do you prevent quality oscillation (switching every few seconds)?”
- Minimum switch interval: Only change quality every N segments (e.g., 5 seconds)
- Hysteresis: Require significant change before switching (e.g., new quality must be 20% better/worse)
- Trend detection: Only switch if bandwidth has been consistently higher/lower for multiple segments
- Quality ceiling/floor: Once you switch down, don’t immediately bounce back up
- “What’s the ‘startup problem’ in ABR and how do you solve it?”
- Problem: No bandwidth measurements exist before first segment downloads
- Solutions: Start at lowest quality, probe with mid-quality, use device type heuristics (WiFi vs LTE)
- Advanced: Fast startup—download first segment at multiple qualities, pick best based on download time
- “How would you debug an ABR algorithm that keeps rebuffering?”
- Log bandwidth estimates vs actual bitrates (are estimates too optimistic?)
- Check safety margin (is 90% bandwidth too aggressive?)
- Monitor buffer level trend (is buffer draining faster than filling?)
- Verify segment duration accuracy (are segments actually 4 seconds or longer?)
- “Explain BOLA (Buffer-Occupancy-based Lyapunov Algorithm).”
- Optimizes utility function: maximize video quality while minimizing rebuffering
- Maps buffer level to quality: more buffer = can afford higher quality
- Theoretical guarantees: provably within constant factor of optimal
- Doesn’t need bandwidth estimation (robust to measurement errors)
Hints in Layers
Hint 1 (The simplest approach): Start with throughput-based ABR. Measure time to download each segment, calculate bandwidth, pick the highest quality that fits. Use an exponential moving average to smooth measurements: bw_avg = 0.8 * bw_avg + 0.2 * bw_current.
Hint 2 (Add safety margin): Don’t pick quality that uses 100% of bandwidth—you’ll rebuffer on any fluctuation. Use 80% of estimated bandwidth: safe_bw = bw_estimate * 0.8. This is your “usable” bandwidth.
Hint 3 (Prevent oscillation): Add hysteresis. Don’t switch quality unless the new quality is significantly better/worse: if new_quality_bitrate > current_bitrate * 1.2 or new_quality_bitrate < current_bitrate * 0.8: switch().
Hint 4 (Implement buffer-based): Map buffer level to quality selection. Example: if buffer > 30s: pick highest quality; if buffer 15-30s: pick medium; if buffer < 15s: pick lowest. This ignores bandwidth entirely—buffer level is the signal.
Books That Will Help
| Book | Author | Chapters | What You’ll Learn |
|---|---|---|---|
| Computer Networks | Andrew Tanenbaum | 6.3 | Congestion control, bandwidth measurement techniques |
| Streaming Systems | Tyler Akidau | 8 | Buffer management, watermarks, flow control |
| High Performance Browser Networking | Ilya Grigorik | 10-11 | HTTP adaptive streaming, buffering strategies |
| Video Encoding by the Numbers | Jan Ozer | 9 | ABR algorithms in practice, quality ladder selection |
| Feedback Control of Dynamic Systems | Franklin et al. | 7 | Stability analysis, control theory for adaptive systems |
Common Pitfalls & Debugging
Problem 1: Algorithm oscillates between qualities every few seconds
- Symptom: Quality switches constantly (1080p → 720p → 1080p → 720p)
- Cause: No hysteresis, reacting to every bandwidth fluctuation
- Fix: Add minimum switch interval (5 seconds) and quality change threshold (20% difference)
- Test: Run on variable network trace, verify switches happen < 3 times per minute
Problem 2: Algorithm rebuffers frequently despite good average bandwidth
- Symptom: Video stalls even when network capacity should be sufficient
- Cause: Bandwidth estimate too optimistic, no safety margin
- Fix: Use 75-80% of estimated bandwidth, increase exponential moving average weight on recent values
- Test: Compare estimated bandwidth with actual bitrate, ensure estimate is consistently lower
Problem 3: Algorithm stays at low quality even when network improves
- Symptom: Video remains at 360p despite 10 Mbps connection
- Cause: Pure buffer-based ABR with full buffer (no reason to switch), or too conservative threshold
- Fix: Hybrid approach—allow quality increases when buffer is healthy AND bandwidth supports it
- Test: Simulate network improvement (1 Mbps → 10 Mbps), verify quality ramps up within 30 seconds
Problem 4: Startup always begins at lowest quality (poor user experience)
- Symptom: Every video starts blurry for 10-15 seconds
- Cause: Cold-start problem—no bandwidth history
- Fix: Use device type heuristics (WiFi = start at 720p, LTE = 480p), or fast-start probe
- Test: Measure time-to-high-quality on fresh playback, target < 5 seconds on good connections
Project 7: Live Streaming Pipeline (RTMP to HLS)
- File: VIDEO_STREAMING_DEEP_DIVE_PROJECTS.md
- Main Programming Language: Go
- Alternative Programming Languages: Rust, C, Python
- Coolness Level: Level 4: Hardcore Tech Flex
- Business Potential: 4. The “Open Core” Infrastructure
- Difficulty: Level 4: Expert
- Knowledge Area: Real-Time Protocols / Live Video
- Software or Tool: RTMP Server + HLS Output
- Main Book: “High Performance Browser Networking” by Ilya Grigorik
What you’ll build: A server that accepts RTMP input (from OBS/Streamlabs) and outputs live HLS streams that viewers can watch in any browser.
Why it teaches live streaming: Twitch and YouTube Live work exactly like this. Streamers send RTMP (a Flash-era protocol that refuses to die), the server transcodes to HLS, and viewers watch over HTTP. The challenge is latency—every processing step adds delay. You’ll understand why “low latency” streaming is hard.
Core challenges you’ll face:
- RTMP protocol parsing (handshake, chunking, FLV atoms) → maps to real-time protocol internals
- On-the-fly transcoding (no waiting for file to complete) → maps to streaming pipeline
- Playlist updates (live playlists are different from VOD) → maps to live HLS specifics
- Latency measurement (glass-to-glass delay) → maps to end-to-end system thinking
Key Concepts:
- RTMP Specification: Adobe RTMP Specification - Adobe
- Live HLS: “HTTP Live Streaming 2nd Edition” Chapter 5 - Apple Developer
- Low-Latency HLS: Apple LL-HLS Specification - Apple Developer
- Video Pipeline Architecture: “Streaming Systems” Chapter 8 - Tyler Akidau
Difficulty: Expert Time estimate: 3-4 weeks Prerequisites: Go/Rust experience, Projects 3-4 completed
Real world outcome:
$ ./live-server --rtmp-port 1935 --http-port 8080

Live streaming server started
  RTMP ingest: rtmp://localhost:1935/live
  HLS output:  http://localhost:8080/live/master.m3u8

# In OBS: Stream to rtmp://localhost:1935/live with stream key "test"

[RTMP] New connection from 192.168.1.5
[RTMP] Stream started: live/test
[TRANSCODER] Starting transcode pipeline
  → 1080p @ 5000kbps
  → 720p @ 2500kbps
  → 480p @ 1000kbps
[HLS] Segment 0 ready (all qualities)
[HLS] Updated live playlist
[HLS] Segment 1 ready...

Latency measurement:
  Capture → RTMP receive: 0.1s
  RTMP → Transcode: 0.3s
  Transcode → HLS segment: 4.0s (segment duration)
  HLS → Player buffer: 6.0s (2 segments)
  ─────────────────────────
  Total glass-to-glass: ~10.4 seconds
Implementation Hints: RTMP is complex but well-documented. The handshake is 3 steps, then you receive “chunks” containing “messages”. Video data arrives in FLV format (codec data + keyframe + delta frames).
For transcoding, shell out to FFmpeg with -f flv -i pipe:0 (read from stdin) and output to HLS. Pipe RTMP video data to FFmpeg’s stdin.
Live HLS playlists differ from VOD:
#EXT-X-PLAYLIST-TYPE:EVENT(growing) instead of VOD- No
#EXT-X-ENDLISTuntil stream ends - Segments are added at the end, old ones removed (sliding window)
Learning milestones:
- Accept RTMP connection and parse handshake → You understand binary protocols
- Extract video/audio packets → You understand FLV/H.264 structure
- Generate live HLS as stream continues → You understand live streaming mechanics
- Measure and reduce latency → You understand the tradeoffs in live streaming
The Core Question You’re Answering
“How do you build a system that ingests a continuous real-time video stream from a broadcaster and transforms it into multiple quality levels that thousands of viewers can watch simultaneously, all while minimizing latency?”
Twitch and YouTube Live solve one of the hardest problems in streaming: converting a single input stream into a multi-quality HTTP-based output while keeping glass-to-glass latency under 10 seconds. Every component (RTMP parsing, transcoding, segmentation, delivery) adds delay. Understanding this pipeline reveals why live streaming is fundamentally harder than on-demand.
Concepts You Must Understand First
Stop and research these before coding:
- RTMP Protocol Internals
- What is the RTMP handshake and why does it exist? (C0/C1/C2/S0/S1/S2 exchange for encryption negotiation)
- How does RTMP chunking work? (variable-sized messages split into 128-byte chunks by default)
- What’s the difference between RTMP messages and chunks? (messages are logical units, chunks are transport units)
- Book Reference: “Video Encoding by the Numbers” Ch. 11 - Jan Ozer (live streaming protocols)
- Real-Time Transcoding Pipelines
- Why can’t you wait for the stream to finish before transcoding? (it’s infinite, users want to watch NOW)
- How does streaming transcoding differ from file transcoding? (no seeking, must process in order, latency-sensitive)
- What’s the latency cost of transcoding? (typically 0.5-3 seconds depending on preset and hardware)
- Book Reference: “Streaming Systems” Ch. 8 - Tyler Akidau (stream processing fundamentals)
- Live HLS vs VOD HLS
- How do live playlists differ from VOD? (no ENDLIST tag, sliding window of segments, dynamic updates)
- What is the playlist update frequency and why does it matter? (determines how quickly players can fetch new segments)
- How long should you keep segments in the playlist? (2-3 times target latency for player flexibility)
- Book Reference: “HTTP Live Streaming 2nd Edition” - Apple Developer (live streaming specifics)
Questions to Guide Your Design
Before implementing, think through these:
- Latency Budget Breakdown
- Where does latency come from? (capture, network upload, transcoding, segmentation, playlist update, player buffer)
- What’s the minimum achievable latency with standard HLS? (typically 10-30 seconds)
- What can you optimize? (reduce segment duration, use Low-Latency HLS, faster transcoding presets)
- Stream Lifecycle Management
- How do you detect when a stream starts? (RTMP publish event)
- How do you handle stream disconnections and reconnections? (maintain state, decide whether to create new session or resume)
- When should you clean up old segments? (after they’re removed from playlist + grace period)
- Resource Allocation
- How many transcoding jobs can you run simultaneously? (CPU/GPU limits)
- Should you transcode all qualities or just the most popular? (cost vs user experience tradeoff)
- What happens when transcoding can’t keep up with real-time? (frames dropped, stream degrades or fails)
Thinking Exercise
Trace a single video frame through your pipeline:
A streamer’s webcam captures a frame at T=0ms. Follow this frame:
- Capture → RTMP send: 16ms (60fps capture interval)
- Network upload: 50ms (home internet latency)
- RTMP receive → decode: 20ms (parse chunks, extract H.264)
- Transcode to 3 qualities: 500ms (encoding is the bottleneck)
- Wait for segment boundary: 0-4000ms (depends on when you hit 4-second segment boundary)
- Segment write + playlist update: 50ms
- Player polls playlist: 0-2000ms (player refresh interval)
- Player fetches segment: 100ms
- Player buffers: 4000-8000ms (2 segments buffer)
Total latency: 4.7s - 14.8s (best case to worst case)
Which step contributes most? Where can you optimize?
The Interview Questions They’ll Ask
Prepare to answer these:
- “Explain the RTMP handshake and why it exists.”
- Three-step process: C0/S0 (version), C1/S1 (timestamp/random data), C2/S2 (echo)
- Purpose: Verify both sides understand RTMP, establish encryption parameters
- Prevents simple packet replay attacks, sets up shared state
- “How would you reduce live streaming latency from 20 seconds to 3 seconds?”
- Reduce segment duration (6s → 1s or use LL-HLS with 0.2s chunks)
- Minimize player buffer (3 segments → 1.5 segments)
- Use faster transcode preset (medium → ultrafast, or hardware encoding)
- Increase playlist update frequency (every segment ready, not every 3 segments)
- Use LL-HLS or WebRTC for sub-3-second latency
- “What’s the difference between RTMP, WebRTC, and HLS for live streaming?”
- RTMP: Ingest protocol (broadcaster → server), low latency, not browser-native
- HLS: Delivery protocol (server → viewer), high latency (5-30s), works everywhere
- WebRTC: P2P or SFU-based, ultra-low latency (<1s), complex NAT traversal
- Production stacks often combine: RTMP ingest → HLS delivery
- “How do live HLS playlists work differently from VOD playlists?”
- Live: No #EXT-X-ENDLIST tag, playlist grows as stream continues
- Uses #EXT-X-MEDIA-SEQUENCE to indicate position in infinite stream
- Old segments removed (sliding window), new segments appended
- Players repeatedly poll for updates (every segment duration or faster)
- “What happens when transcoding can’t keep up with real-time?”
- Frames dropped → temporal quality degrades (stuttering/judder)
- Buffer overflow → OOM crash or forced stream termination
- Solutions: Use faster preset, reduce quality levels, hardware encoding, stream at lower fps
Hints in Layers
Hint 1 (Use FFmpeg for everything): Don’t parse RTMP yourself initially. Use FFmpeg to accept RTMP (-listen 1 -f flv -i rtmp://localhost:1935/live) and output HLS (-f hls -hls_time 4 -hls_list_size 5 -hls_flags delete_segments). This proves the concept works.
Hint 2 (Parse RTMP handshake): Implement the 3-step handshake. Read C0 (1 byte version), C1 (1536 bytes timestamp+random), send S0/S1, read C2, send S2. After handshake, you’ll receive RTMP messages. Look for connect, releaseStream, publish commands.
Hint 3 (Extract video data): RTMP messages have type IDs. Type 8 = audio, Type 9 = video. Video messages contain FLV tags with H.264 NAL units. Pipe these directly to FFmpeg via stdin: ffmpeg -f flv -i pipe:0 -f hls output.m3u8.
Hint 4 (Update live playlist): After each segment is written, update the m3u8 file. Remove old segments (keep last 3-5), add new one, increment #EXT-X-MEDIA-SEQUENCE. Players poll this file every few seconds to discover new segments.
Books That Will Help
| Book | Author | Chapters | What You’ll Learn |
|---|---|---|---|
| Video Encoding by the Numbers | Jan Ozer | 11-12 | Live streaming protocols, RTMP internals, latency optimization |
| Streaming Systems | Tyler Akidau | 8-9 | Stream processing, windowing, real-time pipelines |
| High Performance Browser Networking | Ilya Grigorik | 15 | HTTP Live Streaming architecture and performance |
| HTTP Live Streaming (Apple Docs) | Apple | Live sections | Live playlist format, segment management, LL-HLS |
| Designing Data-Intensive Applications | Martin Kleppmann | 11 | Stream processing systems at scale |
Common Pitfalls & Debugging
Problem 1: RTMP connection accepted but no video appears
- Symptom: OBS says “connected” but your server receives no video data
- Cause: Failed to complete handshake, or not reading publish command properly
- Fix: Log all RTMP messages, verify handshake bytes match spec, check for publish event
- Test: Use Wireshark to capture RTMP traffic, compare with working RTMP server
Problem 2: Transcoding lags behind real-time (frames dropped)
- Symptom: HLS output stutters, logs show “frame dropped” or “buffer overflow”
- Cause: Encoding preset too slow (e.g., “slow” preset on high resolution)
- Fix: Use “ultrafast” or “veryfast” preset, reduce resolution, or use hardware encoding (-c:v h264_nvenc)
- Test: Monitor encoding time per frame, must be < frame duration (16ms for 60fps)
Problem 3: Players can’t find new segments (stale playlist)
- Symptom: Video plays first few seconds then stops, playlist doesn’t update
- Cause: Not updating m3u8 file after each segment, or CORS headers blocking requests
- Fix: Write new m3u8 after every segment, ensure HTTP server sends Access-Control-Allow-Origin header
- Test: Curl the playlist repeatedly, verify #EXT-X-MEDIA-SEQUENCE increments and new segments appear
Problem 4: High latency (20+ seconds) despite short segments
- Symptom: Glass-to-glass latency is 20-30 seconds even with 2-second segments
- Cause: Player buffering 3+ segments before starting (default HLS behavior)
- Fix: Configure player to buffer fewer segments, reduce segment duration to 1s, or implement LL-HLS
- Test: Measure each stage (capture → ingest → transcode → delivery → playback), identify bottleneck
Project 8: Mini-CDN with Edge Caching
- File: VIDEO_STREAMING_DEEP_DIVE_PROJECTS.md
- Main Programming Language: Go
- Alternative Programming Languages: Rust, Python, Node.js
- Coolness Level: Level 4: Hardcore Tech Flex
- Business Potential: 4. The “Open Core” Infrastructure
- Difficulty: Level 3: Advanced
- Knowledge Area: Distributed Systems / Caching
- Software or Tool: CDN / Cache
- Main Book: “Designing Data-Intensive Applications” by Martin Kleppmann
What you’ll build: A distributed caching system with an “origin” server and multiple “edge” servers. The edge servers cache video segments close to users, only fetching from origin on cache miss.
Why it teaches YouTube’s scale: YouTube has hundreds of cache locations worldwide. When you watch a video, you’re likely hitting a server within 50ms of your location, not Google’s data center. Understanding CDN architecture explains why YouTube feels instant—your request never travels far.
Core challenges you’ll face:
- Cache hierarchy (edge → regional → origin) → maps to distributed caching
- Cache invalidation (when source changes) → maps to consistency problems
- Geographic routing (direct user to closest edge) → maps to DNS/anycast
- Cache hit ratio optimization → maps to performance engineering
Key Concepts:
- CDN Architecture: “Designing Data-Intensive Applications” Chapter 5 - Martin Kleppmann
- Caching Strategies: “High Performance Browser Networking” Chapter 10 - Ilya Grigorik
- Consistent Hashing: “Consistent Hashing and Random Trees” - Karger et al.
- HTTP Caching: RFC 7234 - IETF
Difficulty: Advanced Time estimate: 2-3 weeks Prerequisites: Distributed systems basics, networking
Real world outcome:
# Start origin (has all content)
$ ./cdn-node --role origin --port 8080 --content ./hls/

# Start edge nodes (cache on demand)
$ ./cdn-node --role edge --port 8081 --origin http://localhost:8080 --location "us-west"
$ ./cdn-node --role edge --port 8082 --origin http://localhost:8080 --location "us-east"
$ ./cdn-node --role edge --port 8083 --origin http://localhost:8080 --location "eu-west"

# Simulate viewer requests
$ ./cdn-test --edge http://localhost:8081 --video master.m3u8

Request: GET /1080p/segment_000.ts
  Edge (us-west): MISS → fetching from origin
  Origin: 200 OK (234 KB, 45ms)
  Edge: cached, returning to client (total: 52ms)

Request: GET /1080p/segment_000.ts (same segment, different user)
  Edge (us-west): HIT → returning cached
  Response time: 3ms

Cache Statistics (after 1 hour):
  Edge Node    | Requests | Hits  | Hit Ratio | Bandwidth Saved
  -------------|----------|-------|-----------|----------------
  us-west      | 12,450   | 11,823| 94.9%     | 28.4 GB
  us-east      | 8,320    | 7,901 | 95.0%     | 19.1 GB
  eu-west      | 5,670    | 5,215 | 92.0%     | 12.6 GB

  Origin load reduced by: 93.8%
Implementation Hints: Basic architecture:
- Edge receives request, checks local cache (file system or in-memory)
- On hit: return immediately
- On miss: fetch from origin (or parent edge), cache, return
Use HTTP headers properly:
Cache-Control: max-age=31536000for immutable segmentsETagfor cache validationX-Cache: HITorX-Cache: MISSfor debugging
Add a “cache warmer” that pre-fetches popular content to edges.
Learning milestones:
- Single edge caches content → You understand basic caching
- Cache hit ratio exceeds 90% → You understand cache effectiveness
- Multi-tier caching works → You understand CDN hierarchy
- Simulate geographic routing → You understand how users reach the right edge
The Core Question You’re Answering
“How do content delivery networks cache video segments across the globe to serve millions of viewers without overloading the origin server, and what algorithms determine what to cache where?”
When you click play on YouTube, you’re not downloading from Google’s datacenter—you’re hitting a cache server 10-50ms away. CDNs are the reason streaming works at scale. Without caching, every viewer would hammer the origin, costs would explode, and latency would be terrible. Understanding CDNs means understanding how the internet actually delivers content.
Concepts You Must Understand First
Stop and research these before coding:
- Cache Hierarchy & Tiered Architecture
- What is the difference between edge, regional, and origin servers? (proximity to user, cache size, fallback chain)
- Why use multiple cache tiers instead of just origin and edge? (reduces origin load, regional aggregation, cost efficiency)
- How does the cache hierarchy handle cache misses? (edge → regional → origin, each tier can cache)
- Book Reference: “Designing Data-Intensive Applications” Ch. 5 - Martin Kleppmann (replication and caching)
- Cache Eviction Policies
- What is LRU (Least Recently Used) and when does it fail? (works for temporal locality, fails for scanning workloads)
- What is LFU (Least Frequently Used) and its tradeoffs? (good for hot content, slow to adapt to trends)
- Why do CDNs use custom algorithms (e.g., size-aware LRU)? (video segments vary in size, large segments shouldn’t evict many small ones)
- Book Reference: “Computer Architecture: A Quantitative Approach” Ch. 2 - Hennessy & Patterson (cache replacement policies)
- HTTP Caching Headers & Validation
- What’s the difference between Cache-Control and Expires? (Cache-Control is modern, supports max-age and directives)
- How does ETag-based validation work? (server sends hash of content, client sends If-None-Match, server replies 304 Not Modified)
- When should content be immutable? (video segments never change, playlists do change)
- Book Reference: “High Performance Browser Networking” Ch. 10 - Ilya Grigorik (HTTP caching)
Questions to Guide Your Design
Before implementing, think through these:
- Cache Strategy
- Should all content be cached or only popular content? (depends on cache size, content distribution)
- How long should segments remain cached? (immutable segments: forever; playlists: short TTL)
- What’s your target cache hit ratio? (90%+ is typical for video CDNs)
- Geographic Routing
- How do users discover which edge server to use? (DNS-based geo-routing, anycast, or load balancer)
- Should you simulate network latency between locations? (yes, to demonstrate value of edge proximity)
- What happens if the closest edge is overloaded? (fallback to next-closest, or load balance across region)
- Cache Invalidation
- When origin content changes, how do edges learn? (purge API, TTL expiration, or versioned URLs)
- Should you proactively push updates or wait for TTL? (push for critical updates, TTL for normal content)
- How do you handle partial cache poisoning? (validation via ETag or checksum)
Thinking Exercise
Simulate a video’s lifecycle in your CDN:
- First viewer requests segment_042.ts from US-West edge:
- Edge: MISS (not in cache)
- Edge → Regional (US): MISS
- Regional → Origin: HIT (200 OK, 2MB, 50ms)
- Regional caches it
- Edge caches it
- Total time: 50ms + 2 * network latency
- Second viewer (same region) requests same segment:
- Edge: HIT (cached locally)
- Total time: <1ms (memory or local disk)
- Viewer in EU requests same segment:
- EU Edge: MISS
- EU Edge → EU Regional: MISS
- EU Regional → Origin: HIT
- (Why didn’t it use US cache? Regional caches don’t talk to each other)
Questions:
- What’s the cache hit ratio after 1000 viewers across 3 regions?
- If origin serves 100 requests and edges serve 9900, what’s the bandwidth savings?
- How does cache warmth affect the cold start problem for new content?
The Interview Questions They’ll Ask
Prepare to answer these:
- “Explain the difference between a CDN and a load balancer.”
- Load balancer: Distributes requests across backend servers in same datacenter (low latency, high availability)
- CDN: Caches content geographically close to users (global distribution, reduces origin load and latency)
- CDNs often use load balancers at each PoP (point of presence)
- “How would you measure cache hit ratio and why does it matter?”
- Formula:
hit_ratio = hits / (hits + misses) - Matters for: Origin bandwidth cost, user latency (hits are fast), origin server load
- Typical targets: 90%+ for popular content, lower for long-tail
- Measure per edge, per content type, and aggregate
- Formula:
- “What’s cache stampede and how do you prevent it?”
- Problem: Popular cached item expires, 1000 requests simultaneously hit origin
- Origin gets overwhelmed, all requests slow
- Solutions: Stale-while-revalidate (serve stale while fetching fresh), request coalescing (first request fetches, others wait)
- “How do video CDNs handle huge files (multi-GB videos)?”
- Segment-based caching: Cache individual HLS/DASH segments (2-10 seconds each) not entire files
- Range requests: Support HTTP byte-range requests for partial fetches
- Prefetching: Warm cache with next segments based on playback position
- “Explain cache invalidation strategies and the tradeoffs.”
- TTL-based: Simple, eventually consistent, can serve stale content
- Purge API: Immediate, requires active invalidation, complex for multi-tier
- Versioned URLs: No invalidation needed (video_v2.mp4), requires URL changes
- Video segments use versioned URLs (immutable), playlists use short TTL
Hints in Layers
Hint 1 (Simple file-based cache): Start with a reverse proxy. On request, check if file exists in cache directory. If yes, serve it. If no, fetch from origin with HTTP GET, save to cache, serve. Use filename as cache key: cache/{quality}/{segment_name}.
Hint 2 (Add cache headers): Set HTTP response headers. For segments: Cache-Control: public, max-age=31536000, immutable (1 year, never changes). For playlists: Cache-Control: public, max-age=4 (4 seconds, allow updates). Add X-Cache: HIT or X-Cache: MISS for debugging.
Hint 3 (Implement LRU eviction): Track cache size and last access time. When cache exceeds limit (e.g., 1GB), remove least recently used files until size is under threshold. Use a min-heap or sorted list keyed by access time.
Hint 4 (Geographic simulation): Run multiple edge processes on different ports. Add artificial latency based on “distance”: edge-to-client (5ms), edge-to-origin (100ms). Use DNS or a simple router to direct clients to nearest edge by IP prefix.
Books That Will Help
| Book | Author | Chapters | What You’ll Learn |
|---|---|---|---|
| Designing Data-Intensive Applications | Martin Kleppmann | 5-6 | Replication, caching, partitioning strategies |
| High Performance Browser Networking | Ilya Grigorik | 10-11 | HTTP caching, CDN architecture, cache optimization |
| Computer Architecture: A Quantitative Approach | Hennessy & Patterson | 2 | Cache hierarchies, replacement policies, hit ratio analysis |
| Web Scalability for Startup Engineers | Artur Ejsmont | 8 | CDN integration, caching layers, cache invalidation |
| Systems Performance | Brendan Gregg | 8 | Cache performance analysis, monitoring, tuning |
Common Pitfalls & Debugging
Problem 1: Cache hit ratio is low (< 50%)
- Symptom: Origin receives most requests, edges barely help
- Cause: Cache keys are too granular (query params differ), or cache size too small for working set
- Fix: Normalize cache keys (ignore irrelevant query params), increase cache size, or implement request coalescing
- Test: Log cache keys, check for duplicates with minor variations (cache key normalization issue)
Problem 2: Stale content served even after origin update
- Symptom: Origin has new video, but edges serve old version
- Cause: TTL too long, no purge mechanism
- Fix: Implement cache purge API (POST /purge/{path}), or use versioned URLs for immutable content
- Test: Update origin content, trigger purge, verify edge fetches fresh copy within 1 request
Problem 3: Cache stampede overloads origin when popular content expires
- Symptom: Periodic spikes in origin traffic, all edges simultaneously refetch same content
- Cause: TTL expires at same time for all edges, no coordination
- Fix: Add jitter to TTL (TTL ± random(0, 60s)), implement request coalescing at edge
- Test: Expire popular cached item, observe origin request count (should be 1 per edge, not N per edge)
Problem 4: Origin bandwidth doesn’t decrease despite high hit ratio
- Symptom: Cache reports 95% hit ratio but origin still serves tons of data
- Cause: Cache misses are on large files (disproportionate bandwidth impact), or long-tail content dominates
- Fix: Measure bandwidth saved (not just hit ratio), implement selective caching (only cache files < 50MB)
- Test: Calculate
bandwidth_saved = (hits * avg_size) / ((hits + misses) * avg_size), compare to hit ratio
Project 9: WebRTC Video Chat (P2P)
- File: VIDEO_STREAMING_DEEP_DIVE_PROJECTS.md
- Main Programming Language: JavaScript
- Alternative Programming Languages: TypeScript, Rust (WebAssembly)
- Coolness Level: Level 4: Hardcore Tech Flex
- Business Potential: 4. The “Open Core” Infrastructure
- Difficulty: Level 4: Expert
- Knowledge Area: Real-Time Communication / P2P
- Software or Tool: WebRTC
- Main Book: “WebRTC: APIs and RTCWEB Protocols” by Alan Johnston
What you’ll build: A peer-to-peer video chat application using WebRTC, with your own signaling server. Video flows directly between browsers with sub-second latency.
Why it teaches real-time video: WebRTC is the opposite of HLS/DASH. Where streaming adds 5-30 seconds of latency for buffering, WebRTC aims for <500ms. You’ll understand the tradeoffs: no buffering means no quality adaptation, packet loss means visual glitches. This completes your understanding of the video delivery spectrum.
Core challenges you’ll face:
- Signaling (exchanging SDP offers/answers) → maps to connection establishment
- NAT traversal (STUN/TURN servers) → maps to network reality
- ICE candidates (finding the best path) → maps to connectivity checking
- MediaStream API (capturing camera/screen) → maps to browser media APIs
Key Concepts:
- WebRTC Architecture: “WebRTC: APIs and RTCWEB Protocols” Chapter 2-4 - Alan Johnston
- SDP Format: RFC 4566 - IETF
- ICE Protocol: RFC 8445 - IETF
- STUN/TURN: RFC 5389, RFC 5766 - IETF
Difficulty: Expert Time estimate: 2-3 weeks Prerequisites: JavaScript, networking basics, Project 5 helps
Real world outcome:
┌─────────────────────────────────────────────────────────────┐
│  WebRTC Video Chat                                [Room: abc123] │
├─────────────────────────────────────────────────────────────┤
│  ┌───────────────────┐    ┌───────────────────┐            │
│  │                   │    │                   │            │
│  │   Your Camera     │    │   Remote Peer     │            │
│  │                   │    │                   │            │
│  │   [720p, 30fps]   │    │   [720p, 28fps]   │            │
│  └───────────────────┘    └───────────────────┘            │
├─────────────────────────────────────────────────────────────┤
│  Connection Stats:                                          │
│    State: connected                                         │
│    RTT: 45ms                                               │
│    Packets lost: 0.02%                                     │
│    Connection type: host (direct P2P!)                     │
│    Bandwidth: 2.1 Mbps                                     │
├─────────────────────────────────────────────────────────────┤
│  ICE Candidates:                                            │
│    ✓ host: 192.168.1.5:54321 (UDP) - SELECTED             │
│    ✓ srflx: 203.0.113.45:54321 (STUN)                      │
│    ✓ relay: 198.51.100.1:3478 (TURN)                       │
└─────────────────────────────────────────────────────────────┘
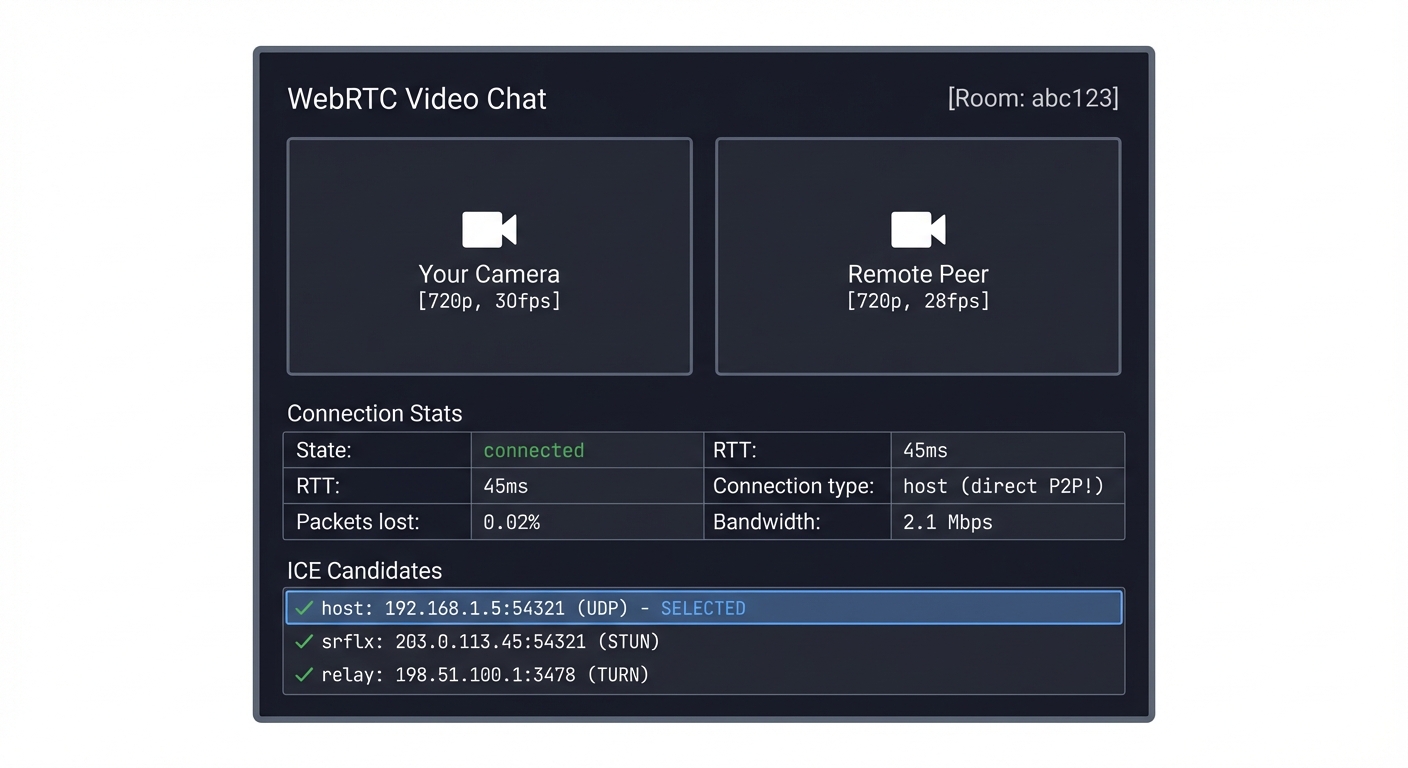
Implementation Hints: WebRTC requires three things:
- Signaling server (WebSocket) - Exchanges SDP offers/answers between peers
- STUN server - Discovers your public IP (use Google’s: stun:stun.l.google.com:19302)
- TURN server (optional) - Relays traffic when P2P fails
The flow:
- Peer A creates offer:
pc.createOffer()→ SDP - Send SDP to Peer B via signaling server
- Peer B creates answer:
pc.createAnswer()→ SDP - Exchange ICE candidates as they’re discovered
- Connection established, video flows P2P
const pc = new RTCPeerConnection({
  iceServers: [{ urls: 'stun:stun.l.google.com:19302' }]
});

navigator.mediaDevices.getUserMedia({ video: true, audio: true })
  .then(stream => {
    stream.getTracks().forEach(track => pc.addTrack(track, stream));
  });

pc.onicecandidate = e => signaling.send({ candidate: e.candidate });
pc.ontrack = e => remoteVideo.srcObject = e.streams[0];
Learning milestones:
- Signaling server exchanges messages → You understand connection bootstrapping
- Video appears on both ends → You understand WebRTC basics
- Connection works across NAT → You understand STUN
- Add TURN fallback → You understand relay-based connectivity
The Core Question You’re Answering: How do two browsers on different networks establish a direct peer-to-peer video connection when they’re both behind NATs/firewalls, and how can real-time video achieve sub-500ms latency without buffering?
Concepts You Must Understand First:
- NAT (Network Address Translation): Your router hides internal IPs behind a public IP
- SDP (Session Description Protocol): How peers describe their media capabilities
- ICE (Interactive Connectivity Establishment): The algorithm for finding the best connection path
- STUN/TURN: Protocols for NAT traversal (STUN) and relay fallback (TURN)
- RTP/SRTP: Real-time Transport Protocol for actual media delivery
- Offer/Answer Model: The negotiation pattern for establishing connections
Book References:
- “WebRTC: APIs and RTCWEB Protocols” Chapter 3-4 (SDP negotiation)
- “High Performance Browser Networking” Chapter 18 (WebRTC architecture)
- RFC 8445 (ICE protocol specification)
- “Real-Time Communication with WebRTC” by Salvatore Loreto (practical implementation)
Questions to Guide Your Design:
- Why can’t browsers just connect directly using IP addresses? (NAT/firewall reality)
- What information needs to be exchanged before video can flow? (SDP offers/answers)
- How does ICE determine which candidate to use? (connectivity checks, priority)
- When would TURN be necessary vs STUN? (symmetric NAT, corporate firewalls)
- Why does WebRTC prefer UDP over TCP for video? (latency vs reliability tradeoff)
- How does WebRTC handle packet loss without buffering? (FEC, NACK, visual glitches)
- What happens if bandwidth drops mid-call? (congestion control, quality degradation)
Thinking Exercise: Draw the complete message flow for establishing a WebRTC connection:
- Peer A creates offer → sends to signaling server → Peer B receives
- Peer B creates answer → sends back → Peer A receives
- Both gather ICE candidates → exchange via signaling → test connectivity
- Best path selected → media flows directly P2P
Now trace what happens when Peer A is behind symmetric NAT and all direct paths fail. When does TURN activate? How does the connection quality change?
The Interview Questions They’ll Ask:
- “Explain the difference between STUN and TURN servers”
- STUN: Helps you discover your public IP/port (NAT binding discovery)
- TURN: Relays traffic when P2P fails (fallback, uses bandwidth)
- “Walk me through the SDP offer/answer exchange”
- Offer contains: codecs, resolutions, encryption keys, ICE credentials
- Answer responds with: matching capabilities, selected codecs
- Both sides commit to agreed parameters
- “What are the different types of ICE candidates?”
- Host: Your local IP (works on LAN)
- Server Reflexive (srflx): Your public IP from STUN
- Relay: TURN server address (guaranteed to work)
- “How does WebRTC maintain low latency?”
- No buffering (unlike HLS which buffers 10-30 seconds)
- UDP for speed (drops packets vs retransmitting)
- Congestion control adapts quality in real-time
- Jitter buffer is minimal (40-200ms)
- “What happens when packet loss exceeds 5%?”
- Visual artifacts (blocky frames, freezing)
- Audio drops/glitches
- Automatic quality reduction (lower bitrate/resolution)
- Potential fallback to audio-only
Books That Will Help:
| Book | Author | Chapters | What You’ll Learn |
|---|---|---|---|
| WebRTC: APIs and RTCWEB Protocols | Alan Johnston | 2-4, 7-8 | SDP, ICE, DTLS-SRTP architecture |
| Real-Time Communication with WebRTC | Salvatore Loreto | 3-5 | Practical signaling, peer connections |
| High Performance Browser Networking | Ilya Grigorik | 18 | WebRTC transport internals |
| Computer Networking: A Top-Down Approach | Kurose & Ross | 2.6 | NAT, UDP, real-time protocols |
Common Pitfalls & Debugging:
- Signaling confusion:
- Symptom: Connection never establishes
- Debug: Check WebSocket messages, verify SDP exchange
- Fix: Ensure both offer and answer are set correctly
- ICE candidates not working:
- Symptom: “checking” state forever
- Debug: Log all candidates, check STUN server accessibility
- Fix: Add multiple STUN servers, implement TURN fallback
- One-way video:
- Symptom: Only one peer sees video
- Debug: Check
ontrackevent, verify MediaStream handling - Fix: Ensure both peers add tracks to RTCPeerConnection
- Connection drops after working:
- Symptom: Video freezes after 30-60 seconds
- Debug: Monitor ICE connection state changes
- Fix: Check firewall timeout rules, implement keepalives
- High latency despite WebRTC:
- Symptom: 2+ seconds of delay
- Debug: Check if TURN is being used instead of P2P
- Fix: Debug NAT traversal, may need symmetric NAT workaround
- Poor quality on good connection:
- Symptom: Blocky video with plenty of bandwidth
- Debug: Check codec settings, bitrate constraints
- Fix: Adjust
maxBitratein sender parameters
Debugging Tools:
- chrome://webrtc-internals (Chrome’s built-in WebRTC debugger)
- getStats() API (connection statistics)
- Wireshark with STUN/RTP filters (packet-level analysis)
Project 10: Video Quality Analyzer (VMAF/SSIM)
- File: VIDEO_STREAMING_DEEP_DIVE_PROJECTS.md
- Main Programming Language: Python
- Alternative Programming Languages: C, Rust, Julia
- Coolness Level: Level 3: Genuinely Clever
- Business Potential: 3. The “Service & Support” Model
- Difficulty: Level 3: Advanced
- Knowledge Area: Signal Processing / Image Quality
- Software or Tool: FFmpeg + VMAF
- Main Book: “Digital Video and HD” by Charles Poynton
What you’ll build: A tool that compares encoded video against the source and calculates perceptual quality scores (VMAF, SSIM, PSNR), helping you understand what “good quality” actually means mathematically.
Why it teaches video quality: YouTube and Netflix obsess over VMAF scores. A VMAF of 93+ is “visually lossless” for most content. Understanding quality metrics helps you understand encoding tradeoffs—why 720p at high bitrate often looks better than 1080p at low bitrate.
Core challenges you’ll face:
- Frame extraction and alignment → maps to video processing pipeline
- SSIM calculation (structural similarity) → maps to image comparison algorithms
- VMAF integration (Netflix’s ML-based metric) → maps to perceptual quality
- Per-frame analysis (finding quality drops) → maps to quality debugging
Key Concepts:
- VMAF Algorithm: “Toward a Practical Perceptual Video Quality Metric” - Netflix Tech Blog
- SSIM: “Image Quality Assessment: From Error Visibility to Structural Similarity” - Wang et al.
- PSNR Limitations: “Digital Video and HD” Chapter 28 - Charles Poynton
- Encoding Quality: “Video Encoding by the Numbers” Chapter 6 - Jan Ozer
Difficulty: Advanced Time estimate: 1-2 weeks Prerequisites: Python, basic signal processing concepts
Real world outcome:
$ ./quality_analyzer.py --reference source_4k.mp4 --encoded ladder/video_720p.mp4

Analyzing quality: ladder/video_720p.mp4
Reference: source_4k.mp4 (3840x2160)
Encoded: 1280x720, 2.5 Mbps

Frame-by-frame analysis: [████████████████████████] 100%

Quality Report:
═══════════════════════════════════════════════════════════════
  Metric          | Mean    | Min     | Max     | Std Dev
  ----------------|---------|---------|---------|--------
  VMAF            | 87.3    | 72.1    | 95.2    | 4.8
  SSIM            | 0.962   | 0.891   | 0.988   | 0.021
  PSNR            | 38.4 dB | 31.2 dB | 44.1 dB | 2.3 dB
═══════════════════════════════════════════════════════════════

Quality interpretation:
  VMAF 87.3 = "Good" (target: 93+ for premium, 85+ for mobile)

Problematic frames detected:
  Frame 1234 (00:51.42): VMAF=72.1 - high motion scene
  Frame 2891 (02:00.45): VMAF=74.3 - dark scene, banding
  Frame 4012 (02:47.16): VMAF=73.8 - complex texture

Recommendation:
  Increase bitrate to 3.5 Mbps to achieve VMAF 93+
  Or accept current quality for bandwidth-constrained scenarios

Generated graph: quality_graph.png
  [Shows VMAF per frame with problem areas highlighted]
Implementation Hints: FFmpeg has VMAF built-in:
ffmpeg -i encoded.mp4 -i reference.mp4 \
  -filter_complex "[0:v][1:v]libvmaf=log_path=vmaf.json:log_fmt=json" \
  -f null -
For SSIM/PSNR:
ffmpeg -i encoded.mp4 -i reference.mp4 \
  -filter_complex "[0:v][1:v]ssim=stats_file=ssim.txt" \
  -f null -
Parse the output and create visualizations. The interesting part is correlating quality drops with video content (motion, darkness, complexity).
Learning milestones:
- Calculate PSNR → You understand pixel-level comparison (and its limitations)
- Calculate SSIM → You understand structural comparison
- Integrate VMAF → You understand perceptual quality
- Find quality problem frames → You can debug encoding issues
The Core Question You’re Answering: How do streaming platforms objectively measure video quality after compression, and why do human-perceived quality and mathematical pixel differences diverge so dramatically?
Concepts You Must Understand First:
- Lossy Compression: Why video encoding discards information (bandwidth constraints)
- Human Visual System (HVS): We’re more sensitive to luminance than chrominance, spatial frequency matters
- Rate-Distortion Tradeoff: Lower bitrate = more compression = more quality loss
- Perceptual Quality: What looks “good” to humans vs what math says is “different”
- Temporal vs Spatial Quality: Motion quality vs still-frame sharpness
- Just Noticeable Difference (JND): The threshold where humans detect quality changes
Book References:
- “Digital Video and HD” Chapter 28-29 (quality metrics, HVS)
- “Video Encoding by the Numbers” Chapter 6 (VMAF deep dive by Jan Ozer)
- Wang et al. “Image Quality Assessment: From Error Visibility to Structural Similarity” (SSIM paper)
- Netflix Tech Blog: “Toward a Practical Perceptual Video Quality Metric” (VMAF development)
Questions to Guide Your Design:
- Why is PSNR misleading? (It treats all pixels equally, ignores HVS)
- What does SSIM measure that PSNR doesn’t? (structural similarity, local patterns)
- Why does Netflix prefer VMAF over SSIM? (machine learning trained on human ratings)
- What VMAF score is “visually transparent”? (~93+ means indistinguishable from source)
- Why do dark scenes and high-motion scenes score lower? (compression struggles with those)
- How do you choose target quality scores for different use cases? (premium vs mobile vs bandwidth-limited)
- Can you have high PSNR but low VMAF? (Yes! Blurry video has low pixel error but looks bad)
Thinking Exercise: Encode the same 10-second clip at three bitrates: 500 kbps, 2000 kbps, 8000 kbps.
- Which one crosses the “good enough” threshold (VMAF 85+)?
- Which one is visually transparent (VMAF 93+)?
- Plot quality vs bitrate—is it linear or diminishing returns?
- Now encode a different clip (action movie vs talking heads). Do the curves differ?
This reveals: content-dependent encoding and the sweet spot for each content type.
The Interview Questions They’ll Ask:
- “Explain the difference between PSNR, SSIM, and VMAF”
- PSNR: Simple pixel-difference metric (dB scale), doesn’t correlate with HVS
- SSIM: Structural similarity, considers luminance/contrast/structure patterns
- VMAF: ML-based, trained on human quality ratings, best predictor of perceived quality
- “Why doesn’t PSNR correlate well with human perception?”
- Treats all frequency components equally (humans are less sensitive to high-frequency detail)
- Doesn’t account for masking effects (artifacts hidden in complex textures)
- Can’t distinguish blur from blockiness (both have similar pixel error)
- “How would you use VMAF to optimize encoding?”
- Run quality ladder generation: encode at multiple bitrates
- Find lowest bitrate that achieves target VMAF (e.g., 85 for mobile, 93 for premium)
- Per-title encoding: different content needs different bitrates for same quality
- Identify problem frames: scenes that need higher bitrate to maintain quality
- “What’s a good VMAF score for production streaming?”
- 93+: Visually transparent (premium tier, 4K)
- 85-92: High quality (standard HD streaming)
- 75-84: Good quality (mobile, bandwidth-constrained)
- Below 75: Noticeable artifacts (only for extreme constraints)
- “How do you handle per-title encoding decisions with VMAF?”
- Encode sample clips at various bitrates
- Measure VMAF for each
- Find “knee” in quality curve (point of diminishing returns)
- Set target bitrate per content type (sports needs more, talking heads needs less)
Books That Will Help:
| Book | Author | Chapters | What You’ll Learn |
|---|---|---|---|
| Digital Video and HD | Charles Poynton | 28-29 | Color perception, quality metrics, HVS |
| Video Encoding by the Numbers | Jan Ozer | 6-7 | VMAF methodology, practical quality testing |
| H.264 and MPEG-4 Video Compression | Iain Richardson | 10 | Compression artifacts, quality impacts |
| High Efficiency Video Coding (IEEE) | Sullivan et al. | Quality sections | HEVC quality improvements, metrics |
Common Pitfalls & Debugging:
- Frame alignment issues:
- Symptom: Very low scores despite good visual quality
- Debug: Check if source and encoded have same frame count/timestamps
- Fix: Ensure identical frame extraction, handle frame drops
- Resolution mismatch:
- Symptom: VMAF calculation fails or gives nonsensical results
- Debug: Verify both videos are same resolution
- Fix: Scale encoded video to match reference before comparison
- VMAF taking forever:
- Symptom: 10-minute video takes hours to analyze
- Debug: VMAF is computationally expensive
- Fix: Use FFmpeg’s multithreading (
-threads 8), sample frames instead of all frames
- Misinterpreting PSNR:
- Symptom: High PSNR (40+ dB) but video looks blurry
- Debug: PSNR penalizes sharpening but rewards blur
- Fix: Always pair with VMAF/SSIM for perceptual quality
- Inconsistent VMAF across content:
- Symptom: Same bitrate gives VMAF 90 for one video, 70 for another
- Debug: Different content has different complexity
- Fix: Per-title encoding—adjust bitrate based on content type
- Temporal vs spatial confusion:
- Symptom: Still frames look great but motion is juddery
- Debug: Quality metrics focus on spatial quality
- Fix: Add temporal quality checks (frame rate analysis, motion smoothness)
Debugging Tools:
- FFmpeg with
-lavfifilters (VMAF, SSIM, PSNR integrated) - Netflix VMAF library (standalone CLI tool)
- Graph plotting tools (matplotlib, gnuplot) for quality curves
- Frame-by-frame extraction to identify problem scenes
Project 11: Bandwidth Estimator Network Simulator
- File: VIDEO_STREAMING_DEEP_DIVE_PROJECTS.md
- Main Programming Language: Python
- Alternative Programming Languages: Go, Rust, C
- Coolness Level: Level 2: Practical but Forgettable
- Business Potential: 1. The “Resume Gold”
- Difficulty: Level 2: Intermediate
- Knowledge Area: Network Simulation / Estimation
- Software or Tool: Network Simulator
- Main Book: “Computer Networks” by Andrew Tanenbaum
What you’ll build: A network simulator that models variable bandwidth, latency, and packet loss, plus bandwidth estimation algorithms that try to detect available throughput in real-time.
Why it teaches streaming reality: ABR algorithms depend on accurate bandwidth estimation. But networks are noisy—WiFi drops randomly, cellular varies by the second, other apps compete for bandwidth. This project helps you understand why streaming quality can fluctuate and how estimation algorithms cope.
Core challenges you’ll face:
- Network modeling (variable bandwidth, latency, loss) → maps to real network conditions
- Exponential moving average (smoothing measurements) → maps to noise reduction
- Probe-based estimation (send packets, measure response) → maps to active probing
- History-based estimation (use download times) → maps to passive estimation
Key Concepts:
- Network Simulation: “Computer Networks” Chapter 5 - Andrew Tanenbaum
- Bandwidth Estimation: “Pathload: A Measurement Tool for End-to-End Available Bandwidth” - Jain & Dovrolis
- Exponential Smoothing: “High Performance Browser Networking” Chapter 2 - Ilya Grigorik
- TCP Congestion Control: RFC 5681 - IETF
Difficulty: Intermediate Time estimate: 1 week Prerequisites: Basic networking, statistics
Real world outcome:
$ ./network_sim.py --profile "commuter_train" --duration 300

Simulating network: "Commuter Train"
  Baseline: 10 Mbps
  Variance: high (tunnels, cell towers)
  Pattern: periodic drops every 30-60s

Running estimation algorithms...

Time     | Actual BW | Simple Avg | EWMA (α=0.3) | Probe-Based
---------|-----------|------------|--------------|-------------
0:00     | 10.2 Mbps | 10.2 Mbps  | 10.2 Mbps    | 9.8 Mbps
0:15     | 8.5 Mbps  | 9.4 Mbps   | 9.7 Mbps     | 8.2 Mbps
0:30     | 0.5 Mbps  | 6.4 Mbps   | 6.9 Mbps     | 0.8 Mbps  ← tunnel!
0:45     | 12.1 Mbps | 7.8 Mbps   | 8.5 Mbps     | 11.5 Mbps
1:00     | 11.8 Mbps | 8.6 Mbps   | 9.5 Mbps     | 11.2 Mbps

Estimation Error (RMSE):
  Simple Average: 3.2 Mbps (slow to react)
  EWMA α=0.3:     2.1 Mbps (balanced)
  EWMA α=0.7:     1.4 Mbps (reactive but noisy)
  Probe-Based:    0.9 Mbps (most accurate, but overhead)

Recommendation: EWMA α=0.5 provides best balance for this profile
Implementation Hints: Model the network as a pipe with time-varying capacity. When “sending” a segment, calculate transfer time based on current bandwidth.
EWMA (Exponential Weighted Moving Average):
def ewma_update(current_estimate, new_measurement, alpha=0.3):
    return alpha * new_measurement + (1 - alpha) * current_estimate
Lower α = smoother but slower to react Higher α = reactive but noisy
Create different network profiles: “stable wifi”, “coffee shop”, “cellular”, “commuter train”, etc.
Learning milestones:
- Simulate variable bandwidth → You understand network modeling
- EWMA beats simple average → You understand smoothing
- Find optimal α for different profiles → You understand parameter tuning
- Add packet loss modeling → You understand complete network simulation
The Core Question You’re Answering: How do video players accurately estimate available bandwidth in real-time when networks are noisy, variable, and shared with other applications, and how do different smoothing algorithms trade off responsiveness versus stability?
Concepts You Must Understand First:
- Network Variability: Bandwidth changes constantly (WiFi interference, cell tower handoffs, other apps)
- Exponential Moving Average (EWMA): Weighted average favoring recent measurements
- Alpha Parameter (α): Controls responsiveness vs stability (0.0 = never changes, 1.0 = only latest)
- Probe-Based vs Passive Estimation: Active probing (send test packets) vs passive (measure actual downloads)
- Throughput vs Bandwidth: Measured speed vs theoretical capacity
- Network Patterns: Different scenarios have different variability characteristics
Book References:
- “Computer Networks” Chapter 5 (network simulation, performance)
- “High Performance Browser Networking” Chapter 2 (latency, bandwidth estimation)
- Jain & Dovrolis “Pathload: A Measurement Tool for End-to-End Available Bandwidth” (estimation algorithms)
- RFC 5681 (TCP congestion control, related concepts)
Questions to Guide Your Design:
- Why can’t we just use the latest measurement? (Too noisy, causes quality thrashing)
- Why can’t we just average all measurements? (Too slow to react to real changes)
- What does the alpha parameter control in EWMA? (Weight of new vs old data)
- How do you choose alpha for different scenarios? (Stable network = low α, variable = higher α)
- Why might probe-based estimation be more accurate? (Dedicated bandwidth test vs shared download)
- What are the downsides of probing? (Network overhead, latency impact)
- How does this relate to ABR decisions? (Bandwidth estimate drives quality switching)
Thinking Exercise: Simulate these three network scenarios:
- Stable WiFi: 10 Mbps ± 5%
- Commuter Train: 5-15 Mbps with periodic drops to 0.5 Mbps (tunnels)
- Coffee Shop: 3-8 Mbps with random interference spikes
For each scenario, test alpha values: 0.1, 0.3, 0.5, 0.7, 0.9
Which alpha minimizes RMSE for each scenario? Why does the optimal α differ? Draw a graph: x-axis = time, y-axis = bandwidth (actual, estimated)
The Interview Questions They’ll Ask:
- “Explain exponential moving average (EWMA) and why it’s better than simple average”
- EWMA:
new_estimate = α × measurement + (1-α) × old_estimate - Gives more weight to recent data while smoothing noise
- Simple average treats all history equally (too slow to adapt)
- EWMA:
- “How would you tune the alpha parameter?”
- Low α (0.1-0.3): Stable networks, smooth out noise
- High α (0.7-0.9): Variable networks, quick reaction
- Mid α (0.4-0.6): General purpose, balances both
- Test against network profiles, minimize prediction error
- “What’s the difference between active and passive bandwidth estimation?”
- Passive: Measure actual segment download times (no overhead, real usage)
- Active: Send probe packets to test capacity (more accurate, but uses bandwidth)
- Hybrid: Use passive primarily, active probes when uncertain
- “How does bandwidth estimation affect ABR decisions?”
- Underestimate → pick quality too low → underutilized bandwidth
- Overestimate → pick quality too high → buffering/stalls
- Goal: slightly conservative estimate to avoid rebuffering
- “Why do streaming players use multiple measurements before switching quality?”
- Single measurement could be outlier (network spike/drop)
- EWMA provides stability
- Some players require 3+ consecutive measurements before upgrading
Books That Will Help:
| Book | Author | Chapters | What You’ll Learn |
|---|---|---|---|
| Computer Networks | Andrew Tanenbaum | 5 | Network performance, queuing theory, simulation |
| High Performance Browser Networking | Ilya Grigorik | 2-3 | Latency, bandwidth, TCP dynamics |
| Performance Modeling and Design of Computer Systems | Mor Harchol-Balter | 3-4 | Queuing models, variability analysis |
| Video Streaming Quality of Experience | Ramón Aparicio-Pardo | 4 | ABR algorithms, bandwidth estimation |
Common Pitfalls & Debugging:
- Estimation lags behind reality:
- Symptom: Player buffers despite bandwidth increase
- Debug: Alpha too low (over-smoothing)
- Fix: Increase α for faster adaptation
- Quality thrashing:
- Symptom: Constantly switching between qualities
- Debug: Alpha too high (not enough smoothing)
- Fix: Decrease α, add hysteresis (require sustained change)
- Unrealistic network model:
- Symptom: Simulated results don’t match real behavior
- Debug: Network model too simplistic
- Fix: Add correlated variability, periodic patterns, realistic packet loss
- Clock vs network time confusion:
- Symptom: Bandwidth calculations wildly inaccurate
- Debug: Using wall-clock time instead of transfer time
- Fix: Only measure actual data transfer duration
- Not accounting for overhead:
- Symptom: Estimates consistently too high
- Debug: Measuring application throughput vs network throughput
- Fix: Account for HTTP headers, TCP overhead, retransmissions
- Ignoring packet loss impact:
- Symptom: High bandwidth but poor quality
- Debug: Packet loss requires retransmissions (reduces effective throughput)
- Fix: Model loss as effective bandwidth reduction
Debugging Tools:
- Matplotlib/gnuplot for visualization (actual vs estimated bandwidth)
- Statistics libraries (numpy, scipy) for RMSE calculation
- Network trace files (real bandwidth logs) for validation
- tcpdump/Wireshark for comparing simulation vs real network
Project 12: Codec Comparison Visualizer
- File: VIDEO_STREAMING_DEEP_DIVE_PROJECTS.md
- Main Programming Language: Python
- Alternative Programming Languages: JavaScript (web-based), Rust
- Coolness Level: Level 3: Genuinely Clever
- Business Potential: 2. The “Micro-SaaS / Pro Tool”
- Difficulty: Level 2: Intermediate
- Knowledge Area: Video Compression / Visualization
- Software or Tool: FFmpeg + Visualization
- Main Book: “H.264 and MPEG-4 Video Compression” by Iain Richardson
What you’ll build: A tool that encodes the same source with multiple codecs (H.264, H.265, VP9, AV1) at the same bitrate and creates a side-by-side comparison with quality metrics overlaid.
Why it teaches codecs: “Why does YouTube use VP9?” “Why is AV1 the future?” This project answers those questions empirically. You’ll see that AV1 at 2 Mbps looks like H.264 at 4 Mbps—codecs are compression algorithms, and newer ones are dramatically better.
Core challenges you’ll face:
- Multi-codec encoding pipeline → maps to encoding workflow
- Bitrate matching (same bitrate, different quality) → maps to codec efficiency
- Visual comparison generation → maps to video processing
- Encoding time comparison → maps to complexity tradeoffs
Key Concepts:
- H.264 Compression: “H.264 and MPEG-4 Video Compression” Chapters 5-7 - Iain Richardson
- H.265 Improvements: “High Efficiency Video Coding” - Sullivan et al. (IEEE)
- VP9/AV1: “AV1 Bitstream & Decoding Process” - Alliance for Open Media
- Rate-Distortion: “Video Encoding by the Numbers” Chapter 4 - Jan Ozer
Difficulty: Intermediate Time estimate: 1 week Prerequisites: FFmpeg basics, video concepts
Real world outcome:
$ ./codec_compare.py input.mp4 --bitrate 2000k --output comparison/

Encoding at 2000 kbps:
  H.264 (x264):    [████████████████████] Done (1.2x realtime)
  H.265 (x265):    [████████████████████] Done (0.3x realtime)
  VP9 (libvpx):    [████████████████████] Done (0.1x realtime)
  AV1 (libaom):    [████████████████████] Done (0.02x realtime)

Quality Analysis:
  Codec | File Size | VMAF  | Encode Time | Decode CPU
  ------|-----------|-------|-------------|------------
  H.264 | 15.2 MB   | 78.3  | 45s         | 12%
  H.265 | 15.1 MB   | 84.2  | 180s        | 18%
  VP9   | 15.0 MB   | 85.1  | 520s        | 15%
  AV1   | 14.9 MB   | 89.7  | 2800s       | 22%

Generated: comparison/side_by_side.mp4
  [4-way split screen showing all codecs with VMAF overlay]

Key insight: AV1 at 2 Mbps ≈ H.264 at 4 Mbps quality
  → 50% bandwidth savings for same quality
  → But 60x slower to encode!
Implementation Hints: Use FFmpeg with different codecs:
# H.264
ffmpeg -i input.mp4 -c:v libx264 -b:v 2000k output_h264.mp4

# H.265
ffmpeg -i input.mp4 -c:v libx265 -b:v 2000k output_h265.mp4

# VP9
ffmpeg -i input.mp4 -c:v libvpx-vp9 -b:v 2000k output_vp9.webm

# AV1
ffmpeg -i input.mp4 -c:v libaom-av1 -b:v 2000k output_av1.mp4
Create side-by-side with filter_complex:
ffmpeg -i h264.mp4 -i h265.mp4 -i vp9.webm -i av1.mp4 \
  -filter_complex "[0:v][1:v][2:v][3:v]xstack=inputs=4:layout=0_0|w0_0|0_h0|w0_h0" \
  comparison.mp4
Learning milestones:
- Encode with all codecs → You understand codec landscape
- Measure quality differences → You understand efficiency gains
- Visualize compression artifacts → You understand quality/bitrate tradeoff
- Understand encode time tradeoffs → You understand why H.264 isn’t dead
The Core Question You’re Answering: Why do newer video codecs (H.265, VP9, AV1) achieve the same quality at 50% less bandwidth than H.264, and what are the practical tradeoffs that prevent instant universal adoption despite this dramatic efficiency gain?
Concepts You Must Understand First:
- Codec = Compression Algorithm: Different mathematical approaches to reducing video size
- Rate-Distortion Optimization: Balancing file size vs quality loss
- Temporal Prediction: Using previous frames to predict current frame (motion compensation)
- Spatial Prediction: Using nearby pixels within same frame (intra prediction)
- Transform Coding: Converting pixels to frequency domain (DCT) for better compression
- Entropy Coding: Final lossless compression of encoded data
- Encoding Complexity: Better compression requires more computation time
Book References:
- “H.264 and MPEG-4 Video Compression” Chapters 5-7 (H.264 internals)
- “High Efficiency Video Coding” by Sullivan et al. (HEVC/H.265 improvements)
- “AV1 Bitstream & Decoding Process” - Alliance for Open Media (AV1 specification)
- “Video Encoding by the Numbers” Chapter 4 (codec comparisons by Jan Ozer)
Questions to Guide Your Design:
- What makes H.265 50% more efficient than H.264? (larger block sizes, better prediction, advanced transforms)
- Why is AV1 the “most efficient” but rarely used live? (encode time is 100x+ slower)
- What’s the relationship between encode time and quality? (more time = better optimization)
- Why does decode complexity matter? (mobile battery, CPU usage)
- How do codecs handle different content types? (talking heads vs sports vs animation)
- What’s the “sweet spot” bitrate for each codec? (where diminishing returns start)
- Why does YouTube use VP9 instead of H.265? (royalty-free, similar efficiency)
Thinking Exercise: Take three video clips with different characteristics:
- Talking head: Low motion, simple background
- Sports game: High motion, camera pans, complex scenes
- Animation: Flat colors, sharp edges, predictable motion
Encode each at 2 Mbps with H.264, H.265, VP9, AV1. Which codec wins for each content type? Plot VMAF scores. Does the ranking change based on content?
Now encode the sports clip at bitrates: 500k, 1M, 2M, 4M, 8M with all codecs. Plot quality curves (bitrate vs VMAF). Where do the curves diverge? Where’s the point of diminishing returns?
The Interview Questions They’ll Ask:
- “Why is AV1 more efficient than H.264?”
- Larger block sizes (up to 128x128 vs 16x16) → better for high-res video
- More prediction modes (56 vs 9 intra modes) → better spatial prediction
- Better motion compensation (warped motion, overlapped block motion) → handles complex motion
- Advanced transforms (adaptive, direction-specific) → better frequency representation
- Result: 30-50% bitrate savings for same quality
- “What’s the tradeoff between H.264 and AV1?”
- H.264: Fast encode (1-2x realtime), fast decode (low CPU), mature ecosystem
- AV1: Slow encode (0.01-0.1x realtime), moderate decode (higher CPU), best compression
- Use H.264 for: Live streaming, legacy devices, fast turnaround
- Use AV1 for: VOD, bandwidth-critical scenarios, modern devices
- “Why does encode time vary so dramatically between codecs?”
- More efficient codecs have more compression tools (prediction modes, transforms)
- Encoder must test many options to find best (rate-distortion optimization)
- H.264: ~9 intra prediction modes, simple motion estimation
- AV1: ~56 intra modes, warped motion, super-resolution, loop filters
- Each decision point adds computational cost
- “How would you choose a codec for production use?”
- Consider:
- Target devices (browser support, hardware decode)
- Live vs VOD (encode time constraints)
- Bandwidth costs (savings from better codec)
- Encoding infrastructure costs (CPU time = money)
- Decision matrix:
- Live streaming: H.264 (compatibility, speed)
- VOD with broad compatibility: H.264
- VOD with modern browsers: VP9 or H.265
- Bandwidth-critical VOD: AV1 (if encode time acceptable)
- Consider:
- “What’s the future of video codecs?”
- AV1 becoming standard for streaming (YouTube, Netflix adopting)
- Hardware decode support improving (mobile chips, GPUs)
- VVC (H.266): Next gen, even better, but licensing unclear
- Machine learning codecs: Research phase, may disrupt
Books That Will Help:
| Book | Author | Chapters | What You’ll Learn |
|---|---|---|---|
| H.264 and MPEG-4 Video Compression | Iain Richardson | 5-9 | H.264 internals, block-based compression |
| High Efficiency Video Coding (IEEE paper) | Sullivan et al. | Full paper | HEVC improvements over H.264 |
| Video Encoding by the Numbers | Jan Ozer | 4-5 | Practical codec comparisons, benchmarks |
| Digital Video and HD | Charles Poynton | 32-34 | Compression fundamentals, transform coding |
Common Pitfalls & Debugging:
- Unfair bitrate comparison:
- Symptom: Results don’t match published benchmarks
- Debug: CBR vs VBR encoding, different encoder settings
- Fix: Use same bitrate mode (2-pass VBR recommended), same target bitrate
- Encoding settings not optimized:
- Symptom: H.265 looks worse than H.264 despite newer codec
- Debug: Default encoder settings vary by codec
- Fix: Use “slow” or “medium” preset for all codecs (not “ultrafast”)
- Different container formats:
- Symptom: File size differences not just from codec
- Debug: H.264 in MP4, VP9 in WebM, different overhead
- Fix: Compare bitrate and quality metrics, not file size
- Content too short:
- Symptom: Results inconsistent, not representative
- Debug: Short clips don’t show codec strengths
- Fix: Use 30-60 second clips minimum, multiple content types
- Hardware vs software encoding:
- Symptom: H.264 quality worse than expected
- Debug: Hardware encoders trade quality for speed
- Fix: Use software encoders (libx264, libx265) for fair comparison
- Missing VMAF integration:
- Symptom: Can’t objectively compare, relying on visual inspection
- Debug: Subjective quality assessment is unreliable
- Fix: Always measure VMAF, SSIM, PSNR for objective comparison
Debugging Tools:
- FFmpeg with codec libraries (libx264, libx265, libvpx-vp9, libaom-av1)
- VMAF library for quality measurement
- MediaInfo for verifying codec settings and bitrates
- ffprobe for detailed stream analysis
- Video comparison players (side-by-side viewing)
Project 13: Buffer Visualization Dashboard
- File: VIDEO_STREAMING_DEEP_DIVE_PROJECTS.md
- Main Programming Language: JavaScript
- Alternative Programming Languages: TypeScript, Python (for backend)
- Coolness Level: Level 2: Practical but Forgettable
- Business Potential: 2. The “Micro-SaaS / Pro Tool”
- Difficulty: Level 2: Intermediate
- Knowledge Area: Data Visualization / Streaming
- Software or Tool: Web Dashboard
- Main Book: “High Performance Browser Networking” by Ilya Grigorik
What you’ll build: A real-time dashboard that visualizes everything happening during video playback: buffer level, download speed, quality level, ABR decisions, and more.
Why it teaches streaming internals: YouTube’s “Stats for Nerds” shows limited info. Your dashboard will show EVERYTHING—why quality switched, what the buffer was when it switched, network conditions, predicted vs actual download times. This visibility is crucial for debugging streaming issues.
Core challenges you’ll face:
- Real-time data collection (MediaSource events, performance API) → maps to instrumentation
- Time-series visualization → maps to data presentation
- Correlation analysis (why did rebuffer happen?) → maps to debugging
- Event timeline (decisions + outcomes) → maps to system understanding
Key Concepts:
- Media Source Extensions Events: W3C MSE Spec - W3C
- Performance Timing: Resource Timing API - W3C
- D3.js Visualization: “Interactive Data Visualization” - Scott Murray
- Streaming Metrics: “Video Quality Monitoring” - NPAPI Community Report
Difficulty: Intermediate Time estimate: 1-2 weeks Prerequisites: JavaScript, basic charting
Real world outcome:
┌────────────────────────────────────────────────────────────────────┐
│  Streaming Dashboard - Real-Time Analysis                          │
├────────────────────────────────────────────────────────────────────┤
│  Buffer Level                                                      │
│  40s │     ████████████████░░░░░░░░                                │
│  20s │ ████                                                        │
│   0s │_________________________________________________________    │
│        0:00    0:30    1:00    1:30    2:00    2:30    3:00       │
│              └── rebuffer event (buffer hit 0)                     │
├────────────────────────────────────────────────────────────────────┤
│  Quality Level                                                     │
│  1080p │          ████████████████████████████████                 │
│  720p  │ ██████████                  ░░░░░░░░                      │
│  480p  │                                                           │
│         0:00    0:30    1:00    1:30    2:00    2:30    3:00      │
│                                         └── downgrade (bandwidth)  │
├────────────────────────────────────────────────────────────────────┤
│  Bandwidth Estimate vs Actual                                      │
│  8Mbps │    ╱╲    ╱────────╲                                       │
│  4Mbps │ ──╱  ╲──╱          ╲__________________                   │
│  0Mbps │_________________________________________________________ │
│         Estimate: ── Actual: ╱╲                                    │
├────────────────────────────────────────────────────────────────────┤
│  Event Log:                                                        │
│  0:00 - Started playback, selected 720p (bandwidth: 4.2 Mbps)     │
│  0:32 - Upgraded to 1080p (buffer: 25s, bandwidth: 6.1 Mbps)      │
│  1:45 - Bandwidth dropped to 1.8 Mbps                              │
│  1:52 - Rebuffer! Buffer emptied waiting for segment              │
│  2:05 - Resumed at 720p                                            │
│  2:30 - Downgraded to 480p (buffer: 8s, conservative)             │
└────────────────────────────────────────────────────────────────────┘
Implementation Hints: Instrument your HLS player (from Project 5) to emit events:
player.on('segment-downloaded', ({ url, size, duration, quality }) => {
  dashboard.addPoint('bandwidth', size / duration);
  dashboard.addPoint('quality', quality);
});

player.on('buffer-update', (bufferLevel) => {
  dashboard.addPoint('buffer', bufferLevel);
});

player.on('quality-switch', ({ from, to, reason }) => {
  dashboard.addEvent(`Switch ${from} → ${to}: ${reason}`);
});
Use Chart.js or D3.js for real-time updating charts.
Learning milestones:
- Basic charts update in real-time → You understand event-driven visualization
- Buffer/quality correlation visible → You see how ABR works
- Diagnose rebuffer causes → You understand debugging streaming
- Compare algorithm behavior visually → You understand ABR tradeoffs
Project 14: MPEG-TS Demuxer
- File: VIDEO_STREAMING_DEEP_DIVE_PROJECTS.md
- Main Programming Language: C
- Alternative Programming Languages: Rust, Go, Python
- Coolness Level: Level 4: Hardcore Tech Flex
- Business Potential: 1. The “Resume Gold”
- Difficulty: Level 4: Expert
- Knowledge Area: Binary Protocols / Broadcast
- Software or Tool: MPEG-TS Parser
- Main Book: “MPEG-2 Transport Stream Packet Analyzer” - ISO 13818
What you’ll build: A tool that parses MPEG Transport Stream files (the .ts segments in HLS), extracting video/audio elementary streams and displaying packet-level details.
Why it teaches streaming deeply: HLS uses MPEG-TS containers inherited from digital TV broadcasting. Understanding TS packets (188 bytes each!), PES packets, and elementary streams shows you how video data is actually structured for transmission. It’s one layer deeper than container formats.
Core challenges you’ll face:
- Fixed-size packet parsing (188-byte packets) → maps to broadcast requirements
- PID filtering (identifying video vs audio vs metadata) → maps to stream multiplexing
- PES header parsing (timestamps, stream types) → maps to synchronization
- Continuity counter checking (detecting packet loss) → maps to error detection
Key Concepts:
- MPEG-TS Format: ISO 13818-1 (MPEG-2 Systems) - ISO/IEC
- Transport Stream Structure: “Digital Video and HD” Chapter 26 - Charles Poynton
- PES Packets: “MPEG-2 Transport Stream Packet Analyzer” - ISO
- Broadcast Constraints: “Video Demystified” Chapter 11 - Keith Jack
Difficulty: Expert Time estimate: 2-3 weeks Prerequisites: C, binary parsing, Project 1 completed
Real world outcome:
$ ./ts_demux segment_000.ts

MPEG-TS Analysis: segment_000.ts
File size: 1,234,567 bytes (6570 packets @ 188 bytes)

Program Association Table (PAT):
  Program 1 → PMT PID: 0x1000

Program Map Table (PMT) @ PID 0x1000:
  Video: PID 0x0100, H.264 (stream_type: 0x1b)
  Audio: PID 0x0101, AAC (stream_type: 0x0f)

Packet Analysis:
  Sync byte: 0x47 (valid for all 6570 packets)

  PID 0x0100 (Video):
    Packets: 5821
    PES units: 180 (= 180 video frames @ 30fps = 6 seconds ✓)
    First PTS: 126000 (1.4s)
    Last PTS: 666000 (7.4s)
    Continuity errors: 0

  PID 0x0101 (Audio):
    Packets: 631
    PES units: 282 (AAC frames)
    First PTS: 126000
    Audio/Video sync: ✓ aligned

  PID 0x0000 (PAT): 7 packets
  PID 0x1000 (PMT): 7 packets

Elementary Stream Output:
  → video.h264 (5,234 KB) - raw H.264 NAL units
  → audio.aac (189 KB) - raw AAC frames
Implementation Hints: TS packets are exactly 188 bytes:
Byte 0: Sync byte (0x47 always)
Bytes 1-2: Flags + PID (13 bits)
Byte 3: Flags + continuity counter (4 bits)
Bytes 4-187: Payload (may include adaptation field)
The flow:
- Find PID 0x0000 (PAT) → tells you where PMT is
- Parse PMT → tells you video/audio PIDs
- Filter packets by PID
- Reassemble PES packets from TS payloads
- Extract elementary streams from PES
Watch for continuity counter (should increment 0-15 for each PID) to detect packet loss.
Learning milestones:
- Parse PAT/PMT → You understand TS structure
- Filter by PID correctly → You understand multiplexing
- Extract valid H.264 stream → You understand PES packets
- Detect continuity errors → You understand broadcast reliability
Project 15: DRM Concepts Demo (Clearkey)
- File: VIDEO_STREAMING_DEEP_DIVE_PROJECTS.md
- Main Programming Language: JavaScript
- Alternative Programming Languages: Python (key server), Go
- Coolness Level: Level 3: Genuinely Clever
- Business Potential: 3. The “Service & Support” Model
- Difficulty: Level 3: Advanced
- Knowledge Area: Security / Encryption
- Software or Tool: EME/Clearkey
- Main Book: “Serious Cryptography” by Jean-Philippe Aumasson
What you’ll build: A demonstration of how DRM works using the browser’s Encrypted Media Extensions (EME) with Clearkey (unprotected keys for learning). You’ll encrypt video segments and require a key server to play them.
Why it teaches DRM: Netflix/YouTube Premium content is encrypted. Understanding EME shows you how browsers handle protected content—the video is encrypted (AES-128-CTR), the player requests a license from a server, and decryption happens in a “Content Decryption Module” that you can’t inspect. Clearkey lets you understand the flow without Widevine/FairPlay complexity.
Core challenges you’ll face:
- AES-CTR encryption of segments → maps to content protection
- PSSH box and initialization data → maps to DRM metadata
- License request/response flow → maps to key exchange
- EME API usage → maps to browser DRM integration
Key Concepts:
- EME Specification: W3C Encrypted Media Extensions - W3C
- Clearkey: EME Clearkey Primer - W3C
- AES-CTR Mode: “Serious Cryptography” Chapter 4 - Jean-Philippe Aumasson
- CENC (Common Encryption): ISO 23001-7 - ISO/IEC
Difficulty: Advanced Time estimate: 1-2 weeks Prerequisites: Encryption basics, JavaScript, Project 5 understanding
Real world outcome:
┌─────────────────────────────────────────────────────────────────────┐
│  DRM Demo Player                                                    │
├─────────────────────────────────────────────────────────────────────┤
│  [VIDEO: Currently encrypted and unplayable]                        │
│                                                                     │
│  Status: Waiting for license...                                     │
├─────────────────────────────────────────────────────────────────────┤
│  EME Flow:                                                          │
│  1. ✓ Loaded encrypted video (PSSH box detected)                   │
│  2. ✓ Browser requested MediaKeys for "org.w3.clearkey"            │
│  3. ✓ Created MediaKeySession                                       │
│  4. → License request sent to http://localhost:8081/license         │
│       Request: { "kids": ["abc123..."] }                           │
│  5. ← License received                                              │
│       Response: { "keys": [{ "kty":"oct", "k":"...", "kid":"..." }]}│
│  6. ✓ Key loaded into CDM                                          │
│  7. ✓ Decryption active - VIDEO PLAYING!                           │
├─────────────────────────────────────────────────────────────────────┤
│  Key Server Log:                                                    │
│  [LICENSE] Request from 192.168.1.5 for kid=abc123...              │
│  [LICENSE] User authenticated, issuing key                         │
│  [LICENSE] Key delivered (valid for 24h)                           │
└─────────────────────────────────────────────────────────────────────┘
Implementation Hints:
- Encrypt segments with AES-128-CTR using FFmpeg:
ffmpeg -i input.mp4 -c:v copy -c:a copy \ -encryption_scheme cenc-aes-ctr \ -encryption_key abc123def456... \ -encryption_kid 12345678... \ encrypted.mp4 - Create a simple key server that returns JSON Web Keys:
@app.route('/license', methods=['POST']) def license(): return jsonify({ "keys": [{ "kty": "oct", "kid": base64url_encode(KEY_ID), "k": base64url_encode(KEY) }], "type": "temporary" }) - In the player, use EME: ```javascript const video = document.querySelector(‘video’); const config = [{ initDataTypes: [‘cenc’], videoCapabilities: […] }]; navigator.requestMediaKeySystemAccess(‘org.w3.clearkey’, config) .then(access => access.createMediaKeys()) .then(keys => video.setMediaKeys(keys));
video.addEventListener(‘encrypted’, async (e) => { const session = video.mediaKeys.createSession(); await session.generateRequest(e.initDataType, e.initData); // Handle license request/response });
**Learning milestones**:
1. **Encrypt video with known key** → You understand content encryption
2. **Detect encrypted event in browser** → You understand EME flow
3. **Key server issues licenses** → You understand key exchange
4. **Video plays after license** → You understand complete DRM flow

---

## Project 16: Thumbnail Generator at Scale

- **File**: VIDEO_STREAMING_DEEP_DIVE_PROJECTS.md
- **Main Programming Language**: Go
- **Alternative Programming Languages**: Rust, Python, C
- **Coolness Level**: Level 2: Practical but Forgettable
- **Business Potential**: 3. The "Service & Support" Model
- **Difficulty**: Level 2: Intermediate
- **Knowledge Area**: Video Processing / Performance
- **Software or Tool**: FFmpeg + Workers
- **Main Book**: "High Performance Browser Networking" by Ilya Grigorik

**What you'll build**: A service that generates thumbnail sprites for video seeking (the preview images you see when hovering over YouTube's progress bar), optimized for processing thousands of videos.

**Why it teaches video processing at scale**: Those thumbnail previews require extracting hundreds of frames per video. YouTube processes 500+ hours of video uploaded every minute. Understanding how to parallelize video processing and generate compact thumbnail sprites teaches production video infrastructure.

**Core challenges you'll face**:
- **Frame extraction at intervals** → maps to *video seeking*
- **Sprite sheet generation** → maps to *bandwidth optimization*
- **VTT metadata for thumbnails** → maps to *player integration*
- **Parallel processing** → maps to *scaling*

**Key Concepts**:
- **Seeking to Keyframes**: *"Digital Video and HD"* Chapter 26 - Charles Poynton
- **Image Sprites**: CSS Sprites technique (web performance)
- **WebVTT Thumbnails**: WebVTT spec + thumbnail extension
- **Worker Pools**: *"Concurrency in Go"* Chapter 4 - Katherine Cox-Buday

**Difficulty**: Intermediate
**Time estimate**: 1 week
**Prerequisites**: FFmpeg basics, basic concurrency

**Real world outcome**:
```bash
$ ./thumbnail_gen --input videos/ --interval 5s --output thumbs/

Processing 100 videos with 8 workers...
  [████████████████████] 100/100 complete

Generated:
  thumbs/
  ├── video_001/
  │   ├── sprite_0.jpg (10x10 grid, 100 thumbnails, 180x100 each)
  │   ├── sprite_1.jpg
  │   └── thumbnails.vtt
  ├── video_002/
  │   └── ...

Sample thumbnails.vtt:
  WEBVTT

  00:00:00.000 --> 00:00:05.000
  sprite_0.jpg#xywh=0,0,180,100

  00:00:05.000 --> 00:00:10.000
  sprite_0.jpg#xywh=180,0,180,100

  00:00:10.000 --> 00:00:15.000
  sprite_0.jpg#xywh=360,0,180,100
  ...

Performance:
  Total video duration: 48 hours
  Processing time: 12 minutes
  Throughput: 240x realtime
  CPU utilization: 95% (all 8 cores)
Implementation Hints: Extract frames with FFmpeg:
ffmpeg -i video.mp4 -vf "fps=1/5,scale=180:100" -q:v 5 thumb_%04d.jpg
Create sprite sheet with ImageMagick:
montage thumb_*.jpg -tile 10x10 -geometry 180x100+0+0 sprite.jpg
Generate VTT by calculating grid positions:
x = (frame_number % 10) * width
y = (frame_number / 10) * height
For parallel processing, use a worker pool pattern—distribute videos across workers.
Learning milestones:
- Extract frames at intervals → You understand video seeking
- Generate sprite sheets → You understand bandwidth optimization
- VTT integrates with player → You understand preview thumbnails
- Process 100 videos in parallel → You understand production scaling
The Core Question You’re Answering
“How do you generate preview thumbnails for millions of videos without overwhelming your infrastructure?”
When you hover over YouTube’s progress bar, you see a preview thumbnail. Simple concept. But YouTube processes 500+ hours of video every minute. If each hour requires extracting 720 frames (one every 5 seconds), that’s 360,000 frames per minute. How do you do this at scale without creating a massive bottleneck? This project teaches you the production engineering behind seemingly simple features.
Concepts You Must Understand First
Video Seeking and Keyframes Can you seek to any frame in a video, or only certain frames? Why does FFmpeg sometimes jump to the “wrong” time when you specify a timestamp?
📚 “Digital Video and HD” Chapter 26 - Charles Poynton (keyframe intervals, GOP structure)
Self-check: What’s the difference between ffmpeg -ss 00:05:00 -i input.mp4 and ffmpeg -i input.mp4 -ss 00:05:00? Which is faster and why?
Sprite Sheets (Image Atlases) Why combine 100 separate images into one large grid instead of serving them individually?
📚 Web performance articles on CSS Sprites (bandwidth optimization, HTTP request reduction)
Self-check: If you have 100 thumbnails at 180x100 pixels, how much bandwidth do you save by serving one sprite sheet instead of 100 individual JPEGs?
Worker Pool Pattern How do you distribute work across multiple CPU cores without creating race conditions or overwhelming system resources?
📚 “Concurrency in Go” Chapter 4 - Katherine Cox-Buday (worker pools, fan-out pattern)
Self-check: If you have 8 CPU cores and 1000 videos to process, should you create 1000 workers or 8 workers? Why?
WebVTT Metadata Format How does the player know which part of the sprite sheet to display at which timestamp?
📚 WebVTT specification (W3C) + thumbnail track extension
Self-check: Can you write a VTT file that maps the first 10 seconds of a video to coordinates (0,0) in sprite.jpg?
Questions to Guide Your Design
-
Frame Extraction Strategy: Should you extract frames sequentially (one pass through the video) or seek to specific timestamps? What are the performance implications?
-
Parallel Processing: How many videos should you process simultaneously? How many frames should you extract per video in parallel?
-
Error Handling: What happens if a video is corrupted? How do you prevent one bad video from stopping the entire batch?
-
Storage Organization: How do you organize the output? One directory per video? How do you prevent filename collisions?
-
Backpressure: If videos are being uploaded faster than you can generate thumbnails, how do you handle the queue?
Thinking Exercise
Before writing code, work through this scenario with pencil and paper:
You have a 10-minute video (600 seconds). You want thumbnail previews every 5 seconds.
- How many frames will you extract?
- If each thumbnail is 180x100 pixels, and you put them in a 10x10 grid, how many sprite sheets will you need?
- Write out the VTT entries for the first 3 thumbnails (timestamps 0, 5, 10 seconds)
- If the video is encoded at 24fps with keyframes every 2 seconds (GOP size 48), will seeking to 00:05.000 be exact or approximate?
Now the insight: If your video player only needs thumbnail resolution (180x100), should you extract from the full-quality source or from a lower-quality version? What’s the tradeoff?
The Interview Questions They’ll Ask
-
“YouTube processes 500 hours of video per minute. How would you design a thumbnail generation system that scales?” They want: Architecture discussion (queue, workers, monitoring), failure handling, resource allocation
-
“Your thumbnail generation is taking 10x realtime (processing a 1-hour video takes 10 hours). How do you debug this?” They want: Profiling approach, understanding of FFmpeg decode speed, parallelization strategies
-
“A user reports that thumbnail previews are showing the wrong scene. How could this happen?” They want: Understanding of keyframe seeking, variable frame rate videos, timestamp precision
-
“How would you handle videos that are still being uploaded (incomplete files)?” They want: Race condition awareness, file locking, event-driven architecture
-
“What metrics would you track for a production thumbnail service?” They want: Throughput (videos/hour), processing speed (realtime multiplier), error rate, queue depth
Hints in Layers
Layer 1 - The Architecture Think of this as a pipeline: Queue → Worker Pool → FFmpeg → Image Compositor → VTT Generator → Storage. You need a job queue (Redis, RabbitMQ, or simple file-based), workers that pull jobs, and output storage.
Layer 2 - FFmpeg Optimization
The naive approach (ffmpeg -i video.mp4 -vf fps=1/5 output_%04d.jpg) decodes every frame and throws most away. Instead, use -vf select='not(mod(n\,120))' to select every 120th frame (at 24fps, that’s every 5 seconds). Even better: seek to specific timestamps with -ss.
Layer 3 - Parallel Decisions You have two dimensions of parallelism: (1) process multiple videos simultaneously, (2) extract multiple frames from one video simultaneously. For thumbnails, option 1 is usually better—process 8 videos concurrently, each extracting frames sequentially. Why? FFmpeg decode is fast, and seeking randomly is slower than sequential.
Layer 4 - Production Gotchas
VTT coordinates use #xywh=x,y,width,height. If your sprite sheet is 10 thumbnails wide and each is 180x100, the 5th thumbnail (index 4) is at x=720, y=0. But what if you only have 93 frames (not a perfect 100)? Your last sprite will be incomplete. Handle this edge case or your player will show broken thumbnails.
The Core Question You’re Answering
“How can viewers become part of the delivery infrastructure, turning bandwidth costs into a distributed problem?”
Netflix pays millions for CDN bandwidth. What if popular videos could be distributed by the viewers themselves? The more people watching, the more bandwidth available—completely inverting the economics. This is how BitTorrent revolutionized file sharing, and why companies like Peer5 and StreamRoot (acquired by Akamai) built P2P video delivery. You’re learning to build infrastructure where the problem (traffic) becomes the solution (distribution).
Concepts You Must Understand First
BitTorrent Protocol Basics How does BitTorrent ensure you get the right pieces from untrusted peers? What’s the difference between a tracker and DHT?
📚 BEP 3 (BitTorrent Protocol Specification) - BitTorrent.org 📚 “A Measurement Study of a Large-Scale P2P IPTV System” - Hei et al.
Self-check: If a file is split into 1000 pieces, how does BitTorrent ensure you don’t download piece #547 twice from different peers?
Piece Selection Strategy BitTorrent uses “rarest-first” for efficient swarm distribution. Why won’t this work for streaming video?
📚 “Computer Networks” Chapter 7 - Andrew Tanenbaum (P2P networks)
Self-check: You’re streaming video and you have pieces 1-10, but you need piece 11 next. Should you request the rarest piece in the swarm or piece 11? Why?
WebRTC DataChannel How do two browsers send data directly to each other without a server in the middle? What’s the role of STUN/TURN?
📚 W3C WebRTC Specification 📚 “High Performance Browser Networking” Chapter 18 - Ilya Grigorik
Self-check: Can two browsers behind different NATs establish a direct connection? What needs to happen first?
Distributed Hash Table (DHT) How do peers find each other without a central server? What’s Kademlia?
📚 Kademlia paper - Maymounkov & Mazières (2002)
Self-check: If there are 10,000 viewers of a video, how does a new viewer discover which peers have which chunks without asking all 10,000?
Questions to Guide Your Design
-
Hybrid Architecture: Should you use pure P2P or hybrid (P2P + CDN fallback)? What are the tradeoffs?
-
Chunk Size: BitTorrent uses 256KB-1MB pieces. What chunk size makes sense for streaming video? (Hint: HLS segments are typically 2-10 seconds)
-
Peer Selection: If 50 peers have the chunk you need, which ones should you request from? Fastest? Closest? Most reliable?
-
Upload/Download Balance: BitTorrent has “tit-for-tat” to encourage sharing. Should streaming video punish non-uploaders, or allow free-riding?
-
NAT Traversal: How many peers will be behind NATs that prevent direct connections? What’s your fallback?
Thinking Exercise
Before coding, work through this scenario:
You’re watching a live sports game. There are 100,000 concurrent viewers.
- The video is encoded as 6-second HLS chunks. After 1 minute of streaming, how many chunks exist?
- You’ve been watching for 30 seconds. Which chunks do you have? Which chunks can you share with new viewers joining now?
- A new viewer joins. They request chunk #1 from you. You have it. But chunk #1 is now 1 minute old—they don’t need it (they need chunk #10). How does the protocol prevent this waste?
- Your upload speed is 5 Mbps. The video bitrate is 4 Mbps. Can you watch and share simultaneously?
Now the insight: In live streaming, old chunks become worthless quickly. How does this change your piece selection and caching strategy compared to BitTorrent file sharing?
The Interview Questions They’ll Ask
-
“Design a P2P video delivery system. How does it work?” They want: Architecture (signaling server, WebRTC, hybrid fallback), piece selection for streaming, incentive mechanism
-
“What’s the bandwidth savings for a video with 1000 viewers? What about 10 viewers?” They want: Understanding of network effects, P2P efficiency scaling, long-tail problem (unpopular videos)
-
“A user behind a corporate firewall can’t establish P2P connections. What happens?” They want: Fallback strategy, TURN relay costs, graceful degradation
-
“How do you prevent malicious peers from sending fake video chunks?” They want: Content verification (hashing chunks), trust models, encryption
-
“Netflix tried P2P and abandoned it. Why might that be?” They want: Legal concerns (user bandwidth costs), ISP traffic shaping, complexity vs CDN reliability, user privacy
Hints in Layers
Layer 1 - The Simplest Architecture Three components: (1) Signaling server (WebSocket) - tells peers about each other, (2) WebRTC DataChannel - direct browser-to-browser transfer, (3) Hybrid fetcher - tries P2P first, falls back to CDN. Start with this before optimizing.
Layer 2 - Piece Selection for Streaming Unlike BitTorrent’s rarest-first, streaming needs “sequential-first” or “deadline-aware” selection. Priority: (1) next chunk needed for playback, (2) chunks within buffer window, (3) chunks you don’t have (for sharing). Always have a “download from CDN” timeout (~500ms) to prevent stalls.
Layer 3 - Signaling and Peer Discovery Your signaling server maintains a room per video. When a peer joins, server says “here are 10-20 peers also watching, connect to them.” Peers exchange SDP offers/answers via signaling, then establish direct WebRTC DataChannels. Keep connection count reasonable (10-20 peers) to avoid overhead.
Layer 4 - The Economics Track metrics: % of bytes from P2P vs CDN, upload/download ratio per peer, average peer connections, time to first byte (P2P vs CDN). The savings come from popular content—a video with 10,000 viewers might achieve 85% P2P offload. A video with 5 viewers? Maybe 20%. This is why P2P works for live sports, not niche content.
Books That Will Help
| Book | Chapters | Why It Matters |
|---|---|---|
| “Computer Networks” by Andrew Tanenbaum | Chapter 7 (Application Layer - P2P) | Explains BitTorrent, DHT, peer coordination fundamentals |
| “High Performance Browser Networking” by Ilya Grigorik | Chapter 18 (WebRTC) | Deep dive into WebRTC, STUN/TURN, NAT traversal |
| “Designing Data-Intensive Applications” by Martin Kleppmann | Chapter 5 (Replication) | Principles of distributed data (applies to chunk distribution) |
| “Distributed Systems” by Maarten van Steen | Chapter 2 (Architectures) | P2P architectures, structured vs unstructured overlays |
Common Pitfalls & Debugging
Pitfall 1: Peers Can’t Connect (NAT Traversal Fails) You see peers in the signaling server, but WebRTC connections fail or timeout.
Why: Both peers are behind symmetric NATs that block incoming connections. STUN can’t help; you need TURN relay.
Fix: Set up a TURN server (coturn is popular), include it in your WebRTC config. This costs server bandwidth—defeats the P2P purpose but necessary for ~20% of connections.
Pitfall 2: P2P Is Slower Than CDN Downloading from peers takes 2 seconds per chunk; CDN is 200ms.
Why: Peer upload bandwidth is limited (typical home upload: 5-10 Mbps), or you’re requesting from geographically distant peers.
Fix: Implement peer selection based on measured throughput. Request from the 3 fastest peers simultaneously, use whichever completes first. Always timeout and fallback to CDN.
Pitfall 3: Some Chunks Never Available via P2P Everyone is stuck waiting for chunk #47 from CDN.
Why: The first viewer of a chunk always fetches from CDN. If all peers start at the same time (live stream), everyone needs the same chunk simultaneously—no one has it yet.
Fix: Use a “seeding” mechanism where your server pre-fetches new chunks into a few “seed” peers, or accept that the first 5-10 viewers of each live chunk will hit the CDN.
Pitfall 4: Memory Leaks from Chunk Storage Browser memory usage climbs to 2GB after 30 minutes of watching.
Why: You’re storing all chunks in memory for sharing, but never evicting old chunks.
Fix: Implement chunk eviction. Once a chunk is older than your buffer window (e.g., more than 30 seconds behind playback position), delete it. For live streams, chunks older than 2 minutes are useless—no one will request them.
Books That Will Help
| Book | Chapters | Why It Matters |
|---|---|---|
| “Digital Video and HD” by Charles Poynton | Chapter 26 (Compression) | Explains keyframes, GOPs, and why seeking isn’t frame-accurate |
| “Concurrency in Go” by Katherine Cox-Buday | Chapter 4 (Concurrency Patterns) | Worker pool pattern, fan-out/fan-in for parallel processing |
| “High Performance Browser Networking” by Ilya Grigorik | Chapter 2 (HTTP) | Why sprite sheets reduce latency (fewer HTTP requests) |
| “Designing Data-Intensive Applications” by Martin Kleppmann | Chapter 11 (Stream Processing) | Queue-based architectures for background jobs |
Common Pitfalls & Debugging
Pitfall 1: Thumbnails Don’t Match Timestamps Your VTT says 00:05:00 but the preview shows a scene from 00:04:58.
Why: FFmpeg seeks to the nearest keyframe before your target timestamp. If keyframes are every 2 seconds, seeking to 5.0s might land at 4.0s.
Fix: Use -ss after -i for frame-accurate seeking (slower), or accept ~1-2 second inaccuracy (faster). For previews, inaccuracy is usually fine.
Pitfall 2: Sprite Sheets Are Huge Files Your sprite sheet is 5MB for a 10-minute video.
Why: You’re extracting frames at full resolution or using lossless PNG.
Fix: Use -vf scale=180:100 to resize, and -q:v 5 (JPEG quality 5, scale 1-31) to compress. Balance quality vs file size.
Pitfall 3: Processing Is Slower Than Expected You’re only achieving 10x realtime when you expected 100x.
Why: You’re decoding the entire video for each frame extraction (seeking backwards), or your worker count exceeds CPU cores (context switching overhead).
Fix: Extract frames in one sequential pass, or use FFmpeg’s scene detection to find interesting frames. Limit workers to CPU core count.
Pitfall 4: VTT Coordinates Are Wrong The player shows the wrong part of the sprite sheet.
Why: Off-by-one error in grid calculation, or you’re using 0-indexed frame numbers for 1-indexed grids.
Fix: Double-check math: x = (frame_index % columns) * thumb_width, y = (frame_index / columns) * thumb_height. Test with the first and last frame.
Project 17: P2P Video Delivery (BitTorrent-Style)
- File: VIDEO_STREAMING_DEEP_DIVE_PROJECTS.md
- Main Programming Language: Go
- Alternative Programming Languages: Rust, Python, JavaScript
- Coolness Level: Level 5: Pure Magic
- Business Potential: 4. The “Open Core” Infrastructure
- Difficulty: Level 4: Expert
- Knowledge Area: P2P Networks / Distributed Systems
- Software or Tool: P2P Protocol
- Main Book: “Computer Networks” by Andrew Tanenbaum
What you’ll build: A peer-to-peer video streaming system where viewers share video chunks with each other, reducing server bandwidth by 50-90% for popular content.
Why it teaches distributed video: Before YouTube, video was often distributed via BitTorrent. Some modern services (Peer5, Hola) still use P2P to reduce CDN costs. Understanding peer-assisted delivery shows you an alternative to pure client-server architecture. Popular videos become more efficient as more people watch!
Core challenges you’ll face:
- Peer discovery (finding other viewers of same video) → maps to DHT/tracker
- Chunk sharing protocol (requesting/providing pieces) → maps to BitTorrent concepts
- Piece selection strategy (rarest first vs sequential for streaming) → maps to optimization
- Fallback to CDN (when peers aren’t available) → maps to hybrid architecture
Key Concepts:
- BitTorrent Protocol: BEP 3 (Protocol Specification) - BitTorrent.org
- DHT: Kademlia paper - Maymounkov & Mazières
- P2P Streaming: “A Measurement Study of a Large-Scale P2P IPTV System” - Hei et al.
- WebRTC DataChannel: W3C WebRTC Spec
Difficulty: Expert Time estimate: 3-4 weeks Prerequisites: Networking, distributed systems, Project 9 helps
Real world outcome:
┌─────────────────────────────────────────────────────────────────────┐
│  P2P Video Streaming                                                │
├─────────────────────────────────────────────────────────────────────┤
│  Video: Big Buck Bunny                  Viewers: 47                 │
│  Your peer ID: abc123                                               │
├─────────────────────────────────────────────────────────────────────┤
│  Chunk Source Visualization:                                        │
│  Segment 1:  ████ (CDN)                                            │
│  Segment 2:  ████ (CDN)                                            │
│  Segment 3:  ████ (Peer: xyz789)                                   │
│  Segment 4:  ████ (Peer: def456)                                   │
│  Segment 5:  ████ (Peer: xyz789)                                   │
│  Segment 6:  ░░░░ (downloading from Peer: ghi012)                  │
│  ...                                                                │
├─────────────────────────────────────────────────────────────────────┤
│  Statistics:                                                        │
│    Downloaded: 156 MB                                               │
│    From CDN: 23 MB (15%)                                           │
│    From Peers: 133 MB (85%)                                         │
│    Uploaded to Peers: 89 MB                                         │
│    Connected Peers: 12                                              │
│                                                                     │
│  Server Bandwidth Saved: 85%!                                       │
├─────────────────────────────────────────────────────────────────────┤
│  Peer List:                                                         │
│    xyz789 (Seattle): 5 Mbps, 45 chunks                             │
│    def456 (Portland): 3 Mbps, 23 chunks                            │
│    ghi012 (SF): 8 Mbps, 67 chunks                                  │
│    ...                                                              │
└─────────────────────────────────────────────────────────────────────┘
Implementation Hints: Key differences from BitTorrent:
- Sequential priority: For streaming, you need chunks in order (not rarest-first)
- Aggressive download: Fetch from CDN if peer is too slow
- Buffer-aware: Share chunks you’ve already watched
Architecture:
- Tracker/Signaling: WebSocket server that tells peers about each other
- P2P data transfer: WebRTC DataChannels for direct browser-to-browser
- Hybrid fetcher: Try peers first, fall back to CDN
async function fetchChunk(chunkId) {
  // Try peers first (timeout: 500ms)
  const peers = tracker.getPeersWithChunk(chunkId);
  for (const peer of peers) {
    try {
      return await peer.requestChunk(chunkId, { timeout: 500 });
    } catch { continue; }
  }
  // Fall back to CDN
  return await fetch(`/cdn/chunk_${chunkId}.ts`);
}
Learning milestones:
- Peers discover each other → You understand P2P coordination
- Chunks transfer between browsers → You understand WebRTC DataChannels
- Hybrid system works smoothly → You understand fallback design
- Measure actual bandwidth savings → You understand P2P economics
The Core Question You’re Answering
“How can viewers become part of the delivery infrastructure, turning bandwidth costs into a distributed problem?”
Netflix pays millions for CDN bandwidth. What if popular videos could be distributed by the viewers themselves? The more people watching, the more bandwidth available—completely inverting the economics. This is how BitTorrent revolutionized file sharing, and why companies like Peer5 and StreamRoot (acquired by Akamai) built P2P video delivery. You’re learning to build infrastructure where the problem (traffic) becomes the solution (distribution).
Concepts You Must Understand First
BitTorrent Protocol Basics How does BitTorrent ensure you get the right pieces from untrusted peers? What’s the difference between a tracker and DHT?
📚 BEP 3 (BitTorrent Protocol Specification) - BitTorrent.org 📚 “A Measurement Study of a Large-Scale P2P IPTV System” - Hei et al.
Self-check: If a file is split into 1000 pieces, how does BitTorrent ensure you don’t download piece #547 twice from different peers?
Piece Selection Strategy BitTorrent uses “rarest-first” for efficient swarm distribution. Why won’t this work for streaming video?
📚 “Computer Networks” Chapter 7 - Andrew Tanenbaum (P2P networks)
Self-check: You’re streaming video and you have pieces 1-10, but you need piece 11 next. Should you request the rarest piece in the swarm or piece 11? Why?
WebRTC DataChannel How do two browsers send data directly to each other without a server in the middle? What’s the role of STUN/TURN?
📚 W3C WebRTC Specification 📚 “High Performance Browser Networking” Chapter 18 - Ilya Grigorik
Self-check: Can two browsers behind different NATs establish a direct connection? What needs to happen first?
Distributed Hash Table (DHT) How do peers find each other without a central server? What’s Kademlia?
📚 Kademlia paper - Maymounkov & Mazières (2002)
Self-check: If there are 10,000 viewers of a video, how does a new viewer discover which peers have which chunks without asking all 10,000?
Questions to Guide Your Design
-
Hybrid Architecture: Should you use pure P2P or hybrid (P2P + CDN fallback)? What are the tradeoffs?
-
Chunk Size: BitTorrent uses 256KB-1MB pieces. What chunk size makes sense for streaming video? (Hint: HLS segments are typically 2-10 seconds)
-
Peer Selection: If 50 peers have the chunk you need, which ones should you request from? Fastest? Closest? Most reliable?
-
Upload/Download Balance: BitTorrent has “tit-for-tat” to encourage sharing. Should streaming video punish non-uploaders, or allow free-riding?
-
NAT Traversal: How many peers will be behind NATs that prevent direct connections? What’s your fallback?
Thinking Exercise
Before coding, work through this scenario:
You’re watching a live sports game. There are 100,000 concurrent viewers.
- The video is encoded as 6-second HLS chunks. After 1 minute of streaming, how many chunks exist?
- You’ve been watching for 30 seconds. Which chunks do you have? Which chunks can you share with new viewers joining now?
- A new viewer joins. They request chunk #1 from you. You have it. But chunk #1 is now 1 minute old—they don’t need it (they need chunk #10). How does the protocol prevent this waste?
- Your upload speed is 5 Mbps. The video bitrate is 4 Mbps. Can you watch and share simultaneously?
Now the insight: In live streaming, old chunks become worthless quickly. How does this change your piece selection and caching strategy compared to BitTorrent file sharing?
The Interview Questions They’ll Ask
-
“Design a P2P video delivery system. How does it work?” They want: Architecture (signaling server, WebRTC, hybrid fallback), piece selection for streaming, incentive mechanism
-
“What’s the bandwidth savings for a video with 1000 viewers? What about 10 viewers?” They want: Understanding of network effects, P2P efficiency scaling, long-tail problem (unpopular videos)
-
“A user behind a corporate firewall can’t establish P2P connections. What happens?” They want: Fallback strategy, TURN relay costs, graceful degradation
-
“How do you prevent malicious peers from sending fake video chunks?” They want: Content verification (hashing chunks), trust models, encryption
-
“Netflix tried P2P and abandoned it. Why might that be?” They want: Legal concerns (user bandwidth costs), ISP traffic shaping, complexity vs CDN reliability, user privacy
Hints in Layers
Layer 1 - The Simplest Architecture Three components: (1) Signaling server (WebSocket) - tells peers about each other, (2) WebRTC DataChannel - direct browser-to-browser transfer, (3) Hybrid fetcher - tries P2P first, falls back to CDN. Start with this before optimizing.
Layer 2 - Piece Selection for Streaming Unlike BitTorrent’s rarest-first, streaming needs “sequential-first” or “deadline-aware” selection. Priority: (1) next chunk needed for playback, (2) chunks within buffer window, (3) chunks you don’t have (for sharing). Always have a “download from CDN” timeout (~500ms) to prevent stalls.
Layer 3 - Signaling and Peer Discovery Your signaling server maintains a room per video. When a peer joins, server says “here are 10-20 peers also watching, connect to them.” Peers exchange SDP offers/answers via signaling, then establish direct WebRTC DataChannels. Keep connection count reasonable (10-20 peers) to avoid overhead.
Layer 4 - The Economics Track metrics: % of bytes from P2P vs CDN, upload/download ratio per peer, average peer connections, time to first byte (P2P vs CDN). The savings come from popular content—a video with 10,000 viewers might achieve 85% P2P offload. A video with 5 viewers? Maybe 20%. This is why P2P works for live sports, not niche content.
Books That Will Help
| Book | Chapters | Why It Matters |
|---|---|---|
| “Computer Networks” by Andrew Tanenbaum | Chapter 7 (Application Layer - P2P) | Explains BitTorrent, DHT, peer coordination fundamentals |
| “High Performance Browser Networking” by Ilya Grigorik | Chapter 18 (WebRTC) | Deep dive into WebRTC, STUN/TURN, NAT traversal |
| “Designing Data-Intensive Applications” by Martin Kleppmann | Chapter 5 (Replication) | Principles of distributed data (applies to chunk distribution) |
| “Distributed Systems” by Maarten van Steen | Chapter 2 (Architectures) | P2P architectures, structured vs unstructured overlays |
Common Pitfalls & Debugging
Pitfall 1: Peers Can’t Connect (NAT Traversal Fails) You see peers in the signaling server, but WebRTC connections fail or timeout.
Why: Both peers are behind symmetric NATs that block incoming connections. STUN can’t help; you need TURN relay.
Fix: Set up a TURN server (coturn is popular), include it in your WebRTC config. This costs server bandwidth—defeats the P2P purpose but necessary for ~20% of connections.
Pitfall 2: P2P Is Slower Than CDN Downloading from peers takes 2 seconds per chunk; CDN is 200ms.
Why: Peer upload bandwidth is limited (typical home upload: 5-10 Mbps), or you’re requesting from geographically distant peers.
Fix: Implement peer selection based on measured throughput. Request from the 3 fastest peers simultaneously, use whichever completes first. Always timeout and fallback to CDN.
Pitfall 3: Some Chunks Never Available via P2P Everyone is stuck waiting for chunk #47 from CDN.
Why: The first viewer of a chunk always fetches from CDN. If all peers start at the same time (live stream), everyone needs the same chunk simultaneously—no one has it yet.
Fix: Use a “seeding” mechanism where your server pre-fetches new chunks into a few “seed” peers, or accept that the first 5-10 viewers of each live chunk will hit the CDN.
Pitfall 4: Memory Leaks from Chunk Storage Browser memory usage climbs to 2GB after 30 minutes of watching.
Why: You’re storing all chunks in memory for sharing, but never evicting old chunks.
Fix: Implement chunk eviction. Once a chunk is older than your buffer window (e.g., more than 30 seconds behind playback position), delete it. For live streams, chunks older than 2 minutes are useless—no one will request them.
Project 18: Low-Latency Live Streaming (LL-HLS)
- File: VIDEO_STREAMING_DEEP_DIVE_PROJECTS.md
- Main Programming Language: Go
- Alternative Programming Languages: Rust, C, Python
- Coolness Level: Level 4: Hardcore Tech Flex
- Business Potential: 4. The “Open Core” Infrastructure
- Difficulty: Level 4: Expert
- Knowledge Area: Real-Time Protocols / Live Streaming
- Software or Tool: LL-HLS
- Main Book: “High Performance Browser Networking” by Ilya Grigorik
What you’ll build: A low-latency live streaming server implementing Apple’s LL-HLS protocol, achieving 2-4 second glass-to-glass latency instead of the typical 10-30 seconds.
Why it teaches live streaming evolution: Standard HLS has 10-30 second delay because it waits for complete segments. LL-HLS uses “partial segments” (sub-second chunks) and preload hints to reduce latency dramatically. This is how Twitch and YouTube Live are getting closer to real-time without abandoning HLS.
Core challenges you’ll face:
- Partial segment generation (encode in ~200ms chunks) → maps to low-latency encoding
- Preload hints (telling player what’s coming next) → maps to predictive loading
- Blocking playlist requests (long-poll for updates) → maps to real-time playlist updates
- Delta updates (send only playlist changes) → maps to bandwidth optimization
Key Concepts:
- LL-HLS Specification: Apple HLS Authoring Spec 2nd Edition - Apple Developer
- Partial Segments: CMAF specification - ISO 23000-19
- HTTP/2 Push: RFC 7540 - IETF
- Low-Latency Considerations: “Streaming Media Handbook” - Jan Ozer
Difficulty: Expert Time estimate: 3-4 weeks Prerequisites: Project 7 completed, HLS deep understanding
Real world outcome:
$ ./ll-hls-server --input rtmp://localhost:1935/live/test --port 8080

LL-HLS Server Started
  Standard HLS: http://localhost:8080/live/playlist.m3u8
  Low-Latency:  http://localhost:8080/live/playlist.m3u8?_HLS_msn=0&_HLS_part=0

Encoding pipeline:
  GOP size: 2 seconds (standard segments)
  Partial segment: 200ms (10 per GOP)

Stream Status:
  Segment 0: [P0 ✓][P1 ✓][P2 ✓][P3 ✓][P4 ✓][P5 ✓][P6 ✓][P7 ✓][P8 ✓][P9 ✓] COMPLETE
  Segment 1: [P0 ✓][P1 ✓][P2 ✓][P3...                                      ] IN PROGRESS
                              └── Player is HERE (only 600ms behind encoder!)

Latency Comparison:
  Standard HLS: ~12 seconds (3 segment buffer)
  LL-HLS:       ~2.4 seconds (target + 2 partials buffer)

Playlist (live):
  #EXT-X-SERVER-CONTROL:CAN-BLOCK-RELOAD=YES,PART-HOLD-BACK=0.6
  #EXT-X-PART-INF:PART-TARGET=0.2

  #EXT-X-PART:DURATION=0.2,URI="seg0_p0.m4s"
  #EXT-X-PART:DURATION=0.2,URI="seg0_p1.m4s"
  ...
  #EXT-X-PRELOAD-HINT:TYPE=PART,URI="seg1_p3.m4s"
Implementation Hints: Key LL-HLS features:
- Partial segments: Split each 2-second segment into ~10 parts
- Preload hints:
#EXT-X-PRELOAD-HINTtells player what to request next - Blocking reload: Player requests
playlist.m3u8?_HLS_msn=5&_HLS_part=3, server holds the connection until that part is ready - Delta updates: Only send new playlist entries, not entire playlist
Encoding for LL-HLS:
ffmpeg -i rtmp://input -c:v libx264 -preset ultrafast \
  -g 48 -keyint_min 48 \  # 2-second GOPs at 24fps
  -f hls -hls_time 2 \
  -hls_fmp4_init_filename init.mp4 \
  -hls_segment_type fmp4 \
  -hls_flags independent_segments+split_by_time \
  -hls_segment_filename 'seg%d.m4s' \
  playlist.m3u8
For partial segments, you need to split further (or use a media server library).
Learning milestones:
- Generate partial segments → You understand LL-HLS structure
- Implement blocking playlist → You understand the latency reduction mechanism
- Preload hints work → You understand predictive loading
- Measure <3 second latency → You’ve achieved low-latency streaming
Project 19: Video Analytics Pipeline
- File: VIDEO_STREAMING_DEEP_DIVE_PROJECTS.md
- Main Programming Language: Python
- Alternative Programming Languages: Go, Rust, JavaScript
- Coolness Level: Level 3: Genuinely Clever
- Business Potential: 4. The “Open Core” Infrastructure
- Difficulty: Level 3: Advanced
- Knowledge Area: Data Engineering / Analytics
- Software or Tool: Analytics Pipeline
- Main Book: “Designing Data-Intensive Applications” by Martin Kleppmann
What you’ll build: A system that collects player-side metrics (buffer health, quality changes, errors, engagement) and aggregates them into actionable dashboards showing QoE (Quality of Experience) across your video platform.
Why it teaches production streaming: YouTube doesn’t just serve video—it obsessively measures everything. “What’s the average rebuffer rate in India?” “What percentage of 4K plays actually stay at 4K?” This project teaches you how streaming platforms measure success and identify problems at scale.
Core challenges you’ll face:
- Client-side instrumentation (capture events without affecting playback) → maps to monitoring
- Event ingestion pipeline (handle millions of events/second) → maps to data engineering
- Real-time aggregation (calculate metrics as events arrive) → maps to stream processing
- QoE metrics (rebuffer rate, average bitrate, startup time) → maps to video quality metrics
Key Concepts:
- Stream Processing: “Designing Data-Intensive Applications” Chapter 11 - Martin Kleppmann
- Video QoE Metrics: “QoE-Centric Analysis of Video Streaming” - Mao et al.
- Time-Series Databases: InfluxDB documentation
- Event Collection: Apache Kafka documentation
Difficulty: Advanced Time estimate: 2-3 weeks Prerequisites: Basic data engineering, JavaScript, SQL
Real world outcome:
┌─────────────────────────────────────────────────────────────────────┐
│  Video Analytics Dashboard - Last 24 Hours                          │
├─────────────────────────────────────────────────────────────────────┤
│  Overall QoE Score: 87.3 / 100         Sessions: 1.2M              │
├─────────────────────────────────────────────────────────────────────┤
│  Key Metrics:                                                       │
│    Startup Time (median):     1.8s  [████████░░] Good              │
│    Rebuffer Rate:             2.1%  [█████████░] Good              │
│    Avg Bitrate (played):      4.2 Mbps                             │
│    Avg Bitrate (available):   8.1 Mbps                             │
│    Time at Highest Quality:   67%                                  │
│    Completion Rate:           43%                                  │
├─────────────────────────────────────────────────────────────────────┤
│  By Region:                                                         │
│    Region      | Sessions | Rebuffer | Avg Quality | Startup       │
│    ------------|----------|----------|-------------|----------     │
│    US West     | 234K     | 1.2%     | 1080p       | 1.4s         │
│    US East     | 312K     | 1.8%     | 1080p       | 1.6s         │
│    Europe      | 189K     | 2.4%     | 720p        | 2.1s         │
│    Asia        | 456K     | 4.1%     | 480p        | 3.2s   ⚠️    │
│    └── Alert: Asia rebuffer rate 2x baseline                      │
├─────────────────────────────────────────────────────────────────────┤
│  Error Breakdown:                                                   │
│    Media decode errors:       0.3%                                 │
│    Network errors:            0.8%                                 │
│    DRM license failures:      0.1%                                 │
│    Manifest parse errors:     0.02%                                │
├─────────────────────────────────────────────────────────────────────┤
│  Time Series (Rebuffer Rate by Hour):                              │
│  4% │                    ╱╲                                        │
│  2% │ ────────────╱────╱  ╲─────────────                          │
│  0% │_________________________________________________________    │
│       00:00  04:00  08:00  12:00  16:00  20:00  24:00             │
│                              └── Peak hour spike                   │
└─────────────────────────────────────────────────────────────────────┘
Implementation Hints:
- Client instrumentation: Add event listeners to your player
player.on('rebuffer', () => { analytics.track('rebuffer', { timestamp: Date.now(), currentQuality: player.getCurrentQuality(), bufferLevel: player.getBuffer(), sessionId: sessionId }); }); -
Event ingestion: Simple approach - POST to an API endpoint that writes to a database (Postgres/ClickHouse) or use Kafka for scale
- Aggregation queries:
SELECT region, COUNT(DISTINCT session_id) as sessions, AVG(rebuffer_count) / AVG(duration) * 100 as rebuffer_rate, AVG(avg_bitrate) as avg_quality FROM playback_events WHERE timestamp > NOW() - INTERVAL '24 hours' GROUP BY region; - Dashboard: Grafana with InfluxDB, or build custom with D3.js
Learning milestones:
- Capture events from player → You understand instrumentation
- Store and query millions of events → You understand data engineering
- Calculate QoE metrics correctly → You understand video quality measurement
- Build alerting for anomalies → You understand production monitoring
Project 20: Complete YouTube Clone (Capstone)
- File: VIDEO_STREAMING_DEEP_DIVE_PROJECTS.md
- Main Programming Language: Go (backend), JavaScript (frontend)
- Alternative Programming Languages: Rust (backend), TypeScript (frontend)
- Coolness Level: Level 5: Pure Magic
- Business Potential: 5. The “Industry Disruptor”
- Difficulty: Level 5: Master
- Knowledge Area: Full Stack / Distributed Systems / Video
- Software or Tool: Video Platform
- Main Book: “Designing Data-Intensive Applications” by Martin Kleppmann
What you’ll build: A complete video platform with upload processing, adaptive streaming, live streaming, analytics, and a full web interface—applying everything from the previous 19 projects.
Why this is the ultimate capstone: This project synthesizes every concept: container parsing (Project 1), progressive download (2), transcoding (3), HLS (4), custom player (5), ABR (6), live streaming (7), CDN (8), quality metrics (10), thumbnails (16), analytics (19). Building this proves you truly understand how YouTube works.
Core challenges you’ll face:
- Upload & transcode pipeline → maps to video processing at scale
- Storage & CDN integration → maps to video delivery
- Live streaming ingestion → maps to real-time processing
- Player with ABR → maps to client-side streaming
- Analytics & monitoring → maps to production operations
Key Concepts:
- System Design: “Designing Data-Intensive Applications” - Martin Kleppmann
- Video Platform Architecture: Netflix Tech Blog - Netflix Engineering
- Microservices: “Building Microservices” Chapter 4 - Sam Newman
- Full Stack Integration: “Software Architecture in Practice” Chapter 15 - Bass et al.
Difficulty: Master Time estimate: 2-3 months Prerequisites: All previous projects (or equivalent knowledge)
Real world outcome:
┌─────────────────────────────────────────────────────────────────────┐
│  YourTube - Video Platform                     [Upload] [Go Live]  │
├─────────────────────────────────────────────────────────────────────┤
│  ┌─────────────────────────────────────────────────────────────┐   │
│  │                                                             │   │
│  │                    [VIDEO PLAYER]                           │   │
│  │           1080p ▼   🔊   ▶   1:23 / 5:47                   │   │
│  │                                                             │   │
│  └─────────────────────────────────────────────────────────────┘   │
│                                                                     │
│  "Building a Video Platform from Scratch"                          │
│  12,345 views • 3 days ago                                         │
│                                                                     │
│  Related Videos:                                                    │
│  ┌──────┐ ┌──────┐ ┌──────┐ ┌──────┐                              │
│  │ 🎬  │ │ 🎬  │ │ 🎬  │ │ 🔴  │ ← LIVE                        │
│  │      │ │      │ │      │ │      │                              │
│  └──────┘ └──────┘ └──────┘ └──────┘                              │
└─────────────────────────────────────────────────────────────────────┘

Backend Services:
  ✓ Upload Service (accepts videos, triggers processing)
  ✓ Transcode Service (generates quality ladder + HLS)
  ✓ Thumbnail Service (generates preview sprites)
  ✓ CDN/Storage (serves video chunks)
  ✓ Live Ingest (RTMP → HLS)
  ✓ API Gateway (video metadata, user data)
  ✓ Analytics Service (playback metrics)

Architecture:
  User Upload → S3 → Transcode Workers → HLS Output → CDN → Player
                ↓
           Thumbnail Worker → Sprites → CDN
                ↓
           Metadata → PostgreSQL → API → Frontend

Live Stream:
  OBS → RTMP Ingest → Live Transcoder → HLS → CDN → Player

Player Features:
  ✓ Adaptive bitrate (custom ABR algorithm)
  ✓ Quality selector (manual override)
  ✓ Thumbnail preview on seek
  ✓ Keyboard shortcuts
  ✓ Picture-in-picture
  ✓ Playback speed control
Implementation Hints: This is a multi-service system. Break it down:
- Upload Service: Accept multipart uploads, store to S3/local, trigger processing
- Transcode Workers: FFmpeg jobs for each quality level
- HLS Packager: Segment and generate manifests
- Thumbnail Generator: Extract frames, create sprites + VTT
- Metadata DB: PostgreSQL for video info, users, views
- API: REST or GraphQL for frontend communication
- CDN Layer: Nginx with caching or cloud CDN
- Live Ingest: RTMP server that outputs to HLS
- Player: Custom HTML5/MSE player with ABR
- Analytics: Event collection and dashboards
Start with VOD only, add live streaming later. Use Docker Compose to run all services.
Learning milestones:
- Upload → Transcode → Play works → You understand the basic pipeline
- ABR works smoothly → You understand adaptive streaming
- Live streaming works → You understand real-time video
- Analytics dashboard shows insights → You understand production monitoring
- It all works together → You truly understand how YouTube works!
Project Comparison Table
| Project | Difficulty | Time | Depth of Understanding | Fun Factor |
|---|---|---|---|---|
| 1. Video File Dissector | Advanced | 1-2 weeks | ⭐⭐⭐⭐ | ⭐⭐⭐ |
| 2. Progressive Download Server | Intermediate | 3-5 days | ⭐⭐⭐ | ⭐⭐ |
| 3. Quality Ladder Generator | Intermediate | 1 week | ⭐⭐⭐ | ⭐⭐⭐ |
| 4. HLS Segmenter | Advanced | 1 week | ⭐⭐⭐⭐ | ⭐⭐⭐ |
| 5. HLS Player from Scratch | Expert | 2-3 weeks | ⭐⭐⭐⭐⭐ | ⭐⭐⭐⭐ |
| 6. ABR Algorithm | Advanced | 1-2 weeks | ⭐⭐⭐⭐ | ⭐⭐⭐⭐ |
| 7. Live RTMP to HLS | Expert | 3-4 weeks | ⭐⭐⭐⭐⭐ | ⭐⭐⭐⭐⭐ |
| 8. Mini-CDN | Advanced | 2-3 weeks | ⭐⭐⭐⭐ | ⭐⭐⭐ |
| 9. WebRTC Video Chat | Expert | 2-3 weeks | ⭐⭐⭐⭐ | ⭐⭐⭐⭐⭐ |
| 10. Quality Analyzer | Advanced | 1-2 weeks | ⭐⭐⭐ | ⭐⭐⭐ |
| 11. Bandwidth Simulator | Intermediate | 1 week | ⭐⭐⭐ | ⭐⭐ |
| 12. Codec Comparison | Intermediate | 1 week | ⭐⭐⭐ | ⭐⭐⭐ |
| 13. Buffer Dashboard | Intermediate | 1-2 weeks | ⭐⭐⭐ | ⭐⭐⭐ |
| 14. MPEG-TS Demuxer | Expert | 2-3 weeks | ⭐⭐⭐⭐⭐ | ⭐⭐⭐ |
| 15. DRM Demo (Clearkey) | Advanced | 1-2 weeks | ⭐⭐⭐⭐ | ⭐⭐⭐ |
| 16. Thumbnail Generator | Intermediate | 1 week | ⭐⭐⭐ | ⭐⭐ |
| 17. P2P Video Delivery | Expert | 3-4 weeks | ⭐⭐⭐⭐⭐ | ⭐⭐⭐⭐⭐ |
| 18. LL-HLS Server | Expert | 3-4 weeks | ⭐⭐⭐⭐⭐ | ⭐⭐⭐⭐ |
| 19. Analytics Pipeline | Advanced | 2-3 weeks | ⭐⭐⭐⭐ | ⭐⭐⭐ |
| 20. YouTube Clone (Capstone) | Master | 2-3 months | ⭐⭐⭐⭐⭐ | ⭐⭐⭐⭐⭐ |
Recommended Learning Path
Based on your goal of deeply understanding YouTube/video streaming, here’s the optimal sequence:
Phase 1: Foundations (2-3 weeks)
- Project 1: Video File Dissector - Understand what video files actually are
- Project 2: Progressive Download Server - Understand pre-streaming video delivery
Phase 2: Modern Streaming (4-6 weeks)
- Project 3: Quality Ladder Generator - Understand encoding
- Project 4: HLS Segmenter - Understand chunked streaming
- Project 5: HLS Player from Scratch - Understand the player side deeply
- Project 6: ABR Algorithm - Understand adaptive quality selection
Phase 3: Production Concerns (4-6 weeks)
- Project 8: Mini-CDN - Understand global delivery
- Project 10: Quality Analyzer - Understand quality measurement
- Project 12: Codec Comparison - Understand compression evolution
- Project 13: Buffer Dashboard - Understand debugging/monitoring
Phase 4: Advanced Topics (6-8 weeks)
- Project 7: Live RTMP to HLS - Understand live streaming
- Project 9: WebRTC Video Chat - Understand real-time P2P
- Project 14: MPEG-TS Demuxer - Go deeper into format internals
- Project 18: LL-HLS Server - Understand low-latency evolution
Phase 5: Capstone (2-3 months)
- Project 20: YouTube Clone - Synthesize everything
Start with Project 1 - understanding the video file structure is foundational. Then Project 2 shows you how video was delivered before streaming. From there, Projects 3-6 take you through the complete modern streaming pipeline.
Summary
| # | Project | Main Language |
|---|---|---|
| 1 | Video File Dissector (MP4 Parser) | C |
| 2 | Progressive Download Server | Python |
| 3 | Quality Ladder Generator | Python (FFmpeg) |
| 4 | HLS Segmenter & Manifest Generator | Python |
| 5 | HLS Player from Scratch | JavaScript |
| 6 | Adaptive Bitrate Algorithm | JavaScript |
| 7 | Live Streaming (RTMP to HLS) | Go |
| 8 | Mini-CDN with Edge Caching | Go |
| 9 | WebRTC Video Chat (P2P) | JavaScript |
| 10 | Video Quality Analyzer (VMAF) | Python |
| 11 | Bandwidth Estimator Simulator | Python |
| 12 | Codec Comparison Visualizer | Python |
| 13 | Buffer Visualization Dashboard | JavaScript |
| 14 | MPEG-TS Demuxer | C |
| 15 | DRM Concepts Demo (Clearkey) | JavaScript |
| 16 | Thumbnail Generator at Scale | Go |
| 17 | P2P Video Delivery | Go |
| 18 | Low-Latency Live Streaming (LL-HLS) | Go |
| 19 | Video Analytics Pipeline | Python |
| 20 | Complete YouTube Clone (Capstone) | Go + JavaScript |
This document was generated as a comprehensive learning path for understanding video streaming technology through hands-on projects.