Learn System Design: From Zero to System Design Master
Goal: Deeply understand how to design systems that scale from 100 users to 100 million users—mastering the fundamental tradeoffs between consistency, availability, and partition tolerance; learning to diagnose and prevent cascading failures, hot spots, and thundering herds; and building the intuition to make architectural decisions that balance performance, reliability, and cost. You’ll understand not just the “what” of distributed systems, but the “why” behind every design pattern, and gain the practical ability to implement these patterns from scratch.
Why System Design Matters
System design is the discipline of defining the architecture, components, data flow, and interfaces of a system to meet specific requirements for scalability, reliability, availability, and maintainability. It’s not abstract theory—it’s the difference between a system that handles 100 users and one that handles 100 million.
The Cost of Poor System Design
Real-world failures demonstrate why this matters:
| Incident | Root Cause | Impact |
|---|---|---|
| 2017 British Airways IT Failure | Scalability issues during surge | Hundreds of flights cancelled, thousands stranded |
| 2024 CrowdStrike Outage | Poor update rollout design | Global disruption: airlines, hospitals, governments |
| AWS 2017 Outage | Human error + no safeguards | $150-160 million cost, Slack/Quora/Trello down |
| 2019 Facebook Outage | Untested config change | Facebook, Instagram, WhatsApp all down |
| Google MillWheel Hot Key | No hot key mitigation | Single machine hammered, re-architecture needed |
| UK CS2 System | “Badly designed, badly tested” | £768M cost (vs £450M budget), 3,000 incidents/week |
In 2022 alone, tech failures cost U.S. companies $2.41 trillion. These aren’t edge cases—they’re the norm when systems aren’t designed properly.
Why System Design Skills Are Career-Defining
According to industry research, system design is now the most common interview format for senior engineering roles. Companies like Google, Amazon, Meta, Netflix, and Uber use system design interviews to assess candidates’ ability to think at scale. The difference between passing and failing often comes down to understanding the fundamental tradeoffs and patterns covered in these projects.
Market Demand (2025):
- System design patterns are fundamental to modern microservices architectures
- Microservices adoption continues to grow, with companies like Netflix, Amazon, and Uber built entirely on microservices
- Distributed systems patterns from Martin Fowler’s catalog are essential knowledge for senior engineers
- Event-driven architectures are becoming standard for IoT platforms and real-time systems
Prerequisites & Background Knowledge
Essential Prerequisites (Must Have)
Before starting these projects, you should be comfortable with:
- Programming proficiency: Ability to write clean, working code in at least one language (Go, Rust, Java, Python, or C)
- Basic networking: Understanding of TCP/IP, HTTP, sockets, and DNS
- Data structures: Hash tables, queues, trees, and their time complexities
- Concurrency fundamentals: Threads, locks, race conditions, and basic synchronization
- Database basics: SQL queries, indexes, transactions (ACID properties)
- Linux command line: Navigating filesystems, process management, basic shell scripting
Helpful But Not Required
These topics will be learned through the projects:
- Distributed systems theory (you’ll learn CAP theorem, consensus, replication through building)
- Production operations (monitoring, logging, deployment)
- Container orchestration (Kubernetes, Docker Swarm)
- Message queue internals (you’ll build one!)
- Advanced algorithms (consistent hashing, LSM trees, Raft/Paxos)
Self-Assessment Questions
Before starting, can you answer these? If not, review the basics first:
- Networking: What happens when you type a URL into your browser? Explain DNS, TCP handshake, HTTP.
- Concurrency: What’s a race condition? How do you prevent it?
- Data structures: When would you use a hash table vs a binary search tree?
- Databases: What’s the difference between a primary key and an index?
- Linux: How do you find all files containing a specific string? How do you see which process is using port 8080?
If you can answer 4 out of 5, you’re ready. If not, spend a week on fundamentals first.
Development Environment Setup
Required:
- A Unix-like environment (Linux, macOS, or WSL2 on Windows)
- Go 1.21+ installed (primary language for most projects)
- Docker and Docker Compose (for running multiple services)
- PostgreSQL or MySQL (for database projects)
- Redis (for caching projects)
- Git (for version control)
Recommended:
- A code editor with Go support (VS Code, GoLand, Vim)
curlandjqfor API testinghtoportopfor monitoring processestcpdumpor Wireshark for network debugging- A notebook for tracking learnings and design decisions
Time Investment Expectations
Per project:
- Simple projects (Circuit Breaker, URL Shortener): 3-7 days
- Intermediate projects (Load Balancer, Rate Limiter): 1-2 weeks
- Complex projects (Distributed Cache, Message Queue): 3-4 weeks
- Master projects (LSM Store, Final E-Commerce): 1-3 months
Total curriculum: If you complete all 17 projects plus the final capstone, expect 6-12 months of part-time work (10-15 hours/week).
Important Reality Check
System design is hard. You will:
- Get stuck for hours debugging race conditions
- Realize your “obvious” approach has a fundamental flaw
- Discover edge cases you never imagined
- Rebuild the same component 3 times before it works correctly
- Question whether you’re on the right track
This is normal. Every production system went through this. The difference is that you’re doing it in a learning environment where mistakes don’t cost millions of dollars.
Don’t give up. The moment when everything clicks—when you understand why Cassandra chose AP over CP, or why Google Spanner needs atomic clocks—makes it all worthwhile.
Core Concepts You’ll Master Through These Projects
The Fundamental Tradeoffs
Understanding system design means understanding tradeoffs. There are no “best” solutions—only solutions optimized for specific constraints.
1. CAP Theorem: Choose Two
The CAP theorem states that any distributed system can provide at most two of three guarantees:
- Consistency (C): Every read receives the most recent write or an error
- Availability (A): Every request receives a response (without guarantee it’s the most recent)
- Partition Tolerance (P): The system continues operating despite network failures
The CAP Triangle

        Consistency (C)
              /\
             /  \
            /    \
           /      \
          /   CP   \        Examples:
         /  (banks) \       CP: PostgreSQL (configured for strong consistency)
        /            \      AP: Cassandra, DynamoDB
       /______________\     CA: Single-node databases (not distributed)
      /                \
     /    CA (rare)      \
    /                    \
Availability (A) -------- Partition Tolerance (P)
                            AP (social media)
In practice, partition tolerance is mandatory (networks fail), so you’re choosing between CP and AP:
- CP Systems (Banking, Financial): Prefer consistency over availability. Example: If nodes can’t communicate, reject writes to avoid inconsistency.
- AP Systems (Social Media, Caching): Prefer availability over consistency. Example: Show slightly stale data rather than error messages.
According to Google SRE practices, most systems use consensus algorithms like Paxos or Raft as clients of services like Zookeeper, Consul, or etcd to achieve CP guarantees where needed.
2. Latency vs Throughput
- Latency: How long one request takes (milliseconds)
- Throughput: How many requests per second you can handle
Optimizing for one often hurts the other:
- Lower latency → often means processing requests immediately → can’t batch → lower throughput
- Higher throughput → often means batching requests → waiting for batch → higher latency
Latency/Throughput Tradeoff

High Throughput                  Low Latency
(batch processing)               (immediate response)

Queue fills up                   Process immediately
Wait for batch                   No batching overhead
Process 1000 at once             Higher per-request cost

Latency: 500ms avg               Latency: 5ms avg
Throughput: 10,000/sec           Throughput: 200/sec
3. Consistency vs Performance
- Strong consistency: All nodes see the same data at the same time (requires coordination)
- Eventual consistency: Nodes may temporarily disagree, but converge eventually (no coordination)
Strong consistency is expensive because:
- Requires synchronous replication (wait for all replicas to acknowledge)
- Requires distributed locks or consensus (coordination overhead)
- Limits horizontal scalability (more nodes = more coordination)
Consistency Models (Strongest → Weakest)

Linearizable (strongest)
   ↓ (expensive: global coordination)
Sequential
   ↓ (cheaper: per-process ordering)
Causal
   ↓ (cheaper: track causality only)
Eventual (weakest)
   ↓ (cheapest: no coordination)
4. Simplicity vs Flexibility
- Simplicity: Fewer components, easier to understand, faster to build
- Flexibility: More components, handles edge cases, adapts to changes
The YAGNI principle (“You Aren’t Gonna Need It”) applies: start simple, add complexity only when needed.
Key Problem Areas
| Problem | What Goes Wrong | What You’ll Build |
|---|---|---|
| Single Points of Failure | One component dies, system dies | Load balancers, failover systems |
| Unbounded Growth | Memory/connections grow until crash | Connection pools, rate limiters |
| Thundering Herd | All clients retry simultaneously | Circuit breakers, backoff strategies |
| Hot Keys/Spots | One partition gets all traffic | Consistent hashing, sharding |
| Cascading Failures | One failure triggers chain reaction | Bulkheads, circuit breakers |
| Slow Dependencies | One slow service blocks everything | Timeouts, async processing |
| Data Inconsistency | Stale reads, lost writes | Replication strategies, consensus |
| Operational Blindness | Can’t see what’s happening | Metrics, logging, tracing |
Concept Summary Table
| Concept Cluster | What You Need to Internalize |
|---|---|
| CAP Theorem | You can’t have all three (Consistency, Availability, Partition Tolerance). Partition tolerance is mandatory in distributed systems, so you’re choosing CP or AP based on your domain. Banks need CP; social media can use AP. |
| Load Distribution | Round-robin, least-connections, and weighted algorithms each have tradeoffs. Round-robin is simple but ignores server load. Least-connections adapts dynamically but requires state. |
| Failure Detection | Health checks must balance frequency (catch failures fast) vs overhead (don’t overwhelm backends). Active checks (ping the server) vs passive (monitor request errors). |
| Consistency Models | Linearizability (strongest, expensive), eventual consistency (weakest, cheap). Most systems use eventual consistency with conflict resolution strategies (last-write-wins, CRDTs). |
| Rate Limiting | Token bucket allows bursts, fixed window is simple but has boundary issues, sliding window is accurate but memory-intensive. Choose based on your accuracy vs performance needs. |
| Partitioning | Hash-based (consistent hashing), range-based (know data distribution), or hybrid. Hot keys break hash-based partitioning—need detection and mitigation. |
| Replication | Synchronous (strong consistency, slow writes) vs asynchronous (eventual consistency, fast writes). Multi-leader allows writes everywhere but creates conflicts. |
| Caching | Cache-aside (app manages cache), read-through (cache loads on miss), write-through (cache writes to DB). Each has different consistency guarantees and complexity. |
| Message Delivery | At-most-once (fast, may lose messages), at-least-once (may duplicate, needs idempotency), exactly-once (expensive, requires coordination). |
| Consensus | Raft and Paxos solve the same problem (distributed agreement) with different trade offs. Raft is easier to understand. Both require quorum (N/2 + 1) to make progress. |
| Observability | Metrics (aggregated numbers), logs (discrete events), traces (request flow). You need all three to debug production issues. |
| Backpressure | When producers are faster than consumers, you must either: drop requests (lose work), queue (bounded or unbounded?), or slow down producers (apply backpressure). |
Deep Dive Reading by Concept
This section maps each concept from above to specific book chapters for deeper understanding. Read these before or alongside the projects to build strong mental models.
Distributed Systems Fundamentals
| Concept | Book & Chapter |
|---|---|
| CAP Theorem | “Designing Data-Intensive Applications” by Martin Kleppmann — Ch. 9: “Consistency and Consensus” (sections 9.1-9.2) |
| Consistency Models | “Designing Data-Intensive Applications” by Martin Kleppmann — Ch. 5: “Replication” (sections 5.2-5.3) |
| Partitioning Strategies | “Designing Data-Intensive Applications” by Martin Kleppmann — Ch. 6: “Partitioning” (entire chapter) |
| Consensus Algorithms | “Designing Data-Intensive Applications” by Martin Kleppmann — Ch. 9: “Consistency and Consensus” (sections 9.3-9.4) |
| Replication | “Designing Data-Intensive Applications” by Martin Kleppmann — Ch. 5: “Replication” (entire chapter) |
Load Balancing & Networking
| Concept | Book & Chapter |
|---|---|
| Load Balancing Algorithms | “System Design Interview” by Alex Xu — Ch. 6: “Design a Key-Value Store” (section on consistent hashing) |
| TCP/IP & Sockets | “TCP/IP Illustrated, Volume 1” by W. Richard Stevens — Ch. 2: “The Internet Protocol” |
| HTTP Protocol | “Computer Networks” by Tanenbaum & Wetherall — Ch. 7: “Application Layer” |
| Connection Management | “The Linux Programming Interface” by Michael Kerrisk — Ch. 59-61: “Sockets” |
Resilience & Fault Tolerance
| Concept | Book & Chapter |
|---|---|
| Circuit Breaker Pattern | “Release It!, 2nd Edition” by Michael Nygard — Ch. 5: “Stability Patterns” |
| Cascading Failures | “Release It!, 2nd Edition” by Michael Nygard — Ch. 4: “Stability Antipatterns” |
| Bulkheads | “Release It!, 2nd Edition” by Michael Nygard — Ch. 5: “Stability Patterns” |
| Health Checking | “Building Microservices, 2nd Edition” by Sam Newman — Ch. 11: “Security” |
Caching & Performance
| Concept | Book & Chapter |
|---|---|
| Caching Strategies | “System Design Interview” by Alex Xu — Ch. 5: “Design a URL Shortener” |
| Cache Invalidation | “Designing Data-Intensive Applications” by Martin Kleppmann — Ch. 11: “Stream Processing” |
| Consistent Hashing | “Designing Data-Intensive Applications” by Martin Kleppmann — Ch. 6: “Partitioning” (section 6.2) |
| LSM Trees | “Designing Data-Intensive Applications” by Martin Kleppmann — Ch. 3: “Storage and Retrieval” (section 3.2) |
Messaging & Queues
| Concept | Book & Chapter |
|---|---|
| Message Delivery Semantics | “Designing Data-Intensive Applications” by Martin Kleppmann — Ch. 11: “Stream Processing” (section 11.1) |
| Write-Ahead Logging | “Database Internals” by Alex Petrov — Ch. 3: “File Formats” |
| Pub/Sub Patterns | “Enterprise Integration Patterns” by Hohpe & Woolf — Ch. 3: “Messaging Channels” |
Observability & Operations
| Concept | Book & Chapter |
|---|---|
| Metrics & Monitoring | “Site Reliability Engineering” by Google SRE — Ch. 6: “Monitoring Distributed Systems” |
| Distributed Tracing | “Building Microservices, 2nd Edition” by Sam Newman — Ch. 10: “Deployment” |
| Log Aggregation | “Building Microservices, 2nd Edition” by Sam Newman — Ch. 10: “Deployment” |
Microservices Patterns
| Concept | Book & Chapter |
|---|---|
| Service Discovery | “Building Microservices, 2nd Edition” by Sam Newman — Ch. 5: “Communication Styles” |
| API Gateway | “Building Microservices, 2nd Edition” by Sam Newman — Ch. 8: “Deployment” |
| Saga Pattern | “Designing Data-Intensive Applications” by Martin Kleppmann — Ch. 9: “Consistency and Consensus” |
Essential Reading Order
For maximum comprehension, read in this order:
Foundation (Week 1-2):
- “Designing Data-Intensive Applications” Ch. 1-2 (Foundations of data systems)
- “System Design Interview” Ch. 1 (Scale from zero to millions)
- “Release It!, 2nd Edition” Ch. 1-3 (Introduction to stability)
Core Distributed Systems (Week 3-4):
- “Designing Data-Intensive Applications” Ch. 5-6 (Replication & Partitioning)
- “Designing Data-Intensive Applications” Ch. 9 (Consistency & Consensus)
- “Building Microservices, 2nd Edition” Ch. 5 (Communication)
Advanced Topics (Week 5-8):
- “Designing Data-Intensive Applications” Ch. 3 (Storage engines, LSM trees)
- “Designing Data-Intensive Applications” Ch. 11 (Stream processing)
- “Site Reliability Engineering” Ch. 6 (Monitoring)
Quick Start Guide
Overwhelmed? Start here.
If the 17 projects feel daunting, this “first 48 hours” guide will get you building and learning immediately.
Day 1: Build Something Tangible (8 hours)
Morning (4 hours): Simple Load Balancer
- Read Project 1 overview (30 min)
- Build a TCP proxy that forwards to one backend (2 hours)
- Add round-robin distribution to 3 backends (1 hour)
- Test:
for i in {1..10}; do curl localhost; doneshows even distribution (30 min)
Afternoon (4 hours): Add Health Checks
- Implement basic health check (ping backend every 5 seconds) (1.5 hours)
- Remove unhealthy backends from pool (1.5 hours)
- Test: Kill one backend, see traffic redistribute (1 hour)
What you’ll learn: Connection lifecycle, concurrency basics, failure detection
If you get stuck: Skip to Project 7 (Circuit Breaker) - it’s simpler and teaches similar concepts.
Day 2: Understand the “Why” (4 hours)
Morning (2 hours): Read Core Concepts
- Re-read CAP Theorem section
- Re-read Load Distribution section
- Ask yourself: Why did my load balancer need health checks? What happens without them?
Afternoon (2 hours): Break Your Code
- Remove health checks, kill a backend, watch requests fail
- Add 100 backends, see if round-robin still works
- Send 10,000 concurrent requests, see what breaks
What you’ll learn: Edge cases, failure modes, why production systems are complex
Next Steps
After 48 hours, you should feel:
- ✅ Confident you can build simple distributed components
- ✅ Aware of edge cases you didn’t initially consider
- ✅ Curious about how production systems handle these issues
Now pick your path:
- Want to go deeper on load balancing? → Continue with Project 9 (Metrics) to add observability
- Want to learn new patterns? → Jump to Project 7 (Circuit Breaker) or Project 2 (Rate Limiter)
- Ready for a challenge? → Try Project 3 (Distributed Cache) or Project 4 (Message Queue)
Recommended Learning Paths
Path 1: For Backend Engineers New to Distributed Systems
Goal: Build intuition for distributed system challenges through progressively complex projects.
Timeline: 3-4 months (10 hours/week)
- Week 1-2: Project 5 (URL Shortener) — Warm up with a complete but simple system
- Week 3-4: Project 7 (Circuit Breaker) — Learn failure handling patterns
- Week 5-6: Project 2 (Rate Limiter) — Understand resource protection
- Week 7-9: Project 1 (Load Balancer) — Build the front door of distributed systems
- Week 10-12: Project 3 (Distributed Cache) — Face partitioning and replication challenges
- Week 13-16: Final Project (E-Commerce) — Put it all together
Why this order: Starts with familiar web concepts, gradually introduces distribution, ends with full integration.
Path 2: For Senior Engineers Preparing for Interviews
Goal: Cover maximum breadth of system design patterns quickly.
Timeline: 6-8 weeks (15 hours/week)
- Week 1: Projects 1, 2, 7 (Load Balancer, Rate Limiter, Circuit Breaker) — Core resilience patterns
- Week 2: Projects 8, 10 (Service Discovery, API Gateway) — Microservices infrastructure
- Week 3: Projects 3, 13 (Distributed Cache, Consistent Hashing) — Distributed data
- Week 4: Projects 4, 6 (Message Queue, LSM Store) — Durability and storage
- Week 5: Projects 9, 12 (Metrics, Log Aggregation) — Observability
- Week 6-8: Final Project — Interview-ready capstone
Why this order: Clusters related patterns together, maximizes conceptual coverage, ends with a comprehensive system you can discuss in interviews.
Path 3: For Students/Self-Learners Going Deep
Goal: Master distributed systems from first principles through hands-on building.
Timeline: 6-9 months (12 hours/week)
- Month 1: Foundations
- Read “Designing Data-Intensive Applications” Ch. 1-2
- Project 5 (URL Shortener)
- Project 7 (Circuit Breaker)
- Month 2: Networking & Load Distribution
- Read DDIA Ch. 6 (Partitioning)
- Project 1 (Load Balancer)
- Project 13 (Consistent Hashing)
- Month 3: Storage & Durability
- Read DDIA Ch. 3 (Storage)
- Project 6 (LSM Key-Value Store)
- Project 4 (Message Queue)
- Month 4: Distributed Data
- Read DDIA Ch. 5 (Replication)
- Project 3 (Distributed Cache)
- Project 11 (Distributed Lock)
- Month 5: Microservices
- Read “Building Microservices” Ch. 5, 8
- Projects 8, 10 (Service Discovery, API Gateway)
- Month 6-9: Observability & Integration
- Read “SRE Book” Ch. 6
- Projects 9, 12 (Metrics, Logs)
- Final Project (E-Commerce System)
Why this order: Interleaves reading with building, starts from storage layer and moves up the stack, culminates in full system integration.
Path 4: For Infrastructure/DevOps Engineers
Goal: Focus on operational concerns—reliability, observability, deployment.
Timeline: 4-5 months (12 hours/week)
- Month 1: Core Infrastructure
- Projects 1, 2 (Load Balancer, Rate Limiter)
- Project 14 (Connection Pool)
- Month 2: Resilience
- Project 7 (Circuit Breaker)
- Project 15 (Chaos Engineering)
- Month 3: Observability
- Project 9 (Metrics Collection)
- Project 12 (Log Aggregation)
- Month 4: Microservices Ops
- Project 8 (Service Discovery)
- Project 16 (Feature Flags)
- Month 5: Integration
- Final Project (E-Commerce) — Focus on the operational aspects
Why this order: Prioritizes reliability, monitoring, and operational tools over data storage internals.
Project 1: Build a Load Balancer
- File: SYSTEM_DESIGN_MASTERY_PROJECTS.md
- Main Programming Language: Go
- Alternative Programming Languages: Rust, C, Python
- Coolness Level: Level 3: Genuinely Clever
- Business Potential: 3. The “Service & Support” Model
- Difficulty: Level 3: Advanced
- Knowledge Area: Networking / Distributed Systems
- Software or Tool: HAProxy / Nginx (conceptual model)
- Main Book: “Designing Data-Intensive Applications” by Martin Kleppmann
What you’ll build: A TCP/HTTP load balancer that distributes incoming connections across multiple backend servers using configurable algorithms (round-robin, least-connections, weighted), performs health checks, and gracefully removes unhealthy servers.
Why it teaches system design: Load balancers are the front door of every distributed system. Building one forces you to understand:
- How to handle thousands of concurrent connections
- Health checking and failure detection
- The difference between L4 and L7 load balancing
- Connection pooling and keep-alive management
- Why NGINX and HAProxy make certain architectural choices
Core challenges you’ll face:
- Connection multiplexing (one goroutine per connection won’t scale) → maps to concurrency patterns
- Health check design (how often? what counts as “unhealthy”?) → maps to failure detection
- Graceful degradation (what happens when all backends are down?) → maps to fault tolerance
- Hot reload config (change backends without dropping connections) → maps to zero-downtime operations
- Sticky sessions (route same user to same backend) → maps to stateful vs stateless
Key Concepts:
- Connection Management: “The Linux Programming Interface” Chapter 59-61 - Michael Kerrisk
- Concurrency Patterns: “Learning Go, 2nd Edition” Chapter 12 - Jon Bodner
- Load Balancing Algorithms: “System Design Interview” Chapter 6 - Alex Xu
- Health Checks: “Building Microservices, 2nd Edition” Chapter 11 - Sam Newman
Difficulty: Advanced Time estimate: 2-3 weeks Prerequisites: Network sockets, concurrency basics, HTTP protocol
Real world outcome:
# Start 3 backend servers
$ ./backend --port 8081 --name "Server-A" &
$ ./backend --port 8082 --name "Server-B" &
$ ./backend --port 8083 --name "Server-C" &

# Start your load balancer
$ ./loadbalancer --config lb.yaml --port 80
[LB] Loaded 3 backends: 8081, 8082, 8083
[LB] Health checker started (interval: 5s)
[LB] Listening on :80

# Test distribution
$ for i in {1..6}; do curl http://localhost/; done
Response from Server-A
Response from Server-B
Response from Server-C
Response from Server-A
Response from Server-B
Response from Server-C

# Kill one backend, watch failover
$ kill %2  # Kill Server-B
[LB] Backend 8082 failed health check (3 consecutive failures)
[LB] Removed 8082 from pool

$ for i in {1..4}; do curl http://localhost/; done
Response from Server-A
Response from Server-C
Response from Server-A
Response from Server-C
Implementation Hints:
- Start with a simple TCP proxy that forwards bytes between client and one backend
- Add round-robin by maintaining a counter and using modulo
- Health checks should run in a separate goroutine with configurable intervals
- Use channels to communicate backend status changes to the main routing logic
- For HTTP, you’ll need to parse headers to implement features like sticky sessions (look at the
Cookieheader)
Learning milestones:
- TCP proxy works → You understand socket forwarding and connection lifecycle
- Round-robin distributes evenly → You understand stateless routing
- Unhealthy servers are removed → You understand failure detection patterns
- Zero-downtime config reload → You understand graceful operations
The Core Question You’re Answering
“How do you distribute load across multiple servers while ensuring that failed servers don’t receive traffic and that individual connections are properly managed throughout their lifecycle?”
Before you write any code, sit with this question. Most developers think a load balancer is “just round-robin routing,” but that misses the hard parts: What happens when a backend is slow but not down? What if your health check is too aggressive and marks healthy servers as down? How do you handle the transition when removing a server from the pool?
Concepts You Must Understand First
Stop and research these before coding:
- TCP Connection Lifecycle
- What are the states of a TCP connection? (SYN, SYN-ACK, ESTABLISHED, FIN, etc.)
- What’s the difference between a socket and a connection?
- What happens when you call
accept()on a listening socket? - Book Reference: “TCP/IP Illustrated, Volume 1” Ch. 18 — W. Richard Stevens
- Concurrency Models
- What’s the difference between goroutines/threads and async I/O?
- When should you use one goroutine per connection vs a worker pool?
- How do you coordinate shared state (the list of healthy backends) across goroutines?
- Book Reference: “Learning Go, 2nd Edition” Ch. 12 — Jon Bodner
- Load Balancing Algorithms
- Why does round-robin fail for long-lived connections?
- What’s the difference between weighted round-robin and least-connections?
- Book Reference: “System Design Interview” Ch. 6 — Alex Xu
- Health Checking Strategies
- Active (probe the server) vs passive (monitor errors) health checks?
- How many consecutive failures before marking a server down?
- How quickly should you mark a server back up after recovery?
- Book Reference: “Release It!, 2nd Edition” Ch. 5 — Michael Nygard
Questions to Guide Your Design
Before implementing, think through these:
- Connection Handling
- Should I spawn a goroutine per connection or use a worker pool?
- How do I clean up resources when a connection closes?
- What happens if a backend closes the connection mid-request?
- Backend Selection
- Where do I maintain the list of healthy backends?
- How do I protect that list from concurrent access?
- Should backend selection be synchronized (lock) or lock-free (atomic operations)?
- Health Checking
- Should health checks run on a timer or after N failures?
- What protocol for health checks? (TCP dial, HTTP GET /health, custom ping?)
- If all backends are down, do I reject all traffic or route to “least bad” backend?
- Configuration
- How do I add/remove backends without restarting?
- Should configuration changes take effect immediately or wait for in-flight requests?
Thinking Exercise
Connection Flow Tracing
Before coding, trace this scenario on paper:
- Load balancer starts with 3 backends: A (healthy), B (healthy), C (down)
- Client 1 connects
- Client 2 connects while Client 1’s request is still in flight
- Backend B goes down while handling Client 2
- Health checker marks B as unhealthy
- Client 3 connects
Questions while tracing:
- After step 3, where is each client’s connection routed?
- In step 4, what happens to Client 2’s in-flight request?
- In step 5, does the health checker immediately remove B or wait for confirmation?
- In step 6, which backends are in the pool?
Draw the connection state for each step. This exercise reveals edge cases you’ll need to handle.
The Interview Questions They’ll Ask
Prepare to answer these:
- “How would you handle the case where one backend is slower than others, causing it to accumulate connections?”
- “Your load balancer uses round-robin. During a traffic spike, one backend keeps returning errors. How do you detect this and adapt?”
- “Explain the difference between Layer 4 (TCP) and Layer 7 (HTTP) load balancing. When would you use each?”
- “How would you implement session affinity (sticky sessions) where a user always goes to the same backend?”
- “If you’re doing health checks every 5 seconds and mark a server down after 3 consecutive failures, what’s the worst-case detection time for a failure?”
- “How does a load balancer handle the case where a backend accepts the connection but times out during request processing?”
Hints in Layers
Hint 1: Starting Point
Start by building a TCP proxy that connects to a single hardcoded backend. Use net.Listen() to accept client connections and net.Dial() to connect to the backend. Use io.Copy() to bidirectionally copy data between client and backend.
Hint 2: Adding Round-Robin
Keep a slice of backend addresses and an atomic counter. For each new connection, increment the counter and use modulo to select the next backend: backends[counter.Add(1) % len(backends)].
Hint 3: Health Checking
Run a separate goroutine with a time.Ticker that attempts to dial each backend every N seconds. Maintain a map of backend → health status. Use a sync.RWMutex to protect this map (reads are frequent, writes are rare).
Hint 4: Removing Unhealthy Backends
When selecting a backend, read the health map. If the selected backend is unhealthy, try the next one. If all backends are unhealthy, either return an error or route to the “least recently failed” backend.
Books That Will Help
| Topic | Book | Chapter |
|---|---|---|
| TCP Socket Programming | “The Linux Programming Interface” by Michael Kerrisk | Ch. 59-61 |
| Go Concurrency Patterns | “Learning Go, 2nd Edition” by Jon Bodner | Ch. 12 |
| Load Balancing Algorithms | “System Design Interview” by Alex Xu | Ch. 6 |
| Health Checking | “Building Microservices, 2nd Edition” by Sam Newman | Ch. 11 |
| Connection Pooling | “Release It!, 2nd Edition” by Michael Nygard | Ch. 5 |
Common Pitfalls & Debugging
Problem 1: “Load balancer accepts connection but backend never receives it”
- Why: You’re accepting client connections but not spawning goroutines to handle them, so they queue up
- Fix: Use
go handleConnection(conn)for each accepted connection - Quick test: Add a log statement right after
conn, _ := listener.Accept()to confirm you’re accepting
Problem 2: “Round-robin always sends to the same backend”
- Why: You’re using a non-atomic counter that wraps around incorrectly, or multiple goroutines are reading the same value
- Fix: Use
atomic.AddUint64()to safely increment across goroutines - Quick test: Add logging:
fmt.Printf("Selected backend %d\n", index)before proxying
Problem 3: “Health checker marks all backends as down even though they’re healthy”
- Why: Health check timeout is too aggressive, or you’re checking a wrong endpoint
- Fix: Increase timeout, ensure you’re dialing the right address, check for firewall/network issues
- Quick test: Manually
curlortelnetto the backend from the load balancer host
Problem 4: “Connections hang when backend goes down mid-request”
- Why:
io.Copy()blocks forever if the backend disappears without sending FIN - Fix: Set deadlines on both client and backend connections:
conn.SetDeadline(time.Now().Add(30*time.Second)) - Quick test: Use
tcto add latency:sudo tc qdisc add dev lo root netem delay 5000ms, see if connections timeout properly
Problem 5: “Removing a backend causes panic: index out of range”
- Why: You’re modifying the backend slice while another goroutine is reading it
- Fix: Use a
sync.RWMutexaround the slice, or use atomic operations with copy-on-write - Quick test: Run with
-raceflag:go run -race main.goto detect data races
Project 2: Build a Rate Limiter
- File: SYSTEM_DESIGN_MASTERY_PROJECTS.md
- Main Programming Language: Go
- Alternative Programming Languages: Python, Rust, Java
- Coolness Level: Level 3: Genuinely Clever
- Business Potential: 4. The “Open Core” Infrastructure
- Difficulty: Level 3: Advanced
- Knowledge Area: Distributed Systems / API Protection
- Software or Tool: Redis (conceptual model)
- Main Book: “System Design Interview” by Alex Xu
What you’ll build: A rate limiting library and service that enforces request quotas using multiple algorithms (Token Bucket, Sliding Window, Leaky Bucket), supports both local and distributed modes (using Redis), and returns proper 429 Too Many Requests with Retry-After headers.
Why it teaches system design: Rate limiting is deceptively complex. You’ll confront:
- The tradeoff between accuracy and performance
- Why distributed rate limiting is hard (clock skew, network partitions)
- Memory management (can’t store every request timestamp forever)
- The difference between algorithms that “feel” similar but behave differently
Core challenges you’ll face:
- Algorithm selection (token bucket vs sliding window have different burst behavior) → maps to algorithm tradeoffs
- Distributed coordination (two servers must agree on limits) → maps to consistency models
- Memory bounds (sliding window log can grow unbounded) → maps to resource management
- Clock drift (what if servers disagree on time?) → maps to distributed time
- Fairness (one bad actor shouldn’t slow everyone) → maps to isolation
Key Concepts:
- Rate Limiting Algorithms: “System Design Interview” Chapter 4 - Alex Xu
- Distributed Locks: “Designing Data-Intensive Applications” Chapter 8 - Martin Kleppmann
- Redis Operations: “Redis in Action” Chapters 6-7 - Josiah Carlson
- API Design: “Design and Build Great Web APIs” Chapter 8 - Mike Amundsen
Difficulty: Intermediate-Advanced Time estimate: 1-2 weeks Prerequisites: Basic concurrency, HTTP, Redis basics
Real world outcome:
# Start rate limiter as HTTP middleware
$ ./ratelimiter --algorithm token-bucket --rate 10 --burst 20 --port 8080
[RL] Token bucket: 10 tokens/sec, burst 20
[RL] Listening on :8080

# Normal requests work
$ curl -w "%{http_code}\n" http://localhost:8080/api/users
200

# Burst through the limit
$ for i in {1..25}; do curl -s -w "%{http_code} " http://localhost:8080/api; done
200 200 200 200 200 200 200 200 200 200 200 200 200 200 200 200 200 200 200 200 429 429 429 429 429

# Check headers on 429
$ curl -i http://localhost:8080/api
HTTP/1.1 429 Too Many Requests
Retry-After: 1
X-RateLimit-Limit: 10
X-RateLimit-Remaining: 0
X-RateLimit-Reset: 1703084400
Implementation Hints:
- Token bucket: maintain a counter of “tokens” that refills at a constant rate; each request consumes one token
- For sliding window log: store timestamps of requests, but set a max size and use approximate counting beyond that
- In distributed mode, use Redis’s
INCRwithEXPIREfor fixed windows, or Lua scripts for atomic sliding window - Return
Retry-Afterheader so clients know when to retry (this is critical for good API design) - Consider using IP address as default key, but allow custom key extractors (API key, user ID, etc.)
Learning milestones:
- Token bucket works locally → You understand the core algorithm
- Multiple algorithms implemented → You understand tradeoffs (burst handling, memory, accuracy)
- Distributed mode with Redis → You understand coordination overhead
- Proper HTTP headers returned → You understand API contract design
Project 3: Build a Distributed Cache
- File: SYSTEM_DESIGN_MASTERY_PROJECTS.md
- Main Programming Language: Go
- Alternative Programming Languages: Rust, C++, Java
- Coolness Level: Level 4: Hardcore Tech Flex
- Business Potential: 4. The “Open Core” Infrastructure
- Difficulty: Level 4: Expert
- Knowledge Area: Distributed Systems / Storage
- Software or Tool: Memcached / Redis (conceptual model)
- Main Book: “Designing Data-Intensive Applications” by Martin Kleppmann
What you’ll build: A distributed in-memory cache that supports GET/SET/DELETE operations, uses consistent hashing to distribute keys across nodes, handles node failures gracefully, and supports TTL-based expiration.
Why it teaches system design: Caching is everywhere, but distributed caching exposes the hardest problems in distributed systems:
- How do you split data across machines?
- What happens when a machine dies?
- How do you avoid the “thundering herd” when cache expires?
- Why is cache invalidation “one of the two hard problems in computer science”?
Core challenges you’ll face:
- Consistent hashing (adding/removing nodes should only move minimal keys) → maps to partitioning strategies
- Replication (what’s the consistency model?) → maps to CAP theorem tradeoffs
- Expiration (active vs passive expiration, memory management) → maps to resource cleanup
- Cache stampede (many clients try to populate cache simultaneously) → maps to thundering herd
- Hot keys (one key gets 90% of traffic) → maps to load distribution
Key Concepts:
- Consistent Hashing: “Designing Data-Intensive Applications” Chapter 6 - Martin Kleppmann
- Cache Patterns: “System Design Interview” Chapter 5 - Alex Xu
- Memory Management: “The Linux Programming Interface” Chapter 7 - Michael Kerrisk
- Distributed Hash Tables: “Computer Networks” Chapter 7 - Tanenbaum & Wetherall
Difficulty: Expert Time estimate: 3-4 weeks Prerequisites: Concurrency, networking, hash functions
Real world outcome:
# Start 3 cache nodes
$ ./cache-node --port 7001 --cluster-port 17001 &
$ ./cache-node --port 7002 --cluster-port 17002 --join localhost:17001 &
$ ./cache-node --port 7003 --cluster-port 17003 --join localhost:17001 &

[CLUSTER] Node 7001 started, ring: [7001]
[CLUSTER] Node 7002 joined, ring: [7001, 7002]
[CLUSTER] Node 7003 joined, ring: [7001, 7002, 7003]

# Set a key (client talks to any node)
$ ./cache-cli SET user:123 '{"name":"Alice"}' --ttl 3600
OK (stored on node 7002)

# Get from different node (automatic routing)
$ ./cache-cli GET user:123
{"name":"Alice"}

# Kill a node, watch redistribution
$ kill %2  # Kill node 7002
[CLUSTER] Node 7002 unreachable, redistributing 1847 keys...
[CLUSTER] Redistribution complete, ring: [7001, 7003]

# Key is still accessible (if replication was configured)
$ ./cache-cli GET user:123
{"name":"Alice"} (from replica on 7003)
Implementation Hints:
- Implement consistent hashing with virtual nodes (150+ vnodes per physical node provides good distribution)
- For the hash ring, use a sorted array/tree where you find the first node with hash >= key_hash
- Start without replication, add it later (replicate to N next nodes on the ring)
- Implement passive expiration (check TTL on GET) first, then active expiration (background thread)
- For cluster membership, start with static config, then add gossip protocol for dynamic membership
Learning milestones:
- Single-node cache works → You understand in-memory storage and expiration
- Consistent hashing distributes keys → You understand partitioning without central coordination
- Node removal only moves affected keys → You understand why consistent hashing matters
- Replication survives node failure → You understand the consistency/availability tradeoff
Project 4: Build a Message Queue
- File: SYSTEM_DESIGN_MASTERY_PROJECTS.md
- Main Programming Language: Go
- Alternative Programming Languages: Rust, Java, C
- Coolness Level: Level 4: Hardcore Tech Flex
- Business Potential: 4. The “Open Core” Infrastructure
- Difficulty: Level 4: Expert
- Knowledge Area: Distributed Systems / Async Processing
- Software or Tool: RabbitMQ / Kafka (conceptual model)
- Main Book: “Designing Data-Intensive Applications” by Martin Kleppmann
What you’ll build: A persistent message queue supporting publish/subscribe semantics, message acknowledgment, dead letter queues, and at-least-once delivery guarantees. Messages survive process restart.
Why it teaches system design: Message queues are the backbone of asynchronous architectures. Building one teaches:
- Why “exactly-once” delivery is nearly impossible
- The relationship between durability and performance
- How to handle slow consumers without blocking producers
- The difference between push and pull models
Core challenges you’ll face:
- Durability (messages must survive crashes) → maps to write-ahead logging
- Ordering guarantees (FIFO within partition, but what about across?) → maps to ordering tradeoffs
- Consumer groups (multiple consumers share work, but each message processed once) → maps to coordination
- Backpressure (producer faster than consumer) → maps to flow control
- Dead letter handling (what to do with poison messages) → maps to error handling patterns
Key Concepts:
- Message Delivery Semantics: “Designing Data-Intensive Applications” Chapter 11 - Martin Kleppmann
- Write-Ahead Logging: “Database Internals” Chapter 3 - Alex Petrov
- Pub/Sub Patterns: “Enterprise Integration Patterns” Chapter 3 - Hohpe & Woolf
- Durable Storage: “Operating Systems: Three Easy Pieces” Chapter 42 - Arpaci-Dusseau
Difficulty: Expert Time estimate: 3-4 weeks Prerequisites: File I/O, networking, concurrency
Real world outcome:
# Start the queue server
$ ./messageq --data-dir ./queue-data --port 5672
[MQ] WAL initialized at ./queue-data
[MQ] Recovered 3 queues, 1847 pending messages
[MQ] Listening on :5672

# Terminal 1: Publish messages
$ ./mq-cli publish orders '{"order_id": 123, "items": ["book", "pen"]}'
Published message abc123 to queue 'orders'

# Terminal 2: Consume with ack
$ ./mq-cli consume orders --ack-mode manual
Received: {"order_id": 123, ...}
[Press 'a' to ack, 'n' to nack, 'q' to quit]
> a
Message abc123 acknowledged

# Test durability: kill server, restart
$ kill %1
$ ./messageq --data-dir ./queue-data --port 5672
[MQ] WAL initialized at ./queue-data
[MQ] Recovered 3 queues, 1846 pending messages  # Our acked message is gone
[MQ] Listening on :5672

# Test dead letter queue
$ ./mq-cli consume orders --auto-nack  # Reject all messages
[MQ] Message xyz789 exceeded retry limit (3), moved to orders.dlq
Implementation Hints:
- Use write-ahead log (WAL): append every operation to a log file before applying it
- Log format:
[timestamp][operation][queue][message_id][payload_length][payload] - On startup, replay the log to rebuild state
- Periodically compact the log (remove acknowledged messages)
- For consumer groups, track offsets per consumer group, not per individual consumer
- Implement visibility timeout: unacked messages become visible again after timeout
Learning milestones:
- Pub/sub works in memory → You understand the basic queue abstraction
- Messages survive restart → You understand durability via write-ahead logging
- Consumer groups work → You understand coordination and offset management
- Dead letters capture failures → You understand error handling in distributed systems
Project 5: Build a URL Shortener (Full System)
- File: SYSTEM_DESIGN_MASTERY_PROJECTS.md
- Main Programming Language: Go
- Alternative Programming Languages: Python, Java, Node.js
- Coolness Level: Level 2: Practical but Forgettable
- Business Potential: 2. The “Micro-SaaS / Pro Tool”
- Difficulty: Level 2: Intermediate
- Knowledge Area: Web Systems / Database Design
- Software or Tool: bit.ly (conceptual model)
- Main Book: “System Design Interview” by Alex Xu
What you’ll build: A complete URL shortening service with API, redirect handling, click analytics, rate limiting, and database persistence. Think bit.ly clone with the full production concerns.
Why it teaches system design: This “simple” project exposes many real decisions:
- How to generate short, unique IDs at scale
- Read-heavy vs write-heavy optimization
- When to use caching and how to invalidate
- Analytics without slowing down redirects
Core challenges you’ll face:
- ID generation (sequential leaks info, random might collide) → maps to ID generation strategies
- Read optimization (redirects are 100x more common than creates) → maps to caching strategies
- Analytics capture (must not slow down redirects) → maps to async processing
- Custom aliases (user wants “mylink” but it’s taken) → maps to conflict resolution
- Expiration (links should optionally expire) → maps to TTL management
Key Concepts:
- URL Shortener Design: “System Design Interview” Chapter 7 - Alex Xu
- Database Indexing: “Designing Data-Intensive Applications” Chapter 3 - Martin Kleppmann
- Caching Strategies: “System Design Interview” Chapter 5 - Alex Xu
- Async Processing: “Enterprise Integration Patterns” Chapter 10 - Hohpe & Woolf
Difficulty: Intermediate Time estimate: 1 week Prerequisites: HTTP, SQL basics, basic caching concepts
Real world outcome:
# Start the service
$ ./urlshortener --db postgres://localhost/urls --port 8080
[URL] Database connected, 0 links stored
[URL] Listening on :8080

# Create a short URL
$ curl -X POST http://localhost:8080/api/shorten \
    -d '{"url": "https://example.com/very/long/path?with=params"}'
{
  "short_url": "http://localhost:8080/abc123",
  "original_url": "https://example.com/very/long/path?with=params",
  "expires_at": null
}

# Use it (redirects with 301)
$ curl -I http://localhost:8080/abc123
HTTP/1.1 301 Moved Permanently
Location: https://example.com/very/long/path?with=params

# Check analytics
$ curl http://localhost:8080/api/stats/abc123
{
  "clicks": 47,
  "created_at": "2024-01-15T10:30:00Z",
  "top_referrers": ["google.com", "twitter.com"],
  "clicks_by_day": {"2024-01-15": 30, "2024-01-16": 17}
}
Implementation Hints:
- For ID generation: Base62 encode a counter or use the first 7 chars of a hash (check for collision)
- Use 301 (permanent) redirects for SEO, but 302 if you want to change destination later
- Capture analytics asynchronously: write to a channel/queue, process in background
- Cache popular URLs in memory (LRU cache) to avoid database hits
- Consider bloom filter to quickly check if custom alias is taken
Learning milestones:
- Basic shorten/redirect works → You understand the core flow
- Caching speeds up redirects → You understand read optimization
- Analytics captured without blocking → You understand async patterns
- Handles 1000 req/sec → You understand performance considerations
Project 6: Build a Key-Value Store with LSM Tree
- File: SYSTEM_DESIGN_MASTERY_PROJECTS.md
- Main Programming Language: C
- Alternative Programming Languages: Rust, Go, C++
- Coolness Level: Level 5: Pure Magic
- Business Potential: 4. The “Open Core” Infrastructure
- Difficulty: Level 5: Master
- Knowledge Area: Storage Engines / Database Internals
- Software or Tool: LevelDB / RocksDB (conceptual model)
- Main Book: “Designing Data-Intensive Applications” by Martin Kleppmann
What you’ll build: A persistent key-value store using Log-Structured Merge Tree (LSM Tree) architecture: in-memory memtable, write-ahead log, SSTable files on disk, compaction, and bloom filters for read optimization.
Why it teaches system design: This is how modern databases actually work. You’ll understand:
- Why writes are fast (append-only log)
- Why reads can be slow (checking multiple SSTables)
- How compaction trades disk I/O for read performance
- Why bloom filters are essential for negative lookups
Core challenges you’ll face:
- Write-ahead logging (durability without fsync on every write) → maps to durability guarantees
- Memtable to SSTable flush (sorted on-disk format) → maps to storage format design
- Compaction (merge overlapping SSTables) → maps to background maintenance
- Bloom filters (avoid reading SSTables that don’t have key) → maps to probabilistic data structures
- Crash recovery (replay WAL, handle partial writes) → maps to fault tolerance
Key Concepts:
- LSM Trees: “Designing Data-Intensive Applications” Chapter 3 - Martin Kleppmann
- Write-Ahead Logging: “Database Internals” Chapter 3 - Alex Petrov
- Bloom Filters: “Algorithms” Chapter 6.5 - Sedgewick & Wayne
- File I/O: “Advanced Programming in the UNIX Environment” Chapter 3 - Stevens & Rago
Difficulty: Master Time estimate: 4-6 weeks Prerequisites: C programming, file I/O, data structures
Real world outcome:
# Start the KV store server
$ ./lsm-kv --data-dir ./kv-data --port 6379
[LSM] WAL opened: ./kv-data/wal.log
[LSM] Loaded 3 SSTables, 847293 keys
[LSM] Memtable: 0 entries (limit: 4MB)
[LSM] Listening on :6379

# Basic operations
$ ./kv-cli SET user:1 '{"name": "Alice"}'
OK (wrote to memtable, 1 entries)

$ ./kv-cli GET user:1
{"name": "Alice"} (from memtable)

# Fill memtable until flush
$ ./kv-bench --writes 100000 --key-size 16 --value-size 256
[LSM] Memtable full (4.1MB), flushing to SSTable...
[LSM] Created SSTable L0_004.sst (23847 keys, bloom filter: 0.01 FP rate)
Benchmark: 100000 writes in 2.3s (43478 writes/sec)

# Trigger compaction
$ ./kv-cli COMPACT
[LSM] Compacting L0 (4 tables) + L1 (2 tables)...
[LSM] Created L1_007.sst (merged 127493 keys)
[LSM] Deleted 6 old SSTables

# Verify durability
$ kill -9 %1  # Crash the server
$ ./lsm-kv --data-dir ./kv-data --port 6379
[LSM] Replaying WAL: 3847 operations...
[LSM] Recovery complete
$ ./kv-cli GET user:1
{"name": "Alice"}  # Still there!
Implementation Hints:
- Start simple: memtable as a red-black tree or skip list, SSTable as sorted key-value pairs
- WAL format:
[length:4bytes][key_len:2bytes][val_len:4bytes][key][value][crc:4bytes] - SSTable format: data block (sorted KV pairs) + index block (key → offset) + bloom filter + footer
- For compaction, implement merge sort on SSTable iterators
- Bloom filter: k hash functions, m bits, add all keys on SSTable creation
Learning milestones:
- In-memory KV with WAL works → You understand durability basics
- SSTable flush works, reads check multiple files → You understand LSM read path
- Bloom filters reduce unnecessary reads → You understand probabilistic optimization
- Compaction merges and cleans up → You understand write amplification tradeoffs
Project 7: Build a Circuit Breaker Library
- File: SYSTEM_DESIGN_MASTERY_PROJECTS.md
- Main Programming Language: Go
- Alternative Programming Languages: Java, Python, Rust
- Coolness Level: Level 3: Genuinely Clever
- Business Potential: 3. The “Service & Support” Model
- Difficulty: Level 2: Intermediate
- Knowledge Area: Fault Tolerance / Microservices
- Software or Tool: Netflix Hystrix / Resilience4j (conceptual model)
- Main Book: “Release It!, 2nd Edition” by Michael Nygard
What you’ll build: A circuit breaker library that wraps external service calls, tracks failures, opens the circuit when failure rate exceeds threshold, and periodically allows test requests through a half-open state.
Why it teaches system design: Circuit breakers prevent cascading failures—one of the most important patterns for production resilience. You’ll understand:
- Why timeouts alone aren’t enough
- The state machine: closed → open → half-open → closed
- How to tune thresholds (too sensitive = flapping, too tolerant = slow failures)
- The relationship between circuit breakers and bulkheads
Core challenges you’ll face:
- Failure detection (what counts as a failure? timeout? 5xx? any error?) → maps to error classification
- State transitions (when to open? when to try half-open?) → maps to state machine design
- Metric windows (last 10 requests? last 10 seconds?) → maps to sliding window statistics
- Fallback behavior (return cached value? default? error?) → maps to degradation strategies
- Concurrency (many goroutines hitting the breaker simultaneously) → maps to thread safety
Key Concepts:
- Circuit Breaker Pattern: “Release It!, 2nd Edition” Chapter 5 - Michael Nygard
- Fault Tolerance Patterns: “Building Microservices, 2nd Edition” Chapter 11 - Sam Newman
- State Machines: “Language Implementation Patterns” Chapter 2 - Terence Parr
- Concurrency Primitives: “Learning Go, 2nd Edition” Chapter 12 - Jon Bodner
Difficulty: Intermediate Time estimate: 3-5 days Prerequisites: Concurrency basics, HTTP clients
Real world outcome:
// Usage in your code
cb := circuitbreaker.New(circuitbreaker.Config{
    FailureThreshold:   5,           // Open after 5 failures
    SuccessThreshold:   2,           // Close after 2 successes in half-open
    Timeout:            30 * time.Second,  // Try half-open after 30s
    WindowSize:         10,          // Count last 10 requests
})

result, err := cb.Execute(func() (interface{}, error) {
    return http.Get("https://flaky-api.com/data")
})

if err == circuitbreaker.ErrCircuitOpen {
    // Use fallback
    return getCachedData()
}
# Test program that hammers a flaky service
$ ./circuit-test --url http://flaky-service:8080 --requests 100
Request 1: OK (circuit: CLOSED)
Request 2: OK (circuit: CLOSED)
Request 3: FAIL (circuit: CLOSED, failures: 1/5)
Request 4: FAIL (circuit: CLOSED, failures: 2/5)
Request 5: FAIL (circuit: CLOSED, failures: 3/5)
Request 6: FAIL (circuit: CLOSED, failures: 4/5)
Request 7: FAIL (circuit: CLOSED, failures: 5/5)
Request 8: REJECTED (circuit: OPEN) ← Fast fail, didn't even try
Request 9: REJECTED (circuit: OPEN)
...
[30 seconds later]
Request 47: TRYING (circuit: HALF-OPEN)
Request 47: OK (circuit: HALF-OPEN, successes: 1/2)
Request 48: OK (circuit: HALF-OPEN, successes: 2/2)
Request 49: OK (circuit: CLOSED) ← Recovered!
Implementation Hints:
- Use atomic operations or mutex to protect the state and counters
- Three states: CLOSED (normal), OPEN (fast-fail), HALF-OPEN (testing)
- Use a ring buffer for sliding window: index = request_count % window_size
- In HALF-OPEN state, only allow one request through at a time (use a semaphore)
- Consider adding metrics hooks:
OnStateChange,OnSuccess,OnFailure
Learning milestones:
- Basic open/close works → You understand the state machine
- Half-open allows recovery → You understand gradual restoration
- Sliding window is accurate → You understand windowed metrics
- Thread-safe under load → You understand concurrent access patterns
Project 8: Build a Service Discovery System
- File: SYSTEM_DESIGN_MASTERY_PROJECTS.md
- Main Programming Language: Go
- Alternative Programming Languages: Java, Rust, Python
- Coolness Level: Level 3: Genuinely Clever
- Business Potential: 4. The “Open Core” Infrastructure
- Difficulty: Level 3: Advanced
- Knowledge Area: Distributed Systems / Microservices
- Software or Tool: Consul / etcd (conceptual model)
- Main Book: “Building Microservices, 2nd Edition” by Sam Newman
What you’ll build: A service registry where services register themselves on startup, deregister on shutdown, and clients can query for healthy instances of a service by name. Includes health checking and DNS interface.
Why it teaches system design: Service discovery is the foundation of microservices. You’ll understand:
- Why hardcoding IP addresses doesn’t work at scale
- The difference between client-side and server-side discovery
- How health checks prevent routing to dead instances
- The consistency requirements for a registry
Core challenges you’ll face:
- Registration/deregistration (what if service crashes without deregistering?) → maps to failure detection
- Health checking (active vs passive, how often, what protocol) → maps to liveness detection
- Consistency (all clients should see the same view) → maps to consensus requirements
- DNS integration (return A/SRV records for service names) → maps to protocol integration
- Watch/subscribe (get notified when service changes) → maps to event systems
Key Concepts:
- Service Discovery Patterns: “Building Microservices, 2nd Edition” Chapter 5 - Sam Newman
- DNS Protocol: “TCP/IP Illustrated, Volume 1” Chapter 11 - Stevens
- Consensus Basics: “Designing Data-Intensive Applications” Chapter 9 - Martin Kleppmann
- Health Checking: “Release It!, 2nd Edition” Chapter 5 - Michael Nygard
Difficulty: Advanced Time estimate: 2 weeks Prerequisites: Networking, HTTP, basic DNS understanding
Real world outcome:
# Start service registry
$ ./registry --port 8500 --dns-port 8600
[REG] HTTP API on :8500
[REG] DNS server on :8600
[REG] Health checker started

# Service A registers itself
$ curl -X PUT http://localhost:8500/v1/agent/service/register \
    -d '{"name": "payment-api", "port": 8080, "check": {"http": "http://localhost:8080/health", "interval": "10s"}}'
[REG] Registered payment-api (id: payment-api-abc123)
[REG] Health check scheduled: every 10s

# Service B registers
$ curl -X PUT http://localhost:8500/v1/agent/service/register \
    -d '{"name": "payment-api", "port": 8081, "check": {"http": "http://localhost:8081/health", "interval": "10s"}}'
[REG] Registered payment-api (id: payment-api-def456)

# Query for services
$ curl http://localhost:8500/v1/catalog/service/payment-api
[
  {"ID": "payment-api-abc123", "Address": "192.168.1.10", "Port": 8080, "Status": "passing"},
  {"ID": "payment-api-def456", "Address": "192.168.1.11", "Port": 8081, "Status": "passing"}
]

# Query via DNS
$ dig @localhost -p 8600 payment-api.service.local SRV
;; ANSWER SECTION:
payment-api.service.local. 0 IN SRV 1 1 8080 192.168.1.10.
payment-api.service.local. 0 IN SRV 1 1 8081 192.168.1.11.

# Kill one instance, watch it get removed
[REG] Health check failed for payment-api-abc123 (3 consecutive failures)
[REG] Marked payment-api-abc123 as critical
Implementation Hints:
- Store services in a map:
map[serviceName][]serviceInstance - Each instance needs: ID, name, address, port, tags, health status, last_check_time
- Health checker runs as a background goroutine with a ticker
- For DNS, implement a minimal DNS server (or use a library like
miekg/dns) - Support watch with long-polling: client sends request with
?wait=60s&index=42, server blocks until change or timeout
Learning milestones:
- Register/query works → You understand the basic registry abstraction
- Health checks detect failures → You understand liveness detection
- DNS interface works → You understand protocol adaptation
- Watch returns changes → You understand event-driven architecture
Project 9: Build a Metrics Collection System
- File: SYSTEM_DESIGN_MASTERY_PROJECTS.md
- Main Programming Language: Go
- Alternative Programming Languages: Rust, Python, Java
- Coolness Level: Level 3: Genuinely Clever
- Business Potential: 4. The “Open Core” Infrastructure
- Difficulty: Level 3: Advanced
- Knowledge Area: Observability / Time-Series Data
- Software or Tool: Prometheus (conceptual model)
- Main Book: “Designing Data-Intensive Applications” by Martin Kleppmann
What you’ll build: A pull-based metrics collection system with a client library for instrumenting applications, a collector that scrapes metrics endpoints, time-series storage, and a query interface for visualization.
Why it teaches system design: Observability is how you understand production systems. Building this teaches:
- Why pull-based (Prometheus) vs push-based (StatsD) have different tradeoffs
- How to store time-series data efficiently (not like a regular database!)
- The four golden signals: latency, traffic, errors, saturation
- Metric types: counters, gauges, histograms
Core challenges you’ll face:
- Instrumentation (client library that doesn’t slow down the app) → maps to low-overhead design
- Scraping (pull from many targets efficiently) → maps to concurrent I/O
- Storage (time-series has special patterns) → maps to specialized data structures
- Aggregation (rate, sum, percentiles over time) → maps to streaming computation
- Retention (can’t keep everything forever) → maps to compaction/downsampling
Key Concepts:
- Time-Series Data: “Designing Data-Intensive Applications” Chapter 3 - Martin Kleppmann
- Metrics Types: “Site Reliability Engineering” Chapter 6 - Google SRE
- Pull vs Push: “Building Microservices, 2nd Edition” Chapter 10 - Sam Newman
- Efficient Aggregation: “Streaming Systems” Chapter 2 - Akidau et al.
Difficulty: Advanced Time estimate: 2-3 weeks Prerequisites: HTTP, concurrency, basic data structures
Real world outcome:
# Start metrics collector
$ ./metrics-collector --config collector.yaml --port 9090
[PROM] Loaded 3 scrape targets
[PROM] Scrape interval: 15s
[PROM] Listening on :9090

# Your app uses the client library
# (in your Go code)
requestCounter := metrics.NewCounter("http_requests_total", "method", "path", "status")
requestDuration := metrics.NewHistogram("http_request_duration_seconds",
    []float64{0.01, 0.05, 0.1, 0.5, 1.0})

func handler(w http.ResponseWriter, r *http.Request) {
    start := time.Now()
    // ... handle request ...
    requestDuration.Observe(time.Since(start).Seconds())
    requestCounter.Inc("GET", "/api/users", "200")
}

# Metrics endpoint exposed by your app
$ curl http://localhost:8080/metrics
# HELP http_requests_total Total HTTP requests
# TYPE http_requests_total counter
http_requests_total{method="GET",path="/api/users",status="200"} 1847
http_requests_total{method="POST",path="/api/users",status="201"} 234

# HELP http_request_duration_seconds Request duration histogram
# TYPE http_request_duration_seconds histogram
http_request_duration_seconds_bucket{le="0.01"} 1200
http_request_duration_seconds_bucket{le="0.05"} 1750
http_request_duration_seconds_bucket{le="0.1"} 1800
http_request_duration_seconds_bucket{le="+Inf"} 1847
http_request_duration_seconds_sum 47.23
http_request_duration_seconds_count 1847

# Query the collector
$ curl 'http://localhost:9090/api/v1/query?query=http_requests_total'
{"status":"success","data":{"resultType":"vector","result":[
  {"metric":{"__name__":"http_requests_total","method":"GET"},"value":[1703084400,"1847"]}
]}}
Implementation Hints:
- Client library: use atomics for counters, mutex for histograms (or lock-free ring buffer)
- Prometheus text format is simple:
metric_name{label="value"} 12345 timestamp - For storage, use a simple approach: one file per metric, append-only, with periodic compaction
- Histograms: store cumulative bucket counts, compute percentiles from buckets
- Scrape targets concurrently with a worker pool
Learning milestones:
- Client library records metrics → You understand instrumentation patterns
- Collector scrapes targets → You understand pull-based collection
- Queries return correct data → You understand time-series storage
- Histograms compute percentiles → You understand approximate statistics
Project 10: Build an API Gateway
- File: SYSTEM_DESIGN_MASTERY_PROJECTS.md
- Main Programming Language: Go
- Alternative Programming Languages: Rust, Java, Node.js
- Coolness Level: Level 3: Genuinely Clever
- Business Potential: 4. The “Open Core” Infrastructure
- Difficulty: Level 3: Advanced
- Knowledge Area: Microservices / API Management
- Software or Tool: Kong / AWS API Gateway (conceptual model)
- Main Book: “Building Microservices, 2nd Edition” by Sam Newman
What you’ll build: An API gateway that routes requests to backend services, handles authentication, rate limiting, request/response transformation, and provides a unified API for multiple microservices.
Why it teaches system design: API gateways are the entry point to microservice architectures. You’ll understand:
- Why having a single entry point simplifies client development
- Cross-cutting concerns: auth, logging, rate limiting in one place
- The tradeoff between coupling and convenience
- How to handle versioning and backward compatibility
Core challenges you’ll face:
- Routing (path-based, header-based, method-based) → maps to request matching
- Authentication (validate JWT, API keys, OAuth) → maps to security at the edge
- Rate limiting (per-user, per-endpoint limits) → maps to resource protection
- Request transformation (rewrite paths, add headers) → maps to protocol adaptation
- Response aggregation (combine multiple backend responses) → maps to composition
Key Concepts:
- API Gateway Pattern: “Building Microservices, 2nd Edition” Chapter 8 - Sam Newman
- Authentication: “Designing Web APIs” Chapter 6 - Brenda Jin
- Rate Limiting: “System Design Interview” Chapter 4 - Alex Xu
- Proxy Design: “Enterprise Integration Patterns” Chapter 7 - Hohpe & Woolf
Difficulty: Advanced Time estimate: 2 weeks Prerequisites: HTTP, JWT, basic proxy concepts
Real world outcome:
# gateway.yaml
routes:
  - path: /api/users/*
    service: user-service
    url: http://users:8080
    auth: jwt
    rate_limit: 100/min

  - path: /api/orders/*
    service: order-service
    url: http://orders:8080
    auth: jwt
    rate_limit: 50/min

  - path: /public/*
    service: static
    url: http://static:80
    auth: none
# Start gateway
$ ./api-gateway --config gateway.yaml --port 443
[GW] Loaded 3 routes
[GW] JWT public key loaded
[GW] Rate limiters initialized
[GW] Listening on :443

# Request without auth → rejected
$ curl https://gateway/api/users/123
{"error": "Authorization header required"}

# Request with valid JWT → routed to backend
$ curl -H "Authorization: Bearer eyJ..." https://gateway/api/users/123
{"id": 123, "name": "Alice"}
[GW] → user-service 32ms (rate: 1/100)

# Hit rate limit
$ for i in {1..101}; do curl -H "Authorization: Bearer eyJ..." https://gateway/api/users/123; done
...
{"error": "Rate limit exceeded", "retry_after": 47}
[GW] Rate limit hit for user:abc123 on route:users

# Response transformation (aggregate)
$ curl https://gateway/api/dashboard
# Gateway internally calls /users/me AND /orders?limit=5 AND /notifications
{"user": {...}, "recent_orders": [...], "notifications": [...]}
Implementation Hints:
- Use a router library or build a simple trie-based path matcher
- For JWT validation, decode header and payload (base64), verify signature with public key
- Rate limiter can use the one from Project 2, keyed by (user_id, route)
- For response aggregation, make concurrent requests to backends, merge results
- Add request ID header for tracing across services
Learning milestones:
- Basic routing works → You understand the gateway abstraction
- JWT auth blocks invalid requests → You understand edge authentication
- Rate limiting per-user works → You understand resource protection
- Response aggregation combines backends → You understand composition patterns
Project 11: Build a Distributed Lock Service
- File: SYSTEM_DESIGN_MASTERY_PROJECTS.md
- Main Programming Language: Go
- Alternative Programming Languages: Rust, Java, Python
- Coolness Level: Level 4: Hardcore Tech Flex
- Business Potential: 4. The “Open Core” Infrastructure
- Difficulty: Level 4: Expert
- Knowledge Area: Distributed Systems / Coordination
- Software or Tool: ZooKeeper / etcd (conceptual model)
- Main Book: “Designing Data-Intensive Applications” by Martin Kleppmann
What you’ll build: A distributed locking service that allows multiple processes across multiple machines to coordinate exclusive access to resources. Includes fencing tokens to prevent split-brain scenarios.
Why it teaches system design: Distributed locking is one of the hardest problems in distributed systems. You’ll understand:
- Why mutual exclusion is hard across machines
- The dangers of using Redis SETNX without fencing tokens
- How timeouts interact with locks (what if holder dies?)
- Why consensus (Raft/Paxos) is needed for correctness
Core challenges you’ll face:
- Mutual exclusion (only one holder at a time, globally) → maps to consensus requirements
- Failure detection (what if lock holder crashes?) → maps to lease-based locking
- Fencing tokens (prevent stale holder from corrupting data) → maps to split-brain prevention
- Fairness (should waiters be served in order?) → maps to queue-based coordination
- Performance (locks should be fast to acquire/release) → maps to minimizing consensus overhead
Key Concepts:
- Distributed Locks: “Designing Data-Intensive Applications” Chapter 8 - Martin Kleppmann
- Fencing Tokens: Martin Kleppmann’s blog post “How to do distributed locking”
- Consensus Protocols: “Designing Data-Intensive Applications” Chapter 9 - Martin Kleppmann
- Leases: “Release It!, 2nd Edition” Chapter 5 - Michael Nygard
Difficulty: Expert Time estimate: 3-4 weeks Prerequisites: Consensus basics, networking, concurrency
Real world outcome:
# Start lock server (3 nodes for consensus)
$ ./lockserver --id 1 --peers "localhost:7001,localhost:7002,localhost:7003" --port 7001 &
$ ./lockserver --id 2 --peers "localhost:7001,localhost:7002,localhost:7003" --port 7002 &
$ ./lockserver --id 3 --peers "localhost:7001,localhost:7002,localhost:7003" --port 7003 &
[LOCK] Node 1 started, cluster forming...
[LOCK] Node 2 joined
[LOCK] Node 3 joined
[LOCK] Leader elected: Node 1

# Terminal 1: Acquire lock
$ ./lock-cli acquire "payment-processor" --ttl 30s
Lock acquired! Fencing token: 47
Resource: payment-processor
Expires in: 30s
(Keep this terminal open to hold lock)

# Terminal 2: Try to acquire same lock → blocks
$ ./lock-cli acquire "payment-processor" --ttl 30s
Waiting for lock... (holder: client-abc, expires in 28s)

# Terminal 1: Release lock
$ ./lock-cli release "payment-processor" 47
Lock released

# Terminal 2: Gets the lock
Lock acquired! Fencing token: 48
Resource: payment-processor

# Use fencing token in your application
$ ./my-app --lock-token 48
[APP] Writing to database with fencing token 48
[DB] Write accepted (token 48 >= last seen 47)
Implementation Hints:
- Start with single-node: use a map with TTL expiration, this teaches the API
- Add fencing tokens: monotonically increasing counter, returned on acquire
- For multi-node: implement Raft for consensus (or use existing library like etcd’s raft)
- Leader handles all lock operations, followers forward to leader
- Use lease-based locks: lock expires after TTL unless renewed
- Implement lock queue for fairness: waiters added to queue, notified in order
Learning milestones:
- Single-node locking works → You understand the basic lock abstraction
- Fencing tokens prevent stale writes → You understand split-brain dangers
- Lock survives leader failure → You understand consensus importance
- TTL prevents deadlocks from crashed clients → You understand lease-based coordination
Project 12: Build a Log Aggregation Pipeline
- File: SYSTEM_DESIGN_MASTERY_PROJECTS.md
- Main Programming Language: Go
- Alternative Programming Languages: Rust, Python, Java
- Coolness Level: Level 3: Genuinely Clever
- Business Potential: 3. The “Service & Support” Model
- Difficulty: Level 3: Advanced
- Knowledge Area: Observability / Data Pipelines
- Software or Tool: ELK Stack / Loki (conceptual model)
- Main Book: “Designing Data-Intensive Applications” by Martin Kleppmann
What you’ll build: A log aggregation system with agents that ship logs from applications, a central collector that indexes and stores logs, and a query interface for searching across all logs.
Why it teaches system design: Log aggregation is essential for debugging distributed systems. You’ll understand:
- How to handle high-volume, append-only data
- The tradeoff between ingestion speed and query speed
- Why structured logging matters for searchability
- Retention and storage tier strategies
Core challenges you’ll face:
- Agent efficiency (ship logs without impacting application) → maps to low-overhead collection
- Backpressure (what if collector is overwhelmed?) → maps to flow control
- Indexing (make logs searchable without indexing everything) → maps to selective indexing
- Storage tiering (hot/warm/cold storage) → maps to cost optimization
- Query across time ranges (find needle in haystack) → maps to time-partitioned storage
Key Concepts:
- Log Aggregation: “Building Microservices, 2nd Edition” Chapter 10 - Sam Newman
- Inverted Index: “Designing Data-Intensive Applications” Chapter 3 - Martin Kleppmann
- Stream Processing: “Designing Data-Intensive Applications” Chapter 11 - Martin Kleppmann
- Structured Logging: “The Practice of Network Security Monitoring” Chapter 8 - Richard Bejtlich
Difficulty: Advanced Time estimate: 2-3 weeks Prerequisites: File I/O, networking, text processing
Real world outcome:
# Start log collector
$ ./log-collector --storage ./logs --port 5140
[LC] Storage initialized: ./logs
[LC] Accepting logs on :5140 (TCP) and :5141 (HTTP)

# Run agent on application servers
$ ./log-agent --collector localhost:5140 --path /var/log/myapp/*.log
[AGENT] Tailing: /var/log/myapp/app.log
[AGENT] Tailing: /var/log/myapp/error.log
[AGENT] Shipped 0 lines (backlog: 0)

# Application writes logs
$ echo '{"timestamp":"2024-01-15T10:30:00Z","level":"error","msg":"Connection refused","service":"payment"}' >> /var/log/myapp/app.log

# Agent ships it
[AGENT] Shipped 1 line (backlog: 0)

# Search logs
$ ./log-query 'level:error AND service:payment' --from 1h
[10:30:00] payment: Connection refused
[10:45:23] payment: Timeout exceeded
[11:02:15] payment: Invalid response code 503

# Aggregate query
$ ./log-query 'level:error' --from 24h --group-by service --count
service      | count
-------------|------
payment      | 147
user-api     | 23
order-svc    | 89
Implementation Hints:
- Agent: use file tailing (seek to end, read new lines, track position in a cursor file)
- Collector: receive over TCP (newline-delimited JSON) or HTTP (batch POST)
- Storage: partition by day (one directory per day), compress old partitions
- Index: simple inverted index - map[word][]docID for full-text, map[field:value][]docID for structured
- Query: parse query string (e.g.,
level:error AND msg:timeout), intersect posting lists
Learning milestones:
- Agent ships logs to collector → You understand log shipping
- Logs are searchable by keyword → You understand inverted indexing
- Time-range queries are fast → You understand time partitioning
- Old logs are compressed → You understand storage tiering
Project 13: Build a Consistent Hashing Ring
- File: SYSTEM_DESIGN_MASTERY_PROJECTS.md
- Main Programming Language: Go
- Alternative Programming Languages: Python, Rust, Java
- Coolness Level: Level 3: Genuinely Clever
- Business Potential: 1. The “Resume Gold”
- Difficulty: Level 2: Intermediate
- Knowledge Area: Distributed Systems / Algorithms
- Software or Tool: Dynamo / Cassandra (conceptual model)
- Main Book: “Designing Data-Intensive Applications” by Martin Kleppmann
What you’ll build: A consistent hashing library with virtual nodes, replication factor support, and visualization of key distribution. Demonstrates adding/removing nodes moves minimal keys.
Why it teaches system design: Consistent hashing is fundamental to distributed databases and caches. You’ll understand:
- Why naive modulo hashing fails when nodes change
- How virtual nodes improve distribution
- The relationship between hash ring and replication
- Why Cassandra/DynamoDB use this approach
Core challenges you’ll face:
- Ring implementation (finding the next node for a key) → maps to binary search on sorted ring
- Virtual nodes (even distribution despite node heterogeneity) → maps to load balancing
- Key movement analysis (prove only K/N keys move on rebalance) → maps to algorithm analysis
- Replication placement (replicas on consecutive nodes) → maps to fault domain awareness
- Visualization (show the ring and key distribution) → maps to making algorithms tangible
Key Concepts:
- Consistent Hashing: “Designing Data-Intensive Applications” Chapter 6 - Martin Kleppmann
- Virtual Nodes: “System Design Interview” Chapter 5 - Alex Xu
- Hash Functions: “Algorithms” Chapter 3.4 - Sedgewick & Wayne
- Partitioning Strategies: “Database Internals” Chapter 13 - Alex Petrov
Difficulty: Intermediate Time estimate: 3-5 days Prerequisites: Hash functions, binary search, basic data structures
Real world outcome:
# Start visualization
$ ./hash-ring-viz
[RING] Initial ring with 0 nodes

# Add nodes
$ ./hash-ring-cli add node-A --vnodes 150
[RING] Added node-A with 150 virtual nodes
[RING] node-A owns 100.0% of ring

$ ./hash-ring-cli add node-B --vnodes 150
[RING] Added node-B with 150 virtual nodes
[RING] node-A owns 50.2% of ring
[RING] node-B owns 49.8% of ring

$ ./hash-ring-cli add node-C --vnodes 150
[RING] Added node-C with 150 virtual nodes
[RING] node-A owns 33.4% of ring
[RING] node-B owns 33.2% of ring
[RING] node-C owns 33.4% of ring

# Find where keys go
$ ./hash-ring-cli lookup user:123
Key 'user:123' → node-B (hash: 0x7A3F...)
Replicas: [node-B, node-C, node-A] (RF=3)

# Remove a node, see minimal key movement
$ ./hash-ring-cli remove node-B
[RING] Removed node-B
[RING] Keys moved: 33.2% (only node-B's keys)
[RING] node-A owns 50.1% of ring
[RING] node-C owns 49.9% of ring

# Visualize (ASCII art)
$ ./hash-ring-cli visualize
Ring (0 to 2^32):
         node-A-v23
    ╭──────────────────╮
   A-v1               A-v45
   │                     │
   C-v12               B-v78
   │     [user:123]      │
   C-v98               B-v3
    ╰──────────────────╯
         node-C-v56
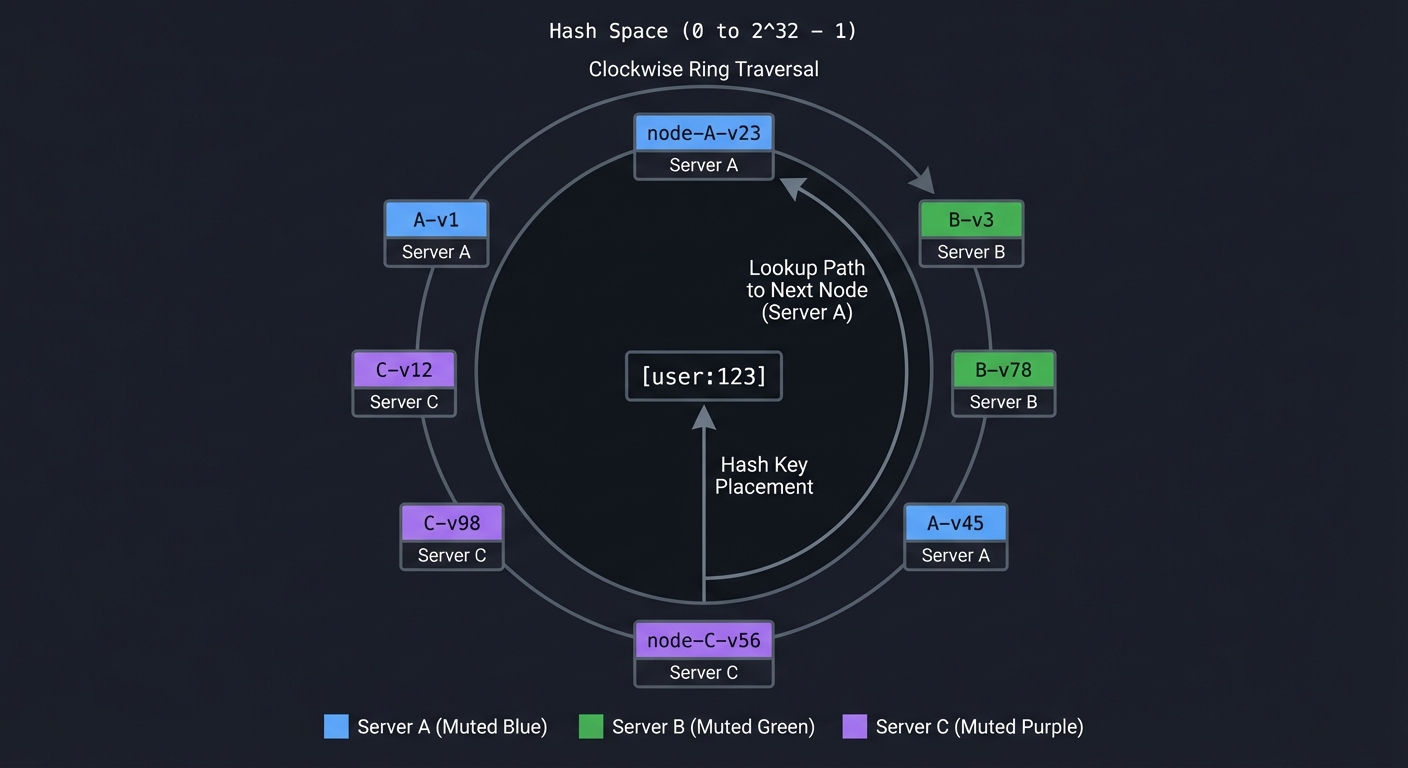
Implementation Hints:
- Use a sorted slice/array of (hash, node_id) pairs
- For lookup: binary search for first entry with hash >= key_hash, wrap around if needed
- Virtual nodes: for node “A”, hash “A-1”, “A-2”, … “A-150” and add all to ring
- For replication: after finding primary, take next N-1 distinct physical nodes
- Hash function: use MD5 or SHA1, take first 4-8 bytes as uint32/uint64
Learning milestones:
- Basic ring works → You understand the core concept
- Virtual nodes improve distribution → You understand load balancing
- Node removal only moves K/N keys → You understand why this is efficient
- Visualization shows the ring → You can explain this in interviews!
Project 14: Build a Connection Pool
- File: SYSTEM_DESIGN_MASTERY_PROJECTS.md
- Main Programming Language: Go
- Alternative Programming Languages: Rust, Java, C
- Coolness Level: Level 2: Practical but Forgettable
- Business Potential: 3. The “Service & Support” Model
- Difficulty: Level 2: Intermediate
- Knowledge Area: Resource Management / Performance
- Software or Tool: HikariCP / pgbouncer (conceptual model)
- Main Book: “Release It!, 2nd Edition” by Michael Nygard
What you’ll build: A generic connection pool that manages reusable connections to an external resource (database, HTTP, Redis), handles connection lifecycle, health checking, and prevents resource exhaustion.
Why it teaches system design: Connection pools are everywhere but rarely understood. You’ll learn:
- Why creating connections is expensive (TCP handshake, auth, etc.)
- How to bound resource usage (max connections)
- The dangers of connection leaks
- Health checking vs failing fast
Core challenges you’ll face:
- Borrowing/returning (thread-safe checkout/checkin) → maps to resource lifecycle
- Max connections (block or fail when exhausted?) → maps to backpressure
- Idle timeout (close connections that sit too long) → maps to resource cleanup
- Health checking (test before returning to user) → maps to connection validation
- Leak detection (connections not returned) → maps to resource tracking
Key Concepts:
- Connection Pooling: “Release It!, 2nd Edition” Chapter 5 - Michael Nygard
- Resource Management: “Effective Java” Item 9 - Joshua Bloch
- Concurrency Patterns: “Learning Go, 2nd Edition” Chapter 12 - Jon Bodner
- Pool Sizing: “Java Concurrency in Practice” Chapter 8 - Brian Goetz
Difficulty: Intermediate Time estimate: 1 week Prerequisites: Concurrency, networking basics
Real world outcome:
// Usage
pool := connpool.New(connpool.Config{
    Factory:     func() (net.Conn, error) { return net.Dial("tcp", "db:5432") },
    MaxSize:     10,
    MaxIdleTime: 5 * time.Minute,
    TestOnBorrow: true,
})

conn, err := pool.Get(ctx)  // Blocks if pool exhausted
if err != nil {
    return err
}
defer pool.Put(conn)  // Return to pool

// Use connection...
# Test program
$ ./pool-test --max-conns 10 --concurrent-users 50
[POOL] Created: 0, Idle: 0, In-use: 0

# 50 goroutines try to get connections
[POOL] Created: 10, Idle: 0, In-use: 10
[POOL] 40 goroutines waiting...

# As goroutines finish, connections are reused
[POOL] Created: 10, Idle: 3, In-use: 7
[POOL] Avg wait time: 45ms

# Idle connections are reaped
[5 minutes later]
[POOL] Reaped 3 idle connections (idle > 5m)
[POOL] Created: 10, Idle: 0, In-use: 0, Destroyed: 3

# Detect leaked connection
[POOL] WARNING: Connection borrowed 60s ago, not returned
[POOL] Borrowed at: main.go:47 (goroutine 23)
Implementation Hints:
- Use a channel of connections as the pool (buffered channel = available connections)
- Track borrowed connections in a map with checkout timestamp for leak detection
- Idle reaper: background goroutine that periodically checks last-use time
- Health check: simple ping/query before returning borrowed connection
- Wrap connections to intercept Close() and return to pool instead
Learning milestones:
- Basic borrow/return works → You understand pooling concept
- Blocks when exhausted → You understand backpressure
- Idle connections are reaped → You understand resource cleanup
- Leaked connections are detected → You understand debugging tools
Project 15: Build a Chaos Engineering Tool
- File: SYSTEM_DESIGN_MASTERY_PROJECTS.md
- Main Programming Language: Go
- Alternative Programming Languages: Python, Rust, Java
- Coolness Level: Level 4: Hardcore Tech Flex
- Business Potential: 3. The “Service & Support” Model
- Difficulty: Level 3: Advanced
- Knowledge Area: Reliability / Testing
- Software or Tool: Chaos Monkey / Gremlin (conceptual model)
- Main Book: “Release It!, 2nd Edition” by Michael Nygard
What you’ll build: A chaos engineering tool that injects failures into running systems: kill processes, add network latency, fill disk, exhaust memory, drop packets. Validates that systems handle failures gracefully.
Why it teaches system design: You can’t know if your system is resilient until you test it. Building this teaches:
- The types of failures that occur in production
- How to safely inject failures (blast radius, abort conditions)
- The difference between testing and production chaos
- Why Netflix runs Chaos Monkey in production
Core challenges you’ll face:
- Failure injection (how to actually cause latency, packet loss, etc.) → maps to system internals
- Blast radius control (affect only target, not everything) → maps to isolation
- Safety mechanisms (automatic abort if things go wrong) → maps to guardrails
- Observability integration (see the impact of chaos) → maps to experiment analysis
- Hypothesis validation (expected vs actual behavior) → maps to scientific method
Key Concepts:
- Chaos Engineering: “Release It!, 2nd Edition” Chapter 16 - Michael Nygard
- Failure Modes: “Building Microservices, 2nd Edition” Chapter 11 - Sam Newman
- Linux Traffic Control: Linux
tccommand documentation - Process Management: “The Linux Programming Interface” Chapter 20 - Michael Kerrisk
Difficulty: Advanced Time estimate: 2 weeks Prerequisites: Linux systems, networking, process management
Real world outcome:
# chaos-experiment.yaml
experiment:
  name: "API resilience test"
  hypothesis: "System returns degraded response when payment service is slow"

  steady_state:
    - probe: http
      url: http://api/checkout
      expect: status == 200 AND latency < 500ms

  method:
    - action: network-latency
      target: payment-service
      latency: 2000ms
      duration: 60s

  rollback:
    - action: network-restore
      target: payment-service
# Run chaos experiment
$ ./chaos-runner --config chaos-experiment.yaml
[CHAOS] Starting experiment: API resilience test
[CHAOS] Checking steady state...
[CHAOS] ✓ http://api/checkout: 200 OK, 127ms

[CHAOS] Injecting failure: 2000ms latency to payment-service
[CHAOS] Using: tc qdisc add dev eth0 root netem delay 2000ms

[CHAOS] Probing during chaos...
[CHAOS] ✓ http://api/checkout: 200 OK, 2340ms (degraded but working)
[CHAOS] ✓ Response includes: "payment_status": "pending"

[CHAOS] Duration complete (60s), rolling back...
[CHAOS] ✓ Latency restored

[CHAOS] Checking steady state restored...
[CHAOS] ✓ http://api/checkout: 200 OK, 134ms

[CHAOS] EXPERIMENT PASSED
[CHAOS] Hypothesis validated: System gracefully degrades
Implementation Hints:
- Network latency: use Linux
tc(traffic control) withnetemfor delay, loss, corruption - Process killing: use signals (SIGTERM, SIGKILL), or cgroups for resource limits
- Disk filling: create large files (fallocate), or use
ioctlto simulate slow disk - Memory exhaustion: use cgroups memory limits
- Always have a watchdog: if chaos tool crashes, failures should auto-revert (use timeouts)
Learning milestones:
- Can inject network latency → You understand Linux traffic control
- Can kill processes by pattern → You understand process management
- Experiments have rollback → You understand safety mechanisms
- Steady-state probes validate hypothesis → You understand chaos engineering methodology
Project 16: Build a Feature Flag System
- File: SYSTEM_DESIGN_MASTERY_PROJECTS.md
- Main Programming Language: Go
- Alternative Programming Languages: Python, Java, Node.js
- Coolness Level: Level 2: Practical but Forgettable
- Business Potential: 3. The “Service & Support” Model
- Difficulty: Level 2: Intermediate
- Knowledge Area: DevOps / Progressive Delivery
- Software or Tool: LaunchDarkly / Unleash (conceptual model)
- Main Book: “Accelerate” by Forsgren, Humble & Kim
What you’ll build: A feature flag service with client SDK, server-side evaluation, gradual rollouts (1% → 10% → 50% → 100%), A/B testing variants, and targeting rules (by user ID, region, etc.).
Why it teaches system design: Feature flags enable continuous delivery and safe deployments. You’ll understand:
- How to decouple deployment from release
- The difference between operational flags and experiment flags
- How gradual rollouts reduce blast radius
- Technical debt from flag accumulation
Core challenges you’ll face:
- Consistent evaluation (same user always gets same variant) → maps to deterministic hashing
- Low-latency SDK (can’t add 100ms to every request) → maps to caching and local evaluation
- Real-time updates (change flag, clients see immediately) → maps to push vs pull
- Targeting rules (complex boolean logic) → maps to rule engines
- Analytics (which variant is winning?) → maps to experiment analysis
Key Concepts:
- Feature Flags: “Accelerate” Chapter 4 - Forsgren, Humble & Kim
- Continuous Delivery: “Continuous Delivery” Chapter 10 - Humble & Farley
- A/B Testing: “Trustworthy Online Controlled Experiments” Chapter 1 - Kohavi et al.
- Hashing for Bucketing: “Designing Data-Intensive Applications” Chapter 6 - Martin Kleppmann
Difficulty: Intermediate Time estimate: 1-2 weeks Prerequisites: HTTP, basic SDK design
Real world outcome:
// SDK usage in your application
ff := featureflags.NewClient("api-key", featureflags.Config{
    BaseURL: "http://flags.internal",
    RefreshInterval: 30 * time.Second,
})

// Simple boolean flag
if ff.IsEnabled("new-checkout-flow", user) {
    return newCheckout(cart)
}
return oldCheckout(cart)

// Variant flag (A/B test)
variant := ff.GetVariant("button-color", user)
switch variant {
case "red":
    return renderRedButton()
case "blue":
    return renderBlueButton()
default:
    return renderDefaultButton()
}
# Admin UI / CLI
$ ./flags-cli create new-checkout-flow --type boolean
Flag created: new-checkout-flow (disabled by default)

$ ./flags-cli rollout new-checkout-flow --percent 10
[FLAGS] new-checkout-flow: 0% → 10%
[FLAGS] Approximately 10% of users will see this flag enabled

$ ./flags-cli target new-checkout-flow --rule 'user.country == "US"' --percent 50
[FLAGS] Added targeting rule: US users at 50%

# See flag evaluation
$ ./flags-cli evaluate new-checkout-flow --user '{"id":"123","country":"US"}'
Flag: new-checkout-flow
User: 123
Bucket: 34 (out of 100)
Rule match: country == "US" (50% rollout)
Result: ENABLED

$ ./flags-cli stats new-checkout-flow --last 24h
Flag: new-checkout-flow
Evaluations: 147,293
Enabled: 14,847 (10.1%)
By variant: control=132,446, treatment=14,847
Implementation Hints:
- Bucket user consistently: hash(flag_name + user_id) % 100 gives bucket 0-99
- If bucket < rollout_percent, flag is enabled
- For variants: divide 100 buckets among variants (e.g., 50/50 or 33/33/34)
- Client SDK should cache flags locally and refresh periodically
- Use SSE or WebSocket for real-time updates (optional)
- Targeting rules: implement a simple expression parser or use JSON rules
Learning milestones:
- Boolean flags work → You understand the basic concept
- Rollouts are gradual and consistent → You understand bucketing
- Targeting rules evaluate correctly → You understand rule engines
- SDK caches and refreshes → You understand client-side concerns
Project 17: Build a Read-Through/Write-Through Cache Layer
- File: SYSTEM_DESIGN_MASTERY_PROJECTS.md
- Main Programming Language: Go
- Alternative Programming Languages: Java, Python, Rust
- Coolness Level: Level 3: Genuinely Clever
- Business Potential: 3. The “Service & Support” Model
- Difficulty: Level 3: Advanced
- Knowledge Area: Caching / Performance
- Software or Tool: Redis (with patterns)
- Main Book: “Designing Data-Intensive Applications” by Martin Kleppmann
What you’ll build: A caching layer that sits between your application and database, automatically populating cache on reads (read-through) and updating cache on writes (write-through), with cache invalidation strategies.
Why it teaches system design: Caching is cited as “one of the two hard problems in CS.” You’ll understand:
- The difference between cache-aside, read-through, write-through, and write-behind
- Why cache invalidation is genuinely hard
- Thundering herd problem and how to solve it
- When NOT to cache (it’s not always beneficial)
Core challenges you’ll face:
- Cache population (on miss, only one request should fetch from DB) → maps to thundering herd
- Write propagation (update cache when DB changes) → maps to consistency
- Invalidation (when to expire, when to delete) → maps to staleness tolerance
- Serialization (object to cache, cache to object) → maps to data format
- Cache stampede prevention (probabilistic early expiration) → maps to jitter
Key Concepts:
- Caching Patterns: “Designing Data-Intensive Applications” Chapter 11 - Martin Kleppmann
- Cache Invalidation: “System Design Interview” Chapter 5 - Alex Xu
- Thundering Herd: “Release It!, 2nd Edition” Chapter 5 - Michael Nygard
- Consistency Models: “Building Microservices, 2nd Edition” Chapter 6 - Sam Newman
Difficulty: Advanced Time estimate: 1-2 weeks Prerequisites: Caching basics, database access, concurrency
Real world outcome:
// Usage
type UserRepository interface {
    GetUser(id string) (*User, error)
    UpdateUser(user *User) error
}

cachedRepo := cache.Wrap(dbRepo, cache.Config{
    Strategy:    cache.ReadThrough | cache.WriteThrough,
    TTL:         10 * time.Minute,
    Backend:     redisClient,
    KeyPrefix:   "user:",
    SingleFlight: true,  // Prevent thundering herd
})

// This checks cache first, falls back to DB on miss
user, err := cachedRepo.GetUser("123")
// → Cache HIT: returns cached value
// → Cache MISS: fetches from DB, populates cache, returns

// This updates DB and cache atomically
err = cachedRepo.UpdateUser(updatedUser)
// → Updates DB first, then cache
# Monitor cache behavior
$ ./cache-monitor --redis localhost:6379
[CACHE] Watching keys: user:*

# First request (miss)
[CACHE] GET user:123 → MISS
[CACHE] DB query for user:123 (45ms)
[CACHE] SET user:123 (TTL: 10m)
[CACHE] Response: 46ms total

# Second request (hit)
[CACHE] GET user:123 → HIT
[CACHE] Response: 1ms total

# Simulate thundering herd (100 concurrent requests for cold key)
$ ./load-test --endpoint /users/999 --concurrent 100
[CACHE] GET user:999 → MISS (request 1 wins lock)
[CACHE] 99 requests waiting on singleflight...
[CACHE] DB query for user:999 (50ms)
[CACHE] SET user:999 (TTL: 10m)
[CACHE] All 100 requests served from single DB query

# Write-through update
[CACHE] UPDATE user:123 → DB write (23ms)
[CACHE] SET user:123 (new value, TTL: 10m)
Implementation Hints:
- Use Go’s
singleflightpackage to prevent thundering herd (only one in-flight request per key) - For write-through: update DB first, then cache (if DB fails, don’t update cache)
- For write-behind: update cache immediately, queue DB write (faster but more complex)
- Add jitter to TTLs: instead of 10 minutes, use 9-11 minutes randomly to prevent mass expiration
- Consider cache tags for group invalidation (e.g., invalidate all
product:*keys)
Learning milestones:
- Read-through works → You understand cache population
- Singleflight prevents stampede → You understand thundering herd
- Write-through maintains consistency → You understand cache invalidation
- Jittered TTLs prevent mass expiration → You understand production concerns
Final Project: Build a Mini E-Commerce System (Comprehensive)
- File: SYSTEM_DESIGN_MASTERY_PROJECTS.md
- Main Programming Language: Go
- Alternative Programming Languages: Rust, Java, Python
- Coolness Level: Level 4: Hardcore Tech Flex
- Business Potential: 5. The “Industry Disruptor”
- Difficulty: Level 5: Master
- Knowledge Area: Full System Design
- Software or Tool: Complete microservices platform
- Main Book: “Designing Data-Intensive Applications” by Martin Kleppmann
What you’ll build: A complete e-commerce backend with multiple services (users, products, orders, payments, inventory), demonstrating every system design concept: load balancing, caching, rate limiting, message queues, service discovery, circuit breakers, and observability.
Why this is the capstone: This integrates everything. You’ll face real decisions:
- How to handle checkout atomically across services?
- What happens when payment succeeds but inventory update fails?
- How to prevent overselling during flash sales?
- How to debug a slow checkout in a distributed system?
Core services you’ll build:
- API Gateway (from Project 10)
- Routes requests to services
- Handles authentication
- Applies rate limiting
- User Service
- Registration, login, profiles
- JWT token generation
- Session management
- Product Service
- Product catalog CRUD
- Search and filtering
- Category management
- Inventory Service
- Stock levels with optimistic locking
- Reservation pattern (hold stock during checkout)
- Prevents overselling
- Order Service
- Order creation and status tracking
- Saga pattern for distributed transactions
- Compensating transactions on failure
- Payment Service
- Mock payment processing
- Idempotency keys
- Retry with exponential backoff
- Notification Service
- Async email/SMS via message queue
- Templating
- Delivery tracking
Infrastructure you’ll use:
- Message Queue (from Project 4): Order events, notifications
- Distributed Cache (from Project 3): Product catalog, sessions
- Service Discovery (from Project 8): Service registration
- Rate Limiter (from Project 2): API protection
- Circuit Breaker (from Project 7): External service calls
- Metrics (from Project 9): Latency, errors, throughput
- Load Balancer (from Project 1): Distribute traffic
Core challenges you’ll face:
- Distributed transactions (checkout spans 5 services) → maps to saga pattern
- Idempotency (retry-safe operations) → maps to exactly-once semantics
- Inventory management (prevent overselling) → maps to pessimistic vs optimistic locking
- Event ordering (process events in correct order) → maps to event sourcing
- Debugging (why is checkout slow?) → maps to distributed tracing
Key Concepts:
- Saga Pattern: “Designing Data-Intensive Applications” Chapter 9 - Martin Kleppmann
- Idempotency: “Designing Data-Intensive Applications” Chapter 11 - Martin Kleppmann
- Event Sourcing: “Building Microservices, 2nd Edition” Chapter 6 - Sam Newman
- Distributed Tracing: “Building Microservices, 2nd Edition” Chapter 10 - Sam Newman
- Inventory Management: “System Design Interview Vol 2” Chapter 4 - Alex Xu
Difficulty: Master Time estimate: 2-3 months Prerequisites: All previous projects
Real world outcome:
# Start the entire platform
$ docker-compose up
[GATEWAY] Listening on :443
[USERS] Connected to DB, listening on :8081
[PRODUCTS] Connected to DB, connected to Redis, listening on :8082
[INVENTORY] Connected to DB, listening on :8083
[ORDERS] Connected to MQ, listening on :8084
[PAYMENTS] Listening on :8085
[NOTIFICATIONS] Connected to MQ, listening on :8086
[REGISTRY] All 6 services registered

# Complete user journey
$ curl -X POST https://api/register -d '{"email":"user@example.com"}'
{"user_id": "u123", "token": "eyJ..."}

$ curl -H "Authorization: Bearer eyJ..." https://api/products?category=electronics
{"products": [{"id": "p1", "name": "Laptop", "price": 999, "stock": 47}]}

# Checkout (the complex part)
$ curl -X POST -H "Authorization: Bearer eyJ..." https://api/checkout \
  -d '{"items": [{"product_id": "p1", "quantity": 2}], "payment_method": "card_xxx"}'

# Behind the scenes:
[ORDERS] Received checkout request (order_id: o789)
[ORDERS] → Reserving inventory...
[INVENTORY] Reserved 2x p1 (reservation_id: r456, expires: 5min)
[ORDERS] → Processing payment...
[PAYMENTS] Charging $1998 to card_xxx (idempotency_key: o789)
[PAYMENTS] ✓ Payment successful (charge_id: ch_123)
[ORDERS] → Confirming inventory...
[INVENTORY] Confirmed reservation r456, stock: 47 → 45
[ORDERS] → Publishing order.created event...
[MQ] Published: order.created (o789)
[NOTIFICATIONS] Consumed: order.created (o789)
[NOTIFICATIONS] Sending confirmation email to user@example.com

# Response to user
{"order_id": "o789", "status": "confirmed", "total": 1998}

# Simulate failure: payment fails
[PAYMENTS] ✗ Payment failed: insufficient funds
[ORDERS] → Releasing inventory reservation...
[INVENTORY] Released reservation r456, stock: 45 → 47
[ORDERS] Order o790 failed: payment_declined

# Observability
$ curl http://metrics:9090/api/v1/query?query=checkout_latency_p99
{"result": [{"value": 847}]}  # 847ms p99 latency

$ curl http://jaeger:16686/api/traces?service=orders&limit=10
[Trace showing: gateway → orders → inventory → payments → inventory → notifications]
Implementation Hints:
- Start with a monolith, then extract services one at a time
- Implement saga orchestrator in Order Service (it coordinates the checkout)
- Use compensation: if payment fails, release inventory; if notification fails, log and retry later
- Idempotency: use order_id as idempotency key for payment
- Inventory reservation: separate “reserved” from “sold” counts, expire reservations after timeout
- Add distributed tracing: pass trace_id through all service calls
Learning milestones:
- Basic checkout works → You understand the flow
- Failures are handled gracefully → You understand sagas and compensation
- Retries don’t double-charge → You understand idempotency
- You can trace a slow request → You understand observability
- Flash sale doesn’t oversell → You understand inventory patterns
Project Comparison Table
| Project | Difficulty | Time | Depth of Understanding | Fun Factor |
|---|---|---|---|---|
| 1. Load Balancer | Advanced | 2-3 weeks | ⭐⭐⭐⭐ | ⭐⭐⭐ |
| 2. Rate Limiter | Intermediate+ | 1-2 weeks | ⭐⭐⭐ | ⭐⭐⭐ |
| 3. Distributed Cache | Expert | 3-4 weeks | ⭐⭐⭐⭐⭐ | ⭐⭐⭐⭐ |
| 4. Message Queue | Expert | 3-4 weeks | ⭐⭐⭐⭐⭐ | ⭐⭐⭐⭐ |
| 5. URL Shortener | Intermediate | 1 week | ⭐⭐ | ⭐⭐ |
| 6. LSM Key-Value Store | Master | 4-6 weeks | ⭐⭐⭐⭐⭐ | ⭐⭐⭐⭐⭐ |
| 7. Circuit Breaker | Intermediate | 3-5 days | ⭐⭐⭐ | ⭐⭐⭐ |
| 8. Service Discovery | Advanced | 2 weeks | ⭐⭐⭐⭐ | ⭐⭐⭐ |
| 9. Metrics System | Advanced | 2-3 weeks | ⭐⭐⭐⭐ | ⭐⭐⭐⭐ |
| 10. API Gateway | Advanced | 2 weeks | ⭐⭐⭐⭐ | ⭐⭐⭐ |
| 11. Distributed Lock | Expert | 3-4 weeks | ⭐⭐⭐⭐⭐ | ⭐⭐⭐⭐ |
| 12. Log Aggregation | Advanced | 2-3 weeks | ⭐⭐⭐ | ⭐⭐⭐ |
| 13. Consistent Hashing | Intermediate | 3-5 days | ⭐⭐⭐ | ⭐⭐⭐⭐ |
| 14. Connection Pool | Intermediate | 1 week | ⭐⭐⭐ | ⭐⭐ |
| 15. Chaos Engineering | Advanced | 2 weeks | ⭐⭐⭐⭐ | ⭐⭐⭐⭐⭐ |
| 16. Feature Flags | Intermediate | 1-2 weeks | ⭐⭐⭐ | ⭐⭐⭐ |
| 17. Cache Layer | Advanced | 1-2 weeks | ⭐⭐⭐⭐ | ⭐⭐⭐ |
| Final: E-Commerce | Master | 2-3 months | ⭐⭐⭐⭐⭐ | ⭐⭐⭐⭐⭐ |
Recommended Learning Path
If you’re new to system design:
- Start with: Project 5 (URL Shortener) - gentle introduction
- Then: Project 7 (Circuit Breaker) - simple but powerful pattern
- Then: Project 13 (Consistent Hashing) - fundamental algorithm
- Then: Project 2 (Rate Limiter) - bridges to distributed systems
If you have some experience:
- Start with: Project 1 (Load Balancer) - see the network layer
- Then: Project 9 (Metrics) - build observability
- Then: Project 3 (Distributed Cache) - distributed data
- Then: Project 8 (Service Discovery) - microservices foundation
If you want to go deep:
- Start with: Project 6 (LSM KV Store) - database internals
- Then: Project 4 (Message Queue) - async and durability
- Then: Project 11 (Distributed Lock) - coordination
- Then: Final Project - put it all together
Key Resources
Books (Read These)
- “Designing Data-Intensive Applications” by Martin Kleppmann - THE system design bible
- “System Design Interview Vol 1 & 2” by Alex Xu - Practical examples
- “Release It!, 2nd Edition” by Michael Nygard - Production patterns
- “Building Microservices, 2nd Edition” by Sam Newman - Microservices patterns
Online Resources
- The Pragmatic Engineer: System Design Book Review - Great analysis of Alex Xu’s book
- ByteByteGo - Alex Xu’s online platform with diagrams
- High Scalability Blog - Real-world architecture case studies
- Martin Kleppmann’s Blog - Deep dives on distributed systems
Famous Case Studies to Study
- How Discord stores trillions of messages
- How Slack scales to millions of connections
- How Netflix handles chaos
- How Google’s Spanner achieves global consistency
- How Uber manages millions of trips in real-time
Summary
| # | Project | Main Language |
|---|---|---|
| 1 | Load Balancer | Go |
| 2 | Rate Limiter | Go |
| 3 | Distributed Cache | Go |
| 4 | Message Queue | Go |
| 5 | URL Shortener | Go |
| 6 | LSM Key-Value Store | C |
| 7 | Circuit Breaker Library | Go |
| 8 | Service Discovery System | Go |
| 9 | Metrics Collection System | Go |
| 10 | API Gateway | Go |
| 11 | Distributed Lock Service | Go |
| 12 | Log Aggregation Pipeline | Go |
| 13 | Consistent Hashing Ring | Go |
| 14 | Connection Pool | Go |
| 15 | Chaos Engineering Tool | Go |
| 16 | Feature Flag System | Go |
| 17 | Read-Through/Write-Through Cache Layer | Go |
| Final | Mini E-Commerce System | Go |
“Everyone has a plan until they get punched in the face.” - Mike Tyson
System design is about building systems that can take that punch and keep running.