Learn Spring Framework: From Internals to Mastery
Goal: Deeply understand how Spring works under the hood—IoC containers, dependency injection, AOP proxies, auto-configuration magic—and how it compares to other web frameworks across languages.
Why Understanding Spring Internals Matters
Spring is arguably the most sophisticated application framework ever built. It powers a massive portion of enterprise Java applications, and for good reason—it elegantly solves the fundamental problem of managing complex object graphs in large applications.
But most developers use Spring as a “magic box.” They annotate classes with @Service, @Autowired, @Transactional, and things “just work.” This is fine until:
- Something breaks and you have no idea why
- Performance issues arise and you don’t know where to look
- You need to extend or customize Spring’s behavior
- You’re asked how Spring works in an interview
After completing these projects, you will:
- Understand exactly what happens when Spring starts up
- Know how dependency injection works at the bytecode level
- Be able to explain AOP proxies (JDK Dynamic vs CGLIB)
- Understand DispatcherServlet’s request processing pipeline
- Know what auto-configuration does and how to customize it
- Compare Spring intelligently with other frameworks
- Debug Spring applications with confidence
Core Concept Analysis
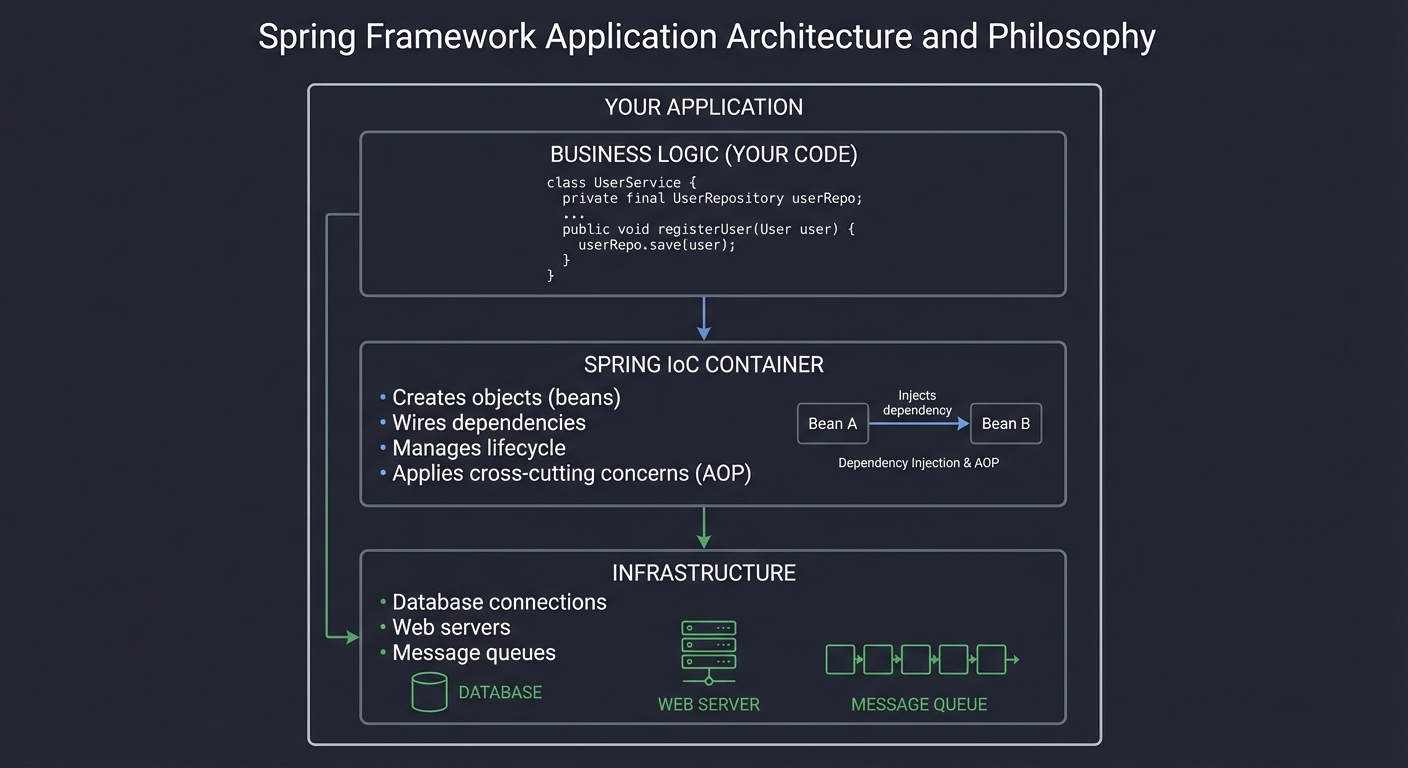
The Spring Philosophy
┌─────────────────────────────────────────────────────────────────────┐
│                          YOUR APPLICATION                           │
│  ┌──────────────────────────────────────────────────────────────┐  │
│  │                    Business Logic (Your Code)                 │  │
│  └──────────────────────────────────────────────────────────────┘  │
│                               ↓                                     │
│  ┌──────────────────────────────────────────────────────────────┐  │
│  │                  Spring IoC Container                         │  │
│  │  • Creates objects (beans)                                    │  │
│  │  • Wires dependencies                                         │  │
│  │  • Manages lifecycle                                          │  │
│  │  • Applies cross-cutting concerns (AOP)                       │  │
│  └──────────────────────────────────────────────────────────────┘  │
│                               ↓                                     │
│  ┌──────────────────────────────────────────────────────────────┐  │
│  │                    Infrastructure                              │  │
│  │  • Database connections                                        │  │
│  │  • Web servers                                                 │  │
│  │  • Message queues                                              │  │
│  └──────────────────────────────────────────────────────────────┘  │
└─────────────────────────────────────────────────────────────────────┘
Fundamental Concepts
- Inversion of Control (IoC)
- Traditional: Your code creates its dependencies
- IoC: A container creates dependencies and gives them to your code
- “Hollywood Principle”: Don’t call us, we’ll call you
- Dependency Injection (DI)
- Constructor Injection: Dependencies passed via constructor
- Setter Injection: Dependencies set via setter methods
- Field Injection: Dependencies injected directly into fields (via reflection)
- BeanFactory vs ApplicationContext
BeanFactory: Basic container, lazy initializationApplicationContext: Full-featured, eager initialization, event publishing, AOP
- Bean Lifecycle
Instantiation → Populate Properties → BeanNameAware → BeanFactoryAware → ApplicationContextAware → @PostConstruct → InitializingBean.afterPropertiesSet() → custom init-method → Bean Ready → @PreDestroy → DisposableBean.destroy() → custom destroy-method - AOP (Aspect-Oriented Programming)
- Cross-cutting concerns: logging, security, transactions
- Advice: Code to execute (before, after, around)
- Pointcut: Where to apply advice
- Proxy: Wrapper that intercepts method calls
- Spring MVC Request Flow
HTTP Request → Filter Chain → DispatcherServlet →
HandlerMapping → HandlerAdapter → Interceptors (preHandle) →
Controller → Interceptors (postHandle) →
ViewResolver → View → Response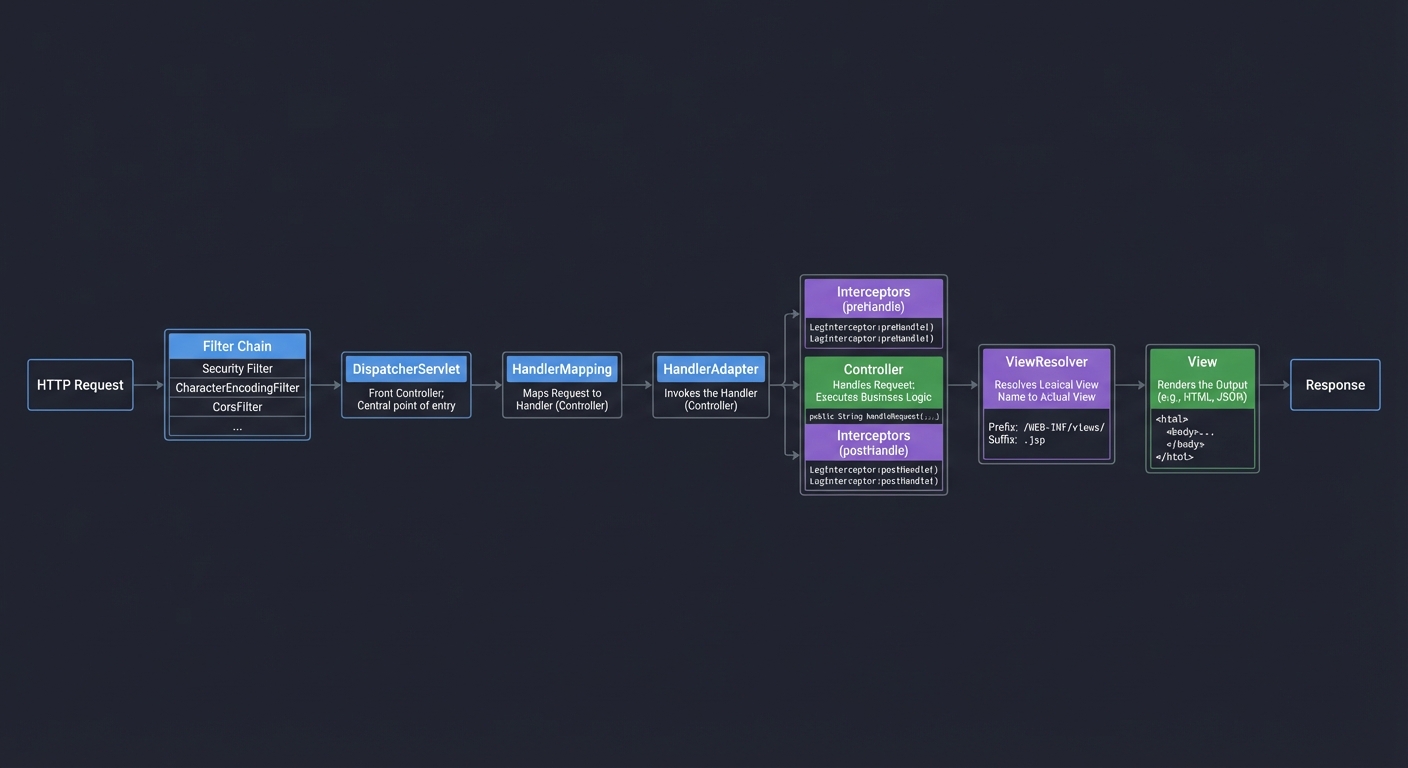
Framework Comparison Overview
Before diving into projects, let’s understand where Spring sits in the ecosystem:
Java Frameworks
| Framework | Approach | Startup Time | Memory | Best For |
|---|---|---|---|---|
| Spring Boot | Runtime reflection, rich ecosystem | ~2-5s | ~200-500MB | Enterprise apps, microservices |
| Quarkus | Build-time optimization, GraalVM native | ~10-50ms | ~20-50MB | Cloud-native, serverless |
| Micronaut | Compile-time DI, no reflection | ~10-50ms | ~20-50MB | Microservices, IoT |
| Jakarta EE | Standards-based, vendor-neutral | ~3-10s | ~200-400MB | Enterprise, portable apps |
Cross-Language Comparison
| Framework | Language | Philosophy | Performance | Learning Curve |
|---|---|---|---|---|
| Spring Boot | Java | Convention over config, comprehensive | Good | Steep |
| ASP.NET Core | C# | Similar to Spring, Microsoft ecosystem | Excellent | Moderate |
| Django | Python | Batteries included, ORM-first | Moderate | Gentle |
| Express | Node.js | Minimal, middleware-based | Very Good | Easy |
| Rails | Ruby | Convention over config, happiness | Moderate | Moderate |
| Gin/Echo | Go | Minimal, explicit, fast | Excellent | Easy |
Project List
Projects are ordered from foundational understanding to advanced implementations.
Project 1: “Build Your Own IoC Container” — Understand Dependency Injection
| Attribute | Value |
|---|---|
| File | SPRING_FRAMEWORK_DEEP_DIVE_PROJECTS.md |
| Main Programming Language | Java |
| Alternative Programming Languages | Kotlin, Scala |
| Coolness Level | Level 4: Hardcore Tech Flex |
| Business Potential | 1. The “Resume Gold” |
| Difficulty | Level 3: Advanced |
| Knowledge Area | Reflection / Dependency Injection / Design Patterns |
| Software or Tool | Java Reflection API |
| Main Book | “Pro Spring 6” by Iuliana Cosmina |
What you’ll build: A miniature IoC container that scans for annotated classes (@Component, @Autowired), creates instances, resolves dependencies, and injects them—exactly like Spring does, but in ~500 lines of code.
Why it teaches Spring internals: You cannot truly understand Spring until you’ve built a tiny version yourself. This project demystifies the “magic” of @Autowired by implementing it from scratch using Java reflection.
Core challenges you’ll face:
- Classpath scanning → maps to finding annotated classes at startup
- Dependency resolution order → maps to topological sorting of bean dependencies
- Circular dependency detection → maps to preventing infinite loops
- Singleton vs prototype scope → maps to bean lifecycle management
- Constructor vs setter injection → maps to different injection strategies
Key Concepts:
- Java Reflection: “Java: The Complete Reference” Chapter 30 - Herbert Schildt
- Dependency Injection Pattern: “Design Patterns” - Gang of Four (Creational Patterns section)
- Bean Scopes: Spring Bean Scopes Documentation
- Classpath Scanning: Spring Component Scanning
Difficulty: Advanced Time estimate: 1-2 weeks Prerequisites: Core Java, understanding of reflection, generics
Real world outcome:
// Your custom annotations
@MyComponent
public class UserService {
    @MyAutowired
    private UserRepository userRepository;

    public User findUser(Long id) {
        return userRepository.findById(id);
    }
}

@MyComponent
public class UserRepository {
    public User findById(Long id) {
        return new User(id, "John Doe");
    }
}

// Your IoC container in action
public class Main {
    public static void main(String[] args) {
        MyApplicationContext context = new MyApplicationContext("com.example");

        // Container scans, instantiates, and wires everything
        System.out.println("Registered beans:");
        context.getBeanNames().forEach(System.out::println);
        // Output:
        // userService
        // userRepository

        UserService userService = context.getBean(UserService.class);
        User user = userService.findUser(1L);
        System.out.println(user.getName()); // "John Doe"
    }
}
Implementation Hints:
The IoC container process:
- Scan: Find all classes with
@MyComponentannotation - Parse: Extract dependency information (constructor params,
@MyAutowiredfields) - Sort: Topologically sort to resolve dependencies in correct order
- Instantiate: Create instances using reflection
- Inject: Set dependencies on each instance
- Store: Keep singletons in a registry
Key Java Reflection APIs you’ll use:
Class.forName()- Load class by nameclass.getDeclaredConstructors()- Get constructorsclass.getDeclaredFields()- Get fields (including private)field.setAccessible(true)- Access private fieldsfield.set(instance, value)- Set field valueconstructor.newInstance(args)- Create instance
Questions to guide your implementation:
- How do you find all classes in a package at runtime?
- What happens when A depends on B, and B depends on A?
- How do you handle constructor injection with multiple parameters?
- What if a dependency doesn’t exist?
Learning milestones:
- You scan and find annotated classes → You understand classpath scanning
- You resolve simple dependencies → You understand basic DI
- You detect circular dependencies → You understand why Spring sometimes fails
- You implement multiple scopes → You understand bean lifecycle
Project 2: “Build Your Own AOP Framework” — Understand Proxies
| Attribute | Value |
|---|---|
| File | SPRING_FRAMEWORK_DEEP_DIVE_PROJECTS.md |
| Main Programming Language | Java |
| Alternative Programming Languages | Kotlin, Scala |
| Coolness Level | Level 4: Hardcore Tech Flex |
| Business Potential | 1. The “Resume Gold” |
| Difficulty | Level 4: Expert |
| Knowledge Area | AOP / Proxies / Bytecode Manipulation |
| Software or Tool | JDK Dynamic Proxy, CGLIB |
| Main Book | “Spring in Action” by Craig Walls |
What you’ll build: An AOP framework that creates proxies (both JDK Dynamic and CGLIB), intercepts method calls, and applies advice (before, after, around)—exactly like Spring AOP works.
Why it teaches Spring AOP: @Transactional, @Secured, @Cacheable all work through AOP proxies. Understanding proxy mechanics explains why self-invocation doesn’t trigger aspects and why you can’t advise final methods.
Core challenges you’ll face:
- JDK Dynamic Proxy creation → maps to interface-based proxying
- CGLIB proxy creation → maps to subclass-based proxying
- Method interception → maps to InvocationHandler/MethodInterceptor
- Pointcut expressions → maps to matching which methods to advise
- Advice chaining → maps to multiple aspects on one method
Key Concepts:
- JDK Dynamic Proxy: Java Proxy Documentation
- CGLIB Proxies: Spring Proxying Mechanisms
- AOP Concepts: “Spring in Action” Chapter 4 - Craig Walls
- AspectJ Pointcuts: Spring AOP Pointcuts
Difficulty: Expert Time estimate: 2-3 weeks Prerequisites: Project 1 (IoC Container), understanding of interfaces and inheritance
Real world outcome:
// Your custom annotations
@MyAspect
public class LoggingAspect {

    @MyBefore("execution(* UserService.*(..))")
    public void logBefore(MethodInvocation invocation) {
        System.out.println(">>> Calling: " + invocation.getMethod().getName());
    }

    @MyAfter("execution(* UserService.*(..))")
    public void logAfter(MethodInvocation invocation, Object result) {
        System.out.println("<<< Returned: " + result);
    }

    @MyAround("execution(* *.save*(..))")
    public Object measureTime(MethodInvocation invocation) throws Throwable {
        long start = System.currentTimeMillis();
        Object result = invocation.proceed();
        long duration = System.currentTimeMillis() - start;
        System.out.println("Method took: " + duration + "ms");
        return result;
    }
}

// Usage
public class Main {
    public static void main(String[] args) {
        MyAopContext context = new MyAopContext("com.example");

        UserService userService = context.getBean(UserService.class);
        // This is actually a PROXY wrapping the real UserService

        User user = userService.findUser(1L);
        // Output:
        // >>> Calling: findUser
        // <<< Returned: User{id=1, name='John Doe'}

        userService.saveUser(new User(2L, "Jane"));
        // Output:
        // >>> Calling: saveUser
        // Method took: 150ms
        // <<< Returned: User{id=2, name='Jane'}

        // Demonstrate self-invocation limitation
        System.out.println("Proxy class: " + userService.getClass().getName());
        // Output: Proxy class: com.example.UserService$$EnhancerByCGLIB$$abc123
    }
}
Implementation Hints:
Two proxy types:
JDK Dynamic Proxy (for interfaces):
// Pseudo-code structure
Proxy.newProxyInstance(
    classLoader,
    new Class<?>[] { UserService.class },  // Interface
    (proxy, method, args) -> {
        // Before advice
        Object result = method.invoke(target, args);
        // After advice
        return result;
    }
);
CGLIB Proxy (for classes):
// Pseudo-code structure
Enhancer enhancer = new Enhancer();
enhancer.setSuperclass(UserService.class);
enhancer.setCallback((MethodInterceptor) (obj, method, args, methodProxy) -> {
    // Before advice
    Object result = methodProxy.invokeSuper(obj, args);
    // After advice
    return result;
});
return enhancer.create();
Why self-invocation bypasses AOP:
When method A calls method B internally using this.methodB(), it bypasses the proxy. The call goes directly to the target object, not through the proxy wrapper.
Questions to guide your implementation:
- When do you use JDK proxy vs CGLIB?
- How do you chain multiple aspects on one method?
- How do you parse pointcut expressions like
execution(* *.save*(..))? - Why can’t you advise final methods with CGLIB?
Learning milestones:
- You create JDK dynamic proxies → You understand interface-based proxying
- You create CGLIB proxies → You understand subclass-based proxying
- You implement around advice → You understand method interception
- You chain multiple aspects → You understand advice ordering
Project 3: “Build a Mini Spring MVC” — Understand DispatcherServlet
| Attribute | Value |
|---|---|
| File | SPRING_FRAMEWORK_DEEP_DIVE_PROJECTS.md |
| Main Programming Language | Java |
| Alternative Programming Languages | Kotlin |
| Coolness Level | Level 4: Hardcore Tech Flex |
| Business Potential | 1. The “Resume Gold” |
| Difficulty | Level 3: Advanced |
| Knowledge Area | Web Frameworks / Servlet API / MVC Pattern |
| Software or Tool | Servlet API, Embedded Tomcat/Jetty |
| Main Book | “Spring in Action” by Craig Walls |
What you’ll build: A mini MVC framework with a central DispatcherServlet, handler mapping (annotations like @GetMapping), argument resolution (@PathVariable, @RequestBody), and JSON response handling.
Why it teaches Spring MVC: Every Spring web request flows through DispatcherServlet. Understanding its pipeline—handler mapping, adapter, interceptors, exception handlers—explains how requests become responses.
Core challenges you’ll face:
- Servlet integration → maps to HttpServletRequest/Response handling
- Handler mapping → maps to matching URLs to controller methods
- Argument resolution → maps to parsing @PathVariable, @RequestParam, @RequestBody
- Return value handling → maps to converting objects to JSON responses
- Exception handling → maps to @ExceptionHandler mechanism
Key Concepts:
- Servlet Lifecycle: Jakarta Servlet Specification
- DispatcherServlet: Spring MVC Documentation
- Handler Mapping: Spring Handler Mapping
- Request Lifecycle: Spring MVC Request Flow
Difficulty: Advanced Time estimate: 2-3 weeks Prerequisites: Project 1 (IoC Container), Java Servlets basics, HTTP protocol
Real world outcome:
// Your custom annotations
@MyController
@MyRequestMapping("/users")
public class UserController {

    @MyAutowired
    private UserService userService;

    @MyGetMapping("/{id}")
    public User getUser(@MyPathVariable("id") Long id) {
        return userService.findById(id);
    }

    @MyPostMapping
    public User createUser(@MyRequestBody User user) {
        return userService.save(user);
    }

    @MyExceptionHandler(UserNotFoundException.class)
    public ErrorResponse handleNotFound(UserNotFoundException e) {
        return new ErrorResponse(404, e.getMessage());
    }
}

// Starting your framework
public class Main {
    public static void main(String[] args) {
        MySpringMvc app = new MySpringMvc("com.example");
        app.start(8080);

        System.out.println("Server started on http://localhost:8080");
        System.out.println("Registered endpoints:");
        // GET  /users/{id}
        // POST /users
    }
}

// Testing with curl
// $ curl http://localhost:8080/users/1
// {"id":1,"name":"John Doe"}

// $ curl -X POST -H "Content-Type: application/json" \
//        -d '{"name":"Jane"}' http://localhost:8080/users
// {"id":2,"name":"Jane"}
Implementation Hints:
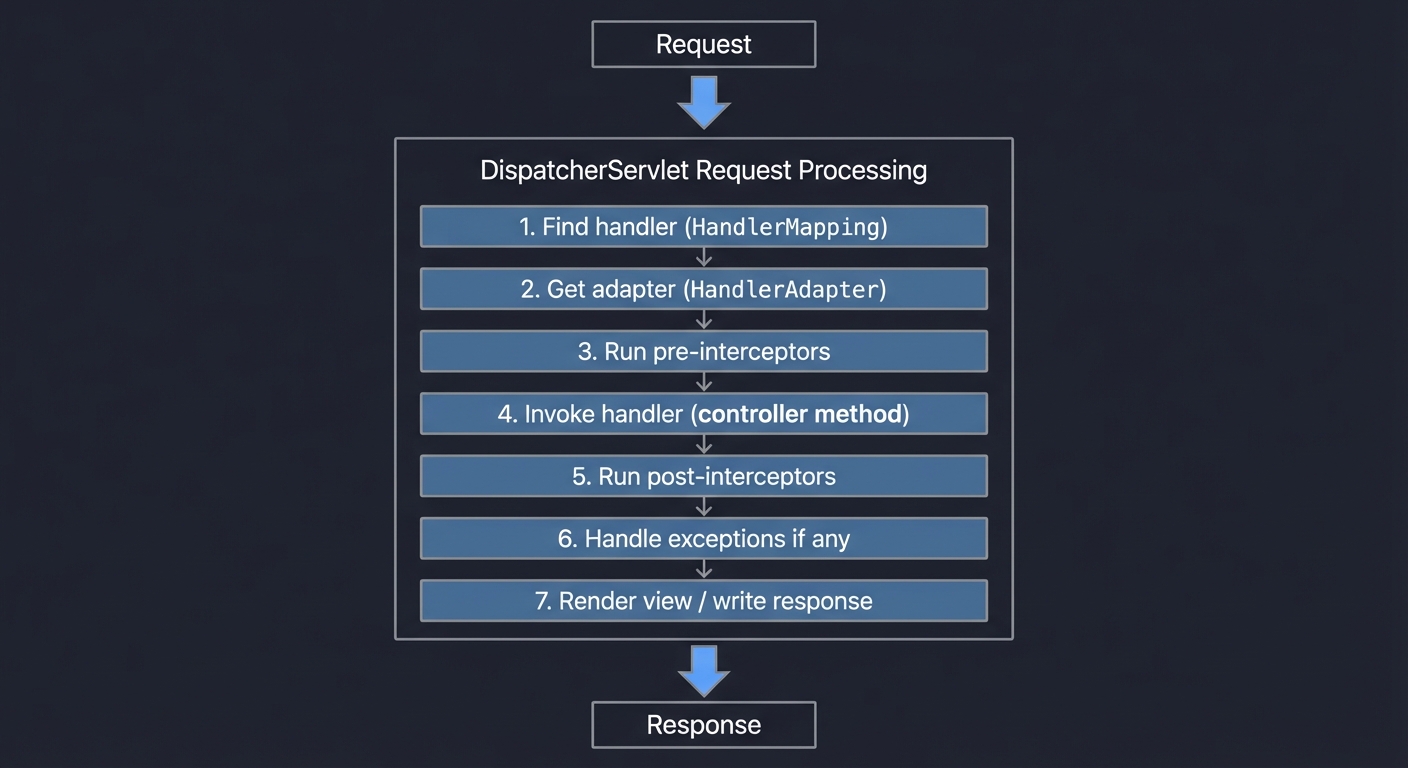
DispatcherServlet pipeline:
Request
   ↓
┌─────────────────────────────────────────┐
│           DispatcherServlet              │
│  1. Find handler (HandlerMapping)        │
│  2. Get adapter (HandlerAdapter)         │
│  3. Run pre-interceptors                 │
│  4. Invoke handler (controller method)   │
│  5. Run post-interceptors                │
│  6. Handle exceptions if any             │
│  7. Render view / write response         │
└─────────────────────────────────────────┘
   ↓
Response
Handler registration:
- At startup, scan for
@MyControllerclasses - For each method with
@MyGetMapping, etc., store:- HTTP method (GET, POST, etc.)
- URL pattern (“/users/{id}”)
- Method reference
- Parameter info (names, types, annotations)
Questions to guide your implementation:
- How do you match “/users/123” to “/users/{id}” and extract “123”?
- How do you convert the extracted “123” string to Long?
- How do you deserialize JSON request body to a Java object?
- How do you serialize the returned object to JSON?
Learning milestones:
- You handle basic GET requests → You understand handler mapping
- You parse path variables → You understand argument resolution
- You handle POST with JSON body → You understand request body handling
- You implement exception handling → You understand error pipelines
Project 4: “Spring Boot Auto-Configuration Simulator” — Understand the Magic
| Attribute | Value |
|---|---|
| File | SPRING_FRAMEWORK_DEEP_DIVE_PROJECTS.md |
| Main Programming Language | Java |
| Alternative Programming Languages | Kotlin |
| Coolness Level | Level 3: Genuinely Clever |
| Business Potential | 1. The “Resume Gold” |
| Difficulty | Level 3: Advanced |
| Knowledge Area | Configuration / Conditional Logic / SPI |
| Software or Tool | Java ServiceLoader, Annotation Processing |
| Main Book | “Learning Spring Boot 3.0” by Greg Turnquist |
What you’ll build: An auto-configuration system that detects classpath dependencies and conditionally registers beans—exactly how Spring Boot’s @ConditionalOnClass, @ConditionalOnProperty work.
Why it teaches Spring Boot: Spring Boot “just works” because of auto-configuration. Understanding the spring.factories/AutoConfiguration.imports mechanism and conditional annotations explains why adding a dependency is often enough.
Core challenges you’ll face:
- Classpath detection → maps to @ConditionalOnClass
- Property-based configuration → maps to @ConditionalOnProperty
- Bean existence checks → maps to @ConditionalOnMissingBean
- Configuration ordering → maps to @AutoConfigureAfter/@Before
- Starter creation → maps to packaging auto-configurations
Key Concepts:
- Auto-Configuration Mechanism: How Spring Boot Auto-Configuration Works
- Conditional Annotations: Spring Boot Conditions
- Creating Starters: Creating Your Own Starter
- ServiceLoader: Java ServiceLoader API
Difficulty: Advanced Time estimate: 1-2 weeks Prerequisites: Project 1 (IoC Container), understanding of annotations
Real world outcome:
// Auto-configuration class
@MyAutoConfiguration
@MyConditionalOnClass(name = "com.mysql.cj.jdbc.Driver")
public class MySqlAutoConfiguration {

    @MyBean
    @MyConditionalOnMissingBean(DataSource.class)
    @MyConditionalOnProperty(name = "db.enabled", havingValue = "true")
    public DataSource dataSource(MyEnvironment env) {
        return new MySqlDataSource(
            env.getProperty("db.url"),
            env.getProperty("db.username"),
            env.getProperty("db.password")
        );
    }
}

// Another auto-config that depends on the first
@MyAutoConfiguration
@MyAutoConfigureAfter(MySqlAutoConfiguration.class)
public class JpaAutoConfiguration {

    @MyBean
    @MyConditionalOnBean(DataSource.class)
    public EntityManager entityManager(DataSource ds) {
        return new EntityManager(ds);
    }
}

// Application startup
public class Main {
    public static void main(String[] args) {
        MyAutoConfigContext context = new MyAutoConfigContext("com.example");
        context.setProperty("db.enabled", "true");
        context.setProperty("db.url", "jdbc:mysql://localhost:3306/test");

        context.refresh();

        System.out.println("Auto-configured beans:");
        context.getBeanNames().forEach(name -> {
            Object bean = context.getBean(name);
            System.out.println("  " + name + " -> " + bean.getClass().getSimpleName());
        });
        // Output (if MySQL driver is on classpath):
        //   dataSource -> MySqlDataSource
        //   entityManager -> EntityManager

        // If MySQL driver is NOT on classpath:
        //   (no dataSource or entityManager beans)

        // Show evaluation report
        context.printConditionReport();
        // MySqlAutoConfiguration:
        //   @ConditionalOnClass(com.mysql.cj.jdbc.Driver): MATCH
        // MySqlAutoConfiguration.dataSource:
        //   @ConditionalOnMissingBean(DataSource): MATCH (no existing bean)
        //   @ConditionalOnProperty(db.enabled=true): MATCH
        // JpaAutoConfiguration.entityManager:
        //   @ConditionalOnBean(DataSource): MATCH (dataSource exists)
    }
}
Implementation Hints:
Spring Boot’s auto-configuration discovery:
- At startup, read
META-INF/spring/org.springframework.boot.autoconfigure.AutoConfiguration.imports - Load each listed class
- Evaluate conditions (classpath, properties, existing beans)
- Register matching configurations
Condition evaluation order:
- Class conditions first (
@ConditionalOnClass) - cheapest - Bean conditions (
@ConditionalOnBean) - requires context - Property conditions (
@ConditionalOnProperty) - environment lookup
How to check if a class is on classpath:
try {
    Class.forName("com.mysql.cj.jdbc.Driver");
    return true; // Class exists
} catch (ClassNotFoundException e) {
    return false; // Class doesn't exist
}
Questions to guide your implementation:
- Why are class conditions evaluated before bean conditions?
- How do you handle circular dependencies between auto-configurations?
- Why is
@ConditionalOnMissingBeanimportant for customization? - How do you debug which auto-configurations are active?
Learning milestones:
- You implement @ConditionalOnClass → You understand classpath detection
- You implement @ConditionalOnProperty → You understand environment config
- You implement @ConditionalOnMissingBean → You understand user customization
- You create a starter → You understand packaging auto-config
Project 5: “Transaction Manager” — Understand @Transactional
| Attribute | Value |
|---|---|
| File | SPRING_FRAMEWORK_DEEP_DIVE_PROJECTS.md |
| Main Programming Language | Java |
| Alternative Programming Languages | Kotlin |
| Coolness Level | Level 3: Genuinely Clever |
| Business Potential | 2. The “Micro-SaaS / Pro Tool” |
| Difficulty | Level 3: Advanced |
| Knowledge Area | Transactions / Database / AOP |
| Software or Tool | JDBC, Connection Pooling |
| Main Book | “Pro Spring 6” by Iuliana Cosmina |
What you’ll build: A transaction manager that wraps methods with database transactions—begin, commit on success, rollback on exception—exactly like Spring’s @Transactional works using AOP proxies.
Why it teaches @Transactional: @Transactional is the most misunderstood Spring annotation. Understanding how it uses AOP proxies explains self-invocation issues, propagation levels, and isolation levels.
Core challenges you’ll face:
- ThreadLocal connection management → maps to one connection per transaction
- Proxy-based interception → maps to @Transactional via AOP
- Propagation levels → maps to REQUIRED, REQUIRES_NEW, etc.
- Rollback rules → maps to which exceptions trigger rollback
- Read-only optimization → maps to readOnly=true behavior
Key Concepts:
- Transaction Management: “Pro Spring 6” Chapter 9 - Cosmina
- @Transactional Deep Dive: Baeldung - Transactions
- Connection Per Thread: ThreadLocal Pattern
- Propagation Levels: Spring Transaction Propagation
Difficulty: Advanced Time estimate: 2 weeks Prerequisites: Project 2 (AOP Framework), JDBC basics, understanding of database transactions
Real world outcome:
// Service using transactions
@MyService
public class BankService {

    @MyAutowired
    private AccountRepository accountRepository;

    @MyTransactional
    public void transfer(Long fromId, Long toId, BigDecimal amount) {
        Account from = accountRepository.findById(fromId);
        Account to = accountRepository.findById(toId);

        from.withdraw(amount);
        to.deposit(amount);

        accountRepository.save(from);
        accountRepository.save(to);
        // If any exception here, ALL changes roll back
    }

    @MyTransactional(propagation = Propagation.REQUIRES_NEW)
    public void audit(String action) {
        // This runs in a NEW transaction
        // Even if outer transaction rolls back, this commits
        auditRepository.save(new AuditLog(action));
    }

    @MyTransactional(readOnly = true)
    public Account getBalance(Long id) {
        // Read-only hint for optimization
        return accountRepository.findById(id);
    }
}

// Demonstration
public class Main {
    public static void main(String[] args) {
        MyTransactionalContext context = new MyTransactionalContext("com.example");

        BankService bankService = context.getBean(BankService.class);

        // Successful transfer
        bankService.transfer(1L, 2L, new BigDecimal("100"));
        // Transaction: BEGIN → UPDATE → UPDATE → COMMIT

        // Failed transfer (insufficient funds)
        try {
            bankService.transfer(1L, 2L, new BigDecimal("1000000"));
        } catch (InsufficientFundsException e) {
            // Transaction: BEGIN → UPDATE → EXCEPTION → ROLLBACK
            System.out.println("Transfer rolled back: " + e.getMessage());
        }

        // Show transaction logs
        context.printTransactionLog();
        // [TX-1] BEGIN
        // [TX-1] UPDATE accounts SET balance=900 WHERE id=1
        // [TX-1] UPDATE accounts SET balance=100 WHERE id=2
        // [TX-1] COMMIT
        // [TX-2] BEGIN
        // [TX-2] UPDATE accounts SET balance=-99100 WHERE id=1
        // [TX-2] ROLLBACK (InsufficientFundsException)
    }
}
Implementation Hints:
Transaction manager components:
- ConnectionHolder: ThreadLocal storing current connection
- TransactionInterceptor: AOP advice that wraps methods
- TransactionDefinition: Propagation, isolation, timeout, readOnly
- TransactionStatus: Current transaction state
Propagation behavior:
- REQUIRED (default): Join existing or create new
- REQUIRES_NEW: Always create new, suspend existing
- NESTED: Create savepoint within existing
- SUPPORTS: Join existing or run non-transactional
- MANDATORY: Must have existing, throw if none
Why self-invocation bypasses @Transactional:
public class MyService {
    @Transactional
    public void methodA() {
        this.methodB(); // Direct call, bypasses proxy!
    }

    @Transactional(propagation = REQUIRES_NEW)
    public void methodB() {
        // Runs in SAME transaction as methodA, not a new one!
    }
}
Learning milestones:
- You manage connections per thread → You understand ThreadLocal
- You implement basic commit/rollback → You understand transaction boundaries
- You implement propagation levels → You understand nested transactions
- You handle self-invocation → You understand proxy limitations
Project 6: “Spring Security Filter Chain” — Understand Authentication
| Attribute | Value |
|---|---|
| File | SPRING_FRAMEWORK_DEEP_DIVE_PROJECTS.md |
| Main Programming Language | Java |
| Alternative Programming Languages | Kotlin |
| Coolness Level | Level 4: Hardcore Tech Flex |
| Business Potential | 3. The “Service & Support” Model |
| Difficulty | Level 4: Expert |
| Knowledge Area | Security / Authentication / Authorization |
| Software or Tool | Servlet Filters, JWT |
| Main Book | “Spring Security in Action” by Laurentiu Spilca |
What you’ll build: A security framework with a filter chain that handles authentication (username/password, JWT), authorization (roles, permissions), and security context propagation—exactly like Spring Security works.
Why it teaches Spring Security: Spring Security’s filter chain is notoriously complex. Understanding how SecurityContextHolder, AuthenticationManager, and filter ordering work demystifies security configuration.
Core challenges you’ll face:
- Filter chain ordering → maps to which filter runs when
- Authentication flow → maps to AuthenticationManager, Providers
- Security context storage → maps to SecurityContextHolder (ThreadLocal)
- Authorization decisions → maps to AccessDecisionManager, voters
- JWT token handling → maps to stateless authentication
Key Concepts:
- Filter Chain Architecture: “Spring Security in Action” Chapter 5 - Spilca
- SecurityContext: Spring Security Architecture
- Authentication Flow: Spring Security Authentication
- Filter Order: Default Filter Ordering
Difficulty: Expert Time estimate: 3-4 weeks Prerequisites: Project 3 (Mini Spring MVC), understanding of HTTP, JWT basics
Real world outcome:
// Security configuration
@MySecurityConfig
public class SecurityConfig {

    @MyBean
    public MySecurityFilterChain filterChain(MyHttpSecurity http) {
        return http
            .csrf().disable()
            .authorizeRequests()
                .antMatchers("/public/**").permitAll()
                .antMatchers("/admin/**").hasRole("ADMIN")
                .antMatchers("/api/**").authenticated()
            .and()
            .formLogin()
                .loginPage("/login")
                .successHandler(this::onSuccess)
            .and()
            .jwt()
                .tokenValiditySeconds(3600)
            .and()
            .build();
    }

    @MyBean
    public MyUserDetailsService userDetailsService() {
        return username -> {
            // Load user from database
            return new MyUser("admin", passwordEncoder.encode("secret"),
                              Set.of("ROLE_ADMIN", "ROLE_USER"));
        };
    }
}

// Protected controller
@MyController
public class AdminController {

    @MyGetMapping("/admin/dashboard")
    @MyPreAuthorize("hasRole('ADMIN')")
    public String dashboard() {
        MyAuthentication auth = MySecurityContext.getAuthentication();
        return "Welcome, " + auth.getName();
    }
}

// Testing
public class Main {
    public static void main(String[] args) {
        MySecurityApp app = new MySecurityApp("com.example");
        app.start(8080);

        // Unauthenticated request to protected resource
        // curl http://localhost:8080/admin/dashboard
        // Response: 401 Unauthorized

        // Login
        // curl -X POST -d "username=admin&password=secret" \
        //      http://localhost:8080/login
        // Response: {"token": "eyJhbGciOiJIUzI1NiIs..."}

        // Authenticated request
        // curl -H "Authorization: Bearer eyJhbGciOiJIUzI1NiIs..." \
        //      http://localhost:8080/admin/dashboard
        // Response: "Welcome, admin"

        // Print filter chain
        app.printFilterChain();
        // 1. SecurityContextPersistenceFilter
        // 2. UsernamePasswordAuthenticationFilter
        // 3. JwtAuthenticationFilter
        // 4. ExceptionTranslationFilter
        // 5. FilterSecurityInterceptor (authorization)
    }
}
Implementation Hints:
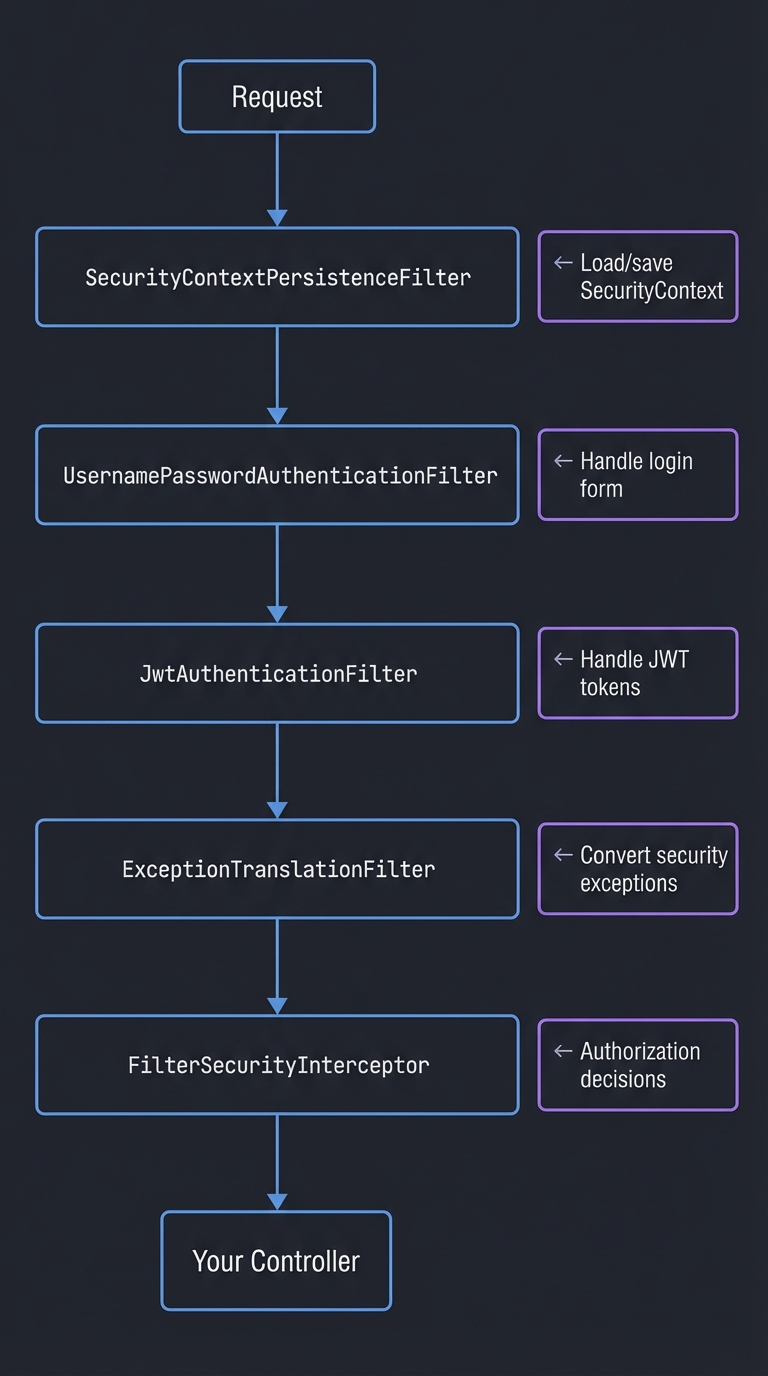
Spring Security filter chain (simplified):
Request
   ↓
SecurityContextPersistenceFilter  ← Load/save SecurityContext
   ↓
UsernamePasswordAuthenticationFilter  ← Handle login form
   ↓
JwtAuthenticationFilter  ← Handle JWT tokens
   ↓
ExceptionTranslationFilter  ← Convert security exceptions
   ↓
FilterSecurityInterceptor  ← Authorization decisions
   ↓
Your Controller
Authentication flow:
- Filter extracts credentials (username/password or JWT)
- Create
Authenticationtoken (unauthenticated) - Pass to
AuthenticationManager - Manager delegates to
AuthenticationProviders - Provider validates and returns authenticated token
- Store in
SecurityContextHolder
SecurityContextHolder uses ThreadLocal:
// Storing authentication
SecurityContextHolder.getContext().setAuthentication(auth);

// Retrieving anywhere in the thread
Authentication auth = SecurityContextHolder.getContext().getAuthentication();
Learning milestones:
- You implement filter chain → You understand request processing
- You handle username/password → You understand form login
- You implement JWT → You understand stateless auth
- You implement role-based access → You understand authorization
Project 7: “Spring Data Repository Magic” — Understand Query Generation
| Attribute | Value |
|---|---|
| File | SPRING_FRAMEWORK_DEEP_DIVE_PROJECTS.md |
| Main Programming Language | Java |
| Alternative Programming Languages | Kotlin |
| Coolness Level | Level 3: Genuinely Clever |
| Business Potential | 2. The “Micro-SaaS / Pro Tool” |
| Difficulty | Level 3: Advanced |
| Knowledge Area | ORM / Query Generation / Proxies |
| Software or Tool | JDBC, Proxy Generation |
| Main Book | “Spring Data” by Mark Pollack et al. |
What you’ll build: A repository framework that generates query implementations from method names—findByNameAndAge, deleteByStatus—exactly like Spring Data JPA works using dynamic proxies.
Why it teaches Spring Data: Spring Data’s magic comes from parsing method names into queries at runtime. Understanding this mechanism explains the naming conventions and limitations.
Core challenges you’ll face:
- Method name parsing → maps to findBy, deleteBy, countBy conventions
- Query generation → maps to building SQL from parsed method name
- Dynamic proxy creation → maps to interface-only repositories
- Pagination and sorting → maps to Pageable, Sort parameters
- Custom queries → maps to @Query annotation support
Key Concepts:
- Query Creation: Spring Data Query Methods
- Repository Abstraction: Spring Data Repositories
- Method Name Keywords: Query Method Keywords
- Proxy Generation: “Spring Data” Chapter 2 - Pollack et al.
Difficulty: Advanced Time estimate: 2-3 weeks Prerequisites: Project 2 (AOP Framework), JDBC basics, understanding of SQL
Real world outcome:
// Your repository interface (no implementation needed!)
@MyRepository
public interface UserRepository extends MyCrudRepository<User, Long> {

    // Automatically generates: SELECT * FROM users WHERE name = ?
    List<User> findByName(String name);

    // Generates: SELECT * FROM users WHERE name = ? AND age > ?
    List<User> findByNameAndAgeGreaterThan(String name, int age);

    // Generates: SELECT * FROM users WHERE email LIKE ?
    Optional<User> findByEmailContaining(String email);

    // Generates: DELETE FROM users WHERE status = ?
    int deleteByStatus(String status);

    // Generates: SELECT COUNT(*) FROM users WHERE active = ?
    long countByActive(boolean active);

    // Pagination: SELECT * FROM users ORDER BY name LIMIT ? OFFSET ?
    MyPage<User> findAll(MyPageable pageable);

    // Custom query
    @MyQuery("SELECT * FROM users WHERE created_at > :date")
    List<User> findRecentUsers(@MyParam("date") LocalDate date);
}

// Usage - the proxy handles everything!
public class Main {
    public static void main(String[] args) {
        MyDataContext context = new MyDataContext("com.example", dataSource);

        UserRepository userRepo = context.getRepository(UserRepository.class);
        // This is a PROXY that generates SQL from method names!

        // Find by name
        List<User> johns = userRepo.findByName("John");
        // Executed: SELECT * FROM users WHERE name = 'John'

        // Complex query
        List<User> adults = userRepo.findByNameAndAgeGreaterThan("John", 18);
        // Executed: SELECT * FROM users WHERE name = 'John' AND age > 18

        // Pagination
        MyPage<User> page = userRepo.findAll(MyPageable.of(0, 10, MySort.by("name")));
        // Executed: SELECT * FROM users ORDER BY name LIMIT 10 OFFSET 0

        // Show query generation log
        context.printQueryLog();
    }
}
Implementation Hints:
Method name parsing rules:
findByNameAndAgeGreaterThan(String name, int age)
     │    │   │             │
     │    │   │             └── GreaterThan → age > ?
     │    │   └── And → AND operator
     │    └── Name → WHERE name = ?
     └── findBy → SELECT query
Supported keywords:
And,Or→ Boolean operatorsIs,Equals→ Equality (default)Between→ BETWEEN x AND yLessThan,GreaterThan→ ComparisonLike,Containing,StartingWith,EndingWith→ LIKE patternsOrderBy→ ORDER BY clauseNot,IsNull,IsNotNull→ Negation and nulls
Proxy implementation: The repository is an interface with no implementation. At runtime:
- Create a JDK dynamic proxy for the interface
- When a method is called, parse its name
- Generate SQL from the parsed tokens
- Execute SQL and map results to objects
Learning milestones:
- You parse method names → You understand the convention
- You generate simple queries → You understand query derivation
- You handle pagination → You understand LIMIT/OFFSET
- You implement custom queries → You understand @Query
Project 8: “Build a Quarkus-Style Framework” — Understand Compile-Time DI
| Attribute | Value |
|---|---|
| File | SPRING_FRAMEWORK_DEEP_DIVE_PROJECTS.md |
| Main Programming Language | Java |
| Alternative Programming Languages | Kotlin |
| Coolness Level | Level 4: Hardcore Tech Flex |
| Business Potential | 4. The “Open Core” Infrastructure |
| Difficulty | Level 4: Expert |
| Knowledge Area | Annotation Processing / Compile-Time DI / AOT |
| Software or Tool | Java Annotation Processor, GraalVM Native Image |
| Main Book | “Quarkus Cookbook” by Alex Soto Bueno & Jason Porter |
What you’ll build: A framework that does dependency injection at compile time (not runtime reflection)—generating wiring code during compilation, resulting in instant startup and GraalVM native image compatibility.
Why it teaches alternative approaches: Spring’s runtime reflection is elegant but slow to start. Understanding how Quarkus/Micronaut avoid reflection explains the performance difference and tradeoffs.
Core challenges you’ll face:
- Annotation processing → maps to generating code at compile time
- Dependency graph building → maps to determining injection order
- Code generation → maps to creating actual Java source files
- Native image compatibility → maps to no runtime reflection
- Startup optimization → maps to moving work from runtime to build time
Key Concepts:
- Annotation Processing: Java Annotation Processing
- Quarkus Extensions: “Quarkus Cookbook” Chapter 3 - Bueno & Porter
- Micronaut Compilation: Micronaut AOT
- GraalVM Native Image: GraalVM Documentation
Difficulty: Expert Time estimate: 3-4 weeks Prerequisites: Projects 1-2, understanding of annotation processors, build tools
Real world outcome:
// Your annotations (same as Spring!)
@MyComponent
public class UserService {
    @MyInject
    private UserRepository userRepository;

    public User findUser(Long id) {
        return userRepository.findById(id);
    }
}

// At COMPILE TIME, your annotation processor generates:
// (This file is auto-generated in target/generated-sources/)
public class UserService_BeanFactory implements BeanFactory<UserService> {

    private final UserRepository userRepository;

    public UserService_BeanFactory(UserRepository userRepository) {
        this.userRepository = userRepository;
    }

    @Override
    public UserService create() {
        UserService instance = new UserService();
        instance.userRepository = this.userRepository;  // Direct field access
        return instance;
    }
}

// Generated context initialization (no reflection!)
public class GeneratedBeanContext {
    public void initialize() {
        // Direct instantiation - no Class.forName(), no reflection
        UserRepository userRepository = new UserRepository();
        UserService_BeanFactory userServiceFactory = new UserService_BeanFactory(userRepository);
        UserService userService = userServiceFactory.create();

        registerBean(UserRepository.class, userRepository);
        registerBean(UserService.class, userService);
    }
}

// Application startup - INSTANT!
public class Main {
    public static void main(String[] args) {
        long start = System.nanoTime();

        MyAotContext context = new MyAotContext();

        long startup = (System.nanoTime() - start) / 1_000_000;
        System.out.println("Started in " + startup + "ms");
        // Output: Started in 3ms (vs Spring's ~2000ms!)

        UserService userService = context.getBean(UserService.class);
        System.out.println(userService.findUser(1L));
    }
}
Implementation Hints:
Annotation Processor structure:
@SupportedAnnotationTypes("com.example.MyComponent")
@SupportedSourceVersion(SourceVersion.RELEASE_17)
public class MyComponentProcessor extends AbstractProcessor {

    @Override
    public boolean process(Set<? extends TypeElement> annotations,
                          RoundEnvironment roundEnv) {
        // 1. Find all @MyComponent classes
        // 2. Analyze their dependencies (@MyInject fields)
        // 3. Generate factory classes
        // 4. Generate context initialization code

        for (Element element : roundEnv.getElementsAnnotatedWith(MyComponent.class)) {
            // Generate factory class
            generateBeanFactory((TypeElement) element);
        }
        return true;
    }

    private void generateBeanFactory(TypeElement classElement) {
        // Use JavaPoet or Filer to write Java source files
        JavaFileObject file = processingEnv.getFiler()
            .createSourceFile(classElement.getSimpleName() + "_BeanFactory");
        // Write generated code...
    }
}
Why compile-time DI is faster:
- No classpath scanning at runtime
- No reflection to create instances
- No proxy generation (CGLIB)
- Dependency graph known at compile time
- Dead code elimination possible
Tradeoffs:
- Less dynamic (can’t change wiring at runtime)
- Longer compile times
- Need to recompile for configuration changes
Learning milestones:
- You write an annotation processor → You understand compile-time code generation
- You generate factory classes → You understand reflection-free DI
- You build a native image → You understand GraalVM compatibility
- You compare startup times → You understand the performance difference
Project 9: “Cross-Framework Comparison App” — Same App, 5 Frameworks
| Attribute | Value |
|---|---|
| File | SPRING_FRAMEWORK_DEEP_DIVE_PROJECTS.md |
| Main Programming Language | Multiple |
| Alternative Programming Languages | N/A (this IS the multi-language project) |
| Coolness Level | Level 3: Genuinely Clever |
| Business Potential | 1. The “Resume Gold” |
| Difficulty | Level 3: Advanced |
| Knowledge Area | Web Frameworks / Comparative Analysis |
| Software or Tool | Spring Boot, Quarkus, Django, Express, ASP.NET Core |
| Main Book | Multiple framework books |
What you’ll build: The exact same REST API implemented in 5 different frameworks—Spring Boot, Quarkus, Django, Express, and ASP.NET Core—with benchmarks comparing startup time, memory, throughput, and developer experience.
Why this teaches framework comparison: Theory only goes so far. Building the same app in multiple frameworks reveals real differences in philosophy, patterns, and performance.
Core challenges you’ll face:
- Idiomatic code per framework → maps to understanding each framework’s conventions
- Equivalent features → maps to finding analogous patterns
- Fair benchmarking → maps to controlling variables
- Docker containerization → maps to consistent deployment
- Objective comparison → maps to avoiding bias
Key Concepts:
- Spring Boot: Spring Boot Reference
- Quarkus: Quarkus Guides
- Django: Django Documentation
- Express: Express Documentation
- ASP.NET Core: ASP.NET Core Documentation
Difficulty: Advanced Time estimate: 3-4 weeks Prerequisites: Basic knowledge of Java, Python, JavaScript, C#
Real world outcome:
project-comparison/
├── spring-boot-app/
│   ├── src/main/java/com/example/
│   │   ├── UserController.java
│   │   ├── UserService.java
│   │   ├── UserRepository.java
│   │   └── User.java
│   ├── pom.xml
│   └── Dockerfile
│
├── quarkus-app/
│   ├── src/main/java/com/example/
│   │   ├── UserResource.java
│   │   ├── UserService.java
│   │   └── User.java
│   ├── pom.xml
│   └── Dockerfile
│
├── django-app/
│   ├── users/
│   │   ├── views.py
│   │   ├── models.py
│   │   ├── serializers.py
│   │   └── urls.py
│   ├── requirements.txt
│   └── Dockerfile
│
├── express-app/
│   ├── src/
│   │   ├── routes/users.js
│   │   ├── services/userService.js
│   │   └── models/user.js
│   ├── package.json
│   └── Dockerfile
│
├── aspnet-app/
│   ├── Controllers/UsersController.cs
│   ├── Services/UserService.cs
│   ├── Models/User.cs
│   ├── Program.cs
│   └── Dockerfile
│
├── docker-compose.yml
├── benchmark.sh
└── RESULTS.md
Benchmark Results Template:
# Framework Comparison Results

## API Specification
- GET /users - List all users
- GET /users/{id} - Get user by ID
- POST /users - Create user
- PUT /users/{id} - Update user
- DELETE /users/{id} - Delete user

## Startup Time (cold start)
| Framework      | JVM/Runtime | Native/AOT |
|---------------|-------------|------------|
| Spring Boot   | 2,450ms     | 45ms       |
| Quarkus       | 890ms       | 12ms       |
| Django        | 1,200ms     | N/A        |
| Express       | 180ms       | N/A        |
| ASP.NET Core  | 650ms       | 28ms       |

## Memory Usage (idle)
| Framework      | JVM/Runtime | Native/AOT |
|---------------|-------------|------------|
| Spring Boot   | 285MB       | 45MB       |
| Quarkus       | 95MB        | 22MB       |
| Django        | 65MB        | N/A        |
| Express       | 45MB        | N/A        |
| ASP.NET Core  | 85MB        | 35MB       |

## Throughput (requests/second)
| Framework      | Simple GET | Complex Query |
|---------------|------------|---------------|
| Spring Boot   | 35,000     | 12,000       |
| Quarkus       | 42,000     | 15,000       |
| Django        | 8,000      | 3,500        |
| Express       | 28,000     | 9,000        |
| ASP.NET Core  | 50,000     | 18,000       |

## Developer Experience
| Aspect           | Spring | Quarkus | Django | Express | ASP.NET |
|-----------------|--------|---------|--------|---------|---------|
| Learning curve  | Steep  | Medium  | Gentle | Easy    | Medium  |
| Documentation   | ⭐⭐⭐⭐⭐ | ⭐⭐⭐⭐  | ⭐⭐⭐⭐⭐ | ⭐⭐⭐   | ⭐⭐⭐⭐  |
| Ecosystem       | ⭐⭐⭐⭐⭐ | ⭐⭐⭐   | ⭐⭐⭐⭐⭐ | ⭐⭐⭐⭐⭐ | ⭐⭐⭐⭐  |
| Hot reload      | ⭐⭐⭐   | ⭐⭐⭐⭐⭐ | ⭐⭐⭐⭐  | ⭐⭐⭐⭐⭐ | ⭐⭐⭐⭐  |
| IDE support     | ⭐⭐⭐⭐⭐ | ⭐⭐⭐⭐  | ⭐⭐⭐⭐  | ⭐⭐⭐   | ⭐⭐⭐⭐⭐ |
Implementation Hints:
Each implementation should have:
- REST endpoints (CRUD for User entity)
- Service layer with business logic
- Repository/data access layer
- Input validation
- Error handling
- JSON serialization
- Basic authentication
- Database connection (PostgreSQL)
Fair benchmarking tips:
- Use the same database (PostgreSQL)
- Same hardware (Docker with resource limits)
- Same data set
- Warm-up runs before measuring
- Multiple runs for statistical significance
Comparison dimensions:
- Performance (startup, memory, throughput)
- Developer experience (learning curve, tooling)
- Ecosystem (libraries, community, jobs)
- Philosophy (convention vs. configuration)
Learning milestones:
- You implement in all frameworks → You understand each framework’s patterns
- You benchmark consistently → You understand fair comparison
- You document tradeoffs → You can make informed recommendations
- You present results objectively → You avoid framework tribalism
Project 10: “Spring Boot Application Debugger” — Understand Internals
| Attribute | Value |
|---|---|
| File | SPRING_FRAMEWORK_DEEP_DIVE_PROJECTS.md |
| Main Programming Language | Java |
| Alternative Programming Languages | Kotlin |
| Coolness Level | Level 3: Genuinely Clever |
| Business Potential | 2. The “Micro-SaaS / Pro Tool” |
| Difficulty | Level 2: Intermediate |
| Knowledge Area | Debugging / Observability / Spring Internals |
| Software or Tool | Spring Boot Actuator, Micrometer |
| Main Book | “Spring Boot in Practice” by Somnath Musib |
What you’ll build: A debugging/introspection tool that visualizes a running Spring Boot application—bean graph, request flow, transaction boundaries, auto-configuration decisions—giving you X-ray vision into the framework.
Why it teaches debugging: When Spring apps misbehave, you need to understand what’s happening. This project teaches you to leverage Actuator, debugging endpoints, and internal Spring APIs to diagnose issues.
Core challenges you’ll face:
- Bean graph visualization → maps to understanding dependencies
- Request tracing → maps to following request flow
- Auto-config report → maps to understanding what’s active
- Transaction monitoring → maps to seeing transaction boundaries
- Memory analysis → maps to detecting bean bloat
Key Concepts:
- Spring Boot Actuator: Actuator Documentation
- Conditions Report: Auto-Configuration Report
- Bean Introspection: ApplicationContext API
- Debugging Tips: “Spring Boot in Practice” Chapter 10 - Musib
Difficulty: Intermediate Time estimate: 1-2 weeks Prerequisites: Basic Spring Boot application, understanding of REST APIs
Real world outcome:
# Start your Spring Boot app with the debugger enabled

$ curl http://localhost:8080/debugger/beans
{
  "total": 245,
  "byType": {
    "CONTROLLER": 12,
    "SERVICE": 23,
    "REPOSITORY": 8,
    "CONFIGURATION": 45,
    "INFRASTRUCTURE": 157
  },
  "graph": {
    "userController": ["userService", "securityService"],
    "userService": ["userRepository", "emailService"],
    "userRepository": ["dataSource", "entityManager"]
  }
}

$ curl http://localhost:8080/debugger/beans/userService
{
  "name": "userService",
  "type": "com.example.UserService",
  "scope": "singleton",
  "dependsOn": ["userRepository", "emailService"],
  "usedBy": ["userController", "adminController"],
  "proxy": true,
  "proxyType": "CGLIB",
  "aspects": ["@Transactional", "@Cacheable"],
  "created": "2024-01-15T10:23:45Z"
}

$ curl http://localhost:8080/debugger/autoconfig
{
  "matched": [
    {
      "class": "DataSourceAutoConfiguration",
      "conditions": [
        { "condition": "@ConditionalOnClass(DataSource.class)", "matched": true },
        { "condition": "@ConditionalOnProperty(spring.datasource.url)", "matched": true }
      ]
    }
  ],
  "notMatched": [
    {
      "class": "MongoAutoConfiguration",
      "conditions": [
        { "condition": "@ConditionalOnClass(MongoClient.class)", "matched": false,
          "reason": "Class not found on classpath" }
      ]
    }
  ]
}

$ curl http://localhost:8080/debugger/request-trace/last
{
  "request": "GET /users/123",
  "timestamp": "2024-01-15T10:25:00Z",
  "duration": "45ms",
  "trace": [
    { "component": "SecurityFilter", "duration": "2ms", "details": "User authenticated" },
    { "component": "DispatcherServlet", "duration": "1ms", "details": "Mapped to UserController.getUser" },
    { "component": "UserController.getUser", "duration": "38ms", "details": "Transaction started" },
    { "component": "UserService.findById", "duration": "35ms", "details": "Cache MISS" },
    { "component": "UserRepository.findById", "duration": "30ms", "details": "SQL executed" },
    { "component": "TransactionInterceptor", "duration": "1ms", "details": "Transaction committed" }
  ]
}
Implementation Hints:
Access Spring internals:
@Component
public class BeanIntrospector {

    @Autowired
    private ApplicationContext context;

    @Autowired
    private ConfigurableListableBeanFactory beanFactory;

    public BeanInfo getBeanInfo(String beanName) {
        Object bean = context.getBean(beanName);
        BeanDefinition definition = beanFactory.getBeanDefinition(beanName);

        return new BeanInfo(
            beanName,
            bean.getClass().getName(),
            definition.getScope(),
            definition.getDependsOn(),
            isProxy(bean),
            getProxyType(bean)
        );
    }

    private boolean isProxy(Object bean) {
        return AopUtils.isAopProxy(bean);
    }
}
Useful Spring Boot Actuator endpoints:
/actuator/beans- All beans/actuator/conditions- Auto-configuration report/actuator/mappings- Request mappings/actuator/env- Environment properties/actuator/health- Health checks
Learning milestones:
- You visualize bean dependencies → You understand the application structure
- You trace request flow → You understand the MVC pipeline
- You analyze auto-configuration → You understand why beans exist
- You monitor transactions → You understand @Transactional behavior
Project 11: “Reactive Spring WebFlux” — Understand Non-Blocking
| Attribute | Value |
|---|---|
| File | SPRING_FRAMEWORK_DEEP_DIVE_PROJECTS.md |
| Main Programming Language | Java |
| Alternative Programming Languages | Kotlin (with coroutines) |
| Coolness Level | Level 4: Hardcore Tech Flex |
| Business Potential | 3. The “Service & Support” Model |
| Difficulty | Level 4: Expert |
| Knowledge Area | Reactive Programming / Non-Blocking I/O |
| Software or Tool | Spring WebFlux, Project Reactor |
| Main Book | “Hands-On Reactive Programming in Spring 5” by Oleh Dokuka & Igor Lozynskyi |
What you’ll build: A high-concurrency application using Spring WebFlux with reactive streams, non-blocking database access (R2DBC), and reactive security—understanding how it differs from traditional Spring MVC.
Why it teaches reactive Spring: Reactive programming is fundamentally different from imperative. Understanding Mono/Flux, backpressure, and the reactive pipeline explains when and why to use WebFlux.
Core challenges you’ll face:
- Reactive types (Mono/Flux) → maps to understanding publishers and subscribers
- Non-blocking database access → maps to R2DBC vs JDBC
- Backpressure handling → maps to controlling data flow
- Testing reactive streams → maps to StepVerifier usage
- Debugging reactive code → maps to stack traces and hooks
Key Concepts:
- Reactive Streams Specification: Reactive Streams
- Project Reactor: Reactor Documentation
- Spring WebFlux: WebFlux Documentation
- R2DBC: R2DBC Documentation
Difficulty: Expert Time estimate: 3-4 weeks Prerequisites: Projects 1-5, understanding of async programming, Java 8+ streams
Real world outcome:
// Reactive controller
@RestController
@RequestMapping("/users")
public class UserController {

    @Autowired
    private UserService userService;

    @GetMapping("/{id}")
    public Mono<User> getUser(@PathVariable Long id) {
        return userService.findById(id);
    }

    @GetMapping
    public Flux<User> getAllUsers() {
        return userService.findAll();
    }

    @GetMapping("/stream")
    @Produces(MediaType.TEXT_EVENT_STREAM_VALUE)
    public Flux<User> streamUsers() {
        return userService.findAll()
            .delayElements(Duration.ofSeconds(1));  // SSE every second
    }
}

// Reactive service with composition
@Service
public class UserService {

    @Autowired
    private UserRepository userRepository;  // R2DBC

    @Autowired
    private WebClient emailServiceClient;

    public Mono<User> createUserWithNotification(User user) {
        return userRepository.save(user)
            .flatMap(savedUser ->
                emailServiceClient
                    .post()
                    .uri("/notifications")
                    .bodyValue(new WelcomeEmail(savedUser))
                    .retrieve()
                    .bodyToMono(Void.class)
                    .thenReturn(savedUser)
            )
            .onErrorResume(e -> {
                log.error("Failed to send notification", e);
                return Mono.just(user);  // Return user anyway
            });
    }
}

// Performance comparison
public class Main {
    public static void main(String[] args) {
        // Simulate 10,000 concurrent requests

        // Spring MVC (blocking):
        // - Thread pool: 200 threads
        // - Requests waiting in queue
        // - Memory: 500MB (thread stacks)
        // - Throughput: 2,000 req/sec

        // Spring WebFlux (non-blocking):
        // - Event loop: 4 threads (CPU cores)
        // - All requests handled concurrently
        // - Memory: 50MB
        // - Throughput: 20,000 req/sec
    }
}
Implementation Hints:
Reactive vs Imperative:
// Imperative (Spring MVC)
public User getUser(Long id) {
    User user = userRepository.findById(id);  // Blocks thread!
    return user;
}

// Reactive (Spring WebFlux)
public Mono<User> getUser(Long id) {
    return userRepository.findById(id);  // Returns immediately, executes later
}
Composing reactive streams:
// Sequential operations
Mono<User> result = userRepository.findById(id)
    .flatMap(user -> enrichWithProfile(user))
    .flatMap(user -> enrichWithPreferences(user));

// Parallel operations
Mono<EnrichedUser> result = Mono.zip(
    userRepository.findById(id),
    profileService.getProfile(id),
    preferencesService.getPreferences(id)
).map(tuple -> new EnrichedUser(tuple.getT1(), tuple.getT2(), tuple.getT3()));
Common mistakes:
- Calling
.block()(defeats the purpose) - Mixing blocking and non-blocking code
- Not understanding that nothing happens until you subscribe
- Ignoring backpressure
Learning milestones:
- You use Mono and Flux correctly → You understand reactive types
- You compose reactive chains → You understand operators
- You handle errors reactively → You understand error propagation
- You benchmark against MVC → You understand when WebFlux helps
Project 12: “Enterprise Application Platform” — Combine Everything
| Attribute | Value |
|---|---|
| File | SPRING_FRAMEWORK_DEEP_DIVE_PROJECTS.md |
| Main Programming Language | Java |
| Alternative Programming Languages | Kotlin |
| Coolness Level | Level 5: Pure Magic (Super Cool) |
| Business Potential | 5. The “Industry Disruptor” |
| Difficulty | Level 5: Master |
| Knowledge Area | Enterprise Architecture / Full-Stack Spring |
| Software or Tool | Spring Boot, Spring Cloud, Kubernetes |
| Main Book | “Cloud Native Java” by Josh Long & Kenny Bastani |
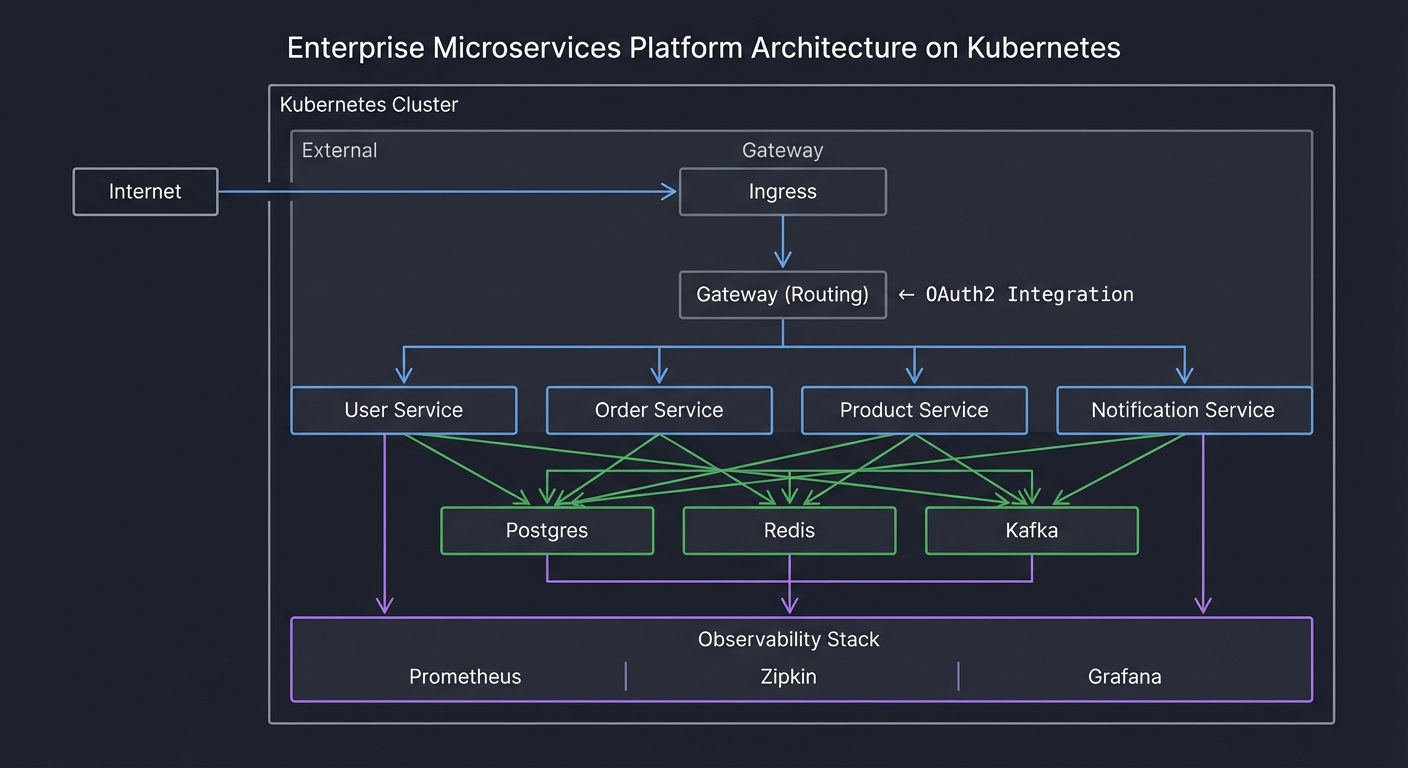
What you’ll build: A complete enterprise application platform with microservices, service discovery, configuration management, API gateway, security (OAuth2/OIDC), distributed tracing, and deployment to Kubernetes—demonstrating mastery of the entire Spring ecosystem.
Why this is the ultimate project: This project proves you understand not just Spring internals, but how to architect production systems. It combines every concept from the previous projects into a cohesive whole.
Core challenges you’ll face:
- Microservices architecture → maps to service boundaries and communication
- Service discovery → maps to Eureka/Consul integration
- Configuration management → maps to Spring Cloud Config
- API Gateway → maps to Spring Cloud Gateway routing
- Distributed tracing → maps to Sleuth/Micrometer + Zipkin
- Container orchestration → maps to Kubernetes deployment
Key Concepts:
- Spring Cloud: Spring Cloud Documentation
- Microservices Patterns: “Cloud Native Java” - Long & Bastani
- Kubernetes Deployment: Spring Boot on Kubernetes
- OAuth2/OIDC: Spring Security OAuth2
Difficulty: Master Time estimate: 2-3 months Prerequisites: All previous projects, Docker, Kubernetes basics
Real world outcome:
enterprise-platform/
├── services/
│   ├── user-service/        # User management
│   ├── order-service/       # Order processing
│   ├── product-service/     # Product catalog
│   ├── notification-service/ # Email/SMS
│   └── payment-service/     # Payment processing
│
├── infrastructure/
│   ├── config-server/       # Spring Cloud Config
│   ├── discovery-server/    # Eureka
│   ├── gateway/             # Spring Cloud Gateway
│   └── auth-server/         # OAuth2/OIDC
│
├── observability/
│   ├── zipkin/             # Distributed tracing
│   ├── prometheus/         # Metrics
│   └── grafana/            # Dashboards
│
├── k8s/
│   ├── namespaces/
│   ├── deployments/
│   ├── services/
│   └── ingress/
│
└── docker-compose.yml      # Local development
Architecture Diagram:
                    ┌───────────────────────────────────────────────────┐
                    │                   Kubernetes Cluster               │
                    ├───────────────────────────────────────────────────┤
                    │                                                   │
     Internet ──────┤     ┌─────────────┐                              │
                    │     │   Ingress   │                              │
                    │     └──────┬──────┘                              │
                    │            │                                      │
                    │     ┌──────▼──────┐                              │
                    │     │   Gateway   │◄──── OAuth2 Integration       │
                    │     │  (Routing)  │                              │
                    │     └──────┬──────┘                              │
                    │            │                                      │
          ┌─────────┼────────────┼────────────┐                        │
          │         │            │            │                        │
   ┌──────▼───┐ ┌───▼────┐ ┌────▼───┐ ┌──────▼─────┐                  │
   │  User    │ │ Order  │ │Product │ │Notification│                  │
   │ Service  │ │Service │ │Service │ │  Service   │                  │
   └────┬─────┘ └───┬────┘ └────┬───┘ └──────┬─────┘                  │
        │           │           │            │                         │
        └───────────┴───────────┴────────────┘                         │
                    │                                                   │
          ┌─────────┼─────────┐                                        │
          │         │         │                                        │
   ┌──────▼───┐ ┌───▼────┐ ┌──▼────┐                                  │
   │ Postgres │ │  Redis │ │Kafka  │                                  │
   └──────────┘ └────────┘ └───────┘                                  │
                    │                                                   │
                    │  ┌─────────────────────────────────────┐        │
                    │  │         Observability Stack          │        │
                    │  │  Prometheus │ Zipkin │ Grafana      │        │
                    │  └─────────────────────────────────────┘        │
                    └───────────────────────────────────────────────────┘
Implementation Hints:
Spring Cloud components:
- Config Server: Centralized configuration (Git-backed)
- Eureka: Service discovery (services register themselves)
- Gateway: API gateway with routing and filters
- Sleuth: Distributed tracing (correlation IDs)
- OpenFeign: Declarative REST clients
Key patterns to implement:
- Circuit Breaker: Resilience4j for fault tolerance
- Event Sourcing: Kafka for async communication
- CQRS: Separate read/write models
- Saga: Distributed transactions
Kubernetes deployment considerations:
- ConfigMaps for Spring configuration
- Secrets for sensitive data
- Service mesh (Istio) for traffic management
- Horizontal Pod Autoscaler for scaling
Learning milestones:
- Services communicate via discovery → You understand microservices
- Configuration is centralized → You understand 12-factor apps
- Traces span services → You understand observability
- Platform runs on Kubernetes → You understand cloud-native
Project Comparison Table
| Project | Difficulty | Time | Depth of Understanding | Fun Factor |
|---|---|---|---|---|
| 1. Build Your Own IoC Container | Advanced | 1-2 weeks | ⭐⭐⭐⭐⭐ | ⭐⭐⭐⭐ |
| 2. Build Your Own AOP Framework | Expert | 2-3 weeks | ⭐⭐⭐⭐⭐ | ⭐⭐⭐⭐ |
| 3. Build a Mini Spring MVC | Advanced | 2-3 weeks | ⭐⭐⭐⭐⭐ | ⭐⭐⭐⭐⭐ |
| 4. Auto-Configuration Simulator | Advanced | 1-2 weeks | ⭐⭐⭐⭐ | ⭐⭐⭐ |
| 5. Transaction Manager | Advanced | 2 weeks | ⭐⭐⭐⭐⭐ | ⭐⭐⭐ |
| 6. Security Filter Chain | Expert | 3-4 weeks | ⭐⭐⭐⭐⭐ | ⭐⭐⭐⭐ |
| 7. Spring Data Repository Magic | Advanced | 2-3 weeks | ⭐⭐⭐⭐ | ⭐⭐⭐⭐ |
| 8. Quarkus-Style Framework | Expert | 3-4 weeks | ⭐⭐⭐⭐⭐ | ⭐⭐⭐⭐⭐ |
| 9. Cross-Framework Comparison | Advanced | 3-4 weeks | ⭐⭐⭐⭐ | ⭐⭐⭐⭐⭐ |
| 10. Spring Boot Debugger | Intermediate | 1-2 weeks | ⭐⭐⭐ | ⭐⭐⭐ |
| 11. Reactive Spring WebFlux | Expert | 3-4 weeks | ⭐⭐⭐⭐⭐ | ⭐⭐⭐⭐ |
| Final: Enterprise Platform | Master | 2-3 months | ⭐⭐⭐⭐⭐ | ⭐⭐⭐⭐⭐ |
Recommended Learning Path
For Java Developers New to Spring
- Project 10 (Debugger) - See Spring from the outside first
- Project 1 (IoC Container) - Understand DI fundamentals
- Project 3 (Mini MVC) - Understand web layer
- Project 4 (Auto-Configuration) - Understand Spring Boot magic
For Spring Developers Wanting Deeper Understanding
- Project 1 (IoC Container) - Demystify @Autowired
- Project 2 (AOP Framework) - Demystify @Transactional, @Cacheable
- Project 5 (Transaction Manager) - Understand transaction boundaries
- Project 6 (Security Filter Chain) - Understand Spring Security
For Architects Comparing Frameworks
- Project 9 (Cross-Framework) - Build same app in 5 frameworks
- Project 8 (Compile-Time DI) - Understand Quarkus/Micronaut approach
- Project 11 (WebFlux) - Understand reactive vs imperative
- Final Project - Prove enterprise architecture skills
Summary
| # | Project Name | Main Language |
|---|---|---|
| 1 | Build Your Own IoC Container | Java |
| 2 | Build Your Own AOP Framework | Java |
| 3 | Build a Mini Spring MVC | Java |
| 4 | Spring Boot Auto-Configuration Simulator | Java |
| 5 | Transaction Manager | Java |
| 6 | Spring Security Filter Chain | Java |
| 7 | Spring Data Repository Magic | Java |
| 8 | Build a Quarkus-Style Framework | Java |
| 9 | Cross-Framework Comparison App | Multiple |
| 10 | Spring Boot Application Debugger | Java |
| 11 | Reactive Spring WebFlux | Java |
| Final | Enterprise Application Platform | Java |
Essential Resources
Official Documentation
Books
- “Pro Spring 6” by Iuliana Cosmina - Comprehensive Spring reference
- “Spring in Action” by Craig Walls - Practical Spring guide
- “Spring Boot in Practice” by Somnath Musib - Real-world patterns
- “Spring Security in Action” by Laurentiu Spilca - Deep security dive
- “Cloud Native Java” by Josh Long & Kenny Bastani - Microservices with Spring
- “Hands-On Reactive Programming in Spring 5” by Oleh Dokuka - WebFlux mastery
Comparison Resources
Community
- Spring Blog
- Baeldung - Excellent Spring tutorials
- Spring Reddit
- Stack Overflow - Spring