macOS Automation Mastery: Learning Through Building
Goal: Master the macOS automation ecosystem by peeling back the layers of the operating system. You will move from simple scripts to complex system extensions, understanding how macOS manages processes, events, input, and inter-application communication (IPC). By the end, you will not just use tools like Alfred or Rectangle—you will know how to build them.
Core Concept Analysis
macOS is unique in how it exposes its internal machinery to users. Unlike Windows (registry-heavy) or Linux (file-heavy), macOS provides several distinct, powerful layers for automation. Understanding these layers is the key to mastering the platform.
To truly understand what you are doing, you must visualize the system as a stack that you can hook into at different levels of abstraction:
┌─────────────────────────────────────────────────────────────┐
│                      User Session (Aqua)                     │
│   ┌──────────────┐   ┌──────────────┐   ┌──────────────┐    │
│   │     Apps     │   │   Scripts    │   │  Background  │    │
│   │ (GUI/Cocoa)  │   │  (JXA/Bash)  │   │   Daemons    │    │
│   └──────┬───────┘   └──────┬───────┘   └──────┬───────┘    │
│          │                  │                  │            │
├──────────┼──────────────────┼──────────────────┼────────────┤
│          ▼                  ▼                  ▼            │
│  ┌──────────────┐   ┌──────────────┐   ┌──────────────┐     │
│  │ Accessibility│   │ Apple Events │   │   launchd    │     │
│  │     API      │◀──│    (OSA)     │   │  (Scheduler) │     │
│  └──────┬───────┘   └──────┬───────┘   └──────┬───────┘     │
│         │                  │                  │             │
├─────────┼──────────────────┼──────────────────┼─────────────┤
│         ▼                  ▼                  ▼             │
│  ┌──────────────┐   ┌──────────────┐   ┌──────────────┐     │
│  │ Quartz Events│   │    Kernel    │   │ File System  │     │
│  │ (Input Taps) │   │     (XNU)    │   │    (APFS)    │     │
│  └──────────────┘   └──────────────┘   └──────────────┘     │
└─────────────────────────────────────────────────────────────┘
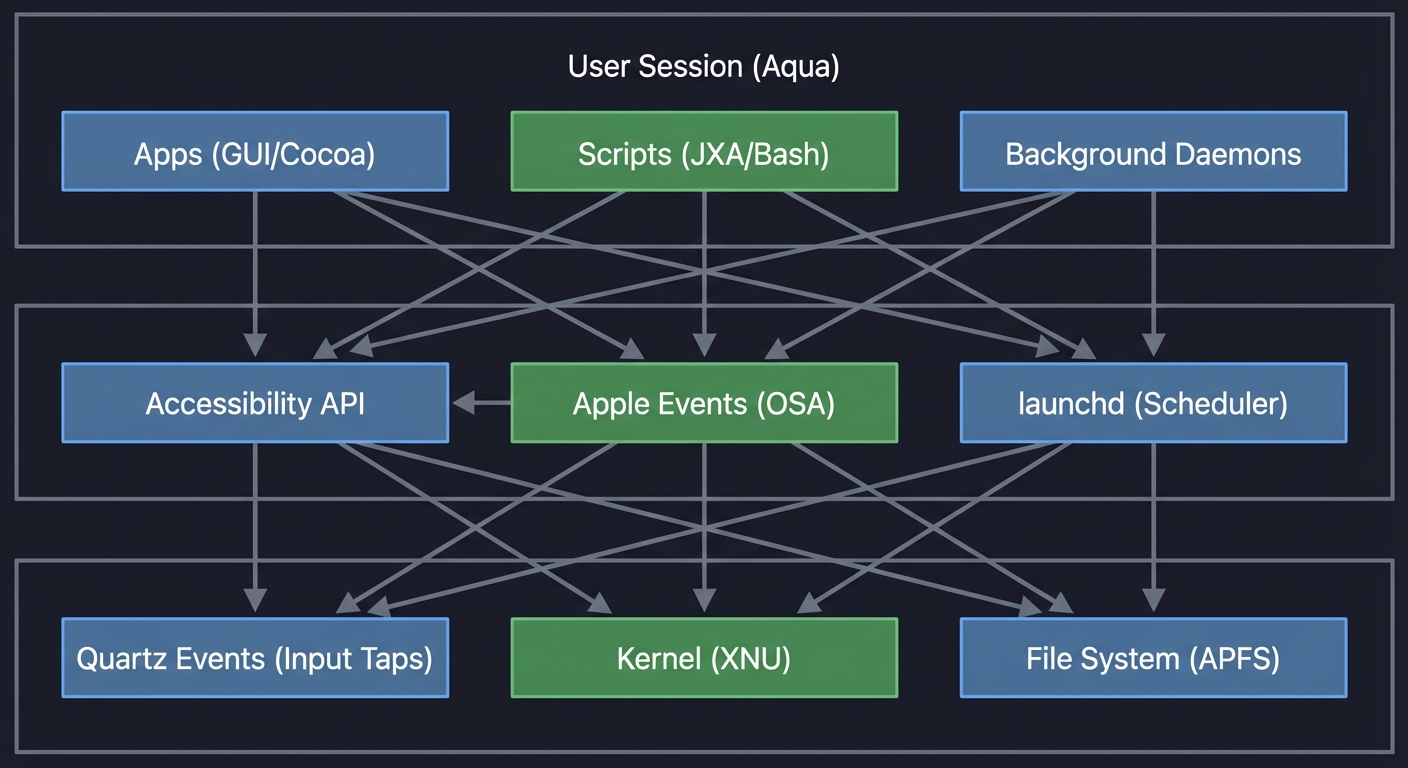
The Automation Hierarchy: A Deeper Look
1. Quartz Event Taps (The Raw Input Layer)
This is the lowest level accessible from userspace. A CGEventTap is a filter placed into the window server’s event stream. It sees (and can modify) every single mouse movement, key press, and scroll wheel tick for the entire system before the active application receives it.
- Where it lives: Core Graphics framework. This is a C-based API.
- What it’s for: Global hotkey remapping, creating custom input devices, and system-wide event modification.
- Example Tool: Karabiner-Elements uses an event tap (via a kernel extension for more power) to remap Caps Lock to a Hyper key. Project 5 operates at this level.
- Power & Peril: This is the most powerful input automation tool. It’s also the mechanism by which keyloggers work. It requires special permissions and can easily break input if not handled carefully.
2. The Accessibility API (The UI “Reader” Layer)
This is macOS’s secret weapon for automation. Originally designed for screen readers (like VoiceOver) for the visually impaired, this API exposes the entire UI of most applications as a “tree” of elements.
- Where it lives: Application Services framework, represented by
AXUIElementobjects. - What it’s for: Reading UI element properties (like a button’s title or a window’s position) and performing actions on them (like programmatically “pressing” a button).
- Example Tools: Hammerspoon uses this to control windows (Project 1). The UI Element Inspector (Project 6) is a pure exploration of this API.
- Key Insight: You are not simulating a mouse click at
(x, y). You are finding a specificAXButtonobject in the app’s hierarchy and telling it to perform itskAXPressAction. This is more robust than coordinate-based clicking but depends on the target app being well-behaved and implementing accessibility correctly. Requires explicit user permission in System Settings > Privacy & Security > Accessibility.
3. Apple Events / OSA (The Application “Conversation” Layer)
This is a high-level Inter-Process Communication (IPC) protocol, dating back to classic Mac OS. It allows applications to expose a “scripting dictionary” of objects and commands.
- Where it lives: Open Scripting Architecture (OSA). AppleScript and JavaScript for Automation (JXA) are the two main client languages.
- What it’s for: Telling an application to perform a semantic action. You don’t “type ‘q’ with command key down”; you send the
quitcommand to the application process. - Example Tools: The Application Launcher (Project 2) and Browser Automator (Project 10) use JXA to interact with applications at this level.
- The Tradeoff: It’s incredibly robust and readable (
tell application "Finder" to empty trash). However, it requires the developer of the target application to explicitly add scripting support. If an app isn’t scriptable, this method is useless.
4. launchd (The System “Scheduler” Layer)
This is the modern replacement for cron, init, and other Unix daemons. launchd is the master process that starts and manages nearly every other process on the system, including system daemons and user agents.
- Where it lives: It’s process #1 on the system. You configure it with
.plist(Property List) files located in~/Library/LaunchAgents(for your user) or/Library/LaunchDaemons(system-wide). - What it’s for: Running scripts on a schedule (
StartInterval), in response to file system changes (WatchPaths), or just keeping a background script alive (KeepAlive). - Example Tools: The File Organizer (Project 7) uses a
launchdagent to watch the Downloads folder. The Daily Standup Automator (Project 3) could be triggered by alaunchdtimer. - Key Insight: Learning
launchdis learning how macOS manages work. It’s more efficient than an infinitewhile true; sleep 60; doneloop because the OS only runs your code when necessary, saving battery and CPU.
Concept Summary Table
| Concept Cluster | What You Need to Internalize |
|---|---|
| Event Taps (CGEventTap) | How to intercept, modify, and suppress raw keyboard/mouse events before the OS processes them. |
| The Accessibility Tree | UI is a tree structure (Window -> SplitGroup -> Button). Automating means traversing this tree. |
| Open Scripting Architecture (OSA) | The bridge that allows languages (JavaScript, AppleScript) to send “Events” (Objects/Verbs) to applications. |
| Process Management (launchd) | How the OS manages background tasks, keeps them alive, and triggers them based on paths or time. |
| Coordinate Systems | Screen geometry (0,0 is usually bottom-left in Cocoa, top-left in Quartz/Carbon). Handling multiple displays. |
| The Pasteboard (Clipboard) | It’s not just text. It’s a buffer that holds multiple data types (RTF, String, FileURL) simultaneously. |
Deep Dive Reading by Concept
| Concept | Book | Chapter |
|---|---|---|
| Apple Events & OSA | AppleScript: The Definitive Guide (Matt Neuburg) | Ch. 2 “The AppleScript Model”, Ch. 19 “Scripting Applications” |
| System Services & launchd | macOS Internals, Vol I: User Mode (Jonathan Levin) | Section on launchd and XPC (Advanced) |
| Shell & CLI Integration | Wicked Cool Shell Scripts (Dave Taylor) | Ch. 1 “The Missing Code Library”, Ch. 8 “OS X Scripts” |
| Lua Scripting (Hammerspoon) | Programming in Lua (Roberto Ierusalimschy) | Ch. 1-6 (Basics), Ch. 24 (C API - to understand how it binds) |
| UI & Event Handling | macOS Programming for Absolute Beginners (Wallace Wang) | Ch. 5 “Handling Events” (for the native perspective) |
| Input & Vim Philosophy | Practical Vim (Drew Neil) | Ch. 1 “The Vim Way” (Conceptual basis for Project 5) |
Project 1: Window Tiling Manager with Hammerspoon
- Main Programming Language: Lua
- Software or Tool: Hammerspoon
- Difficulty: Intermediate
What you’ll build: A complete window tiling system that responds to hotkeys to snap windows to halves, thirds, quarters, and custom grid positions—like Rectangle or Magnet, but built from scratch.
Real World Outcome
Imagine your screen, cluttered with a dozen overlapping windows. It’s digital chaos. You select your code editor and press Ctrl + Alt + Left. The window instantly and precisely snaps to occupy the left 50% of the display. You highlight your terminal, press Ctrl + Alt + Right, and it perfectly fills the other half. With two keystrokes, you’ve imposed order. You’ve just built a personal version of popular tools like Rectangle or Magnet, tailored perfectly to your needs. The outcome is a calm, organized workspace that you can navigate with pure muscle memory, making you faster and more focused.
-- How it looks in your config:
hs.hotkey.bind({"ctrl", "alt"}, "Left", function()
  local win = hs.window.focusedWindow()
  local f = win:frame()
  local screen = win:screen()
  local max = screen:frame()

  f.x = max.x
  f.y = max.y
  f.w = max.w / 2
  f.h = max.h
  win:setFrame(f)
end)
The Core Question You’re Answering
“How can a simple script, running in the background, seize control of the size and position of a completely unrelated graphical application’s window? What underlying OS architecture makes this possible?”
Concepts You Must Understand First
Stop and research these before coding:
- The Window Object (
hs.window):- A window is an object, not just pixels. What are its key properties? Look up
frame(),screen(),title(), andid()in the Hammerspoon docs. - How do you get a reference to the currently active window? (e.g.,
hs.window.focusedWindow()) - How is this different from getting all visible windows?
- A window is an object, not just pixels. What are its key properties? Look up
- macOS Coordinate Systems:
- Where is the origin point
(0,0)on the main screen in Hammerspoon? (Hint: It’s the top-left, but in lower-level C-based APIs, it’s often the bottom-left). - If you have two 1920x1080 monitors side-by-side (main on the left), what are the coordinates of the top-left corner of the right-hand monitor?
- What is the crucial difference between
screen:frame()andscreen:fullFrame()? How do the Menu Bar and Dock affect your calculations? - Reference: Hammerspoon documentation for
hs.screen.
- Where is the origin point
- Lua Basics & Event-Driven Programming:
- How do you define a function in Lua? What is a “table”?
- Hammerspoon is event-driven. What does it mean for your code to be triggered by an “event” (like a hotkey press) rather than running top-to-bottom in a script? Your code will live inside functions that wait to be called.
- Book Reference: Programming in Lua by Roberto Ierusalimschy, Ch. 1-6.
Questions to Guide Your Design
Before implementing, think through these:
- Multi-Monitor Strategy: If a window is on the right edge of Monitor 1 and you trigger the “move right” action, what should happen? Should it do nothing, wrap around to the left edge of Monitor 1, or jump to the left edge of Monitor 2? There is no single right answer; you must design the behavior you want.
- State and History: How would you implement a “Restore Last Position” hotkey? This implies you need to store the window’s frame before you modify it. Where will you save this state? A global variable? A table indexed by window ID?
- Animation vs. Performance: Do you want windows to “teleport” instantly (
win:setFrame()) or “slide” smoothly (hs.window.animation). What are the tradeoffs? Instant is faster, but animation can feel more polished. How does animation impact performance if you’re moving many windows at once? - Grid System: Instead of just halves and quarters, how could you design a generic function that takes grid dimensions (e.g., 3x2) and a cell position (e.g., row 1, col 2) to place a window? This forces you to think in terms of ratios and abstract math.
Thinking Exercise
Trace the geometry by hand before coding. Get a piece of paper and draw a rectangle representing a 1920x1080 screen. Remember that for Hammerspoon, coordinate (0,0) is the top-left corner.
- Draw a window at an arbitrary starting position, for example:
x: 200, y: 300, w: 800, h: 600. - Now, calculate the new
x, y, w, hvalues needed to move this window to the “Top Right Quadrant”. - Write down the math:
new_x=1920 / 2=960new_y=0new_w=1920 / 2=960new_h=1080 / 2=540This manual exercise solidifies your understanding of the screen’s coordinate system before you ever touch the API.
The Interview Questions They’ll Ask
- “Explain the difference between
screen:frame()andscreen:fullFrame(). Which one should you use for a window manager and why does it matter?” - “What is the underlying macOS technology that Hammerspoon uses to control window positions? How is this different from AppleScript’s approach to window control?”
- “If you press a hotkey very rapidly, your move function might be triggered multiple times. How would you ‘debounce’ the hotkey to ensure the function only runs once per quick succession of presses?”
- “You’ve snapped a window to the left. The user then manually resizes it. How could your script detect that the window is no longer in its ‘snapped’ state?” (Hint:
hs.window.watcher) - “Why is it a bad idea to put a
hs.execute('sleep 1')call inside your window move function? What is the proper way to handle animations or delays?”
Hints in Layers
- Layer 1 (The Simplest Thing): Forget percentages. Make a hotkey that moves the focused window to the absolute top-left corner:
win:setFrame({x=0, y=0, w=800, h=600}). - Layer 2 (Using Ratios): Now, modify your function to use the screen’s dimensions. Get the screen frame with
win:screen():frame(). Set the window width toscreen.w / 2and height toscreen.h. - Layer 3 (Abstraction): Don’t repeat yourself. Create a single, generic function
moveWindow(x_ratio, y_ratio, w_ratio, h_ratio)that does all the math. Your hotkey functions will now be simple one-liners that call this master function with the correct ratios (e.g.,moveWindow(0, 0, 0.5, 1)for the left half). - Layer 4 (Multi-Screen Logic): Use
win:screen():next()to get a reference to the next monitor. Create a new hotkey that moves the entire window to the next screen (win:moveOneScreenEast()). This proves you can handle more than one display.
Books That Will Help
| Topic | Book | Chapter |
| :— | :— | :— |
| Lua Syntax | Programming in Lua | Ch. 1-5 |
| API Reference | Hammerspoon Docs | hs.window, hs.screen |
Project 2: Application Launcher with Fuzzy Search (AppleScript + JXA)
- Main Programming Language: JavaScript (JXA)
- Software or Tool: Script Editor, osascript
- Difficulty: Intermediate
What you’ll build: A Spotlight-alternative launcher that indexes your applications and custom shortcuts, providing fuzzy search through a minimal UI.
Real World Outcome
You hit your global hotkey. A clean, minimal search bar appears instantly, floating elegantly over your current work. It prompts: “Run what?”. You type vsc. Before you can finish, the script presents a sorted list of possibilities: “Visual Studio Code” is at the top, but it also found “iTerm (Vim scripts)” and “Invoice Scanner.app”. You didn’t type the full name, or even consecutive letters. You hit Enter, and VS Code launches. You’ve just built the core logic of Alfred or Raycast—a smart, fuzzy-finding launcher that understands your intent and gets you where you need to go, faster.
$ osascript launcher.js
> [Dialog: "Launch app..."]
> User types: "code"
> [Launching Visual Studio Code...]
The Core Question You’re Answering
“How does the operating system locate and launch applications, and how can I build a personalized ‘search engine’ for my local machine that is faster and smarter than the default Spotlight search?”
Concepts You Must Understand First
Stop and research these before coding:
- JXA (JavaScript for Automation):
- What is the global
Applicationobject in JXA? How do you use it to interact with running programs (Application('Finder')) versus the system itself (Application.currentApplication())? - How do you enable the
osascriptstandard additions for UI commands likedisplayDialog? (app.includeStandardAdditions = true). - Reference: The JXA Cookbook is the essential community resource.
- What is the global
- macOS Application Structure:
- What is an application “bundle”? Right-click on an app in Finder and “Show Package Contents.” Explore the
Contents/MacOSandContents/Info.plistfiles. Understand that an.appis a directory, not a single file. - Where does macOS look for applications? Learn about the standard search paths (
/Applications,~/Applications,/System/Applications).
- What is an application “bundle”? Right-click on an app in Finder and “Show Package Contents.” Explore the
- File System Interaction in JXA:
- How do you read the contents of a directory using JXA? You’ll likely need to bridge to Objective-C classes like
NSFileManager. - Example:
ObjC.deepUnwrap($.NSFileManager.defaultManager.contentsOfDirectoryAtPath('/Applications')). Why is this necessary?
- How do you read the contents of a directory using JXA? You’ll likely need to bridge to Objective-C classes like
- Fuzzy Matching Algorithms:
- This is a core computer science concept. A simple
string.includes()check is not fuzzy matching. - Research the basic principle: a query “abc” matches “apple beef cake” because the characters appear in order, even if not consecutively. How would you score a match based on the proximity of the found characters?
- This is a core computer science concept. A simple
Questions to Guide Your Design
Before implementing, think through these:
- Indexing and Caching: Searching
/Applicationsand~/Applicationsevery single time the hotkey is pressed will be noticeably slow. What is your caching strategy? Should you generate the list once and save it to a file (e.g.,~/.cache/app_list.json)? When should this cache be invalidated and rebuilt? - Handling Aliases and Symlinks: The
/Applicationsfolder often contains aliases or symbolic links (e.g., to apps installed via Homebrew). How will your file system code handle these? Will you resolve them to their original paths? What happens if you don’t? - Choosing the Right UI: A simple
display dialogwith a text field is easy but offers a poor user experience. How can you usechoose from listto present a dynamic, filterable list of results to the user as they type? This creates a much more interactive feel. - Handling Duplicates: What happens if you have two apps with the same name (e.g., from different versions or locations)? How will you display them in the results list to differentiate them? Should you show the full path?
Thinking Exercise
Design a fuzzy match algorithm in pseudocode. Before you write any JXA, think about the core matching logic. Write a function fuzzyMatch(query, target) that returns a score.
function fuzzyMatch(query, target):
  query = query.toLowerCase()
  target = target.toLowerCase()

  score = 0
  lastMatchIndex = -1

  for each character `q` in query:
    // Find q in target, starting *after* the last match
    foundIndex = find first occurrence of `q` in `target` after `lastMatchIndex`

    if `q` is not found:
      return 0 // No match

    // Bonus for adjacent letters
    if foundIndex == lastMatchIndex + 1:
      score += 10
    else:
      score += 5

    // Penalize for distance
    score -= (foundIndex - lastMatchIndex)

    lastMatchIndex = foundIndex

  return score
Tracing this logic with query="ph" and target="Photoshop" helps you understand the core of the project.
The Interview Questions They’ll Ask
- “What is the ‘Scripting Bridge’? How does it allow languages like Python or Ruby to interact with scriptable applications, and how does this relate to JXA?”
- “Why is JXA often preferred over AppleScript for tasks involving complex data manipulation, like implementing a search algorithm?”
- “How does macOS determine the default application to open a specific file type? Where is this information stored?” (Hint: Launch Services,
Info.plistUTIs). - “Your launcher needs to build a cache. What are the pros and cons of storing this cache in
/tmpversus~/Library/Caches?” - “Describe the difference between a symbolic link and an alias file in macOS. Why might your application indexer need to handle both?”
Hints in Layers
- Layer 1 (List All Apps): Forget UI. Write a JXA script that uses
NSFileManagerto get a list of all file names in/Applicationsand logs them to the console. - Layer 2 (Simple Filter): Modify the script to take a hard-coded query string and filter the list of apps using a simple
string.includes()check. - Layer 3 (Interactive UI): Use
app.includeStandardAdditions = trueandapp.chooseFromList()to display your filtered list in a native macOS selection dialog. This makes it interactive. - Layer 4 (Caching): To make it fast, implement a cache. On first run, generate the full app list and write it to a JSON file in a temporary directory. On subsequent runs, read from this file instead of rescanning the file system. Add a separate script or a special command to rebuild the cache when needed.
- Layer 5 (Fuzzy Search): Replace your simple
string.includes()filter with the fuzzy matching algorithm you designed in the Thinking Exercise. Now you have a truly smart launcher.
Books That Will Help
| Topic | Book | Chapter | | :— | :— | :— | | JXA Fundamentals | JXA Cookbook (Wiki) | Basics, File System | | String Algos | Grokking Algorithms | (General search concepts) |
Project 3: Daily Standup Automator with Shortcuts + Shell Scripts
- Main Programming Language: Shell (Bash/Zsh)
- Software or Tool: Shortcuts, launchd
- Difficulty: Beginner
What you’ll build: An automated workflow that prepares your digital environment for work every morning—opening specific apps, positioning them, and posting a status update.
Real World Outcome
It’s 8:55 AM. You sit down at your desk with your coffee. As if on cue, your Mac springs to life without you touching a thing:
- Your main work apps—Slack, VS Code, and your terminal—launch and arrange themselves into your preferred layout using the logic from Project 1.
- Slack automatically opens the
#daily-standupchannel. - Your web browser opens, loading
localhost:3000, your Jira dashboard, and your company email in three separate tabs. - A silent notification appears: “Work Mode Engaged. Do Not Disturb is now active.”
Your entire digital workspace has been assembled for you. The 5 minutes of repetitive clicking you used to do every morning is now a single, automated, time-triggered event.
The Core Question You’re Answering
“How do I bridge the gap between simple, user-friendly automation tools (like Shortcuts) and powerful, low-level shell scripts to orchestrate multiple, unrelated applications into a single, cohesive, and time-triggered workflow?”
Concepts You Must Understand First
Stop and research these before coding:
- URL Schemes for Deep Linking:
- Many apps can be opened to a specific state or resource via a custom URL. For example,
slack://channel?team={TEAM_ID}&id={CHANNEL_ID}. - How do you find out which URL schemes an application supports? (Hint: Look inside the app’s
Info.plistfile forCFBundleURLSchemes). - Research the URL schemes for the apps you use daily.
- Many apps can be opened to a specific state or resource via a custom URL. For example,
- The
openCommand:- This is the master key for launching things from the macOS command line.
- What’s the difference between
open /Applications/Safari.appandopen -a Safari? - How do you use
opento launch a URL (open https://...)? - How do you use it to open a file with a specific application, overriding the default (
open -a "Visual Studio Code" report.txt)?
- Shortcuts for macOS:
- How do you create a new Shortcut that contains the “Run Shell Script” action?
- How can you pass input into the shell script from a previous action? How does the script receive this input (e.g., as arguments or via stdin)?
- How can a Shortcut be triggered automatically? (e.g., at a specific time of day).
- Scheduling with
launchd:- For ultimate control, you can bypass the Shortcuts GUI for scheduling. What is the structure of a basic
launchd.plistfile? - What do the
StartCalendarInterval(for time-based triggers) andStartInterval(for recurring tasks) keys do? - Book Reference: macOS Internals, Vol I by Jonathan Levin has an excellent, though advanced, section on
launchd. Themanpages (man launchd.plist) are also invaluable.
- For ultimate control, you can bypass the Shortcuts GUI for scheduling. What is the structure of a basic
Questions to Guide Your Design
Before implementing, think through these:
- Idempotency: What should your script do if an application it’s supposed to open (like Slack) is already running? The
open -acommand handles this gracefully by simply bringing the app to the front. But what about your custom logic? Should you still try to switch to the#daily-standupchannel? A robust script should produce the same end result, regardless of the starting state. - Handling Dependencies and Delays: Applications don’t launch instantly. If you issue a command to position a window immediately after a command to launch the app, the script will fail because the window doesn’t exist yet. How will you build in “smart waits”? Should you use a fixed
sleep 5, or a more robust loop that checks if the application process is running (pgrep -x "Slack")? - Context-Awareness: You don’t want your work setup triggering on a Saturday morning. How will you make the script conditional? Can you use the
datecommand in your shell script to check the day of the week before executing the main logic? - Configuration: Your project directories and URLs will change. Should you hard-code these paths into your script, or should you store them in a separate configuration file (e.g.,
~/.config/standup.conf) that your main script reads from? This makes your automator portable and easier to maintain.
Thinking Exercise
Deconstruct your morning routine. Before writing the script, map out your ideal morning setup manually. Be incredibly specific about each action and the tool used. This becomes the blueprint for your script.
| Manual Action | Automation Command |
|---|---|
| 1. Click Slack icon in Dock | open -a "Slack" |
2. Navigate to #standup channel |
open "slack://channel?team=...&id=..." |
| 3. Click VS Code icon | open -a "Visual Studio Code" |
| 4. File > Open Recent > MyProject | code ~/Projects/MyProject |
| 5. Open new iTerm2 tab | osascript -e 'tell app "iTerm" to create window with default profile' |
6. cd ~/Projects/MyProject |
(part of the iTerm script) |
| 7. Open Chrome | open -a "Google Chrome" "https://jira.mycompany.com" |
This exercise forces you to translate every click and keystroke into a concrete, scriptable command.
The Interview Questions They’ll Ask
- “What is the difference between launching an application via
open -aversus executing its binary directly from within theContents/MacOSdirectory?” - “How do you pass arguments from a Shortcuts workflow into the shell script it’s running? How does the script access those arguments?”
- “You want to schedule this script to run at 9 AM every weekday. Would you use
cronorlaunchdon a modern macOS system? Why?” - “What is an ‘idempotent’ script, and why is it a desirable quality for a setup script like this?”
- “How would you make your script check if you’re connected to your office Wi-Fi before it attempts to open internal company URLs?” (Hint:
networksetuporairportcommands).
Hints in Layers
- Layer 1 (Basic Shell Script): Create a
standup.shfile. In it, put threeopen -a "AppName"lines to launch your most-used apps. Make it executable (chmod +x) and run it from your terminal. - Layer 2 (Adding URLs and Specifics): Add
open "https://..."commands to launch websites. Use app-specific CLI commands likecode ~/Projects/MyProjectto open specific folders. - Layer 3 (UI Scripting for Control): Add an
osascriptblock to your shell script to perform actions thatopencan’t, like telling your terminal to run a command or positioning a window. - Layer 4 (Wrapping in a Shortcut): Create a new macOS Shortcut. Use the “Run Shell Script” action and paste the contents of your
standup.shfile into it. Now you can run it from the Shortcuts app or via Siri. - Layer 5 (Time-Based Automation): In the Shortcuts app, go to the “Automations” tab. Create a new “Time of Day” automation that runs your new shortcut every weekday at 8:55 AM. You have now made it fully automatic.
Books That Will Help
| Topic | Book | Chapter | | :— | :— | :— | | Shell Automation | Wicked Cool Shell Scripts | Ch. 8 “OS X Scripts” | | CLI Basics | The Linux Command Line | Ch. 1-5 |
Project 4: Clipboard History Manager with JXA
- Main Programming Language: JavaScript (JXA)
- Software or Tool: osascript, Script Editor
- Difficulty: Intermediate
What you’ll build: A background daemon that watches your clipboard. Every time you copy something, it saves it to a list. You can then recall the last 50 items.
Real World Outcome
You’re deep in a coding session. You copy a function name from one file, a variable from another, and a URL from your browser. Now you’re back in your editor and need that original function name. Instead of switching back to the first file and re-copying, you press your custom hotkey, Cmd+Shift+V. A simple list appears on your screen:
1: function calculateTotal(items)
2: user_id_12345
3: https://stackoverflow.com/questions/...
You press 1, and function calculateTotal(items) is instantly pasted into your code. You have transcended the limitation of a single-item clipboard. You’ve built your own version of Pastebot or Maccy, ensuring you never lose a copied item again.
The Core Question You’re Answering
“How does the operating system manage the ephemeral data on the clipboard (the ‘Pasteboard’), and how can I build a persistent, long-running process to observe changes to this data and save it before it’s overwritten?”
Concepts You Must Understand First
Stop and research these before coding:
- The Pasteboard (
NSPasteboard):- This is the underlying macOS class that manages clipboard data. While JXA provides a wrapper, understanding the source is key.
- A pasteboard can hold multiple data types simultaneously for a single copied item (e.g.,
public.utf8-plain-text,public.rtf, and a custom app-specific type). How can you inspect the available types? - What is the
changeCountproperty? This is the fundamental mechanism you will use to detect when a new item has been copied.
- Polling vs. Event-Based Programming:
- Ideally, we would subscribe to a “clipboardDidChange” event. However, this is not easily exposed to scripting languages.
- Therefore, you must use polling: periodically checking the
changeCountto see if it has incremented. This is a common pattern in automation when direct event hooks aren’t available. - What are the drawbacks of polling? (CPU usage, battery drain, potential for missed events if the polling interval is too long).
- Data Persistence and Serialization:
- Your script will be a long-running process, but it’s not invincible. If it crashes or the machine reboots, its in-memory history is gone.
- How can you persist the clipboard history to disk? The simplest method is using a structured text format like JSON (JavaScript Object Notation).
- You’ll need a JXA method to write a string to a file (e.g.,
~/.clipboard_history.json) and to read it back when the script starts up.
- JXA Background Processes:
- How do you run a JXA script as a persistent background daemon? You will need to use
launchd(see Project 7) to keep your polling script running at all times. - Alternatively, for development, you can run it in a loop from Script Editor, but this is not a permanent solution.
- How do you run a JXA script as a persistent background daemon? You will need to use
Questions to Guide Your Design
Before implementing, think through these:
- Performance and Efficiency: Checking the clipboard every 0.1 seconds is wasteful. Checking every 5 seconds might miss quick copy-paste actions. What is a reasonable polling frequency? How could you make it adaptive (e.g., poll more frequently when the user is active)?
- Security and Privacy: You are building a tool that logs everything the user copies, including passwords, API keys, and private messages. How will you mitigate this? Should you have a “blacklist” of apps (like 1Password) from which you don’t save copies? Should you add a “Clear History” function? How can you prevent sensitive data from being written to a plain text file on disk?
- Handling Rich Data: What happens if the user copies an image from a web page or files from Finder? Your script will likely crash if it tries to save binary data as a plain text string. How can you check the type of the clipboard content and decide whether to save it? For this project, you might choose to only save content of type
public.utf8-plain-text. - UI for Recall: How will the user access the history? Will you use a
choose from listdialog? How many items should you show? Should the most recent item be at the top or bottom? Should you display a snippet of long text items?
Thinking Exercise
Design the core polling loop. Before coding, write the logic for your daemon on paper. This is the heart of your application.
// Initialize state
let clipboardHistory = readHistoryFromDisk() // e.g., from ~/.clipboard_history.json
let lastChangeCount = getPasteboardChangeCount()

// Start the infinite loop
while (true) {
  let currentChangeCount = getPasteboardChangeCount()

  if (currentChangeCount > lastChangeCount) {
    // Clipboard has changed!
    let newContent = getClipboardContent()

    // Avoid saving duplicates
    if (newContent != last_item_in(clipboardHistory)) {
      add newContent to clipboardHistory

      // Optional: limit history size
      if (size of clipboardHistory > 50) {
        remove oldest item from clipboardHistory
      }

      write clipboardHistory to disk
    }

    lastChangeCount = currentChangeCount
  }

  // Wait before checking again
  sleep(1 second)
}
This exercise forces you to think about state management, avoiding duplicate entries, and data persistence.
The Interview Questions They’ll Ask
- “What is the difference between a launch agent and a launch daemon in macOS? Why is an agent the correct choice for a user-specific clipboard manager?”
- “Your script polls the pasteboard’s
changeCount. Why is this generally considered an inefficient pattern compared to event-driven programming? Why are we forced to use it here for this scripting-level project?” - “How does the pasteboard handle complex data, like a mix of text and an image copied from a website? What does
NSPasteboard’stypesproperty return in this case?” - “What are the security and privacy risks of a tool that logs every clipboard interaction? How might a commercial application mitigate these risks?”
- “If you were to build this tool as a native Swift application instead of a JXA script, what different, more efficient APIs might be available to you for monitoring clipboard changes?” (Hint:
NSPasteboardnotifications).
Hints in Layers
- Layer 1 (Read Once): Write a simple JXA script that just reads the current clipboard content once (
theClipboard.get()) and prints it to the console. - Layer 2 (The Polling Loop): Wrap your script in a
while(true)loop. Add adelay(1)at the end. Store thechangeCountand only print the content if the count has changed since the last loop iteration. You now have a basic poller. - Layer 3 (In-Memory History): Instead of just printing, store the copied items in a JavaScript
Array. Add logic to avoid storing consecutive duplicates. - Layer 4 (File Persistence): Use JXA’s file I/O capabilities to
JSON.stringify()your history array and write it to a file (e.g.,~/.clipboard_history.json) every time it changes. When your script starts, it should first try to read and parse this file to load the previous history. - Layer 5 (Recall UI): Write a second script,
recall.js. This script reads the history file, displays the contents usingapp.chooseFromList(), and sets the clipboard to the user’s selected item. Bind this script to a hotkey. You now have a complete system.
Books That Will Help
| Topic | Book | Chapter | | :— | :— | :— | | JXA System Access | JXA Cookbook | “System Events”, “Clipboard” | | File I/O | JavaScript: The Definitive Guide | Ch. 11 (Standard Libs) |
Project 5: Hyper Key System with Karabiner + Goku
- Main Programming Language: EDN (Goku DSL) / JSON
- Software or Tool: Karabiner Elements, Goku
- Difficulty: Intermediate
What you’ll build: You will transform the useless “Caps Lock” key into a “Hyper Key” (Cmd+Ctrl+Opt+Shift). This opens up a new layer of keyboard shortcuts that never conflict with system defaults.
Real World Outcome
You’ve transformed your “Caps Lock” key, once a digital appendix, into the most powerful key on your keyboard. It now has two functions:
- Tapped quickly: It’s
Escape. Perfect for Vim users and dismissing dialogs. - Held down: It becomes a “Hyper Key,” pressing
Cmd+Ctrl+Opt+Shiftsimultaneously.
This unlocks a brand new, conflict-free layer of shortcuts, managed by you:
- Hyper + H/J/K/L: Becomes your navigation layer. You can now press
Hyper + Jto move the cursor down in any text field, without ever leaving the home row. - Hyper + C: Launches Google Chrome.
- Hyper + S: Launches Slack.
- Hyper + V: Launches VS Code.
Your hands remain anchored to the home row, and you navigate your entire OS with a speed and ergonomic comfort you designed yourself. You are no longer constrained by the default keyboard shortcuts.
The Core Question You’re Answering
“How can I intercept raw signals from my physical keyboard and fundamentally rewrite their meaning before the operating system or any application has a chance to interpret them? How can I create an entirely new, conflict-free layer of keyboard shortcuts by transforming a useless key into a universal modifier?”
Concepts You Must Understand First
Stop and research these before coding:
- Input Event Chain & Virtual Devices:
- Understand the path of a keystroke:
Hardware -> Kernel Driver -> macOS WindowServer -> Active App. - Karabiner works by creating a virtual keyboard device. It intercepts the signal from your real keyboard, processes it according to your rules, and then outputs a new event from its virtual keyboard, which the OS then sees. Why is this virtual device necessary?
- Reference: Read the “How it works” section on the official Karabiner-Elements website.
- Understand the path of a keystroke:
- Key Codes vs. Modifiers:
- Every physical key on your keyboard has a unique “key code” (e.g.,
a,spacebar,caps_lock). - “Modifier keys” (
shift,control,option,command) are flags that are applied to a key code. A “Hyper Key” is simply a macro that activates all four modifier flags at once.
- Every physical key on your keyboard has a unique “key code” (e.g.,
- Karabiner’s “Complex Modifications”:
- Karabiner’s power comes from its JSON-based rule engine. A simple remap is easy, but a “complex modification” is a rule with conditions.
- The core of the Hyper Key is the
to_if_aloneandto_if_heldrule structure. You need to understand how Karabiner distinguishes between a quick tap and a longer press-and-hold action.
- Goku: Configuration as Code:
- Writing Karabiner’s JSON rules by hand is tedious and error-prone. Goku is a Domain Specific Language (DSL) that compiles a simpler, more readable
.ednfile into the complexkarabiner.json. - This is an example of “configuration as code.” Why is defining your keymap in a managed, version-controllable text file better than clicking buttons in a GUI?
- Reference: Study the example
.ednfiles in the Goku GitHub repository to understand its syntax.
- Writing Karabiner’s JSON rules by hand is tedious and error-prone. Goku is a Domain Specific Language (DSL) that compiles a simpler, more readable
Questions to Guide Your Design
Before implementing, think through these:
- Ergonomics and Hand Strain: The goal is to move your hands less. With your left pinky holding down Caps Lock, which keys are easiest for your other fingers and your right hand to press? Design your layout around the most common actions. For example, navigation (
HJKL) should be on the home row. - Semantic Layers: Don’t just assign random keys. Think in “layers.” For example:
- Navigation Layer: Hyper + HJKL for arrows.
- App Layer: Hyper + C for Chrome, V for VS Code, S for Slack.
- Window Management Layer: Hyper + Arrow Keys to snap windows (integrating with Project 1). How will you group your shortcuts logically so they are easy to remember?
- Tap vs. Hold Threshold: How long is a “hold”? Karabiner lets you configure the millisecond threshold that distinguishes a tap from a hold. If it’s too short, you’ll get accidental Hyper triggers. If it’s too long, tapping
Escapewill feel laggy. You will need to tune this to your personal typing speed. - Discoverability and Cheatsheet: You’re about to create dozens of new shortcuts. How will you remember them? Should your Hyper key configuration also include a rule to open a “cheatsheet” (e.g., Hyper + / opens a text file listing all your shortcuts)?
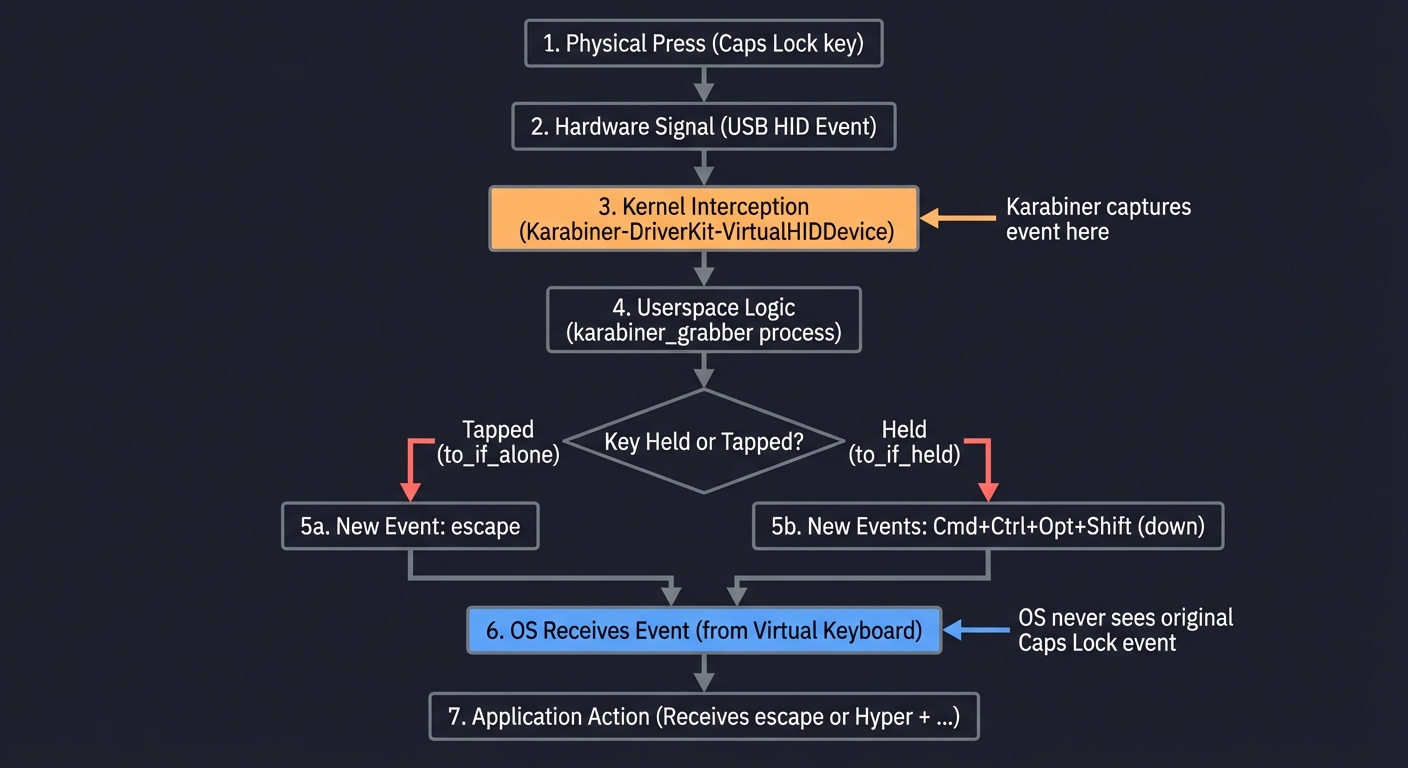
Thinking Exercise
Visualize the event pipeline. This project isn’t about complex code, but a complex data flow. Draw it out to make sure you understand it:
- Physical Press: Your finger presses the physical
Caps Lockkey. - Hardware Signal: The keyboard sends a USB HID event for
caps_lockto the OS. - Kernel Interception: Karabiner’s kernel extension (
Karabiner-DriverKit-VirtualHIDDevice) captures this event before anything else sees it. - Karabiner-Elements Logic: The userspace
karabiner_grabberprocess checks yourkarabiner.jsonrules. It sees thecaps_lockevent. - Rule Execution:
- If the key is released quickly (
to_if_alone), it sends a new event from the virtual keyboard:escape. - If the key is held down (
to_if_held), it sends four new events:left_shift(down),left_control(down),left_option(down),left_command(down).
- If the key is released quickly (
- OS Receives Event: The macOS WindowServer receives the new event(s) from the virtual keyboard (it never sees the original
caps_lockevent). - Application Action: The active application receives
escapeorHyper + ...and acts accordingly.
Understanding this flow is the key to debugging your configuration.
The Interview Questions They’ll Ask
- “What are the pros and cons of remapping keys at the OS level with Karabiner versus at the firmware level with QMK/VIA on a custom mechanical keyboard?”
- “How does Karabiner distinguish between a ‘tap’ and a ‘hold’ on a key? Explain the concept of
to_if_aloneand the importance of thetapping_termsetting.” - “Why does Karabiner require a ‘virtual keyboard’ device? What problem does this solve in the OS input architecture?”
- “You want to map
Hyper + Wto close a window (Cmd + W), but only in Google Chrome. How would you add a condition to a Karabiner rule to limit its scope to a specific application?” - “What are the security implications of installing a tool like Karabiner that can intercept all keyboard input?”
Hints in Layers
- Layer 1 (Simple Remapping): First, understand the tool. Install Karabiner-Elements. Don’t touch any configuration files. Use the GUI in
Karabiner-Elements > Simple Modificationsto remapcaps_locktoright_control. Verify that it works. - Layer 2 (Goku and the Hyper Key): Install Goku. Create your
~/.config/karabiner/karabiner.ednfile. Define the corecaps_lockto Hyper/Escape rule. Rungokuto compile it tokarabiner.json. This is the core of the project. - Layer 3 (Your First Layer): Add a simple “Navigation Layer” to your
.ednfile. MapHyper + H,J,K,Lto the arrow keys. This is your first practical use of your new Hyper key. - Layer 4 (The App-Launching Layer): Add another layer to your config for launching applications. Map
Hyper + Cto execute a shell command:open -a "Google Chrome". This connects Karabiner to the rest of the OS.
Books That Will Help
| Topic | Book | Chapter | | :— | :— | :— | | Modal Editing | Learning the vi and Vim Editors | Ch. 2 “Simple Editing” | | Config DSLs | Goku Documentation | (Online GitHub Repo) |
Project 6: UI Element Inspector and Automator (Accessibility API)
- Main Programming Language: Swift
- Software or Tool: Xcode
- Difficulty: Advanced
What you’ll build: A tool that explores the hierarchy of UI elements of any running application. It’s an X-Ray for apps. You hover over a button, and your tool tells you “This is Button X, nested inside View Y”. You can then script a click on it.
Real World Outcome
There’s a button in a clunky, old application that you have to click a hundred times a day, and it has no keyboard shortcut. You run your UI inspector tool and hover your mouse over the button. Your terminal immediately displays its “accessibility signature”:
$ ./ui_inspector
Hovering over process "LegacyApp" (pid 4567)...
---
[AXButton]
  Title: "Submit Report"
  Position: {x: 845.2, y: 512.7}
  Size: {w: 120.0, h: 24.0}
  Action: kAXPressAction (Press)
  Hierarchy: AXWindow -> AXGroup -> AXButton
---
Now you have the power. You can write a script that targets this exact button by its properties (Title: "Submit Report") and triggers the kAXPressAction programmatically. You’ve built an X-Ray for macOS apps, allowing you to see and control the internal structure of any application’s UI, automating the un-automatable.
The Core Question You’re Answering
“How do assistive technologies like screen readers for the visually impaired actually ‘see’ and interact with an application’s interface? How can I leverage this same powerful Accessibility API as a backdoor to inspect and control any application on the system, even those that offer no official scripting support?”
Concepts You Must Understand First
Stop and research these before coding:
- The Accessibility API (
AXUI):- This is a C API, but you will interact with it through Swift’s bridging capabilities.
- The fundamental object is
AXUIElement. Every UI element (a window, a button, a text field) is represented as anAXUIElementreference. - You don’t just “get a button.” You get an
AXUIElementand then query its attributes (like its role, title, or position) to determine if it’s the button you’re looking for.
- Process Identifier (PID):
- To inspect an application, you must first target it. The most common way is by its PID.
- How do you get the PID of a running application like “Notes”? You can use
NSRunningApplicationin Swift/Cocoa. - The entry point for inspecting an app is often
AXUIElementCreateApplication(_: pid_t) -> AXUIElement. This gives you the top-levelAXUIElementfor the entire application.
- The Accessibility Tree:
- The UI is a hierarchy. An application element has children (windows). A window has children (groups, buttons, text areas). Your job is to traverse this tree to find the element you need.
- You will need to understand how to query for an element’s children (
kAXChildrenAttribute) and its parent.
- Permissions:
- For security reasons, an application cannot use the Accessibility API without explicit user permission.
- You must add your application (even a simple command-line tool) to the list in
System Settings > Privacy & Security > Accessibility. The OS will prompt the user the first time the API is called. Your code must handle the case where permission is denied.
Questions to Guide Your Design
Before implementing, think through these:
- Tree Traversal Strategy: The UI element hierarchy is a tree. To find a specific button with the title “Post,” will you use a Depth-First Search (DFS) or a Breadth-First Search (BFS) algorithm to explore the tree? DFS is often simpler to implement with recursion.
- Performance and Responsiveness: Making calls to the Accessibility API can be slow, as it involves cross-process communication. If you recursively print the entire UI tree of a complex app like Xcode, you might block your main thread for seconds. How can you perform the inspection asynchronously to keep your own app’s UI responsive?
- Element Identification: How do you create a “selector” or “path” to a specific element that is robust against UI changes? Searching for a button by its title (
"Post") is good, but what if the title changes in an update? A more robust selector might be a path from the window down, like/Window[0]/Group[1]/Button[2]. How would you generate and use such a path? - Inspecting Under the Cursor: How do you solve the specific problem of finding the element directly under the mouse pointer? This requires a different approach than traversing an app’s UI tree. You will need to get the global mouse position (
CGEvent.mouseLocation) and then use the system-wide accessibility element to perform a “hit test” (AXUIElementCopyElementAtPosition).
Thinking Exercise
Model the UI as a file path. Before coding, open a simple app like Calculator. Imagine its UI hierarchy as a file system or an HTML DOM. Try to write a “path” to the “9” key.
Application("Calculator") -> Window("Calculator") -> Group[1] -> Button("9")
This can be translated into a conceptual traversal:
- Get the Calculator application element.
- Get its first (and only) window.
- Get the second child of that window (which might be a group containing all the number keys).
- Get the child of that group whose title is “9”.
This exercise forces you to think of a graphical interface not as a picture, but as a structured, hierarchical, and traversable data format.
The Interview Questions They’ll Ask
- “What is the function of
AXUIElementCreateApplicationand how does it differ fromAXUIElementCreateSystemWide?” - “Accessibility API calls can be slow due to their cross-process nature. What strategies can you use to minimize performance impact when traversing a large UI tree?”
- “How would you reliably find the
AXUIElementfor the UI element currently under the mouse cursor? Describe the steps involved.” (Hint:CGEvent->AXUIElementCreateSystemWide->kAXFocusedUIElementAttribute->kAXTopLevelUIElementAttribute->AXUIElementCopyElementAtPosition). - “What are ‘notifications’ in the context of the Accessibility API (e.g.,
kAXFocusedWindowChangedNotification)? How could you use them to build a more efficient and responsive automation tool than one that constantly polls for state changes?” - “Why is it a bad practice to rely on an element’s absolute position or index in the child array for automation? What attributes provide a more robust way to identify an element?” (e.g.,
kAXIdentifierAttribute).
Hints in Layers
- Layer 1 (Target an App): Write a Swift command-line tool that takes a Process ID (PID) as an argument. Use
NSRunningApplicationto find the PID for “TextEdit”. UseAXUIElementCreateApplicationto get the top-level accessibility object for the app and print its description. - Layer 2 (Print Children): Write a function
printChildren(of: AXUIElement)that gets the value of thekAXChildrenAttributearray and prints the description of each child element. Call this on the main application element from Layer 1. - Layer 3 (Recursive Tree Traversal): Modify your
printChildrenfunction to be recursive. Add indentation based on the depth of the recursion. Now, when you call it on the main app element, it will print the entire UI hierarchy tree. - Layer 4 (Inspect Under Cursor): Create a separate function. Use
CGEvent.mouseLocationto get the current mouse coordinates. UseAXUIElementCreateSystemWide()to get the system-wide accessibility object. UseAXUIElementCopyElementAtPositionto get a reference to the specific UI element under the cursor. Print its attributes. This is the core of the “inspector” feature.
Books That Will Help
| Topic | Book | Chapter | | :— | :— | :— | | Mac Accessibility | macOS Programming for Absolute Beginners | (Search for Accessibility) | | Tree Algorithms | Algorithms, 4th Edition | Ch. 5 (Trees) |
Project 7: File Organization Daemon with launchd + AppleScript
- Main Programming Language: AppleScript
- Software or Tool: launchd, Script Editor
- Difficulty: Intermediate
What you’ll build: A “Hazel” clone. A background service that watches your Downloads folder. When a file lands there, it checks the extension. PDFs go to /Documents, JPGs go to /Pictures, and DMGs are mounted automatically.
Real World Outcome
You download a file named Company-Invoice-Q4.pdf into your ~/Downloads folder. You do nothing else. A few seconds later, the file vanishes from your Downloads folder. Simultaneously, a notification slides into view:
File Organizer Moved
Company-Invoice-Q4.pdfto~/Documents/Invoices/2025/
Your script, running silently in the background via launchd, detected the new PDF, identified it as an invoice based on your rules, and filed it away into a neatly organized, year-based folder structure. You’ve built a personal, automated digital filing clerk—a “Hazel” clone that tames the chaos of your Downloads folder for you.
The Core Question You’re Answering
“How can I create an autonomous background process that acts like a ‘digital butler’ for my file system? How can I ‘listen’ for file system events (like a new file appearing in Downloads) and automatically trigger a rule-based script to organize, rename, or process that file without any manual intervention?”
Concepts You Must Understand First
Stop and research these before coding:
launchdProperty Lists (.plist):launchdis configured via XML files called Property Lists. You will create a file likecom.user.file-organizer.plistand place it in~/Library/LaunchAgents.- What are the essential keys? You’ll need
Label(a unique name),ProgramArguments(the script to run), and a trigger key. - Reference: Open Terminal and run
man launchd.plistto read the official, detailed documentation for all possible keys.
launchdTriggers (WatchPaths):- This is the modern and recommended way to monitor a directory. You will add a
WatchPathskey to your.plistfile with an array containing the path to your~/Downloadsfolder. launchdwill now automatically run your script whenever the contents of that directory change (a file is added, removed, or modified).- How is this better than the older “Folder Actions” feature in Finder? (Hint:
launchdis a system-level service and is more reliable and efficient; Folder Actions are tied to Finder.)
- This is the modern and recommended way to monitor a directory. You will add a
- File Metadata (MIME Types vs. Extensions):
- The simplest way to identify a file is by its extension (e.g.,
.pdf). This is often good enough. - A more robust method is to inspect the file’s metadata to determine its MIME type (e.g.,
application/pdf). Thefilecommand in the terminal does this (file --mime-type my-document.pdf). Why might this be better than trusting the extension?
- The simplest way to identify a file is by its extension (e.g.,
- Debugging Background Scripts:
- When
launchdruns your script, it runs in the background. It has no terminal.print()orechostatements won’t appear on your screen. - You must redirect the standard output (
stdout) and standard error (stderr) of your script to log files. You can specify this in your.plistfile using theStandardOutPathandStandardErrorPathkeys. This is absolutely critical for debugging.
- When
Questions to Guide Your Design
Before implementing, think through these:
- Race Conditions: A web browser often creates a temporary file (e.g.,
invoice.pdf.download) while the download is in progress. YourWatchPathstrigger might fire on this partial file. If you move it immediately, you will corrupt the file. How can you reliably determine if a file has finished downloading? Should you check for the.downloadextension? Or check if the file size has stopped changing for a few seconds? - Handling Name Collisions: You download
invoice.pdf. Your script moves it. The next day, you download another file also namedinvoice.pdf. What should happen when your script tries to move the new file to a destination where a file with that name already exists? Should you overwrite it, ignore the new file, or rename it (e.g.,invoice-1.pdf)? - Logging and Debugging: Your script runs invisibly in the background. If it fails, how will you know? Your design must include a logging strategy. Will you write status updates, successes, and errors to a dedicated log file (e.g.,
~/Library/Logs/FileOrganizer.log)? Remember to use theStandardErrorPathkey in your plist. - Rule-Based Logic: Instead of a giant
if/elif/elseblock, how could you design a more elegant, scalable system? Could you define your rules in a separate configuration file (e.g., a JSON file) that maps extensions or keywords to destination folders? This separates your logic from your configuration.{ "rules": [ { "extensions": ["pdf", "docx"], "folder": "~/Documents/" }, { "extensions": ["png", "jpg", "gif"], "folder": "~/Pictures/" }, { "filename_contains": ["invoice", "receipt"], "folder": "~/Documents/Finance/" } ] }
Thinking Exercise
Design the “download finished” check. A WatchPaths event can fire the instant a .download file is created, leading to a race condition. How do you wait for the download to complete? Sketch out the logic in your script:
- Trigger: Your script is run by
launchdbecause something changed in~/Downloads. It is passed the list of changed files. - Initial Check: For each file, check if its name ends with
.downloador if the browser is still actively writing to it. If so, maybe you ignore it for now and wait for the nextlaunchdtrigger (which will happen when the file is renamed). - Stability Check (Alternative): Another method is to check the file’s size and modification date.
size1 = get_file_size(file)sleep(2)size2 = get_file_size(file)if size1 == size2, the file is likely stable and ready to be moved.
Thinking through this core problem of “is the file ready?” is essential for a reliable daemon.
The Interview Questions They’ll Ask
- “What is the full structure of a
launchd.plistfile? Explain the roles of theLabel,ProgramArguments, andWatchPathskeys.” - “What’s the difference between
RunAtLoadandKeepAlive? When would you use one over the other?” - “Your launch agent runs a script that fails silently. How do you debug it? Describe the role of
StandardOutPath,StandardErrorPath, and thelaunchctlcommand.” - “What is the difference between
~/Library/LaunchAgents,/Library/LaunchAgents, and/Library/LaunchDaemons? Where should you put your script and why?” - “How is
launchd’sWatchPathsmore efficient than awhile true; do ...; sleep 1; doneloop written in a shell script?”
Hints in Layers
- Layer 1 (The Core Logic): Forget
launchd. Write a simple AppleScript (or shell script) that organizes the~/Downloadsfolder once when you manually run it. It should move PDFs to Documents and JPGs to Pictures. Hard-code everything. - Layer 2 (The
plistfile): Create acom.user.file-organizer.plistfile. Give it a label, pointProgramArgumentsto your script from Layer 1, and add theWatchPathskey pointing to~/Downloads. - Layer 3 (Loading the Agent): Place your
.plistfile in~/Library/LaunchAgents/. Uselaunchctl load ~/Library/LaunchAgents/com.user.file-organizer.plistto load it. Now, download a file and see if your script runs automatically. Check Console.app for errors. - Layer 4 (Robustness): Add logging to your script. Use
StandardOutPathandStandardErrorPathin your plist to redirect output to log files. Modify your script to handle filename collisions and to ignore.downloadfiles, as you designed in the Thinking Exercise. Uselaunchctl unloadandlaunchctl loadto reload your agent after making changes.
Books That Will Help
| Topic | Book | Chapter | | :— | :— | :— | | launchd | macOS Internals | Section on Daemons | | Scripting Files | AppleScript: The Definitive Guide | Ch. 22 “The Finder” |
Project 8: Menu Bar Status App with Hammerspoon
- Main Programming Language: Lua
- Software or Tool: Hammerspoon
- Difficulty: Intermediate
What you’ll build: A custom item in your menu bar (top right of screen) that displays exactly what you care about—Crypto prices, next meeting time, or CPU temperature—and reveals a menu of actions when clicked.
Real World Outcome
You glance at the top-right of your screen. Nestled between the Wi-Fi and battery icons is your own custom status item, displaying exactly the information you care about, updated in real-time:
🚀 ETH: $12.5k | CPU: 58°C | 🎧 On Air
You click on it. A clean, native dropdown menu appears, populated with actions you defined:
- “Refresh Prices”
- “Open Activity Monitor”
- “Toggle Mute on All Mics”
-
- “Quit All Apps”
You’ve created a fully functional menu bar application using a simple scripting language. It’s your personal dashboard and control center, seamlessly integrated with the macOS UI, providing at-a-glance info and one-click access to your most common workflows.
The Core Question You’re Answering
“How can I, using only a scripting language like Lua, create my own persistent, native-feeling UI elements inside the main macOS menu bar? How do I build a personal dashboard that can display real-time information from any source (APIs, shell commands) and provide a clickable menu of custom actions?”
Concepts You Must Understand First
Stop and research these before coding:
- Hammerspoon Menu Bar API (
hs.menubar):- This is the module that lets you create and manage status items in the macOS menu bar.
- An
hs.menubarobject has asetTitlemethod, asetTooltipmethod, and asetMenumethod. You need to understand how these work together. - How do you create a basic, static menu bar item that says “Hello”? This should be your first step.
- Asynchronous Operations (
hs.http&hs.timer):- Your menu bar lives on the main UI thread of Hammerspoon. If you make a blocking network request (e.g., to a crypto API) on this thread, your entire Hammerspoon engine (and thus all your hotkeys and automations) will freeze until the request completes.
- You must use asynchronous methods.
hs.http.asyncGetmakes a network request and provides a callback function that will be executed when the data returns. hs.timer.doEveryis used to run a function (like your async HTTP request) on a recurring schedule without blocking.
- Styled Text (
hs.styledtext):- A plain string in the menu bar is functional but boring.
hs.styledtextallows you to create an “attributed string” with colors, fonts, and even SF Symbols. - How do you create a string where “BTC” is green but the price is white? You will need to construct a styled text object and apply attributes to specific ranges.
- Reference: Explore the
hs.styledtextdocumentation for examples on setting foreground color and font attributes.
- A plain string in the menu bar is functional but boring.
Questions to Guide Your Design
Before implementing, think through these:
- Information Density and UI Real Estate: The menu bar is a small, shared space, especially on laptops with a camera notch. How will you keep your information concise yet readable? Should you use symbols (e.g.,
🚀or SF Symbols) instead of text where possible? What happens if your text string becomes too long? - Managing Multiple Timers: You might want to update your CPU temperature every 2 seconds, the current song title every 5 seconds, and a stock price every 5 minutes. How will you manage these different update schedules? Should you have one
hs.timerfor each, or a single master timer that decides which data to refresh based on the time elapsed? - Dynamic Menus and Interactivity: Your menu doesn’t have to be static. What if holding the
Optionkey while clicking the menu bar item revealed a different “debug” menu? The menu’ssetMenufunction can be passed a function that dynamically builds the menu table each time it’s clicked, allowing you to check for modifier keys. - CPU and Battery Impact: Even asynchronous polling has a cost. Every network request or shell command wakes up the CPU and uses energy. Is it acceptable for your menu bar app to use 1% of the CPU constantly? How can you be more efficient? For example, instead of polling for the current song, can you listen for a notification from Spotify via
hs.distributednotification?
Thinking Exercise
Design the menu’s data structure. The hs.menubar:setMenu method takes a Lua table that defines the menu’s entire structure and behavior. Before coding, design this table on paper for a crypto-tracker menu.
-- This is a Lua table (like a dictionary or an array of objects)
menuData = {
  { title = "BTC: $95,123.45", disabled = true }, -- A non-interactive display item
  { title = "ETH: $12,500.10", disabled = true },
  { title = "-" }, -- A separator line
  { title = "Refresh Prices", fn = function() refreshCryptoData() end },
  { title = "Open Coinbase", fn = function() openCoinbase() end },
  { title = "-" },
  {
    title = "Settings",
    menu = { -- A nested sub-menu!
      { title = "Set API Key...", fn = function() showAPIKeyInput() end }
    }
  }
}
This exercise forces you to think about the menu as a declarative data structure that Hammerspoon will render into a native UI element.
The Interview Questions They’ll Ask
- “A user complains that after you added a network request to your menu bar app, all their other Hammerspoon hotkeys have become laggy. What is the likely cause, and how do you fix it?” (Probes understanding of main thread blocking and async operations).
- “What is the impact of frequent polling (e.g., checking a stock price every second) on laptop battery life? Explain the concept of CPU wake cycles.”
- “How does
hs.styledtextwork under the hood? What’s the difference between a plain string and anNSAttributedString?” - “You want to show the current Git branch in the menu bar. This can be slow in large repositories. How would you design your app to update the branch name efficiently, perhaps only when the user switches directories or windows?” (Hint:
hs.window.watcherandhs.pathwatcher). - “Why is it important for any UI updates to happen on the ‘main thread’? What could happen if you tried to call
myMenu:setTitle()from a background thread?”
Hints in Layers
- Layer 1 (Static Item): Create a “Hello World” menu bar item. Use
hs.menubar.new()to create an object andsetTitle("Hello")to make it appear. Make its menu show a single item, “Quit”, which reloads your Hammerspoon config. - Layer 2 (Dynamic Title): Use
hs.timer.doEvery(1, ...)to create a timer that fires every second. Inside the timer’s function, update the menu bar’s title to the current time usingos.date(). - Layer 3 (Async HTTP GET): Write a function that uses
hs.http.asyncGetto fetch data from a public JSON API (e.g., a Bitcoin price API). In the callback function of the async request, update the menu bar’s title with the price you received. - Layer 4 (Triggered Refresh): Combine Layers 2 and 3. Create a timer that runs your async HTTP function every 5 minutes. Also, add a “Refresh Now” item to your menu that calls the same function, allowing for both automatic and manual updates.
- Layer 5 (Styled Text): Instead of a plain string, use
hs.styledtextto add color or a symbol to your title. For example, show an up arrow ("🔼", in green) or a down arrow ("🔽", in red) based on the price change.
Books That Will Help
| Topic | Book | Chapter |
| :— | :— | :— |
| Async Logic | Programming in Lua | Ch. 9 (Coroutines/Async concepts) |
| Hammerspoon | Official Docs | hs.menubar, hs.http |
Project 9: Text Expansion Engine with Karabiner + JXA
- Main Programming Language: JavaScript (JXA) + EDN
- Software or Tool: Karabiner, Script Editor
- Difficulty: Advanced
What you’ll build: A system where typing ;;em automatically backspaces and replaces it with your email address. Typing ;;date inserts 2025-01-15.
Real World Outcome
You’re typing an email and need to insert your standard sign-off. You simply type ;;sig. Instantly, the five characters you typed disappear and are replaced by:
Best Regards,
Douglas
Sent from my custom automation engine.
Next, you’re filing a bug report and need to insert a markdown template. You type ;;bug. The trigger vanishes and a full template appears, with the cursor intelligently placed right where you need to start typing:
**## Bug Report**

**Description:**
|

**Steps to Reproduce:**
1.
2.

**Expected Behavior:**
You have built your own TextExpander. You’re no longer typing repetitive information; you’re using custom keywords to summon complex blocks of text, complete with formatting and dynamic content like the current date (;;date), saving yourself thousands of keystrokes.
The Core Question You’re Answering
“How can I build a system that maintains a global, stateful buffer of recent keystrokes, regardless of the active application? How do I detect a specific sequence of keys from this buffer and then programmatically inject a different set of keystrokes back into the OS, effectively creating a system-wide text substitution engine?”
Concepts You Must Understand First
Stop and research these before coding:
- Global Input Buffering:
- Your script needs to be aware of every key pressed, no matter which application is active. This is a job for a low-level tool like Karabiner or a
CGEventTapin Hammerspoon. - You will need to maintain a small, rolling buffer or queue of the last N keypress events. When a new key is pressed, you add it to the buffer and check if the buffer’s tail now matches one of your trigger sequences (e.g.,
[;, ;, s, i, g]).
- Your script needs to be aware of every key pressed, no matter which application is active. This is a job for a low-level tool like Karabiner or a
- Synthetic Keystroke Generation:
- Once a trigger is detected, you need to “undo” the trigger text by simulating
deleteorbackspacekeystrokes. - Then, you must inject the replacement text. This can be done by simulating each keystroke one-by-one (
hs.eventtap.keyStroke(...)) or by using a more efficient clipboard-based method. - Reference: Study
hs.eventtapin the Hammerspoon documentation, or the “shell” action in Karabiner’s complex modifications to trigger a script.
- Once a trigger is detected, you need to “undo” the trigger text by simulating
- Race Conditions and Event Timing:
- The user types quickly. What happens if they type
;;sigand then immediately press another key before your script has finished expanding? Your script might delete the character they just typed. - Handling the timing of event deletion and injection is the most complex part of this project. You need to ensure your synthetic events are processed correctly in sequence and don’t interfere with real user input that happens concurrently.
- The user types quickly. What happens if they type
- Text Insertion Methods (Typing vs. Clipboard):
- Typing: Simulating each keystroke is compatible with all applications but is slow for long snippets and can’t easily handle special characters.
- Pasting: A much faster method is to temporarily store your current clipboard, set the clipboard to your expansion text, simulate
Cmd+V, and then restore the original clipboard. This is faster but can have unintended side effects (e.g., in apps that have special paste handling).
Questions to Guide Your Design
Before implementing, think through these:
- Trigger Design: Why is a prefix like
;;orxxa good choice for a trigger? It creates a “namespace” that is unlikely to be typed accidentally in normal prose. What are the pros and cons of a prefix trigger versus a suffix trigger (e.g.,sig;;)? - Typing vs. Pasting Strategy: Which insertion method will you use, and why? Will you use a hybrid approach (type short snippets, paste long ones)? How will you handle restoring the user’s clipboard content flawlessly if you use the paste method? What happens if the user’s clipboard contained a large image file?
- Dynamic Snippets and Cursor Placement: A simple text replacement is easy. But how would you implement a snippet like
<div>|</div>, where|represents the desired final cursor position? This requires you to programmatically move the cursor back after the expansion (e.g., by simulatingleft arrowkey presses). How would you handle dynamic content, like having;;dateexpand to the current date? - Managing Expansions: Where will you store your list of text expansions? A simple dictionary or table in your script is a good start. A more robust solution would be a JSON or EDN file that the script reads on startup, allowing you to edit your snippets without editing the script itself. How will you structure this file?
Thinking Exercise
Trace the event-handling logic. This project is all about state and timing. Trace the lifecycle of an expansion:
user_input_buffer = []- User types
;:- Event is received.
- Append
;to buffer.user_input_bufferis now[;]. - Check if buffer matches any triggers. No.
- User types
;again:- Event is received.
- Append
;to buffer.user_input_bufferis now[;, ;]. - Check again. No.
- User types
d:- Append
d. Buffer is now[;, ;, d]. No match.
- Append
- User types
a,t,e:- …Buffer becomes
[;, ;, d, a, t, e]. - Check for matches. Found a match for
;;date!
- …Buffer becomes
- Action Triggered:
- Immediately block further user input from being processed.
- Simulate
deletekey press 6 times. - Get the current date and format it as
2025-12-22. - Simulate the keystrokes for
2,0,2,5,-,1,2,-,2,2. - Clear the
user_input_buffer. - Re-enable user input processing.
This exercise clarifies the stateful nature of the problem.
The Interview Questions They’ll Ask
- “A text expander is, functionally, a keylogger. What are the security and privacy implications of building and using such a tool? How does macOS try to protect users from malicious keyloggers?”
- “What is ‘Secure Input Mode’ on macOS? Which types of application fields enable it (e.g., password fields), and how does it affect tools like Karabiner or
CGEventTap?” - “Compare the ‘keystroke simulation’ method of text injection versus the ‘clipboard paste’ method. What are the pros and cons of each in terms of speed, reliability, and compatibility?”
- “You’ve implemented a snippet
<h1>|</h1>where|is the desired cursor position. Describe the sequence of synthetic events required to produce this outcome.” - “How would you handle a conflict where a text expansion trigger (e.g.,
;;s) is a prefix of another trigger (e.g.,;;sig)? How does your detection logic decide when to fire?”
Hints in Layers
- Layer 1 (Single Key Macro): Use Karabiner’s
Simple Modificationsto map a function key you never use (e.g., F6) to a full string of text. This demonstrates the basic concept of “one key press -> many characters.” - Layer 2 (Sequence Detection): Move to
Complex Modifications. Write a rule that detects a simple, non-conflicting sequence of characters (e.g.,qthenwthene) and maps it to a single output keystroke (e.g.,a). This proves you can detect a sequence. - Layer 3 (Script Triggering): Instead of mapping the sequence to a keystroke, map it to a
shell_command. Have it trigger a simple JXA script that just displays a notification. This proves you can connect Karabiner to your scripting environment. - Layer 4 (The Full Engine): Now, combine everything. The Karabiner rule detects your trigger (e.g.,
;;date). The JXA script it triggers is responsible for:- Calculating the date string.
- Simulating the
deletekeystrokes to erase the trigger. - Simulating the keystrokes for the date string. (Note: A more advanced approach uses a long-running Hammerspoon script with an event tap watcher, which is more performant than launching a new JXA process for every expansion).
Books That Will Help
| Topic | Book | Chapter | | :— | :— | :— | | Key Events | macOS Internals | Input Processing | | Text Processing | Regular Expressions Cookbook | (For pattern matching) |
Project 10: Browser Automation Suite with JXA + Chrome DevTools
- Main Programming Language: JavaScript (JXA)
- Software or Tool: Google Chrome / Safari
- Difficulty: Advanced
What you’ll build: Scripts that drive your web browser. Open specific tabs, scrape data from a page, fill out forms, and click buttons—all without using Selenium or Puppeteer, just native JXA.
Real World Outcome
You run a single command, node login-bank.js, from your terminal. A new Chrome window opens and navigates to your bank’s login page. Your script waits patiently for the page to finish loading, then finds the “Username” field and types in your username (securely retrieved from the keychain). It clicks “Continue,” waits for the next page to load, and correctly focuses the “Password” field. All you have to do is type your password and hit Enter. The 15 seconds of tedious navigation and typing you perform daily is now condensed into a single, scriptable command. You’ve built a lightweight, native browser automation tool without the overhead of Selenium or Puppeteer.
The Core Question You’re Answering
“How can my desktop automation scripts ‘reach into’ the isolated, sandboxed environment of a web browser to read and manipulate the content of a web page? How can I programmatically interact with a site’s Document Object Model (DOM) from an external JXA script?”
Concepts You Must Understand First
Stop and research these before coding:
- The JXA-to-Browser Bridge (
do JavaScript):- This is the core mechanism that makes this project possible. Both Safari and Chrome have an AppleScript command,
do JavaScript, which executes a string of JavaScript code within the context of the frontmost tab. - From JXA, you access this via
browser.windows[0].activeTab.execute({javascript: "..."})for Chrome, orsafari.doJavaScript("...", {in: safari.windows[0].currentTab})for Safari. Notice the APIs are different. - Crucially, the JavaScript string you pass can have a
returnstatement. The return value of the JavaScript execution is then passed back to your JXA script.
- This is the core mechanism that makes this project possible. Both Safari and Chrome have an AppleScript command,
- DOM Selectors (
querySelector):- Once you are “inside” the browser’s JavaScript context, you are no longer in JXA. You are in the world of the Document Object Model (DOM).
- You must be proficient with standard web DOM manipulation.
document.querySelector()is the essential tool for finding an element on the page (e.g.,document.querySelector('#username')to find an input field with the ID “username”). - How do you set the value of an input field (
.value = '...')? How do you simulate a click (.click())?
- Handling Asynchronous Page Loads:
- This is the hardest part of browser automation. Your JXA script runs instantly, but a web page can take several seconds to load its content, especially on Single Page Applications (SPAs).
- If you try to
querySelectoran element before it exists, your script will fail. You must build a “wait” or “retry” loop in your JXA script that repeatedly tries to execute the JavaScript until it succeeds or a timeout is reached. A simpledelay(5)is a brittle and inefficient solution.
Questions to Guide Your Design
Before implementing, think through these:
- Browser Abstraction: The JXA APIs for Chrome and Safari are frustratingly different. Will you write separate scripts for each, or will you attempt to build a single script with a wrapper function,
executeJS(browserName, jsCode), that handles the differences internally? - Security and Permissions: To protect users, browsers don’t allow external scripts to run JavaScript by default. You will need to manually enable this feature. For Chrome, it’s
View > Developer > Allow JavaScript from Apple Events. For Safari, it’sDevelop > Allow JavaScript from Apple Events. How can your script detect if this permission is denied and provide a helpful error message to the user? - Data Extraction vs. Action: Are you performing an action (clicking a button) or extracting data (getting the text of a div)? How will you handle the
returnvalue from yourdo JavaScriptcall to get data back into a JXA variable? What happens if the JavaScript returns a complex object? (Hint: It often gets converted to a string). - Handling SPAs (Single Page Applications): Many modern websites don’t reload the page; they update the DOM dynamically. How does this affect your “wait” logic? Instead of waiting for a page to load, you may need to wait for a specific element (
#app-root) to appear, or for a loading spinner to disappear. This makes your retry loop even more critical.
Thinking Exercise
Trace the JXA-to-DOM data flow. This project involves two separate JavaScript contexts. Draw a diagram to trace how they communicate when you want to extract the title of the current web page.
- JXA Context:
const chrome = Application('Google Chrome')const targetTab = chrome.windows[0].activeTabconst javascriptToExecute = "return document.title"
- The Bridge:
const pageTitle = targetTab.execute({javascript: javascriptToExecute})- This sends the
javascriptToExecutestring to the Chrome browser process.
- Browser JS Context:
- Chrome receives the command.
- It executes the string
return document.titlewithin the DOM of the active tab. - The expression evaluates to a string, e.g., “Google”.
- The Bridge (Return):
- Chrome sends the return value (“Google”) back to the
osascriptprocess that is running your JXA script.
- Chrome sends the return value (“Google”) back to the
- JXA Context:
- The
pageTitlevariable in your JXA script is now assigned the string value"Google".
- The
This exercise clarifies that you are not directly accessing the DOM from JXA; you are sending a script to the browser and receiving the result.
The Interview Questions They’ll Ask
- “Why is using AppleScript/JXA for browser automation often considered lighter and less brittle than a full WebDriver-based solution like Selenium or Puppeteer? What are the drawbacks?”
- “You’re trying to automate a modern React/Vue/Angular Single Page Application (SPA). Why might your script fail even if you wait for the page to ‘load’? What should you be waiting for instead?”
- “What is the ‘Same-Origin Policy’ in web browsers? Does it affect the JavaScript you can execute via JXA’s
do JavaScriptcommand? Why or why not?” - “How would you securely handle credentials in your automation script? Why is it a bad idea to hard-code a username or password into the script file itself?” (Hint: Keychain scripting).
- “If the
do JavaScriptcommand wasn’t available, what other automation techniques could you use to fill out a web form?” (Hint: Accessibility API, simulating keystrokes).
Hints in Layers
- Layer 1 (Open a URL): Write a basic JXA script to tell Chrome to open a specific URL in a new tab.
chrome.windows[0].tabs.push(chrome.Tab({url: "..."})). - Layer 2 (Run a Simple Command): Use the
executecommand to run a simple piece of JavaScript that has a visible effect, likealert('Hello from JXA!'), in the active tab. This confirms the bridge is working. - Layer 3 (Fill a Form Field): Navigate to a login page. Use
executeto run JavaScript that finds the username input field usingdocument.querySelector()and sets its.valueproperty. You will have to manually run the script after the page loads. - Layer 4 (Waiting and Data Extraction): Build a “read-it-later” script. It should get the active tab,
executeJavaScript toreturn document.titleandreturn location.href, and then append this information as a markdown link to a local text file. This combines data extraction with file I/O. - Layer 5 (The Retry Loop): Combine everything into a script that navigates to a page and then tries to fill a form field. It will fail. Now, wrap the form-filling part in a
whileloop that retries every second for up to 10 seconds, until thequerySelectorsuccessfully finds the element. This handles the asynchronous loading problem.
Books That Will Help
| Topic | Book | Chapter | | :— | :— | :— | | DOM Scripting | JavaScript: The Definitive Guide | Ch. 15 “Scripting Documents” | | Chrome Scripting | Chrome Dictionary | (Open in Script Editor) |
Project 11: Voice Command System with Shortcuts + Dictation
- Main Programming Language: AppleScript / Shortcuts
- Software or Tool: Voice Control, Shortcuts
- Difficulty: Intermediate
What you’ll build: A personal voice assistant that actually works. You say “Computer, Work Mode”, and it triggers your Project 3 automation.
Real World Outcome
You walk into your office and say, clearly and calmly, “Computer, activate work mode.” Your Mac, which was asleep, wakes up. It launches and arranges your work applications exactly as you defined in Project 3. A lo-fi playlist quietly starts on Spotify. Later, you need to test a feature on a clean slate. You say, “Computer, reset environment.” Your script closes all open applications, clears the terminal, and reopens your project in a fresh state. You have built your own “Jarvis” or “Siri,” leveraging macOS’s powerful built-in Voice Control to map your spoken words to complex, scripted actions.
The Core Question You’re Answering
“How can I hijack the operating system’s built-in voice recognition engine, normally an accessibility feature, and transform it into a fully programmable interface to trigger any arbitrary script, workflow, or command?”
Concepts You Must Understand First
Stop and research these before coding:
- macOS Voice Control:
- This is a powerful accessibility feature built into the OS. You must first enable it in
System Settings > Accessibility > Voice Control. - Spend time using its default commands (“Open Mail,” “Scroll down”) to understand its capabilities and limitations.
- Crucially, understand the difference between Command Mode (listening for commands) and Dictation Mode (transcribing speech to text). Your project will primarily use Command Mode.
- This is a powerful accessibility feature built into the OS. You must first enable it in
- Custom Voice Commands:
- The real power comes from the “Commands” panel within the Voice Control settings. You can create your own custom vocabulary.
- You can define a spoken phrase (e.g., “activate work mode”) and map it to an action. The key action for this project is “Run Shortcut.”
- The Shortcuts CLI:
- While Voice Control can run shortcuts directly, understanding the command-line interface is essential for more advanced automation and debugging.
- The command is
shortcuts. How do you list all available shortcuts (shortcuts list)? How do you run a specific one by name (shortcuts run "My Awesome Shortcut")? - This CLI tool is the bridge that allows your voice command to trigger a Shortcut, which can then in turn run a powerful shell script, AppleScript, or JXA script—chaining all the technologies together.
Questions to Guide Your Design
Before implementing, think through these:
- Designing Wake Words and Triggers: How will you avoid accidental triggers? Using a “wake word” like “Computer” or “Mac” at the start of every command (
Computer, open terminal) creates a clear namespace and prevents the system from misinterpreting conversations. Your trigger phrases should be distinct and easy to remember but not things you’d say in normal conversation. - User Feedback: How does the user know the command was heard and understood? Voice Control provides a small visual cue, but you might want more. Should your triggered script play a subtle sound (e.g.,
afplay /System/Library/Sounds/Submarine.aiff) or flash the screen to confirm execution? Lack of feedback can make a voice interface feel unreliable. - Latency and Responsiveness: Voice recognition is not instant. There will be a slight delay between you speaking and the action occurring. How does this affect the user experience? For simple commands, it’s fine. For complex workflows, consider providing immediate feedback (“Running work mode…”) before the longer actions complete.
- Command Grammar and Structure: How will you structure your commands? A good pattern is
[Wake Word] [Action] [Target], such as “Computer, open VS Code” or “Computer, run backup script”. Designing a consistent grammar makes your commands easier to remember and for the system to recognize accurately.
Thinking Exercise
Design your command grammar. A good voice UI has a consistent and predictable structure. Before you create any commands, design your “language” on paper. A robust grammar often follows the pattern [WAKE WORD] [ACTION] [TARGET] [PARAMETER].
| Wake Word | Action | Target | Parameter | Resulting Command |
|---|---|---|---|---|
| Computer | set | scene | coding | “Computer, set scene coding” |
| Computer | open | app | VS Code | “Computer, open app VS Code” |
| Computer | find | file | report | “Computer, find file report” |
| Computer | play | playlist | focus | “Computer, play playlist focus” |
This exercise forces you to think about your voice interface as a language to be designed, not just a collection of one-off commands. A consistent grammar makes the system more powerful and easier to remember.
The Interview Questions They’ll Ask
- “Compare and contrast on-device voice processing (like macOS Voice Control) with cloud-based processing (like Siri). What are the trade-offs in terms of privacy, latency, accuracy, and power?”
- “How would you chain a voice command to a complex shell script that requires arguments? For example, a command like ‘Computer, create project named Foobar’.”
- “What are the main principles of good Voice User Interface (VUI) design? How do you provide feedback and handle errors when there is no screen?”
- “Why is choosing a good ‘wake word’ critical for preventing false activations? What makes a word or phrase a good or bad choice?”
- “If you needed to add voice commands to your own native Swift application, what macOS framework would you use?” (Hint:
SFSpeechRecognizer).
Hints in Layers
- Layer 1 (Enable and Explore): Before writing any custom commands, enable Voice Control in System Settings. Spend 10 minutes using only your voice to navigate your Mac. Open apps, scroll windows, click buttons. Understand the tool’s capabilities and limitations first.
- Layer 2 (Create a Simple Shortcut): Create a new Shortcut that does something simple and visible, like showing a notification that says “Hello from my first voice command”.
- Layer 3 (The Voice Trigger): In
System Settings > Accessibility > Voice Control > Commands, create a new custom command. For the “When I say” field, enter “Test command”. For the “Perform” action, choose “Run Shortcut” and select the shortcut you created in Layer 2. Now say “Test command” and see the notification appear. - Layer 4 (The Shell Script Bridge): Modify your Shortcut. Remove the notification action and replace it with a “Run Shell Script” action. In the script box, write something simple like
say "Hello from a shell script". Trigger your voice command again. You should now hear the computer speak to you. This proves you have chained Voice -> Shortcut -> Shell. - Layer 5 (Complex Workflow): Replace the simple
saycommand in your Shortcut’s shell script action with the logic from a more complex project, like your Standup Automator from Project 3. You have now given a voice to a powerful workflow.
Books That Will Help
| Topic | Book | Chapter | | :— | :— | :— | | Voice Interaction | Designing Voice User Interfaces | (General Principles) | | Shortcuts | Take Control of Shortcuts | (Ebook) |
Project 12: Notification Center Automation with JXA
- Main Programming Language: JavaScript (JXA)
- Software or Tool: osascript
- Difficulty: Intermediate
What you’ll build: Scripts that can send rich notifications (with buttons and sounds) and scripts that can toggle “Do Not Disturb” programmatically based on your calendar or CPU usage.
Real World Outcome
A long-running script you wrote to back up your photos finally completes. Instead of you having to check a log file, a native macOS notification appears on your screen:
Photo Backup Complete Successfully backed up 1,452 items (4.1 GB).
[View Log] [Open Folder]
You click the “Open Folder” button, and a Finder window immediately opens to the backup directory. If you had clicked “View Log,” Console.app would have opened, filtered to your script’s log file. You’ve learned to make your background scripts communicate with you, providing rich, actionable feedback instead of just exiting silently. You can also now programmatically toggle “Do Not Disturb” before starting a critical task, ensuring you’re not interrupted.
The Core Question You’re Answering
“How can my silent, background scripts communicate their status and results back to me in a clean, native way? And how can these scripts interact with system-wide states like ‘Do Not Disturb’ to create a more context-aware computing environment?”
Concepts You Must Understand First
Stop and research these before coding:
- Basic Notifications (
display notification):- This is the simplest way to show a notification and is built into JXA’s standard additions.
Application.currentApplication().displayNotification({text: "...", title: "..."})is your entry point.- What are its limitations? (No action buttons, limited control over sound and appearance).
- Rich, Interactive Notifications:
- To add buttons, you cannot use the basic JXA command. The easiest way to achieve this from a script is to use a dedicated command-line utility.
terminal-notifieris a popular, powerful tool for this. You’ll need to install it (e.g., via Homebrew) and learn its command-line arguments for creating buttons (-actions), running commands when a button is clicked (-execute), and opening URLs (-open).- The advanced alternative is to write a small helper application in Swift using the
UserNotificationsframework, which your JXA script can then call.
- Focus Modes (Do Not Disturb):
- Focus Modes are a system-level state that controls notification delivery.
- There is no simple, direct API for scripts to toggle them. The most common methods involve either UI scripting of System Settings or toggling the state via the Shortcuts app.
- How can you create a Shortcut to “Turn on DND until tomorrow morning” and then execute that shortcut from your JXA or shell script using the
shortcutsCLI?
- Alerts vs. Banners (
display alert):- JXA also offers
display alert. How is this different fromdisplay notification? - An alert is a modal dialog that steals focus and must be dismissed by the user. A notification is a transient banner that appears and then fades away into the Notification Center. Understanding when to use each is key to good UI design. Use alerts for critical information that requires user confirmation. Use notifications for passive status updates.
- JXA also offers
Questions to Guide Your Design
Before implementing, think through these:
- Actionable Payloads: When a user clicks a button on your notification (e.g., “View Log”), how does your system execute the corresponding action? If using
terminal-notifier, you can pass a shell command or URL directly. How would you design this payload? Should the notification itself contain all the information needed to act, or should it just trigger another script? - Urgency and Criticality: How do you signal that a notification is urgent? Tools like
terminal-notifierallow you to specify a sound. When should a notification make a sound versus being silent? How could you build a script that breaks through Do Not Disturb for a true emergency (e.g., a server is down)? (Hint: TheUserNotificationsframework has “critical alerts,” but this requires a special entitlement from Apple). - Persistence and Banners: Should your notification disappear after a few seconds (a “banner”) or stay on screen until dismissed (an “alert”)?
terminal-notifieranddisplay alertlet you control this. Which style is appropriate for which type of information? A “backup complete” message might be a transient banner, while a “permission required” message should be a persistent alert. - Toggling DND Intelligently: When you automate turning on Do Not Disturb, how do you automate turning it off? Should it turn off after a fixed duration (e.g., 1 hour)? Or should it turn off when a specific process (like your backup script) completes? This requires more complex state management.
Thinking Exercise
Compare display alert vs. display notification. These two commands seem similar but have fundamentally different UI/UX implications. For each scenario below, decide which command is the appropriate choice and why.
| Scenario | alert or notification? |
Justification |
|---|---|---|
| 1. Script finished a 1-hour backup. | notification |
Passive information. Doesn’t require immediate user action. |
| 2. Script is about to delete files and needs confirmation. | alert |
Modal and blocking. Halts the script until the user explicitly confirms or denies the destructive action. |
| 3. A background script failed to connect to a server. | notification |
An error, but likely doesn’t need to interrupt the user’s current task. |
| 4. Your meeting reminder script sees a meeting starts in 1 min. | notification |
Provides timely information with optional actions, but doesn’t steal focus from what the user is doing. |
This exercise forces you to think like a UI designer and choose the least disruptive, most effective way to communicate with the user.
The Interview Questions They’ll Ask
- “Explain how a background script can handle a user clicking a button on a notification it posted. What is the data flow?”
- “What is the role of the XPC services in the macOS notification architecture? How do apps and the Notification Center communicate?”
- “What is a ‘provisional’ notification, and when might you use it? How does it relate to user permissions?”
- “You want to programmatically turn on the ‘Sleep’ Focus Mode. Since there’s no direct API, describe how you would use a combination of other automation tools to achieve this.”
- “What is the difference between a notification’s ‘banner’ and ‘alert’ style? How do you control this, and what is the user experience implication of each?”
Hints in Layers
- Layer 1 (Simple Notification): In a JXA script, get a reference to the current application and use
app.displayNotification()with a simple “Hello, World!” message. This is the most basic form of feedback. - Layer 2 (Blocking Alert): Use
app.displayAlert()to create a dialog with “OK” and “Cancel” buttons. Practice capturing thebuttonReturnedproperty from the result object to determine which button the user clicked. - Layer 3 (Rich Notifications): Install
terminal-notifiervia Homebrew (brew install terminal-notifier). Use a shell script (ordoShellScriptfrom JXA) to runterminal-notifier -message "..." -title "..." -actions "OK,Cancel". This gives you buttons without needing to write a native app. - Layer 4 (Actionable Notifications): Add the
-execute "command"flag to yourterminal-notifiercall. Make the “OK” button run a command likeopen /Applications/Calculator.app. This proves you can link notification interactions to actions. - Layer 5 (Focus Mode Scripting): Create a Shortcut in the Shortcuts app that toggles the “Do Not Disturb” focus mode. Then, from your JXA script, use
doShellScript('shortcuts run "Toggle DND"')to programmatically control the Focus Mode.
Books That Will Help
| Topic | Book | Chapter | | :— | :— | :— | | User Interaction | AppleScript: The Definitive Guide | Ch. 15 “User Interaction” |
Project 13: Git Workflow Automator with Shell + Hammerspoon
- Main Programming Language: Shell / Lua
- Software or Tool: Git, Hammerspoon
- Difficulty: Intermediate
What you’ll build: A pervasive Git tool. Your menu bar shows the current branch of the active Finder window or Terminal. A global hotkey opens a “Quick Commit” dialog that auto-stages changes and pushes.
Real World Outcome
You’ve just fixed a small bug in your project. Instead of switching to your terminal, typing git add ., then git commit -m "...", and finally git push, you simply press your global hotkey: Cmd+Opt+G. A minimal dialog box appears, asking only for a commit message. You type “Fix off-by-one error in pagination” and hit Enter.
In the background, your script automatically stages all changes, creates the commit, and pushes it to the remote repository. A second later, a notification confirms the job is done:
Git Push Successful Pushed
mainto origin.
You’ve wrapped the entire git commit-and-push ceremony into a single, context-aware command, saving time and keeping you focused on your code.
The Core Question You’re Answering
“How can I wrap a powerful command-line tool like git with a context-aware graphical user interface? How can I create a system that knows which repository I’m working on and provides simple, global access to my most common Git workflows, abstracting away the repetitive terminal commands?”
Concepts You Must Understand First
Stop and research these before coding:
- Application Context Detection:
- Your script needs to be aware of the user’s current context to find the right Git repository.
- If the active app is Finder, you can get the current directory. If it’s VS Code, iTerm, or another developer tool, they often have their own AppleScript dictionaries or command-line hooks to expose the current project path.
- In Hammerspoon, you can start by getting the active application (
hs.window.focusedWindow():application()) and then write specific logic for the apps you care about.
- Executing Shell Commands from Lua:
- The
hs.execute()function in Hammerspoon is your bridge to the shell. It allows you to run any command-line program, likegit, from your Lua script. - How do you capture the output of a command?
hs.execute()returns the output as a string that you can then process in Lua. - Crucially, you must understand that Hammerspoon does not run in the same environment as your interactive shell. It may not have the same
$PATH. You should use full paths to your executables (e.g.,/usr/local/bin/git) to be safe.
- The
- Parsing Git Output (Porcelain vs. Plumbing):
git statusproduces colorful, human-readable output. This is hard to parse reliably.- Git provides “porcelain” commands for scripting. For example,
git status --porcelainproduces a simple, stable, machine-readable output format where each line represents a file’s status. - Learning to use these plumbing and porcelain commands is the key to writing robust Git automation.
git symbolic-ref --short HEADis a reliable way to get the current branch name. - Book Reference: Pro Git by Scott Chacon & Ben Straub, Chapter 10 (“Git Internals”), explains the difference between plumbing and porcelain commands.
Questions to Guide Your Design
Before implementing, think through these:
- Safety and Destructive Actions: A “Quick Commit” that blindly runs
git add .is convenient but dangerous. What if you have accidentally saved a.envfile with secret keys or a large build artifact? How can your tool mitigate this? Should it first rungit statusand show you a list of files to be committed, requiring confirmation? Or should it respect the repository’s.gitignorefile implicitly? - Authentication:
git pushoften requires authentication (an SSH key password or an HTTPS token). A background GUI application like Hammerspoon doesn’t have a terminal to prompt you for this. How will you handle it? You must ensure yourssh-agentis configured correctly so that your script can push without interactive prompts. - Performance in Large Repositories: Running
git statusorgit branchin a massive repository (like the Linux kernel) can take a non-trivial amount of time. If you are updating a menu bar item, you must not block the UI thread. How will you run these commands asynchronously? - UI/UX for the Tool: What is the best interface for your Git tool?
- A Menu Bar Item showing the current branch is great for passive context.
- A Global Hotkey for a “Quick Commit” dialog (
hs.dialog.textPrompt) is great for actions. - How can you combine these? Perhaps clicking the menu bar item could show the output of
git statusor a list of recent commits.
Thinking Exercise
Design the context-detection logic. Before coding, design the flowchart for finding the “current” Git repository. This function is the brains of your tool.
function findActiveRepoPath():
  let active_app = getActiveApplication()

  if active_app is "Finder":
    repo_path = getFinderPath()
  else if active_app is "iTerm2" or "Terminal":
    repo_path = getCurrentTerminalDirectory() // May require AppleScript
  else if active_app is "Visual Studio Code":
    repo_path = getVSCodeProjectDirectory() // May require AppleScript
  else:
    return null // No context found

  // Traverse up the directory tree from repo_path
  while repo_path is not root ("/"):
    if ".git" directory exists in repo_path:
      return repo_path
    else:
      repo_path = parentDirectory(repo_path)

  return null // Not in a Git repository
This exercise forces you to think about how to support multiple applications and how to reliably find the root of the repository.
The Interview Questions They’ll Ask
- “Explain the difference between Git’s ‘plumbing’ and ‘porcelain’ commands. Which type should you use for scripting, and why?”
- “Your Hammerspoon script calls
gitand it fails, but the same command works in your iTerm2 shell. What is the most likely reason for this discrepancy?” (Hint:$PATHenvironment variable differences). - “How does
git pushhandle authentication when run from a non-interactive script? What is the role ofssh-agent?” - “You want to display the number of commits the local branch is ahead/behind the remote. Which Git command would you use to get this information in a machine-readable format?” (Hint:
git rev-list --count ...). - “If you were to build this tool in native Swift instead of Lua, what class would you use to execute a
gitcommand and capture its standard output and error streams?” (Hint:Process).
Hints in Layers
- Layer 1 (Static Command): Write a Hammerspoon function that runs
git status --porcelainon a single, hard-coded repository path on your machine. Print the output to the Hammerspoon console. This verifies you can rungitand get output. - Layer 2 (Dynamic Context): Write the
findActiveRepoPath()function you designed in the Thinking Exercise. For now, just support Finder. Usehs.finder.path()to get the current folder. - Layer 3 (Menu Bar Display): Create a menu bar item. Use a timer (
hs.timer) that runs every few seconds, calls yourfindActiveRepoPath()function, and if it finds a repo, runsgit symbolic-ref --short HEADto get the branch name and displays it in the menu bar. - Layer 4 (Interactive Commit): Create a global hotkey. When pressed, it should pop up a text input dialog (
hs.dialog.textPrompt). When the user submits text, the callback function should construct and run the fullgit commit -m "..."command. - Layer 5 (Safety First): Before committing, make your hotkey function first run
git status --porcelain. If there are unstaged changes you might not want to add (e.g., untracked files), show them to the user in a confirmation dialog (hs.dialog.confirmation) before runninggit add .andgit commit.
Books That Will Help
| Topic | Book | Chapter | | :— | :— | :— | | Git Internals | Pro Git | Ch. 10 “Git Internals” | | Text Processing | Wicked Cool Shell Scripts | Ch. 2 “User Creation/Management” (Parsing concepts) |
Project 14: PDF Annotation Automator with AppleScript + Preview
- Main Programming Language: AppleScript
- Software or Tool: Preview.app
- Difficulty: Intermediate
What you’ll build: A batch processor for PDFs. Select 10 files, run the script, and it adds a watermark “CONFIDENTIAL”, merges them into one file, and saves it.
Real World Outcome
It’s the end of the month, and you have 50 PDF invoices to process. Instead of opening each one manually, you select all of them in Finder and drag the entire batch onto a single app icon on your Dock—your “Process Invoices” droplet.
Your Mac gets to work. You watch as Preview.app opens and closes, methodically processing each file. In under a minute, the script has:
- Opened every single invoice PDF.
- Stamped a large, red “PAID” watermark on the first page of each document.
- Saved the modified versions into a separate “Processed” folder.
- Opened a new draft email in Mail.app with all 50 stamped invoices already attached, ready for you to send.
You have automated a tedious, multi-step document workflow, turning an hour of mind-numbing clicks into a 3-second drag-and-drop.
The Core Question You’re Answering
“How can I automate a GUI-centric application like Preview.app, which has a very limited scripting dictionary? What happens when direct API calls are not available, and how can I fall back to programmatically simulating clicks and menu selections to get the job done?”
Concepts You Must Understand First
Stop and research these before coding:
- Application Scripting Dictionaries:
- Open Script Editor, go to
File > Open Dictionary..., and choosePreview.app. This shows you every command and object that Preview officially supports for scripting. - You will quickly notice that many things you can do with the mouse (like adding a text annotation) are not in the dictionary. This is a critical lesson in macOS automation: an app being “scriptable” does not mean everything is scriptable.
- Open Script Editor, go to
- UI Scripting with “System Events”:
- When an application’s dictionary is insufficient, you must fall back to “UI Scripting.” This involves using the “System Events” application to simulate clicks on menus, buttons, and other UI elements.
- Example:
tell application "System Events" to tell process "Preview" to click menu item "Text" of menu "Annotate" of menu bar 1. - This is powerful but extremely brittle. If Apple changes the menu layout in a macOS update, your script will break. This project forces you to understand this trade-off.
- Automator and “Droplets”:
- Automator is a visual workflow tool. You can create a workflow that accepts files as input (a “Droplet”). When you drag files onto the droplet’s icon, it runs your workflow.
- Your Automator workflow can contain a “Run AppleScript” action, which is where you will place your main logic. This is how you create the drag-and-drop target for your files.
- File Iteration in AppleScript:
- Your droplet will receive a list of file paths. You need to know how to loop through this list in AppleScript.
on open the_filesis the entry point for a droplet script.the_fileswill be a list of aliases. You will use arepeat with a_file in the_filesloop to process each one.
Questions to Guide Your Design
Before implementing, think through these:
- Native UI Scripting vs. External CLI Tools: This is the central design decision.
- UI Scripting: You can try to automate Preview by simulating menu clicks and keystrokes. This is a great learning exercise but is fragile and might break with the next OS update.
- External Tools: A more robust solution is to use a command-line tool like
pdftk,cpdf(commercial), or a Python library likepypdfto add watermarks and merge files. Your AppleScript would then simply call this shell tool. - Which path will you choose, and why? For this project, attempting the UI scripting path first is highly encouraged to learn its limitations.
-
Coordinate Systems and Positioning: If you are adding a watermark via UI scripting, where do you click and type? The position of the “PAID” stamp needs to be consistent. But what about PDFs of different sizes (A4 vs. Letter) or orientations (portrait vs. landscape)? How can you reliably place the annotation in the “bottom left corner”?
-
Error Handling: What happens if your script tries to process a non-PDF file? Or a password-protected PDF that Preview cannot open? Your script should not just crash; it should gracefully log the error, skip the problematic file, and continue with the rest of the batch.
- User Experience of the Droplet: When the user drops files on your droplet, what feedback do they get? The script should probably display a notification when it starts (
display notification "Processing 50 files...") and another when it completes, perhaps with a summary of successes and failures.
Thinking Exercise
Trace the UI Scripting path. Assume Preview’s scripting dictionary for adding annotations is empty. How would you do it with clicks? Open a PDF in Preview and manually perform the steps, writing down the exact name of every menu and button you click.
- Action: Add a text box.
- Path:
Menu Bar "Tools" -> Menu "Annotate" -> Menu Item "Text"
- Path:
- Action: Type the watermark.
- Path:
tell application "System Events" to keystroke "CONFIDENTIAL"
- Path:
- Action: Move the text box.
- (This is very hard with UI scripting. You might have to accept the default position).
- Action: Save the file.
- Path:
Menu Bar "File" -> Menu Item "Save"ORkeystroke "s" using command down.
- Path:
This exercise highlights the verbosity and extreme fragility of UI scripting. If the name of any of those menus changes in a future OS update, the script breaks.
The Interview Questions They’ll Ask
- “What are the major pros and cons of UI Scripting via System Events versus using an application’s official scripting dictionary?”
- “Your UI script clicks a button, but sometimes a ‘Save As’ dialog appears unexpectedly, causing your script to fail. How would you add error handling to detect and gracefully manage such unexpected dialogs?”
- “Why is UI scripting considered a ‘last resort’ for professional automation tasks? When is it appropriate to use?”
- “macOS ships with a Python script for combining PDFs. Where is it located, and how would you call it from an AppleScript or shell script?” (Hint: It’s deep within the Automator application bundle).
- “What is a ‘droplet’ in the context of macOS automation? How does it process the files that are dropped onto it?”
Hints in Layers
- Layer 1 (The Droplet Stub): In Automator, create a new “Application” (a droplet). Add a “Run AppleScript” action. The default
on open the_files ... end openblock is your entry point. Add a simple command to count the number of dropped files and show a notification. This creates the basic app structure. - Layer 2 (Basic Scripting): Inside your droplet’s AppleScript, add the logic to
tell application "Preview"toopenthe first file in the dropped list. This proves you can control Preview. - Layer 3 (Attempt UI Scripting): Use
tell application "System Events" to tell process "Preview" ...to try and script the menu bar clicks you identified in the Thinking Exercise. This is where you will experience the pain and fragility of UI scripting firsthand. - Layer 4 (Robust CLI Tools): Fall back to a more robust method. Find the system’s
combine_pdfs.pyscript (/System/Library/Automator/Combine PDF Pages.action/Contents/Resources/join.py). Modify your AppleScript to call this Python script usingdo shell script, passing it the list of files. This is a much more reliable way to merge PDFs. - Layer 5 (Full Workflow): Combine the layers. The droplet receives files, calls the Python script to merge them into a single output file, and then uses
tell application "Mail"to create a new email with the merged PDF attached.
Books That Will Help
| Topic | Book | Chapter | | :— | :— | :— | | UI Scripting | AppleScript: The Definitive Guide | Ch. 23 “System Events” |
Project 15: macOS Theming Engine with AppleScript + Shell
- Main Programming Language: Shell / AppleScript
- Software or Tool: defaults, System Events
- Difficulty: Advanced
What you’ll build: A “Day/Night” switch on steroids. When triggered, it changes the wallpaper, toggles Dark Mode, changes the system accent color to Blue (Day) or Orange (Night), and changes the font size in Terminal.
Real World Outcome
The sun sets outside your window. At the exact moment of sunset, your Mac’s entire personality shifts automatically.
- Your vibrant, sunlit mountain wallpaper gracefully crossfades into a serene, starry night sky.
- The system’s bright, distracting blue accent colors (used for buttons and selections) instantly change to a warm, soft amber.
- Your iTerm2 or VS Code terminal, which was using a “Solarized Light” theme, immediately flips to “Solarized Dark.”
- The system-wide appearance switches from Light Mode to Dark Mode.
You’ve built a powerful, automated theming engine. With a single command (or triggered automatically by time), you can change the entire look and feel of your workspace to match your mood, focus level, or the time of day, going far beyond the default macOS Day/Night settings.
The Core Question You’re Answering
“How does macOS store its user preferences, from the mundane (highlight color) to the complex (Dock appearance)? How can I reverse-engineer these undocumented settings and build a script that modifies this underlying database to create a ‘theming engine’ that transforms the entire look and feel of the operating system on command?”
Concepts You Must Understand First
Stop and research these before coding:
- The
defaultsCommand-Line Tool:- This is your primary tool for changing hidden system settings. It directly reads from and writes to the
.plistpreference files located in~/Library/Preferences/. - You must understand its syntax:
defaults read [domain] [key]anddefaults write [domain] [key] [value]. - What is a “domain”? It’s typically a reverse-DNS string identifying an application or system component (e.g.,
com.apple.finderor-gfor the global domain).
- This is your primary tool for changing hidden system settings. It directly reads from and writes to the
- Discovering Preference Keys:
- The settings you want to change are often not documented. The key skill is discovering the correct domain and key.
- The technique: Read all defaults for a domain (
defaults read com.apple.finder). Then, go to the GUI and change a single setting. Read the defaults again anddiffthe two outputs. The changed line contains the key you need to script.
- JXA Appearance Preferences:
- For some common settings, Apple provides a high-level API that is safer than using
defaults. Application('System Events').appearancePreferencesis an object that lets you get and set properties likedarkMode. This is the preferred way to toggle Light/Dark mode, as it handles all the necessary notifications to make apps refresh instantly.
- For some common settings, Apple provides a high-level API that is safer than using
- Preference Caching (
cfprefsd):- Why do some
defaults writecommands not apply instantly? macOS uses a daemon calledcfprefsdto cache preferences in memory for performance. - Simply editing the
.plistfile on disk is not enough. Using thedefaultscommand correctly informscfprefsdof the change. For some applications, you may still need to force them to reload their preferences by restarting them (e.g.,killall Dock).
- Why do some
Questions to Guide Your Design
Before implementing, think through these:
- Theme Structure: How will you define a “theme”? It’s a collection of settings. Should you use a shell script with a long list of
defaults writecommands? Or would it be better to define your themes in a structured format like JSON or YAML?day_theme: com.apple.finder: AppleShowAllFiles: false "-g AppleInterfaceStyle": "Light" wallpaper: "/path/to/day.jpg"A structured format separates your configuration from your execution logic.
-
Atomicity: When you switch themes, you want all the changes to happen at once for a clean visual transition. How can you ensure this? Your script should apply all the settings as quickly as possible.
-
Backup and Restore: Before applying a new theme, your script should probably back up the user’s current settings. How would you read and save the existing values for every key you’re about to change? This would allow you to write a
restore_theme.shscript to undo your changes. - Application-Specific Theming: System-wide changes are one part. Many apps (like iTerm2, VS Code, etc.) have their own theme settings. How can your script control these?
- iTerm2 can be controlled via its proprietary AppleScript dictionary or by changing its
.plistfile. - VS Code’s theme is set in its
settings.jsonfile. A truly comprehensive theming engine must know how to talk to individual applications.
- iTerm2 can be controlled via its proprietary AppleScript dictionary or by changing its
Thinking Exercise
Reverse-engineer a Finder setting. This project is about discovery. Let’s find the key for showing hidden files in the Finder.
- Get Initial State: Open Terminal and run
defaults read com.apple.finder > ~/Desktop/finder_before.txt. This saves all of Finder’s current settings to a text file. - Make a Manual Change: In Terminal, run
defaults write com.apple.finder AppleShowAllFiles -bool true, then restart Finder withkillall Finder. You will now see hidden dotfiles on your Desktop and in Finder windows. - Get New State: Run
defaults read com.apple.finder > ~/Desktop/finder_after.txt. - Find the Difference: Use a diff tool to compare the two files:
diff ~/Desktop/finder_before.txt ~/Desktop/finder_after.txt.
The output of the diff command will point you directly to the key-value pair that changed: AppleShowAllFiles. You have just reverse-engineered a preference, the core skill needed for this project. Now, set it back to false using the same defaults write command.
The Interview Questions They’ll Ask
- “What is the global domain (
-gorNSGlobalDomain) in thedefaultssystem? How does it differ from an application-specific domain likecom.apple.finder?” - “You’ve used
defaults writeto change a setting, but the target application’s appearance doesn’t change. What is the most likely reason?” (Hint: Thecfprefsdcaching daemon). “How would you programmatically force the application to recognize the change?” - “What is the role of
cfprefsdin the user preferences architecture? Why does macOS use a caching daemon for preferences?” - “As an app developer, how would you listen for changes to your app’s preferences so you can update the UI dynamically when a user changes a setting via the
defaultscommand?” (Hint:NSUserDefaultsDidChangeNotification). - “Where are preference
.plistfiles physically stored on disk? What is the difference between the files in~/Library/Preferencesand a sandboxed application’s container?”
Hints in Layers
- Layer 1 (The Easy Way): Start with the highest-level API. Write a JXA script that uses
Application('System Events').appearancePreferences.darkModeto toggle between light and dark mode. This is the simplest theme change. - Layer 2 (Changing the Wallpaper): Use AppleScript or JXA to
tell application "System Events"to set the desktop wallpaper. You’ll need to target the current desktop and set itspictureproperty to a file path. - Layer 3 (Using
defaults): Use thedefaults write -g AppleHighlightColor "0.780400 0.815700 0.858800"command (for blue) to change the system highlight color. You will likely need to log out and back in to see this change take effect. This teaches you about preference caching. - Layer 4 (Application-Specific Theming): Target a specific application. Write a script that changes the “Profile” for iTerm2 or modifies the
workbench.colorThemesetting in VS Code’ssettings.jsonfile. This demonstrates how to extend your theming engine beyond system settings. - Layer 5 (Unified Script): Combine all the above into a single
theme.shscript that takes an argument (dayornight) and executes all the necessary commands to perform a complete theme transition.
Books That Will Help
| Topic | Book | Chapter | | :— | :— | :— | | Defaults System | macOS Internals | Configuration | | System Events | AppleScript: The Definitive Guide | Ch. 23 |
Project 16: Meeting Automator with Calendar + AppleScript
- Main Programming Language: AppleScript
- Software or Tool: Calendar.app
- Difficulty: Intermediate
What you’ll build: A script that checks your calendar. If a meeting starts in 5 minutes, it finds the Zoom/Meet link in the notes and opens it. It creates a seamless “Just in Time” join experience.
Real World Outcome
It’s 10:58 AM. A notification appears on your screen, presented by your own script:
Meeting starting in 2 minutes: Daily Standup
https://meet.google.com/xyz-abc-def[Join Now]
You click “Join Now”. Your script instantly parses the Google Meet URL from the chaotic calendar event description, ignoring the rest of the notes, and opens it in your default browser. You’re in the call with a single click, without ever needing to open your calendar, find the event, and hunt for the link. You’ve built a “just-in-time” meeting assistant that eliminates the friction of joining online calls.
The Core Question You’re Answering
“How can I programmatically query a database of time-based events (the Calendar)? More importantly, how can I parse the unstructured, free-text notes within those events to extract structured data, like a meeting URL, and then trigger an action based on a time-sensitive condition?”
Concepts You Must Understand First
Stop and research these before coding:
- Calendar Scripting Dictionary:
- Open Script Editor, go to
File > Open Dictionary..., and selectCalendar.app. Study the available objects and commands. - The key objects are
calendarandevent. You will need to learn how to get a list of calendars, then get a list of events from a specific calendar within a date range. - An
eventobject has properties likestartDate,endDate,summary(the title), anddescription(the notes, where links usually are).
- Open Script Editor, go to
- Regular Expressions (Regex):
- The meeting link will be buried in a block of text in the event’s
description. You cannot reliably extract it without Regex. - You need to learn how to write patterns that match common meeting URLs. For example, a pattern for Zoom might be
https?:\/\/.*zoom\.us\/j\/\d+. - Your chosen language (AppleScript, JXA, or Shell) will need a way to execute Regex matches. For AppleScript, this often requires using an external framework or a shell command. JXA has built-in Regex support.
- The meeting link will be buried in a block of text in the event’s
- Date and Time Arithmetic:
- Your script needs to compare the current time with the
startDateof upcoming events. - You must learn how your chosen language handles
Dateobjects. How do you get the current date and time? How do you find the difference between two dates to see if it’s less than 5 minutes? - Be aware of time zones, as they can be a common source of bugs in date-related programming. Calendar events have time zone information, and your script should respect it.
- Your script needs to compare the current time with the
Questions to Guide Your Design
Before implementing, think through these:
- Parsing Robustness: Your colleagues will use Zoom, Google Meet, Microsoft Teams, and other services. Will you write a separate Regex for each one? How can you create a single, elegant function that tries multiple patterns and returns the first valid link it finds? What should happen if an event has multiple meeting links in the description?
- Handling Overlapping Events: What if you have two meetings scheduled for 10:00 AM? Which one does your script choose to notify you about? Should it present a choice? Or should it prioritize based on some other logic (e.g., which one was accepted first)?
- Permissions: To access your calendar data, your script will need to be granted permission by the OS. This will trigger a user prompt the first time. How will your script behave if permission is denied? It should fail gracefully with a clear error message.
- Execution Strategy: How will this script be run?
- On-demand: Will you trigger it with a hotkey when you’re ready to join a meeting?
- Daemon: Will it be a background
launchdagent (Project 7) that runs every minute to check for upcoming meetings and automatically post a notification? The daemon approach is more complex but provides a much more seamless experience.
Thinking Exercise
Write a universal meeting Regex. A script that only finds Zoom links is brittle. The real challenge is to create one regular expression that can find a link for Zoom, Google Meet, or Microsoft Teams.
- Zoom:
https://...zoom.us/j/... - Meet:
https://meet.google.com/... - Teams:
https://teams.microsoft.com/l/meetup-join/...
How can you combine these into a single pattern? The | (OR) operator in regex is your friend. Sketch out a pattern that looks something like this:
https?:\/\/(.*zoom.us\/j\/[0-9]+|meet.google.com\/[a-z-]+|teams.microsoft.com\/l\/meetup-join\/[a-zA-Z0-9_%\/]+)
This exercise forces you to think about creating flexible, multi-format data extraction patterns. You can test your Regex using an online tool like regex101.com.
The Interview Questions They’ll Ask
- “How does AppleScript handle date objects? How would you get the current date, add 5 minutes to it, and compare it to an event’s start date?”
- “Your script needs to access the user’s calendar. What are the privacy implications of this? How does macOS’s permission system (TCC) manage this access?”
- “Why is parsing data with regular expressions sometimes a bad idea? What is a more robust alternative if the data were available in a structured format like JSON or XML?”
- “An event’s start time is
10:00 AM PST. Your script is running on a machine set to EST. What will thestartDateproperty return, and how do you correctly handle time zone conversions?” - “How would you design your script to be ‘polite’ and not open a meeting link if you have already manually joined the call?”
Hints in Layers
- Layer 1 (Fetch Events): Write an AppleScript that connects to the Calendar app and gets a list of all events happening today. Loop through them and print the
summary(title) of each event to the console. - Layer 2 (Filter and Find Next): Modify your script to filter the list to only include events that haven’t ended yet. Find the event with the earliest start time in that filtered list. This is your “next meeting.”
- Layer 3 (Regex Parsing): Get the
description(notes) of your next meeting. Apply the universal regex you designed in the Thinking Exercise to extract the meeting URL. Print only the URL to the console. - Layer 4 (The Daemon): Use
launchdto create an agent that runs your script every minute. Instead of printing to the console, the script should now check if the next meeting is within the next 5 minutes. - Layer 5 (Interactive Notification): If a meeting is starting soon, use
display notificationto show the meeting title and the extracted URL. Use the techniques from Project 12 to add a “Join Now” button that opens the URL. You now have a complete, automated meeting assistant.
Books That Will Help
| Topic | Book | Chapter | | :— | :— | :— | | Calendar API | AppleScript: The Definitive Guide | Ch. 20 “Scripting System Apps” | | Regex | Regular Expressions Cookbook | URL Patterns |
Project 17: Screenshot Workflow Automator
- Main Programming Language: Shell / AppleScript
- Software or Tool: screencapture, sips
- Difficulty: Intermediate
What you’ll build: A replacement for the default screenshot behavior. When you take a screenshot, instead of just saving to Desktop, it prompts you to name it, converts it to a specific format, and copies the file path to clipboard.
Real World Outcome
You press your custom screenshot hotkey, Cmd+Shift+5. You select an area of the screen capturing a bug. Instead of the screenshot ambiguously landing on your Desktop, a dialog box immediately appears, asking for a filename. You type “login-form-bug” and hit Enter.
Instantly, your script performs a sequence of actions:
- Renames the file to
2025-12-22-login-form-bug.png. - Moves it to your designated
~/Screenshotsfolder. - Resizes it to a maximum width of 1200px to make it Slack-friendly, using
sips. - Copies the file’s path (
/Users/douglas/Screenshots/2025-12-22-login-form-bug.png) to your clipboard.
The path is now ready to be pasted directly into a Jira ticket or Slack message. You’ve replaced the default screenshot behavior with a powerful, organized workflow that saves, names, and prepares your screenshots for immediate use.
The Core Question You’re Answering
“How can I intercept a core, built-in system function like screen capture and replace it with my own enhanced workflow? How can I chain together command-line tools to build a seamless process for capturing, naming, processing, and sharing images?”
Concepts You Must Understand First
Stop and research these before coding:
- The
screencaptureCLI:- This is the powerful command-line tool that the graphical screenshot utility is built on. Run
man screencaptureto see all its options. - You need to know the flags for interactive selection (
-i), window selection (-w), capturing to the clipboard (-c), and capturing to a file (filename.png). - How do you prevent the default drop shadow on window captures? (
-o).
- This is the powerful command-line tool that the graphical screenshot utility is built on. Run
sips(Scriptable Image Processing System):sipsis a command-line tool built into macOS for basic, fast image manipulation. It’s perfect for a screenshot workflow.- How do you use it to resize an image to a maximum width while preserving the aspect ratio? (
sips -Z 1200 image.png). - How do you convert an image from PNG to JPG? (
sips -s format jpeg image.png --out image.jpg).
- Workflow Interception Strategies:
- This is the key architectural decision. How will you run your script?
- Folder Action: You can attach a script to the default screenshot location (
~/Desktop). When a new file appears, your script runs. This is simple but has a noticeable delay and can be triggered by non-screenshot files. - Custom Hotkey: A more robust method. You first disable the system screenshot hotkeys in System Settings. Then, you use a tool like Hammerspoon or Karabiner to bind
Cmd+Shift+4to run your custom script directly. This gives you instant execution and more control.
Questions to Guide Your Design
Before implementing, think through these:
- Workflow Trigger: Which interception strategy will you use? If you choose the “Custom Hotkey” method, how will you guide the user to disable the native macOS shortcuts to avoid conflicts? If you choose “Folder Actions,” how will you handle the inherent delay and potential for false triggers?
- Handling Retina/Hi-DPI Displays: Screenshots taken on a Retina display are twice the size they appear. When you resize with
sips, are you aiming for a “logical” pixel width or a “physical” pixel width? Does this matter when you’re posting to the web or Slack? - Post-Capture Actions: What happens after the screenshot is saved and processed?
- Should the file itself be copied to the clipboard, ready to paste into Finder?
- Should the path to the file be copied, ready to paste into a terminal or script?
- Should the image be opened in Preview for annotation? Your script should be designed to support the workflow you use most often.
- Automatic Cleanup: Your screenshots folder will quickly fill up. How could you design a companion
launchdagent that runs once a day and automatically deletes any screenshots older than 30 days? (Hint: use thefindcommand with the-mtimeflag).
Thinking Exercise
Design the command chain. This project is a sequence of shell commands piped together. Plan the full sequence before writing the script.
#!/bin/bash

# 1. Define a destination and a temporary file
SCREENSHOT_DIR="$HOME/Screenshots"
TMP_FILE="/tmp/screenshot-$(date +%s).png"

# 2. Capture the screenshot interactively into the temp file
# The '-i' flag is for interactive selection.
screencapture -i "$TMP_FILE"

# 3. Ask the user for a descriptive name
# Use AppleScript to show a dialog
FILENAME=$(osascript -e 'text returned of (display dialog "Enter screenshot name:" default answer "")')

# 4. If the user provided a name, process the file
if [ -n "$FILENAME" ]; then
  # Create a timestamped, clean filename
  FINAL_NAME="$SCREENSHOT_DIR/$(date +%Y-%m-%d)-${FILENAME}.png"

  # 5. Move and process the file
  mv "$TMP_FILE" "$FINAL_NAME"
  sips -Z 1200 "$FINAL_NAME" # Optional: resize

  # 6. Copy the final path to the clipboard
  echo "$FINAL_NAME" | pbcopy

  # 7. Notify the user
  echo "Screenshot saved and path copied!"
else
  # 8. If user cancelled, clean up the temp file
  rm "$TMP_FILE"
fi
This exercise forces you to think through user input, temporary files, and the step-by-step flow of data.
The Interview Questions They’ll Ask
- “What is the
sipscommand-line tool, and for what kinds of tasks is it a good choice? When would you reach for a more powerful tool like ImageMagick instead?” - “How can you change the default behavior of macOS screenshots, such as the file format (PNG, JPG) or the drop shadow on window captures, using the
defaultscommand?” - “Explain what this shell script command does:
screencapture -i -c. What are the pros and cons of this approach versus capturing to a file?” - “In a shell script, what is the difference between
echo $VARandecho "$VAR"? When does it matter?” - “You’ve bound your script to
Cmd+Shift+4. How did you disable the original system-wide hotkey to prevent a conflict?”
Hints in Layers
- Layer 1 (Manual CLI Capture): Open Terminal. Manually run
screencapture -i ~/Desktop/test.png. Then runsips -Z 800 ~/Desktop/test.png. Then runecho "~/Desktop/test.png" | pbcopy. This proves each component of your workflow works. - Layer 2 (The Shell Script): Combine the commands from Layer 1 into a single
screenshot.shscript. Replace the hardcoded filename with a variable that uses thedatecommand to be unique. - Layer 3 (User Input): Add the
osascriptcommand to your shell script to pop up a dialog box asking the user for a filename, and use the result to name your file. - Layer 4 (The Hotkey): Disable the default
Cmd+Shift+4hotkey inSystem Settings > Keyboard > Keyboard Shortcuts. Then, use Hammerspoon (hs.hotkey.bind) or a similar tool to bindCmd+Shift+4to execute yourscreenshot.shscript. - Layer 5 (Finishing Touches): Add notifications to your script to confirm that the screenshot was saved and the path was copied. Add error handling in case the user cancels the dialog box.
Books That Will Help
| Topic | Book | Chapter | | :— | :— | :— | | Image CLI | Wicked Cool Shell Scripts | Ch. 11 “Image Management” |
Project 18: Personal Raycast Clone (Complete Launcher)
- Main Programming Language: Swift
- Software or Tool: Xcode, SwiftUI
- Difficulty: Expert
What you’ll build: A full-featured launcher application. A spotlight-like search bar that pops up in the center of the screen, allowing you to search files, run scripts, and calculate math.
Real World Outcome
You press your custom hotkey, Cmd+Space, replacing Spotlight entirely. A beautiful, translucent, and blazing-fast search bar appears in the center of your screen. This is your creation, a complete launcher built in Swift.
- You type
calc 50 * (1.2-0.3)and the result,45, appears instantly below the search bar. - You type
win leftand an option appears: “Run: Move Window to Left Half.” You hit Enter, and the frontmost window snaps to the left, powered by your Hammerspoon script from Project 1. - You type
ssand it fuzzy-searches your scripts, suggesting your “Screenshot Workflow” from Project 17.
You have built a personal Raycast clone. It’s not just a script; it’s a full, native macOS application that acts as the central hub for all your other automations, providing a beautiful, unified, and high-performance interface to your entire custom ecosystem.
The Core Question You’re Answering
“How do I graduate from disconnected scripts to building a complete, high-performance, native macOS application? How can I create a central ‘command center’ that unifies all the automation concepts I’ve learned—file searching, script execution, calculations, and window management—into a single, polished, and professional-feeling tool?”
Concepts You Must Understand First
Stop and research these before coding:
- SwiftUI and the App Lifecycle:
- This is a full native application, not a script. You need to understand how to create a new macOS project in Xcode and the basics of the SwiftUI application lifecycle (
@main,App,Scene,WindowGroup). - You will design your UI with a
Listfor results and aTextFieldfor the query. How do you bind the text field’s value to a state variable (@State) that triggers a search?
- This is a full native application, not a script. You need to understand how to create a new macOS project in Xcode and the basics of the SwiftUI application lifecycle (
- HUD Windows (
NSPanel):- A launcher window is not a normal window. It needs to float above other apps, not show up in the Dock, and disappear when it loses focus.
- The AppKit class for this is
NSPanel. You will need to learn how to configure your SwiftUI window to behave like a non-activating, transient HUD panel.
- Global Hotkey Registration:
- Your app needs to respond to a hotkey (like
Cmd+Space) even when it is not the frontmost application. This is a “global event monitor.” - You can achieve this using the low-level Carbon framework (
RegisterEventHotKey) or, more easily, by using a modern Swift library likeHotKeythat provides a friendly wrapper around these APIs.
- Your app needs to respond to a hotkey (like
- Plugin Architecture:
- Your launcher is a central hub. It doesn’t do everything itself; it runs other tools. This requires a plugin architecture.
- How will you define a “plugin” protocol? It might be a Swift
structthat defines a name, a trigger keyword, and anexecute()method. - Your “Calculator” plugin would parse a math expression. Your “Scripts” plugin would use the
Processclass in Swift to execute a shell command (like running your JXA or Hammerspoon scripts). - Book Reference: Design Patterns: Elements of Reusable Object-Oriented Software provides the conceptual basis for patterns you might use here, like the Command pattern.
Questions to Guide Your Design
Before implementing, think through these:
- Application Lifecycle: Your launcher needs to be running all the time in the background to listen for its hotkey, but it should have no visible windows or Dock icon most of the time. How do you structure a macOS app to run as a background agent or “menu bar app”? (Hint: You can set
LSUIElementto1in your app’sInfo.plist). - Focus Management: This is the most critical UX challenge. When the user presses the hotkey, your app must:
- Note which application was active before it.
- Bring itself to the front and make its text field the first responder, ready to accept input.
- When the user dismisses the launcher (e.g., by pressing
Escape), your app must hide itself and programmatically return focus to the original application. How do you manage this focus-stealing and focus-restoring dance?
-
App Sandboxing: If you plan to distribute your app, you must consider the App Sandbox. A sandboxed app has severe restrictions; for example, it cannot run arbitrary shell scripts or access most of the file system. For a personal tool like this, you will almost certainly build it as a non-sandboxed application. What are the implications of this choice?
- Search and Performance: As the user types, the results list must update instantly. How will you design your search function to be highly performant? Should the search run synchronously on the main thread or asynchronously on a background thread to keep the UI from stuttering, especially when searching thousands of files on disk? You will need to implement an efficient fuzzy-finding algorithm directly in Swift.
Thinking Exercise
Design the application architecture. This is a real application, so think about its components before you write a line of Swift.
- The App Delegate / Entry Point:
- Responsible for setting up the app, registering the global hotkey, and creating the main window. It’s the “conductor.”
- The Main View (SwiftUI):
- A
VStackcontaining aTextFieldfor the query and aListto display the results. - It is completely “dumb.” It only knows how to display data that is passed to it. It binds user input to a
@Statevariable.
- A
- The Search Controller / View Model:
- The “brains” of the operation. It observes the query string from the view.
- When the query changes, it dispatches the query to all registered “plugins.”
- It collects, sorts, and ranks the results from the plugins and publishes a final, ordered list of results back to the Main View.
- The Plugin Protocol:
- Define a
protocol Searchablein Swift. Any “plugin” must conform to it. - It must have a
nameproperty (e.g., “Calculator”) and a functionperformSearch(query: String) -> [SearchResult].
- Define a
This exercise forces you to think in terms of modern application design patterns like MVVM (Model-View-ViewModel) and dependency injection.
The Interview Questions They’ll Ask
- “Explain the difference between an
NSPaneland a standardNSWindow. Why isNSPanelthe correct choice for a Spotlight-style launcher?” - “Describe the process of registering a global hotkey in a sandboxed macOS application. What are the limitations?”
- “How would you design your plugin architecture to support plugins written in other languages, like the JXA and shell scripts you’ve already built?”
- “Your app needs to return focus to the previously active application when dismissed. How do you get a reference to that application and programmatically activate it?” (Hint:
NSWorkspace). - “When searching a large number of files, your UI freezes while the search is in progress. How would you refactor your search logic to be asynchronous and keep the UI responsive?” (Hint:
DispatchQueue,Actors, orCombine).
Hints in Layers
- Layer 1 (The Basic Window): Forget the hotkey and floating panel. Build a standard, boring, single-window SwiftUI app. Make it a
TextFieldand aList. As you type in the text field, filter a hard-coded array of strings and display the results in the list. This is your core UI and state management practice. - Layer 2 (The Floating Panel): Modify your app to use an
NSPanelsubclass. Make the window borderless and have it hide when it loses focus. This gives you the “Spotlight” look and feel. - Layer 3 (The Global Hotkey): Add a library like
HotKeyor use the Carbon APIs to register a global hotkey. Make the hotkey simply show and hide your panel. You’ll also need to figure out how to make your app run without a Dock icon (LSUIElement). - Layer 4 (The Plugin System): Define your
Searchableprotocol. Create a simple “Calculator” plugin that conforms to it. Make your search controller dispatch queries to a list containing just this one plugin. - Layer 5 (External Scripts Plugin): Create a “ShellRunner” plugin. This plugin reads from a directory of your scripts. Its search function returns results for scripts whose filenames match the query. Its
execute()method uses Swift’sProcessclass to run the selected script. You have now integrated all your previous work into your new native launcher.
Books That Will Help
| Topic | Book | Chapter | | :— | :— | :— | | App Development | macOS Programming for Absolute Beginners | Full Book | | Swift Language | The Swift Programming Language | Language Guide |
Final Capstone Project: Complete macOS Productivity Suite
- Main Programming Language: Swift + Lua + AppleScript + Shell
- Difficulty: Master
What you’ll build: A unified productivity suite. You won’t just run 18 separate scripts. You will build a “Command Center” (Project 18) that orchestrates them all.
Real World Outcome
Your Mac is no longer a generic computer; it is a bespoke productivity instrument, an extension of your own mind. A typical workflow looks like this:
- Morning (8:55 AM): You say, “Computer, begin workday.” The voice command triggers your Standup Automator (Project 3), which arranges your apps and loads your work tabs.
- Coding (11:00 AM): You use your Hyper Key (Project 5) and Window Manager (Project 1) to fly between apps and organize your workspace without touching the mouse. A
;;sigsnippet from your Text Expander (Project 9) drops in a complex function boilerplate. - Debugging (2:15 PM): You find a visual bug. You trigger your custom Screenshot Workflow (Project 17), name the file, and the path is instantly on your clipboard, ready for Jira.
- Contextual Awareness: Your custom Menu Bar app (Project 8) quietly shows your current Git branch and the status of your CI build. Your Clipboard History (Project 4) saves a vital log snippet you copied earlier.
- Evening (6:00 PM): As the sun sets, your Theming Engine (Project 15) automatically shifts the entire OS to a warm, dark theme, helping you wind down.
All of this is orchestrated by your Raycast Clone (Project 18), the central nervous system of your personalized OS layer. You haven’t just learned to automate macOS; you have fundamentally reshaped it to fit you perfectly.
The Core Question You’re Answering
“How do I evolve from writing individual, disconnected tools to architecting a single, cohesive system where multiple disparate components (written in Swift, Lua, JXA, and shell script) can communicate and share state? How do I create a whole that is greater than the sum of its parts, effectively building my own personal productivity layer on top of macOS?”
Concepts You Must Understand First
Stop and research these before coding:
- Inter-Process Communication (IPC):
- Your Swift launcher needs to tell your Hammerspoon window manager to act. Your JXA script needs to read a config file managed by your shell script. This requires IPC.
- URL Schemes: This is the simplest and most powerful IPC mechanism for this suite. You can define a custom URL scheme for Hammerspoon (e.g.,
hammerspoon://moveWindowLeft). Your Swift app can then simply “open” this URL, and Hammerspoon will execute the corresponding function. - CLI as API: Your native apps or scripts can always fall back to executing another script via the command line. Your Swift app can call
osascript my_script.jxa. - Book Reference: Enterprise Integration Patterns by Hohpe and Woolf, while for enterprise systems, provides the vocabulary (Pipes and Filters, Message Bus) to think about how your separate tools will talk to each other.
- Unified Configuration:
- You will have settings for your window manager, your theming engine, your app launcher, etc. Instead of scattering them across multiple files (
.hammerspoon/init.lua,karabiner.edn, etc.), you should create a single source of truth. - A central JSON or YAML file (e.g.,
~/.config/macos_suite/config.json) can hold all your preferences (colors, paths, hotkeys). Each tool (Hammerspoon, Swift, JXA) is then responsible for reading this one file to get its configuration. This makes managing your system much easier.
- You will have settings for your window manager, your theming engine, your app launcher, etc. Instead of scattering them across multiple files (
- Deployment and Dotfiles Management:
- How do you install this entire suite on a new Mac? You need a deployment strategy.
- This is typically handled by a “dotfiles” repository. Your repository would contain all your configuration files (
karabiner.edn,init.lua,config.json) and a masterinstall.shscript. - This install script would use
stowor simple symbolic links (ln -s) to place the config files in their correct locations (~/.config/karabiner/,~/.hammerspoon/). It would also use Homebrew (brew bundle) to install all the necessary applications (Hammerspoon, Karabiner, etc.). - Book Reference: While not a book, searching GitHub for “dotfiles” will yield thousands of examples of how developers manage their personal configurations. This is a rite of passage for power users.
Questions to Guide Your Design
Before implementing, think through these:
- Single Source of Truth: When you trigger “Dark Mode,” which component is in charge? Does the Theming Engine (Project 15) contain the logic, or does the Launcher (Project 18) simply call the script? How do you avoid duplicating logic? You should design a clear hierarchy where one component “owns” a piece of functionality, and all other components communicate with it via a well-defined API (like a URL scheme or CLI command).
- Resilience and Error Handling: What happens if your Hammerspoon configuration crashes? Does it bring down your entire system? Your components should be loosely coupled. Your Swift launcher should be able to function even if Hammerspoon isn’t running, perhaps by gracefully disabling the window management plugins. How will you report errors from background scripts to the user? (e.g., via a centralized log file and a notification).
- Modularity and Interchangeability: Can you swap out one piece of your system without breaking everything else? For example, if you decide you prefer Alfred over your custom Swift launcher, how much work would it be to re-wire your hotkeys and scripts to work with Alfred? A well-designed system uses stable, abstract interfaces (like URL schemes) between components, rather than tool-specific integrations.
- A Cohesive Command Language: You are building the UI for your own OS. Should there be a consistent language? For example, does your launcher use
win leftwhile your voice command usessnap window left? Designing a consistent verb/noun grammar across all your interfaces (GUI, voice, hotkey) will make the entire system feel more intuitive and cohesive.
Thinking Exercise
Diagram the complete system architecture. This is a system design exercise. On a whiteboard or in a diagramming tool, draw a node for each major component (Raycast Clone, Hammerspoon, Karabiner, launchd agents, shell scripts) and draw arrows to represent the flow of commands and data.
Global Hotkey (Karabiner)-> triggers ->Raycast Clone (Swift)Raycast Clone-> executes ->Shell Scripts(for Git, Screenshots, etc.)Raycast Clone-> opens URL ->hammerspoon://moveWindowLeftHammerspoon-> reads config from ->~/.config/suite/config.jsonlaunchd Agent-> triggers ->File Organizer Script (AppleScript)File Organizer Script-> reads rules from ->~/.config/suite/config.jsonVoice Control-> runs ->Shortcut-> executes ->Standup Script (Shell)
This exercise forces you to think explicitly about the public “API” of each component and how they are wired together. It moves you from being a script writer to a system architect.
The Interview Questions They’ll Ask
- “You’ve built a suite of tools in 4 different languages. Discuss the trade-offs of this polyglot approach versus standardizing on a single language like Swift.”
- “Describe the ‘API’ you’ve designed between your components. Why did you choose URL schemes over other forms of IPC like local sockets or AppleEvents?”
- “How would you design a centralized configuration system that allows for live-reloading of settings across all your running components (Hammerspoon, Swift app, etc.) when the config file changes?”
- “Walk me through your deployment strategy. How does a developer go from a fresh macOS install to having your entire suite set up and running in a single command?”
- “If you were to productize this suite and sell it, what are the top three architectural changes you would make regarding security, stability, and ease of installation for non-technical users?”
Hints in Layers
- Layer 1 (The API Contract): Establish the communication protocol. Define a custom URL scheme for Hammerspoon (e.g.,
producitivity-suite://) and document the “API endpoints” it will support (e.g.,move-window,show-menu). This is your core IPC contract. - Layer 2 (The Central Hub): Modify your Swift Launcher (Project 18) to be the central command hub. Instead of having its own logic for moving windows, make it construct and “open” the URL from Layer 1 (e.g.,
productivity-suite://move-window?direction=left). This decouples the components. - Layer 3 (The Unified Config): Create the
~/.config/my_suite/config.jsonfile. Move all hard-coded paths, colors, and settings from your individual scripts into this file. Modify your Hammerspoon, JXA, and Shell scripts to read their configuration from this single source of truth. - Layer 4 (The Dotfiles Repo): Create a new Git repository for your “dotfiles”. Move all your configuration files (
init.lua,karabiner.edn,config.json, all your scripts) into it. - Layer 5 (The Installer): Write a master
install.shscript in your dotfiles repo. This script should:- Use Homebrew to install all required apps (Hammerspoon, Karabiner, etc.).
- Create symbolic links from the repository’s config files to their correct locations in
~/.config/or~/. - Load your
launchdagents. Run this script on a fresh user account to prove you can deploy your entire personalized OS layer in one command.
Books That Will Help
| Topic | Book | Chapter | | :— | :— | :— | | System Design | Clean Architecture (Robert C. Martin) | Component Coupling | | Distribution | Homebrew Documentation | Creating Taps |