Sprint: TUI Programming Mastery - Real World Projects
Goal: Build a first-principles understanding of how terminals work, how text UIs are rendered, and how modern TUI frameworks map human input to predictable screen updates. You will learn the control-sequence layer (ECMA-48/ANSI), the terminal driver layer (termios line discipline), and the portability layer (terminfo/curses), then move into modern MVU and immediate-mode architectures. By the end you will be able to design and implement production-quality TUIs that are responsive, portable, and debuggable across different terminal emulators and operating systems. You will also integrate asynchronous I/O and external protocols (like LSP) to build real tools you can use every day.
Introduction
- What is TUI programming? Building interactive user interfaces inside terminal emulators using text, color, and keyboard-driven interaction.
- What problem does it solve today? Fast, low-latency, keyboard-centric workflows that work over SSH, inside containers, and on minimal systems.
- What will you build across the projects? A ladder of tools from raw ANSI rendering to full TUI apps (dashboards, file explorers, Git clients) ending with a terminal IDE.
- Scope: terminal control, input handling, rendering, portability, and TUI frameworks. Out of scope: full GUI toolkits, browser frontends, and embedded graphics.
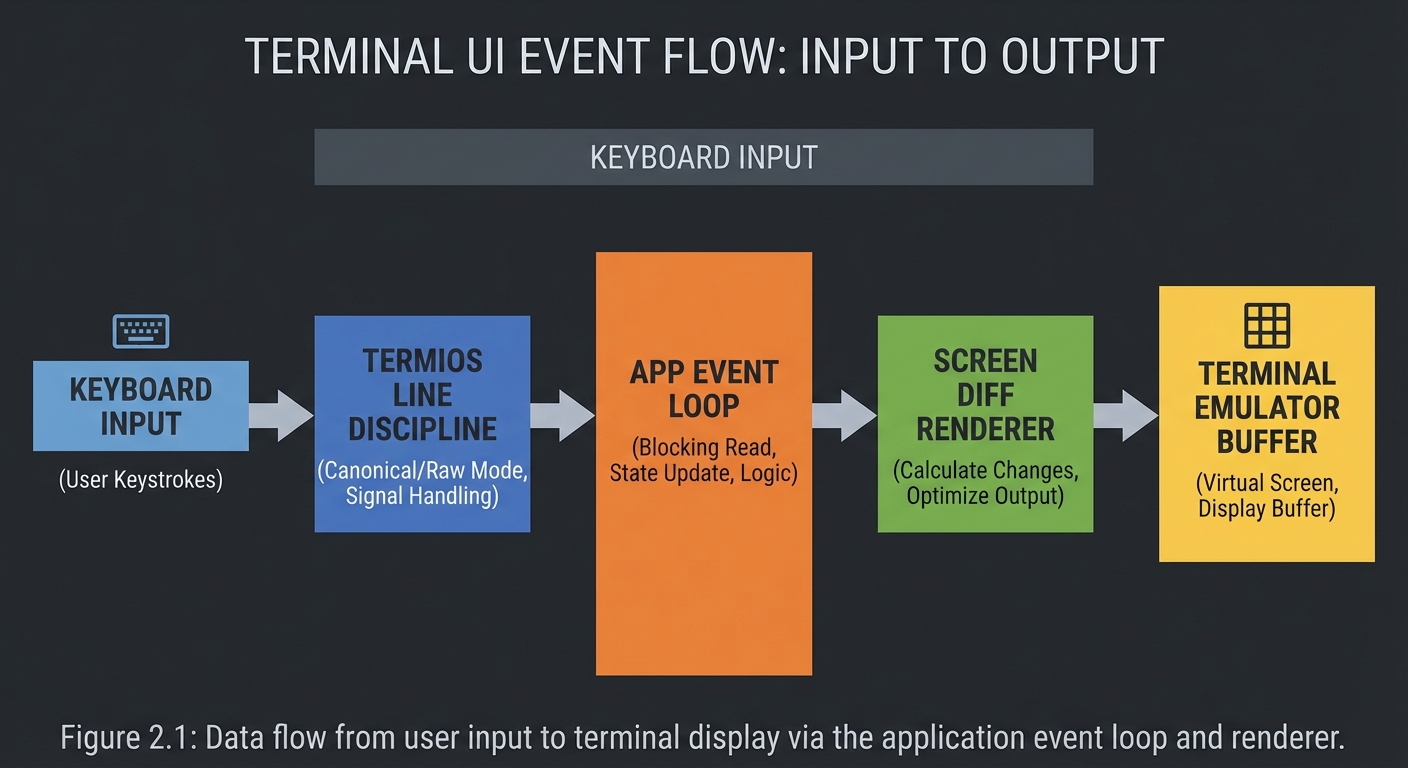
Big-picture flow:
User Input        Terminal Driver         Your App            Terminal Emulator
(keyboard)   ->   (termios line)    ->    (logic + view)  ->   (screen buffer)
   |                 |                        |                      |
   v                 v                        v                      v
Key codes      Canonical/Raw          ANSI/ECMA-48             Glyphs + colors
 + escape       processing             sequences + diff        + cursor position
 sequences          |                         |                      |
   |                v                         v                      v
   +----------> Event Loop  <---------  State Model  -------->  Frame Rendering
How to Use This Guide
- Read the Theory Primer in order before starting Project 1; each concept maps directly to later projects.
- Pick a learning path that matches your background and time budget (see Recommended Learning Paths).
- After each project, validate against the Definition of Done and compare your output to the Real World Outcome.
Prerequisites & Background Knowledge
Essential Prerequisites (Must Have)
- Basic programming in at least one language (loops, functions, data structures).
- Comfortable with terminal basics (shell, pipes, stdin/stdout).
- Recommended Reading: “The Linux Programming Interface” by Michael Kerrisk - Ch. 62 (Terminal I/O)
Helpful But Not Required
- Systems programming basics (processes, file descriptors) - learn during Projects 2-6.
- UI architecture patterns (MVC, MVU) - learn during Projects 8-12.
Self-Assessment Questions
- What is the difference between a terminal emulator and a shell?
- What happens to your input before
read()sees it in a terminal program? - Can you explain why arrow keys arrive as multi-byte sequences?
Development Environment Setup Required Tools:
- POSIX-like shell (macOS/Linux) or WSL2 on Windows
- A modern terminal emulator (iTerm2, Windows Terminal, GNOME Terminal)
- A compiler or interpreter for your chosen language
Recommended Tools:
tput,infocmp,sttyfor terminal inspectiontmuxorscreento test resizing and multiplexing
Testing Your Setup:
$ tput cols; tput lines
80
24
Time Investment
- Simple projects: 4-8 hours each
- Moderate projects: 10-20 hours each
- Complex projects: 20-40 hours each
- Total sprint: 3-5 months (part-time)
Important Reality Check Terminal programming is deceptively tricky: a small bug can leave your terminal in a broken state, and portability across terminals is a real constraint. Expect to spend time debugging input edge cases, rendering flicker, and terminal state restoration.
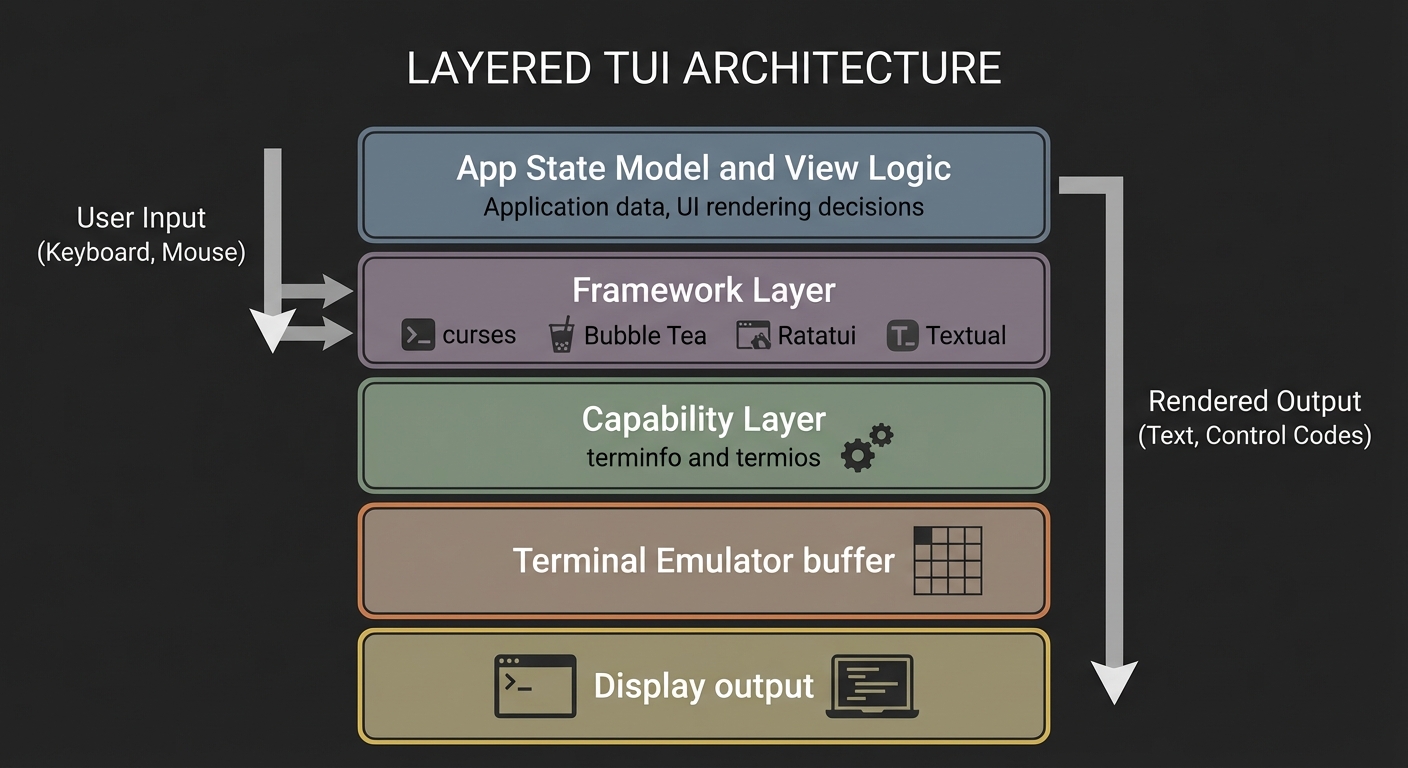
Big Picture / Mental Model
TUI programming is a layered system. You must understand each layer to know when to control it directly and when to use a higher-level library.
+-------------------------------------------------------------+
|                         YOUR APP                            |
|  State Model -> View -> Diff -> Output -> Input Handling     |
+---------------+-------------------------------+-------------+
                |                               |
                v                               v
      High-Level Libraries                 Low-Level Control
  (curses, Bubble Tea, Textual)       (ECMA-48/ANSI sequences)
                |                               |
                v                               v
          terminfo database                 terminal driver
                |                               |
                v                               v
           Terminal Emulator (screen buffer + input)
Theory Primer
Chapter 1: Terminal Control Model (ECMA-48 / ANSI Sequences)
Fundamentals Terminal control is the art of sending special byte sequences that change the terminal’s state: move the cursor, clear regions, and apply styles. These sequences are standardized by ECMA-48 (also ISO/IEC 6429), which defines control functions and their coded representations for character-imaging devices. Most terminal emulators implement a subset of these functions, especially the Control Sequence Introducer (CSI) family used for cursor movement and styling. The key mental model is that your program is not painting pixels; it is describing a sequence of state transitions for a text grid. You output bytes, the terminal interprets them, and the screen updates accordingly. You must assume partial support and variability across emulators, which is why portable TUIs rely on capability lookup rather than hardcoded sequences.
Deep Dive ECMA-48 defines control functions as embedded control codes inside a character stream, and most of the time you interact with them through escape sequences that begin with ESC (0x1B). The CSI sequences are the most common: they use ESC + ‘[’ and a set of parameters to modify cursor position, clear lines, set attributes (SGR), or query terminal state. A typical rendering cycle is a stream of printable characters interleaved with CSI sequences. For example, you might clear the screen, move the cursor to row 1 column 1, draw a header, then move to a different region and draw a table.
However, the standard is intentionally broad: it covers 7-bit and 8-bit forms, allows for extensions, and explicitly acknowledges that devices will implement only subsets appropriate to their role. This is why terminal-specific features exist (like xterm private modes) and why portability is hard if you hardcode sequences. The terminal emulator is a state machine: it maintains cursor position, current attributes, scrolling regions, tab stops, and more. When you send sequences, you modify that state. If you do not reset it properly (e.g., leaving bold mode on), you can affect everything after your program exits.
From a system-design perspective, this means you need a strategy for deterministic state transitions: always enter a known state on startup (clear screen, reset attributes, set cursor visibility), and always restore on exit. It also means you need to avoid assuming a fixed geometry: the terminal can be resized at any time, and the standard defines ways to query or react to size changes.
The rendering problem becomes “how do I minimize the number of control functions I emit while still matching my intended screen?” Naively re-rendering the full screen with full clears causes flicker and wastes bandwidth. Instead, you compute diffs between the old and new screen states and only emit the sequences necessary to update the changed cells. This is the basis of higher-level libraries, but understanding it at the sequence level is crucial when you debug glitches, ghosting, or cursor drift.
Finally, the control layer is not only about rendering: it also includes modes like alternate screen buffers and bracketed paste, which dramatically impact user experience. These are often private modes not guaranteed by ECMA-48, so you must treat them as optional and negotiate via terminfo or feature detection.
Control sequences are also a tiny, compact language. A CSI sequence has parameters, intermediate bytes, and a final byte; if you treat this as a grammar rather than ad hoc string concatenation, you will avoid malformed sequences and undefined behavior. Some sequences are absolute (move cursor to row/col), while others are relative (cursor up/down). Absolute positioning is usually more robust in diff renderers because it does not depend on the current cursor state. Relative moves can be cheaper in bytes but are more error-prone if your state tracking is incorrect.
Another critical practical detail is line wrapping. Many terminals auto-wrap when you print beyond the last column, which can accidentally scroll the screen and break your layout. A robust renderer ensures that it does not write past the last column, or it explicitly disables auto-wrap if the terminal supports it. This is one reason why TUIs often reserve the final column in a row and why they normalize strings to the available width before writing.
At scale, the control layer becomes a bandwidth problem. Over slow connections (SSH, serial), the number of bytes you emit directly impacts latency. Good TUIs reduce redundant attribute changes, minimize cursor moves, and batch output, which is why diffing and run-length optimizations matter. When you understand the control language, you can reason about the byte cost of your rendering decisions.
How this fits on projects
- Project 1 (ANSI Paint), Project 4 (Screen Diff Renderer), Project 5 (ncurses Dashboard)
Definitions & key terms
- ECMA-48 / ISO 6429: Standard that defines control functions and their coded representations for character-imaging devices.
- ESC (0x1B): The escape byte that introduces a control sequence.
- CSI: Control Sequence Introducer, a common ESC-prefixed control family.
- SGR: Select Graphic Rendition; controls color and attributes.
Mental model diagram
[App Output Stream]
  text + ESC [ params cmd
        |          |
        v          v
  Terminal Parser -> State Machine -> Screen Buffer -> Display
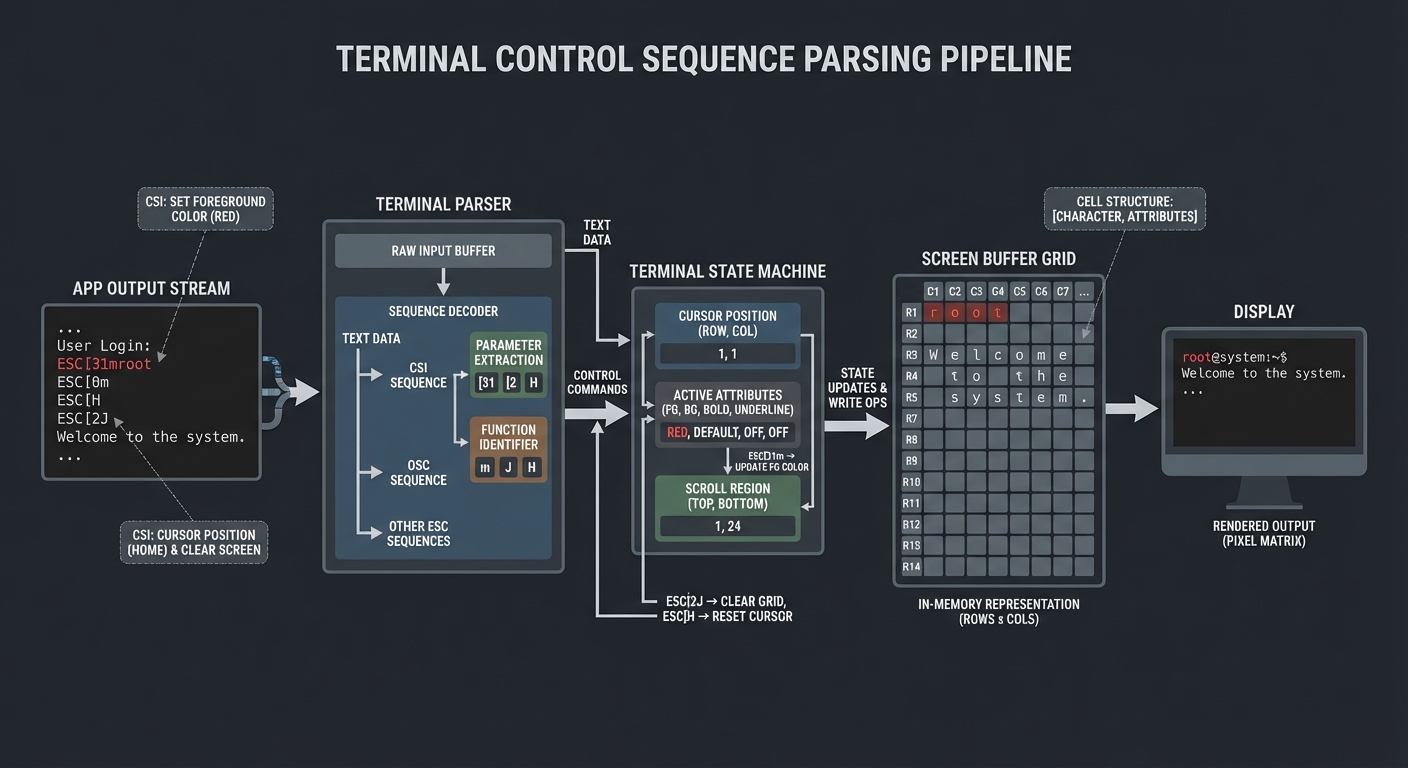
How it works
- Your program writes bytes to stdout.
- The terminal emulator parses bytes into either printable glyphs or control sequences.
- Control sequences mutate terminal state (cursor, attributes, scroll region).
- Printable characters render into the current cursor location.
- The screen buffer is updated; the display refreshes.
Minimal concrete example
PSEUDOCODE:
WRITE "ESC[2J"        # clear screen
WRITE "ESC[H"         # move cursor to home
WRITE "Title"         # draw text at top-left
WRITE "ESC[5;10H"     # move cursor to row 5 col 10
WRITE "*"             # draw a marker
Common misconceptions
- “ANSI codes are universal” -> They are only partially implemented; use terminfo for portability.
- “Clearing the screen is harmless” -> It can cause flicker and reset scrollback unexpectedly.
- “The terminal is stateless” -> It is stateful and preserves modes until you reset them.
Check-your-understanding questions
- Why can two terminal emulators display the same escape sequence differently?
- What is the difference between printable characters and control functions in ECMA-48?
- Why is diff-based rendering more efficient than full-screen redraws?
Check-your-understanding answers
- Terminals implement different subsets and extensions of the standard.
- Printable characters render glyphs; control functions mutate terminal state.
- It reduces bandwidth and avoids flicker by only updating changed cells.
Real-world applications
top,htop,less,vim, terminal dashboards
Where you’ll apply it
- Project 1, Project 4, Project 5, Project 8
References
- ECMA-48 standard (control functions and coded representations)
- “The Linux Programming Interface” by Michael Kerrisk - Ch. 62
Key insights A terminal UI is a state machine driven by a byte stream, not a pixel canvas.
Summary You control terminals by emitting control sequences that mutate display state. Understanding this layer lets you debug and optimize any higher-level library.
Homework/Exercises to practice the concept
- Write a text plan for clearing, drawing a header, and drawing a status bar without flicker.
- List the terminal states you must restore on exit.
Solutions to the homework/exercises
- Use a fixed update order: hide cursor -> clear or diff -> draw header -> draw body -> draw status -> show cursor.
- Restore cursor visibility, attributes (color/bold), alternate screen, and input mode.
Chapter 2: Input Modes and Key Decoding (termios Line Discipline)
Fundamentals
Terminal input is not delivered to your program exactly as the user types it. The terminal driver applies a line discipline that can buffer input, handle editing keys, and interpret control characters. POSIX termios defines canonical (line-based) and non-canonical (raw-ish) input processing. In canonical mode, input is delivered line-by-line and read() waits until newline or EOF; editing keys like erase and kill are handled by the driver. In non-canonical mode, input is delivered immediately and the driver does not perform line editing. This distinction is essential for interactive TUIs because you need keypress-level input, not line-buffered input.
Deep Dive
The termios interface defines how a terminal device processes input and output. Canonical mode (often called “cooked”) is designed for typical shell usage: the driver buffers input until it sees a line delimiter, then passes it to the program. This means your program cannot react to individual keypresses in real time, and special characters like Backspace are processed before the program ever sees them. In contrast, non-canonical mode disables line buffering and line editing, and uses the MIN and TIME settings to control when read() returns. This lets a TUI receive bytes immediately and implement its own key handling.
Raw mode in modern libraries is usually a bundle of termios changes: disable canonical input, disable echo, and disable signal generation for control characters. This is crucial for handling keys like Ctrl+C yourself. Libraries like crossterm summarize the effects: input is no longer line buffered, special keys are not processed by the terminal driver, and input is delivered byte-by-byte.
Once in non-canonical/raw mode, you must interpret input bytes. Many keys are sent as multi-byte escape sequences (for example, arrow keys often begin with ESC). These sequences are not standardized across all terminals, which is why terminfo also contains key capabilities. Your input decoder must handle partial sequences, timeouts, and ambiguous prefixes (ESC alone vs ESC as the start of a sequence). A robust approach is to implement a small state machine: when you see ESC, start collecting bytes; if a complete known sequence is matched, emit a high-level key event; if timeout occurs, treat ESC as a standalone key.
Another key aspect is signals and terminal restoration. If your program is interrupted (SIGINT, SIGTERM) while in raw mode, the terminal may remain in a broken state. A reliable TUI sets up cleanup handlers to restore termios state on exit, and uses an alternate screen buffer to keep the user’s shell clean.
Finally, input in TUIs is not just keys. Resize events are delivered via signals (like SIGWINCH) or via platform-specific APIs, and mouse input can be enabled in some terminals. In your architecture, all of these should be normalized into a single event stream to keep update logic deterministic.
Non-canonical mode uses two parameters, often called VMIN and VTIME, to control when reads return. This lets you trade off latency and CPU usage. A common approach is to request at least one byte and use a short timeout, which yields responsive input without a busy loop. For portability, you should treat these parameters as a contract: they define the boundary between polling and blocking behavior in your main loop.
The line discipline can also transform bytes (for example, carriage return to newline) and handle special control characters. When you disable canonical processing, these transformations often stop, which means you must decide how to handle them yourself. This is why a raw-mode TUI frequently treats Enter, Backspace, and Tab as high-level events that it interprets explicitly.
Key decoding is best done in layers: a byte reader, a sequence parser, and an event normalizer. The parser recognizes known escape sequences and converts them into symbolic events, while the normalizer maps them into consistent key names across platforms. This layered design lets you test the parser independently from the rest of the UI, and it makes it easier to support both simple keys (single byte) and complex keys (multi-byte sequences).
How this fits on projects
- Project 2 (Raw Key Decoder), Project 5 (ncurses Dashboard), Project 8 (Bubble Tea Git Client)
Definitions & key terms
- Canonical mode: Line-buffered input processing;
read()returns after newline/EOF. - Non-canonical mode: Byte-level input without line editing.
- Raw mode: A common configuration that disables echo, line buffering, and special-key processing.
- Escape sequence: Multi-byte sequences starting with ESC representing special keys.
Mental model diagram
Keyboard -> Driver Buffer -> termios line discipline -> read() -> Key Decoder -> Events
            (canonical or raw)                                (state machine)
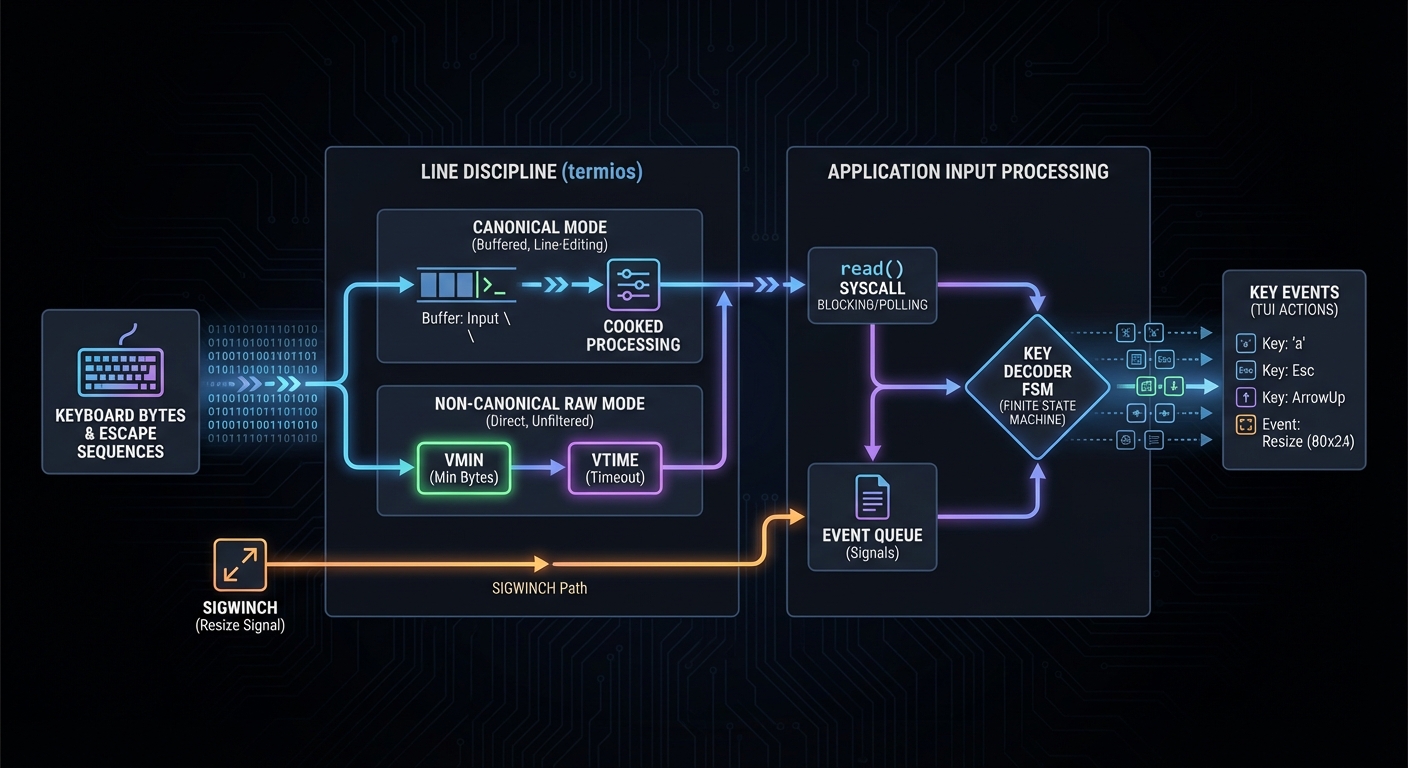
How it works
- Configure termios to canonical or non-canonical mode.
- Read bytes from stdin as they arrive.
- Feed bytes into a decoder that recognizes escape sequences.
- Emit high-level events (Up, Down, Ctrl+C, etc.).
- Feed events into your app’s update loop.
Minimal concrete example
PSEUDOCODE:
SET_INPUT_MODE(raw)
WHILE running:
  bytes = READ_NONBLOCKING()
  FOR b IN bytes:
    decoder.feed(b)
    IF decoder.has_event():
      event = decoder.pop_event()
      dispatch(event)
Common misconceptions
- “Raw mode means no rules” -> It still follows MIN/TIME semantics.
- “Arrow keys are single bytes” -> They are usually escape sequences.
- “SIGINT always means exit” -> You can capture Ctrl+C in raw mode.
Check-your-understanding questions
- Why does canonical mode prevent real-time key handling?
- What is the role of MIN and TIME in non-canonical mode?
- Why must you restore terminal state on exit?
Check-your-understanding answers
- Input is buffered until newline/EOF, so keypresses are not delivered immediately.
- They control when read() returns in byte-oriented input.
- Otherwise the user’s terminal can remain in raw/no-echo mode.
Real-world applications
- TUIs, terminal games, interactive debuggers, SSH-based tools
Where you’ll apply it
- Project 2, Project 5, Project 8, Project 12
References
- termios(3) man page (canonical and non-canonical modes)
- crossterm terminal raw mode documentation
- “Advanced Programming in the UNIX Environment” - Ch. 18
Key insights Raw input is a controlled state machine, not a free-for-all stream.
Summary Input handling is a layered pipeline; understanding termios is required to build reliable keyboard-driven interfaces.
Homework/Exercises to practice the concept
- Draw a state machine for decoding ESC-based arrow keys.
- Describe how you would detect a resize event in your app.
Solutions to the homework/exercises
- Start in NORMAL; on ESC move to ESC_SEEN; accept ‘[’ then digits; map known final byte to key.
- Use a signal handler for window resize and push a Resize event into your loop.
Chapter 3: Screen Rendering, Buffering, and Diffing
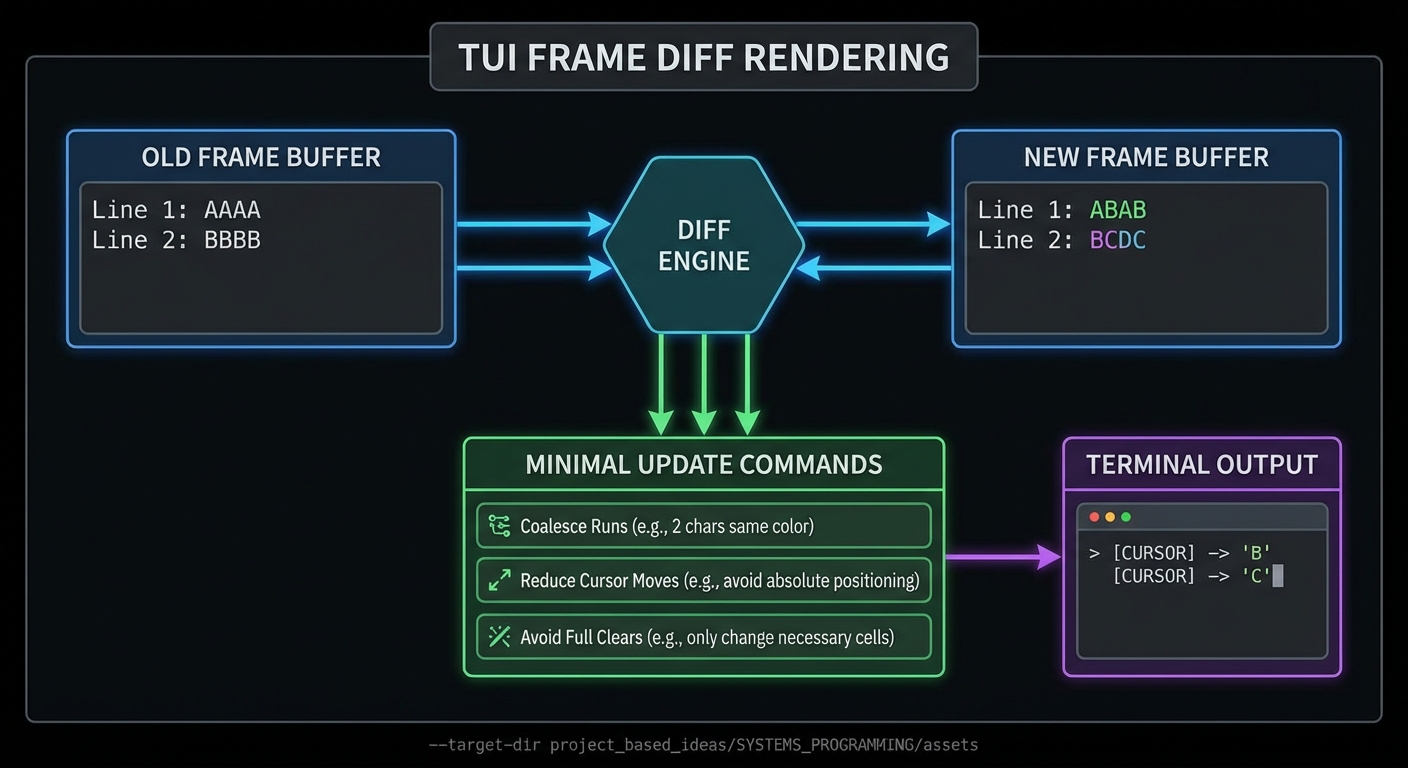
Fundamentals Rendering in TUIs is about mapping a logical state to a 2D grid of cells and emitting the minimal set of updates. Unlike GUIs, you do not have a compositor; you are the compositor. The screen is a matrix of characters with attributes (color, bold, underline). To avoid flicker and wasted output, you typically keep a back buffer (last frame) and compute a diff to the new frame. The diff tells you which cells changed and where to move the cursor. Many libraries implement this for you, but you need to understand it to debug performance or visual glitches. A frame is a full snapshot of the terminal grid, and your renderer is responsible for ensuring that each frame is consistent and complete.
Deep Dive A screen buffer is a 2D array of cells, where each cell has a glyph and style attributes. A frame is a complete snapshot of this buffer. When your app state changes, you generate a new frame. If you were to naively clear the screen and print the entire frame every time, performance would degrade on slow terminals and over SSH. This is why most TUI systems use double buffering and diffing.
Diffing can be done at multiple granularities. The simplest method is to compare cell-by-cell and emit updates for every change, moving the cursor as needed. A more efficient method groups contiguous runs of cells in the same row to reduce cursor movements. Another technique is damage tracking: instead of comparing full frames, you track which regions changed as a result of state updates. The tradeoff is complexity vs performance.
A robust renderer also handles terminal-specific features like alternate screen buffers. Alternate screen buffer usage prevents your UI from polluting the shell scrollback; when you exit, the original screen is restored. Libraries like crossterm expose entry and exit commands for alternate screens.
The critical invariants are: (1) you must know where the cursor is, (2) you must know the current style attributes, and (3) you must restore these on exit. A diffing renderer is essentially a small compiler that transforms an intended frame into a minimal control-sequence program. This is the core of performance optimization in TUIs.
In projects, you will build a simplified diff engine: keep a 2D array of cells for the previous frame, compute a new frame each tick, and emit only the changed cells. You will learn to coalesce updates, manage cursor moves, and reduce redundant style changes.
There are also subtle correctness issues. For example, if you update a cell with a different style, you must ensure the style is set before printing the character, and you must avoid leaking that style into subsequent cells. This means your renderer needs a model of the current style state in the terminal and must emit style reset sequences at the right time. Similarly, when rendering wide characters or combining characters, you must consider how many columns a glyph occupies; otherwise your cursor calculations will drift. Even if you avoid complex Unicode in your own output, the terminal width can vary by locale, so your renderer should treat width as a property of a glyph rather than as a constant.
Resizing adds another layer. When the terminal size changes, your frame dimensions change, and a previously valid cursor position may be out of bounds. A robust renderer clamps or reflows content, re-creates buffers to the new size, and forces a full redraw to prevent artifacts from stale rows. For dashboards, you often choose a strategy: either truncate content to fit the new size or change layout to a stacked mode.
Finally, you must consider how frequently to render. Some TUIs render only on state changes, others render on a fixed tick. Rendering on every tick simplifies animations but can waste bandwidth. Rendering on state change reduces output but requires careful invalidation logic. The projects will give you a chance to compare both approaches and measure their impact.
How this fits on projects
- Project 4 (Screen Diff Renderer), Project 5 (ncurses Dashboard), Project 9 (Ratatui Dashboard)
Definitions & key terms
- Back buffer: The previous frame stored for diffing.
- Damage tracking: Tracking which regions changed to reduce diff work.
- Alternate screen: A separate buffer that restores the original screen on exit.
Mental model diagram
State -> Frame A (buffer) -> diff(Frame A, Frame B) -> Emit sequences -> Screen
               ^                                   |
               |                                   v
            Frame B <--------------------------- Next tick
How it works
- Generate a full frame from app state.
- Compare with the previous frame.
- For each changed region, emit cursor moves and text.
- Update the stored previous frame.
Minimal concrete example
PSEUDOCODE:
new_frame = render(state)
for each cell in grid:
  if new_frame[cell] != old_frame[cell]:
    move_cursor(cell.x, cell.y)
    set_style(cell.style)
    write(cell.glyph)
old_frame = new_frame
Common misconceptions
- “Diffing is only for speed” -> It also prevents flicker and keeps cursor stable.
- “You can ignore cursor position” -> Incorrect; cursor drift causes corrupted layouts.
Check-your-understanding questions
- Why is a diff-based renderer faster over SSH?
- What happens if you fail to restore the cursor or styles on exit?
- Why might you prefer damage tracking to full diffing?
Check-your-understanding answers
- It emits fewer bytes and avoids full-screen clears.
- The user’s terminal remains in a modified state.
- It reduces diff cost by focusing on known dirty regions.
Real-world applications
- Terminal dashboards, log viewers, system monitors
Where you’ll apply it
- Project 4, Project 5, Project 9, Project 11
References
- crossterm terminal documentation (alternate screen support)
- “The Pragmatic Programmer” - Ch. “Orthogonality” (designing clear rendering stages)
Key insights Rendering is a compiler: state is compiled into the smallest correct terminal program.
Summary Efficient TUIs rely on diff-based rendering and strict state management to avoid flicker and maintain control over the screen.
Homework/Exercises to practice the concept
- Design a diff strategy that minimizes cursor moves.
- Create a list of rendering invariants you will enforce in every frame.
Solutions to the homework/exercises
- Group contiguous changes by row and emit a single cursor move per group.
- Always reset styles, hide/show cursor explicitly, and restore terminal state on exit.
Chapter 4: Capability Negotiation with TERM and terminfo
Fundamentals
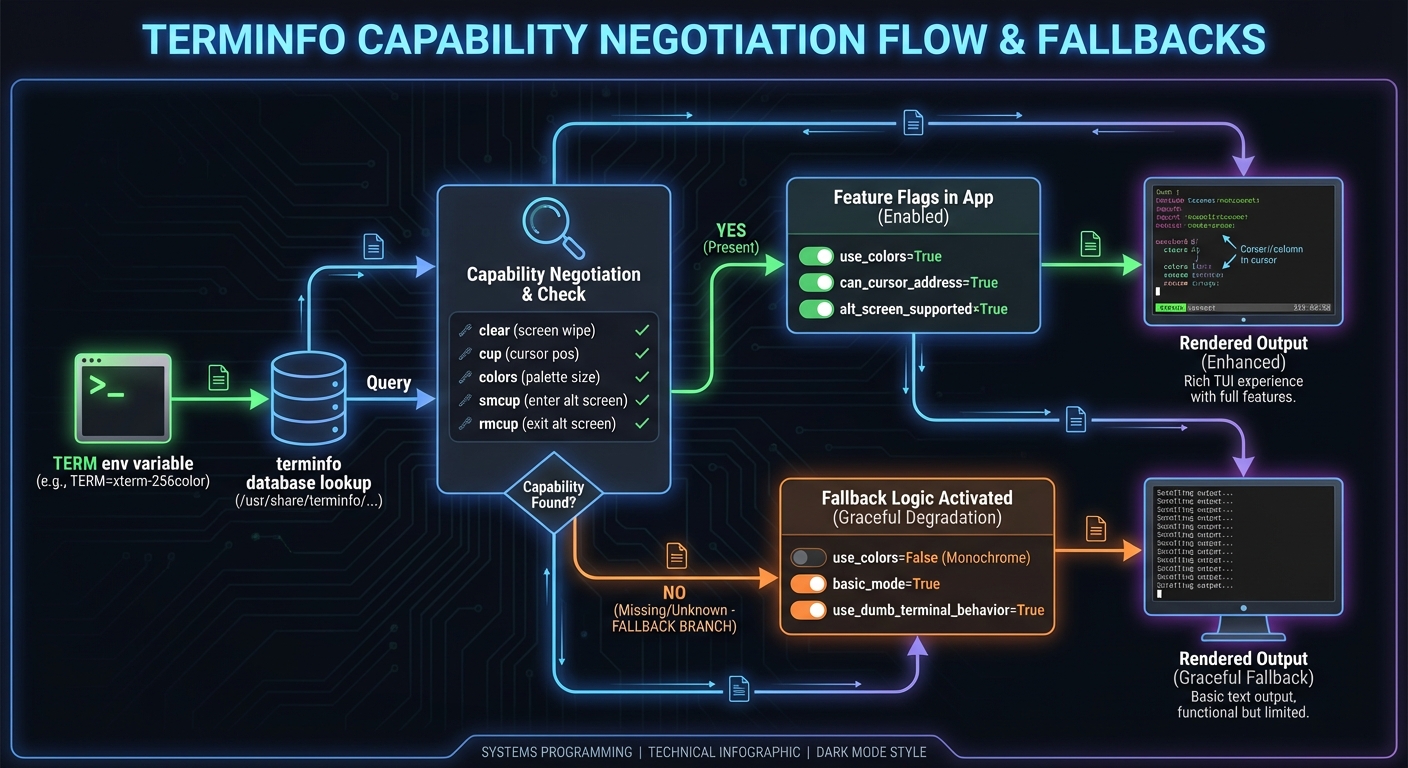
Not all terminals support the same capabilities. The TERM environment variable identifies the terminal type, and terminfo is a database of terminal capabilities used by screen-oriented programs (like curses apps). Terminfo provides a portable way to discover which control sequences a terminal supports and how to invoke them. This is why portable TUIs query capabilities instead of hardcoding sequences. Terminfo describes capabilities such as how to clear the screen, move the cursor, or enter alternate screen modes. Capability negotiation is therefore a feature-detection problem: your app adapts to the terminal rather than assuming a fixed feature set. This mindset is essential when shipping tools to users with unknown environments.
Deep Dive
Terminfo is a structured database describing terminal capabilities, stored as compiled entries on disk. Each entry defines boolean, numeric, and string capabilities, mapping high-level actions to concrete control sequences. The TERM variable selects which entry to use, and libraries like curses use it to abstract away terminal differences. This allows a single program to run on xterm, screen, tmux, or hardware terminals without modification. The man pages emphasize that terminfo describes terminals by specifying how to perform screen operations and padding requirements.
Because terminals vary, capability negotiation is a runtime concern. Some terminals support colors, others do not. Some support 256 colors or truecolor, others only 8. If you send unsupported sequences, you can get garbage output or no effect. The terminfo workflow is: (1) read the terminal type, (2) load its capabilities, (3) choose a rendering strategy compatible with those capabilities. This is why robust TUIs degrade gracefully.
Terminfo is also a source of key sequences. The database includes sequences for arrow keys, function keys, and other special keys. This is essential for portability because key codes vary. A curses library decodes keys based on the terminfo entry, sparing you from hardcoding escape sequences.
Advanced portability work often includes probing terminal features or using fallback heuristics. Tools like infocmp let you inspect terminal capabilities, and tput lets you test specific capabilities. This is not just academic: if you build a TUI that uses alternate screen or mouse reporting, you must check whether those are supported by the user’s terminal. Also note that some terminal emulators intentionally ignore certain sequences for safety or preference.
In your projects, you will build a capability explorer that prints which sequences are available and then uses them to render portable output. This will teach you to separate “what you want to do” from “how this terminal does it”.
Capabilities are more than booleans. Some entries describe parameterized sequences (for example, cursor movement that takes row and column parameters). Others describe padding or delays to accommodate older terminals that need time to process large updates. Even if you ignore padding in modern environments, it is helpful to recognize that terminfo was designed for a wide range of devices, not just modern emulators. The lesson is that terminal output is a negotiated contract, not a universal truth.
Another practical challenge is misconfiguration. If TERM is set incorrectly, your program might load the wrong entry and emit sequences that the terminal does not understand. You should consider defensive behaviors: check for clearly invalid TERM values, allow user overrides, and provide a "safe mode" that uses only basic capabilities. This becomes important when users connect through nested layers (SSH into tmux into a remote host). Each layer can change TERM, and the end result may not match what you expect.
Finally, capability negotiation affects UI design. A color-heavy layout may need a low-color fallback. Mouse-driven interactions should have keyboard alternatives. Even something as simple as bold or underline may not render consistently. Good TUI design is therefore multi-tiered: an ideal layout for full-featured terminals, and a degraded but still usable layout for minimal terminals.
How this fits on projects
- Project 3 (Terminal Capability Explorer), Project 5 (ncurses Dashboard), Project 8 (Bubble Tea Git Client)
Definitions & key terms
- TERM: Environment variable identifying the terminal type.
- terminfo: Database describing terminal capabilities and control sequences.
- capability: A named feature (e.g., clear screen, cursor move) with associated control sequence.
Mental model diagram
TERM -> terminfo entry -> capability lookup -> emit correct sequence
   \-> fallback rules -> reduced feature set -> safe output
How it works
- Read
TERMfrom the environment. - Load the matching terminfo entry from the database.
- Query capabilities you need (clear, cursor move, color).
- Render using those sequences; fallback if missing.
Minimal concrete example
PSEUDOCODE:
term = ENV("TERM")
cap = TERMINFO_LOOKUP(term)
if cap.supports("clear"):
  WRITE(cap.sequence("clear"))
else:
  WRITE("\n" * 100)
Common misconceptions
- “TERM is always xterm” -> It varies in tmux/screen/SSH.
- “terminfo is optional” -> Portability depends on it.
Check-your-understanding questions
- Why does terminfo exist instead of hardcoded escape sequences?
- How does a TUI know if 256-color output is safe?
- What can go wrong if TERM is mis-set?
Check-your-understanding answers
- Terminals implement different sequences; terminfo abstracts them.
- By querying capabilities in terminfo or terminal features.
- The app may emit incorrect sequences and corrupt output.
Real-world applications
- ncurses apps, portable CLI tools, text editors
Where you’ll apply it
- Project 3, Project 5, Project 6
References
- terminfo(5) man page (capability database)
- “The Linux Programming Interface” - Ch. 62
Key insights Portability comes from capability negotiation, not from hoping every terminal is the same.
Summary Terminfo provides the translation layer between abstract UI intents and terminal-specific control sequences.
Homework/Exercises to practice the concept
- Use
infocmpto compare two TERM entries. - List three capabilities you must check before enabling advanced features.
Solutions to the homework/exercises
- Compare
xterm-256colorvsscreen-256colorand note differences. - Color depth, alternate screen support, and cursor visibility control.
Chapter 5: Curses and ncurses Abstractions
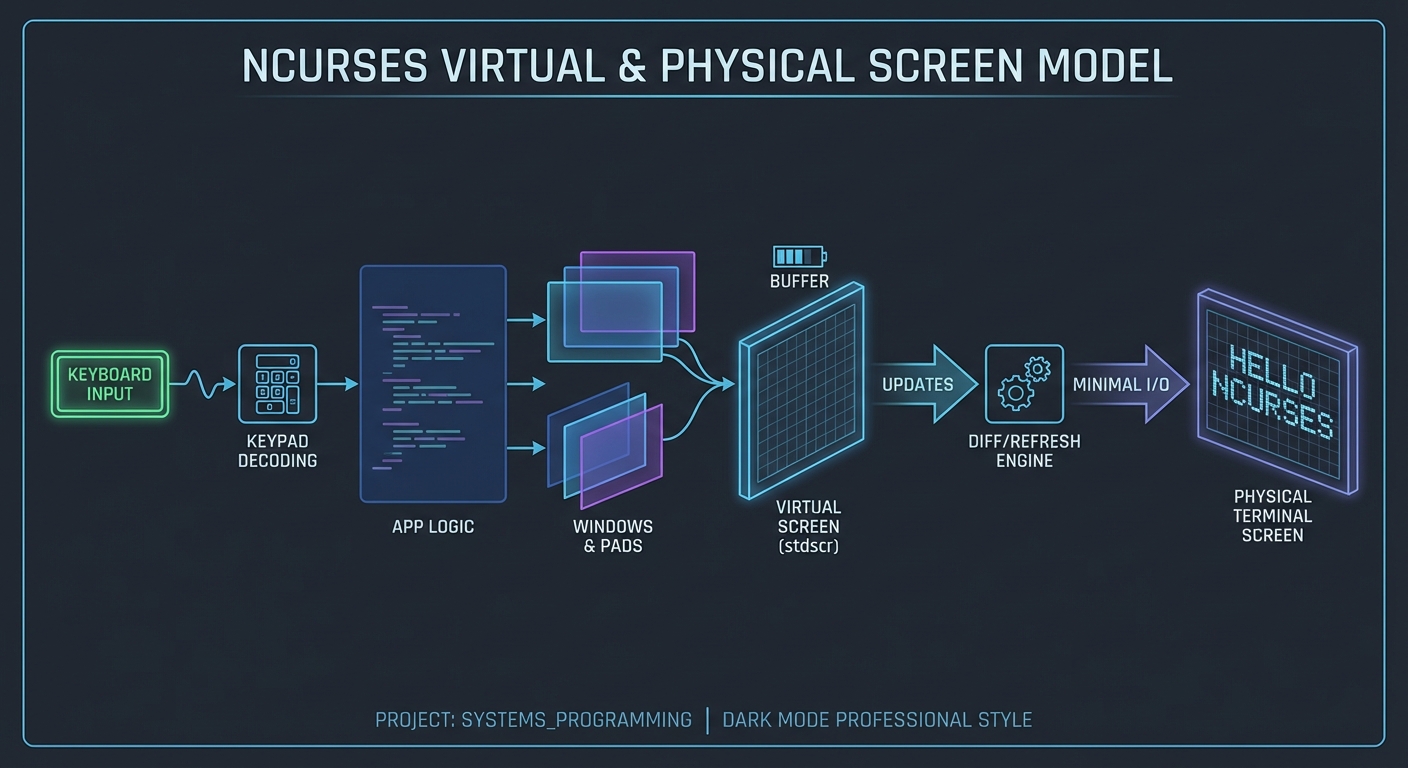
Fundamentals Curses (and its modern implementation ncurses) provides a higher-level, terminal-independent method for updating character screens. It abstracts the terminal into windows, handles input decoding, and optimizes screen updates. The goal is to let you work at the level of windows and characters rather than raw escape sequences. The ncurses family supports window and pad manipulation, input handling, color attributes, and terminfo-based portability. In practice, curses becomes your rendering engine and event loop helper: you draw into windows, then let the library decide the minimal updates to send to the terminal. It also standardizes common input options like keypad mode.
Deep Dive
Curses is effectively a rendering engine plus a terminal capability adapter. It maintains an internal representation of the screen and computes the minimal set of updates to apply, based on terminfo. This lets you write portable TUIs without hardcoding escape sequences. A core concept is the window: a rectangular region with its own coordinate system. Windows can be subdivided to create multiple panes, and can be overlaid with panels. The standard screen (stdscr) is the default full-screen window.
Pads extend windows beyond the visible screen: they are not constrained to terminal size and can be partially displayed with prefresh or pnoutrefresh. This is useful for scrollable content and large data views.
Curses also integrates with terminfo to map key sequences to key codes, so you can read KEY_UP instead of raw escape sequences. It handles echo, cbreak, and other input modes internally. This helps you build interactive apps without re-implementing a full input decoder. However, you still need to understand its state model: curses keeps both a virtual screen and a physical screen, and only updates differences. If you bypass curses and write directly to stdout, you can desynchronize its internal state.
In projects like a top-like dashboard, curses helps you manage refresh loops, handle resize events, and maintain multiple windows. The tradeoff is that curses is more imperative: you issue commands to mutate windows, and the library decides how to apply them. This is different from modern MVU frameworks which are more declarative. Understanding this difference is crucial when deciding which tool fits a project.
Finally, curses is widely deployed and available on most Unix-like systems. It remains the best choice for low-level portability and performance, especially in constrained environments. But it comes with constraints: limited widget set, manual layout, and a steep learning curve if you do not already know terminal control.
From an architectural perspective, curses encourages a “draw then refresh” discipline. You update window contents, then call refresh on each window or call a batch update that applies all pending changes. This explicit staging is useful because it lets you separate computation from rendering: compute process statistics first, then draw, then refresh. It also means you can insert instrumentation around refresh to measure update costs.
Curses input handling is both powerful and subtle. The library can translate raw key sequences into symbolic key codes, but you must configure it correctly (cbreak vs raw, echo on/off, keypad mode). Because curses owns the terminal state, mixing it with direct writes or external libraries can lead to corrupted output. Therefore, treat curses as the sole authority for screen output once initialized. If you need to integrate with other output (like logging), direct it to a file instead of stdout.
For larger layouts, curses requires manual geometry management. You must compute window sizes from terminal dimensions, handle resizes, and decide what to do when the terminal is too small. A useful pattern is to define a layout function that returns window rectangles based on rows and columns, then re-create or resize windows on resize events. This keeps the geometry logic isolated and testable.
How this fits on projects
- Project 5 (ncurses Dashboard), Project 6 (menuconfig Editor), Project 7 (Form Wizard)
Definitions & key terms
- Window: A rectangular region with its own coordinate system.
- Pad: A window larger than the screen, displayed partially.
- Virtual screen: The desired screen state in curses; diffed to the physical screen.
Mental model diagram
App logic -> Curses virtual screen -> diff -> terminfo sequences -> terminal
                       |
                       +-> windows/pads -> layout -> refresh
How it works
- Initialize curses and create windows.
- Update window content based on app state.
- Call refresh to compute and apply diffs.
- Read input via curses key handling.
Minimal concrete example
PSEUDOCODE:
init_curses()
win = create_window(rows=10, cols=30, y=0, x=0)
write(win, "CPU: 12%")
refresh(win)
key = get_key()
Common misconceptions
- “curses is obsolete” -> It is still the most portable low-level TUI option.
- “curses updates immediately” -> It uses a virtual screen and refresh step.
Check-your-understanding questions
- Why does curses use a virtual screen?
- What is the difference between a window and a pad?
- Why should you avoid direct stdout writes in a curses app?
Check-your-understanding answers
- To compute minimal updates and reduce output.
- Pads can be larger than the visible screen and are partially displayed.
- It desynchronizes curses’ internal state and breaks diffing.
Real-world applications
menuconfig,htop,nmtui, text-mode installers
Where you’ll apply it
- Project 5, Project 6, Project 7
References
- ncurses(3X) man page (terminal-independent updates)
- curs_pad(3X) man page (pad behavior)
- “Advanced Programming in the UNIX Environment” - Ch. 18
Key insights Curses is a stateful renderer and input decoder built on terminfo portability.
Summary Curses abstracts terminal differences while providing efficient screen updates, but it requires disciplined state management.
Homework/Exercises to practice the concept
- Design a two-pane layout for a TUI dashboard using window coordinates.
- Explain how a pad would be used for scrolling logs.
Solutions to the homework/exercises
- Split rows into header, body; split body into left/right windows.
- Store logs in a pad larger than screen and use
prefreshto display a slice.
Chapter 6: Modern TUI Architectures (MVU, Immediate Mode, CSS Styling)
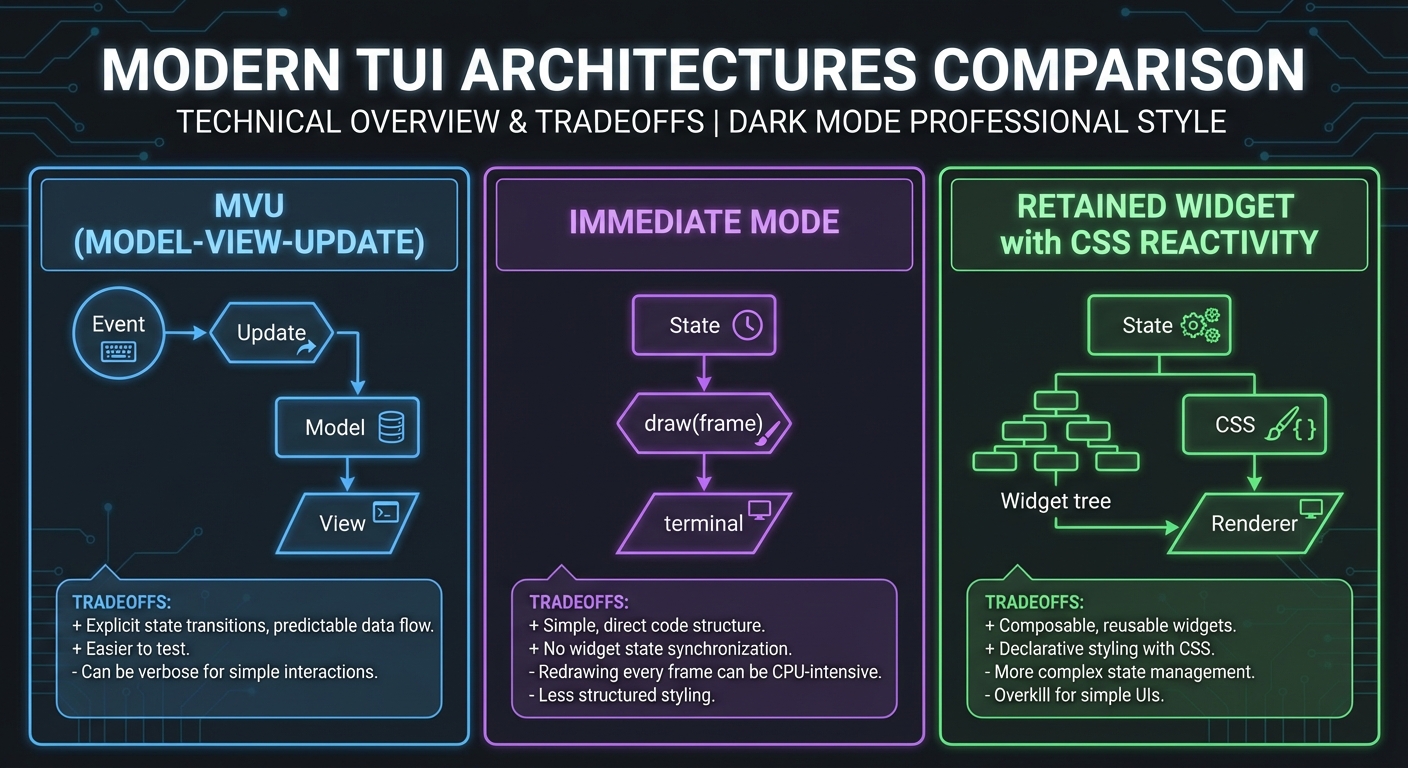
Fundamentals Modern TUI frameworks adopt patterns borrowed from web development: declarative rendering, component composition, and unidirectional data flow. Bubble Tea uses the Elm Architecture (Model-View-Update) where state, update logic, and view rendering are explicit and pure. Ratatui uses immediate-mode rendering: you redraw the UI each frame from current state, rather than keeping persistent widget objects. Textual brings CSS-like styling and a reactive model: widgets are styled via CSS and reactive attributes trigger automatic refresh. These frameworks shift the developer’s focus from imperative cursor control to higher-level state modeling, which is essential as UIs grow in complexity.
Deep Dive The MVU pattern decomposes your app into three parts: a Model (state), an Update function (handles events and returns a new model), and a View function (renders a representation from the model). Bubble Tea follows this pattern closely; the view returns a string representing the UI, and update returns a new model plus optional commands to perform side effects. This unidirectional flow reduces hidden state and makes behavior easier to reason about, especially under asynchronous input.
Immediate-mode rendering, as described by Ratatui, means the UI is reconstructed every frame based on state. There is no persistent widget tree; instead, you issue draw commands in a deterministic order. The advantage is simplicity and explicitness: your UI is always exactly what your state says it is. The tradeoff is that you must be careful about performance and avoid heavy computations in each frame.
Textual introduces a retained-widget model with CSS styling. Widgets are objects organized in a DOM-like tree, and CSS rules apply to these widgets just as they do in the web. Reactive attributes allow you to declare that changes to certain values should trigger a refresh, which reduces manual rendering code and encourages a more data-driven design. This is a different mental model from curses or immediate-mode libraries, but it provides powerful styling and composition.
When choosing between these architectures, consider your project’s complexity and constraints. Curses is lowest-level and most portable but imperative and manual. MVU frameworks make state transitions explicit and testable but require modeling state carefully. Immediate-mode frameworks are simple and fast but require efficient diffing or backend support. CSS-based frameworks allow rich styling but impose their own lifecycle and event models.
In the projects, you will implement MVU with Bubble Tea, immediate-mode with Ratatui, and CSS/reactive widgets with Textual. You will see the tradeoffs directly: how view functions stay pure, how state is centralized, and how rendering pipelines differ.
There are also differences in how these frameworks handle side effects. In MVU, side effects are typically represented as commands that return messages later; this keeps the update function pure and makes behavior easier to test. In immediate-mode frameworks, you often separate data collection from rendering by sampling metrics in a background task, then rendering the latest snapshot each frame. In a retained-widget framework like Textual, side effects can be attached to widget lifecycle events, which is powerful but can make data flow harder to trace if you do not discipline it.
Layout is another area of divergence. MVU and immediate-mode frameworks often use explicit layout primitives (rows, columns, flex-like constraints) that you construct in code. Textual uses CSS rules that are applied after the widget tree is built, which means layout can be modified independently of logic. This makes experimentation easier, but it also means you need a solid mental model of CSS-like specificity and cascading rules to predict the final layout.
Finally, testing differs across architectures. MVU lends itself to pure-function tests: given a model and a message, verify the new model. Immediate-mode rendering is harder to unit test at the UI layer, but you can test layout calculations and data preparation separately. For Textual, you often test widget behavior and state transitions rather than raw rendering output. Understanding these differences will help you select the right architecture for the right kind of tool.
How this fits on projects
- Project 8 (Bubble Tea Git Client), Project 9 (Ratatui Dashboard), Project 10 (Textual File Explorer)
Definitions & key terms
- Model-View-Update (MVU): Unidirectional architecture separating state, update logic, and view rendering.
- Immediate mode: UI is redrawn from scratch every frame based on current state.
- Reactive attributes: Values that automatically trigger refresh when they change.
- Textual CSS: CSS-based styling for terminal widgets.
Mental model diagram
MVU Flow:
Event -> Update -> Model -> View -> Render

Immediate Mode:
State -> draw(frame) -> terminal

CSS/Reactive:
State -> widget tree -> CSS rules -> renderer
How it works
- Input events are normalized into messages.
- Update logic transforms state deterministically.
- View logic renders UI from state.
- Renderer diffs and outputs to terminal.
Minimal concrete example
PSEUDOCODE:
on_event(msg):
  model = update(model, msg)
  ui = view(model)
  render(ui)
Common misconceptions
- “MVU hides state” -> It makes state explicit and centralized.
- “Immediate mode is inefficient” -> It can be efficient with diffing and batching.
- “CSS is only for web” -> Textual uses CSS for terminal widgets.
Check-your-understanding questions
- How does MVU reduce complexity in state handling?
- What is the key difference between immediate and retained rendering?
- Why do reactive attributes reduce manual refresh code?
Check-your-understanding answers
- All state transitions pass through a single update function.
- Immediate mode redraws each frame; retained mode keeps widgets alive.
- They trigger refresh automatically when values change.
Real-world applications
lazygit-style clients, terminal dashboards, rich interactive apps
Where you’ll apply it
- Project 8, Project 9, Project 10, Project 12
References
- Bubble Tea README (Elm architecture / MVU and ecosystem examples)
- Ratatui rendering concepts (immediate-mode rendering)
- Textual CSS guide
- Textual reactivity guide
- “Clean Architecture” by Robert C. Martin - Ch. 4-5 (separation of concerns)
Key insights Modern TUIs are about deterministic state -> view pipelines, not imperative drawing.
Summary MVU and immediate-mode frameworks make state explicit and rendering predictable, while CSS-based frameworks improve styling and composition.
Homework/Exercises to practice the concept
- Sketch a state model for a two-pane file explorer and list its update messages.
- Explain how you would test an MVU update function without a terminal.
Solutions to the homework/exercises
- State includes selected path, list cursor, preview; messages include Up, Down, Enter, Refresh.
- Feed messages into update and assert the resulting model state.
Chapter 7: Concurrency and External Integration (Async I/O and LSP)
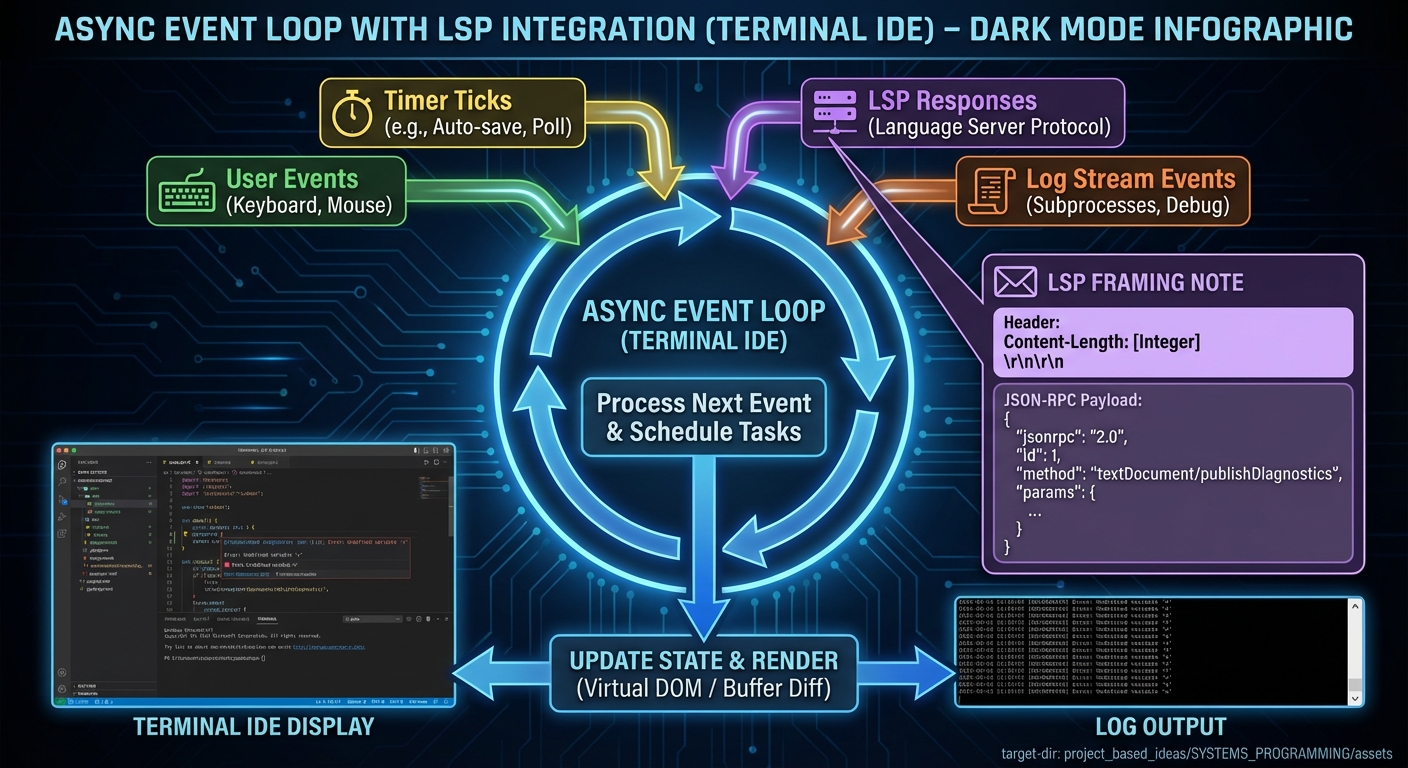
Fundamentals Real TUI tools rarely operate in isolation: they run subprocesses, stream logs, and integrate with external protocols. You need asynchronous I/O so your UI stays responsive while waiting on disk or network. The Language Server Protocol (LSP) is a key example of external integration: it defines a JSON-RPC based protocol between an editor and a language server, with messages framed by Content-Length headers. Understanding this framing and the request/response/notification model is critical for building a terminal IDE. Concurrency is not just a performance feature here; it is what keeps input and rendering from freezing while external work is happening.
Deep Dive A responsive TUI is an event-driven system: it must handle user input, background tasks, and rendering without blocking. This often requires non-blocking I/O or separate worker threads that communicate with the main loop via message queues. The architecture typically resembles a reactor: events enter a queue, state updates occur, and rendering happens on a fixed cadence or after each update. The challenge is coordinating asynchronous tasks without race conditions.
External integration often uses structured protocols. LSP is a canonical example for TUI IDEs. LSP defines a JSON-RPC based message format, and frames messages with a header that includes Content-Length (required) and Content-Type (optional). The header is separated from the JSON content by a blank line (double CRLF). The official LSP overview explains that the protocol standardizes communication between development tools and language servers. This means your TUI must implement a message framing layer: read bytes from the server, parse headers, then parse JSON payloads, then dispatch responses.
Another common integration pattern is log streaming. For example, a TUI log viewer needs to tail a file or subscribe to a stream without blocking input handling. This suggests a concurrency model where background workers push events (new lines) into the UI thread. You must also handle backpressure: if logs arrive faster than you can render, you need buffering and drop strategies.
Finally, clean shutdown matters. When you spawn subprocesses (Git, LSP servers), you must terminate them on exit and restore terminal state. A robust TUI uses a dedicated lifecycle: start external processes, manage their I/O, and ensure cleanup paths on error or signals.
Protocol integration also introduces ordering and correlation problems. JSON-RPC supports requests, responses, and notifications; requests carry an ID so the client can match responses. Your TUI must maintain a table of in-flight requests and timeouts so it can recover if a server is slow or unresponsive. This is not just for correctness; it also affects UI behavior. If you wait indefinitely for a response, you can block features like diagnostics or go-to-definition.
Cancellation is another practical concern. If the user types rapidly or navigates to a different file, outstanding requests may become irrelevant. A well-designed system can cancel or ignore outdated responses to avoid flicker or confusing UI updates. This requires you to tag requests with the state they were generated from and discard responses that no longer apply.
Error handling should be explicit. External processes can crash, JSON can be malformed, and connections can drop. Your event loop must treat these as normal events and surface them to the user in a non-blocking way. For example, a TUI IDE might show a diagnostics banner when the LSP server disconnects, while continuing to allow local editing.
You should also design for flow control. If your UI can only render 30 frames per second but your input stream can produce 1,000 messages per second, you need a strategy to coalesce or drop events. This is especially important for log viewers and diagnostics streams. A small, well-defined queue with clear drop rules keeps the UI stable under load.
How this fits on projects
- Project 11 (Async Log Monitor), Project 12 (TUI IDE with LSP)
Definitions & key terms
- JSON-RPC: Remote procedure call protocol encoded in JSON.
- LSP: Protocol between editors and language servers using JSON-RPC.
- Content-Length framing: LSP messages are preceded by a header specifying byte length.
Mental model diagram
User Events -> UI Loop -> State -> Render
                 ^
                 |
        Background Tasks (I/O, subprocess, LSP)
                 |
              Messages
How it works
- Start background workers or subprocesses.
- Read and parse their output into structured events.
- Send events into the main loop.
- Update state and render without blocking input.
Minimal concrete example
PROTOCOL TRANSCRIPT (LSP framing):
Content-Length: 85\r\n
\r\n
{ "jsonrpc": "2.0", "id": 1, "method": "initialize", "params": { ... } }
Common misconceptions
- “Async means multi-threaded” -> It can be single-threaded with non-blocking I/O.
- “Parsing JSON-RPC is trivial” -> You must handle framing and partial reads.
Check-your-understanding questions
- Why is Content-Length framing required in LSP?
- What happens if a background task blocks the main loop?
- How would you handle a burst of log lines?
Check-your-understanding answers
- To delimit messages in a continuous byte stream.
- The UI freezes and input becomes unresponsive.
- Buffer lines and apply backpressure or drop strategy.
Real-world applications
- Terminal IDEs, log monitors, deployment dashboards
Where you’ll apply it
- Project 11, Project 12
References
- LSP 3.17 base protocol (headers + JSON-RPC content)
- Language Server Protocol official overview
- “Operating Systems: Three Easy Pieces” - Ch. on concurrency
Key insights Responsive TUIs are event-driven systems that must parse and integrate external streams safely.
Summary Concurrency and protocol integration are essential for real tools; they require framing, parsing, and careful event-loop design.
Homework/Exercises to practice the concept
- Design an event queue schema that can carry input, timer ticks, and LSP messages.
- Describe a graceful shutdown sequence for a TUI that spawns subprocesses.
Solutions to the homework/exercises
- Use a tagged union: InputEvent, TimerEvent, LspEvent, LogEvent.
- Stop input loop -> terminate subprocess -> drain output -> restore terminal state.
Glossary
- ANSI Escape Sequence: A byte sequence (often ESC + ‘[’) that controls terminal state.
- ECMA-48: Standard defining control functions for character-imaging devices.
- termios: POSIX interface controlling terminal I/O modes.
- canonical mode: Line-buffered input processing.
- terminfo: Terminal capability database used by curses.
- curses/ncurses: Terminal UI libraries abstracting control sequences.
- MVU: Model-View-Update architecture (Elm style).
- immediate mode: UI drawn from scratch each frame.
- reactive attribute: Value that triggers UI refresh automatically.
- LSP: Protocol between editors and language servers using JSON-RPC.
Why TUI Programming Matters
- Modern motivation: TUIs are fast, keyboard-first, and run over SSH and minimal systems where GUIs are unavailable.
- Real-world impact (current): In the Stack Overflow Developer Survey 2025, Bash/Shell is used by 48.8% of professional developers, based on 49,172 professional responses.
- Ecosystem signal (current): The Bubble Tea README reports over 10,000 applications built with the framework.
- Context & Evolution: Terminals evolved from hardware devices to emulators, but the control-sequence model remains, making TUI knowledge a long-lived skill.
Old vs new approaches:
Old Way (Line Tools)                 Modern TUI
---------------------                ---------------------
One command -> one output            Continuous interactive UI
Minimal state                         Rich state + live updates
No diffing                            Diff-based rendering

Concept Summary Table
| Concept Cluster | What You Need to Internalize |
|---|---|
| Terminal Control Model | How ECMA-48 control functions map byte streams to screen state. |
| Input Modes & Key Decoding | Canonical vs raw input and decoding multi-byte key sequences. |
| Rendering & Diffing | Building frames and emitting minimal updates to avoid flicker. |
| Capability Negotiation (terminfo) | How TERM and terminfo provide portability across terminals. |
| Curses/ncurses Abstractions | Window/pad model and optimized screen updates. |
| Modern TUI Architectures | MVU, immediate mode rendering, and CSS-driven styling. |
| Concurrency & External Integration | Async I/O, subprocess handling, and LSP framing. |
Project-to-Concept Map
| Project | Concepts Applied |
|---|---|
| Project 1 | Terminal Control Model, Rendering & Diffing |
| Project 2 | Input Modes & Key Decoding |
| Project 3 | Capability Negotiation (terminfo) |
| Project 4 | Rendering & Diffing |
| Project 5 | Curses/ncurses Abstractions, Input Modes |
| Project 6 | Curses/ncurses Abstractions, Capability Negotiation |
| Project 7 | Curses/ncurses Abstractions, Input Modes |
| Project 8 | Modern TUI Architectures |
| Project 9 | Modern TUI Architectures, Rendering & Diffing |
| Project 10 | Modern TUI Architectures, Input Modes |
| Project 11 | Concurrency & External Integration |
| Project 12 | Concurrency & External Integration, Modern TUI Architectures |
Deep Dive Reading by Concept
| Concept | Book and Chapter | Why This Matters |
|---|---|---|
| Terminal Control Model | “The Linux Programming Interface” - Ch. 62 | Terminal I/O fundamentals and control sequences. |
| Input Modes & Key Decoding | “Advanced Programming in the UNIX Environment” - Ch. 18 | Canonical vs raw input behavior. |
| Rendering & Diffing | “Clean Architecture” - Ch. 4-5 | Deterministic separation of state and view. |
| Capability Negotiation (terminfo) | “The Linux Programming Interface” - Ch. 62 | Portability across terminals. |
| Curses/ncurses Abstractions | “Advanced Programming in the UNIX Environment” - Ch. 18 | Terminal I/O context for curses. |
| Modern TUI Architectures | “The Pragmatic Programmer” - Ch. 2 | Managing state and reducing complexity. |
| Concurrency & External Integration | “Operating Systems: Three Easy Pieces” - Concurrency chapters | Safe event loops and async design. |
Quick Start: Your First 48 Hours
Day 1:
- Read Theory Primer Chapters 1-2.
- Start Project 1 and get the ANSI painting output working.
Day 2:
- Validate Project 1 against Definition of Done.
- Read Chapters 3-4 and begin Project 2.
Recommended Learning Paths
Path 1: The Beginner
- Project 1 -> Project 2 -> Project 3 -> Project 5 -> Project 6
Path 2: The Systems Programmer
- Project 2 -> Project 4 -> Project 5 -> Project 7 -> Project 11
Path 3: The Modern Framework Builder
- Project 8 -> Project 9 -> Project 10 -> Project 12
Path 4: The Full Sprint
- Project 1 through Project 12 in order
Success Metrics
- You can explain how a byte stream becomes a rendered terminal screen.
- You can implement a raw input decoder and handle resize events.
- You can build at least one TUI using curses and one using a modern MVU framework.
- You can integrate an external protocol (LSP or log stream) without blocking the UI.
Project Overview Table
| # | Project | Difficulty | Time | Focus |
|---|---|---|---|---|
| 1 | ANSI Paint and Cursor Lab | Level 1 | Weekend | Raw control sequences |
| 2 | Raw Key Decoder | Level 2 | Weekend | termios input modes |
| 3 | Terminal Capability Explorer | Level 2 | Weekend | terminfo portability |
| 4 | Screen Diff Renderer | Level 2 | 1 week | diff-based rendering |
| 5 | ncurses Process Dashboard | Level 3 | 1-2 weeks | window management |
| 6 | menuconfig Config Editor | Level 3 | 1-2 weeks | complex interactions |
| 7 | Form Wizard with Validation | Level 3 | 1-2 weeks | input and forms |
| 8 | Bubble Tea Git Client | Level 3 | 2-3 weeks | MVU architecture |
| 9 | Ratatui System Monitor | Level 3 | 2-3 weeks | immediate mode |
| 10 | Textual File Explorer | Level 3 | 2-3 weeks | widgets + CSS |
| 11 | Async Log Monitor | Level 4 | 2-3 weeks | async I/O |
| 12 | TUI IDE with LSP | Level 5 | 4-6 weeks | protocol integration |
Project List
The following projects guide you from raw terminal manipulation to full-featured, modern TUIs.
Project 1: ANSI Paint and Cursor Lab
- File: P01-ansi-paint-and-cursor-lab.md
- Main Programming Language: Python
- Alternative Programming Languages: C, Go, Rust
- Coolness Level: Level 2: Practical but Forgettable (REFERENCE.md)
- Business Potential: Level 1: Resume Gold (REFERENCE.md)
- Difficulty: Level 1: Beginner (REFERENCE.md)
- Knowledge Area: Terminal Control, Rendering
- Software or Tool: None (raw terminal)
- Main Book: “The Linux Programming Interface” by Michael Kerrisk
What you will build: A tiny paint program that moves a cursor and draws colored blocks using raw control sequences.
Why it teaches TUI programming: You directly manipulate cursor position, colors, and screen clearing without any library.
Core challenges you will face:
- Building a cursor model -> Terminal Control Model
- Handling arrow key input -> Input Modes & Key Decoding
- Avoiding flicker -> Rendering & Diffing
Real World Outcome
You launch a program that displays a blank grid. Arrow keys move a visible cursor. Pressing Space toggles a cell to a colored block. The screen updates without scrolling or flicker.
$ ./ansi-paint
[ANSI Paint]
Use arrows to move, Space to draw, Q to quit

+------------------------------+
| . . . . . . . . . . . . . . |
| . . . . . . . . . . . . . . |
| . . . . . . . . . . . . . . |
| . . . . . . . . . . . . . . |
+------------------------------+
ASCII layout:
[Header]
[Grid 20x40]
[Footer: controls]
The Core Question You Are Answering
“How do bytes become a live, interactive terminal screen?”
This question forces you to connect control sequences, cursor state, and rendering.
Concepts You Must Understand First
- ECMA-48 Control Sequences
- What is CSI and why is ESC the prefix?
- Book Reference: “The Linux Programming Interface” - Ch. 62
- Raw Input vs Canonical Input
- Why does canonical mode block keypresses?
- Book Reference: “Advanced Programming in the UNIX Environment” - Ch. 18
- Frame vs Cell Rendering
- Why is full-screen redraw inefficient?
- Book Reference: “Clean Architecture” - Ch. 4-5
Questions to Guide Your Design
- Rendering
- How will you store the grid state (2D array, map)?
- How will you redraw only changed cells?
- Input
- How will you decode arrow keys from escape sequences?
- How will you handle a standalone ESC vs an escape sequence?
Thinking Exercise
Draw the Cursor State Machine
Sketch how the cursor moves and how a draw command toggles a cell.
Questions to answer:
- What happens at the grid boundaries?
- How do you prevent the cursor from leaving the grid?
The Interview Questions They Will Ask
- “Explain how ANSI escape sequences move the cursor.”
- “Why does raw mode matter for TUIs?”
- “What causes flicker in a terminal UI?”
- “How would you test a terminal renderer?”
- “How do you restore terminal state after exit?”
Hints in Layers
Hint 1: Start with a static grid Draw a fixed grid and verify you can position the cursor with absolute coordinates.
Hint 2: Track cursor state Store cursor position in variables and update them on arrow keys.
Hint 3: Pseudocode for redraw
if cell_changed:
  move_cursor(x, y)
  write(cell_glyph)
Hint 4: Debugging Add a key that prints the current cursor coordinates in the footer.
Books That Will Help
| Topic | Book | Chapter |
|---|---|---|
| Terminal I/O | “The Linux Programming Interface” | Ch. 62 |
| Input handling | “Advanced Programming in the UNIX Environment” | Ch. 18 |
Common Pitfalls and Debugging
Problem 1: “Screen scrolls instead of updating”
- Why: You are printing newlines instead of moving the cursor.
- Fix: Use cursor positioning sequences or library equivalents.
- Quick test: Draw a header and rewrite it in place.
Definition of Done
- Cursor moves correctly with arrow keys
- Draw command toggles cells without scrolling
- Terminal state is restored on exit
- Flicker-free redraw
Project 2: Raw Key Decoder
- File: P02-raw-key-decoder.md
- Main Programming Language: C
- Alternative Programming Languages: Rust, Go, Python
- Coolness Level: Level 2: Practical but Forgettable (REFERENCE.md)
- Business Potential: Level 1: Resume Gold (REFERENCE.md)
- Difficulty: Level 2: Intermediate (REFERENCE.md)
- Knowledge Area: Input Handling
- Software or Tool: termios
- Main Book: “Advanced Programming in the UNIX Environment”
What you will build: A tool that prints decoded key events (arrow keys, function keys, Ctrl combos).
Why it teaches TUI programming: It forces you to implement the raw input pipeline used by every TUI.
Core challenges you will face:
- Switching to raw mode safely -> Input Modes & Key Decoding
- Escape sequence parsing -> Input Modes & Key Decoding
- Timeout handling -> Concurrency & External Integration
Real World Outcome
$ ./key-decoder
Press keys (Q to quit)

KEY: UP
KEY: DOWN
KEY: CTRL+C
KEY: ESC
KEY: F5
ASCII layout:
[Live key log]
[Footer: last sequence bytes]
The Core Question You Are Answering
“What exactly reaches my program when I press a key?”
Concepts You Must Understand First
- Canonical vs Non-Canonical Input
- When does
read()return? - Book Reference: “Advanced Programming in the UNIX Environment” - Ch. 18
- When does
- Escape Sequence Parsing
- Why do arrow keys start with ESC?
- Book Reference: “The Linux Programming Interface” - Ch. 62
- State Machines
- How do you parse a stream incrementally?
- Book Reference: “Algorithms, Fourth Edition” - Ch. 1
Questions to Guide Your Design
- Parsing
- How will you handle partial sequences?
- What timeout will distinguish ESC vs ESC+[?
- Output
- How will you log raw bytes vs decoded events?
Thinking Exercise
Build the Key Decoder FSM
Draw states for NORMAL, ESC_SEEN, CSI_SEEN.
Questions to answer:
- What happens if you get ESC then a regular letter?
- When do you reset to NORMAL?
The Interview Questions They Will Ask
- “Explain canonical vs non-canonical input.”
- “Why are arrow keys multi-byte sequences?”
- “How would you parse a streaming protocol?”
- “How do you avoid blocking the UI?”
- “Why must terminal state be restored?”
Hints in Layers
Hint 1: Log raw bytes Print hex codes of every input byte first.
Hint 2: Recognize ESC + ‘[’ sequences Build a small parser that waits for a final byte.
Hint 3: Pseudocode
if b == ESC: state = ESC_SEEN
elif state == ESC_SEEN and b == '[': state = CSI
Hint 4: Debugging Add a timeout counter to reset state if no byte arrives.
Books That Will Help
| Topic | Book | Chapter |
|---|---|---|
| Terminal I/O | “Advanced Programming in the UNIX Environment” | Ch. 18 |
| Parsing streams | “Algorithms, Fourth Edition” | Ch. 1 |
Common Pitfalls and Debugging
Problem 1: “ESC key never registers”
- Why: You always treat ESC as the start of a sequence.
- Fix: Add a timeout to treat ESC as standalone.
- Quick test: Press ESC alone and ensure it logs.
Definition of Done
- Raw mode enabled and restored correctly
- Arrow keys decode consistently
- ESC alone is recognized
- No UI freeze on rapid key input
Project 3: Terminal Capability Explorer
- File: P03-terminal-capability-explorer.md
- Main Programming Language: Python
- Alternative Programming Languages: C, Go, Rust
- Coolness Level: Level 2: Practical but Forgettable (REFERENCE.md)
- Business Potential: Level 2: Micro-SaaS (REFERENCE.md)
- Difficulty: Level 2: Intermediate (REFERENCE.md)
- Knowledge Area: Portability
- Software or Tool: terminfo,
infocmp,tput - Main Book: “The Linux Programming Interface”
What you will build: A CLI tool that inspects TERM and prints supported capabilities.
Why it teaches TUI programming: You learn how portability is negotiated at runtime.
Core challenges you will face:
- Reading terminfo entries -> Capability Negotiation
- Mapping capabilities to features -> Terminal Control Model
- Graceful fallback -> Rendering & Diffing
Real World Outcome
$ ./termcap-explorer
TERM: xterm-256color
Capabilities:
- colors: 256
- clear: supported
- cursor_visibility: supported
- alternate_screen: supported

Recommendation: enable color + alternate screen
ASCII layout:
[TERM info]
[Capability list]
[Recommended feature set]
The Core Question You Are Answering
“How does a TUI know what a terminal can actually do?”
Concepts You Must Understand First
- terminfo database
- What is stored in a terminfo entry?
- Book Reference: “The Linux Programming Interface” - Ch. 62
- Capability-based design
- Why avoid hardcoding sequences?
- Book Reference: “Clean Architecture” - Ch. 4
Questions to Guide Your Design
- Data Model
- How will you represent capability values?
- How will you categorize features (color, cursor, input)?
- User Output
- How will you present recommendations to the user?
Thinking Exercise
Design a Feature Matrix
List 5 features a TUI might use and mark them optional/required.
Questions to answer:
- Which features can be safely disabled?
- Which features require alternate implementations?
The Interview Questions They Will Ask
- “What is terminfo and why is it used?”
- “How does TERM impact portability?”
- “How do you handle missing capabilities?”
- “Why is hardcoding escape sequences risky?”
- “What is a graceful fallback strategy?”
Hints in Layers
Hint 1: Start with tput
Use tput as a baseline for capability checks.
Hint 2: Parse infocmp output
Build a simple parser for key=value capabilities.
Hint 3: Pseudocode
cap = lookup("colors")
if cap >= 256: enable_extended_color()
Hint 4: Debugging
Test under TERM=vt100 and compare output.
Books That Will Help
| Topic | Book | Chapter |
|---|---|---|
| Terminal portability | “The Linux Programming Interface” | Ch. 62 |
| Defensive design | “Clean Architecture” | Ch. 4 |
Common Pitfalls and Debugging
Problem 1: “Capabilities always empty”
- Why: TERM is unset or incorrect.
- Fix: Print TERM and verify it matches your terminal.
- Quick test: Compare with
infocmpin the shell.
Definition of Done
- TERM and terminfo entry detected
- Capability list produced
- Recommendations generated
- Verified under at least two TERM values
Project 4: Screen Diff Renderer
- File: P04-screen-diff-renderer.md
- Main Programming Language: Go
- Alternative Programming Languages: Rust, C, Python
- Coolness Level: Level 3: Genuinely Clever (REFERENCE.md)
- Business Potential: Level 1: Resume Gold (REFERENCE.md)
- Difficulty: Level 2: Intermediate (REFERENCE.md)
- Knowledge Area: Rendering
- Software or Tool: None (raw terminal)
- Main Book: “Clean Architecture”
What you will build: A small rendering engine that diffs two frames and emits minimal updates.
Why it teaches TUI programming: It teaches the core optimization behind all TUI libraries.
Core challenges you will face:
- Frame representation -> Rendering & Diffing
- Diff algorithm -> Rendering & Diffing
- Cursor movement minimization -> Terminal Control Model
Real World Outcome
$ ./diff-renderer --demo
Frame 1 rendered in 120 writes
Frame 2 rendered in 14 writes (diffed)
ASCII layout:
[Frame stats]
[Mini grid demo]
The Core Question You Are Answering
“How do I update a terminal screen without redrawing everything?”
Concepts You Must Understand First
- Screen buffers
- How to represent cells with glyph + style?
- Book Reference: “Clean Architecture” - Ch. 4
- Cursor control
- How do cursor moves affect output size?
- Book Reference: “The Linux Programming Interface” - Ch. 62
Questions to Guide Your Design
- Diff granularity
- Will you diff by cell or by runs?
- How will you handle style changes?
- Optimization
- When do you skip cursor movement?
- How do you handle unchanged rows?
Thinking Exercise
Design a Run-Length Diff
Sketch how to group contiguous changed cells into runs.
Questions to answer:
- What is the worst-case output size?
- How do you prevent redundant style resets?
The Interview Questions They Will Ask
- “What is double buffering in a TUI?”
- “Why does diffing reduce flicker?”
- “What is damage tracking?”
- “How do you minimize cursor moves?”
- “What is the complexity of your diff algorithm?”
Hints in Layers
Hint 1: Start with full redraw Make it correct first, then optimize with diffing.
Hint 2: Track previous frame Store last frame in memory and compare.
Hint 3: Pseudocode
for each row:
  find contiguous changed cells -> emit one move + write
Hint 4: Debugging Add a mode that prints diff regions for inspection.
Books That Will Help
| Topic | Book | Chapter |
|---|---|---|
| Rendering design | “Clean Architecture” | Ch. 4-5 |
| Terminal control | “The Linux Programming Interface” | Ch. 62 |
Common Pitfalls and Debugging
Problem 1: “Cursor jumps unpredictably”
- Why: Missing cursor position tracking.
- Fix: Track last cursor position and avoid implicit moves.
- Quick test: Render a single updated cell repeatedly.
Definition of Done
- Correct diff output for changed cells
- Reduced writes vs full redraw
- No flicker in demo loop
- Handles terminal resize
Project 5: ncurses Process Dashboard
- File: P05-ncurses-process-dashboard.md
- Main Programming Language: C
- Alternative Programming Languages: Python (curses), Rust (ncurses)
- Coolness Level: Level 3: Genuinely Clever (REFERENCE.md)
- Business Potential: Level 2: Micro-SaaS (REFERENCE.md)
- Difficulty: Level 3: Advanced (REFERENCE.md)
- Knowledge Area: Curses UI
- Software or Tool: ncurses
- Main Book: “Advanced Programming in the UNIX Environment”
What you will build: A top-like dashboard showing process list, CPU, and memory.
Why it teaches TUI programming: You manage windows, periodic refresh, and input within curses.
Core challenges you will face:
- Window layout -> Curses/ncurses Abstractions
- Periodic refresh loop -> Rendering & Diffing
- Input handling -> Input Modes & Key Decoding
Real World Outcome
$ ./proc-dashboard
CPU: 12%  MEM: 3.2GB/16GB  Uptime: 2d 03:12

PID   CPU%  MEM%  CMD
1234  5.1   1.2   postgres
2345  1.0   0.4   sshd
...
ASCII layout:
[Header stats]
[Table: processes]
[Footer: q to quit, s to sort]
The Core Question You Are Answering
“How do curses windows and refresh cycles map to real-time dashboards?”
Concepts You Must Understand First
- Curses windows
- How do windows map to screen regions?
- Book Reference: “Advanced Programming in the UNIX Environment” - Ch. 18
- Event loop
- How do you mix timer refreshes and input?
- Book Reference: “Operating Systems: Three Easy Pieces” - Concurrency chapters
Questions to Guide Your Design
- Layout
- How will you split header and table windows?
- How will you handle terminal resize?
- Data refresh
- How frequently will you poll process data?
- How will you avoid flicker on updates?
Thinking Exercise
Design the Refresh Cycle
Sketch a loop that alternates between input and refresh without blocking.
Questions to answer:
- What is your target refresh rate?
- How do you avoid missing keystrokes?
The Interview Questions They Will Ask
- “What is a curses window?”
- “How does curses optimize redraws?”
- “How do you handle terminal resize?”
- “What is the difference between cbreak and raw?”
- “How do you keep input responsive?”
Hints in Layers
Hint 1: Start with a static table Draw a fixed header and dummy rows.
Hint 2: Add refresh loop Update values every second.
Hint 3: Pseudocode
loop:
  if input: handle
  if timer: update data, refresh windows
Hint 4: Debugging Add a counter to confirm refresh frequency.
Books That Will Help
| Topic | Book | Chapter |
|---|---|---|
| Terminal I/O | “Advanced Programming in the UNIX Environment” | Ch. 18 |
| System info | “The Linux Programming Interface” | Ch. 12 |
Common Pitfalls and Debugging
Problem 1: “Screen flickers”
- Why: Full redraw without curses diffing.
- Fix: Use curses windows and refresh, avoid clear.
- Quick test: Toggle between two values without clearing.
Definition of Done
- Processes listed with stable refresh
- Sorting works (CPU, MEM)
- No flicker under continuous updates
- Exits cleanly and restores terminal
Project 6: menuconfig-Style Configuration Editor
- File: P06-menuconfig-config-editor.md
- Main Programming Language: C
- Alternative Programming Languages: C++, Rust
- Coolness Level: Level 3: Genuinely Clever (REFERENCE.md)
- Business Potential: Level 2: Micro-SaaS (REFERENCE.md)
- Difficulty: Level 3: Advanced (REFERENCE.md)
- Knowledge Area: UI State Management
- Software or Tool: ncurses
- Main Book: “Advanced Programming in the UNIX Environment”
What you will build: A menu-driven config editor with nested menus and toggles.
Why it teaches TUI programming: It forces you to manage complex state and input flows.
Core challenges you will face:
- Menu tree modeling -> Data Structures
- Input navigation -> Input Modes & Key Decoding
- UI redraw logic -> Curses/ncurses Abstractions
Real World Outcome
$ ./menuconfig
[Networking]  --->
[ ] Enable IPv6
[ ] Enable VPN
( ) Routing Mode: static

Press Enter to open, Space to toggle
ASCII layout:
[Menu tree]
[Options pane]
[Footer help]
The Core Question You Are Answering
“How do I model and render complex, nested UI state?”
Concepts You Must Understand First
- Tree structures
- How do you represent nested menus?
- Book Reference: “Algorithms, Fourth Edition” - Ch. 4
- Curses input handling
- How do arrow keys map to selection?
- Book Reference: “Advanced Programming in the UNIX Environment” - Ch. 18
Questions to Guide Your Design
- State model
- How will you store selected menu item?
- How do you persist values?
- Navigation
- How do you handle entering/exiting submenus?
Thinking Exercise
Draw the Menu Tree
Sketch a tree of menu items and how selection moves.
Questions to answer:
- How will you represent different item types?
- How do you maintain focus?
The Interview Questions They Will Ask
- “How would you design a menu tree?”
- “How do you handle multiple widget types?”
- “What is the difference between selection and focus?”
- “How do you persist config values?”
- “How would you test menu navigation?”
Hints in Layers
Hint 1: Start with a flat list Render one list and allow arrow navigation.
Hint 2: Add nesting Use a stack for menu history.
Hint 3: Pseudocode
if key == ENTER: push submenu
if key == BACK: pop menu
Hint 4: Debugging Show the current path in the header.
Books That Will Help
| Topic | Book | Chapter |
|---|---|---|
| Data structures | “Algorithms, Fourth Edition” | Ch. 1-3 |
| Terminal I/O | “Advanced Programming in the UNIX Environment” | Ch. 18 |
Common Pitfalls and Debugging
Problem 1: “Selection jumps after redraw”
- Why: Selection index not preserved.
- Fix: Store selection in state, not in the UI.
- Quick test: Toggle a value and verify selection stays.
Definition of Done
- Nested menus work
- Options persist to file
- All widget types render correctly
- Keyboard navigation is consistent
Project 7: Curses Form Wizard with Validation
- File: P07-curses-form-wizard.md
- Main Programming Language: C
- Alternative Programming Languages: Python, Rust
- Coolness Level: Level 3: Genuinely Clever (REFERENCE.md)
- Business Potential: Level 2: Micro-SaaS (REFERENCE.md)
- Difficulty: Level 3: Advanced (REFERENCE.md)
- Knowledge Area: Input Forms
- Software or Tool: ncurses
- Main Book: “Advanced Programming in the UNIX Environment”
What you will build: A multi-step form wizard with validation and error messages.
Why it teaches TUI programming: It forces precise input handling and UI feedback.
Core challenges you will face:
- Field focus and validation -> Input Modes & Key Decoding
- Error display -> Rendering & Diffing
- Form state management -> Curses/ncurses Abstractions
Real World Outcome
$ ./form-wizard
Step 1/3: User Info
Name: [__________]
Email: [__________]

Errors:
- Email must contain '@'
ASCII layout:
[Step header]
[Form fields]
[Error box]
The Core Question You Are Answering
“How do I build reliable, keyboard-first forms in a terminal?”
Concepts You Must Understand First
- Input focus management
- How do you switch between fields?
- Book Reference: “Advanced Programming in the UNIX Environment” - Ch. 18
- Validation logic
- Where does validation belong: input layer or state layer?
- Book Reference: “Clean Architecture” - Ch. 4
Questions to Guide Your Design
- Form model
- How do you represent field values and errors?
- How do you store which field is active?
- User feedback
- How will you display errors without breaking layout?
Thinking Exercise
Design Focus Movement
Draw the focus order and describe Tab/Shift+Tab behavior.
Questions to answer:
- How do you handle enter vs tab?
- What happens on invalid input?
The Interview Questions They Will Ask
- “How do you manage focus in a TUI?”
- “Where should validation logic live?”
- “How do you display errors without flicker?”
- “How would you test form input?”
- “How do you support keyboard shortcuts?”
Hints in Layers
Hint 1: Start with one field Implement a single text field and cursor movement.
Hint 2: Add focus switching Store an index of active field.
Hint 3: Pseudocode
if key == TAB: focus = (focus + 1) % fields
Hint 4: Debugging Show the active field index in a hidden debug bar.
Books That Will Help
| Topic | Book | Chapter |
|---|---|---|
| Input handling | “Advanced Programming in the UNIX Environment” | Ch. 18 |
| UI design | “Clean Architecture” | Ch. 4-5 |
Common Pitfalls and Debugging
Problem 1: “Input overwrites adjacent fields”
- Why: Field width not enforced.
- Fix: Clip input to field width.
- Quick test: Enter a long string and verify layout.
Definition of Done
- Field navigation works
- Validation errors display correctly
- Completed form outputs a summary
- Terminal state restored on exit
Project 8: Bubble Tea Git Client
- File: P08-bubble-tea-git-client.md
- Main Programming Language: Go
- Alternative Programming Languages: Rust (Ratatui), Python (Textual)
- Coolness Level: Level 4: Hardcore Tech Flex (REFERENCE.md)
- Business Potential: Level 2: Micro-SaaS (REFERENCE.md)
- Difficulty: Level 3: Advanced (REFERENCE.md)
- Knowledge Area: MVU Architecture
- Software or Tool: Bubble Tea, Git CLI
- Main Book: “Clean Architecture”
What you will build: A multi-pane TUI Git client with staged/unstaged panels and commit view.
Why it teaches TUI programming: It forces MVU modeling, async commands, and complex layout.
Core challenges you will face:
- MVU state model -> Modern TUI Architectures
- Async Git commands -> Concurrency & External Integration
- Layout composition -> Rendering & Diffing
Real World Outcome
$ ./tui-git
[Status]   [Staged]      [Recent Commits]
M  main.go  + README.md  1a2b3c Fix render bug
A  new.txt                ...

Keys: s=stage, c=commit, q=quit
ASCII layout:
[Left: working tree]
[Middle: staged]
[Right: commits]
[Footer: keybindings]
The Core Question You Are Answering
“How does MVU make complex TUI state predictable?”
Concepts You Must Understand First
- MVU pattern
- How do Model, Update, View interact?
- Book Reference: “Clean Architecture” - Ch. 4-5
- Async commands
- How do you run Git commands without blocking UI?
- Book Reference: “Operating Systems: Three Easy Pieces” - Concurrency chapters
Questions to Guide Your Design
- State modeling
- How do you represent panes and selection?
- Where do you store Git status data?
- Command execution
- How do you handle command failures?
- How often do you refresh status?
Thinking Exercise
Map MVU Events
List the messages that update your model (Stage, Commit, Refresh).
Questions to answer:
- What data must be immutable?
- Where do errors appear in the UI?
The Interview Questions They Will Ask
- “What is MVU and why is it useful?”
- “How do you handle async commands in a UI?”
- “How do you model multi-pane state?”
- “How do you avoid inconsistent UI updates?”
- “What is the role of the view function?”
Hints in Layers
Hint 1: Start with a static view Render three panes with dummy data.
Hint 2: Implement a model struct Store selections and lists.
Hint 3: Pseudocode
Update(msg):
  if msg == Refresh: model.status = run_git()
Hint 4: Debugging Log state transitions to a file.
Books That Will Help
| Topic | Book | Chapter |
|---|---|---|
| Architecture | “Clean Architecture” | Ch. 4-5 |
| Concurrency | “Operating Systems: Three Easy Pieces” | Concurrency |
Common Pitfalls and Debugging
Problem 1: “UI freezes during Git commands”
- Why: Commands run in the main thread.
- Fix: Run commands asynchronously and send results as messages.
- Quick test: Add a spinner while commands run.
Definition of Done
- Panes render correctly
- Stage/commit operations work
- UI remains responsive during Git commands
- Errors displayed without crash
Project 9: Ratatui System Monitor
- File: P09-ratatui-system-monitor.md
- Main Programming Language: Rust
- Alternative Programming Languages: Go, C
- Coolness Level: Level 4: Hardcore Tech Flex (REFERENCE.md)
- Business Potential: Level 2: Micro-SaaS (REFERENCE.md)
- Difficulty: Level 3: Advanced (REFERENCE.md)
- Knowledge Area: Immediate Mode UI
- Software or Tool: Ratatui
- Main Book: “Rust in Action”
What you will build: A system monitor with charts and gauges in an immediate-mode style.
Why it teaches TUI programming: It demonstrates immediate-mode rendering and layout constraints.
Core challenges you will face:
- Immediate mode draw loop -> Modern TUI Architectures
- Layout constraints -> Rendering & Diffing
- Async metrics collection -> Concurrency & External Integration
Real World Outcome
$ ./ratatui-monitor
CPU [||||||||||------] 68%
MEM [||||||----------] 32%
NET  rx: 12MB/s  tx: 3MB/s
ASCII layout:
[Top: CPU/MEM gauges]
[Middle: charts]
[Bottom: logs]
The Core Question You Are Answering
“How does immediate-mode rendering change UI design decisions?”
Concepts You Must Understand First
- Immediate mode rendering
- Why redraw every frame?
- Book Reference: “Rust in Action” - Ch. on systems I/O
- Layout constraints
- How do you split terminal regions?
- Book Reference: “Clean Architecture” - Ch. 4
Questions to Guide Your Design
- Draw pipeline
- What is the order of drawing widgets?
- How do you avoid re-computing heavy data per frame?
- Metrics
- How do you sample CPU/memory without blocking?
Thinking Exercise
Design the Frame
Draw a grid of widgets and decide the layout constraints.
Questions to answer:
- How do you handle narrow terminals?
- Which widgets are optional?
The Interview Questions They Will Ask
- “What is immediate mode rendering?”
- “How does it differ from retained mode?”
- “How do you keep the UI responsive?”
- “What are layout constraints in TUIs?”
- “How do you optimize redraws?”
Hints in Layers
Hint 1: Start with a single widget Render a static gauge first.
Hint 2: Add a draw loop Redraw on a timer tick.
Hint 3: Pseudocode
loop:
  state = sample_metrics()
  draw(state)
Hint 4: Debugging Add a frame counter to verify redraws.
Books That Will Help
| Topic | Book | Chapter |
|---|---|---|
| Rust systems I/O | “Rust in Action” | Ch. 5-7 |
| Architecture | “Clean Architecture” | Ch. 4 |
Common Pitfalls and Debugging
Problem 1: “High CPU usage”
- Why: Render loop too fast.
- Fix: Cap frame rate to a reasonable value.
- Quick test: Measure CPU with top.
Definition of Done
- Immediate-mode draw loop implemented
- Metrics update without blocking
- Layout adapts to terminal size
- UI remains responsive
Project 10: Textual File Explorer
- File: P10-textual-file-explorer.md
- Main Programming Language: Python
- Alternative Programming Languages: Go (Bubble Tea), Rust (Ratatui)
- Coolness Level: Level 4: Hardcore Tech Flex (REFERENCE.md)
- Business Potential: Level 2: Micro-SaaS (REFERENCE.md)
- Difficulty: Level 3: Advanced (REFERENCE.md)
- Knowledge Area: Widget-based UI
- Software or Tool: Textual
- Main Book: “Fluent Python”
What you will build: A multi-pane file explorer with directory tree, file list, and preview.
Why it teaches TUI programming: It introduces widget composition, CSS styling, and reactive updates.
Core challenges you will face:
- Widget composition -> Modern TUI Architectures
- Reactive updates -> Modern TUI Architectures
- Async file I/O -> Concurrency & External Integration
Real World Outcome
$ ./textual-explorer
[Tree]          [File List]          [Preview]
/home/user      main.py              def main():
  projects      README.md            ...
ASCII layout:
[Left: tree]
[Center: list]
[Right: preview]
The Core Question You Are Answering
“How do widget trees and reactive state simplify TUI development?”
Concepts You Must Understand First
- Textual CSS
- How do styles apply to widgets?
- Book Reference: “Fluent Python” - Ch. on descriptors
- Reactive attributes
- How do updates propagate automatically?
- Book Reference: “Fluent Python” - Ch. on descriptors
Questions to Guide Your Design
- UI structure
- Which widgets represent tree, list, preview?
- How do you layout them in CSS?
- Data flow
- How do you load file contents without blocking?
- How do you debounce rapid navigation?
Thinking Exercise
Design the Widget Tree
Sketch a DOM tree of widgets.
Questions to answer:
- Where do you mount new widgets?
- Which widget owns focus?
The Interview Questions They Will Ask
- “What is a reactive attribute?”
- “How does CSS styling work in Textual?”
- “How do you handle async file reads?”
- “How do you manage focus between widgets?”
- “How does Textual differ from curses?”
Hints in Layers
Hint 1: Start with a static layout Build three panes with placeholder text.
Hint 2: Add reactive state Update preview when selection changes.
Hint 3: Pseudocode
on_select(path):
  preview = read_file_async(path)
Hint 4: Debugging Use Textual dev console to inspect widget tree.
Books That Will Help
| Topic | Book | Chapter |
|---|---|---|
| Python descriptors | “Fluent Python” | Ch. 23 |
| UI composition | “Clean Architecture” | Ch. 4 |
Common Pitfalls and Debugging
Problem 1: “UI freezes on large files”
- Why: File reads are synchronous.
- Fix: Use background workers for preview loading.
- Quick test: Open a large log file and verify responsiveness.
Definition of Done
- Tree navigation works
- File list updates with selection
- Preview loads asynchronously
- CSS styling applied correctly
Project 11: Async Log Monitor
- File: P11-async-log-monitor.md
- Main Programming Language: Rust
- Alternative Programming Languages: Go, Python
- Coolness Level: Level 4: Hardcore Tech Flex (REFERENCE.md)
- Business Potential: Level 3: Service & Support (REFERENCE.md)
- Difficulty: Level 4: Expert (REFERENCE.md)
- Knowledge Area: Async I/O
- Software or Tool: tokio or async runtime
- Main Book: “Operating Systems: Three Easy Pieces”
What you will build: A log monitor that tails files, filters lines, and highlights matches.
Why it teaches TUI programming: It forces non-blocking I/O and responsive rendering.
Core challenges you will face:
- Async file tailing -> Concurrency & External Integration
- Backpressure handling -> Concurrency & External Integration
- Rendering log streams -> Rendering & Diffing
Real World Outcome
$ ./log-monitor --follow /var/log/system.log --filter ERROR
[12:01:03] ERROR Failed to connect to db
[12:01:07] ERROR Timeout waiting for response

Status: 2 errors, 0 warnings (live)
ASCII layout:
[Log pane]
[Filter status]
[Footer controls]
The Core Question You Are Answering
“How do I keep a TUI responsive under continuous streaming input?”
Concepts You Must Understand First
- Async event loop
- How do you multiplex input, timers, and I/O?
- Book Reference: “Operating Systems: Three Easy Pieces” - Concurrency
- Rendering diff
- How do you update logs without flicker?
- Book Reference: “Clean Architecture” - Ch. 4
Questions to Guide Your Design
- Buffering
- How many lines will you keep in memory?
- What happens when buffer is full?
- Filtering
- How do you apply filters in real time?
- How do you highlight matches?
Thinking Exercise
Design a Backpressure Strategy
Decide how to handle bursts of log lines.
Questions to answer:
- Do you drop old lines or slow input?
- How do you notify the user?
The Interview Questions They Will Ask
- “How do you avoid blocking the UI with I/O?”
- “What is backpressure?”
- “How do you render a moving window of data?”
- “How do you highlight matches efficiently?”
- “How do you handle file rotation?”
Hints in Layers
Hint 1: Start with a fixed buffer Keep the last N lines only.
Hint 2: Add async tailing Read new lines in a background task.
Hint 3: Pseudocode
if new_line: buffer.push(line); if buffer.size > N: pop_oldest()
Hint 4: Debugging Simulate bursts with a test log generator.
Books That Will Help
| Topic | Book | Chapter |
|---|---|---|
| Concurrency | “Operating Systems: Three Easy Pieces” | Concurrency |
| Architecture | “Clean Architecture” | Ch. 4 |
Common Pitfalls and Debugging
Problem 1: “Log tailing stalls”
- Why: Blocking read in main loop.
- Fix: Move I/O to async task.
- Quick test: Keep typing commands while tailing.
Definition of Done
- Live tailing works
- Filters apply in real time
- UI remains responsive under load
- File rotation handled safely
Project 12: TUI IDE with LSP
- File: P12-tui-ide-with-lsp.md
- Main Programming Language: Rust or Python
- Alternative Programming Languages: Go, C++
- Coolness Level: Level 5: Pure Magic (REFERENCE.md)
- Business Potential: Level 3: Service & Support (REFERENCE.md)
- Difficulty: Level 5: Master (REFERENCE.md)
- Knowledge Area: Protocol Integration
- Software or Tool: Language Server Protocol
- Main Book: “Operating Systems: Three Easy Pieces”
What you will build: A minimal terminal IDE with file explorer, editor pane, and diagnostics panel using LSP.
Why it teaches TUI programming: It combines rendering, input, async I/O, and protocol parsing.
Core challenges you will face:
- LSP framing and JSON-RPC -> Concurrency & External Integration
- Text editing model -> Rendering & Diffing
- Multi-pane layout -> Modern TUI Architectures
Real World Outcome
$ ./tui-ide project/
[Explorer]   [Editor]                [Diagnostics]
main.py      def foo():              1:1 unused import
             ...

Keys: Ctrl+S save, F12 go-to-def, q quit
ASCII layout:
[Left: file tree]
[Center: editor]
[Right: diagnostics]
[Footer: status]
The Core Question You Are Answering
“How do I integrate a real-world protocol into a responsive TUI?”
Concepts You Must Understand First
- LSP framing
- What is Content-Length and why is it required?
- Book Reference: “Operating Systems: Three Easy Pieces” - Concurrency
- Text buffer design
- How do you model cursor and selection?
- Book Reference: “Algorithms, Fourth Edition” - Ch. 1
Questions to Guide Your Design
- Protocol integration
- How will you parse and dispatch LSP messages?
- How will you queue outgoing requests?
- Editor model
- How will you support insert/delete efficiently?
- How will you keep diagnostics in sync?
Thinking Exercise
Design the LSP Message Pipeline
Sketch how bytes become JSON-RPC messages.
Questions to answer:
- How do you handle partial reads?
- How do you match responses to requests?
The Interview Questions They Will Ask
- “How does LSP framing work?”
- “What is JSON-RPC used for?”
- “How do you keep an editor responsive while waiting for LSP?”
- “How do you model cursor and selection?”
- “What happens when the server crashes?”
Hints in Layers
Hint 1: Start with a static editor Render a single file without LSP.
Hint 2: Add LSP handshake Implement initialize and shutdown messages.
Hint 3: Pseudocode
read_stream -> parse_headers -> parse_json -> dispatch
Hint 4: Debugging Log raw LSP messages to a file for inspection.
Books That Will Help
| Topic | Book | Chapter |
|---|---|---|
| Concurrency | “Operating Systems: Three Easy Pieces” | Concurrency |
| Text processing | “Algorithms, Fourth Edition” | Ch. 1 |
Common Pitfalls and Debugging
Problem 1: “LSP messages corrupted”
- Why: Content-Length parsing wrong.
- Fix: Buffer until full payload length is available.
- Quick test: Log header and payload sizes.
Definition of Done
- Editor renders with cursor movement
- LSP handshake succeeds
- Diagnostics display and update
- Clean shutdown restores terminal
Project Comparison Table
| Project | Difficulty | Time | Depth of Understanding | Fun Factor |
|---|---|---|---|---|
| 1. ANSI Paint | Level 1 | Weekend | Medium | 3/5 |
| 2. Raw Key Decoder | Level 2 | Weekend | Medium | 3/5 |
| 3. Capability Explorer | Level 2 | Weekend | Medium | 2/5 |
| 4. Screen Diff Renderer | Level 2 | 1 week | High | 4/5 |
| 5. ncurses Dashboard | Level 3 | 1-2 weeks | High | 4/5 |
| 6. menuconfig Editor | Level 3 | 1-2 weeks | High | 3/5 |
| 7. Form Wizard | Level 3 | 1-2 weeks | High | 3/5 |
| 8. Bubble Tea Git Client | Level 3 | 2-3 weeks | High | 4/5 |
| 9. Ratatui Monitor | Level 3 | 2-3 weeks | High | 4/5 |
| 10. Textual Explorer | Level 3 | 2-3 weeks | High | 4/5 |
| 11. Async Log Monitor | Level 4 | 2-3 weeks | Very High | 4/5 |
| 12. TUI IDE | Level 5 | 4-6 weeks | Maximum | 5/5 |
Recommendation
If you are new to TUI programming: Start with Project 1 to internalize control sequences. If you are a systems programmer: Start with Project 5 and work backwards for fundamentals. If you want to build modern apps fast: Start with Project 8 or Project 10.
Final Overall Project: Terminal Productivity Suite
The Goal: Combine Projects 8, 9, 10, and 12 into a cohesive terminal productivity suite with shared state and plugins.
- Build a shared event bus that routes input to active panes.
- Integrate Git client, file explorer, and editor into one multi-pane layout.
- Add a plugin system that lets new tools register panes.
Success Criteria: A unified TUI that supports Git operations, file browsing, editing with LSP diagnostics, and shared keybindings.
From Learning to Production: What Is Next
| Your Project | Production Equivalent | Gap to Fill |
|---|---|---|
| ANSI Paint | Terminal render engine | Testing + portability |
| ncurses Dashboard | htop | Performance + polish |
| Bubble Tea Git Client | lazygit | Git feature coverage |
| TUI IDE | Helix / Neovim | Plugin ecosystem |
Summary
This learning path covers TUI programming through 12 hands-on projects.
| # | Project Name | Main Language | Difficulty | Time Estimate |
|---|---|---|---|---|
| 1 | ANSI Paint | Python | Level 1 | Weekend |
| 2 | Raw Key Decoder | C | Level 2 | Weekend |
| 3 | Capability Explorer | Python | Level 2 | Weekend |
| 4 | Screen Diff Renderer | Go | Level 2 | 1 week |
| 5 | ncurses Dashboard | C | Level 3 | 1-2 weeks |
| 6 | menuconfig Editor | C | Level 3 | 1-2 weeks |
| 7 | Form Wizard | C | Level 3 | 1-2 weeks |
| 8 | Bubble Tea Git Client | Go | Level 3 | 2-3 weeks |
| 9 | Ratatui Monitor | Rust | Level 3 | 2-3 weeks |
| 10 | Textual Explorer | Python | Level 3 | 2-3 weeks |
| 11 | Async Log Monitor | Rust | Level 4 | 2-3 weeks |
| 12 | TUI IDE with LSP | Rust/Python | Level 5 | 4-6 weeks |
Expected Outcomes
- Understand terminal control and input processing at the byte level
- Build TUIs using curses and modern frameworks
- Integrate async I/O and external protocols
Additional Resources and References
Standards and Specifications
- ECMA-48 / ISO 6429 control functions standard
- termios(3) input processing reference
- Language Server Protocol 3.17 base protocol specification
- terminfo(5) capability database reference
Industry Analysis
- Stack Overflow Developer Survey 2025 technology data (Bash/Shell usage)
- Bubble Tea project README (ecosystem adoption examples)
Books
- “The Linux Programming Interface” by Michael Kerrisk - Terminal I/O depth
- “Advanced Programming in the UNIX Environment” by Stevens and Rago - canonical vs raw input
- “Clean Architecture” by Robert C. Martin - modeling state and view separation