Learn libuv: Master Asynchronous I/O
Goal: Master
libuv, the C library for high-performance, asynchronous, cross-platform I/O. Understand event loops, non-blocking operations, and the callback-driven design that powers Node.js and other modern network applications.
Why Learn libuv?
libuv is the engine that makes Node.js possible, but it’s a powerful C library in its own right. It provides a consistent, event-driven I/O API over the best available backend on each platform (epoll on Linux, kqueue on macOS, IOCP on Windows).
- Understand Asynchronous Systems: Learning
libuvteaches you how event loops work at a fundamental level. - High-Performance C Programming: Write scalable servers and network clients in C that can handle thousands of concurrent connections without threads.
- Cross-Platform Development: Write your I/O code once and have it run efficiently on Linux, macOS, and Windows.
- Demystify Node.js: Understand what is actually happening when you write
asynccode in JavaScript.
After these projects, you’ll be able to build sophisticated, non-blocking applications in C and will have a deep appreciation for the architecture of modern asynchronous frameworks.
Core Concept Analysis
The Event Loop
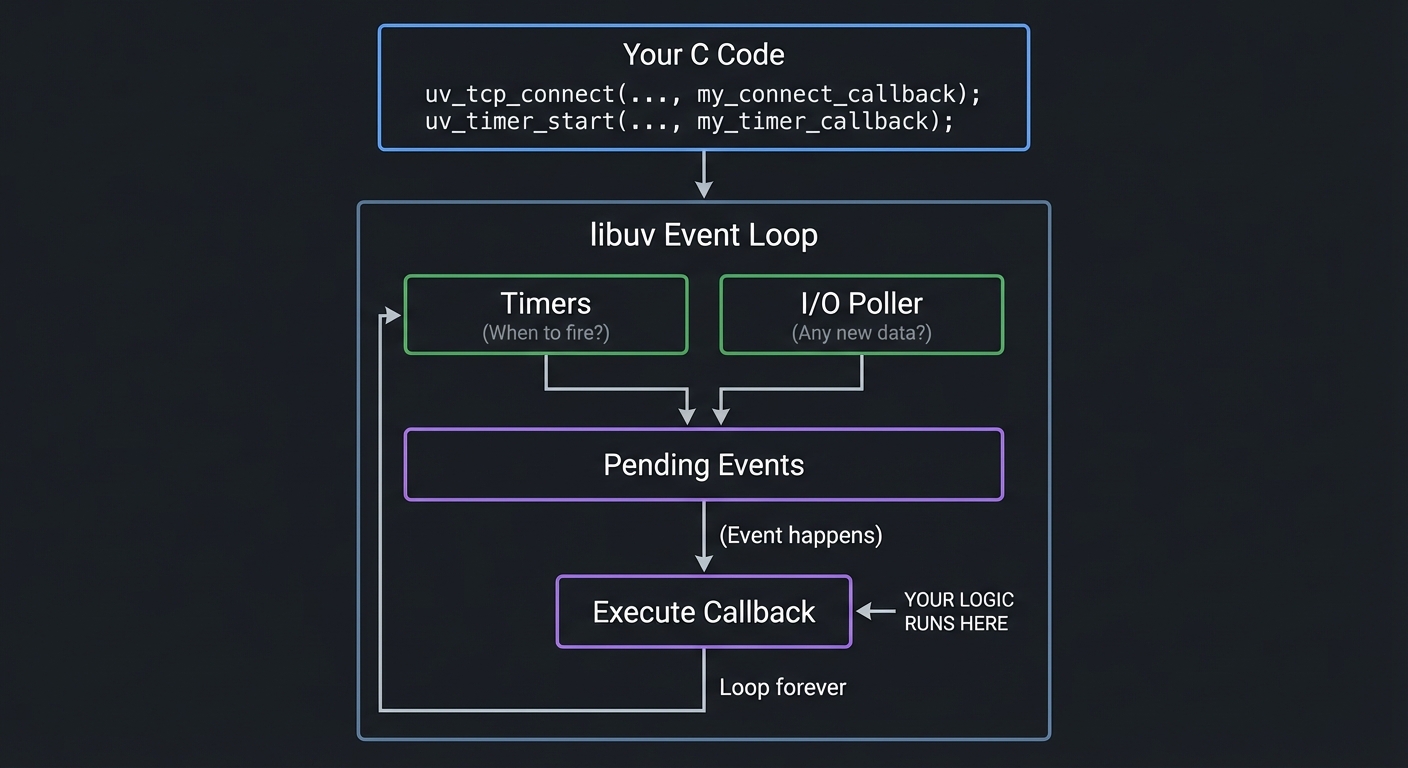
The heart of libuv is the event loop. It’s a single thread that continuously runs and performs two main tasks:
- Asks the operating system, “Has any I/O that I’m interested in completed?” (e.g., “Has data arrived on this socket?”).
- If I/O is complete, it finds the corresponding C callback function you provided and executes it.
Crucially, your callback code should never block. Any long-running operation must itself be initiated as a new asynchronous request. This is the “run-to-completion” model.
+------------------------------------------------------+
|                    Your C Code                       |
|  uv_tcp_connect(..., my_connect_callback);
|  uv_timer_start(..., my_timer_callback);
+------------------------------------------------------+
                         │
                         ▼
+------------------------------------------------------+
|                  libuv Event Loop                    |
|                                                      |
|   ┌──────────────────┐       ┌──────────────────┐    |
|   │     Timers       │       │    I/O Poller    │    |
|   │ (When to fire?)  │       │ (Any new data?)  │    |
|   └──────────────────┘       └──────────────────┘    |
|           │                       │                  |
|           └─────────┐   ┌─────────┘                  |
|                     ▼   ▼                            |
|             ┌──────────────────┐                     |
|             │  Pending Events  │                     |
|             └──────────────────┘                     |
|                     │                                |
|    (Event happens)  ▼                                |
|             ┌──────────────────┐                     |
|             │ Execute Callback │<--- YOUR LOGIC RUNS HERE
|             └──────────────────┘                     |
|                                                      |
+----------------Loop forever--------------------------+
Handles, Requests, and Callbacks
- Handles (
uv_tcp_t,uv_timer_t,uv_fs_t): Long-lived objects that represent a resource, like a TCP socket or a timer. They are the source of I/O events. - Requests (
uv_write_t,uv_connect_t): Short-lived objects that represent a single, one-off operation on a handle, like writing data to a socket. - Callbacks: The C functions you write. You give them to
libuvwhen you start an operation, and the event loop executes them upon completion. For example:void on_connect(uv_connect_t* req, int status).
Project List
Project 1: The Event Loop “Hello, World”
- File: LEARN_LIBUV_DEEP_DIVE.md
- Main Programming Language: C
- Alternative Programming Languages: None
- Coolness Level: Level 3: Genuinely Clever
- Business Potential: 1. The “Resume Gold”
- Difficulty: Level 1: Beginner
- Knowledge Area: Asynchronous Programming / Event Loops
- Software or Tool:
libuv, C Compiler (GCC/Clang) - Main Book: The official
libuvdocumentation (“An Introduction to libuv”)
What you’ll build: The simplest possible libuv program: a timer that prints a “tick” message to the console once per second for five seconds, and then gracefully exits.
Why it teaches libuv: This project isolates the absolute core concepts: initializing and running the event loop, creating a handle (uv_timer_t), starting an operation, and providing a callback. It demonstrates how a libuv program runs and exits without any complex network or file I/O.
Core challenges you’ll face:
- Getting the default loop → maps to
uv_default_loop() - Initializing a handle → maps to
uv_timer_init() - Starting an operation and registering a callback → maps to
uv_timer_start() - Running the event loop until it’s done → maps to
uv_run()withUV_RUN_DEFAULT - Cleaning up handles → maps to
uv_close()and its own callback
Key Concepts:
- The Event Loop: The central concept of
libuv. - Handles:
uv_timer_tas a representative handle object. - Callbacks: The function pointer pattern for handling events.
Difficulty: Beginner Time estimate: A few hours Prerequisites: Basic C (pointers, functions).
Real world outcome:
A program that prints a message to the screen every second without using sleep().
$ ./timer
Tick
Tick
Tick
Tick
Tick
Program exiting.
main.c:
#include <stdio.h>
#include <uv.h>

int64_t counter = 0;

void timer_callback(uv_timer_t *handle) {
    counter++;
    printf("Tick\n");

    if (counter >= 5) {
        // Stop the timer
        uv_timer_stop(handle);
    }
}

int main() {
    // Get the default event loop
    uv_loop_t *loop = uv_default_loop();

    // Initialize a timer handle
    uv_timer_t timer_handle;
    uv_timer_init(loop, &timer_handle);

    // Start the timer to fire the callback every 1000ms (1s)
    // The '1000' is the repeat interval.
    uv_timer_start(&timer_handle, timer_callback, 1000, 1000);

    printf("Timer started...\n");

    // Start the event loop. This will block until there are no more
    // active handles (or uv_stop is called).
    uv_run(loop, UV_RUN_DEFAULT);

    // After the loop is done, we must close all handles
    uv_close((uv_handle_t*)&timer_handle, NULL);

    printf("Program exiting.\n");
    return 0;
}
Learning milestones:
- Your program compiles and links against
libuv→ Your environment is set up correctly. - The
timer_callbackis executed repeatedly → You understand how to start an operation and register a callback. - The program exits gracefully after the timer is stopped → You understand the lifecycle of a handle and the event loop.
- You can explain why
uv_runblocks and when it returns → You have grasped the core concept of the event loop.
Project 2: An Asynchronous cat Clone
- File: LEARN_LIBUV_DEEP_DIVE.md
- Main Programming Language: C
- Alternative Programming Languages: None
- Coolness Level: Level 3: Genuinely Clever
- Business Potential: 1. The “Resume Gold”
- Difficulty: Level 3: Advanced
- Knowledge Area: Asynchronous File I/O
- Software or Tool:
libuv - Main Book: “An Introduction to libuv”
What you’ll build: A program that reads a file specified on the command line and prints its contents to standard output, similar to the cat utility, but using libuv’s asynchronous file system operations.
Why it teaches libuv: This project introduces you to libuv’s threadpool-backed FS operations and the concept of callback chaining. The completion of one async operation (opening the file) triggers the next (reading from the file), which in turn triggers the next read, and so on. This is a fundamental pattern for control flow in callback-based asynchronous programming.
Core challenges you’ll face:
- Using
uv_fs_trequests → maps to understandinglibuv’s request pattern for one-shot operations like file I/O - Chaining callbacks → maps to calling
uv_fs_readfrom within theuv_fs_opencallback - Managing buffers → maps to using
uv_buf_initand understanding buffer ownership - Cleaning up requests → maps to calling
uv_fs_req_cleanupafter a request is finished
Key Concepts:
- Asynchronous FS Operations:
libuvuses a thread pool to make blocking file system calls feel asynchronous. - Request Objects: The
uv_fs_tobject that holds the state for a single FS operation. - Callback Chaining: The primary method of sequencing asynchronous operations.
Difficulty: Advanced Time estimate: Weekend Prerequisites: Project 1, solid C skills (pointers, memory management).
Real world outcome:
A program that functions like cat but is built on an async foundation.
$ ./uv-cat my_file.txt
Contents of my_file.txt will be printed here...
Implementation Hints: The logic will be spread across several callbacks.
main: Creates anuv_fs_t open_reqand callsuv_fs_open(..., on_open).on_open(callback):- Checks if the open succeeded. The file descriptor is in
open_req.result. - Creates an
uv_fs_t read_req. - Calls
uv_fs_read(..., fd, ..., on_read).
- Checks if the open succeeded. The file descriptor is in
on_read(callback):- Checks the result. A result
> 0means bytes were read. A result of0means end-of-file. - Prints the contents of the buffer to the console.
- If not EOF, calls
uv_fs_readagain with the sameon_readcallback to read the next chunk. - If EOF, creates a
uv_fs_t close_reqand callsuv_fs_close(..., fd, ..., on_close).
- Checks the result. A result
on_close(callback):- Cleans up any remaining resources.
Learning milestones:
- You can successfully open a file asynchronously and get a file descriptor in the callback → You understand
uv_fs_open. - You can read the first chunk of the file and print it → You understand
uv_fs_readand buffer management. - Your program reads and prints the entire file, chunk by chunk → You have implemented the read loop correctly.
- Your program correctly closes the file and cleans up all
uv_fs_trequests → You understand resource management inlibuv.
Project 3: The TCP Echo Server
- File: LEARN_LIBUV_DEEP_DIVE.md
- Main Programming Language: C
- Alternative Programming Languages: None
- Coolness Level: Level 4: Hardcore Tech Flex
- Business Potential: 1. The “Resume Gold”
- Difficulty: Level 4: Expert
- Knowledge Area: Network Programming / Sockets
- Software or Tool:
libuv,netcatortelnet(for testing) - Main Book: “An Introduction to libuv”
What you’ll build: A TCP server that can handle multiple concurrent clients. When a client connects and sends data, the server will simply send the exact same data back (an “echo”).
Why it teaches libuv: This is the canonical libuv application. It covers the entire lifecycle of a network server: setting up a listening socket, accepting new connections, reading data from clients, and writing data back. It forces you to manage multiple handles (one for the server, and one for each client) within a single event loop.
Core challenges you’ll face:
- Setting up a listening server → maps to
uv_tcp_bindanduv_listen - Handling new connections → maps to the
on_new_connectioncallback,uv_accept, and creating a new client handle - Reading from a stream → maps to
uv_read_startand its requiredalloc_cbandread_cbpair - Writing back to a stream → maps to
uv_writeand handling its completion callback to free resources - Managing memory for client handles → maps to allocating memory for a
uv_tcp_tfor each client and freeing it on disconnect
Key Concepts:
- Stream Handles (
uv_stream_t): The base type for TCP, pipes, and TTYs. - Backlog: The queue for incoming connections passed to
uv_listen. - Buffer Allocation Strategy: The purpose of the
alloc_cbis to providelibuvwith memory to write incoming data into.
Difficulty: Expert Time estimate: 1-2 weeks Prerequisites: Project 1, basic understanding of TCP sockets.
Real world outcome: A running server that you can connect to with other tools.
Testing with netcat:
# In one terminal, run your server
$ ./echo-server

# In another terminal, connect and type
$ nc localhost 7000
hello
hello  # <-- Echoed back from your server
world
world  # <-- Echoed back from your server
Implementation Hints: The structure is complex and callback-driven.
main: Initializes auv_tcp_tserver handle, binds it to an address/port, and callsuv_listenwith a connection callback (on_new_connection).on_new_connection:- Is called every time a client tries to connect.
- Initializes a new
uv_tcp_tclient handle. - Calls
uv_accept(server_handle, client_handle). - Calls
uv_read_start(client_handle, alloc_buffer, on_read)to begin listening for data from this specific client.
alloc_buffer: A simple function that allocates a chunk of memory forlibuvto use.on_read:- Is called when data arrives from a client.
- If
nread < 0, the client disconnected or an error occurred. Close the handle. - If
nread > 0, you have data. Create auv_write_trequest and calluv_writeto send the data back on the same client handle.
on_write_complete: The callback foruv_write. Its main job is to free the memory associated with theuv_write_trequest.
Learning milestones:
- Your server starts without errors → You have correctly set up the listening socket.
- A client connection is accepted and your
on_new_connectioncallback fires → You understanduv_listenanduv_accept. - Data sent by a client is received in your
on_readcallback → You have mastered theuv_read_startpattern. - The same data is successfully written back to the client → You have a fully functional echo server and understand
uv_write.
Project 4: The Asynchronous HTTP 1.0 Client
- File: LEARN_LIBUV_DEEP_DIVE.md
- Main Programming Language: C
- Alternative Programming Languages: None
- Coolness Level: Level 4: Hardcore Tech Flex
- Business Potential: 1. The “Resume Gold”
- Difficulty: Level 4: Expert
- Knowledge Area: Network Programming / DNS
- Software or Tool:
libuv - Main Book: “An Introduction to libuv”
What you’ll build: A command-line tool that takes a URL (e.g., http://example.com/) and uses libuv to perform a DNS lookup, connect to the server, send a basic HTTP GET request, and print the response from the server to the console.
Why it teaches libuv: This project is the ultimate exercise in callback composition. The successful completion of each asynchronous step is required to trigger the next one. DNS lookup -> TCP connect -> HTTP write -> HTTP read. It demonstrates how to build a complex, multi-stage network client on top of libuv’s primitive operations.
Core challenges you’ll face:
- Asynchronous DNS lookup → maps to using
uv_getaddrinfoand its request objectuv_getaddrinfo_t - Connecting to a resolved address → maps to using
uv_tcp_connectwith the address struct provided by the DNS callback - Composing the entire chain of callbacks → maps to the essence of “callback hell” and the mental model required for async C programming
- Simple HTTP parsing → maps to reading from the stream and knowing when the response is complete
Key Concepts:
uv_getaddrinfo: The asynchronous equivalent of the standardgetaddrinfofunction.- State Management: Since the logic is spread across many callbacks, you often need a
structto hold the state of the overall operation (e.g., the socket, the request being built, etc.).
Difficulty: Expert Time estimate: 1-2 weeks Prerequisites: Project 3.
Real world outcome:
A program similar to a simplified curl.
$ ./http-client http://example.com/
Connecting to 93.184.216.34...
Sending HTTP GET request...

HTTP/1.0 200 OK
...
Content-Type: text/html; charset=UTF-8
...

<!doctype html>
...
Implementation Hints: The control flow is a chain:
main: Kicks off the process by callinguv_getaddrinfowith a callback,on_resolved.on_resolved:- Gets the IP address from the resolver.
- Calls
uv_tcp_connectwith the IP address and a new callback,on_connected.
on_connected:- Constructs the HTTP GET request string.
- Calls
uv_writeto send the request, with a callbackon_write.
on_write:- Once the request is sent, this callback calls
uv_read_startto begin listening for the server’s response.
- Once the request is sent, this callback calls
on_read:- Is called repeatedly as response data streams in. Prints the data to the console.
- When the stream ends (
nreadisUV_EOF), it closes the connection.
Learning milestones:
- You can resolve a domain name to an IP address asynchronously → You understand
uv_getaddrinfo. - You can connect to the resolved IP address → You have linked the DNS and TCP connection steps.
- The server receives your complete HTTP GET request → You have the
uv_writepart working. - Your program receives and prints the full HTTP response → You have built a complete, multi-stage asynchronous client.
Summary
| Project | Main libuv Topic |
Difficulty | Key Takeaway |
|---|---|---|---|
| 1. The Event Loop “Hello, World” | Timers & Event Loop | Beginner | The basic structure and lifecycle of a libuv application. |
2. An Asynchronous cat Clone |
File System I/O | Advanced | Using uv_fs_t requests and chaining callbacks for sequential logic. |
| 3. The TCP Echo Server | TCP Networking | Expert | Handling multiple concurrent clients with stream handles. |
| 4. The Async HTTP Client | DNS & TCP Composition | Expert | Building a complex, multi-stage async workflow. |
```