Game Development to Steam Publishing Mastery - Real World Projects
Goal: This sprint teaches you how to build, polish, and ship a commercial-grade 2D game using C# and MonoGame, then publish it on Steam with disciplined production practices. You will learn how real-time loops, input, physics, UI, audio, data persistence, and platform services fit together as one operating system for your game. You will also learn a practical AI-assisted asset workflow using the Nano Banana image generation workflow in the Gemini API stack while preserving art direction, licensing hygiene, and production quality. By the end, you will have a complete capstone game, a Steam-ready release pipeline, and a repeatable method for future launches.
Introduction
- What is this topic?: A full-stack game production path from first MonoGame prototype to Steam launch and post-launch operations.
- What problem does it solve today?: Many developers can build features, but fail at production integration, content operations, and release discipline; this guide closes that gap.
- What will you build?: 21 linked projects that start with fundamentals and end with a shipped Steam product.
- In scope: C# with MonoGame, Steamworks integration in C#, Steam release workflow, and AI-assisted asset generation.
- Out of scope: Unreal/Unity specific editor workflows, complex 3D rendering pipelines, and live-service backend infrastructure beyond Steam.
Idea -> Prototype -> Core Systems -> Content Pipeline -> Steam Integration -> Launch -> Live Ops
  |         |             |                |                    |             |          |
  |         |             |                |                    |             |          +--> Patch cadence
  |         |             |                |                    |             +-------------> Conversion + wishlist loop
  |         |             |                |                    +---------------------------> Achievements, cloud, leaderboards
  |         |             |                +-----------------------------------------------> Art, audio, UI, save versioning
  |         |             +---------------------------------------------------------------> Movement, physics, game feel
  |         +--------------------------------------------------------------------------------> Deterministic loop + tools
  +-----------------------------------------------------------------------------------------> Product hypothesis
How to Use This Guide
- Read
## Theory Primerfirst. Treat it like a mini-book and take notes on invariants and failure modes. - Build projects in order unless you already have production experience; later projects assume earlier tooling and mental models.
- For each project, complete
#### Thinking Exercisebefore implementation. - Validate outcomes against each
#### Real World Outcomeand#### Definition of Donechecklist. - Use the linked expanded project files for deeper execution detail.
Prerequisites & Background Knowledge
Essential Prerequisites (Must Have)
- Solid C# fundamentals (classes, structs, collections, async basics).
- Basic algebra and vectors for 2D movement.
- Comfort with dotnet CLI, Git, and debugging tools.
- Recommended Reading: “Clean Architecture” by Robert C. Martin - Dependency rule chapters.
Helpful But Not Required
- Prior experience with any game framework (Godot, Unity, raylib).
- Familiarity with JSON schema migration.
- Basic product marketing terms (CTR, conversion, funnel).
Self-Assessment Questions
- Can you explain fixed timestep simulation and why frame-rate dependent movement breaks gameplay?
- Can you design a save file format that survives schema changes?
- Can you describe how a Steam release changes from build upload to public launch?
Development Environment Setup Required Tools:
- .NET SDK 8.x
- MonoGame 3.8.x templates and MGCB tooling
- Steamworks SDK plus Steamworks.NET
- Git
Recommended Tools:
- Aseprite or equivalent for pixel polishing
- Audacity for SFX cleanup
- OBS for trailer capture
- ImageMagick for batch capsule exports
Testing Your Setup:
$ dotnet --version
8.x.x

$ dotnet new --list | rg monogame
MonoGame Application ...

$ mgcb-editor --version
MGCB Editor version ...
Time Investment
- Simple projects: 4-8 hours each
- Moderate projects: 10-20 hours each
- Complex projects: 20-40 hours each
- Total sprint: 4-7 months at part-time pace
Important Reality Check
- Shipping is a systems problem, not just a coding problem. The hard part is not one mechanic; it is integration, consistency, and production discipline across many small decisions.
Big Picture / Mental Model
                           Product Loop (Business + Players)
                           +-------------------------------+
                           | Wishlist -> Sales -> Reviews  |
                           +---------------+---------------+
                                           |
                                           v
+----------------------+        +----------+-----------+       +-------------------------+
| Runtime Loop         |        | Content Operations   |       | Platform Operations     |
| Input -> Sim -> Draw |<------>| Art/Audio/UI/Saves   |<----->| Steamworks + SteamPipe  |
| 16.67ms budget       |        | Versioning + QA       |       | Release + Monitoring    |
+----------+-----------+        +-----------+-----------+       +-----------+-------------+
           |                                    |                               |
           v                                    v                               v
+----------+-----------+        +---------------+------------+      +----------+-----------+
| Gameplay Feel        |        | AI Asset Workflow          |      | Launch Readiness      |
| Control latency      |        | Nano Banana prompt library |      | Checklist + rollback  |
| Camera + feedback    |        | Human review + provenance  |      | Incident response     |
+----------------------+        +----------------------------+      +----------------------+
Theory Primer
Concept 1: Real-Time MonoGame Architecture and Deterministic Simulation
Fundamentals Real-time game software is a continuous control loop, not a request-response application. In MonoGame, you continuously sample input, update simulation state, and render frames. The critical distinction is that simulation correctness depends on deterministic update cadence while rendering is opportunistic and hardware dependent. If movement, collisions, and timers are tied directly to variable frame times, gameplay drifts across machines and can become untestable. A fixed timestep strategy enforces invariants: the same input sequence produces the same world-state transitions under equivalent conditions. This concept underpins debugging, replay systems, competitive fairness, and predictable feel tuning. Determinism does not mean every pixel is identical across GPUs; it means simulation state evolution follows controlled rules you can reason about and verify.
Deep Dive A production loop separates wall-clock variability from simulation time. Practically, you maintain an accumulator: each frame adds measured elapsed time, then processes zero or more fixed-duration simulation steps. The invariant is straightforward: simulation step duration is constant; only the count of steps per render changes. Failure mode one is spiral-of-death, where expensive updates cause backlog growth and ever more catch-up steps. Mitigation includes simulation step caps, coarse-grained LOD reductions, and profiling hot paths. Failure mode two is non-deterministic order of operations in collections, which causes hard-to-reproduce bugs. Mitigation includes deterministic update ordering, command queues, and staged mutation. Failure mode three is timing noise from input sampled at inconsistent points in frame lifecycle; this can add hidden latency and break feel. Input should be sampled consistently before each simulation tick and transformed into stable action intents.
In MonoGame specifically, Update and Draw callbacks provide structure, but deterministic behavior still depends on your own state discipline. Keep world state transitions pure relative to one tick where possible, and isolate side effects such as file I/O or Steam API calls from core simulation logic. For instrumentation, expose frame time, update duration, draw duration, and queue depths in an always-on debug HUD. This allows you to reason about budget pressure rather than guessing from “it feels laggy.” A key tradeoff is responsiveness versus strictness. Pure fixed-step with no interpolation is simplest and deterministic, but may look choppy on mismatched refresh rates. Interpolation improves apparent smoothness but adds complexity and potential visual latency. Decide based on genre: twitch platformers prefer immediate control clarity over perfect interpolation elegance.
How this fit on projects Used heavily in Projects 1, 2, 4, 5, 6, 7, 8, and 21.
Definitions & key terms
- Fixed timestep: Constant-duration simulation step regardless of render rate.
- Accumulator: Buffered elapsed time waiting to be consumed by simulation ticks.
- Frame pacing: Stability of frame-to-frame render intervals.
- Spiral of death: Backlog cascade where update load exceeds real-time budget.
Mental model diagram
wall clock dt -> accumulator += dt -> while accumulator >= tick:
                                        sample intent
                                        simulate one tick
                                        accumulator -= tick
                                  -> render(interpolate(prev_state, curr_state, accumulator/tick))
How it works
- Sample wall clock delta.
- Add delta to accumulator.
- Run fixed-step updates until accumulator is below target tick.
- Render from stable state snapshots.
- Log timing metrics and enforce max update steps.
Minimal concrete example
tick = 16.67ms
if accumulator >= tick:
  process_input_intents()
  simulate_world_one_tick()
  queue_render_data()
Common misconceptions
- Variable delta everywhere is simpler and good enough.
- Determinism only matters for multiplayer.
Check-your-understanding questions
- Why can variable-step collision resolution create tunneling on weaker hardware?
- What metric would you watch first when frame pacing becomes unstable?
- Why should input abstraction happen before simulation, not during render?
Check-your-understanding answers
- Large per-frame deltas skip intermediate contact states.
- Update time percentile and fixed-step backlog.
- Render is observational; gameplay authority belongs to simulation steps.
Real-world applications
- Platformers and action games with strict input feel.
- Deterministic replay systems for QA and esports validation.
Where you’ll apply it Projects 1, 4, 5, 8, 15, 21.
References
- Game Programming Patterns (Game Loop chapter)
- MonoGame documentation
- Glenn Fiedler, Fix Your Timestep
Key insights A stable simulation clock is the backbone of every reliable gameplay system.
Summary You control simulation time explicitly; you never let the render loop dictate game truth.
Homework/Exercises to practice the concept
- Trace a 120Hz monitor and a 45 FPS laptop through the same fixed-step loop.
- Design a metrics panel showing accumulator depth over 60 seconds.
Solutions to the homework/exercises
- Both systems can share identical simulation steps while rendering at different cadence.
- The panel needs timestamp, backlog, update ms, draw ms, and dropped-step counts.
Concept 2: Gameplay Systems, Feel Tuning, and State Discipline
Fundamentals Gameplay quality emerges from how multiple systems interact over time: input interpretation, motion math, collision responses, camera behavior, and audiovisual feedback. A common beginner mistake is tuning each system in isolation. Production-quality feel requires a controlled state model, explicit transitions, and measurable tuning variables. State machines are a practical way to formalize what can happen now for entities like player controllers and UI flows. They reduce impossible state combinations and make event handling predictable. Feel tuning then becomes a data exercise: adjust acceleration, jump curves, coyote windows, and camera damping while observing live telemetry and player outcomes.
Deep Dive State discipline reduces chaos. For the player controller, define explicit states such as grounded, jump-start, airborne, dash, hurt, and locked. For each state, define allowed transitions and constraints. Example invariant: dash may only start if cooldown is ready and player has control authority. Failure mode one is implicit transitions hidden in unrelated subsystems; this creates phantom bugs where animation or collision code unexpectedly changes gameplay state. Mitigation is centralized transition evaluation with logged reasons.
Feel tuning depends on metrics. Instead of saying movement feels floaty, track jump apex time, horizontal acceleration to max speed, stop distance, and input-to-motion latency. Instrument these in a tuning HUD and compare across revisions. This transforms subjective debate into measurable iteration while leaving space for designer taste. Failure mode two is overfitting to one tester or keyboard profile. Mitigation is building a repeatable test script and collecting small sample play sessions with known tasks.
Collision response should preserve intent. Hard snaps can be physically correct but feel bad when they negate player expectation. Genre-specific compromises matter: platformers often include coyote time and jump buffering to match human reaction windows, not strict physical realism. Failure mode three is unstable collision order when multiple contacts occur simultaneously, causing jitter or wall-sticking. Mitigation includes contact sorting, axis separation strategy, and explicit depenetration limits.
Feedback loops must be coherent. If input is accepted but no visible or audible confirmation occurs quickly, players perceive lag even when simulation is correct. Tie state transitions to feedback contracts: jump start triggers a short sound envelope, animation event, and dust particle. Keep these effects data-driven so iteration does not require invasive code edits.
How this fit on projects Primary in Projects 3, 4, 5, 6, 7, 8, 10, 20.
Definitions & key terms
- State machine: Explicit finite model of valid states and transitions.
- Coyote time: Brief post-edge grace period allowing jump input.
- Jump buffering: Queue jump input shortly before landing.
- Intent preservation: Collision and control rules that honor player expectation.
Mental model diagram
Input intents -> State evaluator -> Motion solver -> Collision resolver -> Feedback emitters
      ^                 |                |                 |                    |
      +-----------------+----------------+-----------------+--------------------+
                        telemetry and tuning loop
How it works
- Sample action intents.
- Evaluate legal state transitions.
- Apply movement rules for active state.
- Resolve collisions deterministically.
- Emit feedback tied to confirmed transitions.
Minimal concrete example
if state == AIRBORNE and grounded_for_one_tick:
  state = GROUNDED
if jump_pressed and (state == GROUNDED or coyote_timer > 0):
  apply_jump_impulse()
Common misconceptions
- Good feel is mystical and cannot be measured.
- Physics realism always equals fun.
Check-your-understanding questions
- Why can valid physics still produce poor controls?
- Which metrics help compare two jump tuning profiles?
- When should a transition log be considered mandatory?
Check-your-understanding answers
- Physical correctness may conflict with player intent and readability.
- Apex time, lateral drift, and landing error distance.
- When multiple subsystems can trigger state changes.
Real-world applications
- Platformers, brawlers, top-down action, and sports control loops.
Where you’ll apply it Projects 3 to 8, 10, 20, 21.
References
- Game Programming Patterns (State, Command)
- Game Engine Architecture (input and systems chapters)
- The Art of Game Design
Key insights Game feel improves fastest when you combine strict state models with live metrics.
Summary Control quality is engineered through explicit transitions and measurable tuning, not guesswork.
Homework/Exercises to practice the concept
- Define a transition table for a dash-enabled platformer controller.
- Propose a telemetry panel for jump quality across 20 attempts.
Solutions to the homework/exercises
- Table must include state guards, cooldowns, and invalid transition handling.
- Panel should include jump success rate, early/late input counts, and average apex timing.
Concept 3: Content Pipeline and AI-Assisted Asset Production with Nano Banana
Fundamentals Content production is a pipeline problem: concept creation, generation, refinement, style consistency, technical constraints, and legal provenance. AI can accelerate ideation and variant generation, but uncontrolled use creates style drift, licensing risk, and production debt. In this guide, Nano Banana refers to the community workflow around Gemini image generation models for fast concept and production-support asset generation. Officially, Gemini image generation in the API supports models such as gemini-2.5-flash-image-preview and gemini-2.0-flash-preview-image-generation, with text and image prompting in Google AI Studio and API workflows. Your goal is not one-click finished art; your goal is a reproducible asset factory with prompt versioning, review gates, and export standards.
Deep Dive Treat AI assets like source code: version inputs, review outputs, and ship only approved artifacts. A robust pipeline has five stages. Stage 1 is style framing: define palette, line weight, silhouette rules, camera framing, and negative constraints. Stage 2 is controlled generation: submit structured prompts with seed notes, resolution targets, and model version metadata. Stage 3 is curation and editing: reject off-style outputs quickly, keep approved variants in a tagged library, and run second-pass edits with image plus text prompts. Stage 4 is game readiness conversion: convert dimensions, pivot anchors, transparent backgrounds, and atlas packing constraints. Stage 5 is provenance and QA: log prompt IDs, reviewer decisions, and final export hashes.
Failure mode one is prompt entropy. Teams append ad hoc prompts over weeks and lose consistency. Mitigation: maintain a prompt library with named templates, change history, and examples of acceptable output. Failure mode two is visual incoherence across UI, character, and environment assets. Mitigation: enforce art-direction checklists and small benchmark sheets. Failure mode three is legal uncertainty. Mitigation: follow current platform policies, retain provenance records, and keep human review in final acceptance.
Practical workflow using Google AI Studio and Gemini API: start in AI Studio playground for quick prompt iteration and visual inspection; once style stabilizes, move prompts into scriptable API calls and CI-friendly artifact workflows. Use separate prompt templates for concept exploration versus production outputs. For production templates, freeze structural constraints: aspect ratio, framing, palette hints, and forbidden elements. Keep output deterministic enough for review by pinning model and prompt version metadata and by documenting post-processing steps.
Quality bars for shipping: readable silhouettes at gameplay scale, consistent lighting direction, alpha edge cleanliness, and no typography artifacts in non-textured UI elements. Even strong AI outputs often require manual cleanup for icon clarity and sprite readability. Build this expectation into schedule.
How this fit on projects Core for Project 11; applied again in Projects 16, 17, 20, and 21.
Definitions & key terms
- Prompt template: Structured reusable generation instruction with controlled fields.
- Provenance log: Record of prompt, model, reviewer, and exported artifact metadata.
- Atlas-ready asset: Asset normalized for packing, pivots, and runtime sampling.
- Style guardrails: Rules that constrain visual outputs to brand direction.
Mental model diagram
Art Direction Spec -> Prompt Template Library -> Gemini Generation -> Human Review -> Game-Ready Export
        |                       |                        |                  |                |
        +-----------------------+------------------------+------------------+----------------+
                                    provenance metadata and QA checklist
How it works
- Define style spec and technical target sizes.
- Generate candidate sets in AI Studio.
- Curate and edit with image plus text prompts.
- Normalize outputs for MonoGame content pipeline.
- Track provenance and review before integration.
Operational recipe: Nano Banana workflow for game assets
- In Google AI Studio, pick an image-generation-capable Gemini model:
gemini-2.5-flash-image-previewfor current high-quality generation/editing flows.gemini-2.0-flash-preview-image-generationfor compatible preview workflows.
- Start with a prompt template that includes gameplay readability constraints:
- camera/view (top-down, side view, isometric),
- target size class (16x16, 32x32, 128x128),
- palette constraints,
- forbidden artifacts (text, signatures, noisy backgrounds).
- Generate a candidate batch and reject aggressively using your style checklist.
- Use image-plus-text edits for iterative corrections (silhouette cleanup, color harmonization, lighting consistency).
- Export selected outputs and normalize them:
- transparent background verification,
- consistent padding and pivots,
- naming conventions for atlas build.
- Record provenance metadata per asset:
- model id,
- prompt template id and revision,
- reviewer name,
- final exported file hash.
- Build the assets through MGCB and verify in-game readability at actual gameplay zoom.
- Only promote assets to release branch after human QA sign-off.
Minimal Gemini API request shape (pseudocode)
POST /v1beta/models/gemini-2.5-flash-image-preview:generateContent
{
  \"contents\": [{
    \"parts\": [{\"text\": \"Top-down slime enemy, 32x32 readability, 5-color palette, transparent background\"}]
  }]
}
Minimal concrete example
Prompt template: "Top-down slime enemy, 32x32 readability, single light source from top-left,
limited 5-color palette, transparent background, no text, no watermark-like marks."
Post-process: trim bounds -> pad 2px -> atlas tag enemy/slime/basic -> reviewer sign-off
Common misconceptions
- AI removes need for art direction.
- Generated assets are ready to ship immediately.
Check-your-understanding questions
- Why is a provenance log useful after launch?
- Which constraints improve gameplay readability most?
- Why split concept prompts from production prompts?
Check-your-understanding answers
- It supports policy reviews, legal traceability, and reproducibility.
- Silhouette clarity, palette control, and scale checks.
- They optimize for different goals: exploration versus consistency.
Real-world applications
- Indie art pipeline acceleration.
- Marketing capsule ideation and rapid variant testing.
Where you’ll apply it Projects 11, 16, 20, and 21.
References
- Gemini API Image Generation docs
- Google AI Studio quickstart
- MonoGame content pipeline documentation
Key insights AI helps most when wrapped in a strict production pipeline, not used ad hoc.
Summary Nano Banana style workflows are best treated as structured content operations with human QA.
Homework/Exercises to practice the concept
- Create a three-level prompt taxonomy: concept, production, localization variants.
- Define a rejection checklist for off-style outputs.
Solutions to the homework/exercises
- Taxonomy should separate exploratory freedom from production constraints.
- Rejection checklist should include silhouette, palette, scale readability, and artifact checks.
Concept 4: Persistence, Telemetry, and Reliability for Shipped Games
Fundamentals Shipped games are long-lived software. Save data, player settings, and progression must survive updates, crashes, and cross-device behavior. Reliability demands versioned schemas, migration strategies, and defensive write protocols. Telemetry provides observability: you need event traces to validate progression design, achievement triggers, and funnel behavior. Without this layer, you cannot confidently patch regressions or analyze player behavior. Reliability engineering in games is not optional; it is part of user trust.
Deep Dive A resilient save system starts with explicit schema versioning and migration functions. Never rely on implicit deserialization assumptions across versions. Each release should ship with migration tests from older schemas. Use atomic write strategy: write to temp file, flush, verify, then swap. Failure mode one is partial writes during crash or power loss; mitigation is journaling or dual-slot strategy. Failure mode two is silent migration corruption from permissive parsing; mitigation is strict validation and rollback fallback.
Telemetry strategy should be event-driven and privacy-aware. Define event contracts upfront: event name, required fields, optional fields, and trigger conditions. Failure mode three is event explosion where inconsistent event naming destroys analysis quality. Mitigation is schema governance with a small event taxonomy. For gameplay tuning, track aggregate metrics tied to design questions: level completion time, death heatmaps, ability usage, menu drop-off.
Cloud synchronization adds conflict complexity. Decide conflict policy per data domain. Settings may prefer last-write-wins; progression may require explicit merge rules or user conflict selection. Build user-facing recovery flows: show conflict metadata and allow choose local versus cloud backup. Always keep one recoverable local backup snapshot.
Reliability mindset: design for failure as a normal state. Add chaos tests that simulate interrupted writes, corrupted payloads, and missing cloud responses. Include diagnostics that can be shared by players without exposing secrets.
How this fit on projects Primary in Projects 9, 13, 14, 15, 18, 21.
Definitions & key terms
- Schema version: Explicit format version attached to persisted data.
- Atomic write: All-or-nothing persistence operation.
- Event contract: Structured definition of telemetry event fields and semantics.
- Conflict policy: Rule for reconciling divergent local/cloud state.
Mental model diagram
Runtime state -> Serialize(vN) -> Validate -> Atomic write -> Backup slot
      |                                             |
      +--> Telemetry events ------------------------+
Cloud sync <-> Conflict detector <-> Merge policy <-> User recovery UX
How it works
- Serialize current state with explicit version.
- Validate payload and write atomically.
- Emit telemetry events for key transitions.
- Sync with cloud using deterministic conflict rules.
- Offer recovery path on conflict or failure.
Minimal concrete example
save.version = 4
if incoming.version < 4: migrate_to_v4()
write temp.sav -> checksum -> swap into slotA
Common misconceptions
- Indie games can skip migrations.
- Cloud save removes local backup need.
Check-your-understanding questions
- Why should migration be tested with fixture files from old versions?
- When is last-write-wins unsafe?
- Which two metrics indicate save system health after launch?
Check-your-understanding answers
- It validates real backward compatibility and guards refactor regressions.
- Any domain where writes are non-commutative or user-visible progress can be lost.
- Save load failure rate and recovery success rate.
Real-world applications
- RPG progression systems, roguelite unlock persistence, cross-device play.
Where you’ll apply it Projects 9, 13, 14, 15, 18, and 21.
References
- Release It
- Clean Architecture
- Steam Cloud documentation
Key insights Reliability requires design-time decisions, not late-stage bug fixes.
Summary Persistence and telemetry are production features with explicit contracts and failure handling.
Homework/Exercises to practice the concept
- Draft a save schema evolution plan for three future content updates.
- Design a minimal telemetry dictionary for player progression.
Solutions to the homework/exercises
- Include migration functions, compatibility tests, and fallback strategy.
- Use small stable event vocabulary tied to product questions.
Concept 5: Steamworks Integration and Release Engineering in C#
Fundamentals Steamworks adds platform capabilities: identity, achievements, cloud saves, leaderboards, distribution, and store operations. For C# projects, integration typically uses wrappers such as Steamworks.NET while still respecting Steam API lifecycle rules: initialization, callback pumping, and graceful shutdown. Release engineering then packages builds with SteamPipe branches and rollout controls.
Deep Dive Steam integration should start with minimal surface area. First, prove initialization and callback processing in development builds with clear diagnostics. In API overview docs, Valve notes non-C++ support through wrappers including Steamworks.NET and Facepunch.Steamworks. This means your C# integration still follows platform semantics defined by Steam API docs. Failure mode one is assuming initialization success without runtime checks, leading to silent feature failures. Mitigation: explicit startup checks, clear error states, and fallback behavior for non-Steam runs.
Achievements and stats require event-to-platform mapping discipline. Track local truth first, then sync with platform stats APIs using guarded update cadence. Failure mode two is repeated writes on every frame; mitigation is dirty flags and periodic flush strategy. Cloud saves require careful file scope definitions and conflict UX. Failure mode three is overwriting valid local data with stale cloud payloads; mitigation is metadata comparison and user choice.
Leaderboards need fairness policy. Client submissions are untrusted by default, so add validation windows, sanity thresholds, and suspicious pattern flags. Even without full authoritative backend, you can reduce low-effort abuse. Release engineering should separate branches (internal, beta, default) and use promotion gates based on smoke tests and crash-free sessions.
Steam release process adds constraints: Steam Direct fee, onboarding waits, review windows, and coming-soon expectations. These are product schedule constraints, not optional paperwork. Build your project calendar around them.
How this fit on projects Core for Projects 12 through 18 and capstone Project 21.
Definitions & key terms
- Steamworks.NET: C# wrapper around Steamworks API.
- SteamAPI lifecycle: Initialize, run callbacks regularly, and shutdown safely.
- SteamPipe: Steam build upload and depot system.
- Branch promotion: Controlled movement of builds across release channels.
Mental model diagram
MonoGame Runtime -> Steam wrapper init -> Callback loop -> Feature modules
      |                   |                    |              |
      |                   |                    |              +--> achievements/stats
      |                   |                    +-----------------> cloud/leaderboards
      |                   +--------------------------------------> identity/session state
      +--> build artifact -> SteamPipe -> branch gates -> release
How it works
- Initialize Steam wrapper and verify status.
- Pump callbacks in update loop.
- Route gameplay events to Steam feature modules.
- Test via sandbox branches.
- Promote verified builds through release branches.
Minimal concrete example
startup:
  if steam_init_failed -> run offline profile
update tick:
  steam_run_callbacks()
on achievement event:
  mark_dirty("achievement_x")
periodic flush:
  push_dirty_stats()
Common misconceptions
- Wrapper libraries remove platform lifecycle requirements.
- Steam launch is only uploading a build.
Check-your-understanding questions
- Why must callbacks be pumped continuously?
- What is a safe first milestone for Steam integration?
- Why separate branches before launch?
Check-your-understanding answers
- Many async platform events are delivered through callback queue.
- Initialization plus status indicator plus one no-op callback flow.
- It reduces blast radius and supports rollback discipline.
Real-world applications
- Commercial PC launches and post-launch patch pipelines.
Where you’ll apply it Projects 12 to 18 and 21.
References
- Steamworks API Overview
- Steam Direct and release process docs
- Steamworks.NET repository
Key insights Steam integration succeeds when lifecycle correctness and release process are treated as first-class engineering work.
Summary Platform integration is a system of contracts, tests, and rollout controls.
Homework/Exercises to practice the concept
- Draw your own branch promotion policy with objective gates.
- Define five startup diagnostics for Steam wrapper health.
Solutions to the homework/exercises
- Include internal, beta, and default branches with rollback triggers.
- Diagnostics: init status, app id, callback heartbeat, auth state, feature module readiness.
Concept 6: Go-to-Market, Store Conversion, and Live Operations
Fundamentals Shipping a game is a product operation, not a single event. You need store positioning, capsule quality, trailer clarity, pricing hypothesis, wishlist growth loops, launch-day support readiness, and post-launch patch cadence. Technical quality without discoverability underperforms; marketing with unstable software collapses trust. This concept connects engineering and market execution.
Deep Dive Start with positioning clarity: what player problem or fantasy your game fulfills, for whom, and why your version is distinct. Translate this into store assets: capsule, short description, gameplay GIFs, and trailer structure that show core loop quickly. Failure mode one is ambiguous store messaging where players cannot classify the game in seconds. Mitigation: concise value statement and first-screen readability test.
Wishlist funnel design matters before release. Track impression-to-page CTR, page-to-wishlist conversion, and wishlist-to-purchase conversion after launch. Failure mode two is measuring only wishlists without source segmentation. Mitigation: campaign tags, event tagging, and weekly experiment cadence.
Launch readiness includes support and incident response. Build a runbook for crash triage, hotfix criteria, communication channels, and patch branch policy. Failure mode three is ad hoc launch-day decisions under stress. Mitigation: rehearsal project, predefined ownership, and status templates.
Post-launch operations include review response policy, balance patch scheduling, and telemetry-informed roadmap updates. Avoid random feature drift; prioritize high-impact fixes that improve retention and review sentiment. Treat every patch as trust work.
How this fit on projects Primary in Projects 16 to 21.
Definitions & key terms
- CTR: Click-through rate from impressions to store page.
- Wishlist conversion: Ratio of page visitors adding wishlist.
- Launch runbook: Predefined operating manual for launch and incident handling.
- Patch cadence: Planned rhythm of post-launch updates.
Mental model diagram
Discovery -> Store Visit -> Wishlist -> Launch Purchase -> Retention -> Review Sentiment
    |            |             |             |                |               |
campaigns    capsule/trailer  CTA quality   launch quality   patch quality   support quality
How it works
- Define positioning and audience.
- Build and test store assets.
- Run wishlist growth experiments.
- Execute launch runbook.
- Operate post-launch patch and support loop.
Minimal concrete example
Week plan:
Mon: test capsule variant A/B
Wed: update trailer first 10 seconds
Fri: review funnel metrics and patch priorities
Common misconceptions
- Good games market themselves.
- Launch day is the finish line.
Check-your-understanding questions
- Why is store page clarity part of engineering outcomes?
- Which launch-day metrics matter most in first 24 hours?
- Why rehearse incident response before release?
Check-your-understanding answers
- It directly affects acquisition efficiency and conversion of engineering effort.
- Crash rate, conversion, retention hints, and support queue latency.
- Decision quality drops under stress without predefined protocols.
Real-world applications
- Indie launch planning and first 90-day live ops execution.
Where you’ll apply it Projects 16, 18, 19, 20, 21.
References
- Steamworks release documentation
- Product positioning and growth references
- Postmortems from indie launch teams
Key insights Commercial success is a compound effect of product clarity, technical reliability, and consistent operations.
Summary Treat launch as an operational system with measurable inputs and controlled responses.
Homework/Exercises to practice the concept
- Draft a one-page launch runbook for your game.
- Define three weekly experiments for pre-launch wishlist growth.
Solutions to the homework/exercises
- Include ownership matrix, severity levels, communication templates, and rollback policy.
- Focus on capsule clarity, trailer opening sequence, and tag/description alignment.
Glossary
- Accumulator: Buffered elapsed time consumed by fixed simulation ticks.
- Branch Promotion: Moving a build from internal or beta channel to public default branch.
- Coyote Time: Short grace period after leaving ground where jump input still succeeds.
- Dirty Flag: Marker that data changed and requires deferred synchronization.
- Frame Pacing: Consistency of frame interval timing.
- MGCB: MonoGame content pipeline tool that transforms source assets into runtime formats.
- Nano Banana Workflow: Community shorthand for rapid Gemini-based image generation and editing workflow with structured prompts and review.
- Provenance Log: Trace of model, prompt, reviewer, and final export artifacts.
- SteamPipe: Build upload and depot system in Steamworks.
- Wishlist Funnel: Flow from discovery impression to store visit to wishlist action.
Why Game Development to Steam Publishing Matters
- Modern motivation and use-cases: Small teams can now ship globally with relatively low distribution friction, but product quality and operations maturity decide outcomes.
- Current platform scale: Steam reported roughly 132 million monthly active players and 69 million daily active players in 2024 Year in Review, making discoverability and retention engineering material business concerns.
- Platform process realities: Steam Direct requires a fee per app and staged release process constraints, which should be planned into roadmap milestones instead of treated as administrative afterthoughts.
- Hardware targeting reality: Steam Hardware Survey snapshots in late 2025 show Windows dominance, which strongly influences first-platform optimization strategy for indie teams.
- Concrete Steam launch constraints:
- Steam Direct fee is USD 100 per app and is recoupable after USD 1,000 adjusted gross revenue.
- New partner onboarding includes a 30-day waiting period before first release.
- Store page should be publicly visible as Coming Soon for at least 2 weeks before launch.
- Valve release review commonly runs 1 to 5 days, so schedule a buffer.
Old solo shipping mindset               Modern shipping mindset
+---------------------------+           +-----------------------------------+
| Build game -> upload once |           | Build -> test branches -> launch  |
| Hope for discovery        |   vs      | Store funnel + telemetry + patch  |
| No live ops               |           | Continuous operations             |
+---------------------------+           +-----------------------------------+
Context & Evolution
- Greenlight-era manual gatekeeping moved to Steam Direct fee plus review controls.
- Tooling matured: C# wrappers and modern CI-friendly content pipelines lowered implementation friction, raising the strategic bar on product quality and execution.
Concept Summary Table
| Concept Cluster | What You Need to Internalize |
|---|---|
| Real-Time MonoGame Architecture | Simulation truth must run on fixed, observable timing contracts regardless of render variance. |
| Gameplay Systems and Feel Tuning | State discipline and measurable tuning convert prototypes into reliable player experience. |
| Content Pipeline and Nano Banana Workflow | AI generation only scales when wrapped in style guardrails, provenance logging, and human QA. |
| Persistence and Reliability | Save/versioning/cloud systems require explicit schemas, migration tests, and failure recovery design. |
| Steamworks Integration and Release Engineering | Lifecycle correctness, callback handling, branch gating, and rollout discipline are non-negotiable. |
| Go-to-Market and Live Operations | Store clarity, wishlist conversion, launch rehearsals, and patch cadence drive long-term outcomes. |
Project-to-Concept Map
| Project | Concepts Applied |
|---|---|
| Project 1 | Real-Time MonoGame Architecture |
| Project 2 | Real-Time MonoGame Architecture |
| Project 3 | Real-Time MonoGame Architecture |
| Project 4 | Gameplay Systems and Feel Tuning |
| Project 5 | Gameplay Systems and Feel Tuning |
| Project 6 | Gameplay Systems and Feel Tuning |
| Project 7 | Gameplay Systems and Feel Tuning |
| Project 8 | Gameplay Systems and Feel Tuning |
| Project 9 | Gameplay Systems and Feel Tuning, Content Pipeline and Nano Banana Workflow, Persistence and Reliability |
| Project 10 | Gameplay Systems and Feel Tuning, Content Pipeline and Nano Banana Workflow, Persistence and Reliability |
| Project 11 | Gameplay Systems and Feel Tuning, Content Pipeline and Nano Banana Workflow, Persistence and Reliability |
| Project 12 | Steamworks Integration and Release Engineering, Persistence and Reliability |
| Project 13 | Steamworks Integration and Release Engineering, Persistence and Reliability |
| Project 14 | Steamworks Integration and Release Engineering, Persistence and Reliability |
| Project 15 | Steamworks Integration and Release Engineering, Persistence and Reliability |
| Project 16 | Go-to-Market and Live Operations, Steamworks Integration and Release Engineering |
| Project 17 | Go-to-Market and Live Operations, Steamworks Integration and Release Engineering |
| Project 18 | Go-to-Market and Live Operations, Steamworks Integration and Release Engineering |
| Project 19 | Go-to-Market and Live Operations, Steamworks Integration and Release Engineering |
| Project 20 | Go-to-Market and Live Operations, Steamworks Integration and Release Engineering |
| Project 21 | Go-to-Market and Live Operations, Steamworks Integration and Release Engineering |
Deep Dive Reading by Concept
| Concept | Book and Chapter | Why This Matters |
|---|---|---|
| Real-Time MonoGame Architecture | “Game Programming Patterns” by Robert Nystrom - Game Loop, State, Command | Gives battle-tested patterns for deterministic loops and decoupled behavior. |
| Gameplay Systems and Feel Tuning | “Game Engine Architecture” by Jason Gregory - Input, simulation, runtime architecture | Maps user input and simulation constraints to production runtime decisions. |
| Content Pipeline and Nano Banana Workflow | “Clean Architecture” by Robert C. Martin - boundaries and dependency control | Helps separate generation workflow from runtime domain logic. |
| Persistence and Reliability | “Release It!” by Michael Nygard - stability patterns and failure handling | Frames persistence, conflict handling, and operational recovery as engineering design. |
| Steamworks Integration and Release Engineering | Steamworks official documentation (API, release, cloud, leaderboards) | Authoritative integration lifecycle and release policy source. |
| Go-to-Market and Live Operations | “Traction” by Weinberg and Mares plus Steamworks marketing docs | Bridges technical launch readiness with acquisition and conversion mechanics. |
Quick Start: Your First 48 Hours
Day 1:
- Install .NET, MonoGame templates, and MGCB tools.
- Read Concept 1 and Concept 2 in the primer.
- Build Project 1 and show stable frame pacing overlay.
Day 2:
- Build Project 2 and verify SpriteBatch plus pixel tools.
- Build Project 3 input mapping and buffering prototype.
- Write your first personal postmortem: what broke, what became clearer.
Recommended Learning Paths
Path 1: The New Engine Programmer
- Project 1 -> Project 2 -> Project 3 -> Project 4 -> Project 5 -> Project 21
Path 2: The Gameplay Designer-Engineer
- Project 3 -> Project 5 -> Project 6 -> Project 7 -> Project 8 -> Project 20 -> Project 21
Path 3: The Shipping-Focused Indie
- Project 9 -> Project 11 -> Project 12 -> Project 16 -> Project 17 -> Project 18 -> Project 21
Success Metrics
- You can explain and defend your frame pacing strategy with measured telemetry.
- You can ship a save migration without data loss from two prior schema versions.
- You can integrate Steamworks callbacks and at least three platform features reliably.
- You can run a release rehearsal and execute a rollback without improvisation.
- You can document a complete funnel from store impression to retained player cohort.
Project Overview Table
| # | Project | Main Language | Difficulty | Time Estimate |
|---|---|---|---|---|
| 1 | The MonoGame Core Loop | C# (.NET 8) + MonoGame | Level 2 | Weekend |
| 2 | Pixel Painter and Sprite Batching | C# (.NET 8) + MonoGame | Level 2 | 1 week |
| 3 | Input Mapping and Command Buffer | C# (.NET 8) + MonoGame | Level 2 | 1 week |
| 4 | 2D Collision and Physics Slice | C# (.NET 8) + MonoGame | Level 3 | 2 weeks |
| 5 | Player Controller State Machine | C# (.NET 8) + MonoGame | Level 3 | 2 weeks |
| 6 | Pong Vertical Slice | C# (.NET 8) + MonoGame | Level 2 | Weekend |
| 7 | Breakout with Power-Ups | C# (.NET 8) + MonoGame | Level 2 | 1 week |
| 8 | Platformer Mechanics and Feel Tuning | C# (.NET 8) + MonoGame | Level 3 | 2 to 3 weeks |
| 9 | Save System Architecture | C# (.NET 8) + MonoGame | Level 3 | 1 week |
| 10 | Audio Mixer and Adaptive Music | C# (.NET 8) + MonoGame | Level 3 | 1 to 2 weeks |
| 11 | UI Flows and AI Asset Pipeline | C# (.NET 8) + MonoGame | Level 2 | 1 week |
| 12 | Steamworks Bootstrap for C# | C# (.NET 8) + MonoGame | Level 3 | 1 week |
| 13 | Achievements and Stats Telemetry | C# (.NET 8) + MonoGame | Level 3 | 1 week |
| 14 | Steam Cloud Save Sync | C# (.NET 8) + MonoGame | Level 3 | 1 week |
| 15 | Leaderboards and Fairness Guards | C# (.NET 8) + MonoGame | Level 4 | 1 to 2 weeks |
| 16 | Steam Store Page Builder | C# (.NET 8) + MonoGame | Level 2 | 1 week |
| 17 | Build and Branch Pipeline | C# (.NET 8) + MonoGame | Level 3 | 1 week |
| 18 | Release Readiness Drill | C# (.NET 8) + MonoGame | Level 3 | Weekend |
| 19 | Wishlist Funnel and Market Analysis | C# (.NET 8) + MonoGame | Level 2 | Weekend |
| 20 | Friend Slop Viral Prototype Sprint | C# (.NET 8) + MonoGame | Level 2 | Weekend |
| 21 | Ship a Complete Steam Game | C# (.NET 8) + MonoGame | Level 5 | 6 to 10 weeks |
Project List
The following projects guide you from runtime fundamentals to full Steam release operations.
Project 1: The MonoGame Core Loop
- File: P01-core-loop-monogame.md
- Main Programming Language: C# (.NET 8)
- Alternative Programming Languages: F#, C++ (raylib), Godot C#
- Coolness Level: Level 3
- Business Potential: Level 1
- Difficulty: Level 2
- Knowledge Area: Game Architecture and Real-Time Systems
- Software or Tool: MonoGame DesktopGL
- Main Book: Game Programming Patterns by Robert Nystrom
What you will build: A deterministic update and render loop with frame pacing telemetry and live debug overlay.
Why it teaches game development and shipping: This project forces you to connect system design with observable runtime and production outcomes.
Core challenges you will face:
- Frame pacing invariants -> maps to architecture clarity and deterministic behavior
- Input sampling windows -> maps to production reliability under changing requirements
- Deterministic state updates -> maps to scaling from prototype decisions to shipping constraints
Real World Outcome
This project produces a playable and observable game outcome, not just logs.
On screen you will see:
- Top-left HUD shows FPS, UPS, frame-time graph, backlog counter
- Center test sprite moves in deterministic path regardless of render FPS
- Bottom status line shows VSync state and update-step cap
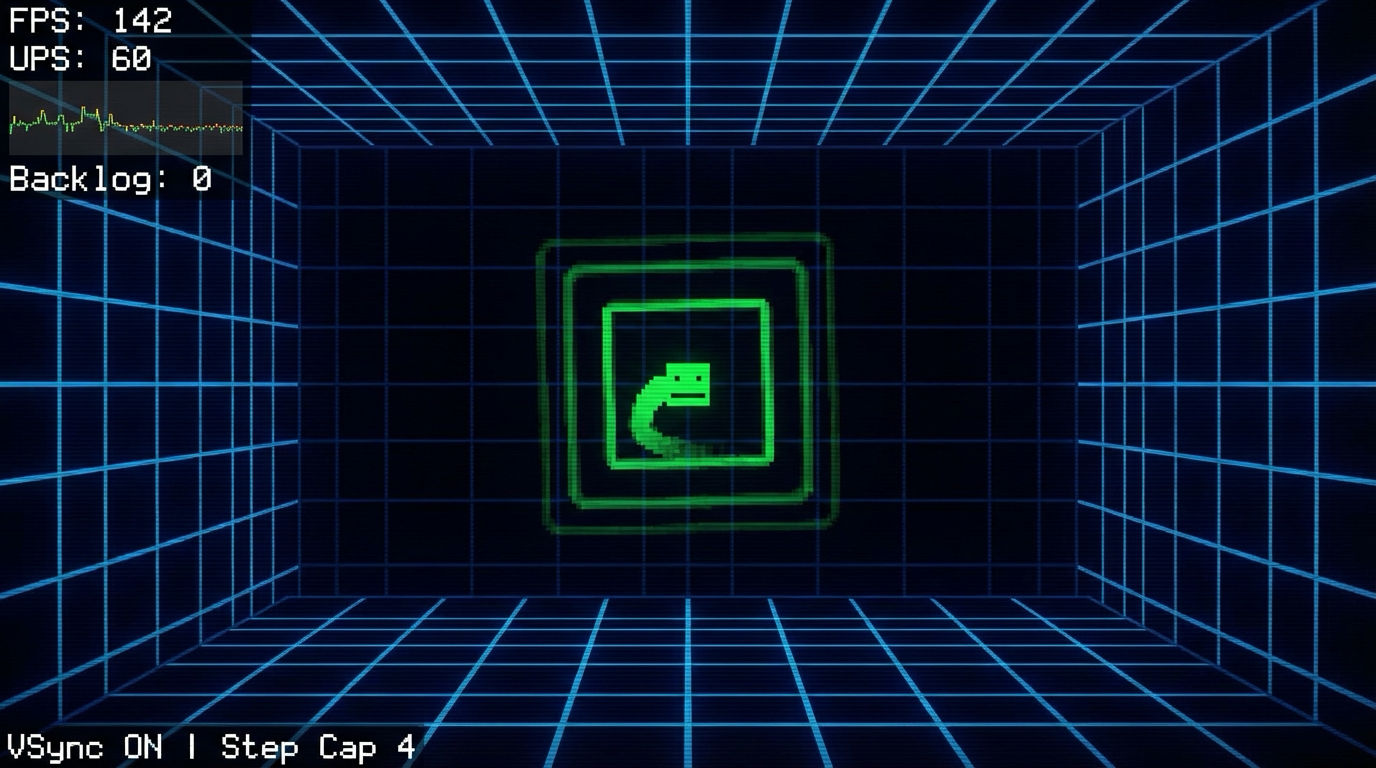
Interaction controls:
- F1 toggles debug HUD
- V toggles VSync
- R toggles render stress mode
Success signal:
- UPS stays fixed at 60 with backlog near zero under normal load.
Failure signal:
- If backlog grows continuously or UPS drifts, loop architecture is incorrect.
Golden path demonstration transcript:
$ dotnet run --project src/Game -- --scene core-loop
[HUD] fps=142 ups=60 backlog=0
[HUD] fps=58 ups=60 backlog=0
[CHECK] deterministic_path hash=8fd1a2 PASS
The Core Question You Are Answering
“How do you keep simulation deterministic when rendering speed changes?”
This question matters because it forces engineering decisions to align with player experience and launch reality.
Concepts You Must Understand First
- Frame pacing invariants
- How does this concept constrain design and testability?
- Book Reference: “Game Programming Patterns by Robert Nystrom”
- Input sampling windows
- What invariant should never be violated during runtime?
- Book Reference: “Clean Architecture” by Robert C. Martin
- Deterministic state updates
- Which failure mode appears first when this is ignored?
- Book Reference: “Release It!” by Michael T. Nygard
Questions to Guide Your Design
- Runtime boundary design
- What data enters this feature each tick, and what data leaves?
- Which part of this feature must remain deterministic?
- Operational resilience
- How will you detect degradation before players report it?
- What is your rollback or fallback path?
Thinking Exercise
Invariant-first design pass
Draw a state diagram for “The MonoGame Core Loop” and identify one invariant that must stay true even during failures.
Questions to answer:
- Which two events are most likely to break this invariant?
- What log or UI signal confirms the invariant is still holding?
The Interview Questions They Will Ask
- “How did you decompose The MonoGame Core Loop so it remained testable?”
- “Which invariant did you enforce first, and why?”
- “What instrumentation did you add to debug regressions quickly?”
- “What edge case surprised you during implementation?”
- “How would you productionize this feature for a larger team?”
Hints in Layers
Hint 1: Starting Point Define one deterministic acceptance scenario before implementing features.
Hint 2: Next Level Introduce a tiny event log model so runtime behavior can be replayed in tests.
Hint 3: Technical Details
collect_intent -> validate_preconditions -> apply_transition -> emit_feedback -> persist_if_needed
Hint 4: Tools/Debugging Add a debug panel line for each invariant and update it once per simulation tick.
Books That Will Help
| Topic | Book | Chapter |
|---|---|---|
| Runtime architecture | “Game Programming Patterns by Robert Nystrom” | Relevant runtime/system chapters |
| Reliability patterns | “Release It!” by Michael T. Nygard | Stability and resilience chapters |
| Refactoring large features | “Refactoring” by Martin Fowler | Code smells and safe transformations |
Common Pitfalls and Debugging
Problem 1: “Feature works in one scene but fails after restart”
- Why: Hidden state initialization dependency.
- Fix: Centralize initialization order and validate preconditions at scene entry.
- Quick test: dotnet test –filter core-loop-monogame
Problem 2: “Intermittent behavior under lower FPS”
- Why: Time-coupled logic leaking into deterministic state transitions.
- Fix: Move decision logic into fixed-step update and cap catch-up steps.
- Quick test: Run with synthetic frame limiter at 30 FPS and 144 FPS.
Definition of Done
- Core functionality works on reference inputs.
- Edge cases are tested and documented.
- Results are reproducible on two machine profiles.
- Performance trends match expected budget for this feature.
- A rollback or fallback strategy is documented.
Project 2: Pixel Painter and Sprite Batching
- File: P02-pixel-painter-sprite-batching.md
- Main Programming Language: C# (.NET 8)
- Alternative Programming Languages: F#, C++ (raylib), Godot C#
- Coolness Level: Level 3
- Business Potential: Level 1
- Difficulty: Level 2
- Knowledge Area: 2D Rendering and Memory Layout
- Software or Tool: MonoGame SpriteBatch and MGCB
- Main Book: Computer Graphics from Scratch by Gabriel Gambetta
What you will build: A software style pixel sandbox plus optimized SpriteBatch drawing path and texture atlas usage.
Why it teaches game development and shipping: This project forces you to connect system design with observable runtime and production outcomes.
Core challenges you will face:
- Pixel formats and alpha blending -> maps to architecture clarity and deterministic behavior
- Draw-call batching -> maps to production reliability under changing requirements
- Texture atlas strategy -> maps to scaling from prototype decisions to shipping constraints
Real World Outcome
This project produces a playable and observable game outcome, not just logs.
On screen you will see:
- Canvas shows Bresenham lines, midpoint circles, and filled rectangles
- Right panel shows draw calls, pixels written, atlas utilization
- Mode badge indicates Software Raster or SpriteBatch mode
![]()
Interaction controls:
- M toggles software and SpriteBatch mode
- Mouse drag paints pixels
- T cycles primitive test patterns
Success signal:
- Primitives render correctly and SpriteBatch mode significantly reduces draw calls.
Failure signal:
- Aliased shapes, wrong alpha blending, or no draw-call reduction indicates broken pipeline.
Golden path demonstration transcript:
$ dotnet run --project src/Game -- --scene pixel-painter
[RENDER] mode=software pixels=188742
[RENDER] primitives line=PASS circle=PASS rect=PASS
[RENDER] mode=spritebatch draw_calls=6 sprites=1200
The Core Question You Are Answering
“What actually happens between a sprite draw call and a frame on screen?”
This question matters because it forces engineering decisions to align with player experience and launch reality.
Concepts You Must Understand First
- Pixel formats and alpha blending
- How does this concept constrain design and testability?
- Book Reference: “Computer Graphics from Scratch by Gabriel Gambetta”
- Draw-call batching
- What invariant should never be violated during runtime?
- Book Reference: “Clean Architecture” by Robert C. Martin
- Texture atlas strategy
- Which failure mode appears first when this is ignored?
- Book Reference: “Release It!” by Michael T. Nygard
Questions to Guide Your Design
- Runtime boundary design
- What data enters this feature each tick, and what data leaves?
- Which part of this feature must remain deterministic?
- Operational resilience
- How will you detect degradation before players report it?
- What is your rollback or fallback path?
Thinking Exercise
Invariant-first design pass
Draw a state diagram for “Pixel Painter and Sprite Batching” and identify one invariant that must stay true even during failures.
Questions to answer:
- Which two events are most likely to break this invariant?
- What log or UI signal confirms the invariant is still holding?
The Interview Questions They Will Ask
- “How did you decompose Pixel Painter and Sprite Batching so it remained testable?”
- “Which invariant did you enforce first, and why?”
- “What instrumentation did you add to debug regressions quickly?”
- “What edge case surprised you during implementation?”
- “How would you productionize this feature for a larger team?”
Hints in Layers
Hint 1: Starting Point Define one deterministic acceptance scenario before implementing features.
Hint 2: Next Level Introduce a tiny event log model so runtime behavior can be replayed in tests.
Hint 3: Technical Details
collect_intent -> validate_preconditions -> apply_transition -> emit_feedback -> persist_if_needed
Hint 4: Tools/Debugging Add a debug panel line for each invariant and update it once per simulation tick.
Books That Will Help
| Topic | Book | Chapter |
|---|---|---|
| Runtime architecture | “Computer Graphics from Scratch by Gabriel Gambetta” | Relevant runtime/system chapters |
| Reliability patterns | “Release It!” by Michael T. Nygard | Stability and resilience chapters |
| Refactoring large features | “Refactoring” by Martin Fowler | Code smells and safe transformations |
Common Pitfalls and Debugging
Problem 1: “Feature works in one scene but fails after restart”
- Why: Hidden state initialization dependency.
- Fix: Centralize initialization order and validate preconditions at scene entry.
- Quick test: dotnet test –filter pixel-painter-sprite-batching
Problem 2: “Intermittent behavior under lower FPS”
- Why: Time-coupled logic leaking into deterministic state transitions.
- Fix: Move decision logic into fixed-step update and cap catch-up steps.
- Quick test: Run with synthetic frame limiter at 30 FPS and 144 FPS.
Definition of Done
- Core functionality works on reference inputs.
- Edge cases are tested and documented.
- Results are reproducible on two machine profiles.
- Performance trends match expected budget for this feature.
- A rollback or fallback strategy is documented.
Project 3: Input Mapping and Command Buffer
- File: P03-input-mapping-command-buffer.md
- Main Programming Language: C# (.NET 8)
- Alternative Programming Languages: F#, C++ (raylib), Godot C#
- Coolness Level: Level 3
- Business Potential: Level 1
- Difficulty: Level 2
- Knowledge Area: Input Systems and UX
- Software or Tool: MonoGame Input APIs
- Main Book: Game Engine Architecture by Jason Gregory
What you will build: An action based input system with keyboard and gamepad rebinding and temporal input buffering.
Why it teaches game development and shipping: This project forces you to connect system design with observable runtime and production outcomes.
Core challenges you will face:
- Action abstraction -> maps to architecture clarity and deterministic behavior
- Edge triggered states -> maps to production reliability under changing requirements
- Input buffering -> maps to scaling from prototype decisions to shipping constraints
Real World Outcome
This project produces a playable and observable game outcome, not just logs.
On screen you will see:
- Action state table shows Pressed/Held/Released transitions per frame
- Input history strip shows last 20 actions with timestamps
- Combo detector panel highlights matched command sequences
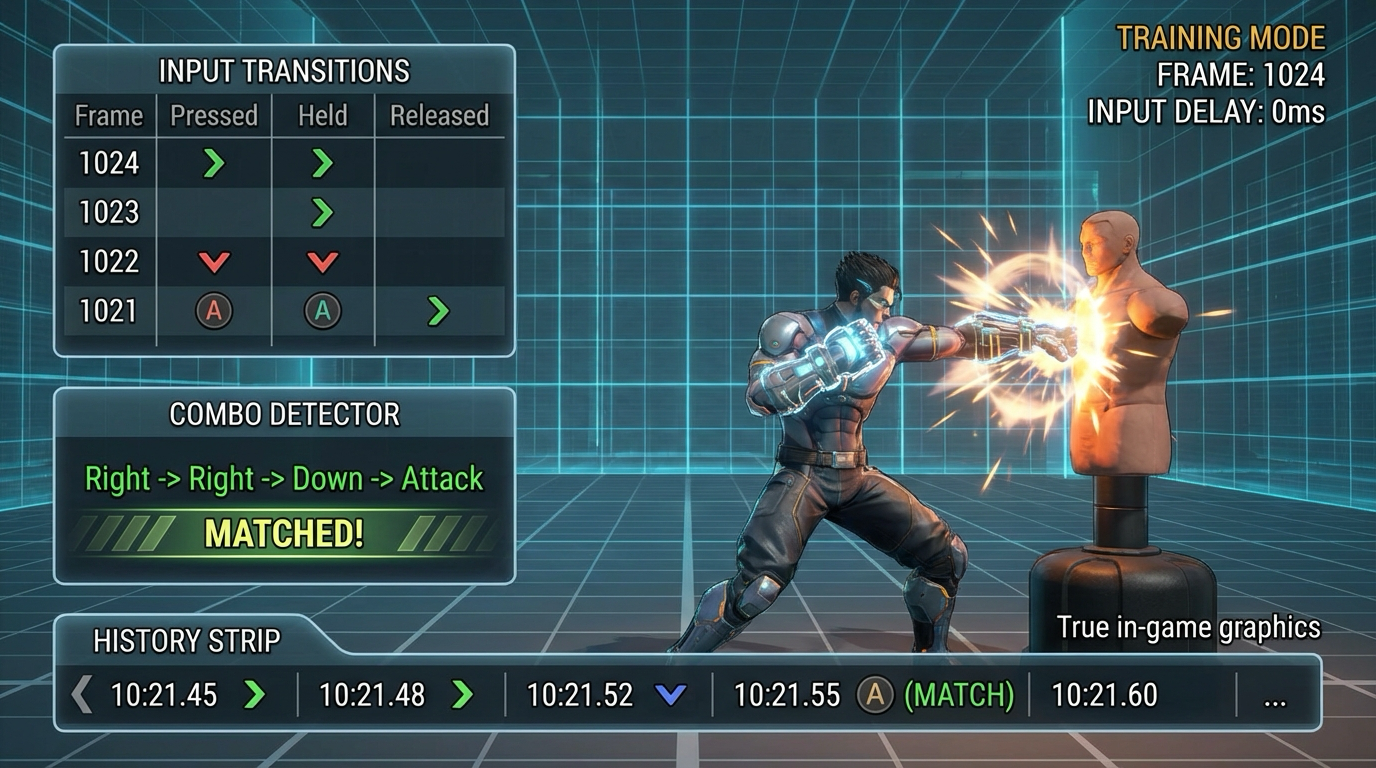
Interaction controls:
- R enters rebinding mode
- Arrow keys and action keys feed command buffer
- F2 toggles raw device vs action abstraction view
Success signal:
- Rebinding persists, edge states are correct, and combo windows match configuration.
Failure signal:
- Stuck input states or false combo triggers indicate state-tracking bugs.
Golden path demonstration transcript:
$ dotnet run --project src/Game -- --scene input-lab
[INPUT] action=Jump state=Pressed
[INPUT] rebind Jump -> J saved=true
[BUFFER] sequence=Right,Right,Down,Attack match=PASS
The Core Question You Are Answering
“How do you make controls feel responsive and rebindable without spaghetti code?”
This question matters because it forces engineering decisions to align with player experience and launch reality.
Concepts You Must Understand First
- Action abstraction
- How does this concept constrain design and testability?
- Book Reference: “Game Engine Architecture by Jason Gregory”
- Edge triggered states
- What invariant should never be violated during runtime?
- Book Reference: “Clean Architecture” by Robert C. Martin
- Input buffering
- Which failure mode appears first when this is ignored?
- Book Reference: “Release It!” by Michael T. Nygard
Questions to Guide Your Design
- Runtime boundary design
- What data enters this feature each tick, and what data leaves?
- Which part of this feature must remain deterministic?
- Operational resilience
- How will you detect degradation before players report it?
- What is your rollback or fallback path?
Thinking Exercise
Invariant-first design pass
Draw a state diagram for “Input Mapping and Command Buffer” and identify one invariant that must stay true even during failures.
Questions to answer:
- Which two events are most likely to break this invariant?
- What log or UI signal confirms the invariant is still holding?
The Interview Questions They Will Ask
- “How did you decompose Input Mapping and Command Buffer so it remained testable?”
- “Which invariant did you enforce first, and why?”
- “What instrumentation did you add to debug regressions quickly?”
- “What edge case surprised you during implementation?”
- “How would you productionize this feature for a larger team?”
Hints in Layers
Hint 1: Starting Point Define one deterministic acceptance scenario before implementing features.
Hint 2: Next Level Introduce a tiny event log model so runtime behavior can be replayed in tests.
Hint 3: Technical Details
collect_intent -> validate_preconditions -> apply_transition -> emit_feedback -> persist_if_needed
Hint 4: Tools/Debugging Add a debug panel line for each invariant and update it once per simulation tick.
Books That Will Help
| Topic | Book | Chapter |
|---|---|---|
| Runtime architecture | “Game Engine Architecture by Jason Gregory” | Relevant runtime/system chapters |
| Reliability patterns | “Release It!” by Michael T. Nygard | Stability and resilience chapters |
| Refactoring large features | “Refactoring” by Martin Fowler | Code smells and safe transformations |
Common Pitfalls and Debugging
Problem 1: “Feature works in one scene but fails after restart”
- Why: Hidden state initialization dependency.
- Fix: Centralize initialization order and validate preconditions at scene entry.
- Quick test: dotnet test –filter input-mapping-command-buffer
Problem 2: “Intermittent behavior under lower FPS”
- Why: Time-coupled logic leaking into deterministic state transitions.
- Fix: Move decision logic into fixed-step update and cap catch-up steps.
- Quick test: Run with synthetic frame limiter at 30 FPS and 144 FPS.
Definition of Done
- Core functionality works on reference inputs.
- Edge cases are tested and documented.
- Results are reproducible on two machine profiles.
- Performance trends match expected budget for this feature.
- A rollback or fallback strategy is documented.
Project 4: 2D Collision and Physics Slice
- File: P04-physics-collision-slice.md
- Main Programming Language: C# (.NET 8)
- Alternative Programming Languages: F#, C++ (raylib), Godot C#
- Coolness Level: Level 4
- Business Potential: Level 1
- Difficulty: Level 3
- Knowledge Area: Physics and Collision
- Software or Tool: MonoGame plus custom simulation
- Main Book: Game Physics Engine Development by Ian Millington
What you will build: A collision sandbox with AABB broadphase, narrowphase resolution, and debug vector overlays.
Why it teaches game development and shipping: This project forces you to connect system design with observable runtime and production outcomes.
Core challenges you will face:
- Broadphase culling -> maps to architecture clarity and deterministic behavior
- Contact resolution -> maps to production reliability under changing requirements
- Fixed timestep physics -> maps to scaling from prototype decisions to shipping constraints
Real World Outcome
This project produces a playable and observable game outcome, not just logs.
On screen you will see:
- Debug view shows AABB bounds, normals, and penetration vectors
- Statistics panel displays broadphase pairs and narrowphase contacts
- Scenario selector runs stack stability and projectile tunnel tests
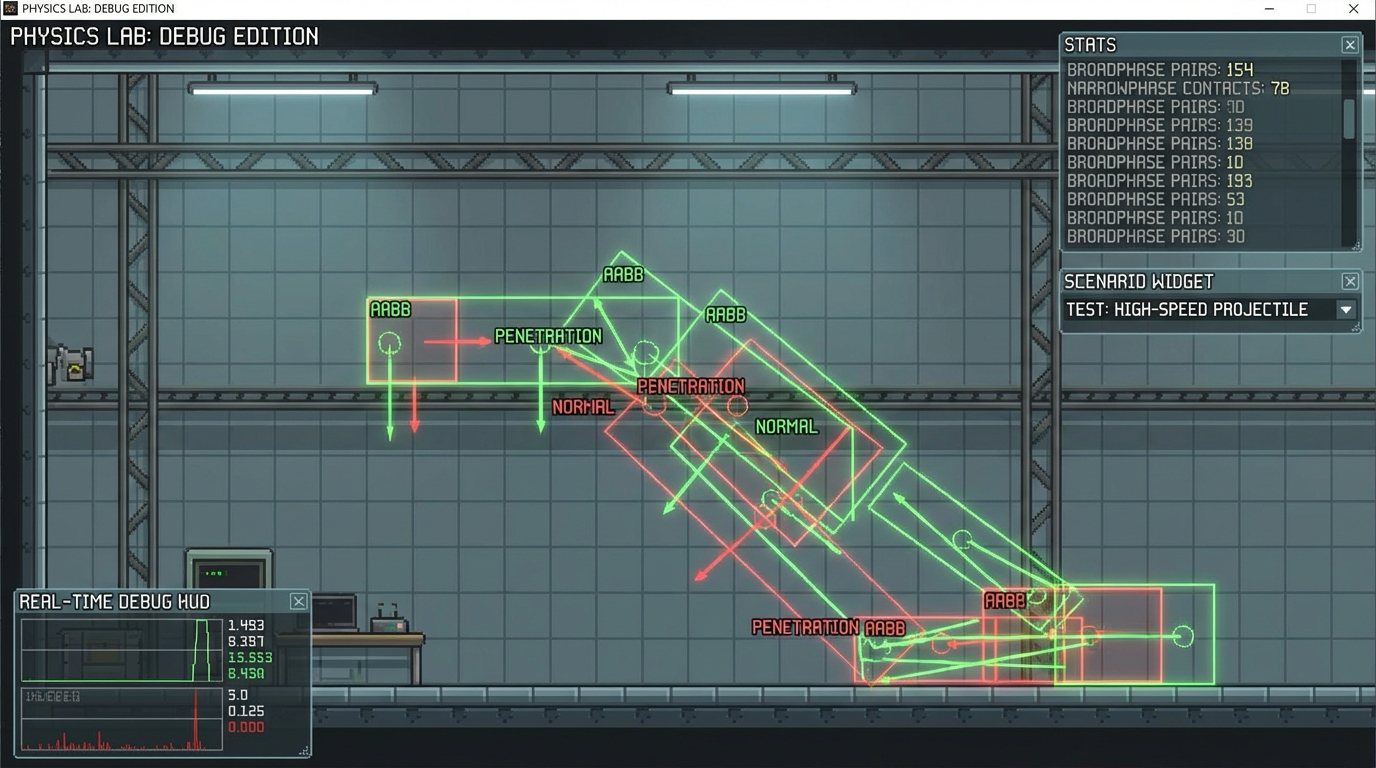
Interaction controls:
- 1 runs stack stability test
- 2 runs high-speed projectile test
- N toggles contact normal overlays
Success signal:
- No tunneling in projectile test and low jitter in stacked contacts.
Failure signal:
- Objects passing through walls or jittering stacks indicates solver issues.
Golden path demonstration transcript:
$ dotnet run --project src/Game -- --scene physics-lab
[PHYS] broadphase_pairs=142 contacts=37
[PHYS] stack_jitter_metric=0.003 PASS
[PHYS] projectile_tunnel_events=0 PASS
The Core Question You Are Answering
“How do you prevent tunneling and jitter while keeping the simulation explainable?”
This question matters because it forces engineering decisions to align with player experience and launch reality.
Concepts You Must Understand First
- Broadphase culling
- How does this concept constrain design and testability?
- Book Reference: “Game Physics Engine Development by Ian Millington”
- Contact resolution
- What invariant should never be violated during runtime?
- Book Reference: “Clean Architecture” by Robert C. Martin
- Fixed timestep physics
- Which failure mode appears first when this is ignored?
- Book Reference: “Release It!” by Michael T. Nygard
Questions to Guide Your Design
- Runtime boundary design
- What data enters this feature each tick, and what data leaves?
- Which part of this feature must remain deterministic?
- Operational resilience
- How will you detect degradation before players report it?
- What is your rollback or fallback path?
Thinking Exercise
Invariant-first design pass
Draw a state diagram for “2D Collision and Physics Slice” and identify one invariant that must stay true even during failures.
Questions to answer:
- Which two events are most likely to break this invariant?
- What log or UI signal confirms the invariant is still holding?
The Interview Questions They Will Ask
- “How did you decompose 2D Collision and Physics Slice so it remained testable?”
- “Which invariant did you enforce first, and why?”
- “What instrumentation did you add to debug regressions quickly?”
- “What edge case surprised you during implementation?”
- “How would you productionize this feature for a larger team?”
Hints in Layers
Hint 1: Starting Point Define one deterministic acceptance scenario before implementing features.
Hint 2: Next Level Introduce a tiny event log model so runtime behavior can be replayed in tests.
Hint 3: Technical Details
collect_intent -> validate_preconditions -> apply_transition -> emit_feedback -> persist_if_needed
Hint 4: Tools/Debugging Add a debug panel line for each invariant and update it once per simulation tick.
Books That Will Help
| Topic | Book | Chapter |
|---|---|---|
| Runtime architecture | “Game Physics Engine Development by Ian Millington” | Relevant runtime/system chapters |
| Reliability patterns | “Release It!” by Michael T. Nygard | Stability and resilience chapters |
| Refactoring large features | “Refactoring” by Martin Fowler | Code smells and safe transformations |
Common Pitfalls and Debugging
Problem 1: “Feature works in one scene but fails after restart”
- Why: Hidden state initialization dependency.
- Fix: Centralize initialization order and validate preconditions at scene entry.
- Quick test: dotnet test –filter physics-collision-slice
Problem 2: “Intermittent behavior under lower FPS”
- Why: Time-coupled logic leaking into deterministic state transitions.
- Fix: Move decision logic into fixed-step update and cap catch-up steps.
- Quick test: Run with synthetic frame limiter at 30 FPS and 144 FPS.
Definition of Done
- Core functionality works on reference inputs.
- Edge cases are tested and documented.
- Results are reproducible on two machine profiles.
- Performance trends match expected budget for this feature.
- A rollback or fallback strategy is documented.
Project 5: Player Controller State Machine
- File: P05-player-controller-state-machine.md
- Main Programming Language: C# (.NET 8)
- Alternative Programming Languages: F#, C++ (raylib), Godot C#
- Coolness Level: Level 3
- Business Potential: Level 1
- Difficulty: Level 3
- Knowledge Area: Gameplay Architecture
- Software or Tool: MonoGame and component patterns
- Main Book: Game Programming Patterns by Robert Nystrom
What you will build: A character controller with grounded and airborne states, coyote time, jump buffering, and dashes.
Why it teaches game development and shipping: This project forces you to connect system design with observable runtime and production outcomes.
Core challenges you will face:
- Finite state machines -> maps to architecture clarity and deterministic behavior
- Input forgiveness windows -> maps to production reliability under changing requirements
- Animation driven feedback -> maps to scaling from prototype decisions to shipping constraints
Real World Outcome
This project produces a playable and observable game outcome, not just logs.
On screen you will see:
- Platformer room with ledges, jump gaps, and dash checkpoints
- State HUD shows Grounded/Airborne/Dash transitions
- Feel panel shows coyote timer and jump buffer counters

Interaction controls:
- A/D move
- Space jump
- Left Shift dash
Success signal:
- Controller transitions are predictable and forgiveness windows behave as designed.
Failure signal:
- Missed buffered jumps or invalid state transitions signal controller architecture issues.
Golden path demonstration transcript:
$ dotnet run --project src/Game -- --scene controller-lab
[CTRL] Grounded->Airborne reason=JumpPressed
[CTRL] coyote_hit=true buffer_hit=true
[CTRL] replay_hash=31d9c7 deterministic=PASS
The Core Question You Are Answering
“How do modern platformers combine strict rules and forgiving controls?”
This question matters because it forces engineering decisions to align with player experience and launch reality.
Concepts You Must Understand First
- Finite state machines
- How does this concept constrain design and testability?
- Book Reference: “Game Programming Patterns by Robert Nystrom”
- Input forgiveness windows
- What invariant should never be violated during runtime?
- Book Reference: “Clean Architecture” by Robert C. Martin
- Animation driven feedback
- Which failure mode appears first when this is ignored?
- Book Reference: “Release It!” by Michael T. Nygard
Questions to Guide Your Design
- Runtime boundary design
- What data enters this feature each tick, and what data leaves?
- Which part of this feature must remain deterministic?
- Operational resilience
- How will you detect degradation before players report it?
- What is your rollback or fallback path?
Thinking Exercise
Invariant-first design pass
Draw a state diagram for “Player Controller State Machine” and identify one invariant that must stay true even during failures.
Questions to answer:
- Which two events are most likely to break this invariant?
- What log or UI signal confirms the invariant is still holding?
The Interview Questions They Will Ask
- “How did you decompose Player Controller State Machine so it remained testable?”
- “Which invariant did you enforce first, and why?”
- “What instrumentation did you add to debug regressions quickly?”
- “What edge case surprised you during implementation?”
- “How would you productionize this feature for a larger team?”
Hints in Layers
Hint 1: Starting Point Define one deterministic acceptance scenario before implementing features.
Hint 2: Next Level Introduce a tiny event log model so runtime behavior can be replayed in tests.
Hint 3: Technical Details
collect_intent -> validate_preconditions -> apply_transition -> emit_feedback -> persist_if_needed
Hint 4: Tools/Debugging Add a debug panel line for each invariant and update it once per simulation tick.
Books That Will Help
| Topic | Book | Chapter |
|---|---|---|
| Runtime architecture | “Game Programming Patterns by Robert Nystrom” | Relevant runtime/system chapters |
| Reliability patterns | “Release It!” by Michael T. Nygard | Stability and resilience chapters |
| Refactoring large features | “Refactoring” by Martin Fowler | Code smells and safe transformations |
Common Pitfalls and Debugging
Problem 1: “Feature works in one scene but fails after restart”
- Why: Hidden state initialization dependency.
- Fix: Centralize initialization order and validate preconditions at scene entry.
- Quick test: dotnet test –filter player-controller-state-machine
Problem 2: “Intermittent behavior under lower FPS”
- Why: Time-coupled logic leaking into deterministic state transitions.
- Fix: Move decision logic into fixed-step update and cap catch-up steps.
- Quick test: Run with synthetic frame limiter at 30 FPS and 144 FPS.
Definition of Done
- Core functionality works on reference inputs.
- Edge cases are tested and documented.
- Results are reproducible on two machine profiles.
- Performance trends match expected budget for this feature.
- A rollback or fallback strategy is documented.
Project 6: Pong Vertical Slice
- File: P06-pong-vertical-slice.md
- Main Programming Language: C# (.NET 8)
- Alternative Programming Languages: F#, C++ (raylib), Godot C#
- Coolness Level: Level 2
- Business Potential: Level 2
- Difficulty: Level 2
- Knowledge Area: Complete Small Game
- Software or Tool: MonoGame
- Main Book: The Art of Game Design by Jesse Schell
What you will build: A polished Pong build with menus, pause, settings, and local two player mode.
Why it teaches game development and shipping: This project forces you to connect system design with observable runtime and production outcomes.
Core challenges you will face:
- Game loop composition -> maps to architecture clarity and deterministic behavior
- UI to gameplay boundaries -> maps to production reliability under changing requirements
- Playtesting loops -> maps to scaling from prototype decisions to shipping constraints
Real World Outcome
This project produces a playable and observable game outcome, not just logs.
On screen you will see:
- Main menu, settings panel, and in-match scoreboard
- Arena with two paddles, ball trail, and score cap indicator
- Match-end screen with winner and rematch action
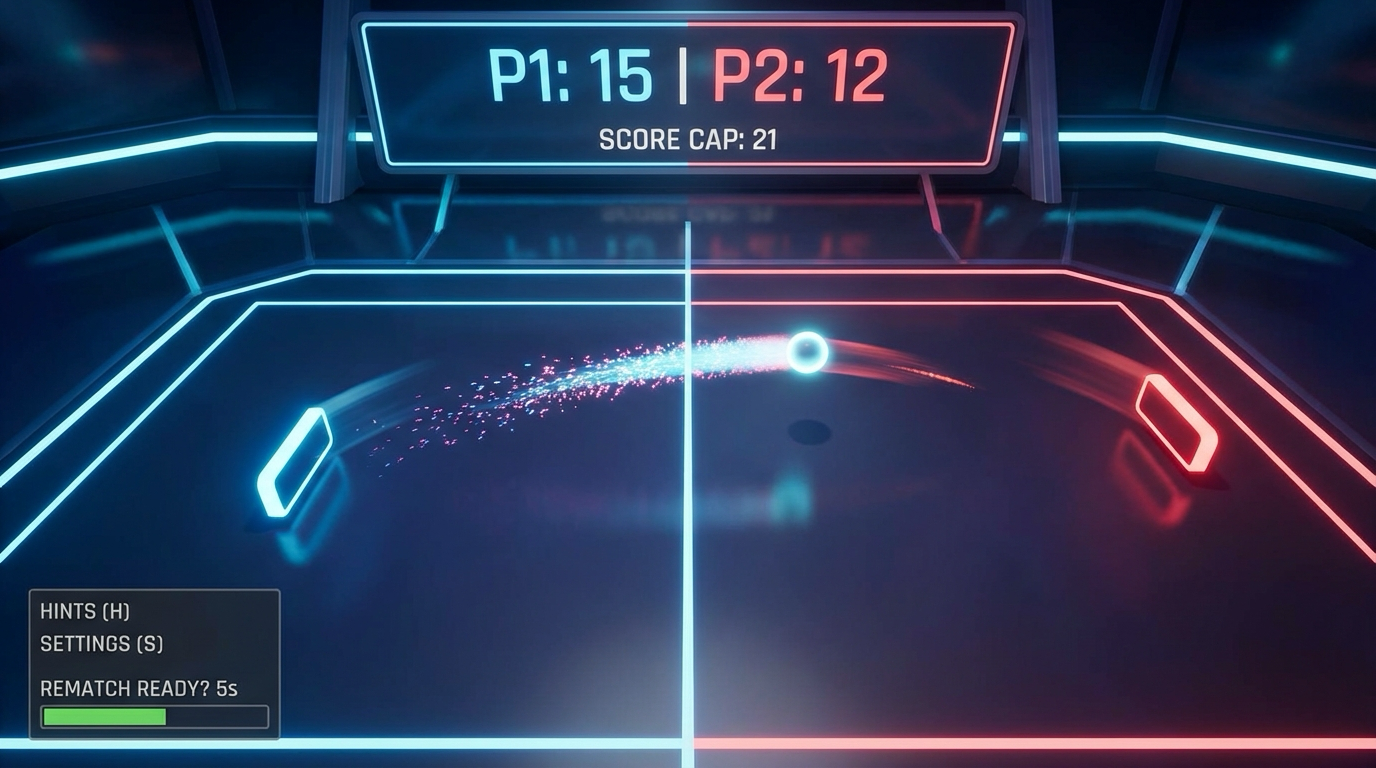
Interaction controls:
- W/S for Player 1
- Up/Down for Player 2
- Esc pause
Success signal:
- A full playable Pong match runs from menu to winner screen and restart.
Failure signal:
- Soft locks in menu/pause/end flow or incorrect scoring breaks vertical slice quality.
Golden path demonstration transcript:
$ dotnet run --project src/Game -- --scene pong
[PONG] match_start score_cap=10
[PONG] score P1=10 P2=7 winner=P1
[UI] end_screen shown rematch_available=true
The Core Question You Are Answering
“What minimum set of systems turns a prototype into a shippable tiny game?”
This question matters because it forces engineering decisions to align with player experience and launch reality.
Concepts You Must Understand First
- Game loop composition
- How does this concept constrain design and testability?
- Book Reference: “The Art of Game Design by Jesse Schell”
- UI to gameplay boundaries
- What invariant should never be violated during runtime?
- Book Reference: “Clean Architecture” by Robert C. Martin
- Playtesting loops
- Which failure mode appears first when this is ignored?
- Book Reference: “Release It!” by Michael T. Nygard
Questions to Guide Your Design
- Runtime boundary design
- What data enters this feature each tick, and what data leaves?
- Which part of this feature must remain deterministic?
- Operational resilience
- How will you detect degradation before players report it?
- What is your rollback or fallback path?
Thinking Exercise
Invariant-first design pass
Draw a state diagram for “Pong Vertical Slice” and identify one invariant that must stay true even during failures.
Questions to answer:
- Which two events are most likely to break this invariant?
- What log or UI signal confirms the invariant is still holding?
The Interview Questions They Will Ask
- “How did you decompose Pong Vertical Slice so it remained testable?”
- “Which invariant did you enforce first, and why?”
- “What instrumentation did you add to debug regressions quickly?”
- “What edge case surprised you during implementation?”
- “How would you productionize this feature for a larger team?”
Hints in Layers
Hint 1: Starting Point Define one deterministic acceptance scenario before implementing features.
Hint 2: Next Level Introduce a tiny event log model so runtime behavior can be replayed in tests.
Hint 3: Technical Details
collect_intent -> validate_preconditions -> apply_transition -> emit_feedback -> persist_if_needed
Hint 4: Tools/Debugging Add a debug panel line for each invariant and update it once per simulation tick.
Books That Will Help
| Topic | Book | Chapter |
|---|---|---|
| Runtime architecture | “The Art of Game Design by Jesse Schell” | Relevant runtime/system chapters |
| Reliability patterns | “Release It!” by Michael T. Nygard | Stability and resilience chapters |
| Refactoring large features | “Refactoring” by Martin Fowler | Code smells and safe transformations |
Common Pitfalls and Debugging
Problem 1: “Feature works in one scene but fails after restart”
- Why: Hidden state initialization dependency.
- Fix: Centralize initialization order and validate preconditions at scene entry.
- Quick test: dotnet test –filter pong-vertical-slice
Problem 2: “Intermittent behavior under lower FPS”
- Why: Time-coupled logic leaking into deterministic state transitions.
- Fix: Move decision logic into fixed-step update and cap catch-up steps.
- Quick test: Run with synthetic frame limiter at 30 FPS and 144 FPS.
Definition of Done
- Core functionality works on reference inputs.
- Edge cases are tested and documented.
- Results are reproducible on two machine profiles.
- Performance trends match expected budget for this feature.
- A rollback or fallback strategy is documented.
Project 7: Breakout with Power-Ups
- File: P07-breakout-power-ups.md
- Main Programming Language: C# (.NET 8)
- Alternative Programming Languages: F#, C++ (raylib), Godot C#
- Coolness Level: Level 3
- Business Potential: Level 2
- Difficulty: Level 2
- Knowledge Area: Systems Composition
- Software or Tool: MonoGame plus content pipeline
- Main Book: Game Programming Patterns by Robert Nystrom
What you will build: A Breakout clone with deterministic brick layouts, drop tables, and progression pacing.
Why it teaches game development and shipping: This project forces you to connect system design with observable runtime and production outcomes.
Core challenges you will face:
- Entity lifecycle rules -> maps to architecture clarity and deterministic behavior
- Spawn probability tables -> maps to production reliability under changing requirements
- Difficulty ramp curves -> maps to scaling from prototype decisions to shipping constraints
Real World Outcome
This project produces a playable and observable game outcome, not just logs.
On screen you will see:
- Brick grid with health variants and drop indicators
- HUD with score, lives, combo multiplier, active power-ups
- Level-clear banner and transition animation
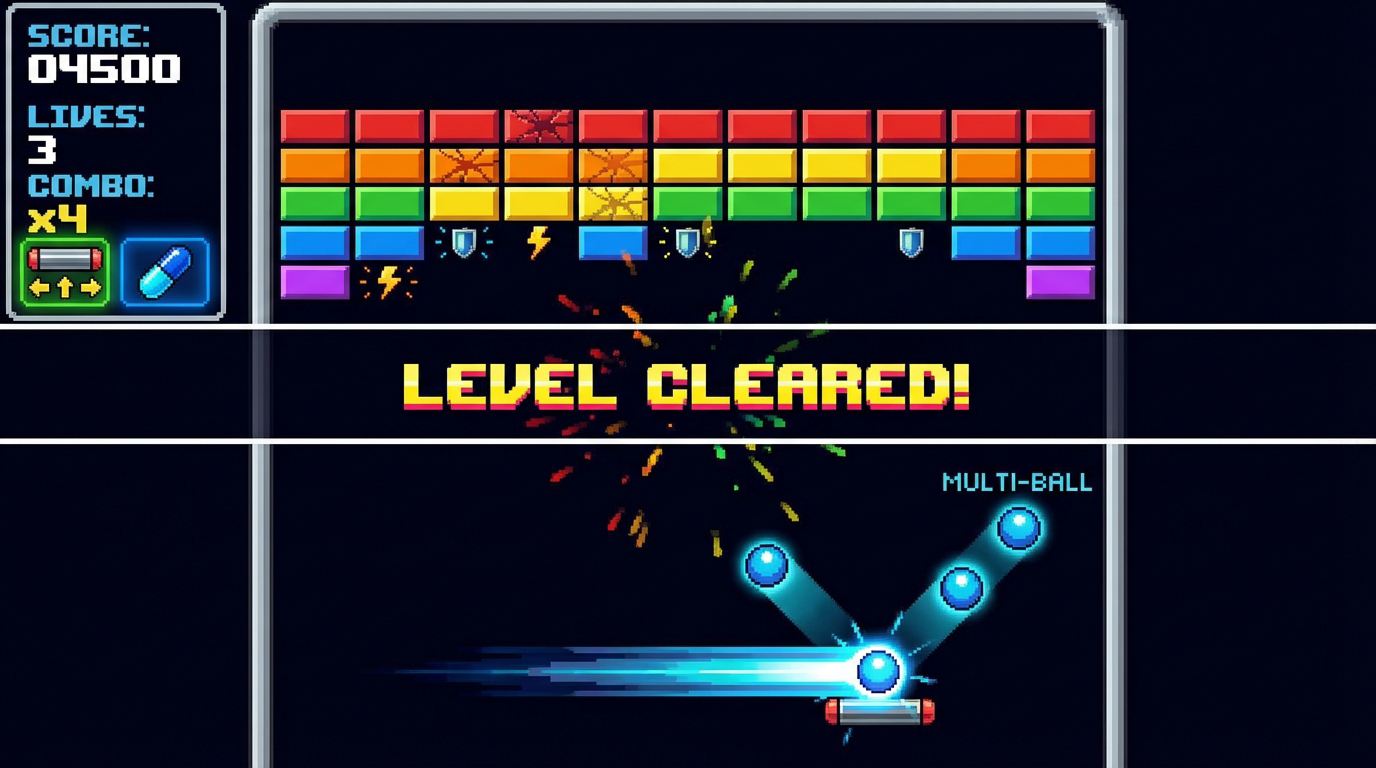
Interaction controls:
- Left/Right move paddle
- Space launch ball
- Esc pause
Success signal:
- Levels clear with deterministic brick layouts and controlled power-up behavior.
Failure signal:
- Broken progression or unbounded multi-ball chaos indicates system instability.
Golden path demonstration transcript:
$ dotnet run --project src/Game -- --scene breakout
[BRK] level=1 seed=101 bricks=84
[BRK] drop=WidePaddle spawned=true duration=12s
[BRK] level_clear next_level=2
The Core Question You Are Answering
“How do you add systemic depth without breaking game readability?”
This question matters because it forces engineering decisions to align with player experience and launch reality.
Concepts You Must Understand First
- Entity lifecycle rules
- How does this concept constrain design and testability?
- Book Reference: “Game Programming Patterns by Robert Nystrom”
- Spawn probability tables
- What invariant should never be violated during runtime?
- Book Reference: “Clean Architecture” by Robert C. Martin
- Difficulty ramp curves
- Which failure mode appears first when this is ignored?
- Book Reference: “Release It!” by Michael T. Nygard
Questions to Guide Your Design
- Runtime boundary design
- What data enters this feature each tick, and what data leaves?
- Which part of this feature must remain deterministic?
- Operational resilience
- How will you detect degradation before players report it?
- What is your rollback or fallback path?
Thinking Exercise
Invariant-first design pass
Draw a state diagram for “Breakout with Power-Ups” and identify one invariant that must stay true even during failures.
Questions to answer:
- Which two events are most likely to break this invariant?
- What log or UI signal confirms the invariant is still holding?
The Interview Questions They Will Ask
- “How did you decompose Breakout with Power-Ups so it remained testable?”
- “Which invariant did you enforce first, and why?”
- “What instrumentation did you add to debug regressions quickly?”
- “What edge case surprised you during implementation?”
- “How would you productionize this feature for a larger team?”
Hints in Layers
Hint 1: Starting Point Define one deterministic acceptance scenario before implementing features.
Hint 2: Next Level Introduce a tiny event log model so runtime behavior can be replayed in tests.
Hint 3: Technical Details
collect_intent -> validate_preconditions -> apply_transition -> emit_feedback -> persist_if_needed
Hint 4: Tools/Debugging Add a debug panel line for each invariant and update it once per simulation tick.
Books That Will Help
| Topic | Book | Chapter |
|---|---|---|
| Runtime architecture | “Game Programming Patterns by Robert Nystrom” | Relevant runtime/system chapters |
| Reliability patterns | “Release It!” by Michael T. Nygard | Stability and resilience chapters |
| Refactoring large features | “Refactoring” by Martin Fowler | Code smells and safe transformations |
Common Pitfalls and Debugging
Problem 1: “Feature works in one scene but fails after restart”
- Why: Hidden state initialization dependency.
- Fix: Centralize initialization order and validate preconditions at scene entry.
- Quick test: dotnet test –filter breakout-power-ups
Problem 2: “Intermittent behavior under lower FPS”
- Why: Time-coupled logic leaking into deterministic state transitions.
- Fix: Move decision logic into fixed-step update and cap catch-up steps.
- Quick test: Run with synthetic frame limiter at 30 FPS and 144 FPS.
Definition of Done
- Core functionality works on reference inputs.
- Edge cases are tested and documented.
- Results are reproducible on two machine profiles.
- Performance trends match expected budget for this feature.
- A rollback or fallback strategy is documented.
Project 8: Platformer Mechanics and Feel Tuning
- File: P08-platformer-mechanics-feel-tuning.md
- Main Programming Language: C# (.NET 8)
- Alternative Programming Languages: F#, C++ (raylib), Godot C#
- Coolness Level: Level 4
- Business Potential: Level 2
- Difficulty: Level 3
- Knowledge Area: Game Feel and Design
- Software or Tool: MonoGame with debug tuning UI
- Main Book: A Theory of Fun for Game Design by Raph Koster
What you will build: A platformer movement lab with live tweakable acceleration, friction, gravity scales, and camera damping.
Why it teaches game development and shipping: This project forces you to connect system design with observable runtime and production outcomes.
Core challenges you will face:
- Feel metrics -> maps to architecture clarity and deterministic behavior
- Telemetry driven tuning -> maps to production reliability under changing requirements
- Camera and motion comfort -> maps to scaling from prototype decisions to shipping constraints
Real World Outcome
This project produces a playable and observable game outcome, not just logs.
On screen you will see:
- Side-view test room with ramps, gaps, and moving platforms
- Live sliders for acceleration, friction, gravity, jump cut, camera damping
- Metric panel for apex time, stop distance, input latency
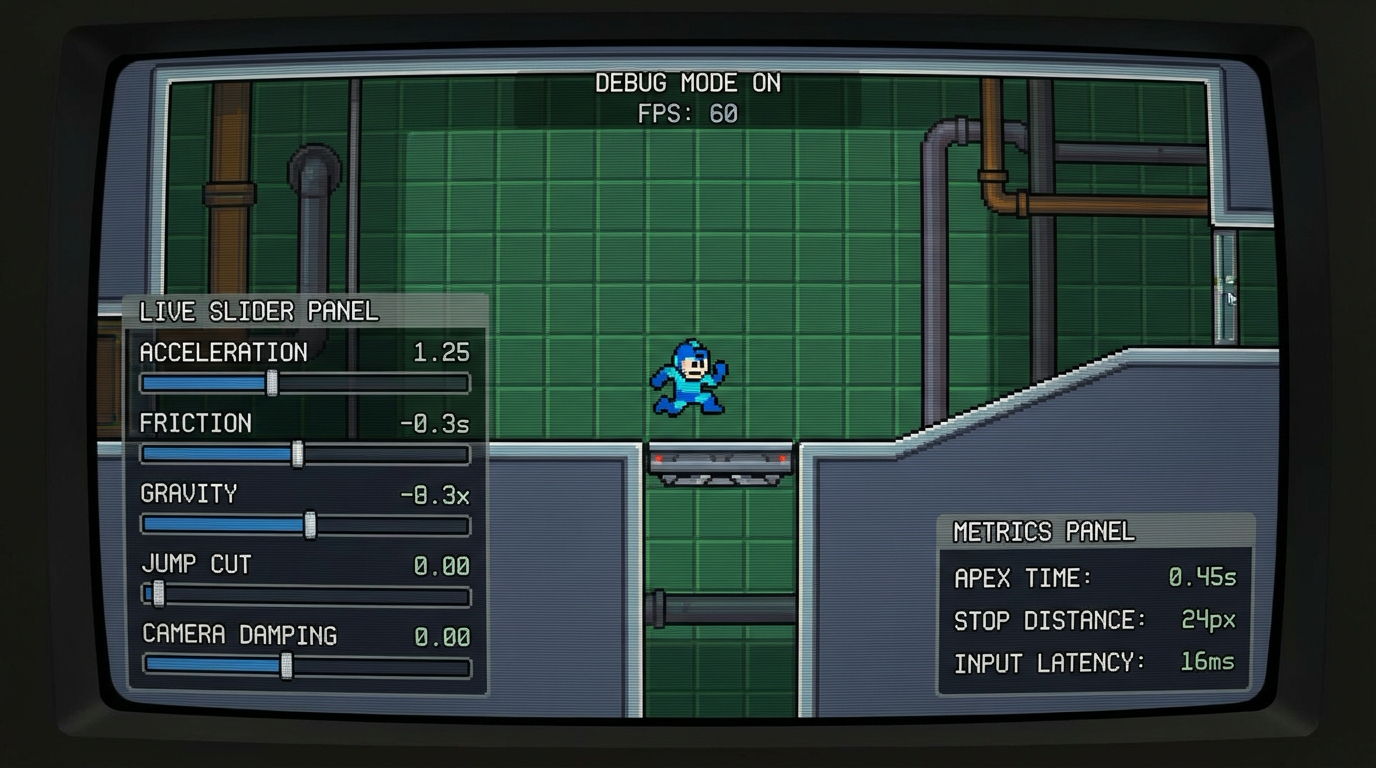
Interaction controls:
- A/D move
- Space jump
- Tab toggles slider panel
Success signal:
- Movement tuning can be measured, saved, and compared across presets.
Failure signal:
- No measurable improvement loop means tuning remains subjective and unreliable.
Golden path demonstration transcript:
$ dotnet run --project src/Game -- --scene feel-lab
[FEEL] apex_ms=412 stop_px=53 latency_ms=28
[FEEL] preset=TournamentCandidate saved
[FEEL] benchmark_run id=7 score=PASS
The Core Question You Are Answering
“How do you tune movement scientifically instead of by guesswork?”
This question matters because it forces engineering decisions to align with player experience and launch reality.
Concepts You Must Understand First
- Feel metrics
- How does this concept constrain design and testability?
- Book Reference: “A Theory of Fun for Game Design by Raph Koster”
- Telemetry driven tuning
- What invariant should never be violated during runtime?
- Book Reference: “Clean Architecture” by Robert C. Martin
- Camera and motion comfort
- Which failure mode appears first when this is ignored?
- Book Reference: “Release It!” by Michael T. Nygard
Questions to Guide Your Design
- Runtime boundary design
- What data enters this feature each tick, and what data leaves?
- Which part of this feature must remain deterministic?
- Operational resilience
- How will you detect degradation before players report it?
- What is your rollback or fallback path?
Thinking Exercise
Invariant-first design pass
Draw a state diagram for “Platformer Mechanics and Feel Tuning” and identify one invariant that must stay true even during failures.
Questions to answer:
- Which two events are most likely to break this invariant?
- What log or UI signal confirms the invariant is still holding?
The Interview Questions They Will Ask
- “How did you decompose Platformer Mechanics and Feel Tuning so it remained testable?”
- “Which invariant did you enforce first, and why?”
- “What instrumentation did you add to debug regressions quickly?”
- “What edge case surprised you during implementation?”
- “How would you productionize this feature for a larger team?”
Hints in Layers
Hint 1: Starting Point Define one deterministic acceptance scenario before implementing features.
Hint 2: Next Level Introduce a tiny event log model so runtime behavior can be replayed in tests.
Hint 3: Technical Details
collect_intent -> validate_preconditions -> apply_transition -> emit_feedback -> persist_if_needed
Hint 4: Tools/Debugging Add a debug panel line for each invariant and update it once per simulation tick.
Books That Will Help
| Topic | Book | Chapter |
|---|---|---|
| Runtime architecture | “A Theory of Fun for Game Design by Raph Koster” | Relevant runtime/system chapters |
| Reliability patterns | “Release It!” by Michael T. Nygard | Stability and resilience chapters |
| Refactoring large features | “Refactoring” by Martin Fowler | Code smells and safe transformations |
Common Pitfalls and Debugging
Problem 1: “Feature works in one scene but fails after restart”
- Why: Hidden state initialization dependency.
- Fix: Centralize initialization order and validate preconditions at scene entry.
- Quick test: dotnet test –filter platformer-mechanics-feel-tuning
Problem 2: “Intermittent behavior under lower FPS”
- Why: Time-coupled logic leaking into deterministic state transitions.
- Fix: Move decision logic into fixed-step update and cap catch-up steps.
- Quick test: Run with synthetic frame limiter at 30 FPS and 144 FPS.
Definition of Done
- Core functionality works on reference inputs.
- Edge cases are tested and documented.
- Results are reproducible on two machine profiles.
- Performance trends match expected budget for this feature.
- A rollback or fallback strategy is documented.
Project 9: Save System Architecture
- File: P09-save-system-architecture.md
- Main Programming Language: C# (.NET 8)
- Alternative Programming Languages: F#, C++ (raylib), Godot C#
- Coolness Level: Level 3
- Business Potential: Level 2
- Difficulty: Level 3
- Knowledge Area: Persistence and Reliability
- Software or Tool: System.Text.Json and local storage
- Main Book: Clean Architecture by Robert C Martin
What you will build: A versioned save system with migration strategy, integrity checks, and rollback slots.
Why it teaches game development and shipping: This project forces you to connect system design with observable runtime and production outcomes.
Core challenges you will face:
- Schema versioning -> maps to architecture clarity and deterministic behavior
- Atomic writes -> maps to production reliability under changing requirements
- Recovery and migration -> maps to scaling from prototype decisions to shipping constraints
Real World Outcome
This project produces a playable and observable game outcome, not just logs.
On screen you will see:
- Save-slot UI with version badges and integrity status
- Migration result panel showing source/target schema versions
- Recovery notice banner for backup failover events
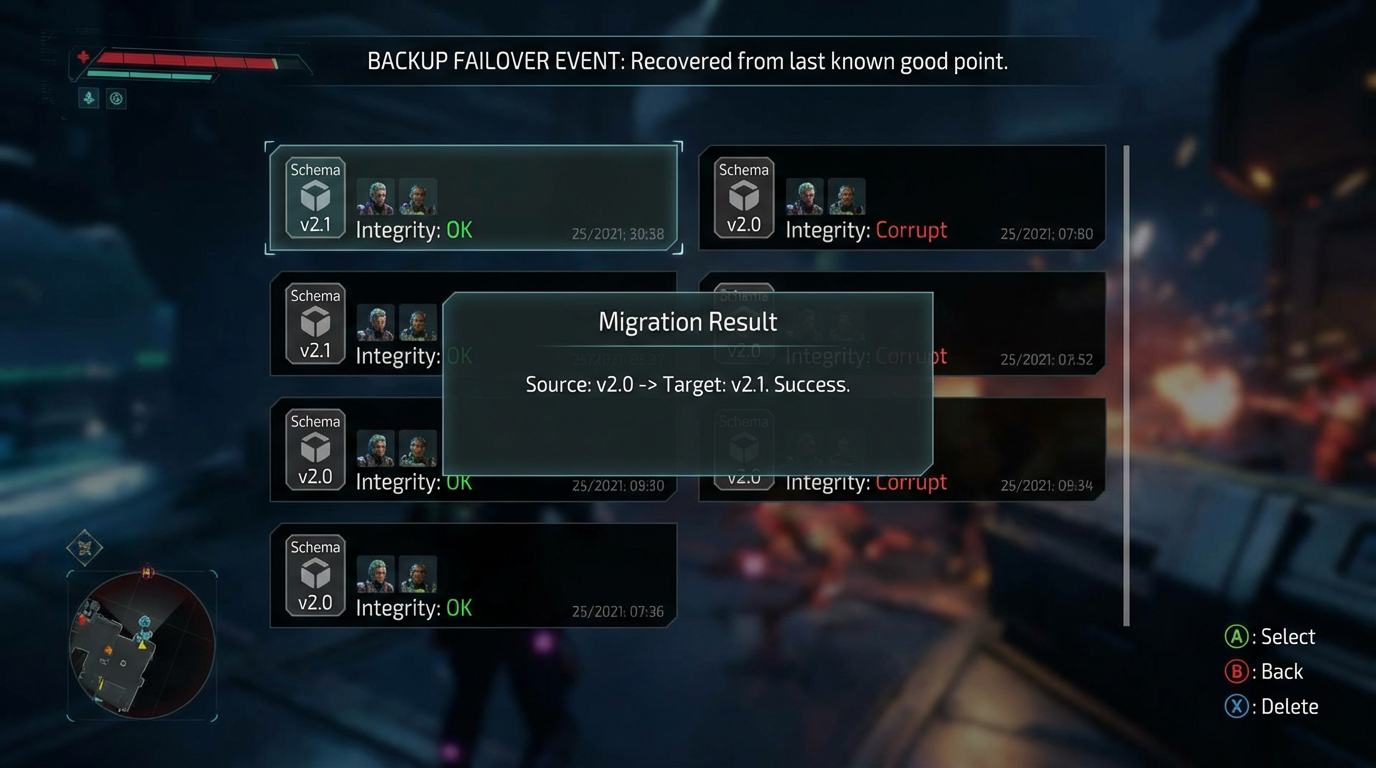
Interaction controls:
- F5 quick-save
- F9 quick-load
- Ctrl+M run migration fixture suite
Success signal:
- Versioned saves migrate cleanly and recover from corruption without losing core progress.
Failure signal:
- Silent save corruption or failed migration blocks is unacceptable for shipping.
Golden path demonstration transcript:
$ dotnet run --project src/Game -- --scene save-lab
[SAVE] slot=A version=1->2 migrate=PASS
[SAVE] checksum primary=FAIL backup=PASS
[SAVE] state_hash_match=true
The Core Question You Are Answering
“How do you evolve saves safely after shipping updates?”
This question matters because it forces engineering decisions to align with player experience and launch reality.
Concepts You Must Understand First
- Schema versioning
- How does this concept constrain design and testability?
- Book Reference: “Clean Architecture by Robert C Martin”
- Atomic writes
- What invariant should never be violated during runtime?
- Book Reference: “Clean Architecture” by Robert C. Martin
- Recovery and migration
- Which failure mode appears first when this is ignored?
- Book Reference: “Release It!” by Michael T. Nygard
Questions to Guide Your Design
- Runtime boundary design
- What data enters this feature each tick, and what data leaves?
- Which part of this feature must remain deterministic?
- Operational resilience
- How will you detect degradation before players report it?
- What is your rollback or fallback path?
Thinking Exercise
Invariant-first design pass
Draw a state diagram for “Save System Architecture” and identify one invariant that must stay true even during failures.
Questions to answer:
- Which two events are most likely to break this invariant?
- What log or UI signal confirms the invariant is still holding?
The Interview Questions They Will Ask
- “How did you decompose Save System Architecture so it remained testable?”
- “Which invariant did you enforce first, and why?”
- “What instrumentation did you add to debug regressions quickly?”
- “What edge case surprised you during implementation?”
- “How would you productionize this feature for a larger team?”
Hints in Layers
Hint 1: Starting Point Define one deterministic acceptance scenario before implementing features.
Hint 2: Next Level Introduce a tiny event log model so runtime behavior can be replayed in tests.
Hint 3: Technical Details
collect_intent -> validate_preconditions -> apply_transition -> emit_feedback -> persist_if_needed
Hint 4: Tools/Debugging Add a debug panel line for each invariant and update it once per simulation tick.
Books That Will Help
| Topic | Book | Chapter |
|---|---|---|
| Runtime architecture | “Clean Architecture by Robert C Martin” | Relevant runtime/system chapters |
| Reliability patterns | “Release It!” by Michael T. Nygard | Stability and resilience chapters |
| Refactoring large features | “Refactoring” by Martin Fowler | Code smells and safe transformations |
Common Pitfalls and Debugging
Problem 1: “Feature works in one scene but fails after restart”
- Why: Hidden state initialization dependency.
- Fix: Centralize initialization order and validate preconditions at scene entry.
- Quick test: dotnet test –filter save-system-architecture
Problem 2: “Intermittent behavior under lower FPS”
- Why: Time-coupled logic leaking into deterministic state transitions.
- Fix: Move decision logic into fixed-step update and cap catch-up steps.
- Quick test: Run with synthetic frame limiter at 30 FPS and 144 FPS.
Definition of Done
- Core functionality works on reference inputs.
- Edge cases are tested and documented.
- Results are reproducible on two machine profiles.
- Performance trends match expected budget for this feature.
- A rollback or fallback strategy is documented.
Project 10: Audio Mixer and Adaptive Music
- File: P10-audio-mixer-adaptive-music.md
- Main Programming Language: C# (.NET 8)
- Alternative Programming Languages: F#, C++ (raylib), Godot C#
- Coolness Level: Level 4
- Business Potential: Level 2
- Difficulty: Level 3
- Knowledge Area: Audio Systems
- Software or Tool: MonoGame Audio and content pipeline
- Main Book: Game Audio Programming edited by Guy Somberg
What you will build: A layered music and SFX mixer with bus routing, ducking, and dynamic intensity states.
Why it teaches game development and shipping: This project forces you to connect system design with observable runtime and production outcomes.
Core challenges you will face:
- Bus architecture -> maps to architecture clarity and deterministic behavior
- Loudness management -> maps to production reliability under changing requirements
- State driven music cues -> maps to scaling from prototype decisions to shipping constraints
Real World Outcome
This project produces a playable and observable game outcome, not just logs.
On screen you will see:
- Mixer panel with bus meters: Master, Music, SFX, UI
- State indicator for Calm/Combat/Victory music layers
- Peak/clipping alerts with time markers
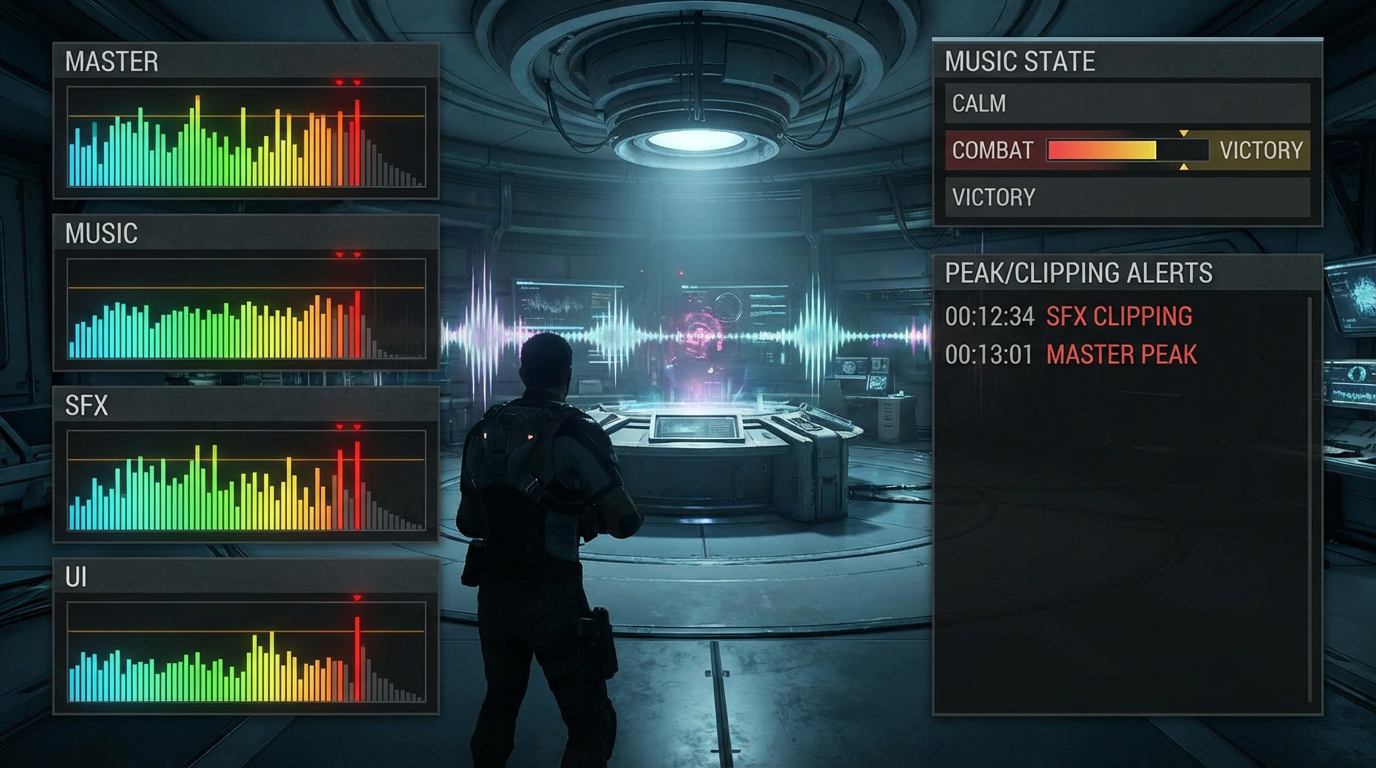
Interaction controls:
- 1/2/3 switch intensity states
- D toggles ducking
- F4 opens mixer HUD
Success signal:
- Adaptive music and SFX mixing stay clear and clipping-free during transitions.
Failure signal:
- Uncontrolled loudness or harsh transitions degrade player experience immediately.
Golden path demonstration transcript:
$ dotnet run --project src/Game -- --scene audio-lab
[AUDIO] state=Calm layer=1
[AUDIO] transition Calm->Combat crossfade=600ms
[AUDIO] peak=-1.2dB clip_events=0 PASS
The Core Question You Are Answering
“How do you make audio reactive without creating chaos in the mix?”
This question matters because it forces engineering decisions to align with player experience and launch reality.
Concepts You Must Understand First
- Bus architecture
- How does this concept constrain design and testability?
- Book Reference: “Game Audio Programming edited by Guy Somberg”
- Loudness management
- What invariant should never be violated during runtime?
- Book Reference: “Clean Architecture” by Robert C. Martin
- State driven music cues
- Which failure mode appears first when this is ignored?
- Book Reference: “Release It!” by Michael T. Nygard
Questions to Guide Your Design
- Runtime boundary design
- What data enters this feature each tick, and what data leaves?
- Which part of this feature must remain deterministic?
- Operational resilience
- How will you detect degradation before players report it?
- What is your rollback or fallback path?
Thinking Exercise
Invariant-first design pass
Draw a state diagram for “Audio Mixer and Adaptive Music” and identify one invariant that must stay true even during failures.
Questions to answer:
- Which two events are most likely to break this invariant?
- What log or UI signal confirms the invariant is still holding?
The Interview Questions They Will Ask
- “How did you decompose Audio Mixer and Adaptive Music so it remained testable?”
- “Which invariant did you enforce first, and why?”
- “What instrumentation did you add to debug regressions quickly?”
- “What edge case surprised you during implementation?”
- “How would you productionize this feature for a larger team?”
Hints in Layers
Hint 1: Starting Point Define one deterministic acceptance scenario before implementing features.
Hint 2: Next Level Introduce a tiny event log model so runtime behavior can be replayed in tests.
Hint 3: Technical Details
collect_intent -> validate_preconditions -> apply_transition -> emit_feedback -> persist_if_needed
Hint 4: Tools/Debugging Add a debug panel line for each invariant and update it once per simulation tick.
Books That Will Help
| Topic | Book | Chapter |
|---|---|---|
| Runtime architecture | “Game Audio Programming edited by Guy Somberg” | Relevant runtime/system chapters |
| Reliability patterns | “Release It!” by Michael T. Nygard | Stability and resilience chapters |
| Refactoring large features | “Refactoring” by Martin Fowler | Code smells and safe transformations |
Common Pitfalls and Debugging
Problem 1: “Feature works in one scene but fails after restart”
- Why: Hidden state initialization dependency.
- Fix: Centralize initialization order and validate preconditions at scene entry.
- Quick test: dotnet test –filter audio-mixer-adaptive-music
Problem 2: “Intermittent behavior under lower FPS”
- Why: Time-coupled logic leaking into deterministic state transitions.
- Fix: Move decision logic into fixed-step update and cap catch-up steps.
- Quick test: Run with synthetic frame limiter at 30 FPS and 144 FPS.
Definition of Done
- Core functionality works on reference inputs.
- Edge cases are tested and documented.
- Results are reproducible on two machine profiles.
- Performance trends match expected budget for this feature.
- A rollback or fallback strategy is documented.
Project 11: UI Flows and AI Asset Pipeline
- File: P11-ui-flows-ai-asset-pipeline.md
- Main Programming Language: C# (.NET 8)
- Alternative Programming Languages: F#, C++ (raylib), Godot C#
- Coolness Level: Level 3
- Business Potential: Level 2
- Difficulty: Level 2
- Knowledge Area: UI and Content Operations
- Software or Tool: MonoGame UI plus Gemini image generation
- Main Book: The Non Designers Design Book by Robin Williams
What you will build: Menu and HUD flows wired to a repeatable AI assisted asset pipeline using Nano Banana prompts and QA gates.
Why it teaches game development and shipping: This project forces you to connect system design with observable runtime and production outcomes.
Core challenges you will face:
- UI information hierarchy -> maps to architecture clarity and deterministic behavior
- Prompt versioning -> maps to production reliability under changing requirements
- Human QA and provenance logs -> maps to scaling from prototype decisions to shipping constraints
Real World Outcome
This project produces a playable and observable game outcome, not just logs.
On screen you will see:
- Main menu + HUD rendered from AI-generated approved atlas
- Provenance panel shows prompt template, model id, reviewer, approval status
- Asset QA panel highlights rejected variants and reasons
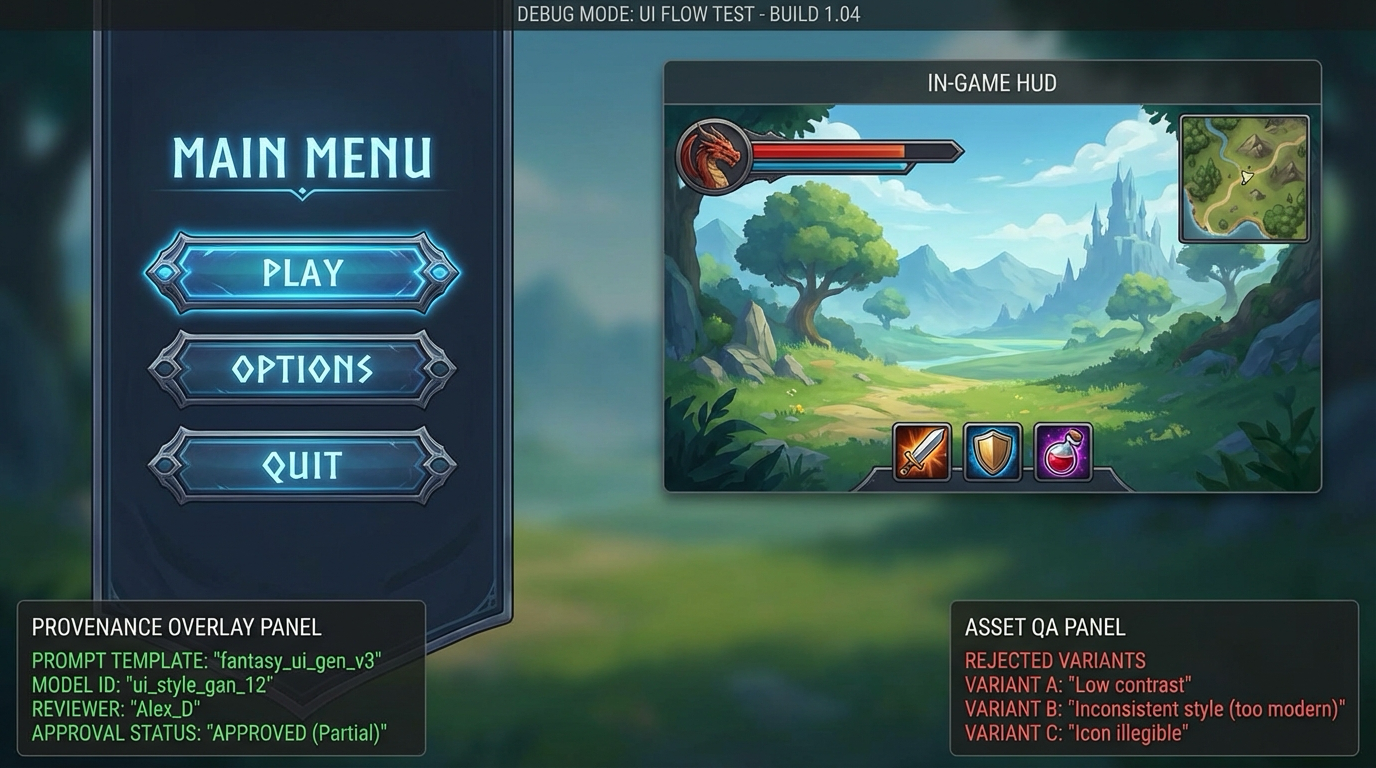
Interaction controls:
- F6 toggles provenance overlay
- N cycles style variants
- Enter navigates full menu flow
Success signal:
- UI flows are polished and asset provenance/quality gates are visible and enforceable.
Failure signal:
- Untracked assets or inconsistent style quality blocks production readiness.
Golden path demonstration transcript:
$ dotnet run --project src/Game -- --scene ui-ai-pipeline
[UI] flow Main->Settings->Gameplay->Pause PASS
[ASSET] approved=12 rejected=4
[PROVENANCE] template=v12 model=gemini-2.5-flash-image-preview
The Core Question You Are Answering
“How do you use AI generated assets fast while still enforcing art direction and legal hygiene?”
This question matters because it forces engineering decisions to align with player experience and launch reality.
Concepts You Must Understand First
- UI information hierarchy
- How does this concept constrain design and testability?
- Book Reference: “The Non Designers Design Book by Robin Williams”
- Prompt versioning
- What invariant should never be violated during runtime?
- Book Reference: “Clean Architecture” by Robert C. Martin
- Human QA and provenance logs
- Which failure mode appears first when this is ignored?
- Book Reference: “Release It!” by Michael T. Nygard
Questions to Guide Your Design
- Runtime boundary design
- What data enters this feature each tick, and what data leaves?
- Which part of this feature must remain deterministic?
- Operational resilience
- How will you detect degradation before players report it?
- What is your rollback or fallback path?
Thinking Exercise
Invariant-first design pass
Draw a state diagram for “UI Flows and AI Asset Pipeline” and identify one invariant that must stay true even during failures.
Questions to answer:
- Which two events are most likely to break this invariant?
- What log or UI signal confirms the invariant is still holding?
The Interview Questions They Will Ask
- “How did you decompose UI Flows and AI Asset Pipeline so it remained testable?”
- “Which invariant did you enforce first, and why?”
- “What instrumentation did you add to debug regressions quickly?”
- “What edge case surprised you during implementation?”
- “How would you productionize this feature for a larger team?”
Hints in Layers
Hint 1: Starting Point Define one deterministic acceptance scenario before implementing features.
Hint 2: Next Level Introduce a tiny event log model so runtime behavior can be replayed in tests.
Hint 3: Technical Details
collect_intent -> validate_preconditions -> apply_transition -> emit_feedback -> persist_if_needed
Hint 4: Tools/Debugging Add a debug panel line for each invariant and update it once per simulation tick.
Books That Will Help
| Topic | Book | Chapter |
|---|---|---|
| Runtime architecture | “The Non Designers Design Book by Robin Williams” | Relevant runtime/system chapters |
| Reliability patterns | “Release It!” by Michael T. Nygard | Stability and resilience chapters |
| Refactoring large features | “Refactoring” by Martin Fowler | Code smells and safe transformations |
Common Pitfalls and Debugging
Problem 1: “Feature works in one scene but fails after restart”
- Why: Hidden state initialization dependency.
- Fix: Centralize initialization order and validate preconditions at scene entry.
- Quick test: dotnet test –filter ui-flows-ai-asset-pipeline
Problem 2: “Intermittent behavior under lower FPS”
- Why: Time-coupled logic leaking into deterministic state transitions.
- Fix: Move decision logic into fixed-step update and cap catch-up steps.
- Quick test: Run with synthetic frame limiter at 30 FPS and 144 FPS.
Definition of Done
- Core functionality works on reference inputs.
- Edge cases are tested and documented.
- Results are reproducible on two machine profiles.
- Performance trends match expected budget for this feature.
- A rollback or fallback strategy is documented.
Project 12: Steamworks Bootstrap for C#
- File: P12-steamworks-bootstrap-csharp.md
- Main Programming Language: C# (.NET 8)
- Alternative Programming Languages: F#, C++ (raylib), Godot C#
- Coolness Level: Level 4
- Business Potential: Level 3
- Difficulty: Level 3
- Knowledge Area: Platform Integration
- Software or Tool: Steamworks SDK plus Steamworks.NET
- Main Book: Steamworks Documentation
What you will build: A MonoGame app that initializes Steam in dev mode, runs callbacks, and surfaces platform status in game.
Why it teaches game development and shipping: This project forces you to connect system design with observable runtime and production outcomes.
Core challenges you will face:
- API initialization lifecycle -> maps to architecture clarity and deterministic behavior
- Callback processing -> maps to production reliability under changing requirements
- AppID environment hygiene -> maps to scaling from prototype decisions to shipping constraints
Real World Outcome
This project produces a playable and observable game outcome, not just logs.
On screen you will see:
- Steam status badge in top bar (Online/Offline/Fallback)
- Callback heartbeat counter updates once per frame
- Overlay test result panel with pass/fail state
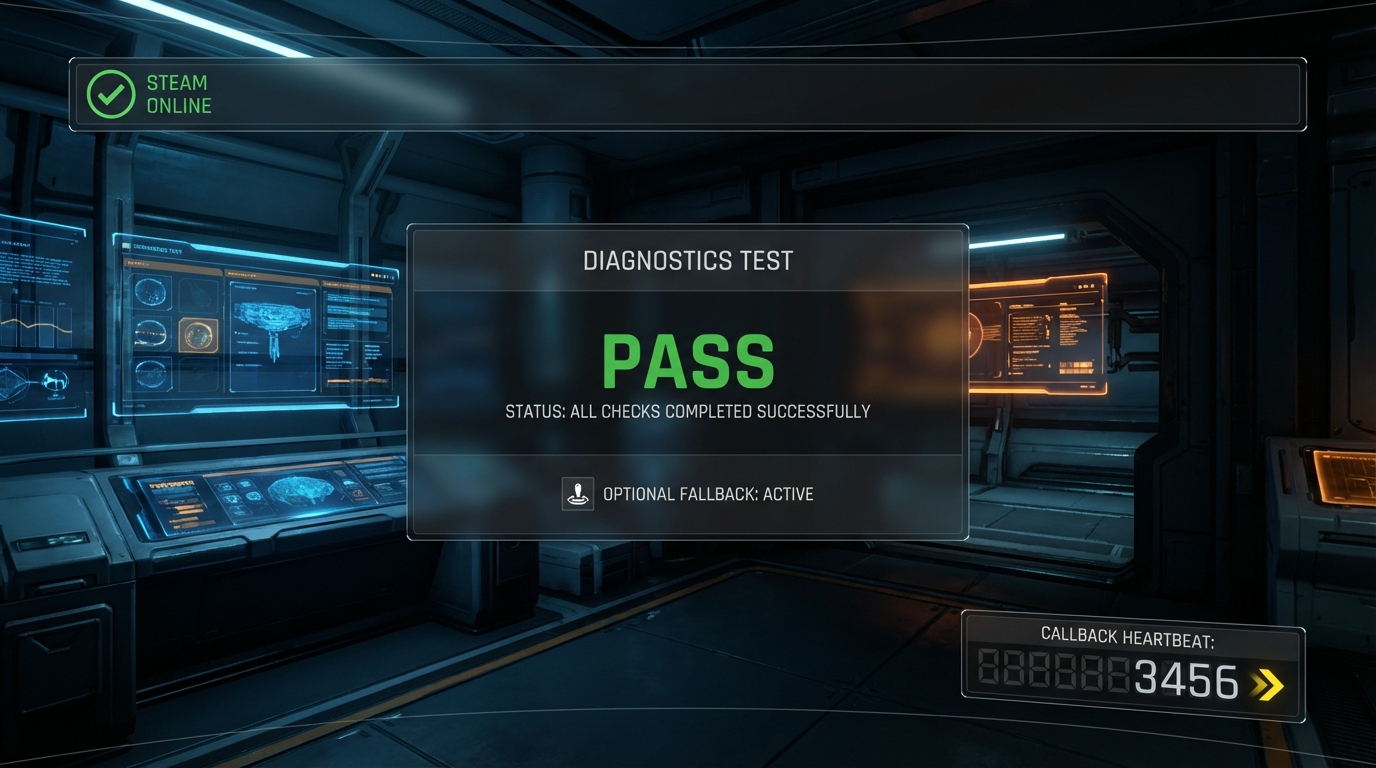
Interaction controls:
- F7 runs overlay check
- O toggles offline fallback simulation
- F1 opens diagnostics
Success signal:
- Steam bootstrap is stable, callbacks pump correctly, and fallback mode is reliable.
Failure signal:
- Silent init failures or dead callback loop will break all later Steam features.
Golden path demonstration transcript:
$ dotnet run --project src/Game -- --scene steam-bootstrap
[STEAM] init=true appid=480 sandbox=true
[STEAM] callback_heartbeat=60/s
[STEAM] overlay_test=PASS
The Core Question You Are Answering
“What is the smallest safe Steam integration that can survive production edge cases?”
This question matters because it forces engineering decisions to align with player experience and launch reality.
Concepts You Must Understand First
- API initialization lifecycle
- How does this concept constrain design and testability?
- Book Reference: “Steamworks Documentation”
- Callback processing
- What invariant should never be violated during runtime?
- Book Reference: “Clean Architecture” by Robert C. Martin
- AppID environment hygiene
- Which failure mode appears first when this is ignored?
- Book Reference: “Release It!” by Michael T. Nygard
Questions to Guide Your Design
- Runtime boundary design
- What data enters this feature each tick, and what data leaves?
- Which part of this feature must remain deterministic?
- Operational resilience
- How will you detect degradation before players report it?
- What is your rollback or fallback path?
Thinking Exercise
Invariant-first design pass
Draw a state diagram for “Steamworks Bootstrap for C#” and identify one invariant that must stay true even during failures.
Questions to answer:
- Which two events are most likely to break this invariant?
- What log or UI signal confirms the invariant is still holding?
The Interview Questions They Will Ask
- “How did you decompose Steamworks Bootstrap for C# so it remained testable?”
- “Which invariant did you enforce first, and why?”
- “What instrumentation did you add to debug regressions quickly?”
- “What edge case surprised you during implementation?”
- “How would you productionize this feature for a larger team?”
Hints in Layers
Hint 1: Starting Point Define one deterministic acceptance scenario before implementing features.
Hint 2: Next Level Introduce a tiny event log model so runtime behavior can be replayed in tests.
Hint 3: Technical Details
collect_intent -> validate_preconditions -> apply_transition -> emit_feedback -> persist_if_needed
Hint 4: Tools/Debugging Add a debug panel line for each invariant and update it once per simulation tick.
Books That Will Help
| Topic | Book | Chapter |
|---|---|---|
| Runtime architecture | “Steamworks Documentation” | Relevant runtime/system chapters |
| Reliability patterns | “Release It!” by Michael T. Nygard | Stability and resilience chapters |
| Refactoring large features | “Refactoring” by Martin Fowler | Code smells and safe transformations |
Common Pitfalls and Debugging
Problem 1: “Feature works in one scene but fails after restart”
- Why: Hidden state initialization dependency.
- Fix: Centralize initialization order and validate preconditions at scene entry.
- Quick test: dotnet test –filter steamworks-bootstrap-csharp
Problem 2: “Intermittent behavior under lower FPS”
- Why: Time-coupled logic leaking into deterministic state transitions.
- Fix: Move decision logic into fixed-step update and cap catch-up steps.
- Quick test: Run with synthetic frame limiter at 30 FPS and 144 FPS.
Definition of Done
- Core functionality works on reference inputs.
- Edge cases are tested and documented.
- Results are reproducible on two machine profiles.
- Performance trends match expected budget for this feature.
- A rollback or fallback strategy is documented.
Project 13: Achievements and Stats Telemetry
- File: P13-achievements-stats-telemetry.md
- Main Programming Language: C# (.NET 8)
- Alternative Programming Languages: F#, C++ (raylib), Godot C#
- Coolness Level: Level 3
- Business Potential: Level 3
- Difficulty: Level 3
- Knowledge Area: Engagement Systems
- Software or Tool: Steam User Stats API
- Main Book: Designing Games by Tynan Sylvester
What you will build: Achievement triggers and stat counters wired to clear gameplay events and anti spam guards.
Why it teaches game development and shipping: This project forces you to connect system design with observable runtime and production outcomes.
Core challenges you will face:
- Event taxonomy -> maps to architecture clarity and deterministic behavior
- Stat consistency -> maps to production reliability under changing requirements
- Telemetry validation -> maps to scaling from prototype decisions to shipping constraints
Real World Outcome
This project produces a playable and observable game outcome, not just logs.
On screen you will see:
- Achievement toast popups with icon/title
- Stats panel showing local and synced values
- Dirty-queue status indicator for pending uploads
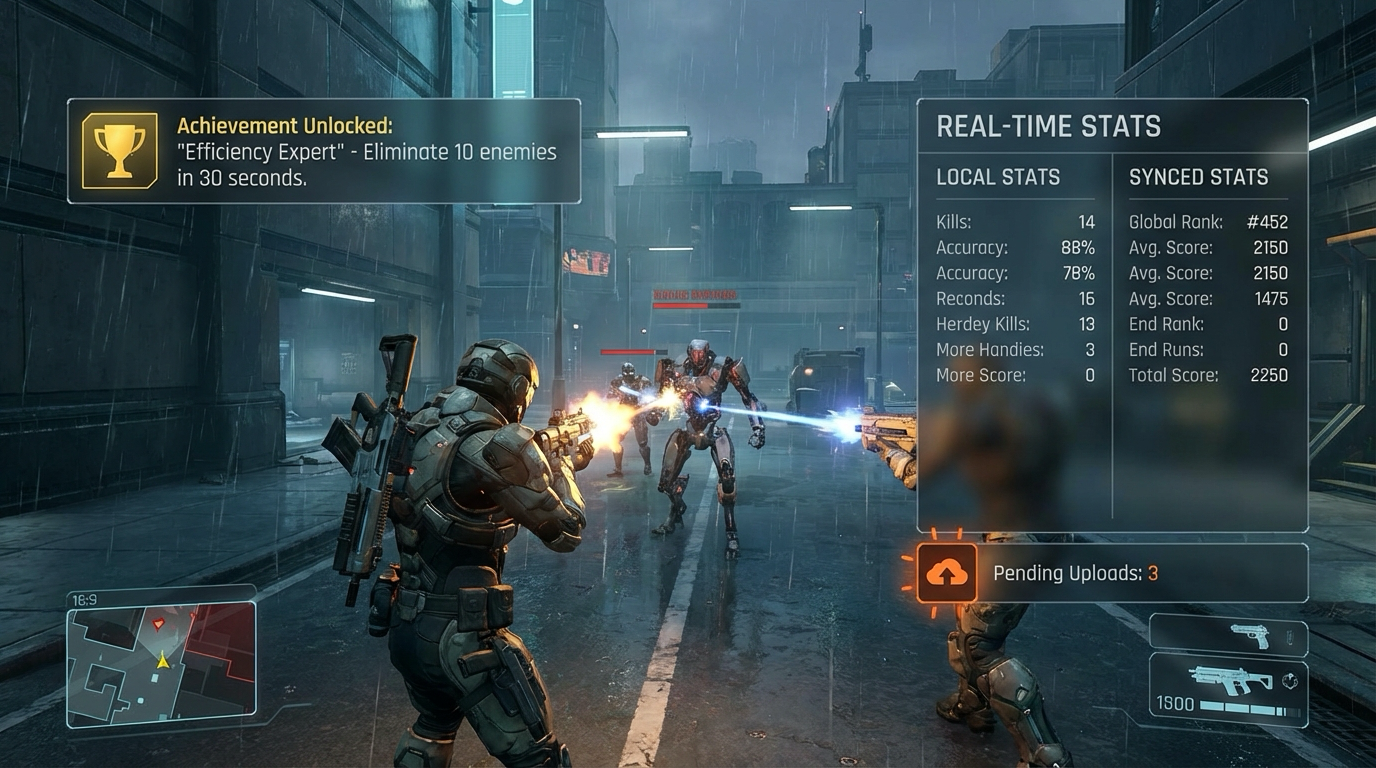
Interaction controls:
- K simulates kill event
- P simulates progress milestone
- U forces stats upload
Success signal:
- Stats and achievements synchronize correctly without duplicate unlocks or spam writes.
Failure signal:
- Duplicate unlocks or missing stat updates undermine trust and analytics quality.
Golden path demonstration transcript:
$ dotnet run --project src/Game -- --scene steam-stats
[STATS] kills=25 dirty=true
[ACH] FIRST_BLOOD unlocked=true duplicate_blocked=true
[UPLOAD] dirty_count=3 result=PASS
The Core Question You Are Answering
“How do you design achievements that reinforce mastery instead of farming noise?”
This question matters because it forces engineering decisions to align with player experience and launch reality.
Concepts You Must Understand First
- Event taxonomy
- How does this concept constrain design and testability?
- Book Reference: “Designing Games by Tynan Sylvester”
- Stat consistency
- What invariant should never be violated during runtime?
- Book Reference: “Clean Architecture” by Robert C. Martin
- Telemetry validation
- Which failure mode appears first when this is ignored?
- Book Reference: “Release It!” by Michael T. Nygard
Questions to Guide Your Design
- Runtime boundary design
- What data enters this feature each tick, and what data leaves?
- Which part of this feature must remain deterministic?
- Operational resilience
- How will you detect degradation before players report it?
- What is your rollback or fallback path?
Thinking Exercise
Invariant-first design pass
Draw a state diagram for “Achievements and Stats Telemetry” and identify one invariant that must stay true even during failures.
Questions to answer:
- Which two events are most likely to break this invariant?
- What log or UI signal confirms the invariant is still holding?
The Interview Questions They Will Ask
- “How did you decompose Achievements and Stats Telemetry so it remained testable?”
- “Which invariant did you enforce first, and why?”
- “What instrumentation did you add to debug regressions quickly?”
- “What edge case surprised you during implementation?”
- “How would you productionize this feature for a larger team?”
Hints in Layers
Hint 1: Starting Point Define one deterministic acceptance scenario before implementing features.
Hint 2: Next Level Introduce a tiny event log model so runtime behavior can be replayed in tests.
Hint 3: Technical Details
collect_intent -> validate_preconditions -> apply_transition -> emit_feedback -> persist_if_needed
Hint 4: Tools/Debugging Add a debug panel line for each invariant and update it once per simulation tick.
Books That Will Help
| Topic | Book | Chapter |
|---|---|---|
| Runtime architecture | “Designing Games by Tynan Sylvester” | Relevant runtime/system chapters |
| Reliability patterns | “Release It!” by Michael T. Nygard | Stability and resilience chapters |
| Refactoring large features | “Refactoring” by Martin Fowler | Code smells and safe transformations |
Common Pitfalls and Debugging
Problem 1: “Feature works in one scene but fails after restart”
- Why: Hidden state initialization dependency.
- Fix: Centralize initialization order and validate preconditions at scene entry.
- Quick test: dotnet test –filter achievements-stats-telemetry
Problem 2: “Intermittent behavior under lower FPS”
- Why: Time-coupled logic leaking into deterministic state transitions.
- Fix: Move decision logic into fixed-step update and cap catch-up steps.
- Quick test: Run with synthetic frame limiter at 30 FPS and 144 FPS.
Definition of Done
- Core functionality works on reference inputs.
- Edge cases are tested and documented.
- Results are reproducible on two machine profiles.
- Performance trends match expected budget for this feature.
- A rollback or fallback strategy is documented.
Project 14: Steam Cloud Save Sync
- File: P14-steam-cloud-save-sync.md
- Main Programming Language: C# (.NET 8)
- Alternative Programming Languages: F#, C++ (raylib), Godot C#
- Coolness Level: Level 3
- Business Potential: Level 3
- Difficulty: Level 3
- Knowledge Area: Cloud Persistence
- Software or Tool: Steam Cloud and save conflict policies
- Main Book: Release It by Michael Nygard
What you will build: Cloud save sync with conflict resolution UX and deterministic merge policy for profile data.
Why it teaches game development and shipping: This project forces you to connect system design with observable runtime and production outcomes.
Core challenges you will face:
- Sync boundaries -> maps to architecture clarity and deterministic behavior
- Conflict resolution -> maps to production reliability under changing requirements
- Offline first guarantees -> maps to scaling from prototype decisions to shipping constraints
Real World Outcome
This project produces a playable and observable game outcome, not just logs.
On screen you will see:
- Cloud sync status panel with local/cloud revision metadata
- Conflict dialog showing timestamps/playtime/hash
- Recovery banner after merge or fallback decision
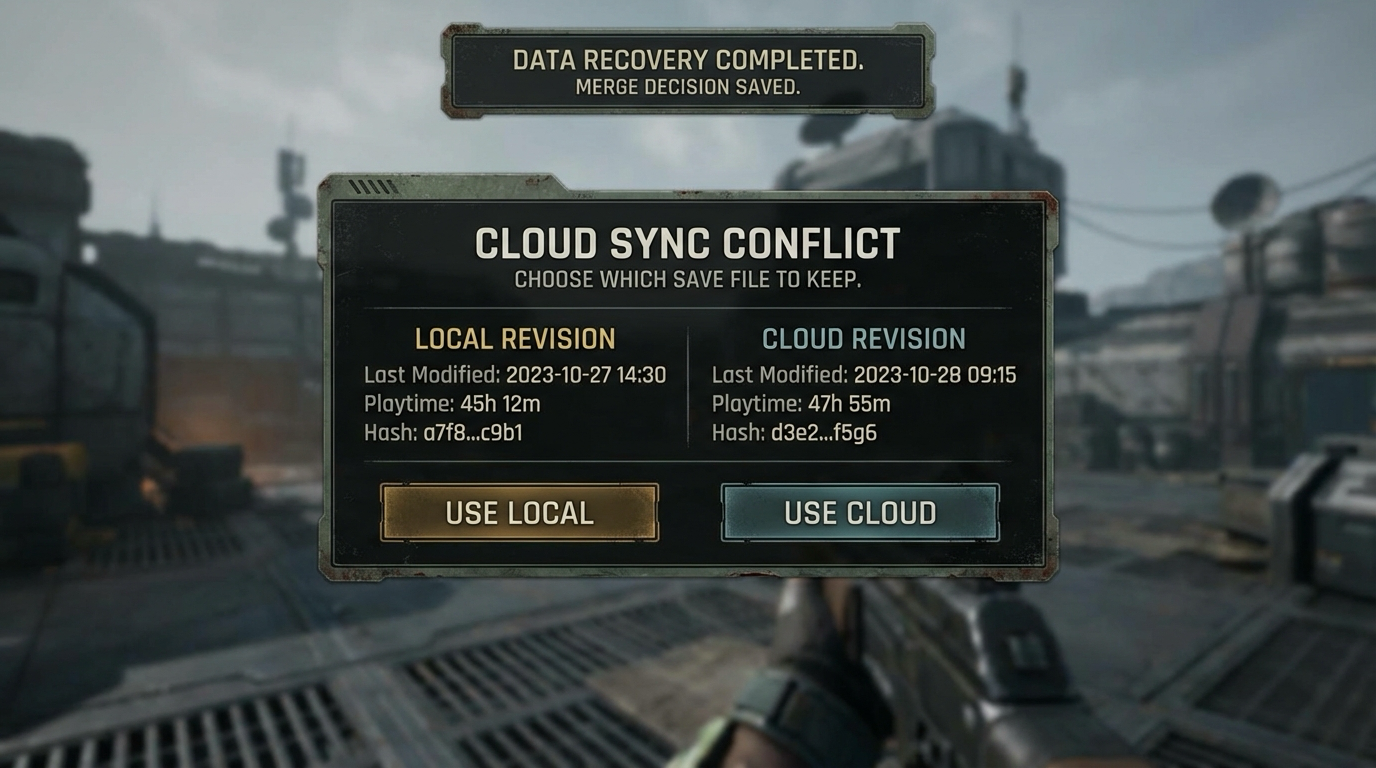
Interaction controls:
- S triggers sync
- C creates synthetic conflict
- L chooses local; K chooses cloud
Success signal:
- Conflicts are resolved explicitly with no silent data loss.
Failure signal:
- Automatic overwrite without visibility can irreversibly erase player progress.
Golden path demonstration transcript:
$ dotnet run --project src/Game -- --scene steam-cloud
[CLOUD] local_rev=18 cloud_rev=20 conflict=true
[CLOUD] decision=cloud backup_created=true
[CLOUD] verify_hash_match=true PASS
The Core Question You Are Answering
“How do you protect player progress when devices diverge?”
This question matters because it forces engineering decisions to align with player experience and launch reality.
Concepts You Must Understand First
- Sync boundaries
- How does this concept constrain design and testability?
- Book Reference: “Release It by Michael Nygard”
- Conflict resolution
- What invariant should never be violated during runtime?
- Book Reference: “Clean Architecture” by Robert C. Martin
- Offline first guarantees
- Which failure mode appears first when this is ignored?
- Book Reference: “Release It!” by Michael T. Nygard
Questions to Guide Your Design
- Runtime boundary design
- What data enters this feature each tick, and what data leaves?
- Which part of this feature must remain deterministic?
- Operational resilience
- How will you detect degradation before players report it?
- What is your rollback or fallback path?
Thinking Exercise
Invariant-first design pass
Draw a state diagram for “Steam Cloud Save Sync” and identify one invariant that must stay true even during failures.
Questions to answer:
- Which two events are most likely to break this invariant?
- What log or UI signal confirms the invariant is still holding?
The Interview Questions They Will Ask
- “How did you decompose Steam Cloud Save Sync so it remained testable?”
- “Which invariant did you enforce first, and why?”
- “What instrumentation did you add to debug regressions quickly?”
- “What edge case surprised you during implementation?”
- “How would you productionize this feature for a larger team?”
Hints in Layers
Hint 1: Starting Point Define one deterministic acceptance scenario before implementing features.
Hint 2: Next Level Introduce a tiny event log model so runtime behavior can be replayed in tests.
Hint 3: Technical Details
collect_intent -> validate_preconditions -> apply_transition -> emit_feedback -> persist_if_needed
Hint 4: Tools/Debugging Add a debug panel line for each invariant and update it once per simulation tick.
Books That Will Help
| Topic | Book | Chapter |
|---|---|---|
| Runtime architecture | “Release It by Michael Nygard” | Relevant runtime/system chapters |
| Reliability patterns | “Release It!” by Michael T. Nygard | Stability and resilience chapters |
| Refactoring large features | “Refactoring” by Martin Fowler | Code smells and safe transformations |
Common Pitfalls and Debugging
Problem 1: “Feature works in one scene but fails after restart”
- Why: Hidden state initialization dependency.
- Fix: Centralize initialization order and validate preconditions at scene entry.
- Quick test: dotnet test –filter steam-cloud-save-sync
Problem 2: “Intermittent behavior under lower FPS”
- Why: Time-coupled logic leaking into deterministic state transitions.
- Fix: Move decision logic into fixed-step update and cap catch-up steps.
- Quick test: Run with synthetic frame limiter at 30 FPS and 144 FPS.
Definition of Done
- Core functionality works on reference inputs.
- Edge cases are tested and documented.
- Results are reproducible on two machine profiles.
- Performance trends match expected budget for this feature.
- A rollback or fallback strategy is documented.
Project 15: Leaderboards and Fairness Guards
- File: P15-leaderboards-fairness-guards.md
- Main Programming Language: C# (.NET 8)
- Alternative Programming Languages: F#, C++ (raylib), Godot C#
- Coolness Level: Level 4
- Business Potential: Level 3
- Difficulty: Level 4
- Knowledge Area: Competitive Features
- Software or Tool: Steam Leaderboards
- Main Book: Multiplayer Game Programming by Glazer and Madhav
What you will build: Global and friends leaderboards with submission validation windows and anti tamper heuristics.
Why it teaches game development and shipping: This project forces you to connect system design with observable runtime and production outcomes.
Core challenges you will face:
- Server authoritative checks -> maps to architecture clarity and deterministic behavior
- Submission throttling -> maps to production reliability under changing requirements
- Cheat signal triage -> maps to scaling from prototype decisions to shipping constraints
Real World Outcome
This project produces a playable and observable game outcome, not just logs.
On screen you will see:
- Leaderboard table with global/friends tabs
- Around-player panel highlights nearby ranks
- Submission audit panel for rejected outliers
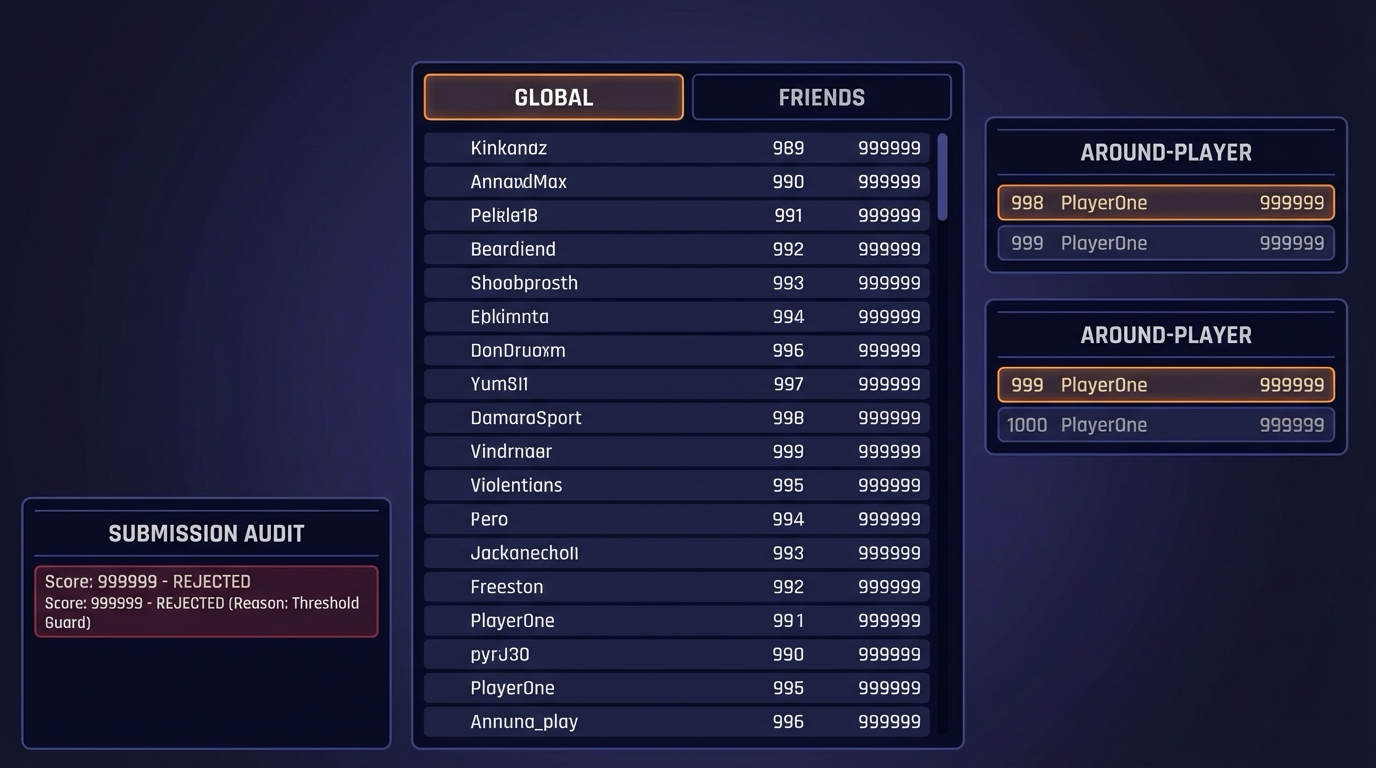
Interaction controls:
- G global tab
- F friends tab
- Submit test score button in diagnostics
Success signal:
- Valid scores rank correctly and suspicious submissions are blocked with logged reasons.
Failure signal:
- Unchecked score submissions make rankings meaningless.
Golden path demonstration transcript:
$ dotnet run --project src/Game -- --scene leaderboards
[LB] submit score=45123 accepted=true
[LB] submit score=99999999 accepted=false reason=threshold_guard
[LB] around_player rank=847 score=45123
The Core Question You Are Answering
“How do you keep leaderboards meaningful when clients are untrusted?”
This question matters because it forces engineering decisions to align with player experience and launch reality.
Concepts You Must Understand First
- Server authoritative checks
- How does this concept constrain design and testability?
- Book Reference: “Multiplayer Game Programming by Glazer and Madhav”
- Submission throttling
- What invariant should never be violated during runtime?
- Book Reference: “Clean Architecture” by Robert C. Martin
- Cheat signal triage
- Which failure mode appears first when this is ignored?
- Book Reference: “Release It!” by Michael T. Nygard
Questions to Guide Your Design
- Runtime boundary design
- What data enters this feature each tick, and what data leaves?
- Which part of this feature must remain deterministic?
- Operational resilience
- How will you detect degradation before players report it?
- What is your rollback or fallback path?
Thinking Exercise
Invariant-first design pass
Draw a state diagram for “Leaderboards and Fairness Guards” and identify one invariant that must stay true even during failures.
Questions to answer:
- Which two events are most likely to break this invariant?
- What log or UI signal confirms the invariant is still holding?
The Interview Questions They Will Ask
- “How did you decompose Leaderboards and Fairness Guards so it remained testable?”
- “Which invariant did you enforce first, and why?”
- “What instrumentation did you add to debug regressions quickly?”
- “What edge case surprised you during implementation?”
- “How would you productionize this feature for a larger team?”
Hints in Layers
Hint 1: Starting Point Define one deterministic acceptance scenario before implementing features.
Hint 2: Next Level Introduce a tiny event log model so runtime behavior can be replayed in tests.
Hint 3: Technical Details
collect_intent -> validate_preconditions -> apply_transition -> emit_feedback -> persist_if_needed
Hint 4: Tools/Debugging Add a debug panel line for each invariant and update it once per simulation tick.
Books That Will Help
| Topic | Book | Chapter |
|---|---|---|
| Runtime architecture | “Multiplayer Game Programming by Glazer and Madhav” | Relevant runtime/system chapters |
| Reliability patterns | “Release It!” by Michael T. Nygard | Stability and resilience chapters |
| Refactoring large features | “Refactoring” by Martin Fowler | Code smells and safe transformations |
Common Pitfalls and Debugging
Problem 1: “Feature works in one scene but fails after restart”
- Why: Hidden state initialization dependency.
- Fix: Centralize initialization order and validate preconditions at scene entry.
- Quick test: dotnet test –filter leaderboards-fairness-guards
Problem 2: “Intermittent behavior under lower FPS”
- Why: Time-coupled logic leaking into deterministic state transitions.
- Fix: Move decision logic into fixed-step update and cap catch-up steps.
- Quick test: Run with synthetic frame limiter at 30 FPS and 144 FPS.
Definition of Done
- Core functionality works on reference inputs.
- Edge cases are tested and documented.
- Results are reproducible on two machine profiles.
- Performance trends match expected budget for this feature.
- A rollback or fallback strategy is documented.
Project 16: Steam Store Page Builder
- File: P16-steam-store-page-builder.md
- Main Programming Language: C# (.NET 8)
- Alternative Programming Languages: F#, C++ (raylib), Godot C#
- Coolness Level: Level 3
- Business Potential: Level 3
- Difficulty: Level 2
- Knowledge Area: Marketing and Conversion
- Software or Tool: Steamworks partner tools
- Main Book: Traction by Gabriel Weinberg and Justin Mares
What you will build: A complete store page package with capsule images, trailer plan, copy variants, and tag strategy.
Why it teaches game development and shipping: This project forces you to connect system design with observable runtime and production outcomes.
Core challenges you will face:
- Positioning clarity -> maps to architecture clarity and deterministic behavior
- Visual hierarchy -> maps to production reliability under changing requirements
- Wishlist conversion loops -> maps to scaling from prototype decisions to shipping constraints
Real World Outcome
This project produces a playable and observable game outcome, not just logs.
On screen you will see:
- Capsule preview board for all required Steam sizes
- Copy panel with short and long description variants
- Checklist meter for clarity/CTA/tag alignment
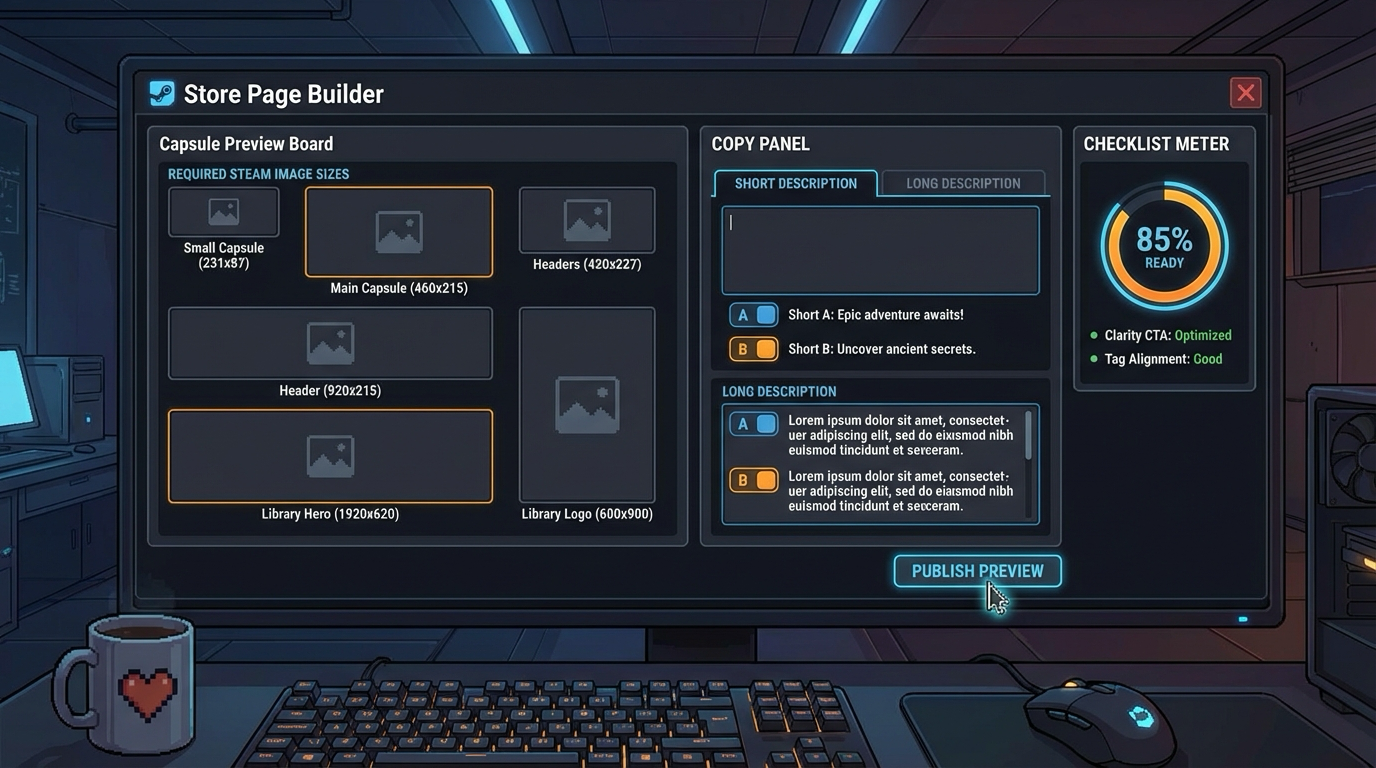
Interaction controls:
- A/B toggles copy variants
- E exports capsule set
- R runs readiness checklist
Success signal:
- Store package assets and copy are coherent, complete, and conversion-oriented.
Failure signal:
- Missing asset sizes or unclear positioning reduces launch conversion significantly.
Golden path demonstration transcript:
$ dotnet run --project src/Game -- --scene store-page-lab
[STORE] capsules_exported=3 required_sizes=PASS
[STORE] copy_variant=B readability=0.82
[STORE] readiness_score=96%
The Core Question You Are Answering
“How do you convert impressions to wishlists before launch day?”
This question matters because it forces engineering decisions to align with player experience and launch reality.
Concepts You Must Understand First
- Positioning clarity
- How does this concept constrain design and testability?
- Book Reference: “Traction by Gabriel Weinberg and Justin Mares”
- Visual hierarchy
- What invariant should never be violated during runtime?
- Book Reference: “Clean Architecture” by Robert C. Martin
- Wishlist conversion loops
- Which failure mode appears first when this is ignored?
- Book Reference: “Release It!” by Michael T. Nygard
Questions to Guide Your Design
- Runtime boundary design
- What data enters this feature each tick, and what data leaves?
- Which part of this feature must remain deterministic?
- Operational resilience
- How will you detect degradation before players report it?
- What is your rollback or fallback path?
Thinking Exercise
Invariant-first design pass
Draw a state diagram for “Steam Store Page Builder” and identify one invariant that must stay true even during failures.
Questions to answer:
- Which two events are most likely to break this invariant?
- What log or UI signal confirms the invariant is still holding?
The Interview Questions They Will Ask
- “How did you decompose Steam Store Page Builder so it remained testable?”
- “Which invariant did you enforce first, and why?”
- “What instrumentation did you add to debug regressions quickly?”
- “What edge case surprised you during implementation?”
- “How would you productionize this feature for a larger team?”
Hints in Layers
Hint 1: Starting Point Define one deterministic acceptance scenario before implementing features.
Hint 2: Next Level Introduce a tiny event log model so runtime behavior can be replayed in tests.
Hint 3: Technical Details
collect_intent -> validate_preconditions -> apply_transition -> emit_feedback -> persist_if_needed
Hint 4: Tools/Debugging Add a debug panel line for each invariant and update it once per simulation tick.
Books That Will Help
| Topic | Book | Chapter |
|---|---|---|
| Runtime architecture | “Traction by Gabriel Weinberg and Justin Mares” | Relevant runtime/system chapters |
| Reliability patterns | “Release It!” by Michael T. Nygard | Stability and resilience chapters |
| Refactoring large features | “Refactoring” by Martin Fowler | Code smells and safe transformations |
Common Pitfalls and Debugging
Problem 1: “Feature works in one scene but fails after restart”
- Why: Hidden state initialization dependency.
- Fix: Centralize initialization order and validate preconditions at scene entry.
- Quick test: dotnet test –filter steam-store-page-builder
Problem 2: “Intermittent behavior under lower FPS”
- Why: Time-coupled logic leaking into deterministic state transitions.
- Fix: Move decision logic into fixed-step update and cap catch-up steps.
- Quick test: Run with synthetic frame limiter at 30 FPS and 144 FPS.
Definition of Done
- Core functionality works on reference inputs.
- Edge cases are tested and documented.
- Results are reproducible on two machine profiles.
- Performance trends match expected budget for this feature.
- A rollback or fallback strategy is documented.
Project 17: Build and Branch Pipeline
- File: P17-build-branch-pipeline.md
- Main Programming Language: C# (.NET 8)
- Alternative Programming Languages: F#, C++ (raylib), Godot C#
- Coolness Level: Level 4
- Business Potential: Level 3
- Difficulty: Level 3
- Knowledge Area: Release Engineering
- Software or Tool: SteamPipe and CI
- Main Book: Accelerate by Forsgren Humble and Kim
What you will build: Automated build packaging to Steam branches with smoke tests and rollback playbooks.
Why it teaches game development and shipping: This project forces you to connect system design with observable runtime and production outcomes.
Core challenges you will face:
- Artifact reproducibility -> maps to architecture clarity and deterministic behavior
- Branch promotion gates -> maps to production reliability under changing requirements
- Rollback drills -> maps to scaling from prototype decisions to shipping constraints
Real World Outcome
This project produces a playable and observable game outcome, not just logs.
On screen you will see:
- Pipeline dashboard with build stages and artifact hashes
- Branch panel (internal/beta/default) showing latest deployment status
- Promotion gate panel with smoke-test outcomes
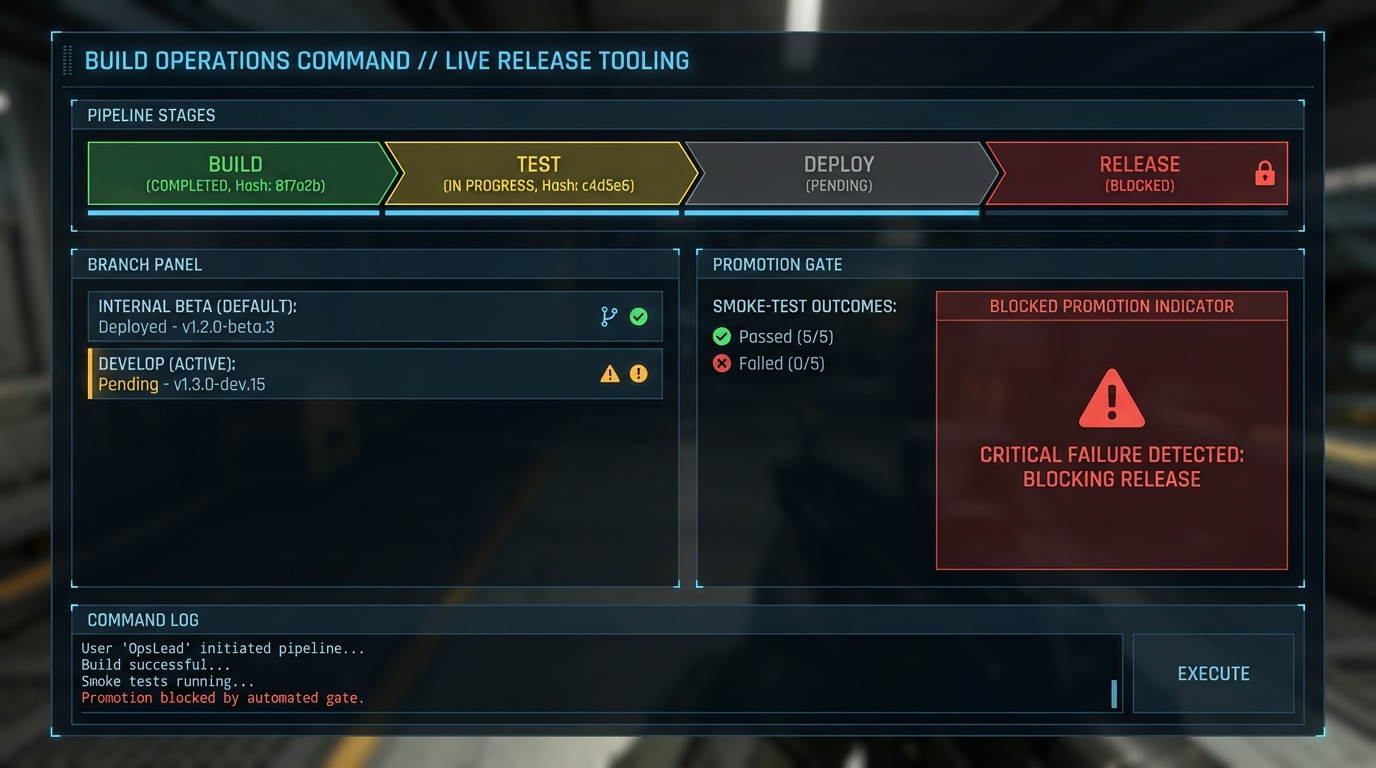
Interaction controls:
- B trigger build
- U upload beta
- P attempt branch promotion
Success signal:
- Artifacts are reproducible and promotion is blocked when gates fail.
Failure signal:
- Unverified branch promotion can ship broken builds.
Golden path demonstration transcript:
$ dotnet run --project src/Game -- --scene build-pipeline-lab
[PIPE] build_id=2026.02.11.3 artifact_hash=9f1a...
[PIPE] upload branch=beta result=PASS
[PIPE] promotion default=BLOCKED smoke_failures=1
The Core Question You Are Answering
“How do you ship quickly without breaking your live branch?”
This question matters because it forces engineering decisions to align with player experience and launch reality.
Concepts You Must Understand First
- Artifact reproducibility
- How does this concept constrain design and testability?
- Book Reference: “Accelerate by Forsgren Humble and Kim”
- Branch promotion gates
- What invariant should never be violated during runtime?
- Book Reference: “Clean Architecture” by Robert C. Martin
- Rollback drills
- Which failure mode appears first when this is ignored?
- Book Reference: “Release It!” by Michael T. Nygard
Questions to Guide Your Design
- Runtime boundary design
- What data enters this feature each tick, and what data leaves?
- Which part of this feature must remain deterministic?
- Operational resilience
- How will you detect degradation before players report it?
- What is your rollback or fallback path?
Thinking Exercise
Invariant-first design pass
Draw a state diagram for “Build and Branch Pipeline” and identify one invariant that must stay true even during failures.
Questions to answer:
- Which two events are most likely to break this invariant?
- What log or UI signal confirms the invariant is still holding?
The Interview Questions They Will Ask
- “How did you decompose Build and Branch Pipeline so it remained testable?”
- “Which invariant did you enforce first, and why?”
- “What instrumentation did you add to debug regressions quickly?”
- “What edge case surprised you during implementation?”
- “How would you productionize this feature for a larger team?”
Hints in Layers
Hint 1: Starting Point Define one deterministic acceptance scenario before implementing features.
Hint 2: Next Level Introduce a tiny event log model so runtime behavior can be replayed in tests.
Hint 3: Technical Details
collect_intent -> validate_preconditions -> apply_transition -> emit_feedback -> persist_if_needed
Hint 4: Tools/Debugging Add a debug panel line for each invariant and update it once per simulation tick.
Books That Will Help
| Topic | Book | Chapter |
|---|---|---|
| Runtime architecture | “Accelerate by Forsgren Humble and Kim” | Relevant runtime/system chapters |
| Reliability patterns | “Release It!” by Michael T. Nygard | Stability and resilience chapters |
| Refactoring large features | “Refactoring” by Martin Fowler | Code smells and safe transformations |
Common Pitfalls and Debugging
Problem 1: “Feature works in one scene but fails after restart”
- Why: Hidden state initialization dependency.
- Fix: Centralize initialization order and validate preconditions at scene entry.
- Quick test: dotnet test –filter build-branch-pipeline
Problem 2: “Intermittent behavior under lower FPS”
- Why: Time-coupled logic leaking into deterministic state transitions.
- Fix: Move decision logic into fixed-step update and cap catch-up steps.
- Quick test: Run with synthetic frame limiter at 30 FPS and 144 FPS.
Definition of Done
- Core functionality works on reference inputs.
- Edge cases are tested and documented.
- Results are reproducible on two machine profiles.
- Performance trends match expected budget for this feature.
- A rollback or fallback strategy is documented.
Project 18: Release Readiness Drill
- File: P18-release-readiness-drill.md
- Main Programming Language: C# (.NET 8)
- Alternative Programming Languages: F#, C++ (raylib), Godot C#
- Coolness Level: Level 3
- Business Potential: Level 3
- Difficulty: Level 3
- Knowledge Area: Operations and QA
- Software or Tool: Steam release checklist plus playtest
- Main Book: The DevOps Handbook
What you will build: A launch rehearsal that validates legal docs, localization, crash reporting, and support workflows.
Why it teaches game development and shipping: This project forces you to connect system design with observable runtime and production outcomes.
Core challenges you will face:
- Checklist discipline -> maps to architecture clarity and deterministic behavior
- Cross functional handoffs -> maps to production reliability under changing requirements
- Incident response prep -> maps to scaling from prototype decisions to shipping constraints
Real World Outcome
This project produces a playable and observable game outcome, not just logs.
On screen you will see:
- Launch checklist board grouped by Legal, QA, Ops, Support
- Incident simulation timer and event timeline
- Owner matrix showing blocker assignment and SLA
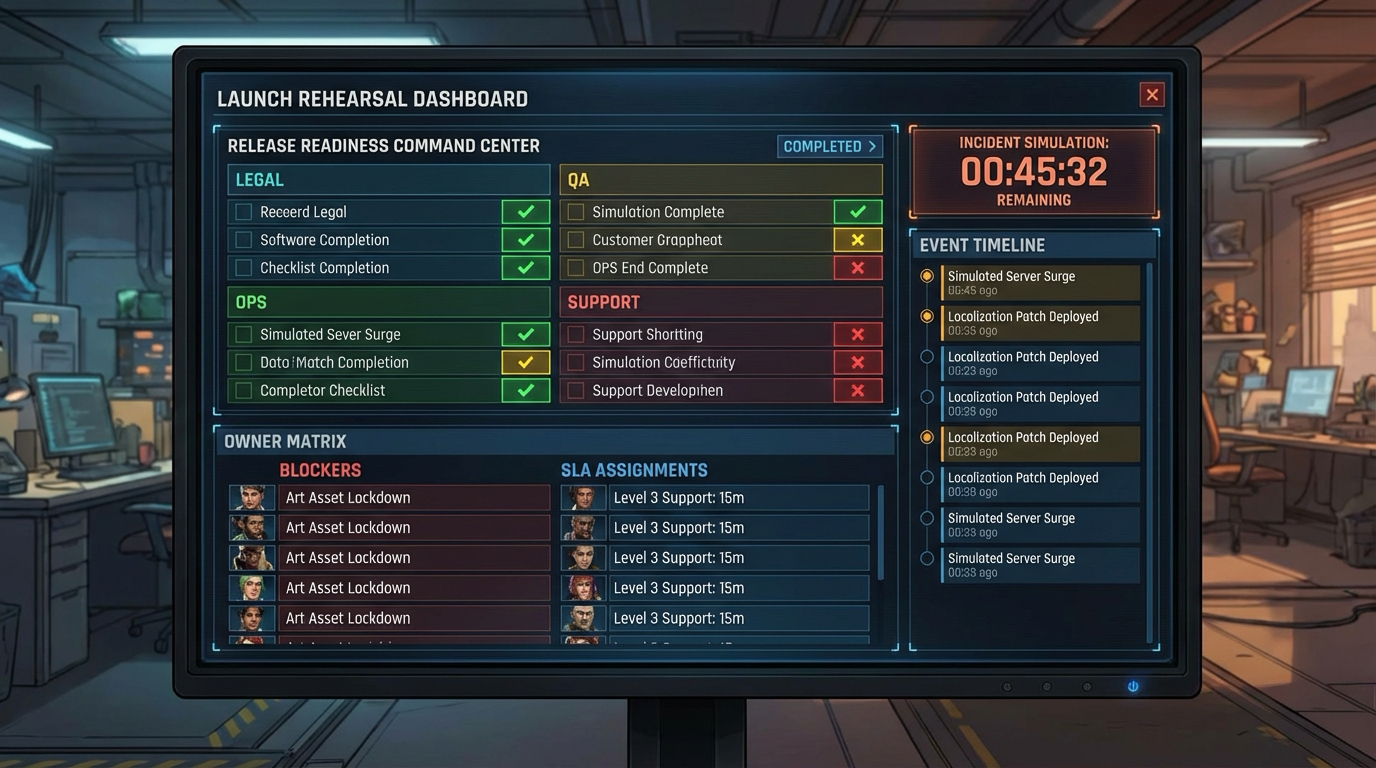
Interaction controls:
- Run drill button
- Inject Sev1 incident
- Export report
Success signal:
- Team can execute a full launch rehearsal with measurable response quality.
Failure signal:
- Unowned blockers and untested incident response create launch-day chaos.
Golden path demonstration transcript:
$ dotnet run --project src/Game -- --scene release-drill
[DRILL] checklist_done=42 blocked=3
[DRILL] sev1_response_time=11m
[DRILL] report_exported path=docs/release-drill.md
The Core Question You Are Answering
“What fails most often in the final 72 hours before launch?”
This question matters because it forces engineering decisions to align with player experience and launch reality.
Concepts You Must Understand First
- Checklist discipline
- How does this concept constrain design and testability?
- Book Reference: “The DevOps Handbook”
- Cross functional handoffs
- What invariant should never be violated during runtime?
- Book Reference: “Clean Architecture” by Robert C. Martin
- Incident response prep
- Which failure mode appears first when this is ignored?
- Book Reference: “Release It!” by Michael T. Nygard
Questions to Guide Your Design
- Runtime boundary design
- What data enters this feature each tick, and what data leaves?
- Which part of this feature must remain deterministic?
- Operational resilience
- How will you detect degradation before players report it?
- What is your rollback or fallback path?
Thinking Exercise
Invariant-first design pass
Draw a state diagram for “Release Readiness Drill” and identify one invariant that must stay true even during failures.
Questions to answer:
- Which two events are most likely to break this invariant?
- What log or UI signal confirms the invariant is still holding?
The Interview Questions They Will Ask
- “How did you decompose Release Readiness Drill so it remained testable?”
- “Which invariant did you enforce first, and why?”
- “What instrumentation did you add to debug regressions quickly?”
- “What edge case surprised you during implementation?”
- “How would you productionize this feature for a larger team?”
Hints in Layers
Hint 1: Starting Point Define one deterministic acceptance scenario before implementing features.
Hint 2: Next Level Introduce a tiny event log model so runtime behavior can be replayed in tests.
Hint 3: Technical Details
collect_intent -> validate_preconditions -> apply_transition -> emit_feedback -> persist_if_needed
Hint 4: Tools/Debugging Add a debug panel line for each invariant and update it once per simulation tick.
Books That Will Help
| Topic | Book | Chapter |
|---|---|---|
| Runtime architecture | “The DevOps Handbook” | Relevant runtime/system chapters |
| Reliability patterns | “Release It!” by Michael T. Nygard | Stability and resilience chapters |
| Refactoring large features | “Refactoring” by Martin Fowler | Code smells and safe transformations |
Common Pitfalls and Debugging
Problem 1: “Feature works in one scene but fails after restart”
- Why: Hidden state initialization dependency.
- Fix: Centralize initialization order and validate preconditions at scene entry.
- Quick test: dotnet test –filter release-readiness-drill
Problem 2: “Intermittent behavior under lower FPS”
- Why: Time-coupled logic leaking into deterministic state transitions.
- Fix: Move decision logic into fixed-step update and cap catch-up steps.
- Quick test: Run with synthetic frame limiter at 30 FPS and 144 FPS.
Definition of Done
- Core functionality works on reference inputs.
- Edge cases are tested and documented.
- Results are reproducible on two machine profiles.
- Performance trends match expected budget for this feature.
- A rollback or fallback strategy is documented.
Project 19: Wishlist Funnel and Market Analysis
- File: P19-wishlist-funnel-market-analysis.md
- Main Programming Language: C# (.NET 8)
- Alternative Programming Languages: F#, C++ (raylib), Godot C#
- Coolness Level: Level 3
- Business Potential: Level 3
- Difficulty: Level 2
- Knowledge Area: Product Strategy
- Software or Tool: Steam analytics and competitor audits
- Main Book: Obviously Awesome by April Dunford
What you will build: A data backed market memo with genre benchmarks, price hypotheses, and wishlist growth experiments.
Why it teaches game development and shipping: This project forces you to connect system design with observable runtime and production outcomes.
Core challenges you will face:
- Audience segmentation -> maps to architecture clarity and deterministic behavior
- Pricing experiments -> maps to production reliability under changing requirements
- Signal to noise filtering -> maps to scaling from prototype decisions to shipping constraints
Real World Outcome
This project produces a playable and observable game outcome, not just logs.
On screen you will see:
- Competitor matrix with price, review score, and feature deltas
- Funnel model board with CTR and wishlist conversion assumptions
- Experiment backlog panel prioritized by expected impact
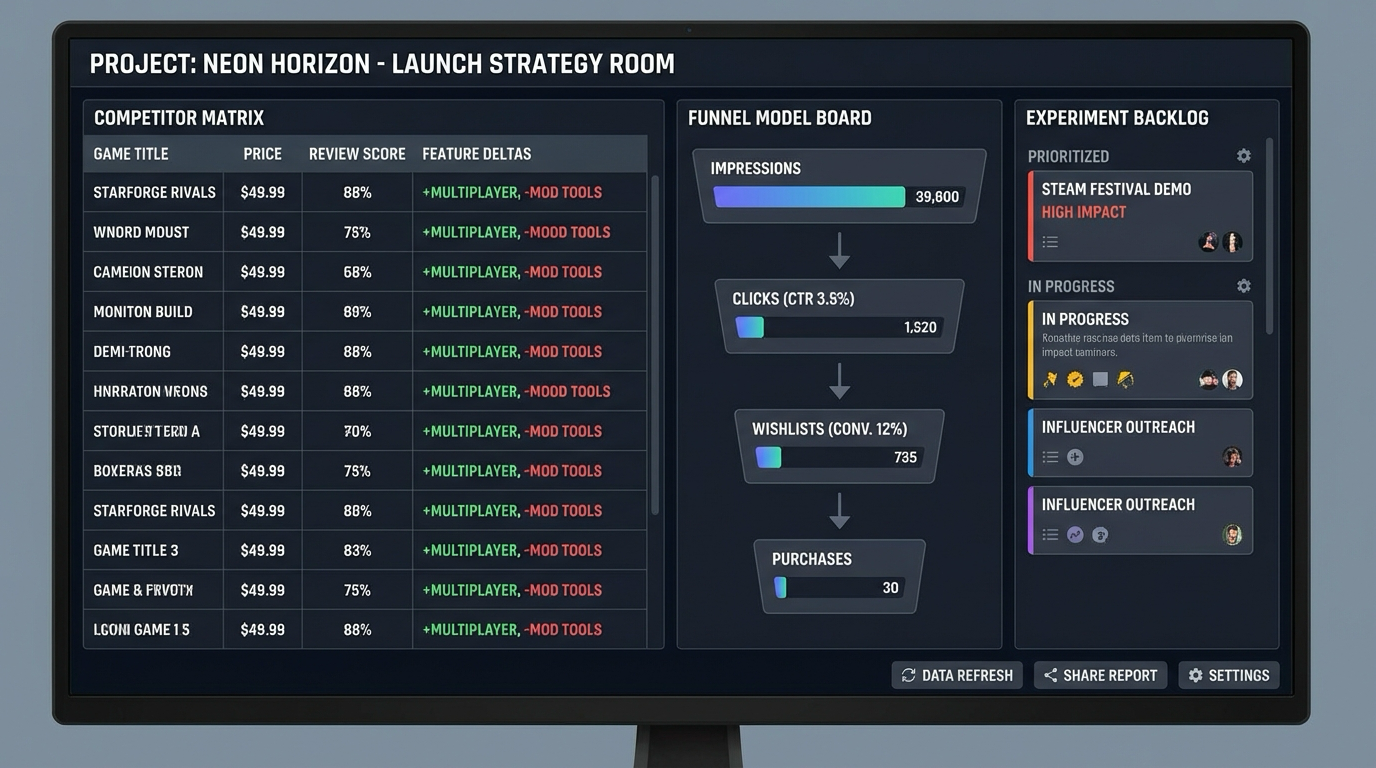
Interaction controls:
- Load benchmark dataset
- Recalculate funnel model
- Promote experiment to sprint
Success signal:
- You end with a concrete market hypothesis and prioritized experiment plan.
Failure signal:
- Unstructured research leads to random marketing actions with no learning loop.
Golden path demonstration transcript:
$ dotnet run --project src/Game -- --scene market-analysis
[MARKET] competitors=12 normalized=PASS
[FUNNEL] ctr=3.8% wishlist_cvr=14.2%
[PLAN] experiments_ranked=3 high_priority=2
The Core Question You Are Answering
“How do you decide if your game has a realistic market wedge?”
This question matters because it forces engineering decisions to align with player experience and launch reality.
Concepts You Must Understand First
- Audience segmentation
- How does this concept constrain design and testability?
- Book Reference: “Obviously Awesome by April Dunford”
- Pricing experiments
- What invariant should never be violated during runtime?
- Book Reference: “Clean Architecture” by Robert C. Martin
- Signal to noise filtering
- Which failure mode appears first when this is ignored?
- Book Reference: “Release It!” by Michael T. Nygard
Questions to Guide Your Design
- Runtime boundary design
- What data enters this feature each tick, and what data leaves?
- Which part of this feature must remain deterministic?
- Operational resilience
- How will you detect degradation before players report it?
- What is your rollback or fallback path?
Thinking Exercise
Invariant-first design pass
Draw a state diagram for “Wishlist Funnel and Market Analysis” and identify one invariant that must stay true even during failures.
Questions to answer:
- Which two events are most likely to break this invariant?
- What log or UI signal confirms the invariant is still holding?
The Interview Questions They Will Ask
- “How did you decompose Wishlist Funnel and Market Analysis so it remained testable?”
- “Which invariant did you enforce first, and why?”
- “What instrumentation did you add to debug regressions quickly?”
- “What edge case surprised you during implementation?”
- “How would you productionize this feature for a larger team?”
Hints in Layers
Hint 1: Starting Point Define one deterministic acceptance scenario before implementing features.
Hint 2: Next Level Introduce a tiny event log model so runtime behavior can be replayed in tests.
Hint 3: Technical Details
collect_intent -> validate_preconditions -> apply_transition -> emit_feedback -> persist_if_needed
Hint 4: Tools/Debugging Add a debug panel line for each invariant and update it once per simulation tick.
Books That Will Help
| Topic | Book | Chapter |
|---|---|---|
| Runtime architecture | “Obviously Awesome by April Dunford” | Relevant runtime/system chapters |
| Reliability patterns | “Release It!” by Michael T. Nygard | Stability and resilience chapters |
| Refactoring large features | “Refactoring” by Martin Fowler | Code smells and safe transformations |
Common Pitfalls and Debugging
Problem 1: “Feature works in one scene but fails after restart”
- Why: Hidden state initialization dependency.
- Fix: Centralize initialization order and validate preconditions at scene entry.
- Quick test: dotnet test –filter wishlist-funnel-market-analysis
Problem 2: “Intermittent behavior under lower FPS”
- Why: Time-coupled logic leaking into deterministic state transitions.
- Fix: Move decision logic into fixed-step update and cap catch-up steps.
- Quick test: Run with synthetic frame limiter at 30 FPS and 144 FPS.
Definition of Done
- Core functionality works on reference inputs.
- Edge cases are tested and documented.
- Results are reproducible on two machine profiles.
- Performance trends match expected budget for this feature.
- A rollback or fallback strategy is documented.
Project 20: Friend Slop Viral Prototype Sprint
- File: P20-friend-slop-viral-prototype-sprint.md
- Main Programming Language: C# (.NET 8)
- Alternative Programming Languages: F#, C++ (raylib), Godot C#
- Coolness Level: Level 4
- Business Potential: Level 2
- Difficulty: Level 2
- Knowledge Area: Rapid Product Experiments
- Software or Tool: MonoGame plus rapid asset workflow
- Main Book: Sprint by Jake Knapp
What you will build: A fast social prototype designed for shareability loops and measurable retention checkpoints.
Why it teaches game development and shipping: This project forces you to connect system design with observable runtime and production outcomes.
Core challenges you will face:
- Loop hypothesis testing -> maps to architecture clarity and deterministic behavior
- Instrumentation first -> maps to production reliability under changing requirements
- Scope slicing -> maps to scaling from prototype decisions to shipping constraints
Real World Outcome
This project produces a playable and observable game outcome, not just logs.
On screen you will see:
- Fast playable prototype scene with instant restart
- Share card generator panel with session summary
- Telemetry mini-dashboard for invites and return sessions
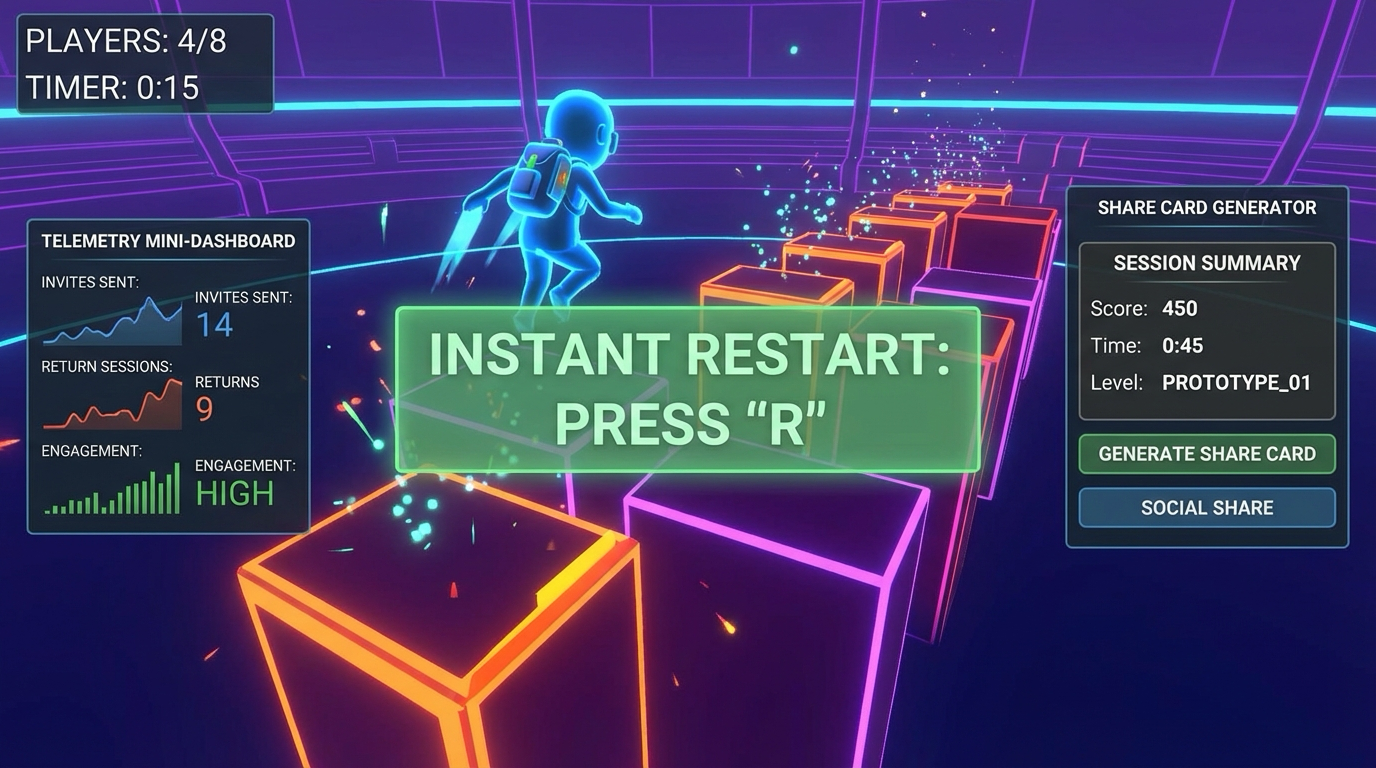
Interaction controls:
- Play loop quickly with Enter restart
- S generate share card
- I simulate invite event
Success signal:
- Prototype validates social-loop hypotheses with measurable instrumentation.
Failure signal:
- No telemetry or unclear share mechanics makes viral claims untestable.
Golden path demonstration transcript:
$ dotnet run --project src/Game -- --scene friend-slop-prototype
[PROTO] run_complete time=4m12s share_card=created
[METRIC] invites_sent=4 returns_24h=1
[METRIC] median_session=6m12s
The Core Question You Are Answering
“How do you test viral hooks quickly without losing engineering discipline?”
This question matters because it forces engineering decisions to align with player experience and launch reality.
Concepts You Must Understand First
- Loop hypothesis testing
- How does this concept constrain design and testability?
- Book Reference: “Sprint by Jake Knapp”
- Instrumentation first
- What invariant should never be violated during runtime?
- Book Reference: “Clean Architecture” by Robert C. Martin
- Scope slicing
- Which failure mode appears first when this is ignored?
- Book Reference: “Release It!” by Michael T. Nygard
Questions to Guide Your Design
- Runtime boundary design
- What data enters this feature each tick, and what data leaves?
- Which part of this feature must remain deterministic?
- Operational resilience
- How will you detect degradation before players report it?
- What is your rollback or fallback path?
Thinking Exercise
Invariant-first design pass
Draw a state diagram for “Friend Slop Viral Prototype Sprint” and identify one invariant that must stay true even during failures.
Questions to answer:
- Which two events are most likely to break this invariant?
- What log or UI signal confirms the invariant is still holding?
The Interview Questions They Will Ask
- “How did you decompose Friend Slop Viral Prototype Sprint so it remained testable?”
- “Which invariant did you enforce first, and why?”
- “What instrumentation did you add to debug regressions quickly?”
- “What edge case surprised you during implementation?”
- “How would you productionize this feature for a larger team?”
Hints in Layers
Hint 1: Starting Point Define one deterministic acceptance scenario before implementing features.
Hint 2: Next Level Introduce a tiny event log model so runtime behavior can be replayed in tests.
Hint 3: Technical Details
collect_intent -> validate_preconditions -> apply_transition -> emit_feedback -> persist_if_needed
Hint 4: Tools/Debugging Add a debug panel line for each invariant and update it once per simulation tick.
Books That Will Help
| Topic | Book | Chapter |
|---|---|---|
| Runtime architecture | “Sprint by Jake Knapp” | Relevant runtime/system chapters |
| Reliability patterns | “Release It!” by Michael T. Nygard | Stability and resilience chapters |
| Refactoring large features | “Refactoring” by Martin Fowler | Code smells and safe transformations |
Common Pitfalls and Debugging
Problem 1: “Feature works in one scene but fails after restart”
- Why: Hidden state initialization dependency.
- Fix: Centralize initialization order and validate preconditions at scene entry.
- Quick test: dotnet test –filter friend-slop-viral-prototype-sprint
Problem 2: “Intermittent behavior under lower FPS”
- Why: Time-coupled logic leaking into deterministic state transitions.
- Fix: Move decision logic into fixed-step update and cap catch-up steps.
- Quick test: Run with synthetic frame limiter at 30 FPS and 144 FPS.
Definition of Done
- Core functionality works on reference inputs.
- Edge cases are tested and documented.
- Results are reproducible on two machine profiles.
- Performance trends match expected budget for this feature.
- A rollback or fallback strategy is documented.
Project 21: Ship a Complete Steam Game
- File: P21-ship-complete-steam-game.md
- Main Programming Language: C# (.NET 8)
- Alternative Programming Languages: F#, C++ (raylib), Godot C#
- Coolness Level: Level 5
- Business Potential: Level 4
- Difficulty: Level 5
- Knowledge Area: Capstone Product Delivery
- Software or Tool: MonoGame plus full Steam stack
- Main Book: The Lean Startup by Eric Ries
What you will build: An end to end Steam release including production build, launch assets, and first patch response plan.
Why it teaches game development and shipping: This project forces you to connect system design with observable runtime and production outcomes.
Core challenges you will face:
- Systems integration -> maps to architecture clarity and deterministic behavior
- Production risk management -> maps to production reliability under changing requirements
- Live operations cadence -> maps to scaling from prototype decisions to shipping constraints
Real World Outcome
This project produces a playable and observable game outcome, not just logs.
On screen you will see:
- Launch command center with release checklist, Steam feature status, and risk panel
- Build panel listing RC artifact versions and hashes
- Hotfix readiness panel with branch and communication templates

Interaction controls:
- Run full validation suite
- Publish RC artifact set
- Simulate day-1 hotfix
Success signal:
- Complete release package is validated for launch and first-patch operations.
Failure signal:
- Missing integration checks or hotfix path means capstone is not production-ready.
Golden path demonstration transcript:
$ dotnet run --project src/Game -- --scene capstone-release
[CAPSTONE] rc=1.0.0-rc3 validation=PASS
[CAPSTONE] steam achievements/cloud/leaderboards=PASS
[CAPSTONE] hotfix_branch=hotfix/1.0.1 ready=true
The Core Question You Are Answering
“Can you take one game from concept to post launch operations with repeatable quality?”
This question matters because it forces engineering decisions to align with player experience and launch reality.
Concepts You Must Understand First
- Systems integration
- How does this concept constrain design and testability?
- Book Reference: “The Lean Startup by Eric Ries”
- Production risk management
- What invariant should never be violated during runtime?
- Book Reference: “Clean Architecture” by Robert C. Martin
- Live operations cadence
- Which failure mode appears first when this is ignored?
- Book Reference: “Release It!” by Michael T. Nygard
Questions to Guide Your Design
- Runtime boundary design
- What data enters this feature each tick, and what data leaves?
- Which part of this feature must remain deterministic?
- Operational resilience
- How will you detect degradation before players report it?
- What is your rollback or fallback path?
Thinking Exercise
Invariant-first design pass
Draw a state diagram for “Ship a Complete Steam Game” and identify one invariant that must stay true even during failures.
Questions to answer:
- Which two events are most likely to break this invariant?
- What log or UI signal confirms the invariant is still holding?
The Interview Questions They Will Ask
- “How did you decompose Ship a Complete Steam Game so it remained testable?”
- “Which invariant did you enforce first, and why?”
- “What instrumentation did you add to debug regressions quickly?”
- “What edge case surprised you during implementation?”
- “How would you productionize this feature for a larger team?”
Hints in Layers
Hint 1: Starting Point Define one deterministic acceptance scenario before implementing features.
Hint 2: Next Level Introduce a tiny event log model so runtime behavior can be replayed in tests.
Hint 3: Technical Details
collect_intent -> validate_preconditions -> apply_transition -> emit_feedback -> persist_if_needed
Hint 4: Tools/Debugging Add a debug panel line for each invariant and update it once per simulation tick.
Books That Will Help
| Topic | Book | Chapter |
|---|---|---|
| Runtime architecture | “The Lean Startup by Eric Ries” | Relevant runtime/system chapters |
| Reliability patterns | “Release It!” by Michael T. Nygard | Stability and resilience chapters |
| Refactoring large features | “Refactoring” by Martin Fowler | Code smells and safe transformations |
Common Pitfalls and Debugging
Problem 1: “Feature works in one scene but fails after restart”
- Why: Hidden state initialization dependency.
- Fix: Centralize initialization order and validate preconditions at scene entry.
- Quick test: dotnet test –filter ship-complete-steam-game
Problem 2: “Intermittent behavior under lower FPS”
- Why: Time-coupled logic leaking into deterministic state transitions.
- Fix: Move decision logic into fixed-step update and cap catch-up steps.
- Quick test: Run with synthetic frame limiter at 30 FPS and 144 FPS.
Definition of Done
- Core functionality works on reference inputs.
- Edge cases are tested and documented.
- Results are reproducible on two machine profiles.
- Performance trends match expected budget for this feature.
- A rollback or fallback strategy is documented.
Project Comparison Table
| Project | Difficulty | Time | Depth of Understanding | Fun Factor |
|---|---|---|---|---|
| 1. The MonoGame Core Loop | Level 2 | Weekend | High | ★★★☆☆ |
| 2. Pixel Painter and Sprite Batching | Level 2 | 1 week | High | ★★★☆☆ |
| 3. Input Mapping and Command Buffer | Level 2 | 1 week | High | ★★★★☆ |
| 4. 2D Collision and Physics Slice | Level 3 | 2 weeks | Very High | ★★★★☆ |
| 5. Player Controller State Machine | Level 3 | 2 weeks | Very High | ★★★★★ |
| 6. Pong Vertical Slice | Level 2 | Weekend | Medium | ★★★☆☆ |
| 7. Breakout with Power-Ups | Level 2 | 1 week | Medium | ★★★★☆ |
| 8. Platformer Mechanics and Feel Tuning | Level 3 | 2 to 3 weeks | Very High | ★★★★★ |
| 9. Save System Architecture | Level 3 | 1 week | High | ★★★☆☆ |
| 10. Audio Mixer and Adaptive Music | Level 3 | 1 to 2 weeks | High | ★★★★☆ |
| 11. UI Flows and AI Asset Pipeline | Level 2 | 1 week | High | ★★★★☆ |
| 12. Steamworks Bootstrap for C# | Level 3 | 1 week | High | ★★★☆☆ |
| 13. Achievements and Stats Telemetry | Level 3 | 1 week | High | ★★★☆☆ |
| 14. Steam Cloud Save Sync | Level 3 | 1 week | High | ★★★☆☆ |
| 15. Leaderboards and Fairness Guards | Level 4 | 1 to 2 weeks | Very High | ★★★★☆ |
| 16. Steam Store Page Builder | Level 2 | 1 week | Medium | ★★★☆☆ |
| 17. Build and Branch Pipeline | Level 3 | 1 week | Very High | ★★★☆☆ |
| 18. Release Readiness Drill | Level 3 | Weekend | High | ★★★☆☆ |
| 19. Wishlist Funnel and Market Analysis | Level 2 | Weekend | Medium | ★★★☆☆ |
| 20. Friend Slop Viral Prototype Sprint | Level 2 | Weekend | Medium | ★★★★★ |
| 21. Ship a Complete Steam Game | Level 5 | 6 to 10 weeks | Maximum | ★★★★★ |
Recommendation
If you are new to game development: Start with Project 1, Project 3, and Project 6 to establish deterministic loop, input correctness, and a full tiny game cycle.
If you are a gameplay-focused developer: Start with Project 4, Project 5, and Project 8 to build control quality and simulation confidence.
If your goal is shipping commercially: Focus on Project 11 through Project 21, especially Steam integration, release rehearsal, and launch operations.
Final Overall Project: Operational Steam Launch Capsule
The Goal: Combine Projects 8, 11, 14, 17, and 21 into one complete launch-ready package.
- Lock core gameplay and telemetry budget using Project 8 metrics.
- Build final content and UI assets through Project 11 pipeline with provenance logs.
- Validate persistence and cloud reliability from Projects 9 and 14.
- Push release candidate through Project 17 branch gates.
- Execute launch rehearsal and release through Project 21 runbook.
Success Criteria: A stable production build, approved store assets, reproducible release checklist completion, and first-week patch plan.
From Learning to Production: What Is Next
| Your Project | Production Equivalent | Gap to Fill |
|---|---|---|
| MonoGame core loop plus systems | Internal game framework layer | Build reusable shared runtime packages |
| Save plus cloud plus telemetry stack | Live player data platform | Add privacy policy, retention policy, and deeper analytics tooling |
| Steam release pipeline | Continuous delivery for game operations | Add automated certification gates and broader platform support |
| AI asset workflow | Studio content operations pipeline | Add dedicated art direction review and legal compliance checkpoints |
Summary
This learning path covers game development to Steam publishing through 21 hands-on projects implemented in C# with MonoGame.
| # | Project Name | Main Language | Difficulty | Time Estimate |
|---|---|---|---|---|
| 1 | The MonoGame Core Loop | C# (.NET 8) + MonoGame | Level 2 | Weekend |
| 2 | Pixel Painter and Sprite Batching | C# (.NET 8) + MonoGame | Level 2 | 1 week |
| 3 | Input Mapping and Command Buffer | C# (.NET 8) + MonoGame | Level 2 | 1 week |
| 4 | 2D Collision and Physics Slice | C# (.NET 8) + MonoGame | Level 3 | 2 weeks |
| 5 | Player Controller State Machine | C# (.NET 8) + MonoGame | Level 3 | 2 weeks |
| 6 | Pong Vertical Slice | C# (.NET 8) + MonoGame | Level 2 | Weekend |
| 7 | Breakout with Power-Ups | C# (.NET 8) + MonoGame | Level 2 | 1 week |
| 8 | Platformer Mechanics and Feel Tuning | C# (.NET 8) + MonoGame | Level 3 | 2 to 3 weeks |
| 9 | Save System Architecture | C# (.NET 8) + MonoGame | Level 3 | 1 week |
| 10 | Audio Mixer and Adaptive Music | C# (.NET 8) + MonoGame | Level 3 | 1 to 2 weeks |
| 11 | UI Flows and AI Asset Pipeline | C# (.NET 8) + MonoGame | Level 2 | 1 week |
| 12 | Steamworks Bootstrap for C# | C# (.NET 8) + MonoGame | Level 3 | 1 week |
| 13 | Achievements and Stats Telemetry | C# (.NET 8) + MonoGame | Level 3 | 1 week |
| 14 | Steam Cloud Save Sync | C# (.NET 8) + MonoGame | Level 3 | 1 week |
| 15 | Leaderboards and Fairness Guards | C# (.NET 8) + MonoGame | Level 4 | 1 to 2 weeks |
| 16 | Steam Store Page Builder | C# (.NET 8) + MonoGame | Level 2 | 1 week |
| 17 | Build and Branch Pipeline | C# (.NET 8) + MonoGame | Level 3 | 1 week |
| 18 | Release Readiness Drill | C# (.NET 8) + MonoGame | Level 3 | Weekend |
| 19 | Wishlist Funnel and Market Analysis | C# (.NET 8) + MonoGame | Level 2 | Weekend |
| 20 | Friend Slop Viral Prototype Sprint | C# (.NET 8) + MonoGame | Level 2 | Weekend |
| 21 | Ship a Complete Steam Game | C# (.NET 8) + MonoGame | Level 5 | 6 to 10 weeks |
Expected Outcomes
- You can architect deterministic real-time gameplay systems with production-level observability.
- You can ship and maintain a Steam-integrated C# game using disciplined release engineering.
- You can run a practical Nano Banana asset workflow with quality gates and traceability.
Additional Resources and References
Standards and Specifications
- Steam Direct Fee and onboarding requirements
- Steam release process and checklist
- Steamworks API overview
- Steamworks.NET (C# wrapper)
Industry Analysis and Platform Data
MonoGame and Tooling
AI Asset Workflow (Nano Banana / Gemini image generation)
Books
- “Game Programming Patterns” by Robert Nystrom
- “Game Engine Architecture” by Jason Gregory
- “Release It!” by Michael T. Nygard
- “Traction” by Gabriel Weinberg and Justin Mares