Project 1: Build Your Own Network Reconnaissance Toolkit
Goal: Develop hands-on offensive security skills by building tools and lab environments that demonstrate real attack paths with safe, reproducible evidence.
Offensive Workflow and Safety
Every offensive task has a legal boundary and a safety boundary. Define scope, isolate labs, and collect evidence without causing damage.
Reconnaissance to Exploitation
Recon discovers surface area, scanning validates exposure, and exploitation demonstrates impact. Each phase should output artifacts that make the next phase precise and repeatable.
Post-Exploitation and Reporting
Access without evidence is not a result. The goal is reproducible findings, minimal persistence, and clear remediation steps.
Concept Summary Table
| Concept Cluster | What You Need to Internalize |
|---|---|
| Recon | Asset discovery and fingerprinting. |
| Exploitation | Controlled proof of impact. |
| Post-exploitation | Privilege escalation and evidence capture. |
| OpSec | Avoid collateral damage, use lab setups. |
| Reporting | Clear, actionable remediation output. |
Deep Dive Reading by Concept
| Concept | Book & Chapter |
|---|---|
| Recon & scanning | The Hacker Playbook 3 — recon chapters |
| Web exploitation | Web Application Hacker’s Handbook — SQLi/XSS |
| Post-exploitation | Penetration Testing by Weidman — post-ex chapters |
| Reporting | PTES Technical Guidelines — reporting |
Project Overview
| Attribute | Value |
|---|---|
| Difficulty | Beginner-Intermediate |
| Time Estimate | 1-2 weeks |
| Programming Language | Python |
| Primary Tool | Scapy / Raw Sockets |
| Main Book | “Black Hat Python” by Justin Seitz |
| Knowledge Area | Networking / Security |
Learning Objectives
By completing this project, you will:
- Understand TCP/IP at the packet level - Not just conceptually, but what actual bytes travel over the wire
- Implement port scanning from scratch - Learn why Nmap works the way it does by building your own
- Master DNS enumeration techniques - Discover subdomains, mail servers, and zone transfer vulnerabilities
- Develop service fingerprinting skills - Identify what’s running on open ports by analyzing banners
- Build production-quality security tools - Handle threading, timeouts, and error conditions like professional tools
The Core Question
“How do attackers discover what’s running on a network before they even attempt exploitation?”
Reconnaissance is the foundation of every penetration test. Before you can hack anything, you need to know:
- What hosts are alive on the network?
- What ports are open on each host?
- What services are running behind those ports?
- What versions of software are exposed?
By building these tools yourself, you’ll understand the mechanics of network discovery at a fundamental level—knowledge that makes you effective with tools like Nmap and helps you understand what defenders see.
Deep Theoretical Foundation
The TCP/IP Stack: Where Scanning Lives
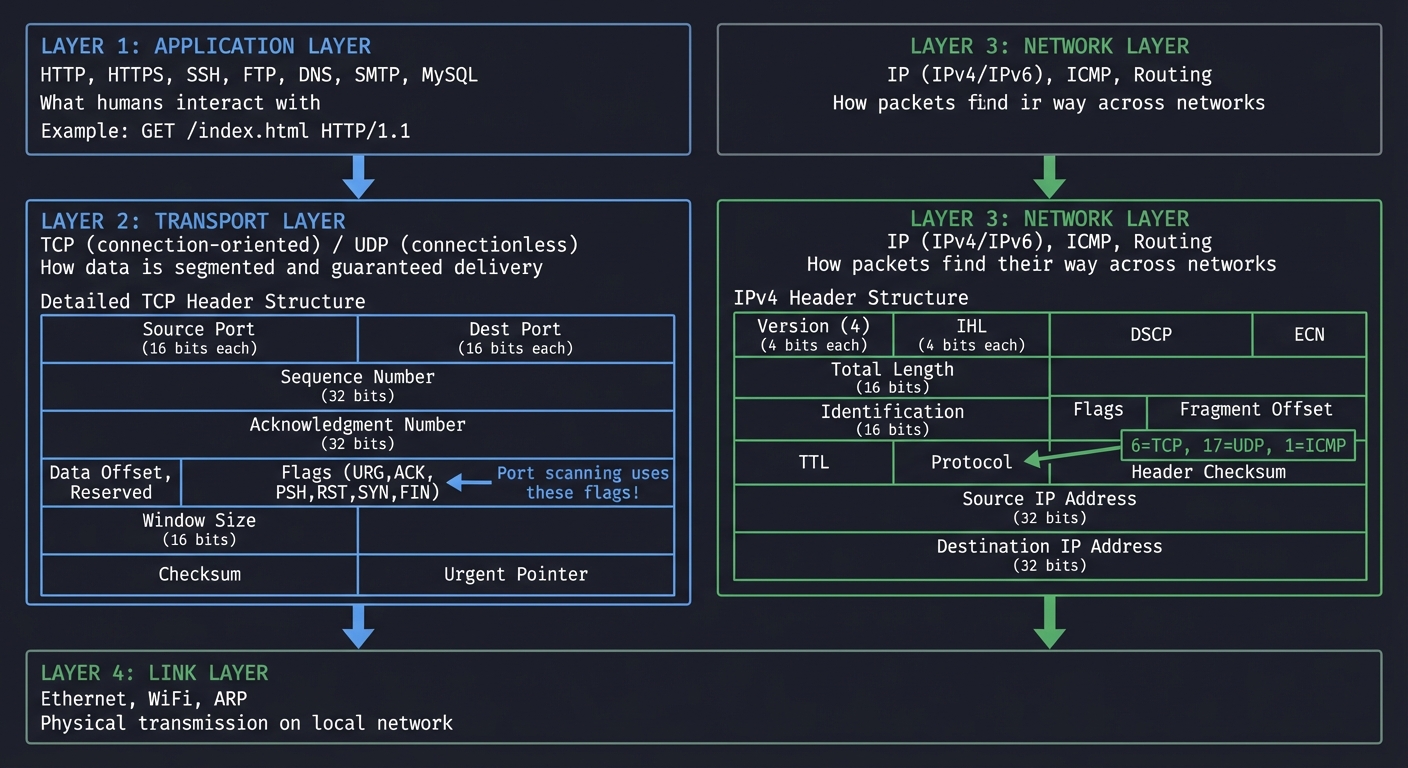
Before writing a single line of code, you must understand how data travels across networks. The TCP/IP model has four layers, and your reconnaissance tools will operate primarily at Layer 3 (Network) and Layer 4 (Transport):
┌─────────────────────────────────────────────────────────────────────┐
│                        APPLICATION LAYER                            │
│  HTTP, HTTPS, SSH, FTP, DNS, SMTP, MySQL                           │
│  "What humans interact with"                                        │
│                                                                     │
│  Example: GET /index.html HTTP/1.1                                 │
└─────────────────────────────────────────────────────────────────────┘
                              │
                              ▼
┌─────────────────────────────────────────────────────────────────────┐
│                        TRANSPORT LAYER                              │
│  TCP (connection-oriented) / UDP (connectionless)                  │
│  "How data is segmented and guaranteed delivery"                   │
│                                                                     │
│  TCP Header Structure:                                              │
│  ┌────────────────┬────────────────┐                               │
│  │ Source Port    │ Dest Port      │ (16 bits each)                │
│  ├────────────────┴────────────────┤                               │
│  │ Sequence Number                  │ (32 bits)                    │
│  ├──────────────────────────────────┤                               │
│  │ Acknowledgment Number            │ (32 bits)                    │
│  ├────────────────┬─────────────────┤                               │
│  │ Data Offset,   │ Flags (URG,ACK, │                               │
│  │ Reserved       │ PSH,RST,SYN,FIN)│ ◄── Port scanning uses these!│
│  ├────────────────┴─────────────────┤                               │
│  │ Window Size                      │ (16 bits)                    │
│  ├──────────────────────────────────┤                               │
│  │ Checksum      │ Urgent Pointer   │                               │
│  └────────────────┴──────────────────┘                              │
└─────────────────────────────────────────────────────────────────────┘
                              │
                              ▼
┌─────────────────────────────────────────────────────────────────────┐
│                        NETWORK LAYER                                │
│  IP (IPv4/IPv6), ICMP, Routing                                     │
│  "How packets find their way across networks"                      │
│                                                                     │
│  IPv4 Header:                                                       │
│  ┌────────────────┬────────────────┐                               │
│  │ Version (4)    │ IHL           │ (4 bits each)                  │
│  ├────────────────┼────────────────┤                               │
│  │ DSCP           │ ECN           │                                 │
│  ├────────────────┴────────────────┤                               │
│  │ Total Length                    │ (16 bits)                     │
│  ├──────────────────────────────────┤                               │
│  │ Identification                   │ (16 bits)                    │
│  ├────────────────┬─────────────────┤                               │
│  │ Flags         │ Fragment Offset │                                │
│  ├────────────────┴─────────────────┤                               │
│  │ TTL           │ Protocol        │ ◄── 6=TCP, 17=UDP, 1=ICMP    │
│  ├────────────────┴─────────────────┤                               │
│  │ Header Checksum                  │                               │
│  ├──────────────────────────────────┤                               │
│  │ Source IP Address                │ (32 bits)                    │
│  ├──────────────────────────────────┤                               │
│  │ Destination IP Address           │ (32 bits)                    │
│  └──────────────────────────────────┘                               │
└─────────────────────────────────────────────────────────────────────┘
                              │
                              ▼
┌─────────────────────────────────────────────────────────────────────┐
│                        LINK LAYER                                   │
│  Ethernet, WiFi, ARP                                               │
│  "Physical transmission on local network"                          │
└─────────────────────────────────────────────────────────────────────┘
The TCP Three-Way Handshake: Why Port Scanning Works
TCP is a connection-oriented protocol. Before any data transfer, client and server must establish a connection using a “three-way handshake”:
Normal TCP Connection Establishment
═══════════════════════════════════

Client                                              Server
   │                                                   │
   │  SYN (Synchronize)                               │
   │  seq=100, ack=0, flags=SYN                       │
   ├─────────────────────────────────────────────────►│
   │  "I want to connect. My sequence starts at 100" │
   │                                                   │
   │                     SYN-ACK                       │
   │  seq=300, ack=101, flags=SYN+ACK                 │
   │◄─────────────────────────────────────────────────┤
   │  "OK. My sequence starts at 300.                 │
   │   I expect your next byte to be 101"             │
   │                                                   │
   │  ACK (Acknowledge)                               │
   │  seq=101, ack=301, flags=ACK                     │
   ├─────────────────────────────────────────────────►│
   │  "Got it. Connection established."               │
   │                                                   │
   │  ═══════ CONNECTION ESTABLISHED ═══════          │
   │                                                   │
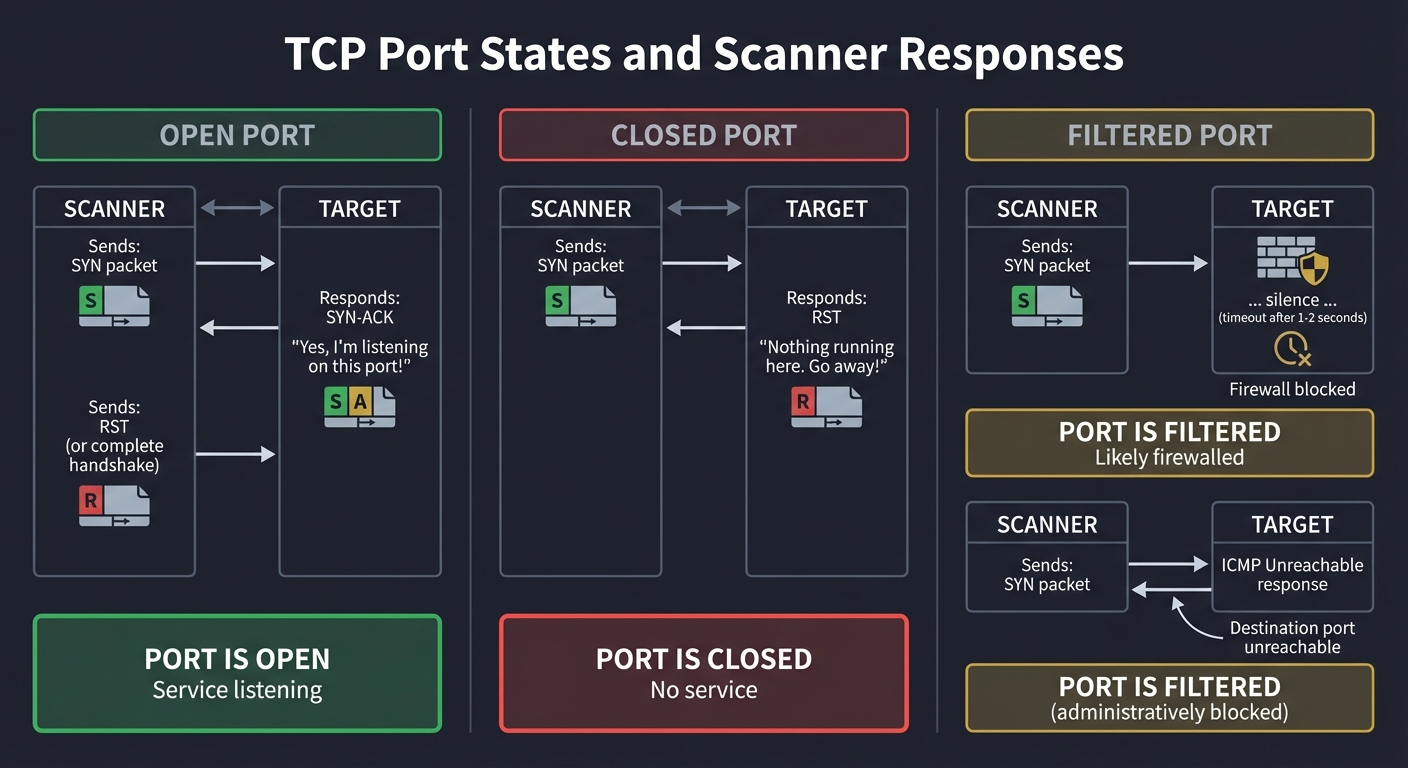
Why this matters for scanning: By sending specific combinations of TCP flags, we can probe a port’s state without completing a full connection:
Port States and What They Mean
OPEN PORT (Service Listening)
─────────────────────────────
Scanner                                             Target
   │                                                   │
   │  SYN                                             │
   ├─────────────────────────────────────────────────►│
   │                                                   │
   │                     SYN-ACK                       │
   │◄─────────────────────────────────────────────────┤
   │  "Yes, I'm listening on this port!"              │
   │                                                   │
   │  RST (or complete handshake)                     │
   ├─────────────────────────────────────────────────►│
   │                                                   │

Result: PORT IS OPEN
─────────────────────


CLOSED PORT (Nothing Listening)
───────────────────────────────
Scanner                                             Target
   │                                                   │
   │  SYN                                             │
   ├─────────────────────────────────────────────────►│
   │                                                   │
   │                     RST                          │
   │◄─────────────────────────────────────────────────┤
   │  "Nothing running here. Go away!"                │
   │                                                   │

Result: PORT IS CLOSED
──────────────────────


FILTERED PORT (Firewall Blocking)
─────────────────────────────────
Scanner                                             Target
   │                                                   │
   │  SYN                                             │
   ├─────────────────────────────────────────────────►│
   │                                              [Firewall]
   │  ... silence ...                                  X
   │  (timeout after 1-2 seconds)                     │
   │                                                   │

Result: PORT IS FILTERED (probably firewalled)
──────────────────────────────────────────────


ALTERNATIVE: ICMP Unreachable
─────────────────────────────
Scanner                                             Target
   │                                                   │
   │  SYN                                             │
   ├─────────────────────────────────────────────────►│
   │                                              [Firewall]
   │                  ICMP Type 3                      │
   │◄─────────────────────────────────────────────────┤
   │  "Destination port unreachable"                   │
   │                                                   │

Result: PORT IS FILTERED (administratively blocked)
───────────────────────────────────────────────────
Types of Port Scans
Your toolkit will implement multiple scan types, each with different tradeoffs:
| Scan Type | How It Works | Advantages | Disadvantages |
|---|---|---|---|
| TCP Connect | Complete 3-way handshake | No root required, reliable | Logged by target, slow |
| SYN Scan | Send SYN, analyze response, send RST | Faster, stealthier (no logging) | Requires root/raw sockets |
| UDP Scan | Send UDP packets, wait for response | Finds UDP services (DNS, SNMP) | Very slow, unreliable |
| ACK Scan | Send ACK, analyze RST response | Detects firewall rules | Can’t determine if port is open |
DNS: The Reconnaissance Goldmine
DNS (Domain Name System) is often overlooked as an attack surface, but it contains a wealth of information:
DNS RECORD TYPES FOR RECONNAISSANCE
═══════════════════════════════════

A Record:      Maps domain to IPv4 address
               example.com → 93.184.216.34

               Use: Discover IP addresses of hosts

AAAA Record:   Maps domain to IPv6 address
               example.com → 2606:2800:220:1:248:1893:25c8:1946

               Use: Often overlooked, may have different security

MX Record:     Mail server for domain
               example.com → mail.example.com (priority 10)

               Use: Identify mail servers (common phishing targets)

NS Record:     Authoritative nameservers
               example.com → ns1.example.com, ns2.example.com

               Use: Identify DNS infrastructure

TXT Record:    Arbitrary text (SPF, DKIM, verification)
               example.com → "v=spf1 include:_spf.google.com ~all"

               Use: Reveals email infrastructure, third-party services

CNAME Record:  Alias pointing to another domain
               www.example.com → cdn.cloudflare.net

               Use: Identifies CDNs, cloud providers

PTR Record:    Reverse DNS (IP to hostname)
               93.184.216.34 → example.com

               Use: Discover internal naming conventions
Zone Transfers: When DNS Gets Really Chatty
A zone transfer (AXFR) is meant for DNS server replication, but misconfigured servers allow anyone to request the entire zone:
ZONE TRANSFER ATTACK
════════════════════

Normal Query (one record at a time):
┌─────────────────────────────────────────────────────┐
│  Attacker: "What's the IP for www.target.com?"     │
│  DNS:      "93.184.216.34"                          │
│                                                     │
│  Attacker: "What's the IP for mail.target.com?"    │
│  DNS:      "93.184.216.35"                          │
│                                                     │
│  (Must guess each subdomain individually)           │
└─────────────────────────────────────────────────────┘

Zone Transfer (get everything at once):
┌─────────────────────────────────────────────────────┐
│  Attacker: "Give me all records for target.com"     │
│  DNS:      "Here's 500 records:                     │
│             - www.target.com → 93.184.216.34       │
│             - mail.target.com → 93.184.216.35      │
│             - admin.target.com → 93.184.216.36     │
│             - dev-internal.target.com → 10.0.0.50  │  ← Internal!
│             - jenkins.target.com → 10.0.0.51       │  ← CI/CD server!
│             - vpn.target.com → 203.0.113.10        │
│             - ..."                                  │
└─────────────────────────────────────────────────────┘

Why this is devastating:
- Reveals ALL subdomains (including internal systems)
- Exposes infrastructure layout
- Identifies high-value targets (admin panels, CI/CD)
- No rate limiting or detection
Service Fingerprinting: What’s Actually Running?
Knowing a port is open isn’t enough—you need to know what service is running and what version:
BANNER GRABBING
═══════════════

Connect to port 22:
┌─────────────────────────────────────────────────────┐
│  Server Response:                                    │
│  SSH-2.0-OpenSSH_8.2p1 Ubuntu-4ubuntu0.5            │
│                                                     │
│  Information Revealed:                              │
│  - Protocol: SSH version 2                          │
│  - Software: OpenSSH 8.2p1                         │
│  - OS: Ubuntu (specific patch level)               │
│                                                     │
│  Now you can search: "OpenSSH 8.2p1 vulnerabilities"│
└─────────────────────────────────────────────────────┘

Connect to port 80:
┌─────────────────────────────────────────────────────┐
│  Send: "GET / HTTP/1.0\r\n\r\n"                    │
│                                                     │
│  Response Headers:                                  │
│  HTTP/1.1 200 OK                                   │
│  Server: Apache/2.4.41 (Ubuntu)                    │
│  X-Powered-By: PHP/7.4.3                           │
│                                                     │
│  Information Revealed:                              │
│  - Web Server: Apache 2.4.41                       │
│  - Language: PHP 7.4.3                             │
│  - OS: Ubuntu                                       │
│                                                     │
│  Attack vector: Look for Apache 2.4.41 CVEs        │
└─────────────────────────────────────────────────────┘
Project Specification
What You’re Building
A command-line toolkit with three main components:
network-recon-toolkit/
├── scanner.py          # Port scanner (TCP connect + SYN scan)
├── dns_enum.py         # DNS enumeration and zone transfer
├── fingerprint.py      # Service fingerprinting and banner grabbing
├── output/             # Scan results (JSON, CSV, HTML)
├── wordlists/          # Subdomain wordlists
│   └── subdomains.txt
├── requirements.txt    # Dependencies
└── README.md           # Usage documentation
Functional Requirements
1. Port Scanner (scanner.py)
Must implement:
- TCP Connect scan (no root required)
- Scan single port, port range, or common ports list
- Configurable timeout per connection
- Multi-threaded scanning (100+ connections concurrent)
- Output: JSON with host, port, state, response time
Should implement:
- SYN scan (requires root/raw sockets)
- UDP scan for common ports (DNS, SNMP, NTP)
- Service version detection via banner grabbing
- Rate limiting to avoid detection
Example usage:
# Scan single host, common ports
python scanner.py 192.168.1.1

# Scan port range with increased threads
python scanner.py 192.168.1.1 -p 1-1000 --threads 200

# Scan network range
python scanner.py 192.168.1.0/24 -p 22,80,443

# SYN scan (requires sudo)
sudo python scanner.py 192.168.1.1 --syn
2. DNS Enumerator (dns_enum.py)
Must implement:
- Query A, AAAA, MX, NS, TXT, CNAME records
- Subdomain enumeration via wordlist
- Attempt zone transfer (AXFR)
- Reverse DNS lookups
Should implement:
- Multi-threaded subdomain bruteforcing
- Wildcard detection (*.domain.com)
- Integration with Certificate Transparency logs
- Output to structured format
Example usage:
# Basic enumeration
python dns_enum.py example.com

# Subdomain bruteforce
python dns_enum.py example.com --wordlist wordlists/subdomains.txt

# Attempt zone transfer
python dns_enum.py example.com --zone-transfer
3. Service Fingerprinter (fingerprint.py)
Must implement:
- HTTP/HTTPS banner grabbing
- SSH version detection
- FTP banner grabbing
- Generic TCP banner grabbing
- TLS certificate extraction
Should implement:
- Service-specific probes (MySQL, PostgreSQL, Redis)
- Custom fingerprint database
- Version-to-CVE mapping suggestions
Example usage:
# Fingerprint all services on host
python fingerprint.py 192.168.1.1

# Fingerprint specific ports
python fingerprint.py 192.168.1.1 -p 22,80,443

# Deep fingerprinting (all probes)
python fingerprint.py 192.168.1.1 --deep
Non-Functional Requirements
- Performance: Scan 1000 ports in under 30 seconds
- Reliability: Handle network errors gracefully, never crash
- Accuracy: Match Nmap results for same targets
- Documentation: Clear help messages, README with examples
- Ethics: Include legal disclaimer, respect robots.txt
Solution Architecture
Component Design
┌─────────────────────────────────────────────────────────────────────┐
│                     RECONNAISSANCE TOOLKIT                          │
└─────────────────────────────────────────────────────────────────────┘
                              │
        ┌─────────────────────┼─────────────────────┐
        │                     │                     │
        ▼                     ▼                     ▼
┌───────────────┐    ┌───────────────┐    ┌───────────────┐
│ Port Scanner  │    │ DNS Enumer.   │    │ Fingerprinter │
├───────────────┤    ├───────────────┤    ├───────────────┤
│ - TCP Connect │    │ - Record      │    │ - Banner Grab │
│ - SYN Scan    │    │   Queries     │    │ - TLS Extract │
│ - UDP Scan    │    │ - Subdomain   │    │ - Service     │
│ - Threading   │    │   Bruteforce  │    │   Probes      │
└───────┬───────┘    │ - Zone AXFR   │    └───────┬───────┘
        │            └───────┬───────┘            │
        │                    │                    │
        └────────────────────┼────────────────────┘
                             │
                             ▼
                    ┌───────────────┐
                    │ Output Engine │
                    ├───────────────┤
                    │ - JSON Export │
                    │ - CSV Export  │
                    │ - HTML Report │
                    │ - Console     │
                    └───────────────┘
Key Data Structures
# Port scan result
@dataclass
class PortResult:
    ip: str
    port: int
    state: Literal["open", "closed", "filtered"]
    service: Optional[str] = None
    banner: Optional[str] = None
    response_time_ms: Optional[float] = None

# DNS enumeration result
@dataclass
class DNSResult:
    domain: str
    record_type: str  # A, AAAA, MX, NS, TXT, CNAME
    value: str
    ttl: int

# Service fingerprint
@dataclass
class ServiceInfo:
    ip: str
    port: int
    protocol: str  # tcp, udp
    service_name: str  # ssh, http, mysql
    version: Optional[str] = None
    os_guess: Optional[str] = None
    cves: List[str] = field(default_factory=list)
Threading Model for Port Scanning
PRODUCER-CONSUMER PATTERN
═════════════════════════

                    ┌──────────────┐
                    │ Target Queue │
                    │ (ports to    │
                    │  scan)       │
                    └──────┬───────┘
                           │
        ┌──────────────────┼──────────────────┐
        │                  │                  │
        ▼                  ▼                  ▼
┌───────────────┐  ┌───────────────┐  ┌───────────────┐
│   Worker 1    │  │   Worker 2    │  │   Worker N    │
│               │  │               │  │               │
│ - Get port    │  │ - Get port    │  │ - Get port    │
│ - Attempt     │  │ - Attempt     │  │ - Attempt     │
│   connect     │  │   connect     │  │   connect     │
│ - Report      │  │ - Report      │  │ - Report      │
│   result      │  │   result      │  │   result      │
└───────┬───────┘  └───────┬───────┘  └───────┬───────┘
        │                  │                  │
        └──────────────────┼──────────────────┘
                           │
                           ▼
                    ┌──────────────┐
                    │ Result Queue │
                    │ (completed   │
                    │  scans)      │
                    └──────────────┘
Phased Implementation Guide
Phase 1: Basic TCP Connect Scanner (Days 1-2)
Goal: Scan a single port on a single host
Implementation steps:
- Create a function that attempts to connect to a TCP port:
def scan_port(ip: str, port: int, timeout: float = 1.0) -> PortResult: """ Attempt TCP connection to ip:port Returns: PortResult with state='open' if connection succeeds PortResult with state='closed' if connection refused PortResult with state='filtered' if timeout """ # Use socket.socket() with SO_REUSEADDR # Set timeout with socket.settimeout() # Try connect_ex() for non-blocking connect # Map return codes to states: # 0 = open # 111 (ECONNREFUSED) = closed # 110 (ETIMEDOUT) = filtered - Add CLI argument parsing:
- Target IP/hostname
- Port number or range
- Timeout value
- Test against your local machine:
- Start a local HTTP server:
python -m http.server 8080 - Scan port 8080 (should be open)
- Scan port 8081 (should be closed)
- Start a local HTTP server:
Verification: Can you correctly identify an open port on localhost?
Phase 2: Multi-Threaded Scanning (Days 2-3)
Goal: Scan 1000 ports in under 30 seconds
Implementation steps:
- Use
concurrent.futures.ThreadPoolExecutor: ```python from concurrent.futures import ThreadPoolExecutor, as_completed
def scan_ports(ip: str, ports: List[int], threads: int = 100) -> List[PortResult]: results = [] with ThreadPoolExecutor(max_workers=threads) as executor: futures = { executor.submit(scan_port, ip, port): port for port in ports } for future in as_completed(futures): results.append(future.result()) return results
2. Add progress indicator (tqdm or simple counter)

3. Implement rate limiting to avoid overwhelming target

**Verification**: Scan ports 1-1000 on a target in under 30 seconds

### Phase 3: DNS Enumeration (Days 3-4)

**Goal**: Enumerate all DNS record types and attempt zone transfer

**Implementation steps**:

1. Use the `dnspython` library for queries:
```python
import dns.resolver
import dns.zone
import dns.query

def query_records(domain: str, record_type: str) -> List[DNSResult]:
    """Query specific DNS record type"""
    resolver = dns.resolver.Resolver()
    try:
        answers = resolver.resolve(domain, record_type)
        return [DNSResult(domain, record_type, str(rdata), answers.ttl)
                for rdata in answers]
    except dns.resolver.NXDOMAIN:
        return []  # Domain doesn't exist
    except dns.resolver.NoAnswer:
        return []  # No records of this type
- Implement subdomain enumeration:
- Read subdomain wordlist
- Query A record for each:
subdomain.domain.com - Track which ones resolve
- Implement zone transfer attempt:
def attempt_zone_transfer(domain: str) -> Optional[List[DNSResult]]:
 """Attempt AXFR zone transfer"""
 # Get NS records for domain
 # For each NS, attempt: dns.query.xfr(ns, domain)
 # If successful, extract all records
Verification: Enumerate google.com and see A, MX, NS, TXT records
Phase 4: Service Fingerprinting (Days 4-5)
Goal: Identify services running on open ports
Implementation steps:
- Implement banner grabbing:
def grab_banner(ip: str, port: int, timeout: float = 2.0) -> Optional[str]: """Connect and read initial response""" sock = socket.socket(socket.AF_INET, socket.SOCK_STREAM) sock.settimeout(timeout) try: sock.connect((ip, port)) # Some services send banner immediately (SSH, FTP) # Others need us to send something first (HTTP) banner = sock.recv(1024) return banner.decode('utf-8', errors='ignore') except: return None finally: sock.close() - Add service-specific probes:
- HTTP: Send
GET / HTTP/1.0\r\n\r\n - MySQL: Parse greeting packet
- TLS: Extract certificate info
- HTTP: Send
- Build a simple service detection database:
SERVICE_SIGNATURES = {
 "ssh": re.compile(r"SSH-[\d.]+-"),
 "http": re.compile(r"HTTP/[\d.]+"),
 "ftp": re.compile(r"220.*FTP"),
 "smtp": re.compile(r"220.*SMTP"),
}
Verification: Correctly identify SSH, HTTP, and MySQL on test servers
Phase 5: SYN Scanning with Scapy (Days 5-6)
Goal: Implement stealthy SYN scanning (requires root)
Implementation steps:
-
Install Scapy:
pip install scapy -
Implement SYN scan: ```python from scapy.all import IP, TCP, sr1, conf
def syn_scan(ip: str, port: int) -> str: “”” SYN scan using raw packets Requires root privileges “”” conf.verb = 0 # Disable Scapy output
# Craft SYN packet
syn = IP(dst=ip)/TCP(dport=port, flags='S')

# Send and wait for response
response = sr1(syn, timeout=1)

if response is None:
    return "filtered"
elif response.haslayer(TCP):
    if response[TCP].flags == 0x12:  # SYN-ACK
        # Send RST to close (stealth)
        rst = IP(dst=ip)/TCP(dport=port, flags='R')
        send(rst, verbose=0)
        return "open"
    elif response[TCP].flags == 0x14:  # RST
        return "closed"
return "filtered" ```
- Add sudo detection and privilege check
Verification: Compare SYN scan results to TCP connect results
Phase 6: Output and Reporting (Days 6-7)
Goal: Generate professional reports
Implementation steps:
- JSON output:
def export_json(results: List[PortResult], filepath: str): data = [asdict(r) for r in results] with open(filepath, 'w') as f: json.dump(data, f, indent=2) -
CSV output for spreadsheet analysis
- HTML report with styling: ```html
Network Reconnaissance Report
Target: {target}
Scan Time: {timestamp}
Open Ports
| Port | Service | Banner |
|---|
4. Compare output to Nmap format

**Verification**: Generate all three output formats for a scan

---

## Testing Strategy

### Unit Tests

```python
# test_scanner.py
import pytest
from scanner import scan_port, parse_port_range

def test_parse_port_range():
    assert parse_port_range("80") == [80]
    assert parse_port_range("1-5") == [1, 2, 3, 4, 5]
    assert parse_port_range("22,80,443") == [22, 80, 443]

def test_scan_localhost_open_port():
    # Start a server on port 9999 before test
    result = scan_port("127.0.0.1", 9999)
    assert result.state == "open"

def test_scan_localhost_closed_port():
    result = scan_port("127.0.0.1", 9998)  # Nothing running
    assert result.state == "closed"
Integration Tests
- Against known targets:
- Scan
scanme.nmap.org(Nmap provides this for testing) - Compare results to Nmap output
- Verify same open ports detected
- Scan
- DNS tests:
- Enumerate
google.com(should find A, MX, NS records) - Test zone transfer against intentionally vulnerable server
- Enumerate
- Fingerprinting tests:
- Correctly identify Apache vs Nginx
- Correctly identify OpenSSH version
Performance Tests
import time

def test_scan_performance():
    start = time.time()
    results = scan_ports("192.168.1.1", range(1, 1001), threads=100)
    elapsed = time.time() - start

    assert elapsed < 30, f"Scan took {elapsed}s, should be under 30s"
Common Pitfalls and Debugging
1. “My scanner is too slow”
Problem: Scanning takes minutes instead of seconds
Debug steps:
- Check thread count (increase to 100-200)
- Check timeout (decrease to 0.5-1s)
- Look for blocking operations in main thread
- Use
cProfileto find bottleneck
Solution: Use ThreadPoolExecutor properly, don’t wait sequentially
2. “I get ‘Permission denied’ for SYN scan”
Problem: Raw socket access requires root
Debug steps:
- Run with
sudo - Check if Scapy is installed correctly
- Verify raw socket capability
Solution: Either use sudo or fall back to TCP connect scan
3. “DNS zone transfer always fails”
Problem: Most servers have zone transfers disabled
This is expected! Zone transfers are a security misconfiguration. For testing:
- Use intentionally vulnerable DNS servers (set up your own)
- Zonetransfer.me is a test server that allows AXFR
4. “Banner grabbing returns empty”
Problem: Some services need a prompt before responding
Debug steps:
- Check if connection succeeds
- Try sending a probe (like HTTP GET)
- Increase timeout
- Handle binary protocols (MySQL handshake)
Solution: Implement service-specific probes
5. “Results don’t match Nmap”
Problem: Different scan techniques yield different results
Debug steps:
- Compare exact scan types (Nmap -sT for TCP connect)
- Check timing/timeout differences
- Verify target hasn’t changed between scans
- Consider rate limiting differences
Extensions and Challenges
Beginner Extensions
- Add color output: Green for open, red for closed
- Progress bar: Show scan progress with tqdm
- Save/resume: Allow resuming interrupted scans
Intermediate Extensions
- OS Detection: Analyze TCP/IP stack quirks to guess OS
- Service probes: Add MySQL, PostgreSQL, Redis detection
- Rate limiting: Avoid triggering IDS/IPS
Advanced Extensions
- Evasion techniques: Fragmented packets, timing variations
- IPv6 support: Scan IPv6 addresses
- Web interface: Flask dashboard for results
- Parallel host scanning: Scan entire subnets efficiently
Real-World Connections
How Nmap Does It
Your scanner is a simplified Nmap. The real Nmap:
- Uses a sophisticated timing engine
- Has 600+ service probes
- Includes 600+ NSE scripts
- Does OS fingerprinting via TCP/IP stack analysis
After this project, read the Nmap source code to see professional implementation.
Shodan and Censys
Commercial services like Shodan scan the entire internet continuously. They use:
- Distributed scanning nodes
- Massive parallelization
- Historical data tracking
Your skills translate to understanding how these services work.
Bug Bounty Applications
Many bug bounties start with reconnaissance:
- Subdomain enumeration reveals forgotten assets
- Open ports expose services you didn’t know existed
- Banner grabbing identifies vulnerable versions
Self-Assessment Checklist
Before considering this project complete, verify:
Core Functionality
- TCP connect scan correctly identifies open/closed/filtered ports
- Multi-threaded scanning completes 1000 ports in < 30 seconds
- DNS enumeration returns A, MX, NS, TXT records
- Zone transfer attempt works (even if server refuses)
- Banner grabbing returns version strings for SSH, HTTP
Code Quality
- CLI has –help with clear usage
- Errors are handled gracefully (no crashes)
- Output is structured (JSON export works)
- Code is documented with docstrings
Understanding
- Can explain TCP three-way handshake whiteboard-style
- Can explain difference between SYN and connect scans
- Understand why zone transfers are security issues
- Know which scan types require root and why
Comparison
- Results match Nmap for same target/options
- Performance is comparable for connect scans
- Output is parseable by other tools
Resources
Primary Reading
- “TCP/IP Illustrated, Volume 1” by W. Richard Stevens - Chapters 17-18 (TCP Connection)
- “Black Hat Python” by Justin Seitz - Chapter 3 (Network Scanning)
- “The Linux Programming Interface” by Michael Kerrisk - Chapters 56-61 (Sockets)
Online Resources
- Nmap Reference Guide - Understand the reference implementation
- Scapy Documentation - Raw packet manipulation
- DNS RFC 1035 - DNS protocol specification
Practice Targets
scanme.nmap.org- Nmap provides this for testing- Your own VMs - Set up services to scan
- TryHackMe/HTB - Use recon tools on CTF challenges
This project is part of the Ethical Hacking & Penetration Testing learning path.